
Chapter 5
Taking Control of Exposure
IN THIS CHAPTER
Understanding the basics of exposure: aperture, shutter speed, and ISO
Deciphering exposure meters and histograms
Picking a metering mode
Shooting in aperture-priority and shutter-priority autoexposure modes
Solving exposure problems
Taking a look at flash options
Getting a grip on the digital characteristics of your camera — resolution, file type, and so on — is critical. But don’t get so involved in this side of digital photography that you overlook traditional photography fundamentals such as proper exposure and lighting. All the megapixels in the world can’t save a picture that’s too dark or too light.
To that end, this chapter tackles all things exposure-related, explaining such basics as how shutter speed, aperture, and ISO affect your pictures and how you can solve common exposure problems. Also look here for information about flash photography, advanced exposure features such as shutter-priority autoexposure and aperture-priority autoexposure, and ways to manipulate exposure to meet your creative goals.
Understanding Exposure
Entire books have been written on the subject of exposure, which may lead you to believe that exposure is an incredibly complex issue. And you can get into lots of arcane details about the science behind how cameras turn light into photographs, if you're interested. But if you're not the science-y type, I have good news: You can take a huge leap forward in your photographic skills by familiarizing yourself with just three exposure controls: aperture, shutter speed, and ISO. The next several sections get you up to speed on these three critical settings.
Introducing the exposure trio: Aperture, shutter speed, and ISO
Any photograph, whether taken with a film or digital camera, is created by focusing light through a lens onto a light-sensitive recording medium. In a film camera, the film negative serves as that medium; in a digital camera, it’s the image sensor, which is an array of light-responsive computer chips.
Between the lens and the sensor are two barriers, known as the aperture and shutter, which together control how much light makes its way to the sensor. The actual design and arrangement of the aperture, shutter, and sensor vary depending on the camera, but Figure 5-1 offers an illustration of the basic concept.
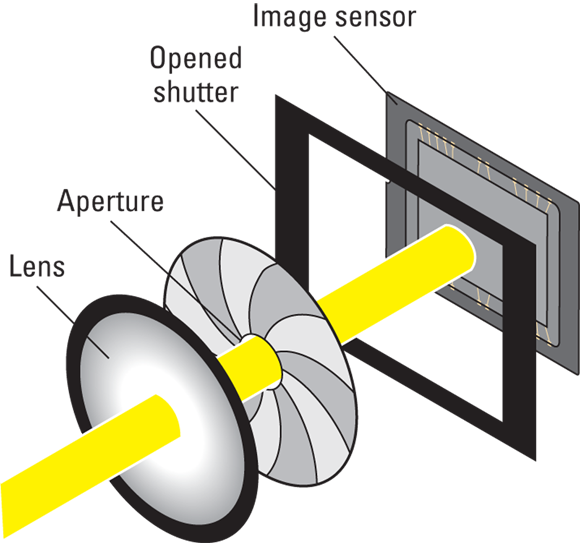
FIGURE 5-1: The aperture size and shutter speed determine how much light strikes the image sensor.
The aperture and shutter, along with a third feature known as ISO, determine exposure — what most would describe as the picture’s overall brightness. This three-part exposure formula works as follows:
-
Aperture (controls amount of light): The aperture is an adjustable hole in a diaphragm set just inside the lens. By changing the size of the aperture, you control the size of the light beam that can enter the camera. Aperture settings are stated as f-stop numbers, or simply f-stops, and are expressed with the letter f followed by a number: f/2, f/5.6, f/16, and so on. The lower the f-stop number, the larger the aperture, and the more light is permitted into the camera, as illustrated by Figure 5-2. To put it another way, raising the f-number stops more light.
 The range of possible f-stops depends on the lens and, if you use a zoom lens, on the zoom position (focal length) of the lens. Your camera or lens manual should spell out the f-stops you can use.
 -
Shutter speed (controls duration of light): The shutter works something like, er, the shutters on a window. When you aren't taking pictures, the camera’s shutter stays closed, preventing light from striking the image sensor, just as closed window shutters prevent sunlight from entering a room. When you press the shutter button, the shutter opens briefly to allow light that passes through the aperture to hit the image sensor. The exception to this scenario is when you compose images using the camera's monitor instead of a viewfinder — the shutter remains open so that your image can form on the sensor and be displayed on the camera’s LCD. Then, when you press the shutter release, the shutter first closes and then reopens for the actual exposure.
This description, however, applies to a traditional, mechanical shutter similar to the one represented in Figure 5-1. Many digital cameras now use an electronic shutter instead. With this design, the image sensor simply passes the current image data to the memory card for the duration of the exposure.
Either way, exposure time is referred to as the shutter speed and is measured in seconds: 1/60 second, 1/250 second, and so on. On most cameras, an inches mark (") is used to indicate shutter speeds of 1 second or more: 1", for example, means a shutter speed of 1 second. The range of shutter speeds varies from camera to camera; again, check your manual for specifics.
 In addition to specific shutter speeds, your camera may offer a bulb setting, which keeps the shutter open indefinitely as long as you press the shutter button. Usually, you must set the camera to manual exposure mode and then cycle past all other available shutter speeds to reach the bulb setting. Some cameras, though, offer a Bulb exposure mode that saves you that trouble, automatically shifting the shutter speed to the bulb setting.
 -
ISO (controls light sensitivity): ISO, which is a digital function rather than a mechanical structure, enables you to adjust how responsive the image sensor is to light. The term ISO is a holdover from film days, when an international standards organization rated each film stock according to light sensitivity: ISO 200, ISO 400, ISO 800, and so on. As with the range of f-stops and shutter speeds, the range of ISO settings varies from camera to camera.
On a digital camera, the sensor doesn't actually get more or less sensitive when you change the ISO — rather, the light “signal” that hits the sensor is either amplified or dampened through electronics wizardry, sort of like how raising the volume on a radio boosts the audio signal. But the upshot is the same as changing to a more light-reactive film stock: A higher ISO means that less light is needed to produce the image, enabling you to use a smaller aperture, faster shutter speed, or both. (In other words, from now on, don't worry about the technicalities and just remember that ISO equals light sensitivity.)

FIGURE 5-2: As the f-stop number increases, the aperture size shrinks, stopping more light from entering the camera.
 Distilled to its essence, the image-exposure formula is just this simple:
- Aperture and shutter speed together determine the quantity of light available to expose the image.
- ISO determines how much the image sensor reacts to that light and, therefore, how much light you need to expose the picture.
The tricky part of the equation is that aperture, shutter speed, and ISO settings affect your pictures in ways that go beyond exposure. You need to be aware of these side effects, explained in the next section, to determine which combination of the three exposure settings will work best for your picture. I introduce these concepts briefly in Part 1 of this book; the next three sections dig more deeply into the topic.
Aperture also affects depth of field
Along with altering exposure, the aperture setting also affects depth of field, or the distance over which objects in the picture appear sharply focused. Figure 5-3 illustrates this issue. Notice that the background in the left image, captured at f/6, is much blurrier than its sibling, taken at f/22. The right image has a greater depth of field due to the higher f-stop.
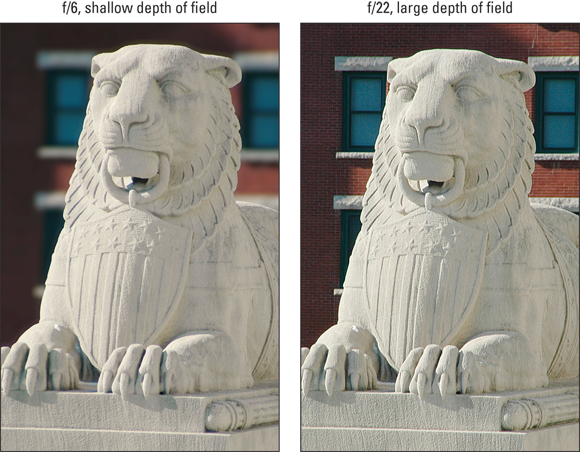
FIGURE 5-3: A higher f-stop increases depth of field, or the distance over which objects appear sharply focused.
You can use this aperture side effect to your creative advantage: For example, if you’re shooting a landscape and want to keep both near and distant objects as sharply focused as possible, you choose a high f-stop number. Or, if you’re shooting a portrait and want objects in the background to be softly focused, you choose a low f-stop number, which reduces depth of field.
One point to note, though: How much depth of field you get at any f-stop varies depending on the camera and the lens. Cameras that use small image sensors produce a greater depth of field than those with larger sensors. So, the background blurring you see at f/6 may be more or less than what you see in my example. Experiment to gauge depth-of-field possibilities with your camera and lens.
Adjusting the aperture setting is just one way to manipulate depth of field. The subject-to-camera distance, subject-to-background (or foreground) distance, and lens focal length all affect depth of field as well. Chapter 2 offers examples of each of these depth-of-field factors.
Shutter speed also affects motion blur
Like the aperture setting, shutter speed affects the apparent focus of your image, but in a different way: Shutter speed determines whether any moving objects in the scene appear blurry or sharp.
I introduce this topic in Chapter 2, but it's an important concept, so here's a recap:
- To freeze motion, use a fast shutter speed. The speed you need to stop action depends on how fast your subject is moving. In the left image in Figure 5-4, for example, a shutter speed of 1/100 second left the jumping children blurry. Setting the shutter speed to 1/300 second caught them cleanly in mid-jump. For the second image, I raised the ISO setting to enable the faster shutter speed. Another choice in this scenario is to open the aperture more, assuming that you don't mind the reduction in depth of field that will result.
- To blur motion, use a slow shutter speed. On occasion, you may want to use a slow shutter to intentionally blur your subject. For example, I used a shutter speed of one second to make the fountain water in the foreground appear misty in the Las Vegas scene shown in Figure 5-5. In action shots, a shutter speed that allows just a slight blur can emphasize the feeling of motion. And in nighttime street scenes, a long exposure turns moving car taillights into trails of streaming light. (See Chapters 2 and 7 for more illustrations of slow-shutter speed photos.)
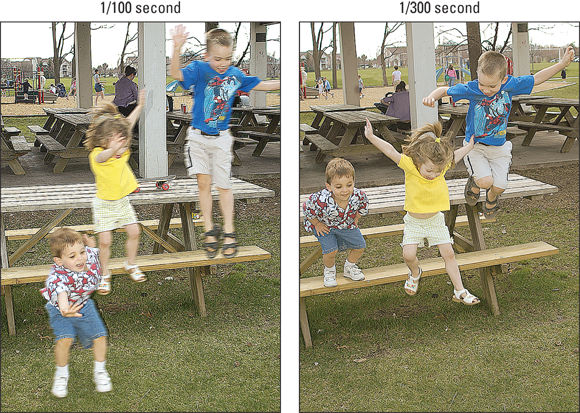
FIGURE 5-4: In addition to affecting exposure, shutter speed determines whether moving objects appear blurry.
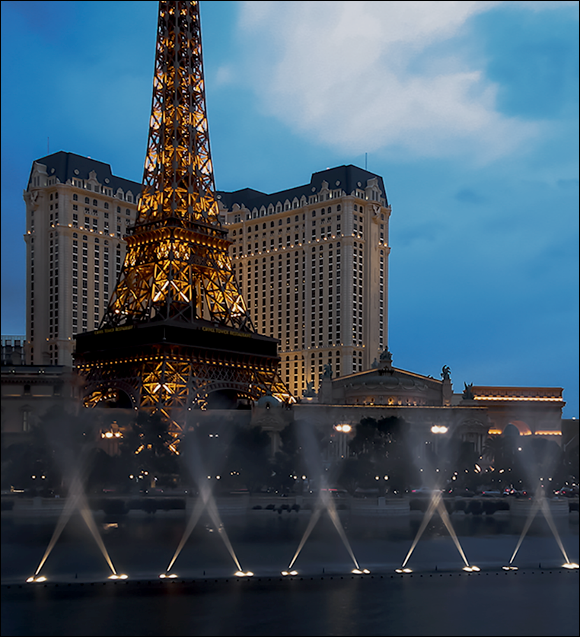
FIGURE 5-5: A slow shutter speed blurs motion; in this case, it makes the fountain water appear misty.
ISO also affects image noise
When you raise the ISO setting to make the image sensor more reactive to light, you increase the risk of producing noise. Noise is a defect that looks like sprinkles of sand and is similar in appearance to film grain, a defect that often mars pictures taken with high ISO film.
Figures 5-6 and 5-7 illustrate the impact of ISO on quality, showing the same subject captured at ISO 200, 400, 800, and 1600. When you print pictures at a small size, as in Figure 5-6, noise may not be apparent to the eye; instead, the image may have a slightly blurry look, as in the ISO 800 and 1600 examples in Figure 5-6.
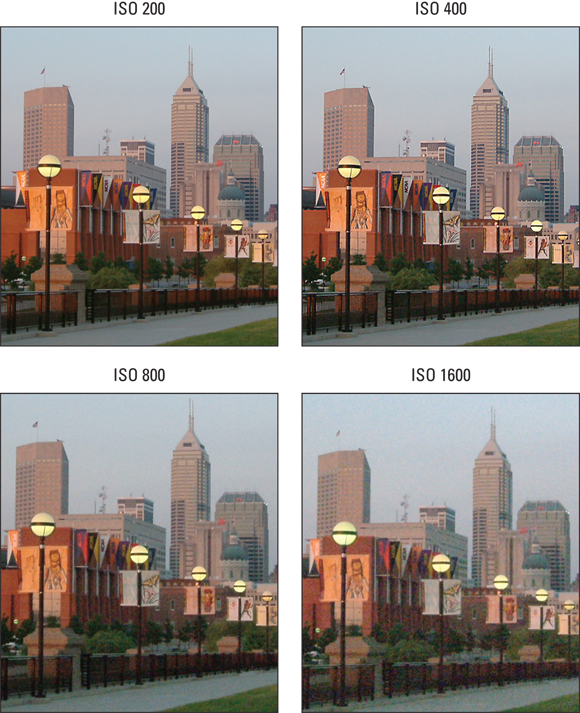
FIGURE 5-6: Raising the ISO setting increases light sensitivity, but also can produce a defect known as noise.
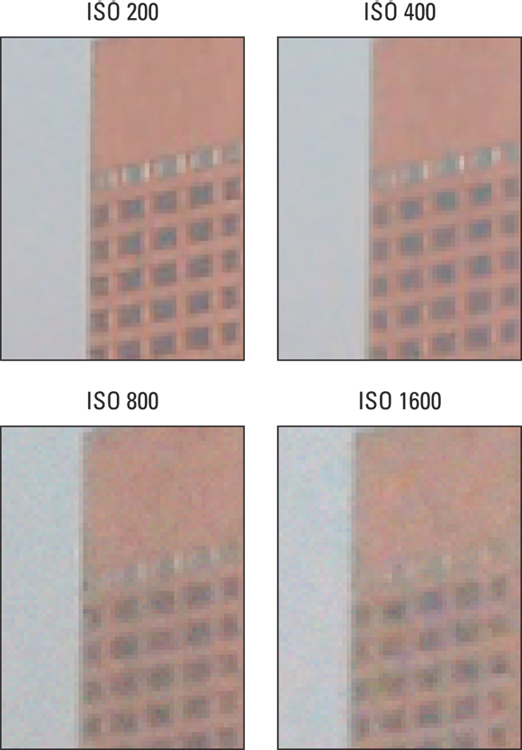
FIGURE 5-7: Noise becomes more apparent when you enlarge images.
Figure 5-7 shows close-up views of each image so that you can more easily compare the loss of detail and increase in noise.
Of course, for some shooting scenarios, you may be forced to use a higher ISO. For example, if you’re trying to capture a moving subject in less than ideal lighting, you may need to raise the ISO in order to use the fast shutter speed necessary to freeze the action.
A few other critical points about ISO and noise:
- Noise levels vary from camera to camera. The examples you see here illustrate noise produced by a specific camera. Some cameras, especially newer models, produce much better high-ISO images than others. Bottom line: Experiment with ISO settings, assuming that your camera gives you control over this feature. Then evaluate your test shots to see how much quality you can expect to give up when you raise ISO. And if you’re in the market for a new camera, read reviews to find out how models you’re considering perform at different ISO settings.
- Be aware that cameras specifically geared to produce little noise at very high ISO settings sometimes generate more noise than you might expect at low ISO settings.
- Auto ISO adjustment may not be your friend. When you shoot in automatic exposure modes, the camera typically adjusts ISO for you. Some cameras, however, give you a choice between automatic ISO adjustment and manual ISO control. If you have the option, sticking with manual is the best idea. In automatic mode, the camera may ramp up the ISO to a point that produces more noise than is acceptable to you. Some cameras allow you to limit the top ISO that can be selected in auto mode or to specify the shutter speed at which ISO increase occurs, which makes Auto ISO more palatable. But if you’re a stickler for image quality, it’s better to control this aspect of your picture-taking yourself.
- Long exposure times also can cause noise. A high ISO isn't the only cause of noise; a long exposure time (slow shutter speed) can also produce the defect. So, how high you can raise the ISO before the image gets ugly varies depending on shutter speed.
Doing the exposure balancing act
As you change any of the three exposure settings — aperture, shutter speed, and ISO — one or both of the others must also shift in order to maintain the same image brightness. Say that you’re shooting a soccer game and you notice that although the overall exposure looks great, the players appear slightly blurry at the current shutter speed. If you raise the shutter speed, you have to compensate with either a larger aperture, to allow in more light during the shorter exposure, or a higher ISO setting, to make the camera more sensitive to the light — or both.
As the previous sections explain, changing these settings impacts your image in ways beyond exposure. As a quick reminder:
- Aperture affects depth of field, with a higher f-stop number producing a greater zone of sharp focus.
- Shutter speed affects whether motion of the subject or camera results in a blurry photo. A faster shutter “freezes” action and also helps safeguard against overall blur that can result from camera shake when you’re handholding the camera.
- ISO affects the camera’s sensitivity to light. A higher ISO makes the camera more responsive to light but also increases the chance of image noise.
When you boost that shutter speed to capture your soccer subjects, you have to decide whether you prefer the shorter depth of field that comes with a larger aperture or the increased risk of noise that accompanies a higher ISO.
Everyone has his or her own approach to finding the right combination of aperture, shutter speed, and ISO, and you’ll no doubt develop your own system as you become more practiced at using the advanced exposure modes. In the meantime, here’s how I handle things:
- I always use the lowest possible ISO setting unless the lighting conditions are so poor that I can’t use the aperture and shutter speed I want without raising the ISO.
- If my subject is moving (or might move, as with a squiggly toddler or antsy pet), I give shutter speed the next highest priority in my exposure decision. I might choose a fast shutter speed to ensure a blurfree photo or, on the flip side, select a slow shutter speed to intentionally blur that moving object, an effect that can create a heightened sense of motion.
- For images of nonmoving subjects, I make aperture a priority over shutter speed, setting the aperture according to the depth of field I have in mind. For portraits, for example, I use the largest aperture (the lowest f-stop number, known as shooting wide open, in photographer speak) so that I get a short depth of field, creating a nice, soft background for my subject. For landscapes, I usually go in the opposite direction, stopping down the aperture as much as possible to capture the subject at the greatest depth of field.
I know that keeping all this straight is overwhelming at first, but the more you work with your camera, the more the whole exposure equation will make sense to you. You can find tips for choosing exposure settings for specific types of pictures in Chapter 7.
Adjusting f-stop, Shutter Speed, and ISO
Most cameras give you control over ISO, but whether or not you have full control over aperture and shutter speed depends on your camera. If your camera offers only automatic exposure, you may not even have any control over these settings.
If you own an intermediate or advanced camera, you should have the option to shoot in manual mode, which enables you to control all three exposure settings. You also can usually choose a semiautomatic mode, where you have some input over exposure but also get an assist from the autoexposure system. Check out the section “Using “priority” exposure modes” later in this chapter for more information on two of these semiauto modes: aperture-priority autoexposure and shutter-priority autoexposure.
Your camera manual should spell out which exposure modes offer what level of exposure control and explain how to adjust the various settings. Also check that manual to find out how the camera indicates the current exposure settings. On cameras that have a viewfinder, you may see the current shutter speed, f-stop, and ISO in the viewfinder display, as shown on the left side of Figure 5-8. Some cameras also display the settings in the camera monitor, as shown on the right. And with some cameras, you can check exposure settings either way. (The viewfinder and monitor may also display several other pieces of information related to other camera settings, as they do here.) Advanced cameras typically also have a smaller settings display on top of the camera or underneath the monitor.
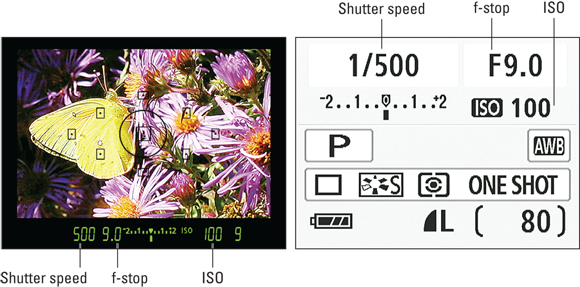
FIGURE 5-8: You may be able to view exposure settings in the viewfinder or on the monitor display.
If you use a point-and-shoot camera, however, you may be able to view the current settings on the monitor only, even if the camera has a viewfinder. And if you have a very basic, fully automatic camera that handles exposure for you, you may not even be able to view the aperture and shutter speed settings until after you take the picture and download it to your computer. Then you can open the photo in a program that can read the camera metadata, which records the settings you used to take the picture. See Chapter 8 for more about viewing metadata. Doing so, by the way, is a great way to learn more about how aperture, shutter speed, and ISO affect the look of your pictures.
The next several sections provide information on additional features related to choosing the right f-stop, shutter speed, and ISO settings.
Taking advantage of exposure guides
When it comes to checking exposure, the image shown on the camera monitor can be misleading. The actual image may be brighter or darker than what you see onscreen because the display is affected by the ambient light in which you view the image and on the brightness of the monitor itself.
For more reliable exposure guidance, find out whether your camera offers an exposure meter, histogram, or highlights display mode, all of which you can explore in the next three sections.
Reading the meter
An exposure meter offers before-the-shot assistance. This simple bar graph indicates whether the camera thinks your current settings will produce a good exposure, as shown in Figure 5-9. When you see a single bar at the 0 mark, as in the third illustration, you're good to go. Bars appearing on the side of the meter that sports a minus sign indicate underexposure; bars on the plus-sign side predict overexposure. The more bars that appear, the greater the potential exposure problem. (Note that some cameras place the positive end of the meter on the left while other models put it on the right, so inspect the meter closely to see which is which on your camera.)

FIGURE 5-9: The exposure meter indicates whether the current camera settings will produce a good exposure.
A few pointers about the way exposure meters operate:
- You may need to press the shutter button halfway to display the meter. Your half-press wakes the exposure system and tells the meter to do its thing.
- Where and when the meter appears depends on your camera and shooting mode. The meter may appear in the viewfinder, monitor, or top LCD readout, depending on your camera. But on most cameras, the meter appears only when you shoot in manual exposure mode. In other modes, the meter typically appears only if the camera anticipates an exposure problem or if you enable Exposure Compensation, an autoexposure adjustment feature I discuss later in this chapter, in the section “Applying exposure compensation.”
- The meter readout depends on the metering mode. This setting determines which part of the frame the camera analyzes when calculating exposure. Normally, the entire frame is measured. You can read more about metering modes later in this chapter, in the section “Changing the Metering mode.”
-
 Keep the lens trained on your subject while checking the meter. If your camera displays the meter only in the monitor (or if you prefer to view the meter there), don't move the camera after pressing the shutter button to display the meter. All too often, people frame the shot, press the shutter button halfway to activate the meter, and then point the lens at the ground so that they can get a better look at the display. The problem is that most cameras continue adjusting exposure settings until you take the picture, so as soon as you move the camera, it takes a new reading. So when the lens is pointing down, you're viewing the proper settings for photographing the ground and not your subject. For this reason, I encourage you to rely on the viewfinder meter if your camera offers one.
Interpreting a histogram
A histogram is a chart that plots out the brightness values of all pixels in the photo, using a scale of 0 (black) to 255 (white). For example, the histogram shown in Figure 5-10 represents the accompanying butterfly photo. The horizontal axis of the chart displays brightness values, with shadows on the left and highlights on the right. The vertical axis shows you how many pixels fall at each brightness value. A spike at any point indicates that you have lots of pixels at that particular brightness value.
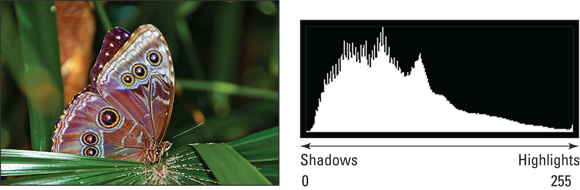
FIGURE 5-10: A histogram tells you how many pixels fall at each point on the brightness scale, from 0 (black) to 255 (white).
Some cameras can display a histogram on the monitor in shooting mode, helping you suss out exposure settings before you snap the shot. Most models, however, offer this tool only during playback; you may need to change your camera's default playback settings to display it.
Normally, a histogram that resembles a bell-shaped curve, or something close to it, is a good sign because well-exposed photos typically contain more midtones (areas of medium brightness) accented by highlights and shadows. This fact has led some photographers to believe that their exposure decisions should be based on generating this so-called perfect histogram. But unless you plan to frame and exhibit your histogram instead of your photograph, this idea is hogwash. There — I said it. Bring it on, histogram perfectionists!
Here's the thing: You have to interpret a histogram with respect to the brightness values of your subject. You're just not going to see a ton of pixels at the dark end of the scale when you're photographing a polar bear against a snowy backdrop, for example. However, if you look at your camera’s histogram and it has a big spike to the left, it may be that your photo is too dark, in which case you need to adjust the exposure settings or add a flash. If it’s spiked to the right, your photo may be too bright. It’s normal to have a few odd spikes here and there, though.
Displaying playback “blinkies”
The problem with both the meter and the histogram is that although they can indicate an exposure issue, they don't tell you which parts of the image are under- or overexposed. To provide this information, many cameras offer a playback mode that causes any pixels that are pure white — that is, the ones that have a brightness value of 0 — to blink in the display. Most photographers refer to this as “blinkies” mode, but the official name on most cameras is Highlights Display mode.
Again, consider the blinkies display with respect to your subject. When you shoot a portrait against a very bright background, you may see lots of blinkies in the background. If your subject is well exposed, ignore those blinkies — it's the subject that matters. But if the blinkies occur on the person's face or hair, that's a signal to adjust the exposure settings or find different light in which to shoot your subject and try again.
Changing the Metering mode
Some cameras offer a choice of exposure metering modes. This setting determines the area of the frame that the camera analyzes in order to choose exposure settings for you when you take advantage of autoexposure. When you shoot in manual exposure mode, the data reported by the exposure meter is also based on the frame area measured in the current metering mode.
The three standard metering modes, usually represented by the symbols shown in the following list, work as follows:
 Whole-frame metering: This setting analyzes the light throughout the entire frame. Depending on your camera, it may be called matrix metering, multizone metering, evaluative metering, pattern metering, or another, similar name.
 Center-weighted metering: In this mode, the camera measures the light in the entire frame but assigns a greater importance — weight — to the center of the frame.
-
 Spot metering: This mode gives you pinpoint exposure control, telling the camera to set exposure based on just a small area of the frame. Most cameras start out using the center of the frame to calculate exposure, but you may be able to choose a different metering spot. How large an area the camera uses in spot metering varies depending on the camera. Also, you may get two spot-metering settings, with one measuring a slightly larger area than the other. The larger-spot metering option is often called partial metering.
Whole-frame metering is typically the default setting and usually produces good results. The exception is when the background is much brighter or darker than the subject, which can result in an over- or underexposed subject. Figure 5-11 offers an example. The left image was taken using whole-frame metering. Because the camera saw so much darkness in the frame, it used an exposure that left the white rose overexposed, leaving almost no detail in the petals. Changing to spot metering corrected the white rose, but left the red rose too dark, as shown in the middle image. For this scene, center-weighted metering produced the best exposure balance. However, if that red rose were out of the picture, the spot-metering image would be preferable because the white rose retains more detail.
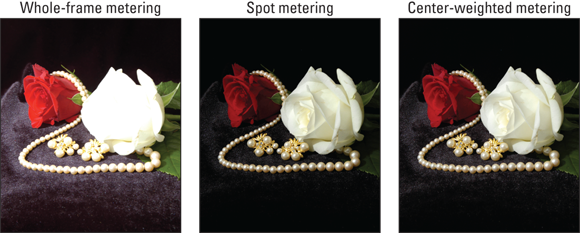
FIGURE 5-11: Try center-weighted or spot metering when your subject is much darker or brighter than the background.
In theory, you should select the best metering mode for your subject every time you shoot. But in practice, I usually stick with whole-frame metering unless I am shooting portraits, in which case I opt for spot metering so that my subject's exposure takes priority. I also use that setting when I visit the local bird sanctuary, again setting the metering spot on the bird I'm photographing. That way, snowy-white birds aren't overexposed when they're posing amid dark green foliage, and the darker-hued birds aren't underexposed when photographed against a bright blue sky.
Of course, when you switch to spot or center-weighted metering, your background may become too dark or too bright. On some newer cameras, you may find an option that brightens the shadows without also making the highlights too bright — see the later section “Expanding Tonal Range” for details. But if your camera doesn’t offer such options, you just have to choose which part of the scene is the most important, exposurewise.
Using “priority” exposure modes
In addition to regular autoexposure modes, where the camera sets both aperture and shutter speed, your camera may offer aperture-priority autoexposure or shutter-priority autoexposure.
On some cameras, aperture-priority autoexposure is abbreviated as A; on others, Av. The a stands for aperture; the v stands for value. Shutter-priority autoexposure is abbreviated by either the letter S or Tv, for time value. (Shutter speed determines the exposure time.) Oh, and if you see the letters AE, as you will if you read many photography magazines, it’s an abbreviation for autoexposure.
Whatever they’re labeled, these options offer more control while still giving you the benefit of the camera’s exposure brain. Here’s how they work:
-
Aperture-priority autoexposure: This setting gives you control over the aperture (f-stop). After you set the aperture, the camera selects the shutter speed necessary to correctly expose the image at that f-stop, taking into account the current ISO setting when making its decision.
By altering the aperture, you change depth of field — the range of sharp focus. The earlier section “Aperture also affects depth of field" explores this relationship between aperture and depth of field. Aperture isn’t the only way to adjust depth of field, though, so see Chapters 2 and 6 for the whole story. - Shutter-priority autoexposure: In shutter-priority mode, you choose the shutter speed, and the camera selects the correct f-stop. This mode is good for times when your scene contains moving objects because shutter speed determines whether those objects appear blurry or are “frozen” in place. See the earlier section “Shutter speed also affects motion blur” for more details about shutter speed.
Assuming that the ISO value doesn’t change, you theoretically should wind up with the same exposure no matter which aperture or shutter speed you choose, because as you adjust one value, the camera makes a corresponding change to the other value, right? Well, yes, sort of. Remember that you’re working with a limited range of shutter speeds and apertures (your camera manual provides information on available settings). So, depending on the lighting conditions, the camera may not be able to properly compensate for the shutter speed or aperture that you choose.
Suppose that you’re shooting outside on a bright, sunny day. You take your first shot at an aperture of f/11, and the picture looks great. Then you shoot a second picture, this time choosing an aperture of f/4. The camera may not be able to set the shutter speed high enough to accommodate the larger aperture, which means an overexposed picture.
Here’s another example: Say that you’re trying to catch a tennis player in the act of smashing a ball during a gray, overcast day. You know that you need a high shutter speed to capture action, so you switch to shutter-priority mode and set the shutter speed to 1/500 second. But given the dim lighting, the camera can’t capture enough light even with the aperture open to its maximum setting, so your picture turns out too dark unless you increase the ISO setting, making the camera more sensitive to light.
These issues would arise even in manual exposure mode, however. If you don't have enough light or if there's too much light, you can't dial in workable exposure settings, either. For this reason, I rely on aperture- or shutter-priority modes for most shots. Letting the camera do half of the exposure heavy lifting frees me up to concentrate on other issues, including composition. The only time I switch to manual exposure is when I want to dial in specific combinations of aperture and shutter speed or when I'm after an unusual exposure — that is, a result that the autoexposure system wouldn't normally deliver.
You don't have to shift to manual mode in those situations, however; by using the tools described in the next section, you can modify the results that the autoexposure system produces on your next shot.
Adjusting Autoexposure Results
Autoexposure is a useful tool, and for most subjects and lighting conditions, produces good results. But it's not foolproof, and it can't read your mind on occasions when you want to purposely under- or overexpose an image to evoke a certain photographic look or mood. Not to worry: Even using autoexposure mode, you may be able to adjust the brightness of your next shot by using the features outlined next: exposure compensation and autoexposure lock (AE Lock).
Another possible autoexposure fix lies in the exposure metering mode, which I cover earlier in this chapter. Again, that setting tells the camera which part of the frame to analyze when setting exposure. So if the metering mode is set to measure the entire frame, you may get different exposure results if you shift to spot metering mode, which enables you to base exposure primarily on your subject. Even then, though, the picture may still come out too bright or too dark for your tastes, so you may need to combine metering mode adjustment with these other autoexposure fixes.
Applying exposure compensation
This feature, often referred to as EV (exposure value) compensation, bumps the exposure up or down a few notches from what the camera’s autoexposure computer thinks is appropriate.
![]() The setting is often marked with a little plus/minus symbol like the one shown in the margin, and you typically choose from settings such as +0.7, +0.3, 0.0, –0.3, –0.7, and so on, with 0.0 representing the default autoexposure setting. (If you’re an old-school photographer, it may help you to know that these settings represent exposure stops. For example, EV –0.3 reduces the exposure by one-third of a stop.)
The setting is often marked with a little plus/minus symbol like the one shown in the margin, and you typically choose from settings such as +0.7, +0.3, 0.0, –0.3, –0.7, and so on, with 0.0 representing the default autoexposure setting. (If you’re an old-school photographer, it may help you to know that these settings represent exposure stops. For example, EV –0.3 reduces the exposure by one-third of a stop.)
How you adjust the amount of compensation varies from camera to camera, but the settings themselves are simple to understand:
- For a brighter exposure, raise the EV value. The scene in Figure 5-12 is a classic example of the problem that occurs when you have a dark subject against a bright background: The camera, choosing exposure settings that average out the brightness values of the entire frame, left the palm tree too dark for my taste. So I applied EV compensation of +1.0 to produce the brighter result on the right.
- For a darker exposure, lower the value. In Figure 5-13, the original exposure didn't have the drama I was after with this composition, and highlights in the sunlit brick and the candle flame are blown out: Areas that should span a range of brightness values have been so overexposed that you're left with a blob of white pixels. To get the more artistic result on the right, I dialed in EV –1.0.
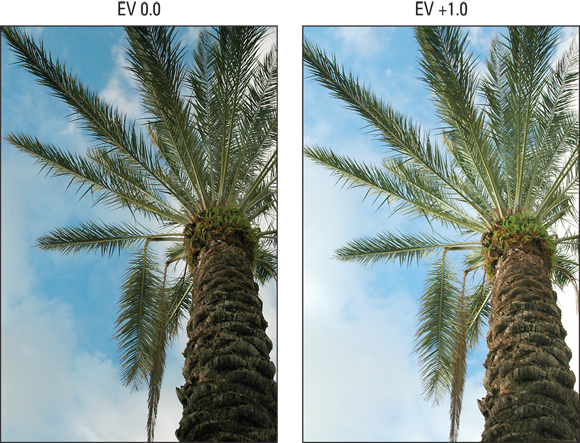
FIGURE 5-12: The original autoexposure setting left the palm tree too dark; raising the EV setting to +1.0 produced the brighter result.
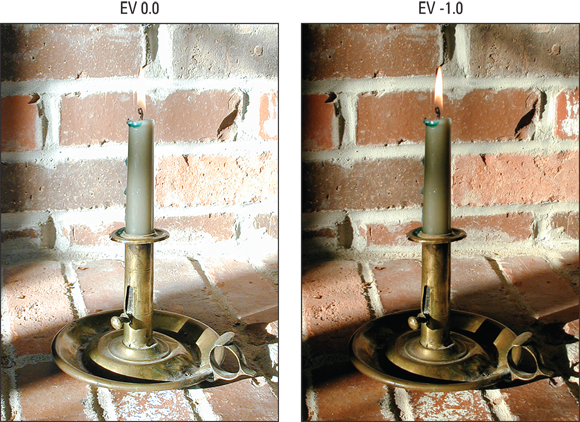
FIGURE 5-13: Here, the autoexposure system blew out the highlights; lowering the EV value solved the problem.
On some cameras, the exposure meter that helps you assess exposure in manual exposure mode appears whenever you enable exposure compensation. For example, if you dial in an adjustment of EV +1.0, you see a bar under the 1.0 mark on the positive side of the meter. This readout can get confusing because you naturally assume that you're about to overexpose the picture. But remember: The meter is based on what the camera considers the ideal exposure — which is what you get when the EV value is 0.0 (no compensation). When you set the EV compensation level to +1.0, you are, in essence, asking the camera to overexpose the shot by one stop over what it thinks is ideal.
Make it a practice to reset the Exposure Compensation value to EV 0.0 after you finish shooting the subject that required the adjustment. You can easily forget that you enabled the option and then not be able to figure out why everything is too bright or too dark when you move on to your next subject. If you do get weird exposure results on a shot, check this setting first to make sure that you didn't leave compensation turned on by accident.
AE Lock (autoexposure lock)
When you use autoexposure, most cameras continually measure and adjust exposure settings from the time you press the shutter button halfway to set focus until the time you take the picture. Usually, that system works well because it accounts for any lighting changes that may occur at the last second. But on occasion, you may want to interrupt the continuous exposure adjustment and lock in the current settings. Some cameras offer an AE Lock feature that does just that.
Your camera may have a button specifically set aside for this function, or you may be able to assign it to a Function (FN) button or another button. Many cameras offer a button labeled AE-L/AF-L, which locks both autoexposure and autofocus, respectively, when pressed. (You often can customize the button so that it locks exposure only if you prefer.)
Expanding Tonal Range
A scene like the one in Figure 5-14 presents the classic photographer’s challenge: Choosing exposure settings that capture the darkest parts of the subject appropriately causes the brightest areas to be overexposed. And if you instead expose for the highlights — that is, set the exposure settings to capture the brightest regions properly — the darker areas are underexposed.
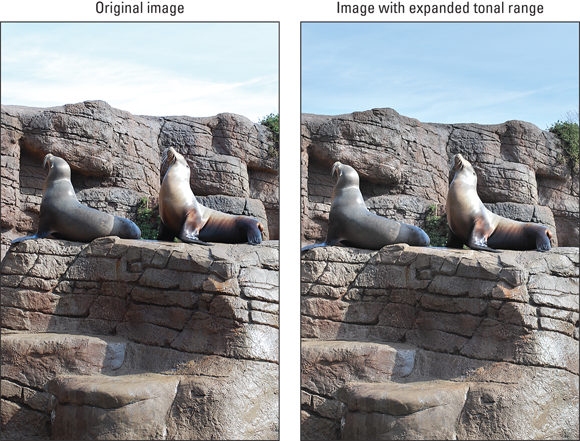
FIGURE 5-14: Some cameras have features that brighten shadows without also blowing out highlights.
In the past, you had to choose between favoring the highlights or the shadows. But now photographers have a couple ways to work around the problem:
- In-camera image manipulation: Some cameras now have tools that brighten the shadows without altering the highlights, enabling you to stretch a photo's tonal range — the range of shadows to highlights, also called dynamic range. Some Nikon cameras, for example, offer a feature called Active D-Lighting, which tackles the problem in two stages: First, the original exposure is slightly underexposed, to ensure that highlights are properly rendered. Then, before the image is written to the memory card, it undergoes a software process that brightens only the darkest shadows. I used this tool to create the improved seal image in Figure 5-14. Some Canon cameras offer a similar tool called Highlight Tone Priority, and some Sony models offer DRO (dynamic range optimizer). Check your camera manual to find out whether you have this sort of option at your disposal.
-
HDR (high dynamic range) imaging: This term refers to a technique in which you photograph the same subject multiple times, exposing some images for the darkest areas, some for the midtones (areas of medium brightness), and some for the highlights. You then use special HDR software to combine the exposures, specifying which parts of the frame to pull from which exposure.
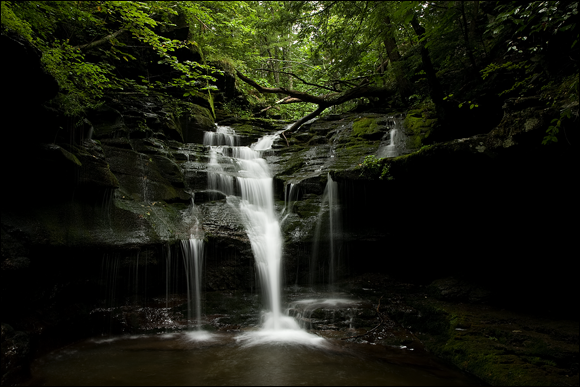
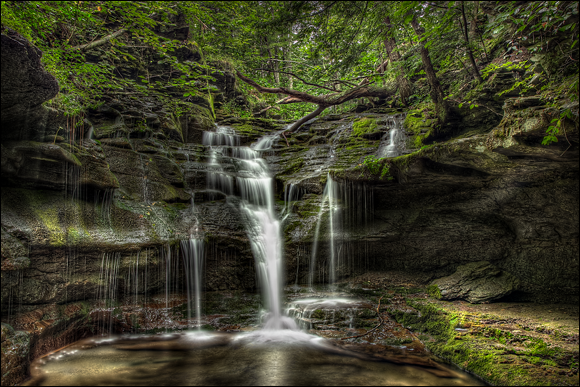
For a great example of HDR work, take a look at the images in Figures 5-15 and 5-16, both from photographer Dan Burkholder (
www.danburkholder.com). In the first image, you see the scene captured at a single exposure. The waterfall is beautiful, but you can't see much detail in the shadows. The second image offers the HDR version, created by combining the shot from Figure 5-15 with seven additional exposures. With the expanded tonal range possible through HDR, you now can see the moss-covered rocks that the water is spilling over. Some cameras offer automated HDR, capturing and blending multiple exposures with one press of the shutter button. The automated features usually don't capture more than a couple of frames, and you don't have much control over the exposure shift between frames or how frames are blended into the HDR composite. Still, they often produce better results than you can achieve in a single exposure.Figure 5-17 shows the type of results you can expect. This scene illustrates a problem often faced by real estate agents taking photos of their clients' homes: How to capture both the interior of the house and the exterior landscaping that's visible through the windows. The first two shots show you what I was able to capture in a single exposure. When I set the exposure based on the exterior, the interior was underexposed. When I instead exposed for the interior, the view out the doors became too bright. To produce the final image, I enabled automated HDR mode. Is it perfect? Well, I'd like the interior to be slightly brighter and the exterior to be a tad darker. But it's a definite improvement over the other two exposures.
However you approach HDR, use a tripod to make sure that the framing doesn't change between shots — otherwise, the HDR software, whether in-camera or on your computer, can't successfully blend the frames. Also, maintain the same f-stop throughout all frames so that the depth of field doesn't shift from one frame to the next. Avoid scenes that contain moving objects, including people, in the blended HDR frame, moving objects will appear at partial opacity along the path they took while the shutter was open.
Courtesy of Dan Burkholder
FIGURE 5-15: Here you see one of the exposures that photographer Dan Burkholder used to create the HDR image in Figure 5-16.
Courtesy of Dan Burkholder
FIGURE 5-16: The final HDR image includes a greater tonal range than can be captured in a single exposure.
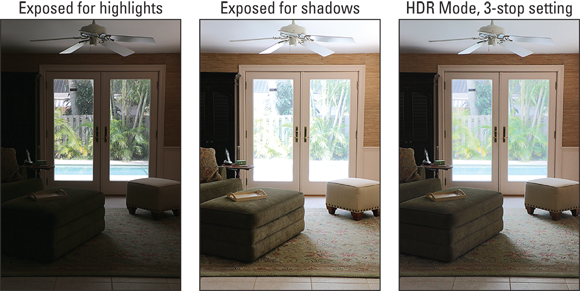
FIGURE 5-17: Some cameras offer automated HDR shooting, which I used to produce the third image in this series.
Bracketing Exposures
Creating HDR images requires you to bracket exposures, which means to capture the scene at different exposure settings. But bracketing isn't just for HDR: For tricky exposures, it's a good idea to capture the subject at a few different exposure settings, to increase your chances of coming home with at least one frame that you like. I took this approach when shooting the skyline scene shown in Figure 5-18, for example.
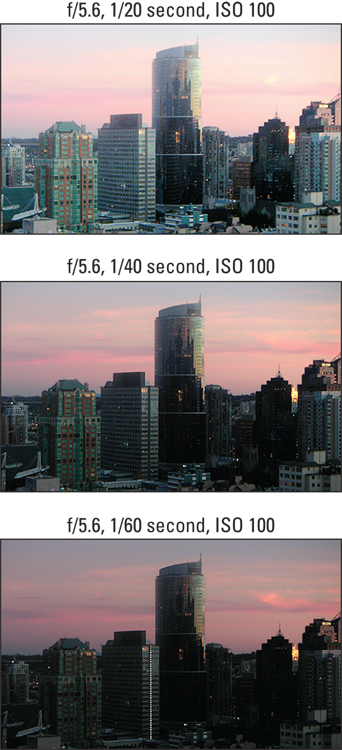
FIGURE 5-18: Automatic bracketing records the same subject several times, using different exposure settings for each shot.
How you accomplish bracketing depends on what exposure modes are available to you:
- In manual exposure mode, change the shutter speed, aperture, or ISO between each shot. For Figure 5-18, I adjusted shutter speed.
- In the automatic exposure modes (including shutter- and aperture-priority autoexposure modes), shoot the subject using three different exposure compensation settings. Simply changing the shutter speed or aperture won't do the trick — as soon as you change one of those settings, the camera adjusts the other to compensate so that the final exposure is the same, no matter what.
Some cameras also offer automatic exposure bracketing. With this feature, often abbreviated as AEB, you take a series of successive shots, and the camera automatically adjusts exposure between each capture. Usually, you can select the number of frames and the amount of exposure shift between each frame. Check your camera manual to find out what your camera offers and how it works.
Adding Flash
You can't create a picture without light (unless, of course, you're shooting with a night-vision camera). Fortunately, most cameras enable you to use flash to illuminate your subject when the ambient lighting is insufficient.
On basic cameras, you may have no control over the flash beyond being able to turn it on or off. Some cameras don't even give you that option, taking over the decision of when flash is needed. But if you're shooting with an intermediate or advanced model, you may be able to adjust various flash settings, each of which has a different impact on your photos. Even starter cameras sometimes offer one or two of these features. You also may have the option of using a built-in, pop-up flash or attaching a larger, external flash head to the camera.
The rest of this chapter explores the most common flash options. But understand that good flash photography involves many more techniques and tools than I have room to cover in this book. I encourage you to seek out other sources of information on the subject. One great place to start is the website www.strobist.com. (Strobe is another word for flash.) Also, check your camera manufacturer's website; Nikon, Canon, and other big names in the photography business offer helpful, free tutorials to help you improve your flash photographs.
Enabling and disabling flash
On most cameras, the exposure mode you use determines whether you can enable or disable flash. In Auto mode, for example, the camera may decide whether flash is needed, preventing you from having any say in the matter. But in advanced modes such as aperture-priority autoexposure, the camera may bow out of the decision, leaving it up to you to enable flash if you see fit.
The following list describes the standard ways in which you enable and disable a built-in flash — assuming of course, that your camera gives you that flexibility:
- Flash button: On intermediate and advanced cameras that offer a pop-up flash, look for a button like the one shown on the left in Figure 5-19. To bring the flash out of hiding, just press that button. Again, you may need to shoot in advanced exposure mode to have this option. To stop using flash, just gently press down on the flash unit to put it away.
- Flash Off exposure mode: Some cameras offer Flash Off exposure mode, which usually sports a label like the one shown on the right side of Figure 5-19. This mode works just like Auto mode, detailed in Chapter 3, but disables flash.
-
Flash mode: Some cameras offer a variety of flash modes, each of which affects flash firing in slightly different ways. You usually adjust this option via the camera's main settings screen, as shown in Figure 5-20, or via a menu option. Sometimes, you press a Flash button while rotating a dial to adjust the flash mode. (In other words, check your camera manual for how-tos.)
I explain some of the more complex flash modes later in this chapter, in the section “Exploring special flash modes,” but for the purposes of this discussion, look for these two flash modes:
- Flash on: This setting causes the flash to fire no matter what the ambient light, which is why it is sometimes called force flash. You may also see this setting represented by the term fill flash or fill-in flash. The idea is that even though there's enough light to expose most of the scene, you need a little flash light to fill in the shadows. Typically, the symbol representing this mode looks like a lightning bolt, as shown in Figure 5-20. See the sidebar “Using flash outdoors,” later in this chapter, for tips on using flash in bright light.
-
Flash Off: In this mode, represented by a symbol like the one labeled in Figure 5-19, the flash won't fire — no way, no how. It's designed primarily for venues such as churches and museums that don't permit flash photography. But you may also want to turn off the flash simply because the quality of the existing light is part of what makes the scene compelling, for example. Or, you may want to go flashless when you’re shooting highly reflective objects, such as glass or metal, because the flash can cause blown highlights (areas that are completely white, with no tonal detail).
- When you turn off the flash in an autoexposure mode, the camera may reduce the shutter speed to compensate for the dim lighting. That means you need to hold the camera steady for a longer period to avoid blurry images. Use a tripod or otherwise brace the camera for best results. You also can consider raising the ISO setting to increase the camera’s sensitivity to light (but be aware that you may introduce noise into the photo).
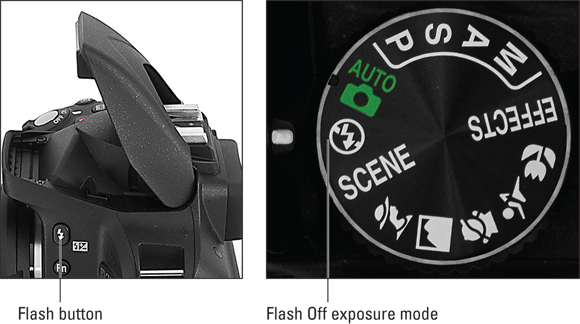
FIGURE 5-19: When you shoot in advanced exposure modes, you may need to press a button like this one to enable flash.
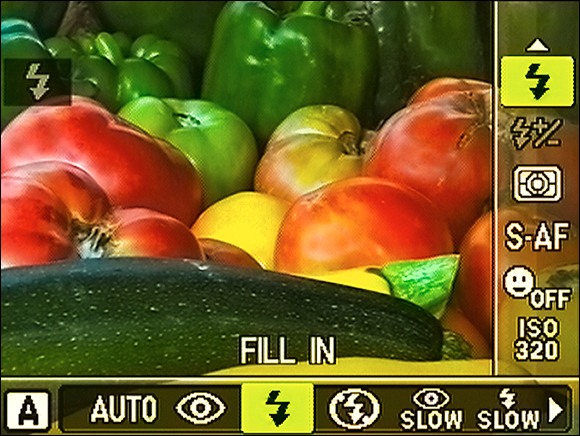
FIGURE 5-20: You also may be able to turn flash off and on via the Flash mode setting.
Exploring special flash modes
In addition to the two basic flash modes, Flash On and Flash Off, your camera may offer the three flash-mode settings outlined next.
Flash with red-eye reduction
Anyone who’s taken “people pictures” with a point-and-shoot camera — digital or film — is familiar with the problem of red-eye, where the flash reflects against the subject’s retinas and the result is a demonic red glint in the eye. Red-eye reduction mode, typically represented by an eyeball icon, aims to thwart this phenomenon by firing a low-power flash before the “real” flash goes off or by emitting a beam of light from a lamp on the camera body for a second or two before capturing the image. The idea is that the prelight, if you will, causes the pupil of the eye to shut down a little, thereby lessening the chance of a reflection when the final flash goes off.
Unfortunately, red-eye reduction flash doesn’t always work perfectly. Often, you still wind up with fire in the eyes — hey, the manufacturer promised only to reduce red-eye, not eliminate it, right? Worse, your subjects sometimes think the prelight is the actual flash and start walking away or blink just when the picture is being captured, so if you shoot with red-eye mode turned on, be sure to explain to your subjects what’s going to happen.
The good news is that, because you’re shooting digitally, you can repair red-eye easily. Some cameras have an in-camera red-eye remover that you can apply after you take a picture. If not, the fix is easy to make in a photo-editing program. Many online printing sites and in-store photo kiosks even have tools that let you do the job before you order your prints.
Slow-sync flash
Slow-sync flash, a specialty flash mode, increases the exposure time beyond what the camera normally sets for flash pictures. The name comes from the way that the timing of the flash light is synchronized with the shutter action.
With a normal flash, your main subject is illuminated, but background elements beyond the reach of the flash are dark, as in the first example in Figure 5-21. The longer exposure time provided by slow-sync flash allows more ambient light to enter the camera, resulting in a brighter background, as shown in the second example in the figure.

FIGURE 5-21: Slow-sync flash produces a brighter background than normal flash mode.
Whether a brighter background is desirable depends upon the subject and your artistic mood. However, remember that the slower shutter speed required for slow-sync flash can easily result in a blurred image; both camera and subject must remain absolutely still during the entire exposure to avoid that problem. As a point of reference, the exposure time for the normal flash example in Figure 5-21 was 1/60 second, and the slow-sync exposure time was a full second.
Rear-curtain sync
Normally, the flash fires at the beginning of the exposure, an arrangement known as front-curtain sync. In Rear-Curtain Sync Flash mode, the flash fires at the end of the exposure. The classic use of this mode is to combine the flash with a slow shutter speed to create trailing-light effects like the one you see in Figure 5-22. With Rear-Curtain Sync, the light trails extend behind the moving object (my hand, and the match, in this case), which makes visual sense. If instead you use slow-sync flash, the light trails appear in front of the moving object.
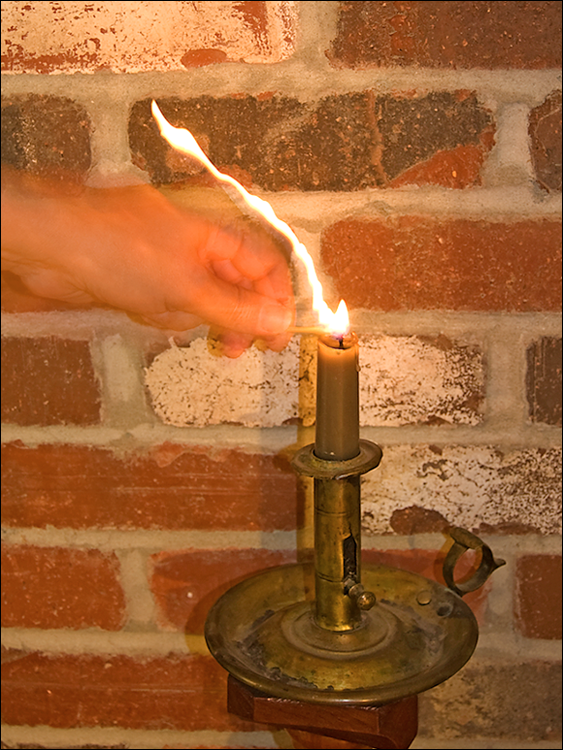
FIGURE 5-22: Rear-curtain sync is combined with a slow shutter to create motion trails that extend behind a moving subject.
Using an external flash
Although your camera’s built-in flash offers a convenient alternative for lighting the scene, the light it produces is typically narrowly focused and fairly harsh. When you’re shooting your subject at close range, a built-in flash can leave some portions of the image overexposed or even cause blown highlights — areas so overexposed that they’re completely white, without any detail. Moving farther from your subject isn't always an option, either, because the range of most built-in flashes is about 8 to 10 feet. And a built-in flash often leads to red-eyed people, as all of us know too well.
Some digital cameras can accept an auxiliary flash unit, which helps reduce blown highlights and red-eye because you can move the flash farther away from, or at a different angle to, the subject. (The closer the flash is to the lens, and the more direct the angle to the subject’s eyes, the better the chance of red-eye.)
Additionally, external flash heads have a longer reach than a built-in flash, yet typically produce a more pleasing result, illuminating the subject with a more widespread, and thus softer, light. If you buy a flash with a rotating head like the one shown in Figure 5-23, you can bounce the light off the ceiling for an even more diffused effect.
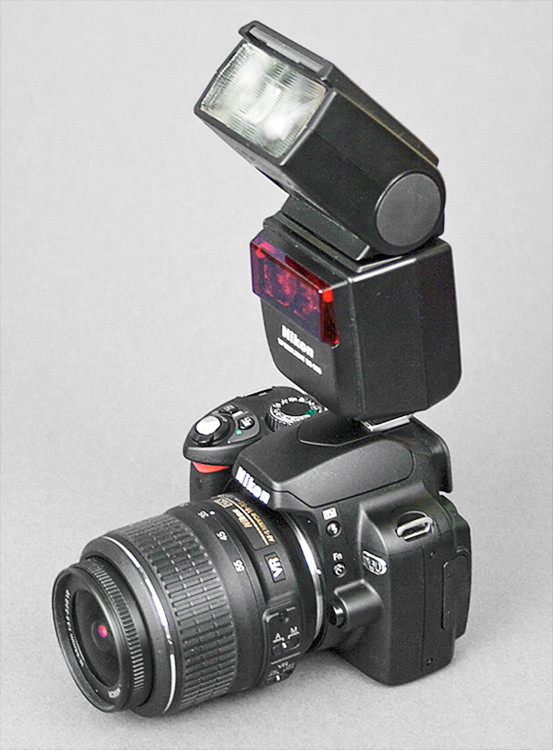
FIGURE 5-23: An external flash with a rotating head offers more flexibility and better illumination than a built-in flash.
Figure 5-24 has an example: Notice that in the first shot, taken with the flash angled directly at the subject, strong shadows appear behind the subject, and the light is harsh on the skin. For the second shot, I aimed the flash head upward so that the light hit the ceiling and then fell down softly on the subject, eliminating background shadows and producing much more pleasing lighting. (Be sure that the ceiling is white if you try this technique — otherwise, the bounced light will take on the color of the ceiling.)
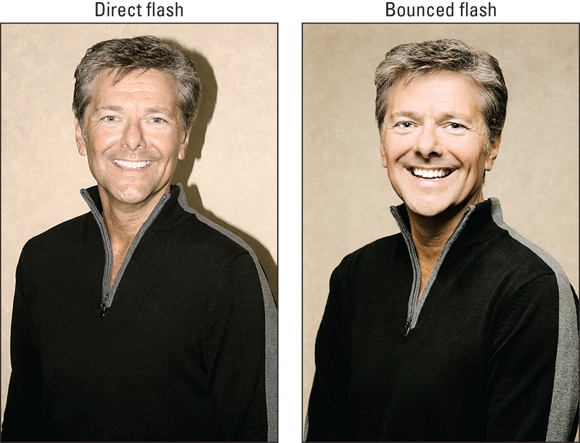
FIGURE 5-24: Here you see the difference between direct (left) and bounced (right) flash lighting.
When you attach an external flash, the camera’s onboard flash is disabled (if the camera has one), but the auxiliary flash works automatically with the camera, just like an on-camera flash. However, to ensure full compatibility, you need to buy an external flash that's set up to work with your specific camera.
Adjusting flash power
When you use flash, the camera automatically sets the flash power according to what it thinks is necessary. But many cameras enable you to adjust the strength of the flash light through a feature called flash exposure compensation, or flash EV. This feature works just like exposure compensation, which adjusts overall exposure to produce a darker or brighter image, but instead varies the strength of the flash. Usually, the option is represented by a little plus/minus symbol alongside a lightning bolt — the universal symbol for flash. It's easy to use: As with exposure compensation, settings are stated in numerical terms, such as +1.0, –1.0, and so on. If you want more flash power, you use a positive flash EV value: +0.3, +0.7, and so on. For less flash power, you select a negative value.
Figure 5-25 offers an example of how this feature works. I shot this picture at an outdoor farmers' market, in a stall that was shaded by a large awning. I wanted to add flash to bring a little more light to the scene, but at the default flash power, the flash light was just too hot, blowing out the highlights in the fruit. So I reduced the flash power by setting the flash compensation value to –1.3, which added just a small pop of light without overpowering the subject.
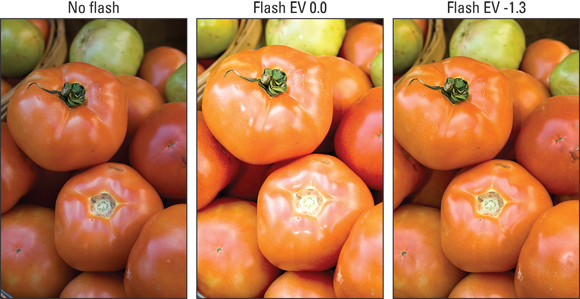
FIGURE 5-25: Flash exposure compensation enables you to adjust the strength of the flash.
For advanced photographers, some cameras also offer manual flash power control. If you go this route, the camera doesn't take any role in setting flash power; you dial in exactly how much flash power you want to use.
In addition to using these flash adjustments, you can diminish flash power by using a mechanical solution: Place a diffuser over the flash head. For example, Figure 5-26 shows a diffuser designed to work with the pop-up flashes on dSLR cameras. The diffuser in the figure is made by LumiQuest (www.lumiquest.com) and sells for under $15, but you can find other styles of diffusers for built-in flashes and also for external flash heads. Regardless of the style or size, the idea is to spread and soften the flash light, helping to eliminate harsh shadows and create more flattering light. If you do much flash photography, especially portrait photography, adding a diffuser to your camera bag is one of the best investments you can make.
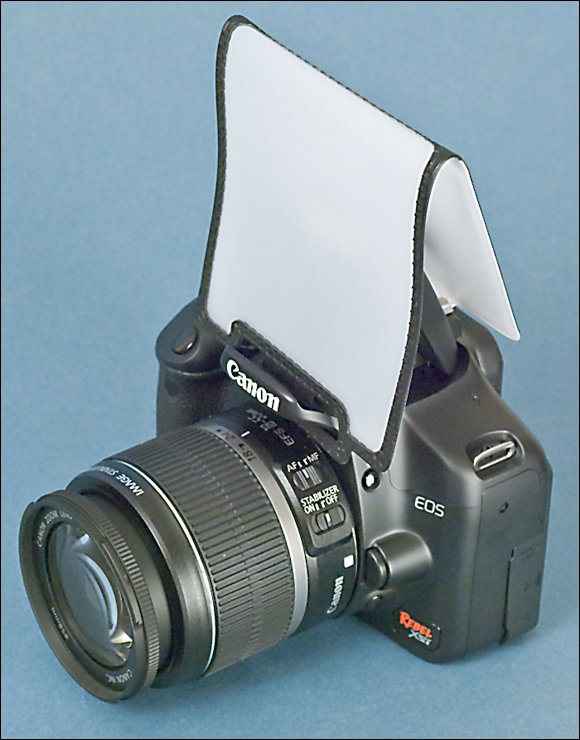
FIGURE 5-26: You also can buy diffusers that soften the harsh light of a built-in flash.