
Chapter 1
Choosing the Right Camera
IN THIS CHAPTER
Finding the best camera for your photography style
Figuring out how many pixels you need
Reviewing your lens options
Deciding what camera features you really need
Considering convenient extras
You've probably heard the saying “It's a poor carpenter who blames his tools.” Well, the same is true for photography: A knowledgeable photographer can produce a masterful image from even the most basic camera. That said, certain camera features make photographing some subjects easier: A fast autofocusing system improves your odds of snapping a sharp shot of a polo player, for example, and a lens that can capture subjects from a great distance enables you to photograph wildlife without the risk of becoming dinner.
This chapter helps you figure out whether your current camera offers the features you need for the type of photography you want to do, and, if not, guides you toward more suitable gear. At the end of the chapter, I provide some tips for getting the biggest bang for your buck if you go camera shopping.
Thinking About Your Artistic Goals (Or Lack Thereof)
When people come to me for camera recommendations, the first question I ask — and the one I suggest that you consider now — is “How much creative control do you want to have?” The answer determines whether you need a bare-bones, point-and-shoot camera, a high-end model with expert-level features, or something in between.
If you're new to photography, you may not understand how the camera you choose affects your creative options. Here are some of the picture qualities you can manipulate if you have the right camera features on board:
- Exposure: In Figure 1-1, the left image shows the picture produced when I used my camera's full-auto shooting mode. It's fine, but it wasn't what I had in mind, which was the darker, and more dramatic, shot on the right. To make that change, I had to step out of auto mode, which doesn't let you adjust exposure. Several camera settings affect exposure, and I explain them all in Chapter 5. For this shot, I used a feature called Exposure Compensation.
- Motion blur: You can determine whether moving subjects appear frozen in place or blurry. Figure 1-2 offers an example. Notice that the fountain water in the right image appears somewhat soft and misty compared with the water in the left image. To alter this characteristic, I adjusted shutter speed, another exposure setting covered in Chapter 5.
- Depth of field: This term refers to how much of a photo stays in sharp focus. To put it another way, do objects in front of and behind your subject appear sharp, as in the left example in Figure 1-3, or blurry, as in the right image.

FIGURE 1-1: The shot produced in automatic shooting mode (left) lacked drama, so I took control over exposure to produce the darker version (right).
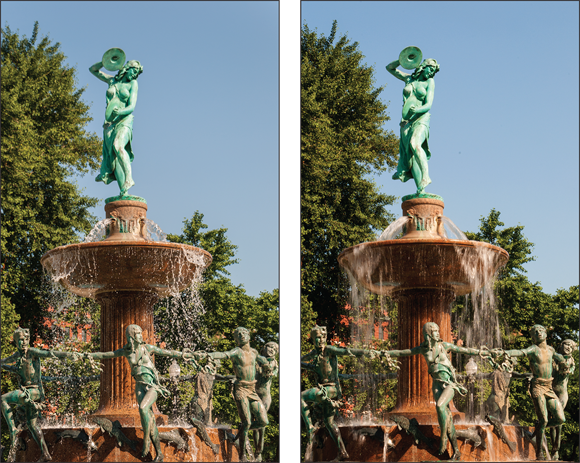
FIGURE 1-2: In these images, I varied the amount of motion blur, which affected the appearance of the fountain water.
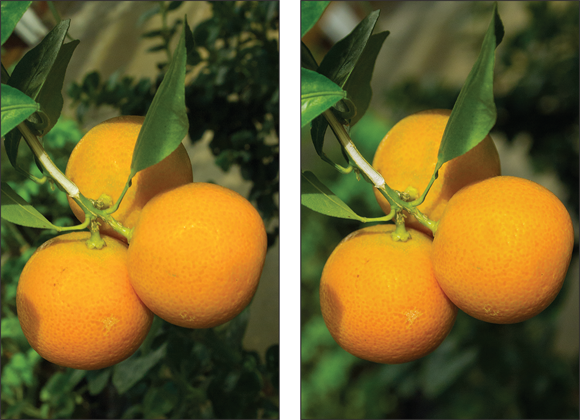
FIGURE 1-3: Here, I adjusted settings that affect the extent to which objects in front of and behind the subject appear sharp (left) or blurry (right).
Neither version of these photos is right or wrong, by the way; beauty, as they say, is in the eye of the beholder. And please don't freak out about the photography lingo I just flung your way — I cover it in detail later in this book. The important point of this discussion is that if you care about these kinds of artistic decisions, you need a camera that lets you take charge of the aforementioned settings as well as others that control focusing, color, and image quality.
Of course, cameras that offer those features typically cost more than basic models and are more complicated to use. So if you're not interested in delving deeply into photography, there's no point in wasting time and money on features you'll never use.
The first step in finding a suitable camera, therefore, is to decide which of the following categories of cameras matches your photography interests:
-
Basic models: I use this term to describe entry-level cameras that offer few (or no) manual controls over exposure, focus, and so on. Cellphone cameras also fall into this category, as do cameras on iPads and other tablets.
A basic model is perfect if you're a casual photographer. That is, you enjoy taking selfies, shooting pictures of the gang at special occasions, and sharing photos of your kids or pets online. Or perhaps your work requires photo documentation of some sort — for example, an insurance adjuster needs to include photographic evidence of hail damage in order to process a claim. Either way, you want your pictures to be as good as possible — you just aren't interested in taking classes or otherwise learning advanced photography techniques.
-
Intermediate models: By intermediate, I mean a camera that offers both automatic and manual picture-taking controls. Go this route if you want to explore photography but don't know much about the topic yet. That way, you can rely on automatic shooting modes while you're learning, and gradually step up to manual options.
You can find a wide range of models in this category, some of which offer just a handful of advanced picture options and others which nearly reach the pro level of control. Later sections in this chapter help you decide which options you need and which you can do without.
-
Advanced models: Cameras in this category are designed for knowledgeable photographers, whether pro or prosumer (advanced amateur), who need certain features that intermediate cameras don't provide. For example, with some cameras in this range, you can use the built-in flash to trigger off-camera flash units, providing lighting flexibility that's often required for professional portraits and product photography. You also get substantially more ways to customize your camera, from tweaking autofocus performance to changing the function of some camera buttons.
 Usually not included at the pro level are automatic shooting modes or other make-it-easy features that you find on basic and intermediate cameras. This leads me to offer the following caution: No matter how much the camera salesperson (or your professional photographer friend) tries to convince you to “start at the top,” don't buy an advanced camera until you master an intermediate model. The added complexity will only overwhelm you, not to mention make a larger dent in your bank account. Step up to this level only if you start doing projects that require features not found on your intermediate-level model.
Of course, you may have multiple-photography personality, as I do. Some shoots demand the capabilities of my pro model, but because it's too large to fit in my purse, it's not something I carry with me all the time. For casual shots on the go, I use my cellphone — it's great for snapping scenes that catch my eye while I'm walking the dog, for example. If I want more features than my cellphone provides but don't need all the capabilities of my advanced model, I have a compact camera that splits the difference. In other words, it's okay to put more than one camera on your next birthday wish list. In fact, I highly recommend it.
As for picture quality, you can find cameras that deliver excellent images in all three camera categories. However, it's unrealistic to expect a cellphone or tablet camera to match what you can get from a “real” camera — that is, a camera designed just to take pictures. The later section “Understanding Photo Quality Factors” explains camera specs that will help you find the best performer in the category that suits your style.
Reviewing Basic Camera Designs
Digital cameras fall into one of two categories: interchangeable-lens cameras and fixed-lens cameras. As the names imply, cameras in the first category enable you to shoot with a variety of lenses, and models in the second category come with a single, permanently attached lens.
You can find cameras designed for different levels of photography within each category, by the way. So consider this discussion one of simply form; for details on function, check out the rest of the chapter.
Interchangeable-lens cameras
Cameras in this category consist of two components: a camera body, which contains the guts of the picture-taking system, and a lens, which you attach to a mount on the front of the body.
What does this flexibility give you? Well, as of yet, no one has invented a single lens that's perfectly suited to capturing the entire range of subjects photographers may want to shoot. A lens designed to produce an extreme close-up, for example, has different optical qualities than one engineered to capture a faraway subject. Ergo ipso facto, we have the interchangeable-lens camera, which enables you to use whatever lens your subject demands.
Within this category, you find the following types of cameras:
-
dSLR (digital single-lens reflex): The top two cameras in Figure 1-4 are dSLRs. (More about the name momentarily.) Although dSLRs were once large, heavy, and complicated, manufacturers now also offer models geared to novice photographers as well as advanced shooters. High-end dSLRs still remain fairly large, but entry-level and intermediate models are available in significantly reduced sizes. The smaller of the two dSLRs in Figure 1-4, for example, isn't much wider than the iPhone 6 that I included in the foreground to give you some frame of reference.
 Okay, about the name: The d in dSLR represents digital, distinguishing a digital SLR from film models, which have been around for a long time. SLR stands for single-lens reflex and refers to the viewfinder technology used in this type of camera. The name stems from the fact that the SLR viewfinder involves a series of mirrors that reflect (reflex) the light coming through the lens to the viewfinder display.
 -
Mirrorless cameras: With this type of camera, the mirror-based viewfinder system is gone — thus, it's mirrorless. Taking out that mirror assembly enables mirrorless models to be much smaller and lighter than dSLRs, which is why you sometimes hear them referred to as compact system cameras. The bottom-left camera in Figure 1-4 is a mirrorless model.
 Some mirrorless models do away with the viewfinder entirely; you compose the image using the monitor on the camera back. Others incorporate or enable you to attach an electronic viewfinder, which provides the convenience of a viewfinder without taking up as much space as an optical viewfinder, which is the type used in a dSLR viewfinder. The section “Viewfinder: Optical or electronic,” later in this chapter, has more details.
 - Rangefinders: Figure 1-5 gives you a look at this less-common variety of interchangeable-lens camera. At first glance, rangefinders look a lot like compact system cameras, but they work quite differently. Traditional rangefinders use a different focusing system than other cameras. The viewfinder displays two views of your subject, and you determine the focusing distance, or range, by turning a ring on the lens until the two images align. However, some rangefinder models also offer other, more standard autofocusing options.
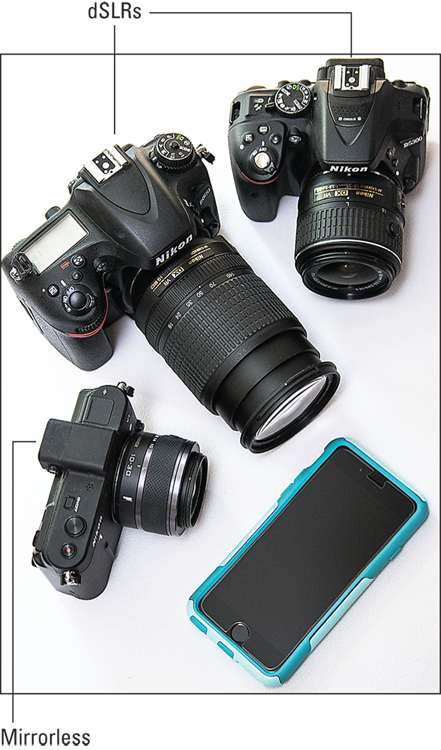
FIGURE 1-4: Interchangeable-lens cameras vary in size; some aren't much bigger than the iPhone 6, included in the foreground for comparison.
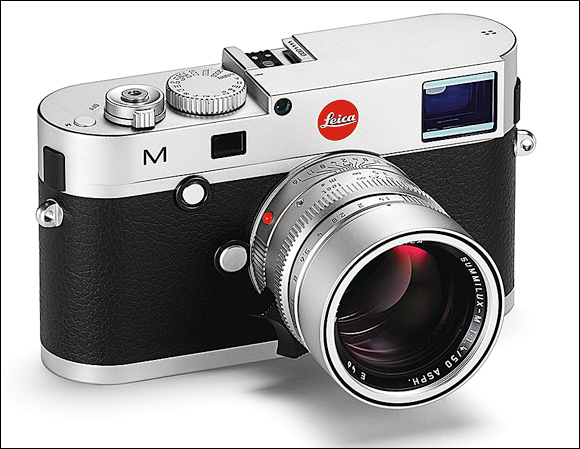
Courtesy of Leica Camera
FIGURE 1-5: Leica is the best-known manufacturer of digital rangefinder cameras.
Fixed-lens cameras
Again, by fixed lens, I mean a lens that's permanently paired with the camera body. Cameras in this category fall into two camps:
-
“Real” cameras: That is, a camera whose sole purpose is photography, as opposed to a computer device or phone that sports a camera.
Most people refer to these cameras as point-and-shoot models because they offer automatic settings that enable the novice photographer to, well, point and shoot. Yet I hesitate to use the term, because higher-end fixed-lens models do enable you to control exposure, focus, and other picture settings. And although you can't swap out lenses on these cameras, some models have zoom lenses that reach from wide-angle to telephoto views, so you still enjoy lots of picture-taking flexibility.Whatever you want to call them, these cameras come in a variety of sizes, shapes, and colors, ranging from models that look like a small dSLR or mirrorless camera to pocket-size wonders that make the latest smartphones look huge. You also can find models specifically designed for rugged use, offering features such as shockproof and water-resistant cases. These models are great not only for outdoor adventurers, but also for young photographers who may not always be as careful with their devices as the adults in their life would like them to be. Heck, I certainly don't qualify as a young photographer (although 56 is the new 55), and I can't be counted on to always retain a firm grip on my equipment, either.
-
Cellphone and tablet cameras: Of course, no book on digital photography today would be complete without mentioning the cameras built into these multipurpose devices. But let's be honest: Taking a photo with a tablet — even a small one such as the iPad mini — is cumbersome at best. For the purposes of this book, I concentrate on cellphone cameras.
Providing many specifics, though, is difficult because the capabilities of cellphone cameras vary so widely. On some phones, you can do things such as tap the screen to indicate the focus point or adjust exposure slightly. Other phones give you no control at all. Suffice it to say that if you're going to use a phone as your main camera, do your research.
Also note that even though you can't swap out lenses on these types of cameras, you can often attach lens modifiers that provide a different angle of view than the built-in lens. Companies such as Moment (www.momentlens.co) sell telephoto and macro (close-up) add-on lenses for smartphones, for example.
Understanding Photo Quality Factors
Often overlooked amidst the more glitzy, whiz-bang options touted in camera magazine and television ads are the ones that affect the quality of the pictures the camera can produce. After all, if a camera doesn’t live up to your expectations for its main purpose — producing sharp, clear, colorful photographs — nothing else matters.
The next sections explain technical specs that affect picture quality. Be sure to also check out the section on lenses, later in this chapter, because they also contribute to photo quality.
 One note before you dig in: Although it's important to understand these specs, don't consider them the final word on image quality. Photos from two cameras that have the same specs may differ greatly because of the performance built into various camera components and the internal software used to turn image data into photographs. For the full story, check out magazine and online reviews done by pros who have the equipment and expertise to make accurate quality assessments.
Resolution: How many megapixels?
Digital images are made of colored tiles know as pixels. The magnified portion of Figure 1-6 gives you a look at these image building blocks. Camera resolution, stated in megapixels (1 million pixels), indicates the maximum number of pixels that it can use to create a photo.
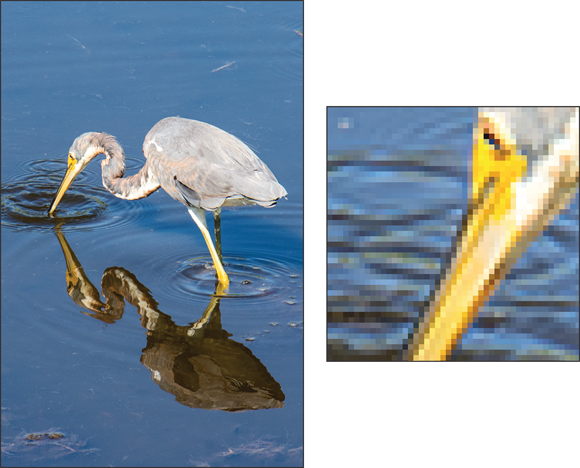
FIGURE 1-6: Image resolution determines how large you can print a photo before the individual pixels can be detected.
Chapter 4 discusses resolution in detail, but in terms of evaluating a camera, you need to know these key points:
- Image resolution determines the size at which you can produce high-quality prints. A general guideline is to aim for 300 pixels per linear inch (ppi). Table 1-1 does the math for you, listing the number of megapixels required for traditional print sizes.
- For onscreen photos, you need very few pixels. Resolution affects the display size of digital photos, but does not affect picture quality. And because most screen devices are limited in the number of pixels they can display, a 1 mp image is usually more than adequate. On Facebook, for example, the area allotted for a cover photo (the wide image that runs across the top of the page) is 851 x 315 pixels (about .2 mp).
- High-resolution pictures create larger data files. The more pixels, the faster you fill a camera memory card (the removable storage used by most cameras), a cellphone's onboard storage space, and your computer's hard drive or any online storage closet you may use.
TABLE 1-1 Resolution Requirements for Printing at 300 ppi
For This Print Size … |
You Need This Many Megapixels |
4 x 6 inches |
2 mp |
5 x 7 inches |
3 mp |
8 x 10 inches |
7 mp |
11 x 14 inches |
14 mp |
Image sensor: Full frame or smaller?
A photograph is formed when light passes through a lens and strikes a light-sensitive recording medium. In a film camera, the film negative performs the light-recording function. In a digital camera, the image sensor handles the task. The sensor is covered with photosites, which are electronic doodads (that's the technical term) that collect the light data needed to create the image pixels.
Digital-camera image sensors come in two flavors: CCD (charge-coupled device) and CMOS (complementary metal-oxide semiconductor). In the past, each had a reputation for offering different advantages, but today, both are capable of producing excellent images (although techno-geeks still love to argue about which technology is best).
Sensor size, however, is a different story: A smaller sensor usually produces lower image quality than a large sensor. Why? Because when you cram tons of photosites onto a small sensor, you increase the chances of electronic noise that can degrade the picture.
The three largest sensors commonly used in digital cameras have been assigned these monikers:
- Full frame: The sensor is the same size as a 35mm film negative (36 x 24mm). Why full frame? The term is related to camera lenses, which are still manufactured using the 35mm film negative as a standard. That means that a full-frame sensor is large enough to capture the entire angle of view that a lens produces on a 35mm film camera. Smaller sensors can capture only a portion of that angle of view. For more on this issue, check out the upcoming section related to lens focal length.
-
APS-C (advanced photo system-type C): This is a smaller-than-full frame sensor but with the same 3:2 proportions as a 35mm negative. Within this category, the specific dimensions of the sensor vary from camera to camera. Nikon APS-C sensors measure about 24 x 16mm, for example, whereas Canon's are approximately 22 x 15mm.
Some people use the term crop sensor to refer to this category because it's a trimmed-down version of a full-frame sensor. Technically, the C in APS-C stands for classic, but crop is more helpful in remembering how these sensors vary from full-frame versions. Also, Nikon coined the term DX to refer to its APS-C sensors, using FX to indicate full-frame sensors.
-
Micro Four Thirds: These sensors are slightly smaller than APS-C sensors, and as the name implies, they have a 4:3 aspect ratio as opposed to the 3:2 ratio of full-frame and APS-C sensors. Note that the term Four Thirds is used for any sensor that has a 4:3 aspect ratio, even for those much smaller than a Micro Four Thirds sensor.
Which is best — 4:3 or 3:2? Well, there's no magic to either aspect ratio. But 3:2 originals translate perfectly to a 4 x 6 print, and a 4:3 image must be cropped to fit. Mind you, you also need to crop 3:2 originals to print them at other frame sizes — 5 x 7, 8 x 10, and so on. And many cameras enable you to choose from several aspect ratios for your pictures or to crop them to a certain proportion using in-camera editing tools.
If you don't see one of these terms, you can find the sensor's dimensions in the camera's spec sheet. But sometimes, size is presented as a single number, such as 1". In this case, that number reflects the diagonal measure of the sensor, which is the same way that TV sizes are presented.
Image file format: JPEG versus Raw
File format refers to the type of file used to record picture data. The standard format is JPEG (“jay-pegg”), but cameras aimed at intermediate and advanced photographers usually offer a second format called Camera Raw, or just Raw, for short.
When it comes to image quality, Raw outperforms JPEG for reasons you can explore in Chapter 4, if you're interested. (Spoiler: The difference has to do with the fact that JPEG files are compressed to shrink file size, resulting in some data loss.)
Pro shooters also prefer Raw to JPEG because Raw can record a greater dynamic range (spectrum of brightness values, from shadows to highlights). Additionally, JPEG files are “processed” in the camera, with characteristics such as contrast, sharpness, and color saturation tweaked to provide what the manufacturer thinks its clients like. Raw files are just that: uncooked data straight from the image sensor. The photographer then does the work of turning that data into a photo using a software tool known as a Raw converter. This gives the photographer control over the final look of a photo.
This is not to say that you should bypass cameras that offer only JPEG, however. Today's digital cameras produce excellent-quality JPEG images, unlike some of the JPEG-only models of past years. But obviously, a camera that offers both formats beats one that doesn't provide the Raw option. You may not be interested in Raw now, but as your skills grow, it may become more appealing to you.
See Chapter 4 for more details on this important camera setting.
High ISO performance (noise levels)
A digital camera's sensitivity to light is measured in terms of ISO, named for the group that developed the standards for this attribute (International Organization for Standards). Most cameras offer a choice of ISO settings so that you can increase or decrease light sensitivity as needed. In dim lighting, for example, you may need to raise the ISO in order to expose the image.
Being able to increase light sensitivity is great in terms of exposure needs, but there's a tradeoff: As you increase sensitivity, you increase the chances of introducing a defect known as noise, which gives your photo a speckled look. Figure 1-7 offers an example, with the noise most evident in the dark background of the picture. Noise is also easier to spot when you enlarge the image, as illustrated by the magnified view shown on the right in the figure.
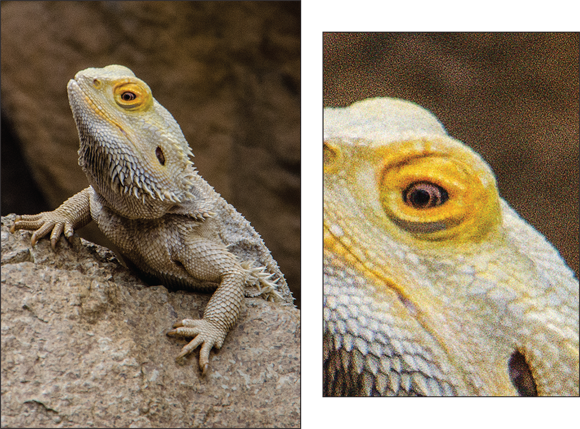
FIGURE 1-7: Using a high ISO setting can produce noise, the speckly defect that mars this image.
Today’s cameras are much less noisy than in years past. In fact, if you're using a camera that's more than a couple of years old, better low-light pictures is a perfectly valid reason to justify the purchase of a new model. But because noise levels vary from camera to camera, this is an important characteristic to study when reading camera reviews. Note, however, that a high ISO isn't the only cause of noise; long exposure times also produce noisy images, no matter what ISO setting you use.
Looking at Lenses
As your camera's eye, the lens plays a huge part in what types of photos your camera can produce. A few lens features are easy to understand:
-
Camera compatibility: Interchangeable-lens cameras require specific lens types. If you have a Nikon camera body, for example, the lens must have a Nikon mount. That doesn't mean that you have to stick with the manufacturer's lenses; you can get great lenses from third-party makers such as Tamron and Sigma. Again, just make sure that the lens offers the correct mount for your camera (or that you can make it work with an adapter).
Just because you can put a lens on a camera doesn't ensure that it can take advantage of all camera features, however. Autofocusing may not be possible, for example. Check your camera manual for details on what types of lenses support which camera features. - Optical quality: Just as with eyeglasses, having a carefully crafted lens — “good glass,” in photo lingo — is critical to image quality. Unfortunately, it's not practical for most of us to test lenses to find the best performer. The good news is that lens reviews are readily available in photography magazines and at online photography sites.
- Weight and size: Today's lenses are significantly lighter and smaller than those from even a decade ago. So if you're shooting with an older lens that's weighing you down — literally — check out the newer options. Some lenses retract into a more compact form when you're not using them, as shown in Figure 1-8.
-
Minimum focusing distance: This number is especially important if you enjoy shooting close-ups. The shorter the minimum focusing distance, the closer you can get to your subject, enabling you to fill the frame with small details.
If you're really into close-up photography, you may want a macro lens, which permits especially close focusing. Technically, the term macro means that the lens can record an object at its actual size or larger, but sometimes the label is used to refer to closer-than-normal focusing in general. Check out Chapter 7 for more tips on close-up photography.
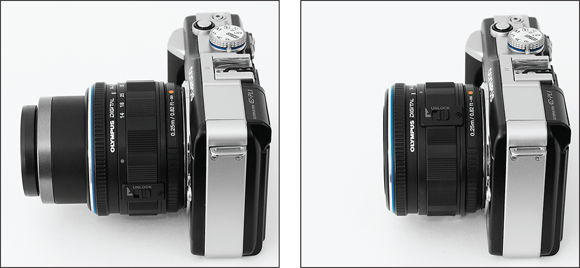
FIGURE 1-8: Some lenses collapse when not in use, taking up less room in your camera bag.
Two additional lens specs, focal length and aperture range, are a little more complicated; the next sections explain how both affect your photography.
Lens focal length
Focal length, stated in millimeters, refers to the distance from the center of the lens to the image sensor. Focal length is measured when the lens is set to focus at the farthest possible distance.
Having done my due diligence in providing the technical definition of focal length — which, by the way, isn't really important to remember unless you want to impress a roomful of optical engineers — I am now free to explain focal length in real-world photographic terms:
-
Focal length determines the angle of view. The shorter the focal length, the more subject area fits in the frame. Increasing focal length narrows the angle of view and makes your subject appear closer and larger. Figure 1-9 illustrates this fact, showing the same scene captured at four focal lengths. (A lower number indicates a shorter focal length.)
Some focal length recommendations:- Landscape photography: Look for a wide-angle lens, characterized by a focal length of 35mm or shorter.
- Nature and sports photography: Assuming that you'll be shooting at a fair distance from your subject, you need a telephoto lens, which has a focal length of 70mm or longer.
- Portrait photography: Aim for a focal length in the range of 70-135mm. At other focal lengths, facial features can be distorted. A wide-angle lens, for example, can make your subjects appear sort of like how they look when you view them through a security peephole in a door. And a very long lens can flatten and widen a face.
-
The angle of view produced by any focal length depends on the size of the image sensor. You get the stated focal length only on a camera that has a full-frame sensor — that is, one that's the same size as a 35mm film negative. With smaller sensors, the angle of view is reduced because the sensor is no longer large enough to capture the entire area that the lens can see. The resulting picture is what you would get if you took a picture with a full-frame camera and then cropped the picture. The measurement of how much frame area you lose is known as the crop factor.
Because sensor sizes vary, the crop factor depends on the camera model. Most dSLR and mirrorless image sensors have a crop factor ranging from 1.5 to 2. Figure 1-10 illustrates the image area at these crop factors when compared to the full-frame view.
To figure out what angle of view a lens will provide, just multiply the camera’s crop factor (which should be stated in the camera specs) by the lens focal length. For example, if the camera has a crop factor of 1.5, a 50mm lens gives you the same angle of view as a 75mm lens on a full-frame digital or 35mm-film camera.
-
Focal length affects depth of field. As focal length goes up, depth of field — the distance over which focus appears sharp — goes down. As an example, compare the backgrounds in Figure 1-9. Notice how much blurrier the trunk of the palm tree behind the monument appears in the 100mm image than in the versions shot at the shorter focal lengths.
What about the crop factor and depth of field? They're unrelated; you get the same depth of field from a particular focal length no matter what the size of the sensor. The image produced by a camera with a smaller sensor may appear to have a different depth of field than one from a camera with a full-frame sensor, but that's only because you're looking at different portions of the scene.
-
A prime lens offers a single focal length; a zoom lens, a range of focal lengths. For example, a lens might zoom from 18 to 55mm.
In camera or lens advertisements, the zoom range is sometimes described in terms of an “x” factor, as in a 3x zoom. Here, the x means times, with the value indicating the difference between the shortest and longest focal length of the lens. So an 18–55mm lens boasts a 3x zoom, for example (18 x 3 = 54).
As a general rule, prime lenses equate to better-quality photos because a lens can be engineered to optimal performance at only a single focal length. That said, one of my favorite lenses is the super zoom; it has a monster focal length range — 18 to 270mm. Newer lenses perform better in this regard than those manufactured in the past. - Don't bother with digital zoom. For fixed-lens cameras, note whether the lens offers an optical or digital zoom. Optical zoom is a true zoom lens and produces the best picture quality. Digital zoom is a software feature that crops away the outside of the image and enlarges the remaining area, a process that lowers image quality.
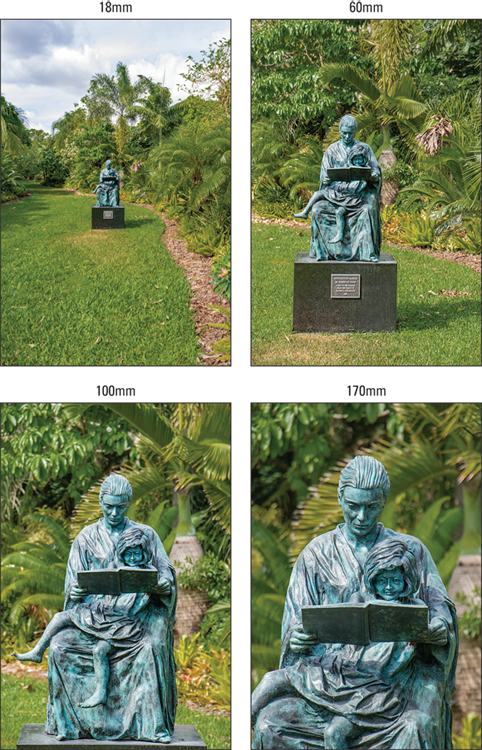
FIGURE 1-9: The shorter the focal length, the wider the angle of view.
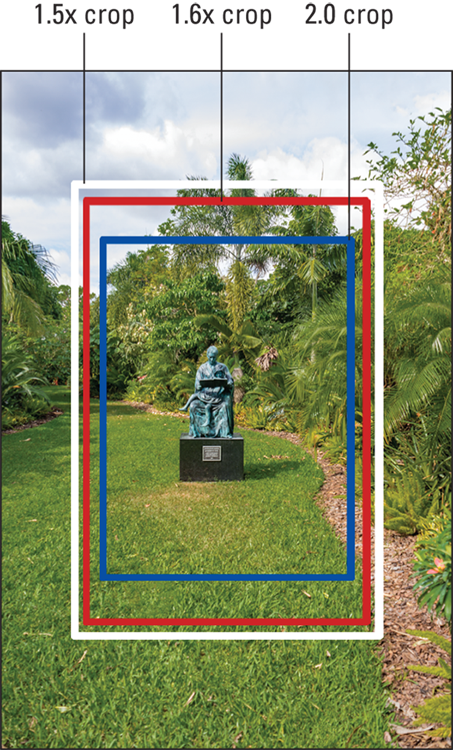
FIGURE 1-10: On a digital camera, the angle of view that can be recorded at any focal length depends on the camera's crop factor.
In most cases, the focal length is printed on the lens, but for some models, you may need to check the user manual or lens spec sheet. Often, the manufacturer gives both the actual focal length of the lens (that's the measurement mentioned in the opening to this section) as well as the 35mm equivalent.
As for cellphone cameras, finding the focal length usually requires inspecting the image metadata (hidden data stored with the digital photo file). You may be able to view this data in a photo program; visit Chapter 9 for a list of some programs to consider. For the time being, just know that cellphone cameras typically have wide-angle lenses.
Lens aperture range
The aperture is an adjustable hole through which light must pass to reach the image sensor. Aperture size is stated in f-numbers, more commonly referred to as f-stops. A higher number indicates a narrower aperture size. So f/11, for example, results in a smaller aperture opening than f/8.
Changing the aperture size is one way to manipulate exposure. But the f-stop setting also contributes to depth of field, or the distance over which focus appears sharp. The smaller the aperture, the greater the depth of field, as illustrated in Figure 1-11.
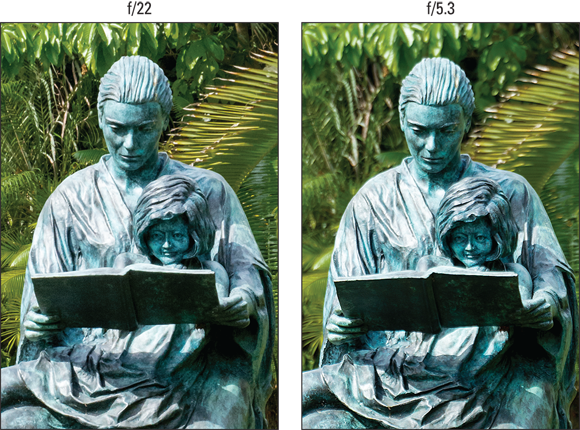
FIGURE 1-11: For these variations, I used the same focal length and instead adjusted the aperture size (f-stop) to manipulate background sharpness.
If you're keeping track, you now know that the lens gives you two points of control over depth of field: the focal length and the aperture setting. In Figure 1-11, I used the same focal length for each shot, so the aperture setting is the sole reason for the shift in depth of field.
And why, you're probably wondering, is the exposure of both images in Figure 1-11 the same, given what I just said about the f-stop affecting image brightness? This is why: When I opened the aperture, I also reduced the exposure time, so the light was able to strike the image sensor for a shorter period. I kept the light sensitivity (ISO setting) the same for both photos.
You can explore f-stops, exposure, and depth of field further in Part 2 of the book. For the purpose of comparing lenses, you need just a few more bits of aperture information:
- Every lens has a specific range of aperture settings. Obviously, the larger that range, the more control you have as a photographer.
-
The larger the maximum aperture, the “faster” the lens. Again, the more open the aperture becomes, the less time is needed to expose the image. So if one lens can open to a maximum setting of f/4 and another lens has a maximum aperture of f/2, the f/2 version is said to be faster.
A fast lens is especially beneficial when photographing action, because a moving subject blurs at long exposure times. But it also helps when you shoot in dim lighting, because you can get the shot at a lower ISO setting, reducing the chances of image noise. -
On a zoom lens, the aperture range may change as you zoom in or out. For example, on an 18–140mm lens, you may be able to open the aperture to f/2 when the lens is at the 18mm position but only to f/5.6 at 140mm.
You can buy zoom lenses that maintain the same minimum and maximum apertures throughout the zoom range, but be prepared to part with more money than for a lens that doesn't offer this feature. - Depth of field at any aperture varies depending on the size of the image sensor and lens. Cameras with small sensors and lenses produce a much greater depth of field at any f-stop than cameras with larger sensors and lenses. The result is that it can be difficult to achieve much background blurring even if you open the aperture all the way. That's an important consideration if you're interested in the type of photography that benefits from a short depth of field, such as portraiture. On the other hand, if you're a landscape photographer, you may love the extended depth of field those smaller cameras produce.
Checking Out Shooting Modes
How much artistic control a camera offers is closely tied to its choice of shooting modes, sometimes called exposure modes. Usually, shooting modes are represented by letters and symbols like the ones you see on the camera dial in Figure 1-12.
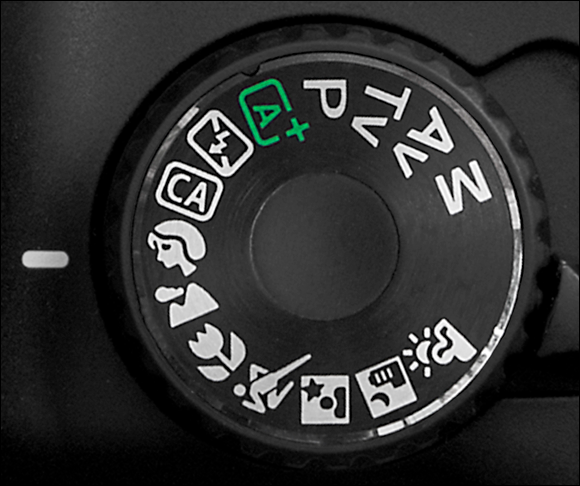
FIGURE 1-12: The various symbols on this camera dial represent shooting modes.
If you fall into the “not that into photography” category, you'd be happy with a basic camera that offers only automatic shooting modes. Along with standard Auto mode, this level of camera typically also offers scene modes, which automatically dial in settings deemed most appropriate for specific types of photos, such as portraits and sports shots.
The problem with scene modes is that they're geared to producing a certain effect, and you can't deviate from that result. For example, in Sports scene mode, the camera can only freeze action; you don't have the option of blurring motion. And in Portrait mode, the camera blurs the background as much as it can. That's fine for most portraits, but you may have times when you want the background to be as sharp as your portrait subject.
For more photographic control, I suggest a camera that offers these three shooting modes: shutter-priority autoexposure, aperture-priority autoexposure, and manual exposure. These modes enable you to precisely control not only exposure, but also all the other characteristics I discuss at the start of this chapter and more.
Check out the first part of Chapter 4 for specifics on these and other common shooting modes.
Considering Focusing Options
Digital camera focusing systems range from incredibly simple to amazingly complex. In my experience, few people need all the focus-related settings found on pro cameras. (Even fewer people understand how to adjust those settings in a way that makes sense for their subject.) But neither do I recommend a camera that offers you no control over focusing, which is the case with some cellphones and basic point-and-shoot cameras.
To help you find the right balance, here's an introduction to focusing features:
-
Focusing method (automatic and manual): Even the best AF (autofocus) systems have trouble with some subjects, such as highly reflective objects. So the option to switch to manual focusing is a plus.
How manual focusing is implemented is also important. In most cases, you adjust focus by turning a ring on the lens — easy peasy. But some cameras instead require you to select a menu option and then enter a focusing distance, which is not only time-consuming but also requires an accurate sense of how far your subject is from the camera. Still, this form of manual focusing is better than none.
- Focus point selection: Most cameras are set by default to focus on the closest object, which causes problems if that object is not your subject. Chapter 6 shows you a trick you can use to lock focus on a specific area, though a better solution is a camera that enables you to select from several focus points located throughout the frame. Some cameras (and lenses) also offer an infinity setting, which sets focus at the farthest point possible.
-
Face/eye/smile/blink detection: These features are designed to simplify portrait photography. Face detection searches the frame for a face, and if it finds one, automatically sets focus on that person, as shown in Figure 1-13. Sometimes you can choose which face in a group portrait to use as the focusing target. Models that offer eye detection narrow their search to specifically target the subject's eyes, which are of primary importance in most portraits. Taking these features one step further, some cameras offer smile-and-blink detection. In this mode, the camera tracks a subject’s face and then snaps the photo automatically when the person’s eyes are open and smile is widest.
These features aren’t foolproof; most face-recognition systems don't work unless your subject is facing forward, for example. And as for smile-and-blink technology, it does the trick only if everyone in the portrait displays wide smiles and bright eyes at the exact same moment. So the best way to ensure that you get a great-looking portrait is to snap many different images of your subject. - Single and continuous autofocusing: Single autofocusing refers to the standard autofocusing method used on most cameras: Focus is locked when you press the shutter button halfway (or tap the touchscreen). This system works fine for still subjects, but for moving subjects, you're better off with continuous autofocusing. When you use this feature, you select an initial focus point, and then if the subject moves, the camera tracks that movement, adjusting focus as necessary until you take the picture.
-
Number of autofocus points: Generally speaking, higher-end cameras have more focusing points than lower-priced models. The difference is most important when you shoot rapidly moving subjects and rely on continuous autofocusing: In this mode, your subject will stay in focus as long as it remains under one of the active focusing points. The more focus points, the better the chances of that happening.
However, because analyzing all the focusing data can slow the system somewhat, a good camera will enable you to choose how many of the available points you want to activate.
- Type of focusing points: If a camera offers cross-type autofocus points, it gets extra credit. Cross-type points improve autofocusing performance because they look for focusing information in four directions: up, down, left, and right. Normal focusing points work only in the vertical direction.
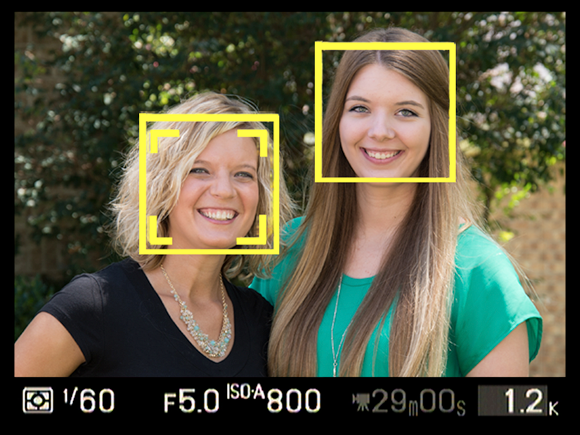
FIGURE 1-13: Face detection is a feature that automatically looks for and sets focus on a face.
Taking the Exposure Reins
Learning to control exposure is one of the most important things you can do to improve your photographs. If you're ready to take this step, you first need a camera that offers the advanced shooting modes I discuss earlier (aperture-priority and shutter-priority autoexposure and manual exposure). In addition, I recommend the following exposure-related features:
-
EV (exposure value) compensation: This feature enables you to tell the camera that you want a darker or lighter picture than its autoexposure system thinks is appropriate. It's a must-have item for intermediate and advanced shooters who want to take advantage of autoexposure but still retain control over the final exposure result. (On some cameras, you can access this feature even when shooting in fully automatic modes.)
Exposure compensation is also now provided on many basic cameras, although it may not announce itself formally. On some cellphones, for example, a little sun icon appears when you tap the screen, and you can then drag the icon up or down to adjust exposure before the shot. - Metering mode options: The metering mode tells the camera which part of the frame to consider when calculating exposure. Basic cameras use whole-frame metering, often called pattern, matrix, or evaluative metering. At times, you may want to base exposure on just one part of the frame, however. So it's important to also have spot metering, which bases exposure on a small, selected area of the frame, and center-weighted metering, which considers the whole frame but puts more emphasis on the center.
- Automatic exposure bracketing: This feature automates the process of capturing the same scene at multiple exposure settings, which increases the odds that you'll get at least one exposure that you love.
Note that this trio of exposure controls is just the start of the multitude of exposure-related features found on high-end cameras. You can read about additional features and get the complete story on exposure in Chapter 5.
Understanding Advanced Flash Options
Basic cameras — even most cellphone cameras — usually offer built-in flash and red-eye reduction, a feature that's designed to lessen the chances of red-eye in flash photos. But that's about it in terms of flash features.
Higher-end cameras offer options that enable you to control flash behavior, which is a critical part of getting the best results when photographing scenes that require artificial light. Here are the most common flash-related features, listed in what I consider the order of importance:
- Control over whether the flash fires: On some point-and-shoot models, you can use flash only when the camera thinks additional light is needed. At first blush, that restriction sounds sensible: Flash on when needed and flash off when the ambient light is sufficient. But when you're outdoors on a sunny day, you often can get a better picture by using flash, especially when shooting portraits. On the flip side, when you want to emphasize the natural light hitting your subject, as I did in Figure 1-14, you don't want flash, because it would eliminate the shadows that enhance the scene. So being able to say yea or nay to flash is essential.
- Flash exposure compensation (Flash EV): This feature adjusts the output of the flash, which is otherwise controlled by the camera's autoexposure system.
- Connection for external flash: The built-in flash on most cameras produces harsh, direct lighting that often overpowers a subject. Especially for portrait work, you can get much better results by connecting a separate flash head to the camera. The most common method is via hot shoe, which is a connection on top of a camera. As an alternative, some models can connect to a flash via a cable known as flash sync cord. You can then attach the flash head to a bracket that positions the flash to the side of the camera or simply hold up the flash by hand, depending on how you want to angle the light. (You often see wedding photographers using this type of setup.)
- High-speed flash: This feature enables you to use a faster shutter speed than is normally possible for flash photos, which is the key to outdoor portraits that feature a soft, dreamy background. To achieve that blurry background, you need a wide aperture, which lets in too much light to permit a slow shutter speed in bright sun. Part 2 of the book provides more details on this topic, but for now, just know that if your goal is outdoor portrait work, high-speed flash is essential. You also need a flash unit that supports the feature.
- Commander mode: Some flash units can be set to commander mode, which lets you use them to wirelessly trigger off-camera flashes. If your camera's flash can't perform this function, you can buy a separate commander unit that you attach to the camera's hot shoe. The benefit is that you can light your subject from any angle and with as many lights as you think necessary — you're no longer restricted to aiming a single flash directly at your subject.

FIGURE 1-14: If you want to be able to capture interesting patterns of light, as here, make sure the camera allows you to disable flash.
Investigating Color Controls
For input over photo colors, look for the following features, usually found on intermediate and advanced cameras:
-
White-balance adjustments. Digital cameras use a feature called white balancing to ensure accurate colors. In most cases, the default white balance setting, auto white balance (AWB), works fine. But problems can occur when a scene is lit by multiple light sources, so being able to manually control the setting is important.
The option to choose from a menu of specific light sources — cloudy daylight, sunshine, fluorescent bulbs, and so on — is standard on intermediate and advanced cameras and even available on many basic models. But those settings often don't get you where you need to be, color-wise, so many cameras offer ways to fine-tune white balance. Chapter 6 explains these features.
- Color space: The color space determines the range of colors a digital device can capture. The standard digital camera space is sRGB (standard RGB), which is fine for 99.9 percent of users. But for photographers who demand a little larger color spectrum, intermediate and advanced cameras usually offer a second color space: Adobe RGB. See Chapter 6 to find out why I recommend sRGB unless you have a specific use for Adobe RGB.
-
Picture Styles: This feature, which goes by different names depending on the camera, enables you to choose from several different recipes that determine how the camera “processes” your digital originals. Common styles include Landscape, which amps up blues and greens; Portrait, which warms skin tones; and Monochrome, which creates a black-and-white image. This feature affects only pictures that you shoot in the JPEG file format, and it also tweaks other picture characteristics, such as sharpness and contrast.
Oh, and don't confuse the Landscape and Portrait Picture Styles with the Scene modes that have the same names. Yeah, I know. But if manufacturers weren't so good about confusing you, I wouldn't be able to earn a living and might wind up sleeping on your couch, so… .
- Raw file capture: Okay, so this feature isn't a color control, strictly speaking. But the Raw file format, discussed earlier in this chapter, makes all the other color controls somewhat moot because you determine how raw pixel data is translated to photo colors when you process Raw files. As long as you use a capable Raw converter, you can play with color in endless ways, from choosing a white-balance setting to altering the saturation and hue of specific colors. You might make all your reds more intense, for example, or turn navy blue into medium blue.
Reviewing Other Important Features
I could write an entire book decoding all the other specifications that affect the type and quality of the pictures your camera can produce. But we'd both be bored to tears after the first few pages. Instead, the rest of this chapter lists only the options that I think make a real difference. Some are designed just to make things easier for beginners, some are geared to advanced photographers, and some can improve your time behind the lens no matter what your experience or interest level.
Viewfinder: Optical or electronic?
Cellphones and cameras that lack a viewfinder force you to frame your shots using the monitor. That causes two problems: You have to hold the camera a few inches away to see the monitor, and unless you keep your hands very steady, camera shake can cause a blurry picture. Additionally, monitors wash out in bright light, making it hard to see what you’re shooting. For these reasons, I consider a viewfinder an important bonus. But not all viewfinders work the same way, and because this component plays a critical role in your camera use, it's worth understanding the differences.
Here's a look at your options:
- Optical viewfinders: This term is used to describe a standard viewfinder — the kind that's been used for a long time in both film and digital cameras. Made from glass, optical viewfinders come in two forms:
-
Mirror-and-pentaprism (dSLR) viewfinders: In a dSLR, a tiny mirror sits in front of the shutter, the barrier that prevents light from hitting the image sensor until you press the shutter button. The mirror reflects the light coming through the lens onto a pentaprism, which is a multi-angled mirror that flips the reflected image to its proper orientation and then bounces it to the viewfinder. When you press the shutter button, the mirror flips up, the shutter opens, and the light passes through the lens to the film or sensor. The mirror flips down after the shutter closes.
This type of viewfinder is categorized as a through-the-lens, or TTL, viewfinder because the display is created by light coming directly through the lens.
-
Non-TTL (through-the-lens) viewfinders: The problem with the mirror-and-pentaprism approach used by dSLR cameras is that the assembly that makes it possible adds to the size and weight of the camera. Rangefinders and most point-and-shoot cameras instead use a different setup: The viewfinder is set above and to the side of the lens.
The disadvantage to this viewfinder setup is that it results in parallax error. Because the viewfinder and lens have slightly different angles on the world, the viewfinder doesn't show exactly what the lens will capture, making it difficult to precisely frame a photo. To help solve the problem, most cameras include framing marks in the viewfinder to guide you; when camera shopping, be sure the framing marks are easily visible. And note that not all viewfinders of this type are created equal — the amount of parallax error varies from camera to camera, so do your research.
-
-
Electronic viewfinder (EVF): In the past few years, manufacturers found another way around both the parallax problem and the bulky design of the dSLR-style viewfinder by developing electronic viewfinders. Mirrorless interchangeable-lens cameras and some point-and-shoot compacts use this type of viewfinder.
With an electronic viewfinder (EVF), the camera sends the live feed that's normally displayed on the camera monitor to the viewfinder, and because the monitor shows the same area as the lens, this viewfinder option offers the same improvement in accuracy that you get with the dSLR system. But this system has two other benefits: First, you can not only use the viewfinder to compose your subject, but you can also see everything normally displayed on the camera monitor. You can review your photos through the viewfinder, for example, and see camera menus. I love these features when I'm shooting in bright sunlight — instead of having to look for a shady spot where I can clearly see what the monitor is displaying, I simply look at the viewfinder display.
However, EVF displays vary in quality, so this is one component you should test in person. Some are amazingly crisp, looking like a high-def TV display, and others are grainy and blurry, making it difficult to compose your pictures precisely. Also, keep in mind that you usually can’t see anything through the viewfinder until you turn on the camera, which means that you can’t set up your shots without using up battery life. More importantly, most electronic viewfinders go dark for a split second between shots, which makes it difficult to follow the action when you're shooting a burst of continuous frames.
While we're on the subject of viewfinders, make sure that you can easily make out the data displayed in the viewfinder. Especially for people who wear glasses, the readouts in some viewfinder displays are too small and dim to be easily read. You also want a viewfinder that can be adjusted to your eyesight; the control in question is called a diopter adjustment.
Video-recording capabilities
Most digital cameras can record video as well as still pictures. In this book, I don't provide much video-recording information, for a few reasons: First, if all you're after is basic recording, there's not much to it: You press the Record button to start recording and press it again to stop. On the other hand, if you want to get serious about digital cinematography, you're probably after a lot more information than I have room to offer in this book.
That said, I realize that you may want a little guidance as far as knowing which video-related specs are most important, so the following sections provide a quick rundown. You can find lots of information online; one site to get you started is www.dslrvideoshooter.com. Also check your camera manufacturer's website; many offer whole sections devoted to video recording.
Video-recording specs
First up are three specs that are commonly presented together, as in “Video recording: 1080p at 30 fps.” Collectively, they tell you the resolution (frame size), frame-recording format, and number of frames per second, all of which contribute to the quality of your video. Here's the scoop:
-
Video resolution (frame size): Just like photos, digital videos are created out of pixels, and the resolution, or frame size, indicates how many pixels are used to produce each frame of video. The highest resolution found on most cameras is 1920 x 1080, known as Full HD (high definition, as in HDTV); the second highest, 1280 x 720 pixels, which is Standard HD.
Some high-end cameras, however, offer 4K video, which delivers approximately 4000 horizontal pixels and is designed for the hot (for now) new 4K displays. I say approximately because the exact number hasn't been standardized yet, so it varies from camera to camera.
Some cameras also offer a low-resolution setting of 640 x 480 pixels, which is old-school television resolution and has a screen format of 4:3, versus the 16:9 of HDTV. This setting can be useful if you want to post videos online and you need a small file size (every pixel increases that size).
- Progressive (p) versus interlaced (i): This spec has to do with the way that the video frames are created. Progressive is the more current technology and is considered better for most video-recording purposes.
- Frame rate: This value indicates how many frames the camera records per second, which affects the look of your movies:
- 24 fps: The standard for motion pictures; gives videos a soft, movie-like look.
- 25 fps: The standard for television broadcast in countries that follow the PAL video-signal standard, such as some European countries. It gives videos a slightly more “real-life” look.
- 30 fps: Resulting in even crisper video, 30 fps is the broadcast standard for the United States and other countries that use the NTSC signal standard. It's the default setting for cameras bought in those countries, too.
-
50 and 60 fps: These super-high frame rates are designed for capturing very fast action as well as for shooting footage that you want to play in slow motion. (More original frames delivers smoother slo-mo playback.)
How about 50 versus 60? You’re back to the PAL versus NTSC question: 50 fps is a PAL standard, and 60 is an NTSC standard.
- 120 fps: A few cameras raise the frames per second bar even higher. Again, the purpose of this high frame rate is for creating slow-motion footage.
Most cameras offer at least two or three combinations of frame size and frame rate, but newer models often don't offer interlaced recording. That may be a problem if you want to shoot new footage and edit into existing interlaced footage; otherwise, don't sweat it.
Other recording features
Also take note of these other video-recording options:
- Audio features: Built-in microphones on most cameras produce so-so audio quality. For better audio, some cameras allow you to attach an external, higher-quality microphone.
- Continuous autofocusing: Most new cameras can track focus during recording, a capability that was missing until a couple years ago. However, one issue still exists on most cameras: If you use the camera's internal microphone to record sound, you may be able to hear the sound of the autofocus motor doing its thing when you play the movie. If the camera offers a jack to attach an external mic, problem solved: You can position the mic far enough from the camera to avoid picking up the focusing sounds. Of course, on interchangeable-lens cameras, you can forego autofocus and focus manually, but it takes practice to be able to adjust focus manually without creating noticeable camera movement.
- Movie length: Digital cameras typically limit you to fairly short video clips — anywhere from 4 to 30 minutes — even if the memory card in the camera isn't full. You can start a new recording when one ends, but you then have to stitch them together in a video-editing program. Check the camera manual to find out the maximum movie length you can record; the answer changes depending on what resolution and frame rate you use to record the movie.
Memory-card features
Instead of recording images on film, digital cameras store picture data on removable memory cards. Most cameras can hold only one card at a time, but a few, like the model shown in Figure 1-15, have two card slots. This feature is great because you can configure the two cards to perform different storage functions. You can put all your Raw files on one card, for example, and JPEG files on the other. Or you can send all files to both cards so that if one fails, the other provides a safety net.
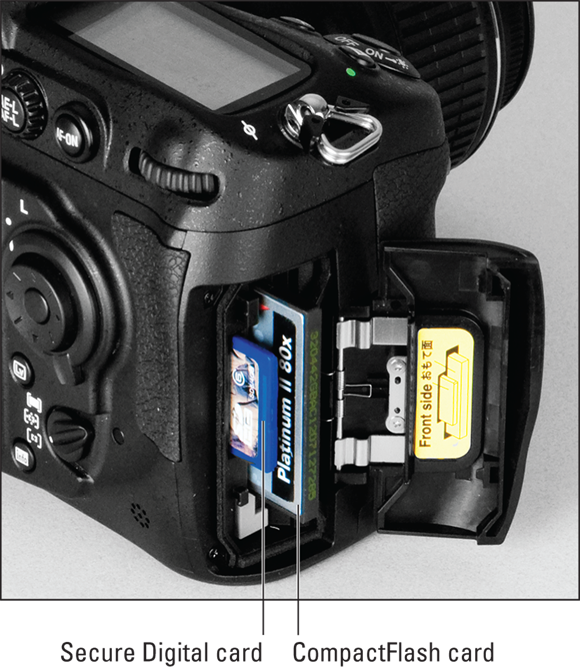
FIGURE 1-15: Having two card slots provides more storage capacity and flexibility.
As for card type, most cameras use either SD (Secure Digital) or CF (CompactFlash) cards, which you can see peeking out of the front and back card slots in Figure 1-15. Some high-end pro cameras accept new card types, XQD and CFast, both of which are designed for high-resolution, high-speed shooters. Some cellphones and tablets enable you to store files on a Micro SD card, which is a miniature version of an SD card.
Although I would never choose a camera based on what type of card it uses, it is important to know what card speed the camera supports. A model that supports high-speed cards can write picture data to the card more quickly, enabling you to capture more frames per second and record smoother videos. Also note that some features provided on the latest cameras aren't compatible with old, slow cards.
Manufacturers use a variety of terms to specify card speed, and those terms vary depending on the type of card. Rather than bore you with an explanation of all the various speed specs, I'll keep it simple: A higher number means faster performance. Check your camera manual to find out which speeds it supports, and then buy the fastest card your budget allows. (Yes, prices go up along with speed.) Memory cards also vary in capacity; again, check your camera manual to find out how large of a card it can accept. If you're using an older camera, it may not be able to use today's super-capacity cards.
Convenience features
No matter what category of photographer you consider yourself, I rank the following features as not critical, but nice to have:
- Articulating (adjustable) monitor: Some cameras, such as the Canon model shown in Figure 1-16, feature fold-out screens that can be rotated to a variety of angles. The benefit is that you can position the camera at nearly any angle while still being able to see the monitor. When not using the monitor, you can rotate it so that the screen faces the back of the camera, providing an extra degree of monitor protection.
- Touchscreen operation: Of course, all smartphone cameras can be operated by touch, as can the phone's picture-playback tools. But touchscreens are being included on many other types of digital cameras as well. I originally thought touchscreens were a gimmick not worth the additional cost they add to a camera, but having used them for a while, I've changed my tune. They do make many camera operations easier, especially scrolling through pictures in playback mode and selecting options from menus.
-
Remote control shutter release: Being able to trigger your camera's shutter release with either a wired or wireless remote control comes in handy for a couple reasons. You can secure a camera on a tripod near your hummingbird feeder, for example, and then step away to avoid spooking any birds that come by, triggering the shutter release from afar. Remote control functionality also is great for long-exposure shots because you don't have to physically press the camera's shutter button, which can jog the camera just enough to introduce a slight blur.
Some cameras enable you to use a smartphone or tablet to trigger the shutter release. For more about remote controls, visit Chapter 10. - Wireless connectivity: If you buy a camera that offers wireless connectivity, you can enjoy the cable-free life when it's time to download pictures or share them online. Some models are designed to connect to a standard wireless network (such as one you may have set up to allow everyone in the house to access your Internet connection). Others offer NFC (Near Field Communication), which means that you can set the camera next to another NFC-enabled device, such as a tablet, and the two can connect on their own independent wireless channel. For more about this feature, see Chapter 9.
- In-camera editing tools: Many cameras offer built-in retouching filters that can fix minor picture flaws, such as red-eye or exposure problems. For easier online sharing, you also may find in-camera options that create low-resolution copies of high-res originals and convert Raw files into the JPEG format. (You have to convert Raw files to JPEG in order to share them online.) These tools are especially helpful for times when you need to print or share a photo before you can get to your computer to fix the image in your photo software or create an online version.
- GPS tagging: Have a hard time remembering — or proving — where you've been? Some cameras offer built-in GPS (global positioning satellite) technology that can tag your pictures with the location where you shot them.
- Video-out capabilities: If the camera has a video-out port, you can connect the camera to a television and view your pictures on a TV screen. Some cameras offer both standard-definition and high-definition (HDTV) output; you may need to buy the necessary cables, however.

FIGURE 1-16: Some monitors can be adjusted to different viewing angles.
So … Is It Time for a New Camera?
Summing up all the details in the preceding sections, the answer is “Maybe.” Consider investing in a new model if any of the following statements apply:
- You’re not happy with the quality of your printed photos.
- You have trouble capturing action shots because your camera is a slow performer.
- Your pictures appear noisy (speckly) when you shoot in dim lighting.
- You’re a serious photographer (or want to be) and your camera doesn’t offer exposure control, Raw image capture, a flash hot shoe, or other advanced features.
- Your current camera is so big and heavy that you often leave it behind — and when you do take it along, your neck and back start to hurt in no time.
Of course, some cameras address these issues better than others, so again, be sure that you read reviews on any new model you consider. Also consult with the salespeople at your local camera store, who can point you toward cameras that best solve the picture-taking problems you’re experiencing.