Chapter 7
Mastering the Light
IN THIS CHAPTER
![]() Seeing what makes up light
Seeing what makes up light
![]() Knowing the secrets of light sources
Knowing the secrets of light sources
![]() Managing white balance
Managing white balance
![]() Making the most of light
Making the most of light
Light defines how we record the world and communicate ideas through movies. But not just any light will do, so don’t expect it to transform your GoPro movie into anything spectacular unless it’s appropriate for the scene. Have you ever been in an old house that uses dingy fluorescent tubes for bathroom illumination? If so, you know that the light makes you look like an alien — not just any alien, but a sick one. Compare that with your appearance in a mirror adorned with an array of soft tungsten bulbs. Now, that’s better.
It’s important to think of light much in the same way that a painter thinks of paint. She doesn’t throw it on haphazardly (unless her name is Jackson Pollock). Instead, she applies color very deliberately, creating both form and detail. Great lighting shares this idea and provides an intoxicating mystique to a scene.
Understanding the intricacies and physics of light can help you master it. This chapter is all about light.
Seeing the Color and Temperature of Light
Ever wonder why the picture of your cat on the living-room couch had a yellow cast or what caused Uncle Freddie to look so blue that he looked like he needed some resuscitation? Funny things can happen when the color isn’t quite right. Sometimes, we can live with it; at other times, it’s a challenge. Though many scenes captured on a GoPro thrive on excitement, the color should nonetheless appear natural.
The good news: Odd color isn’t a flaw in the camera. The bad news: The camera wasn’t set properly to capture the color temperature of the light source or the automatic white balance was fooled. Then there’s the beautiful news: Some scenes have a wide range of color temperature that render the image unexpectedly stunning (see Figure 7-1).
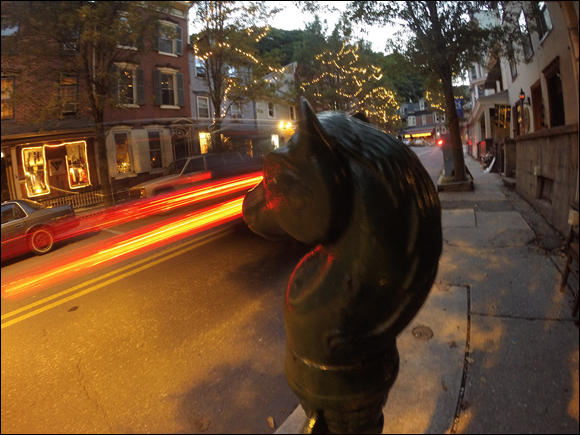
FIGURE 7-1: Automobile light trails at twilight create this unique mix of color.
Taking color temperature
Our brains can differentiate color, but we may not notice when a shadow looks a little blue or when there’s a limited spectrum of color. When you capture a scene with a camera, however, colors become quite apparent, because different light sources have their own ways of producing color.
If you view a piece of white paper under lights ranging from an indoor light bulb to the midday sun, you still see it as white. That’s simply a function of your visual memory. The camera will record it as white, too, but it may render it with a blue or orange tinge, because the color temperature of the light may differ from what the camera is set to record.
 Celsius and Fahrenheit temperatures help you determine what to wear when you leave the house; Kelvin temperatures (K), however, measure light. Kelvin color temperatures range from candlelight at 1800K to overcast sky at 11000K.
Table 7-1 lists color temperatures in Kelvins for a few common light sources.
TABLE 7-1 Color Temperatures
Light Source | Temperature in Kelvins (K) |
Candlelight | 1800K |
Rising or setting sun | 2200–2800K |
Incandescent household bulb | 2800K |
Tungsten light | 3200K |
Daylight | 5500K |
Sun on overcast day | 6000–8000K |
Shade | 7000K |
Cloudy day | 8000–10,000K |
Understanding white balance
White balance refers to setting the camera to record light at its proper color temperature. Simply put, a camera renders a white piece of paper as white when its white balance is set properly for a specific type of illumination. Many cameras, including the GoPro, adjust to the proper setting automatically, but unlike with Mother Nature, automatic settings are often fooled.
One way to counteract disparity in color is to set white balance on the camera to match a specific situation. I cover this topic in more detail in “Setting White Balance” later in this chapter.
Shooting Under Different Light Sources
We humans see light as the antidote to darkness, but we’re often oblivious to its physical properties, such as direction, harshness, and color temperature. Our visual memory kicks in, and the only criterion is seeing what we need to see.
A camera, however, has no visual memory. Instead, it relies on its settings. Like Mr. Spock from Star Trek, it deals with color and exposure in a logical way. But even when you set the GoPro on automatic and let it adjust to each circumstance, success isn’t guaranteed. Sometimes, a scene reproduces with a color cast, which may not match other scenes. You may have a bluish tint on one shot and a cyan cast on another.
Although the GoPro has a fairly intuitive automatic white balance (see “Setting White Balance” later in this chapter), an important part of mastering GoPro moviemaking is understanding the behaviors of different kinds of light.
Sunlight
The primary source of light on the planet resides an average distance of 93 million miles away. The sun provides summer pleasure, vitamin D, and sometimes redistributed energy, and did I mention it’s also the recorded image’s best friend.
When you’re making movies outdoors, the quality of sunlight changes continuously throughout the day with regard to both intensity and color. If you were to start shooting at daybreak, for example, you’d reap the benefits of soft morning light, often referred to as the Golden Hour. for its flattering illumination. That means early morning light renders much warmer than the daylight setting on your GoPro (5500 K; see “Taking color temperature,” earlier in this chapter), so it reproduces as an orange glow on the subject. It’s also coming from just above the horizon, so it’s not lighting the subject from overhead.
Even though light still flatters the subject a couple of hours into the morning, the quality of illumination begins to transform as the sun gets higher. High noon puts the sun directly overhead, producing far less warmth and harsher illumination.
Some days, the clouds roll in, making the afternoon overcast. That type of light isn’t great for the beach but not too bad for shooting a movie, thanks to the nicely diffused illumination. It lacks the warmth of early morning light, but you could tweak it in postproduction.
Later in the day, when the sun breaks through the clouds, the color balance of the scene takes on the warmth of early morning, but in the reverse direction (see Figure 7-2).
FIGURE 7-2: Beautiful light from late-afternoon sun.
Clearly, shooting outdoors covers a wide range of color temperatures. It’s vital that you make manual adjustments when necessary, as I discuss in “Bathing in sunlight” later in this chapter.
Household lights
When it comes to indoor moviemaking, most of the time you’re going to shoot under household lighting conditions. But the game has changed with the incandescent light bulb we all knew, loved, and occasionally burned our fingers on being phased out. In its place, more economical light forms are taking over. Some share similarities with formerly bulbous light sources, while others have their own qualities.
CFL bulbs
Until very recently, most lamps used incandescent bulbs (discussed later in this chapter), but these days, you’re more likely to see compact fluorescent light (CFL) bulbs than many other types of illumination, including illuminated signs, like in Figure 7-3.
FIGURE 7-3: CFL bulbs inside bring this translucent red sign to life.
CFLs are so common now that you can find them almost everywhere, but they have many variations, which makes it hard to nail down the exact color temperature of each one. Because they produce light differently from incandescent bulbs, they’re not very predictable when it comes to shooting your movie. Instead of heating a filament to burn brightly, they produce light through a jolt of electricity that excites vapor in the tube, sharing behavior with their taller cousin, the fluorescent tube.
But ingenuity is a wonderful thing. Because these lights are so popular and cheap to operate, they’ve been engineered to create various light settings, including a full spectrum of color. That makes them great for lighting television and movie sets.
LED bulbs
Watches, scoreboards, and televisions use it, and now so does the lighting in your home. The LED lamp is quickly becoming one of the most efficient forms of artificial light on the planet. Consisting of an array of light emitting diodes, they collectively form illumination in places where bulbs used to reside.
An interesting quality about some of these light forms is that the same bulb can create any color you like, and can be controlled from your smartphone or device. They screw into lamps and fixtures, and can be combined to make any combinations of colors you choose.
On the bright side (pun intended), LED lighting offers the most control over the light. Conversely, it is more expensive and does not provide a high light output.
Halogen bulbs
A true incandescent light source, these lamps offer a high output and naturally produce a full spectrum of color that generally matches tungsten.
Halogen bulbs are found in many places, including automotive headlamps, projector bulbs, and studio lighting. While they usually don’t resemble a traditional household bulb, some types now include a screw base for use in lamp and fixture sockets.
These lamps have a wide variety of uses and come in various sizes and types. On the downside, they get very hot and are sometimes used for heating purposes. Ever hear of a halogen oven?
Incandescent bulbs
Incandescent light bulbs are traditional light bulbs, the ones that appear above cartoon characters’ heads whenever they have a great idea. Brightness varies from 25-watt appliance bulbs to the 60-, 75-, and 100-watt bulbs used in reading lamps. Flood lighting can go to 150 watts, but generally anything equivalent to 65 watts is more common.
Currently, incandescent bulbs are being phased out, but people have stocked up on them. Incandescent illumination is shown in Figure 7-4.
FIGURE 7-4: While you should never stick your GoPro in a heated oven, this simulated photograph shows illumination from an incandescent bulb. Do not try this at home.
Fluorescent lights
Tubes of light seem like perfect ways to deliver illumination. These long, bright sticks are efficient, effective, and used everywhere from basements and garages to factories and offices. They make light through a jolt of electricity exciting vapor in the tube. While generally not ideal for shooting a movie, there are numerous types engineered to produce a full spectrum of color. Some are even used for television and movie lighting. Here’s what you need to know:
- Daylight-balanced tubes: While comparatively lower in output than an incandescent bulb, they offer mass illumination. Sometimes four separate tubes can produce the same output, albeit by using a wider, more collective approach.
- Mixed lighting makes a good picture: Look at any office building and notice the variations in color cast. Lighting your movie with tungsten and allowing the variations of fluorescent light in the background produces a complementary cast that works to your advantage.
- Not a harsh bone in its, the subject’s body: Because illumination comes from a wide bank of soft lamps, it produces a nice soft illumination. As a result, it hides minor blemishes, making many actors fans of it.
- No heat buildup: There’s a reason these are also known as “cool lights.” Trust me, they’re a welcome alternative, especially when using a multiple light tungsten setup in the studio or location area. Fluorescent illumination doesn’t create excess heat, and you can touch the bulbs.
Candlelight
If the sun is the Big Kahuna, candlelight is the little guy. It’s the warmest and least powerful light source (below 2000 K; refer to “Taking color temperature,” earlier in this chapter) range, and by itself, it can barely cover a foot. But candlelight is still light. A group of candles can illuminate a whole scene, lending it a warm and cozy feeling. Because the GoPro gets very close, it can work nicely for candlelit scenes.
Neon lights
Iconic neon signs such as “Bar” are glass sculptures with illuminated colored light running through their tubes. Neon is reminiscent of the night, and can render the scene with a cool tone, if not for its dominant color.
Outdoor lights (HID)
Lighting up the night takes a lot of power, and that can get expensive for whoever pays the bill. So, the goal in illuminating massive spaces is producing the most light for the least money. Many government agencies and businesses use a special kind of outdoor illumination: high-intensity discharge (HID) lights.
Like CFLs (see “CFL bulbs,” earlier in this chapter), HID lights excite a gas inside a glass tube, producing cheap, bright light. They come in three varieties:
- Sodium vapor: What you regard as a streetlight, lighting experts and city designers know as a sodium-vapor lamp on a pole. Look closely, and you’ll notice that its light has a yellowish cast (see Figure 7-5).
- Mercury vapor: Mercury-vapor lamps are far less flattering to most subjects than sodium-vapor lamps are, because they produce greenish illumination from exciting mercury gas. This color makes them problematic when it comes to video. When it comes to producing the most economical illumination, these guys are great for parking lots, garages, and even some school gymnasiums. On average, they have a color temperature of about 4200 K (see “Taking color temperature,” earlier in this chapter).
- Metal halide: Like the other HID lamps, metal-halide lamps produce light by exciting weird gases, but unlike those lamps, they also produce a full spectrum of color. And the reason for their hybrid nature? Metal-halide lamps are used to light many outdoor stadiums, and nobody wants to see anything but the richest, most saturated color when watching football on a big screen TV.
FIGURE 7-5: Sodium-vapor street lamps leave a dominant color cast.
Setting White Balance
If you’re feeling adventurous or simply want to control the color temperature of a scene on your GoPro, feel free to change the White Balance setting. By default, your GoPro is set to Auto, but you have other options, including these:
- Auto: Adjusts automatically to the color temperature of the light source.
- 3000K: Works well for capturing indoor scenes.
- 5500K: Lets you manually balance color outdoors.
- 6500K: Matches the color temperature of moderately overcast skies and some forms of fluorescent lighting.
- Camera RAW: Records a RAW file so you can adjust the color temperature during the postproduction process (see Figure 7-6).
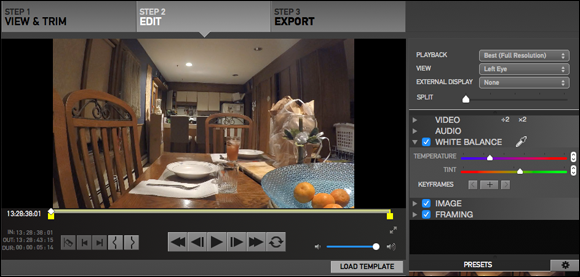
FIGURE 7-6: Color correction in GoPro Studio Edit.
Here’s how you can change the White Balance setting:
Press the Power/Mode button to scroll through the menus until you get to the Settings menu.
The Settings menu’s icon looks like a wrench.
- Press the Shutter/Select button to select Settings.
Make sure Protune is on.
Otherwise the White Balance menu will not be visible.
Scroll until you get to capture settings.
Enter it by pressing the Shutter/Select button.
- Go to the White Balance option.
- Use the Shutter/Select to select one of the following options: Auto, 3000K, 5500K, 6500K, or Camera Raw, and press the Power/Mode button to set it.
Working with the Light You Have
Because many action sequences take place outdoors, you need the sun for illumination. That big, flaming ball of fire in the sky offers bright, diverse, and complimentary illumination. It not only flatters the subject, but it’s also free. But that doesn’t mean there isn’t a slight price to pay. It’s a passive light form that leaves you with no control over it, and you just must accept its direction of light, the shadow it creates, or its light quality. Seems like a fair price to pay when you consider what you get in return.
One day, the light renders warmly against a rich blue sky, and the next day it’s completely different. Sometimes the background sky renders palely; other times it’s completely overcast. The sun is always in the sky, but that stuff in between — you know the clouds and haze — can affect what the sun can do on a predictable basis.
Consider the following:
- Watch out for lens flare: Because the GoPro is so wide, there’s a greater possibility for lens flare. That means you need to be careful.
- Try to use sunlight from a lower angle: This creates the most flattering illumination, and it’s generally warmer too.
- Avoid overhead light: When the sun is beating straight down on the subject, it’s not flattering and creates harsh shadows.
- Take advantage of an overcast day: Direct sunlight is sometimes harsh on the subject because it skims across the face and creates shadow and texture. Most people don’t like it. Clouds come between the sun and the subject and act as a diffuser, presenting the subject in a more flattering illumination, as seen in Figure 7-7. Just watch out for white patches of sky.
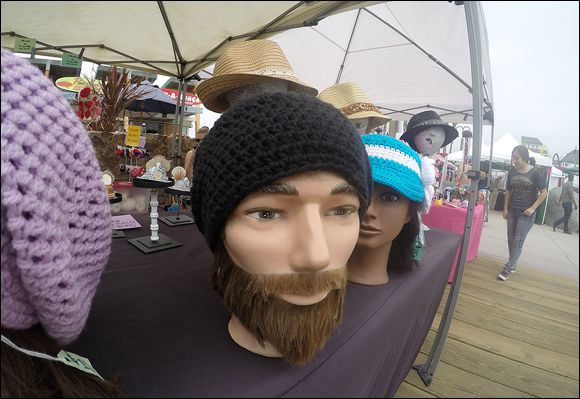
FIGURE 7-7: An overcast day provides even illumination for this hipster head, and can put you ahead of the competition.
Bathing in sunlight
 Here are a few ways to make the most of sunlight:
- Work the angles. I don’t mean working the angles in a grifter sort of way; rather, I mean catching sunlight from different angles.
Shoot early or late. Sunlight becomes more intense as the sun rises higher in the sky, and color temperature increases as the day goes on. A sunny-day color temperature is about 5500K (see “Taking color temperature,” earlier in this chapter) when the sun reaches its highest point. The temperature gets warmer as dusk approaches.
Whenever possible, it’s best to shoot your movie early in the morning or late in the afternoon. At those times, the sun is at an angle that produces the most flattering illumination and the warmest tone (refer to Figure 7-8).
- Take advantage of clouds. Although it can be beautiful, direct sunlight can also produce harsh illumination. Most people don’t like being photographed in full sunlight. But cloud cover between the sun and the subject works like a giant diffuser, bathing subjects in more-flattering light.
- Avoid shooting at noon. High Noon is a great title for a movie but not a great time to shoot it. When the sun is beating straight down on the subject, it’s not flattering and creates harsh shadows.

FIGURE 7-8: Shot from an overhead position late in the afternoon, this construction site emphasizes soft color and even illumination.
Managing artificial illumination
When the sun decides to call it a day, the nightscape comes to life, and individual forms of artificial lighting don’t play by the same set of rules as the sun. There are many types of artificial light, each with its own behavior (see “Shooting Under Different Light Sources,” earlier in this chapter). Here are a few potential problems of shooting under artificial light:
Annoying color casts: Not all light sources produce a full spectrum of color, especially HID lamps (see “Outdoor lights [HID],” earlier in this chapter), which you’re likely to find on a city street or country road. Depending on the way the light source produces light, the scene can render with a yellowish or cyan tinge.
 The good news is that a meticulous white-balance setting can eliminate a color cast; the bad news is that it may deplete the scene of all color. HID lights produce a single color, so when you correct the bad color, no others are left.
- Unpredictable results: Sometimes, you don’t notice the effect of color or contrast on your smartphone’s screen until it’s too late.
- Harsh shadows: Contrasty, splotchy light creates shadows that can wreak havoc. When you adjust for these shadows, the highlights may blow out. Fix the highlights, and the middle tones become shadowy.
In the following sections, I show you how to solve problems with several types of light sources.
Working with incandescent bulbs
It’s possible to use an array of incandescent bulbs to light your movie, but their effectiveness depends on a variety of factors, including wattage, placement, and positioning. Some tips on working with incandescent bulbs follow.
- Move it from the subject. It’s hard to get more basic than simply moving the light away, especially if it’s a lamp.
- Reduce its brightness. If it has a dimmer, turn it down. Other options include using a neutral density gel filter over your GoPro or trying a lower-wattage bulb.
- Remember that fall-off happens quickly: When the subject is relatively close (but not too close) to the light source, you can capture adequate exposure. But the range of light doesn’t go very far.
- Watch for hot spots. Because the camera covers such a wide angle, it’s nearly impossible to keep the actual light out of the frame. Monitor it from the GoPro App to compose the scene so the light is either out of the picture or doesn’t ruin the scene.
Coping with CFLs
Here’s what you need to know about which CFLs can work to your advantage and which ones to avoid:
- Hot it’s not: Fluorescent illumination is considered a cool light form because it doesn’t create excess heat. Not only does this mean you can touch the bulbs (if you were so inclined), but also they keep the room from getting unbearably hot. That makes illuminating the subject from a nearby CFL far more bearable.
- Be careful of the color: While many CFL bulbs provide the characteristics of a traditional household bulb, some behave more like economical fluorescent tubes. That means a dim greenish cast that looks terrible when recorded. Use your eyes to help judge the quality of light.
- Hot spots need not apply: While lighting found around the home is not incredibly bright, it can still produce spectral hot spots (bright light reflections) either because the light source is in the scene, reflecting on a bright surface, or flaring into the lens. It’s imperative to use your smartphone to monitor the scene when using GoPro indoors.
Making the best of fluorescence
Old school fluorescents produce a sickly green light, but when combined on the scene with light sources of other color temperature, it suddenly becomes just another part of the scene. Look at any office building and notice the variations in color cast. Consider the following:
- Try to work with daylight-balanced: While far less bright that an incandescent light bulb, illumination from a mass array of fluorescent tubes produces adequate lighting by using a wider, more collective approach.
- Take advantage of mixed light: Lighting your movie with tungsten and allowing the variations of fluorescent light in the background produce a complementary cast that works to your advantage.
- Take a white balance: Or at least see how your GoPro treats it on the automatic setting. Fluorescent lighting differs with color output; even when the lighting looks good to the eye, it may not reproduce as naturally as you may like.
Capturing candlelight
Take the following pointers into consideration when you work with candlelight:
- Be careful. It’s worth repeating that a candle is a fire, and fire can burn.
- The subject is light. A candle is one of the few light sources that you can keep in a scene without hoping that people think you’re just being “ironic.” Candles make great props as well as lighting the scene. For a table scene, measure the exposure from the candle, and don’t worry too much if the subject is a bit underexposed.
- There’s strength in numbers. A single candle usually isn’t enough to light a scene, but a group of them becomes a force to reckon with. Use a candelabra or multiple candleholders to create soft, warm illumination.
Loving the way that neon glows
Here are a few ways to work with neon:
- Use a wide range of exposures. Neon light is quite flexible when it comes to exposure. Underexpose it to get rich, saturated color. Overexpose it to open the ambient portions of the scene without losing much color from the lamp.
- Establish the location. Think about neon as a scene-setter. Just about any neon light can establish a scene, including a sign for a restaurant, hotel, or bowling alley.
- Take advantage of reflections. These colorful lights aren’t overly bright, but they reflect their rich colors on nearby surfaces. The effect is exponentially powerful when a neon sign is reflected on a rainy sidewalk.
Handling HID lights
HID light is great for finding your car keys in a parking lot or looking at city landmarks at night, but it’s terrible for making movies.
Now, I said terrible, not impossible, because there are ways to take advantage of HIDs. Here are some ways to make this type of light work for you:
- A little goes a long way. Instead of trying to fully correct the color, just reduce it slightly. You’ll still have a color cast, but it won’t be overwhelming anymore. The footage can pass for a street scene, especially when you have supplemental light coming from stores, neon signs, or the taillights of passing cars.
Shoot at twilight. Twilight still has ambient light and a variety of colors, including a purplish sky that looks great when you position your subject against it (see Figure 7-9).
Because a sodium-vapor lamp’s illumination is created by excited gas, there’s nothing left to do after you correct the color. So, if you take a white balance of the scene, use a blue filter to neutralize the yellow cast, or attempt to correct it in postproduction, all that would remain is a monochromatic rendering of the subject. Unlike an incandescent light source that can be color corrected thanks to its full spectrum of color, these light forms only produce a single color. It you had to place a color temperature on this type of lamp, it would be comparable to tungsten, making it around 3000K.
FIGURE 7-9: The color cast of sodium vapor illumination is countered by the coolness of twilight.
It’s a good idea to take a white balance under metal-halide light. Depending on the specific type of lamp, color temperature can range from 3000K to 6000K or higher (see “Taking color temperature,” earlier in this chapter). Check and reset the white balance often.
Creating Your Own Light
Because natural light (the sun) isn’t always around, and artificial light leaves you in a passive role, bring your own light to the scene. The pros have done that since the early days, because using their own lights allows them to actively control light direction, intensity, and color temperature. Now you can do the same.
Lighting a scene can be as simple as using a single bulb and reflector or as elaborate as employing a light kit with soft boxes, umbrellas, stands, and booms. As long as you have some way of lighting the scene and can keep the lights out of view from your GoPro, feel free to light it up.
Basic lighting
Lighting a scene means using the right materials in the right way. The way you light your scene can help establish what you’re trying to say without the audience’s noticing a thing. Viewers absorb the movie as a whole, with lighting, action, and sound quality working together to sustain their attention.
Here are the basic lights you might use:
- Key light: As the name implies, the key light is the main source of light in a scene. Whether that light is the sun, an outdoor lamp, or your light kit, its main job is to illuminate the subject. If you place the main light at a 45-degree angle from the subject, half of the subject renders in shadow, which can be quite dramatic.
Fill light: The fill light illuminates the subject from the side not affected by the main light. Depending on the subject, you can position the fill light at a higher or lower angle than the subject to fill in the shadow areas. The fill light can also be a reflector that redirects illumination from the main light. When you’re shooting outdoors, the fill light may be a large white reflector bouncing sunlight back on the subject.
 Just make sure that the fill light doesn’t overpower the main light.
- Back light (or hair light): With the front of the subject adequately covered, you use back light to add depth to the scene and separate the subject from the background. Position this light high and off to the side, at a 45-degree angle from the subject.
Tungsten lighting
Tungsten lights are used for professional lighting in the studio and on location. This type of bulb produces light by heating the tungsten filament inside until it glows (see Figure 7-7). Studio tungsten bulbs can go as high as 1,000 watts and generally produce a color temperature of 3200 K (see “Taking color temperature,” earlier in this chapter).
Tungsten lighting comes in many forms, including the icon giant lights used on movie sets. Some tungsten lights use a glass lens called a Fresnel (developed for use in lighthouses) that maximizes the light’s potential. Studio lighting uses a combination of Fresnel lenses and reflectors to concentrate light on the subject. These lights produce a full spectrum of color like the sun and can be moved wherever they’re needed.
Nonconventional lighting
Conforming to conventional lighting is a fundamental concept of moviemaking. But what about using nonconventional lighting? You can improvise with just about anything that emits light, such as the following:
- Work lights: You may have seen work-light kits at home-improvement superstores. The lights use some form of tungsten bulbs; many kits have stands and reflectors. The light is harsh but easy to smooth out by finding a creative way to diffuse it. The kits are cheap — a bonus if you’re on a limited budget.
- Flashlight or lantern: These light sources aren’t as unbelievable or impractical as you may think. They’re self-contained, low-intensity light kits that you can use in a jam or for some creative effect.
- Television screen: If the subject is close to a television set and the GoPro is close to both, it’s hard to imagine a softer, more interesting light source than the TV screen. Just tune the set to a nonbroadcast channel and position the subject close to the screen.
- Glow sticks: They’re not bright enough for illuminating a scene, but they often work in situations in which the subject is light. Not only do they provide illumination, but their intense, saturated color makes for a great subject too.
Using Light Effectively
Like many things in life, shooting under the right lighting conditions depends on the time of day, your ability to think on your feet, and recognizing the opportunity. It’s important to understand how light behaves so you’re ready to effectively capture the subject. Here’s how to use light effectively.
Wait for the right light
The sun flatters subjects early in the morning and early in the evening; in the middle of the day, it’s not as effective. It’s best to shoot with your GoPro either in the early morning or later afternoon, as shown in Figure 7-10.
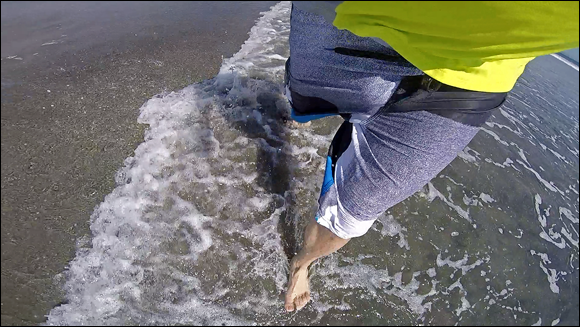
FIGURE 7-10: Perfect lighting for a late afternoon beach run.
Once the sun goes down you have twilight — that narrow span of time between sundown and dusk. The sun is below the horizon but still emits some light providing a “sweet spot” thanks to its rich blue or purple background. But twilight lasts only 20 minutes or so, so you have to act fast.
If you have time, wait for the right light. You have only a short window of time to make the shot work.
Work with the light you have
Color casts aren’t intrinsically bad, and sometimes, they have a place. The normally unflattering cast of a mercury-vapor lamp can emulate an otherworldly experience, for example, just as a street scene lit with sodium-vapor can lend warmth to a subject. (I cover both types of lighting in “Outdoor lights [HID],” earlier in this chapter.)
When the sun goes down, artificial light dominates the scene. Sometimes it does so in an unflattering way, with each light source producing a dominant color of illumination. Separately, this artificial light is problematic because it produces a single-color cast. But when you combine artificial light sources, they collectively show various colors. Put artificial light against a twilight sky, and you have something unique and often beautiful.
Use colored gels
Gels work wonders when you want to adjust the color of a scene, do something creative, or make a statement. You can use a colored gel over a light to spice up the background.
Avoid light pollution
Pollution doesn’t apply just to dirty beaches and belching factory pipes; it also refers to the interplay among lights in a scene. One light can spill to the coverage area of the next, producing hot spots, color variations, and odd shadows. In addition, it’s likely to create lens flare (see the nearby sidebar) because the GoPro captures such a wide view.
In a perfect world, having the light at your back is the ideal way to use a GoPro, but it’s not always possible to do so. That’s why it’s important to strategically place your camera and monitor the scene before recording to prevent light pollution.
Light the scene efficiently
Sometimes, a portion of the light source doesn’t reach the subject, either because it strays out of the way due to improper bouncing or isn’t bright enough. Make sure that the light is properly directed to the subject and close enough to be effective.
Deal with problematic ambient light
Whether it’s a window leaking bright light or a glaring streetlamp, stray light can ruin your shot. Combat it by repositioning the camera or blocking the offending light with a card, sheet, or anything else that prevents it from reaching your subject.