Chapter 10
Getting to Know GoPro Studio Edit
IN THIS CHAPTER
![]() Setting up GoPro Studio Edit to meet your needs
Setting up GoPro Studio Edit to meet your needs
![]() Understanding the program’s features
Understanding the program’s features
![]() Preparing files for editing
Preparing files for editing
Depending on when you grew up, the home movies of your childhood (or perhaps videos of your child) may have something in common: The camera captured too much for the movie to maintain its pizzazz. Sometimes, it took too long for the action to happen; at other times, the camera kept recording after the interesting stuff was long gone. Or maybe, there just wasn’t a whole lot of interesting content. Forget about the reason, though, because the result is the same: People are reluctant to watch long and boring movies.
The problem isn’t necessarily shooting too much footage. Often, when you leave the camera running, you capture amazing activity. You never want to shoot less — maybe more wisely, but never less. As Tarzan might say, “Shooting lot of footage, good. Playing all that footage at family party, bad.”
Editing your movie before showing it to anyone is always a good idea. By assembling the best pieces into a shorter, more concise movie, you not only hold your audience’s attention, but also can create a narrative that keeps them watching.
Using an intuitive editing program like GoPro Studio Edit provides some power to transform your clips into a cohesive, well-edited movie. When you’ve shot the footage, it’s time to get to work. Unlike mowing the lawn or cleaning the gutters, this task is more creative and thought-provoking.
For the section on GoPro Studio Edit, a Macintosh computer was used. Versions for both platforms are similar in operation.
Why Use GoPro Studio Edit?
It’s unlikely that anyone ever said, “Hey, I want to spend more money than necessary for some video editing software.” That’s like asking the Internal Revenue Service whether you can pay more taxes than you owe. But that’s often what happens when beginners buy software that’s too advanced.
These days, many affordable consumer programs are available, as mentioned in Chapter 9, but there’s something nice about a free program. It’s even nicer when that program is powerful and intuitive too. That’s what you can expect from GoPro Studio Edit, which makes it easy to create professional-quality videos from your GoPro content. By providing features that specifically address that type of camera, the program lets you add effects and titles to your movie, as well as add voiceovers, music, and sound effects.
In addition, it includes a series of templates (influenced by popular GoPro videos) that accelerate the process of transforming your clips into an incredible movie.
 Although GoPro is up to the task of working as a stand-alone program, you can also integrate it with other, more powerful nonlinear editing programs such as Apple’s Final Cut Pro and Adobe Premiere.
Seeing what’s special about the program
Besides being free, GoPro Studio Edit offers the right amount of versatility. Here are some advantages of using this program:
- Intuitive working environment
- Nice selection of special-effects features
- Easy integration of clips recorded at different resolutions and frame rates with no visual loss of quality
- Variety of templates
- Capability to export a high-quality master file with up to 4K resolution for broadcast or archival purposes
- Capability to export projects as H.264 MP4 files at up to 1080p resolution for sharing on sites such as YouTube and Vimeo.
Getting the software on your computer
Editing your GoPro footage for free is just a few clicks away when you download the software from the GoPro site.
Besides the free version, two paid versions of the software are available: GoPro Studio Edit Premium and GoPro Studio Edit Professional.
Before you get the software, make sure that your computer meets the minimum requirements mentioned in Chapter 9. If your computer is good to go, you’re ready to start downloading. Follow these steps:
- Go to
http://gopro.com, click the Products link, and navigate to the software page. - Choose your operating system from the drop-down menu.
- Enter your email address.
- Click the Download button.
- When the .dmg (Mac) or .exe (Windows) file finishes downloading to your computer, double-click it to open the installer.
- Double-click the installer icon.
- Follow the installation wizard’s prompts.
Breaking Down the Interface
GoPro Studio Edit 2 offers a new, user-friendly interface with lots of controls and features.
Navigating the player window
The player window (see Figure 10-1) provides three panes:
- Import & Convert: This pane is where you import your files into the program and convert source files to the CineForm format. (I discuss CineForm in Chapter 12.)
- Edit: In this pane, you put the movie together, doing everything from trimming clips to adding effects, titles, and music.
- Export: This pane provides the necessary tools to convert your movie to a self-playing movie file.
The window’s function depends on what you’re working with in the program:
- Individual clips in the Media Bin: Click a clip in the Media Bin, and it loads it in the player. Press the play button to view it. You can trim the clip by setting in and out points (see Figure 10-2).
- Clips on the Storyboard: If you click the Storyboard, the clips play in order.
- Individual clip on the Storyboard: More than likely, your Storyboard is populated with clips. Double-click a clip to play it. You can also trim a clip.
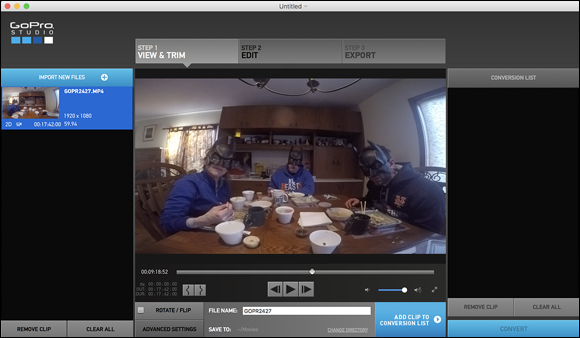
FIGURE 10-1: The three panes of the player window.
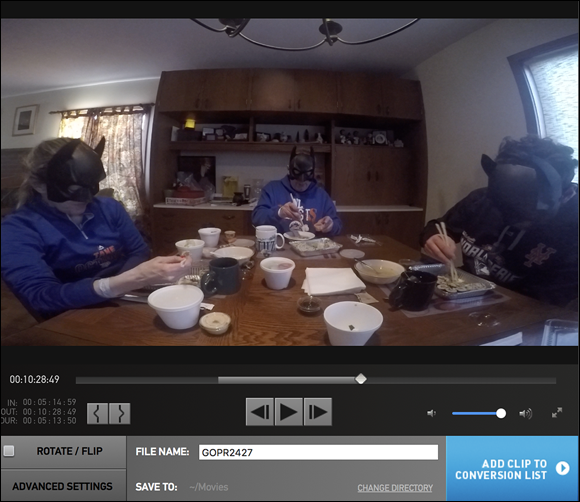
FIGURE 10-2: Player window showing a clip with in and out points.
Deciphering the menus
Navigating the features of GoPro Studio Edit is like driving to a friend’s house a few towns away, as opposed to navigating bigger, more complicated programs, which is like driving cross-country. You still should know the lay of the land, though. In this section, I cover the menus and their commands. The Mac and PC versions are similar in operation, although the Mac version has more operations under the menus.
File menu
The commands on this menu let you create a project, import content, and save the project:
- New Project: As you might expect, this command creates a new project.
- Open Project: This command lets you navigate to a project you’ve already started.
- Open Recent Project: This command displays a submenu of projects you’ve already started.
- Match Stereo Pair (Mac only): This command combines multiple audio channels into a single stereo file.
- Import Media (Mac only): Choose this command to locate and import into GoPro Studio Edit.
- Load GoPro Template: This command allows you to select a template for your movie.
- Close: This command does exactly what it says to the file you have open.
- Save Project: This command saves your project and prompts you for a filename if you’re saving it for the first time.
- Save Project As: The Save Project As command, which lets you change the project name when saving, comes in handy when you want to have an alternative project name.
- Revert to Saved (Mac only): Choose this command if you’ve made a lot of wild changes since the last time you saved the project and want to get back to that point.
Edit menu
The commands in this menu include many of those that you normally find on Edit menus. They are
- Undo: This command lets you reverse your last 50 actions. You could choose the menu command 50 times, or press
 +Z (Mac) or Ctrl+Z (Windows) 50 times and then erase those steps.
 - Redo: Just in case you’ve undone too much, this command allows you to start bringing everything back.
- Cut (Mac only): The Cut command removes a Storyboard element and copies it to the clipboard, just in case you change your mind.
- Copy: This command lets you copy an element for future use and holds it in the clipboard.
- Paste: The Paste command moves a copied or cut element to a new place.
- Clear Storyboard: This command clears the Storyboard of all content.
- Reset All: Choose this command to clear any changes you made in the clip on the Storyboard.
View menu (Mac Only)
Things get a little more interesting on the View menu:
- Enter Full Screen: The floating screen takes over the entire screen when you choose this command.
- Play/Pause: This command is a toggle, allowing you to play and pause a clip wherever it resides: the Import Bin, Media Bin, or Storyboard.
- Stop: Stop stops the movie.
- Fast Rewind: This command rewinds clips quickly, allowing you to look for a specific point in the footage.
- Fast Forward: This command does the same thing as Fast Rewind, only in reverse.
- Previous Edit Point: This command moves the Storyboard time indicator to the last clip on the Storyboard.
- Next Edit Point: This command moves the Storyboard time indicator to the next clip on the Storyboard.
- Mark In: Choose this command to set the point where the clip should begin before trimming.
- Mark Out: Choose this command to set the point where the clip should end before trimming.
- Step Reverse: This command moves backward through the Storyboard or selected clip.
- Step Forward: This command moves forward through the Storyboard or selected clip.
- Split: Choose this command to divide the selected clip.
- Loop Playback: This command makes the Storyboard or selected clip repeat until you intervene.
Share menu (Mac only)
Sparse in choices, the Share menu offers two choices for exporting your movie or still image:
- Export Movie: Lets you export the movie. The resulting Export Movie dialog box provides resolution and format options (see Chapter 11).
- Export Still: Allows you to export a still frame from the movie in three file sizes, as well as in the native format.
Window menu (Mac only)
The Window menu contains commands that have to do with the program window and its relationship to the computer screen:
- Minimize: This command hides GoPro Studio Edit so you can see other open programs on your computer.
- Zoom: This command fills the screen with the program.
- Show Conversion Details: This command shows the conversion setting of the selected clip.
- Bring All to Front: If you’re running other applications while you’re editing in GoPro Studio Edit, this command allows you to bring GoPro to the front.
Help menu
Rounding out the menus is Help:
- Search (Mac only): Choose this command, and type a topic you’re trying to find information on.
- GoPro Studio Manual: This command accesses the manual.
- Online Support: This command launches web-based help.
- Tutorial: Choose this command to find the appropriate tutorial for what you’re doing, such as Import, Edit, or Export.
- Device Window: This command lets you update your GoPro camera and other accessories.
Bringing in Media
I’m sure you’re familiar with the fable of rubbing a magic lamp and having a genie pop up to grant you three wishes. There’s no genie in GoPro Studio Edit, but the first time you try to import content, a tutorial on importing pops up (see Figure 10-3).
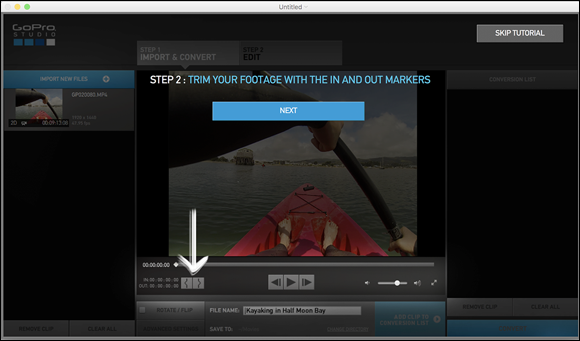
FIGURE 10-3: The Import tutorial.
Alternatively, you can choose this tutorial from the Help menu.
With or without a tutorial, it’s easy to import your GoPro footage and any other elements you want to add.
Importing media from your GoPro
Downloading image and movie files from your GoPro is easy. Just plug the camera into the computer’s USB port. Then you can do the following:
- Import files through GoPro Studio Edit. Click the Import New Files button at the top of the player window’s Import & Convert pane. An import dialog box opens. Select the DCIM folder, and click Open. You can also access the folder where the movie resides and choose the files you want, if you don’t feel like opening the entire batch.
- Pull the files off the camera. Navigate to the DCIM folder and drag the files from the camera to the desktop.
- Use another app. Mac users can easily open files through iPhoto or iMovie. On a PC, you can grab files from Movie Maker or Photo.
Importing other media files
If you want to add footage from other sources to your GoPro movie, you can easily import clips from your camcorder or another camera. Just connect that device to your computer via the USB port, click the Import New Files button at the top of the Import & Convert pane, use the Import New Files dialog box to navigate to the media you want to import, and click Open. This process works for audio files, too.
Using GoPro Edit Templates
At one point or another, a co-worker or friend may have pulled you aside to show you some cool GoPro video online. Guess what? Now you can make your own. GoPro Studio Edit offers templates based on the most popular GoPro videos to transform your footage into another exciting GoPro video.
The program comes with four templates (see Figure 10-4):
- Dubstep Baby: Slow-motion video and dubstep music can transform your baby video into a hip clip.
- Laser Cats: There’s no shortage of cat-video fans on the Internet, so it seems like a no-brainer to combine your cat with GoPro video and a cool layout. All you need to do is drop in your own cat video, and away you go.
- Ocotillo Desert Lines: The action-movie template lets you add your own exciting video to produce a nicely constructed segment.
- Pool Party with the Niños: Replace this family with your family for an impressive movie.
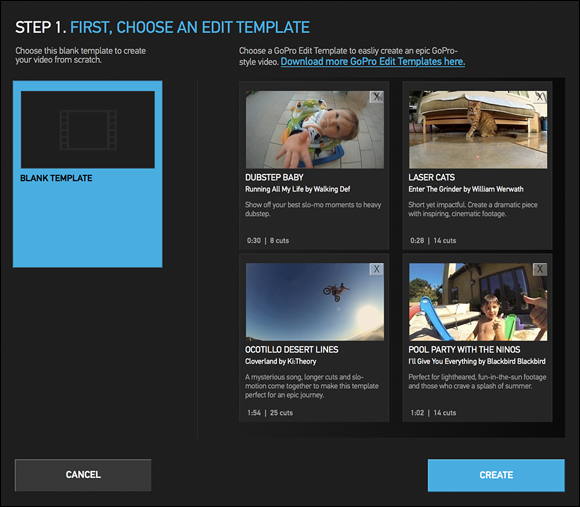
FIGURE 10-4: Pick a template.
Other templates are available online. To download more templates for free, go to http://gopro.com/studio-templates-download?referral=studio_app&version.
Just follow these steps to create a video by using a GoPro template:
Choose File ⇒ Load Edit Template.
The Browse Edit Templates dialog box opens.
Select a template.
The template you choose populates the Storyboard, providing sample video clips, music, and titles. Each template lists the title, artist and song, a brief description, duration, number of clips used, and tempo.
Replace the content of the template with your own.
Just drag the new footage to the target on the clip in the Storyboard. Repeat it for other clips you want to include.
- Save and export your movie.
Implementing an Efficient Workflow
Everyone has different needs, but some basic practices will make your time using GoPro Studio Edit swift and productive.
Customizing your workspace
GoPro Studio Edit doesn’t offer a lot of preferences or settings, so you can’t customize for all your needs. Think of it as being like the computer at the office that everyone shares: It works well, but you wouldn’t dare use your vacation pictures as a screen saver. Well, it’s the same thing when using GoPro Studio Edit. You can’t adjust the size of your bins and windows or create your own keyboard shortcuts, but that doesn’t mean you can’t use it as an effective tool.
Organizing projects and files
It’s essential to organize your movie content to make the process go as smoothly as possible. Here are a few things you can do:
- Group your visual assets. Put all the visuals you want to use in your movies inside a folder so you can access them easily.
- Create a project folder. This folder keeps your GoPro movies in the same place. It differs from your visual-assets folder, which acts more like a storage area.
- Name your folders consistently. Using a coherent naming convention for folders will help you find footage six months from now.
- Import only what you need. There’s no sense in filling the program with excessive footage, especially if you have no intention of using it. Keep things lean and mean.
Setting preferences
If having the fewest preferences were a competition, GoPro Studio Edit would be a finalist. The Preferences dialog box (see Figure 10-5) offers a limited number of options:
- Use Time of Day for Timecode: This option takes the time of day from the source file and writes it into the time-code track of the converted file.
- Use Reel Name in Destination: This option lets you name the clip that you’re converting.
- Auto-Start Conversions: This option automatically starts converting files when they’re added to the Conversion List (see Chapter 11).
- AutoSave Is On: When this option is selected, the project is saved automatically at the intervals you set, which range from 30 seconds to 60 minutes.
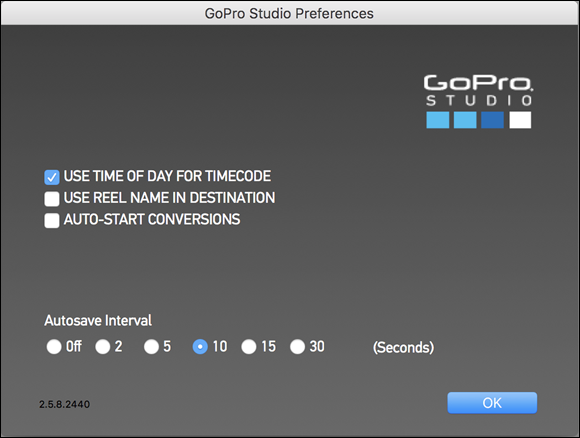
FIGURE 10-5: The GoPro Studio Preferences dialog box.
Delving Deeper into GoPro Studio Edit
Every section of the program windows contains its own controls. In this section, I review them to help you master the program.
Navigating the player window’s controls
GoPro Studio Edit is like the Swiss Army knife of video editing programs. It’s a bit scaled down when compared to programs like Final Cut Pro and Adobe Premiere, but it still provides you enough tools to get the job done, minus the small saw and fold-out scissors. The program’s features and functions center around the player window, which has three states that show different features depending on what you’re doing in the program. Here is a brief description.
Import & Convert pane
The Import & Convert pane (also known as the Import Room; see Figure 10-6) is where you import your movie clips, trim the footage, and choose advanced conversion settings.

FIGURE 10-6: The Import & Convert pane.
Following are brief descriptions of the pane’s controls:
- Import: Click this button to bring media into the program. (Alternatively, choose File ⇒ Import.)
- Import Bin: The Import Bin holds the media you’ve imported for the project.
- Playback slider: This slider shows the progress of the clip or movie, both in the position of playhead and the time code.
- Playhead: This diamond-shaped icon shows the progress of the clip playing. Drag it to scroll through the clip.
- Remove Clip: Click this button to delete a clip from the Import Bin.
- Clear All: Click this button to remove all clips from the Import Bin.
- Rotate/Flip: Click this button to rotate or flip the selected clip.
- Advanced Conversion settings: These controls let you modify the image size, frame rate, and quality. In addition, you can speed the clip or apply a motion blur.
- Trim Point: Click this button to set in and out points to trim your source file.
- Filename text box: Enter the name of each clip here.
- Playback controls: These controls let you play the clip, as well as play it frame-by-frame in forward or reverse.
- Change Directory: Click this button to change the directory in which the clip will be saved.
- Add to Conversion List: Click this button to add the file in the player to the Conversion List.
- Convert All: Click this button to convert everything in the Import Bin.
- Full Screen: Click this button to make GoPro Studio Edit fill the screen. Press the Escape key on your keyboard, and it reverts to the floating window.
- Volume controls: These controls allow you to adjust the volume.
Edit pane
The Edit pane (see Figure 10-7) is where you take the edit to the next level. You can add effects, music, and titles, as well as combine multiple videos on a Storyboard. Access it by clicking the second tab at the top of the player window.
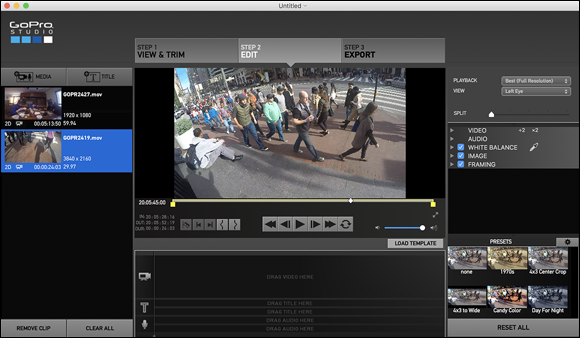
FIGURE 10-7: The Edit pane.
Here are the controls in this pane:
- Add Media: Click this button to add converted media files to your project for editing.
- Add Title: Click this button to bring up a box where you can type a title and adjust its font, size, and style.
- Media Bin: This area contains the converted media clips.
- Remove Clip: Click this button to delete clips from the Media Bin.
- Storyboard time indicator: This control shows the duration of the movie as it plays.
- Volume controls: Use these controls to adjust the volume.
- Trim, Split, and Clip Navigation controls: Use these tools to work on the clip.
- Playback controls: Use these tools to play the movie, scroll through the footage, and make frame-by-frame adjustments in forward and reverse.
- Load Template: Click this button to load one of the GoPro templates (refer to “Using GoPro Edit Templates” earlier in this chapter).
- Global Playback controls: These tools apply playback and view settings to the entire movie, as opposed to a single clip.
- Video & Audio Playback controls: These tools let you change a single clip rather than the entire movie.
- Color Correction, Framing, and 3D controls: These nested controls let you adjust white balance, exposure, cropping, and other settings.
- Presets: These controls let you apply image effects to your clips.
- Reset All Settings: Click this button to revert to the last-saved state after you change a clip.
Export pane
You use the Export pane (see Figure 10-8) when your movie is complete. This pane offers only a few controls, which allow you to name the file, choose an export format, and save your movie in the appropriate folder.
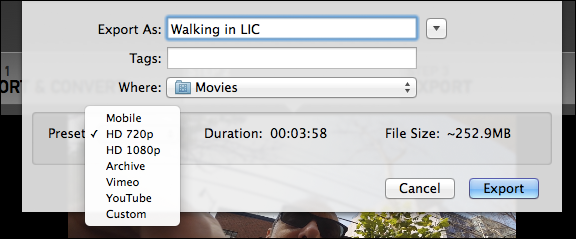
FIGURE 10-8: The Export pane.
Making transitions
GoPro Studio Edit offers only one transition: a dissolve, where one scene slowly transforms into another. If you have two clips, you can add a dissolve. There’s no menu command for this feature, and it’s rather subtle, so if you blink, you can miss it.
To add a transition, follow these steps:
- Click the Edit pane to select it and display your Storyboard.
Click the Add Transition icon between two clips.
This icon is a tiny plus sign (+) resting on the yellow line between the clips (see Figure 10-9). The playhead does not have to be on the clip.
Set the duration of the dissolve.
When you click the + sign, you see a narrow box outlined in yellow that stretches across the two clips you set the dissolve.
- Click the Dissolve icon to select it.
- Move the playhead to the desired out point on the playback slider.
- Click the Mark Out button to shorten the duration of the dissolve.

FIGURE 10-9: To create a dissolve, click the + sign.
Working with audio
Great audio depends on many factors, some of which take place during the editing phase. GoPro Studio Edit offers you a fair amount of control of audio. You can fix noise, add a sound effect, or record a voiceover track.
To access the audio controls, select a clip in the Storyboard and then click the Audio control on the right side of the Edit pane. The control panel shown in Figure 10-10 opens, giving you access to the following settings:
- Level dB: This slider allows you to change the volume level of the clip during playback. You can increase the level for clips with lower audio and decrease it for clips that are too loud or distorted. If you need to reset the levels, just click Level dB.
- Fade In: This slider gradually raises audio level from silence.
- Fade Out: This slider gradually lowers the audio level to silence.
- Completely Disable Audio from Video Clip: Click the Audio Mute button on the clip’s thumbnail.
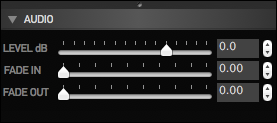
FIGURE 10-10: The Audio control panel.
Using a second video display
You can use a second video monitor with GoPro Studio Edit. If you have one connected to your computer, the program recognizes it. Control this function through the Global Settings panel of the Edit pane (see Figure 10-11).
GoPro Studio Edit makes it easy to edit 3D video, especially when it comes to including a second monitor. You can still view your normal 2D files, but many of the options are for monitoring a 3D movie.
Following are brief descriptions of the options:
- None: The default setting means you aren’t using a second monitor.
Left Eye: This option shows the left-eye side of a 3D clip.
When you’re working with 2D clips, always choose the Left Eye option for playback on a second monitor. If you don’t have a secondary monitor, choose None.
- Right Eye: This option shows only the right-eye side of a 3D clip.
- Anaglyph: There are several Anaglyph settings:
- Red/Cyan shows the left and right eye tinted for viewing with red and cyan 3D glasses.
- Red/Cyan/BW shows the left and right eye in black-and-white and tinted for viewing with red/cyan 3D glasses.
- Red/Cyan/Optimized shows the left and right eye tinted for optimal viewing with red/cyan 3D glasses.
- Amber/Blue shows the left and right eye tinted for viewing with amber/blue 3D glasses.
- Amber/Blue/BW shows the left and right eye in black-and-white and tinted for viewing with amber/blue 3D glasses.
- Green/Magenta shows the left and right eye tinted for viewing with green/magenta 3D glasses.
- Green/Magenta/BW shows the left and right eye in black-and-white and tinted for viewing with green/magenta 3D glasses.
- Line Interleaved: This option shows the left and right eye by alternating between horizontal lines and is used for certain polarized, passive 3D displays and polarized glasses.
- Side-by-Side: This option, for 3D monitors, shows side-by-side 3D mode on a second monitor.
- Over-Under: This option, used on 3D monitors, stacks the left and right eye and scales them vertically into one frame.
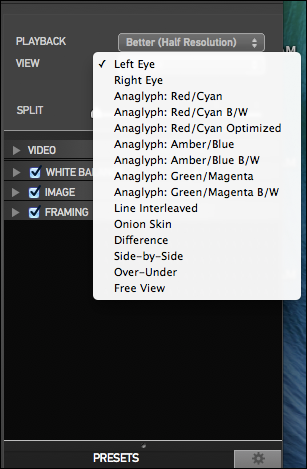
FIGURE 10-11: The Global Settings panel.