Chapter 11
Editing with GoPro Studio Edit
IN THIS CHAPTER
![]() Creating a project
Creating a project
![]() Importing media
Importing media
![]() Assembling the clips
Assembling the clips
![]() Getting audio levels right
Getting audio levels right
![]() Using titles
Using titles
Have you ever wondered why your favorite movies ended up being your favorites? Maybe you liked the subject matter or an actor, but often it’s because the movie was tightly structured and nicely paced.
Regardless of how well a movie is planned and shot, success comes from the editing process. Whether it’s a studio blockbuster, a quaint indie film, or a student project, a well-edited movie compels viewers to escape into the world created onscreen. Conversely, a carelessly arranged film evokes negative emotions. Side effects may include drowsiness, indifference, and nausea.
Making compelling movies sounds like a monumental task, but it’s entirely possible to succeed when you adhere to the fundamentals. This chapter covers the basics of editing a movie in GoPro Studio Edit.
Creating Your Movie Project
Gathering all the assets for your movie can mean anything from putting the video, photos, and music in a folder ahead of time to downloading the day’s shoot into GoPro Studio Edit. First, though, you must create and save a new project. Next, you transfer your footage from the camera to your computer. Then it’s time to bring the footage into GoPro Studio Edit.
Starting a new project
To create a new project, follow these steps:
Launch GoPro Studio Edit.
If you’re using the program for the first time, a tutorial pops up, offering some basic information on how to get files into the program. You can follow it if you want, but importing is simple, so feel free to click the Skip Tutorial button.
When you start GoPro, you can get right to work because it creates a project by default.
Choose File ⇒ New Project.
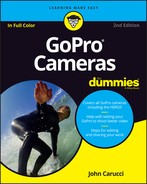
A new, blank project opens (see Figure 11-1).
Choose File ⇒ Save Project to save the project.
Alternatively, press
 + S (Mac) or Ctrl+S (Windows).
- Navigate to your desired save folder.
- Type a name for your project in the Filename text box.
Click the Save button.
The project is saved with the .gcs file extension.
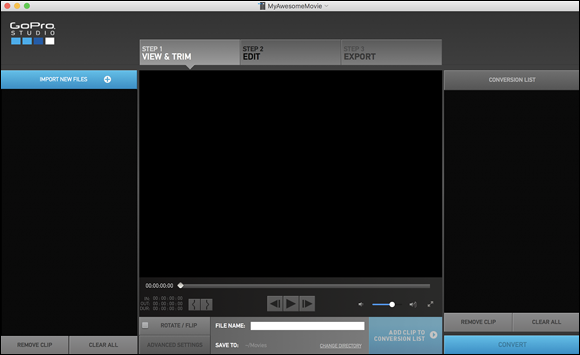
FIGURE 11-1: A new project.
Importing video files
After you create and name the project, you can fill it with content. To import a video file, follow these steps:
- Click the Import New Files button on the left side of the project window (refer to Figure 11-1).
- Navigate to the folder that contains the files you want to import.
Select the desired file, and click Open.
The file loads in the Import Bin.
 You can import an entire folder of clips at the same time by navigating to where it resides on your computer and dragging the folder from a window to the Import Bin.
Importing and converting GoPro media
If you want to edit footage from your GoPro camera, you need to convert it to the CineForm codec (a program that compresses and decompresses files) before you can edit it into GoPro Studio Edit. That’s because GoPro files are so compressed, converting them to CineForm is the only way to get them to play without lagging or dropping frame.
To import and convert GoPro footage for use in GoPro Studio Edit, follow these steps:
- Click the Import & Convert work area selection button in GoPro Studio Edit.
Click the Import New Files button in the top-left corner of the project window (refer to Figure 11-1).
The footage loads in the Import Bin.
- Click the Add Clip to Conversion List button in the bottom-right corner of the player window.
Click the Convert button (Convert All on a PC) in the bottom-right corner of the project window.
Conversion takes a few moments, depending on the length of the file and what you have under the hood of your computer. When conversion is complete, the file appears in the Conversion List pane (see Figure 11-2).
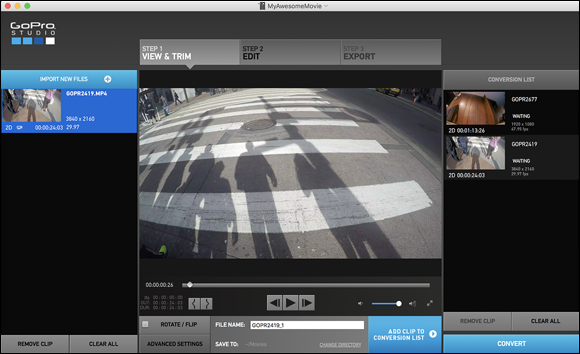
FIGURE 11-2: Converted files show up in the Conversion List.
Adjusting fish-eye distortion
Capturing footage with the GoPro’s ultra-wide-lens may have charm, but (as with eating chocolate cake or watching television) moderation is important. The ultra-wide distortion produced by the lens can be interesting (see Figure 11-3), but a little less distortion sometimes makes it look better.
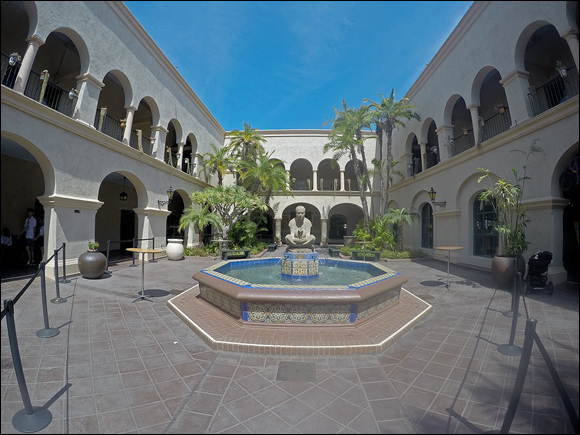
FIGURE 11-3: Fish-eye distortion.
Here’s how to make the fish-eye effect less extreme after you import footage into GoPro Studio Edit:
- Select the clip in the Conversion List pane (refer to Figure 11-3).
- Click the Advanced Settings button in the bottom-left corner of the player window.
- In the Advanced Settings dialog box, select Remove Fisheye.
Click OK.
After you convert the clip, the image has less distortion (see Figure 11-4).
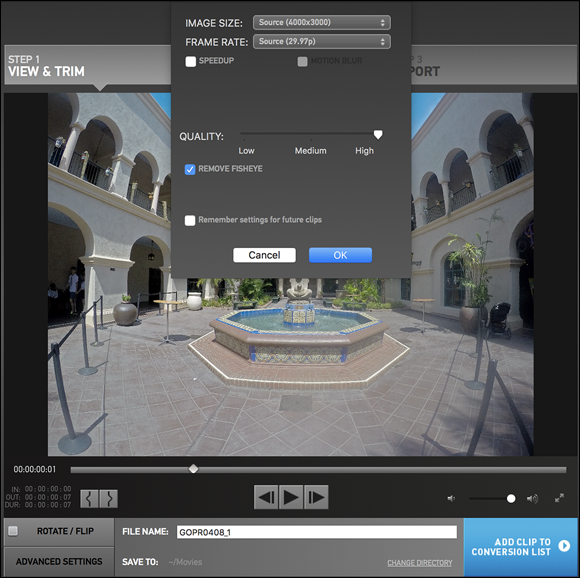
FIGURE 11-4: You can easily make adjustments to limit distortion.
Viewing file information
When you import files, they appear as thumbnails in the Import Bin on the left side of the project window. Each thumbnail also contains some helpful file details (see Figure 11-5).
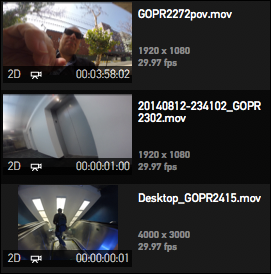
FIGURE 11-5: File details can be very helpful when you’re selecting clips in a densely populated Import Bin.
These details include
- Filename: You can change the name when you convert the file, if that’s how you set your preferences (see Chapter 10).
- Image size: Knowing the resolution comes in handy when you shoot in both high definition (HD) and 4K.
- Frame rate: The frame rate of the clip is helpful when you have multiple clips with different settings.
- 2D or 3D: This item is self-explanatory.
- Video or Time-Lapse icon: This icon is informative when you shoot the same scene both ways.
- Duration: It’s always nice to know the running time of a clip.
Viewing clips
You can select files in the Import Bin by clicking them. Press the up- and down-arrow keys on your keyboard to cycle through clips, or drag the playhead on the playback slider. You can play a clip by clicking it or by highlighting it and then clicking the Play button. Click the Step Forward and Step Backwards buttons to step through a clip one frame at a time.
 When you’re previewing your files, don’t be surprised if you see choppy video. Choppy video is normal because the files are not yet converted to the CineForm codec. Depending on camera settings and the computer you’re using to edit the movie, the effect will vary. But this is only for viewing; you cannot edit the clip until you convert it. You can, however, set in and out points so you only convert the parts of the clip you want to use.
Deleting clips
More than likely, you won’t want to use every clip you import. To remove a clip, select it and then click the Remove Clip button in the bottom-left corner of the Import Bin (refer to Figure 11-1), or select the clip and then press the Delete key on your keyboard.
To remove all clips at the same time, click the Clear All button in the bottom-right corner of the Import Bin.
Putting the Pieces Together in the Edit Pane
Video editing is like assembling a jigsaw puzzle; there are lots of pieces, and it’s up to you to make them fit. But movie editing requires far more creativity. If you don’t have the right piece, you have to go out and shoot it, come back to the project, and add it in the proper place.
You view, arrange, rearrange, and enhance your clips in the Edit pane of the player window. When you first click this pane, you’re given the option to use a blank template or an existing GoPro template for your project. For now, begin by using a blank template. See Chapter 10 for more about templates.
Setting in and out points
To keep your audience interested in your movie, you need to show them the prime parts of each clip, so it’s important to make sure that you remove the excess frames by setting in and out points. There’s no sense in trying to convert a five-minute clip when all you need is 30 seconds of it for your movie.
Setting in and out points is also helpful in reducing the size of the converted file, and it eliminates any unwanted portions of the initial recording from being included in the converted file. It’s like trimming the fat from your chicken cutlets, but you won’t need to wash your hands when you’re done.
GoPro Studio Edit offers a variety of ways to isolate the desired part of the clip:
- Set in and out points with a menu command. You can do this only on a Mac (see Chapter 10).
- Drag points on the playback slider (see Figure 11-6).
- Use the Split Clip tool. It looks like a razor blade and divides the section where you place the playhead.
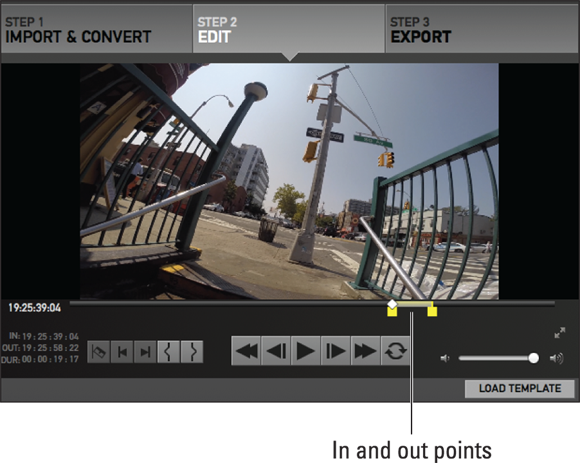
FIGURE 11-6: In and out points on the playback slider.
Here’s how to set in and out points:
- Select the clip in the Import Bin.
- Move the playhead on the playback slider to the desired start point of the clip, and click the Mark In button to cut everything before that point.
- Move the playhead on the playback slider to the desired endpoint of the clip, and click the Mark Out button to cut everything after that point.
Find other cuts on the same clip.
After you click the Add Clip to Conversion List button, you can grab other sections from the original clip by resetting the in and out points and clicking the Add Clip to Conversion List button. This adds it to the Conversion List bin. This comes in handy when you have a long continuous clip with different elements you want for your movie.
- Repeat Steps 1–4 to set more in and out points.
Dragging clips to the Storyboard
After importing your clips, setting in and out points, and converting to the CineForm codec, you can drag them from the Import Bin to the Storyboard. The clips play in order from left to right, so be sure you drag them to the proper place.
Assembling Clips in the Storyboard
After gathering your clips, and setting the in and out points, it’s time to arrange them on the Storyboard. Located below the player window, this is the place where you decide the order the clips play, thus combining multiple clips into a single video. The Storyboard consists of one video track, two audio tracks, and two title tracks (see Figure 11-7).

FIGURE 11-7: Storyboard shows video thumbnails and space for audio and title tracks.
Populating the Storyboard is as simple as dragging clips from the Media Bin (which occupies the same place as the Import Bin when you’re in the Edit pane) into the Storyboard. Although you can drag clips around to change their order, it’s more efficient to build the movie in sequential order when the clips are in the Storyboard. You can always modify the order of clips later.
It’s a good idea to save your work often, especially after making a change or adding some interesting element. The program has an autosave function, adjustable to intervals of 2–30 seconds. You can also turn it off, but that means you will need to save manually. Choose GoPro Studio ⇒ Preferences.
Adding clips
Here’s how to add a clip to the Storyboard:
- Find the desired clip in the Media Bin.
Drag it to the Storyboard.
As you drag, a green vertical line indicates the spot where the clip will be inserted.
- Release the mouse button to drop the clip.
- Repeat Steps 1–3 to add more clips.
- Save the project by choosing File ⇒ Save.
Clips use the same thumbnail in the Media Bin and the Storyboard, but clip information changes slightly in the Storyboard.
A yellow border around the thumbnail indicates a selected clip (refer to Figure 11-7). Other information includes
- Filename: The filename is based on how you set preferences, mentioned in Chapter 10.
- Delete a clip: Poof! It’s gone. By dragging this triangle on the lower left of the thumbnail off the top, as seen in Figure 11-8, you remove all applied effects such as color, framing, and exposure.
- Mute button: Click this button to toggle audio for the selected clip.
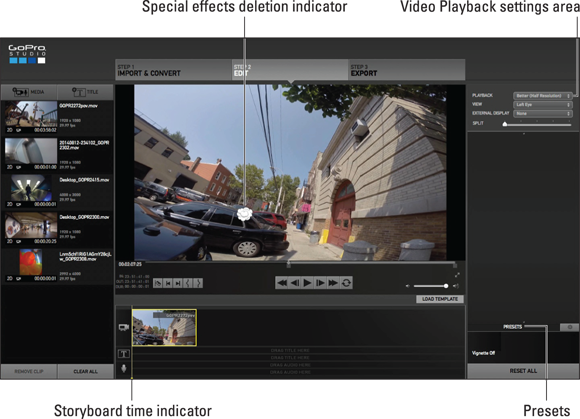
FIGURE 11-8: Deleting special effects.
Cropping images
The Framing controls, found in the Video Playback settings, allow you to change the composition of your clips. This feature comes in handy when you want to isolate a portion of the scene or crop a distracting element. Depending on the amount of area you crop and the resolution of the source footage, you will lose some detail. If you shot the footage in 4K, however, you can crop a good portion of the image and still have more than enough resolution when saving the file in HD.
Just select the clip you want to alter on the Storyboard, go to the Video Playback settings area, and then click the down arrow next to Framing to display the Framing controls (see Figure 11-9).
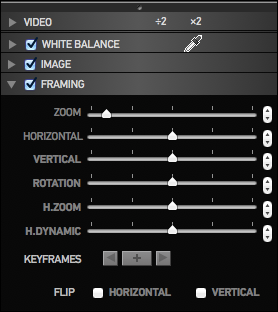
FIGURE 11-9: The Framing controls allow you to adjust and position an image to your liking.
Here’s what each Framing control does:
- Zoom: Use this slider to make the image larger or smaller.
- Horizontal: Use this slider to move the image left or right. This feature works best with a cropped image so that the frame remains filled. An uncropped image shows black at either end.
- Vertical: Use this slider to move the image up or down. This feature works best with a cropped image so that the frame remains filled. An uncropped image shows black at the top or bottom.
- Rotation: Use this slider to rotate the clip. A cropped image maintains a full frame.
- H.Zoom: When you’re mixing 4x3 and 16x9 video sources, use this slider to adjust the horizontal scaling of the image. 4x3 looks like the aspect ratio of your old television set; 16x9 resembles the current wide screen.
- H.Dynamic: Use this slider to adjust the horizontal stretch point of the image. This control, which is best used in tandem with the H.Zoom control, helps preserve the normal appearance of people who have been stretched by 4x3-to-16x9 conversion.
- Keyframes: These controls allow you to create different frame sizes in the same clip so you can zoom, pan, and rotate while the clip is playing.
- Flip: Select the Horizontal or Vertical check box to enable horizontal or vertical flipping of the image. Select both of these options if you shot your scene upside-down and want to correct it.
Splitting clips
Sometimes, you want to split a large clip and insert a new clip between its parts. Splitting a clip is as easy as cutting a piece of pie. Just follow these steps:
Select the clip you want to split.
Move the playhead or the Storyboard time indicator (depending if you’re working from the player or Storyboard, respectively) to the location where you want to insert the new clip.
Click the Split button to split the clip.
If you position the playhead on the first frame of a clip, clicking the Split button cuts the clip in half.- Drag a new clip between the two split clips.
Fine-tuning clips
You can fine-tune clips in several ways:
- Rearrange clips. To rearrange the order of clips, drag them in the Storyboard. A green line appears as you drag a clip, indicating a new location for the clip.
- Delete a clip. Select it on the Storyboard and drag it up and get it a poof! The little cloud lets you know it disappeared (refer to Figure 11-8). Or just select it and press the Delete key.
- Trim a clip. When you’re fine-tuning your edit, you may want to shave a few seconds off a clip to make the movie smoother. Just reset the in and out points (refer to “Setting in and out points” earlier in this chapter), and you’re good to go.
Adjusting white balance
The White Balance controls let you alter the color of the scene to either correct or enhance the way you remembered the scene. Although GoPro captures color fairly accurately, sometimes you need to enhance the scene, and this feature does the trick. Just click the little triangle next to the White Balance choice on the right side of the window. The feature consists of a couple sliders, an eyedropper, and keyframe adjustments. Click the movie clip you want to enhance in the Storyboard, and make your adjustments.
You can change the color by doing one of the following:
- Temperature slider: Move the slider to adjust the color temperature of the clip, ranging from cool to warm. You can also adjust temperature using the step controls just to the right of the slider.
- Tint slider: Move the slider to adjust the tint, ranging from cool to warm. You can also adjust tint using the step controls just to the right of the slider.
- Eye Dropper: When you use the eyedropper to click on something white (or something that’s supposed to be white) in the frame, it adjusts the overall color. So, if the area you click on was a little blue, the correction will neutralize the blue and warm up the image.
- Keyframes: You can change color as the clip plays by setting keyframes at various points. Move the playhead to a desired area, and click the + button. Change the White Balance, or more appropriately, the color in the image. It will play until you set another keyframe and make another change. Every time you repeat this, it will change the tone at that point in the clip.
Adjusting tones with the Image feature
You can make tonal adjustments to your movie clip to make it look just right. Just click the little triangle next to the Image choice on the right side of the window. The feature consists of several sliders and keyframe adjustments. Click the movie clip you want to enhance in the Storyboard, and make your adjustments.
Here’s what the controls do:
- Exposure: Basically, it allows you to make the movie clip lighter or darker.
- Contrast: Adds or decreases image contrast.
- Saturation: Enhances color in the image, or can take it away. This is a cool effect for stylizing your movie.
- Sharpness: Adds, or takes away, sharpness in the image.
- Keyframes: You can make the color change to your specifications in a movie clip by setting keyframes at various points. Each time you set a keyframe, it makes a change to the color (in this case) from that point on (or until you set another keyframe). Move the playhead to a desired area, and click the + button. Make another tonal adjustment, and it will play until you set another keyframe and make another change. Every time you repeat this, it will change the tone at that point in the clip.
Working with presets
GoPro Studio Edit lets you stylize your video with a series of preset effects, found on the bottom-right side of the window. Using these presets is quick and easy, and can help your movie make a statement. All you must do is select a clip on the Storyboard and then click an effect. If you don’t like it, click the Reset All button, on the bottom right, or click and drag the FX triangle on the clip to make it go away.
Using existing presets
You can use the following presets:
- None: Restores all default settings.
- Protune: Makes a flat clip look punchier by increasing saturation and contrast. (For more on Protune, see Chapter 4.)
- 1970s: Applies a warm color filter that simulates film shot in the ’70s (see Figure 11-10).
- 4X3 Center Crop: Zooms in on a clip shot at a 4:3 aspect ratio while cropping the top and bottom portions of the image.
- 4X3 to Wide: Applies a combination of framing adjustments to transform a clip shot in 4:3 aspect ratio to a 16:9 image.
- Candy Color: Applies a highly saturated color effect to the clip.
- Day for Night: Makes a scene shot during the day look as though it was shot at night.
- Hot Day: Creates a warm color effect that simulates being close to the sun.
- Night Vision: Makes the video look as though it was shot through night-vision goggles by applying a green tint (see Figure 11-11).
- Sepia: Applies a brownish, unsaturated filter to create a sepia effect (See Figure 11-12).
- Vignette Large: Blurs the edges of the frame, as in an old photograph.
- Vignette Medium: Provides a subtler vignette effect.
- Vignette Off: Turns vignette off on the image.

FIGURE 11-10: This sunflower picture takes on a retro look with the 1970s filter applied to it.
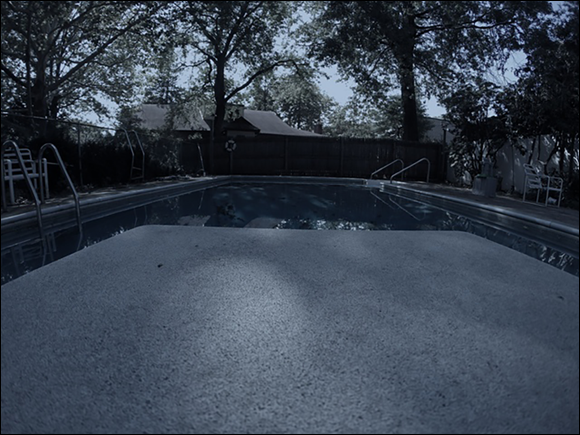
FIGURE 11-11: This cool effect makes your movie look like The Blair Witch Project.
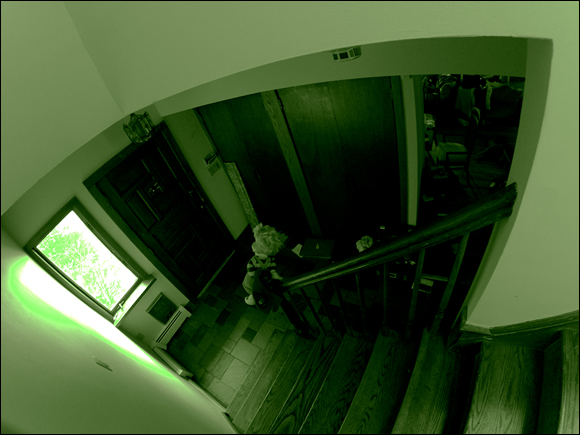
FIGURE 11-12: The Sepia filter provides a timeless look.
Making your own presets
On the off chance that you’re not crazy about GoPro Studio Edit’s presets (see the preceding section), you can make your own. The process is simple. Just follow these steps:
- Select a clip in the Storyboard.
- Use the White Balance, Image, and Framing controls to create the look you want for the video.
- Click the little gear icon next to Preset Title to open the Manage Presets window.
- Click the + button, type a new preset name, and check the setting you want to save.
- Click OK.
Adding slow motion and reverse
Sometimes there’s nothing like slow motion for getting your point across, especially if you want to emphasize a situation that normally plays out too fast. Maybe you performed a jump on a BMX bike and it plays too fast to appreciate. Other times, you want to render the clip in reverse to capture a world gone backwards. A great example is a clip of someone jumping out of the water and onto the diving board. Whatever you choose, GoPro Studio Edit makes it easy to accomplish. Just click on the little triangle next to the Video choice on the right side of the window. The feature consists of a couple sliders that control speed and fade. There’s also a check box for reverse.
Here’s what the controls do:
- Speed: Adjusts the duration of the clip from 1 percent to 1,000 percent. That allows you to slow down the clip, as well as speed it up.
- Fade In: Fades the clip from black. You can choose the duration using the slider or text entry box on the right side of the slider.
- Fade Out: Fades the clip to black.
Managing Audio Matters
GoPro Studio Edit uses Storyboard editing as opposed to a timeline, so editing a movie is a matter of assembling trimmed clips to play in order. The program offers some flexibility when it comes to audio, adding up to two additional tracks for sound effects, background music, or voiceovers.
When you use a GoPro edit template, the soundtrack uses one of the tracks, so you’re left with only one.
Because audio plays such a big part in a movie, it’s important to treat it with some TLC, fine-tuning the levels of your clips, laying down the right music for the soundtrack, and maybe adding a voiceover.
GoPro Studio Edit currently supports the following audio formats: MP3, M4A, WAV, and AIFF.
Adding an audio track
Nothing gives your footage a real movie feel like adding a soundtrack, and GoPro Studio Edit makes that easy to do. You can also include a voiceover. The only limitation is that you can add only two tracks.
Audio is like video in that you must import it into GoPro Studio Edit. Follow these steps:
- Click the Add Media button at the top of the Media Bin.
In the resulting dialog box, browse to your audio file, select it, and click Open.
A thumbnail of a microphone on a music staff appears in the bin.
Drag the file to the Storyboard.
As you drag, a green box indicates the spot where the file will be inserted, making it easier for you to line up the audio file with other portions of your Storyboard.
Dragging an audio file on top of an existing video clip causes the audio file to start at the same time as that video clip.
Revise the file if necessary.
After placing an audio file, you can rearrange it by dragging it to a new location. You can also change its duration by dragging its edges.
Correcting an audio track
Because you capture audio under a variety of circumstances, sometimes audio levels are inconsistent. GoPro Studio Edit makes problems easy to fix. The Audio Setting features include a few controls for adjusting audio levels and fading sound in and out.
- Level dB: Allows you to change the volume level of the clip during playback. You can increase the level for soft clips and decrease it for loud or distorted clips.
- Fade In: Gradually raises the audio level from silence.
- Fade Out: Gradually lowers the audio level to silence.
Working with Titles
Great video, clear audio, nice layout, and a rocking soundtrack … check, check, check, and check. You need just one more thing to make a great movie: a title. You can use two tracks for titles, which can be superimposed over clips or appear directly above them on the Storyboard. And don’t forget the closing credits to give a shout-out to everyone that helped with the movie.
To add a title to your movie, follow these steps:
Click the Add Title button at the top of the Media Bin in the Edit Pane.
A title thumbnail appears in the Media Bin.
Drag the thumbnail to a title track in the Storyboard.
As you drag, a green box indicates the spot where the title will be inserted, which makes it easier for you to line up the title with other portions of your Storyboard.
Double-click the thumbnail.
A dialog box appears on the right side of the project window.
- Type the title.
- Adjust the font, size, and other details.