Chapter 5
Framing the Shot
IN THIS CHAPTER
![]() Understanding the elements of visual style
Understanding the elements of visual style
![]() Composing the scene
Composing the scene
![]() Putting the camera in the perfect place
Putting the camera in the perfect place
![]() Using the Capture app while you shoot
Using the Capture app while you shoot
![]() Giving yourself options
Giving yourself options
Great films are built on the creative use of visual elements such as composition, camera angle, color, and lighting. The GoPro adds its own perspective to the mix, thanks to its extremely wide-angle view and its capability to go almost anyplace.
Although the GoPro has become a recent phenomenon, shooting with an ultra-wide-angle lens is not. Some professional directors rely on it for an occasional shot; others swear by it. Terry Gilliam (director and founding member of the British sketch-comedy group Monty Python) shoots nearly all his films with a rectilinear wide-angle lens, which gives his films a unique look. Wes Anderson also favors a very wide view as a stylistic device.
These directors accomplish what we’re all looking to do: differentiating ourselves from the pack through our special way of seeing a story. Finding your own visual style begins by understanding the fundamentals. That’s what will make you different from your cousin Jim or your former college roommate who also has a GoPro. The goal is to find your visual style and build on it.
This chapter shows you how to use classic visual elements to create a compelling film — GoPro style.
Understanding Time-Honored Visual Basics
Here’s a way you could look at composition: “What happens in the frame stays in the frame.” More accurately, what happens in the frame is all that people can see. Take the time to provide essential visual content, but do it economically enough that you don’t clutter the frame.
How you choose to occupy the frame plays a big part in the success of your movie. No matter what technology you use, what happens in each shot stands on its own but also influences other shots. Not sure what I’m talking about? Check out the shower scene in Alfred Hitchcock’s classic thriller Psycho or the “Here’s Johnny” close-up of Jack Nicholson in The Shining. There’s nothing random about these shots; they were strategically arranged. The directors understood how to fill the frame, as well as the relationship between each shot when it comes to assembling the movie.
Creating an effective composition has its challenges, especially with a camera that captures the world with an ultra-wide-angle view. But that doesn’t mean you can’t find a happy medium. Besides, each of us sees the world a little differently, so here’s a breakdown of the components of visual technique.
Properly composing the scene
Composition is about understanding how to fill the frame in a way that effectively and efficiently communicates your intention to the viewer. There’s psychology behind arrangement of scenes. Normally, people look from left to right and top to bottom. That mechanism works for reading and for effectively arranging a scene to capture video or a still frame.
Here are two examples of how a viewer can interpret a scene, based on the way it’s arranged:
- Positioning the subject at bottom right: This arrangement draws viewers to the subject (see Figure 5-1) as they look across and down at the frame.
- Positioning the subject at top left: When the subject is in the top-left corner of the frame (see Figure 5-2), the viewer can share the perspective of the subject in the scene.
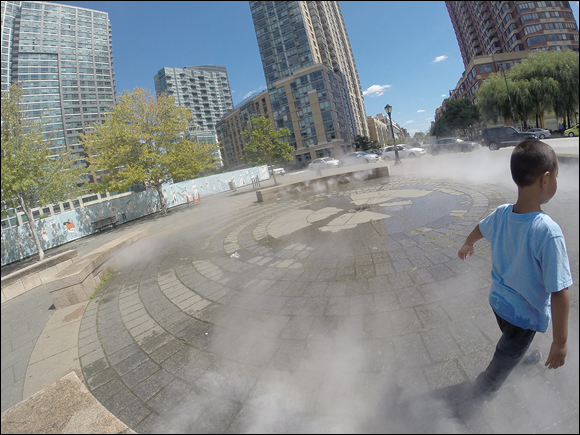
FIGURE 5-1: When the subject is in the bottom-right corner, the viewer’s eye follows him.

FIGURE 5-2: Subject at top left.
Coherently arranging the shot
Basic shot structure with a GoPro differs somewhat from the approach you would take with a conventional camcorder or DSLR (digital single lens reflex camera). The GoPro uses a fixed wide-angle lens, whereas the others use a zoom lens that covers lots of focal lengths (but nowhere as wide as the lengths that the GoPro’s lens can cover).
Instead of using focal length to bring a shot in tight, control the variations in the size of the subject in the frame solely with camera-to-subject distance. Typical shot arrangements such as wide, medium, and close-up take on different meanings with the GoPro. If you’re using the Black Edition, it’s possible to change the Field of View. Here are some of the shots you can get:
- Ultra-wide: This shot covers a wide area of the scene with nothing looking as though it’s anywhere near the camera (see Figure 5-3).
- Very wide: This shot still covers an expansive area, but some objects appear to be closer (see Figure 5-4).
- Fairly wide: Objects in the scene are much closer to the lens, though not that close that the ultra-wide-angle view makes them seem a little distant. Meanwhile the subject is probably only a few feet away, as seen in Figure 5-5.
- Intimate wide: This shot is still wide but fills the frame with the subject, who may be just inches away (see Figure 5-6). Think of this view as being the GoPro’s version of a close-up.
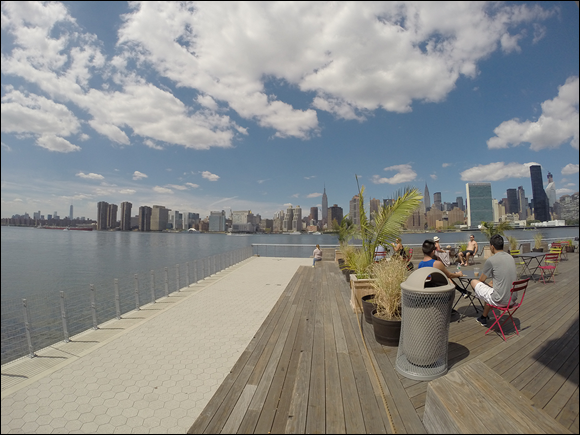
FIGURE 5-3: Normal ultra-wide GoPro view.
FIGURE 5-4: Expansive GoPro view.
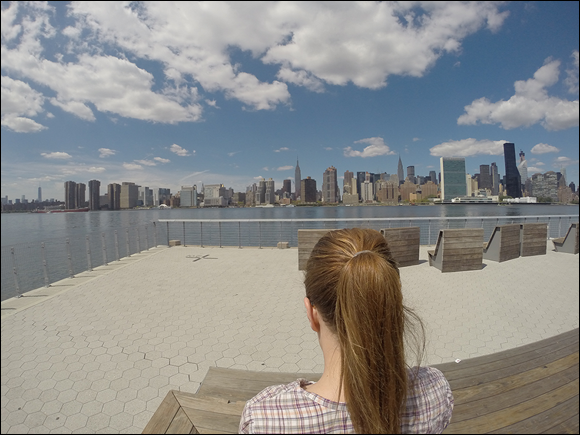
FIGURE 5-5: Wide GoPro view.
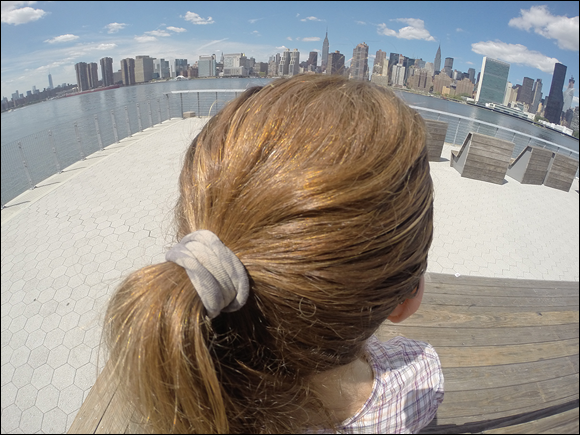
FIGURE 5-6: A shot taken right next to the subject.
Breaking Down Shot Lingo
Great filmmaking weaves different shot types throughout a story. The different sizes at which you depict a subject in the frame help create a visual narrative.
Here’s an in-depth description of various shot types:
- Long shot: Some people call this shot an extreme wide-angle shot, but I call it the result of using your GoPro like a conventional camera. This expansive shot establishes an overall view of the setting and is often used as the first shot in the edit. It’s not always necessary to include actors; a wide landscape with few identifiable subjects qualifies for this type of shot.
- Very wide shot: This shot isn’t as expansive as a long shot but is still wide. It can also work as an establishing shot.
- Wide shot: In the wide world of wide shots, this shot isn’t that wide. It works well with people, presenting them from head to toe. Frequently, this shot is used to set up medium and close-up shots.
- Medium or normal shot: This shot takes a more distinct view of the subject, showing more of him than in a wide shot and much less than in a close-up — perhaps from the waist up. If you shoot from a higher angle, you can make the subject look like a bobble head doll, with his head being much larger than the rest of his body.
- Two shot: This shot shows interaction between two subjects: a conversation or confrontation. Sometimes, the subjects are shown full-figure; at other times, they’re shown from the waist up.
- Medium close-up: One way to think of it is as the close-up for people who don’t like close-ups. This shot captures a person’s entire face, with a little bit of her neck and chest. If the subject is an object instead of the person, the object can loosely fill the frame. Often, this shot is the closest you’re going to get to a subject with a GoPro without totally distorting that subject.
- Close-up: This shot is pretty close, and some people may not like you coming this close. The frame shows the subject from the neck up. It shows the head, hair, and face but not pores and blemishes.
- Extreme close-up: This shot shows lots of detail on inanimate objects, but you may get hit with an object if you try to use this shot on a human with your GoPro.
- Point of view: This shot shows the scene as the subject sees it (see Figure 5-7) and makes for a great selection of shots for editing. Many GoPro mounts help you achieve this type of shot; see Chapter 3 for a few examples.
- Cutaway: All sorts of productions, from news broadcasts and documentaries to feature films and reality television programs, use this device to provide more options for editing. This shot shows details such as the subject’s cracking his knuckles, picking up a glass, or tapping his fingers.
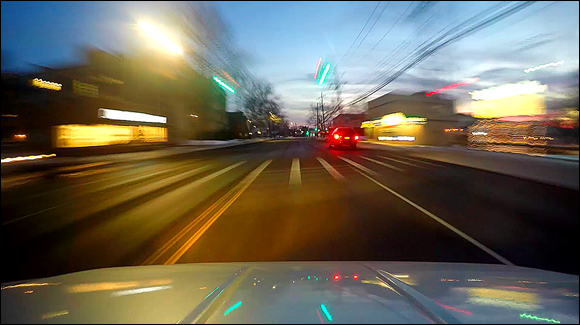
FIGURE 5-7: Point-of-view shot using the Suction Cup mount on a car hood.
Following Simple Framing Rules
Cinematic composition can follow the same time-honored rules as traditional pictorial composition. The following sections present some of the most prominent rules of composition.
Observe the rule of thirds
Have you ever wondered why Greek architecture remains aesthetically pleasing more than 2,000 years later? The reason is the Greeks’ time-honored approach of balancing a shape in thirds — an approach that they called the Golden Mean. Today, we call this approach the rule of thirds.
Here are a few guidelines:
- Don’t place the main subject dead center. Imagine the frame divided into three parts — horizontal, vertical, and center — with the center being off limits to the subject (see Figure 5-8).
- Lead the viewer. It’s your choice to lead the view into or out of the frame. Remember the earlier discussion of positioning the subject.
- Be mindful of the horizon. Placing the horizon line in the center of the frame is almost as boring as placing the subject in the middle. Instead, place the horizon on one of the dividing lines to show more sky or foreground. Make sure that the GoPro is level; otherwise, the shot will have image distortion because of its wide-angle lens.
- Mind your subject’s head. Always have a little room to avoid giving your subject a flat top.
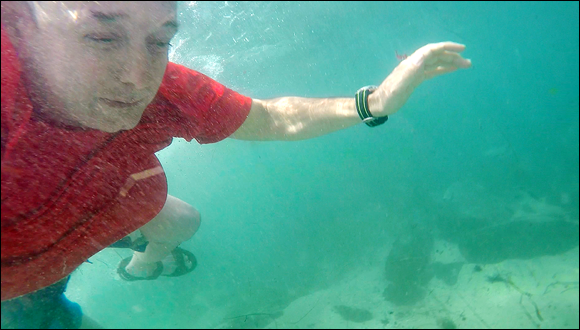
FIGURE 5-8: This underwater selfie follows the rule of thirds, because the main subject does not occupy the center of the frame.
Keeping things simple
Although the axiom “Less is more” can apply to many things, in filmmaking, it refers to including only pertinent visual information. When you keep the scene free of extraneous clutter, the viewer immediately recognizes the center of interest and doesn’t have to take a moment to figure it out. Sounds easy, right? Not all the time. Sometimes, you don’t notice clutter in the frame until you start editing. Before pressing the Shutter/Select button, make sure that the shot is concise and that the viewer clearly understands the center of interest.
Keep in mind the following guidelines:
- Avoid complicated backgrounds. A complicated background features a laundry list of elements that can range from objects strewn behind the subject to a light ratio beyond what the camera can handle. Recompose the scene if the sky is too bright or if a telephone pole appears to be growing out of the subject’s head.
- Focus on simplicity. When a scene concentrates on the subject, try framing the subject against a plain background, even if the scene takes place in a busy area.
- Keep competition among scene elements down. Make sure that the subject isn’t fighting other parts of the scene for the viewer’s attention — unless the conflict is intentional, of course. Look at the scene through the viewer’s eyes; see whether you understand what the subject is.
- Track the shot efficiently. If the camera follows the subject, be sure that it doesn’t lead the viewer into a heap of clutter. Tracking the subject in an open field that leads to a cluster of telephone wires would be leading the viewer into clutter. Recompose the scene if necessary.
Taking advantage of the background
Not placing the subject against a complicated background qualifies as good advice. But at times, the space behind the subject works to your advantage. Colorful, simple, or picturesque backgrounds fall into this category and can even enhance the quality of the scene.
The human eye can effectively distinguish elements in a scene thanks to depth perception, but the camera can’t. A movie frame is two-dimensional, so sometimes it can’t differentiate screen elements properly. Because the GoPro has such a wide lens, almost the entire scene is in focus, so discrepancies between the foreground and background can blend together.
When dealing with backgrounds with your GoPro, consider the following:
- Keep an eye on vertical lines. Be sure that telephone poles, trees, street lamps, and other sticklike objects don’t converge with the subject. These objects can appear to be unusual appendages or look like part of a shish kabob.
- Understand that the scene is two-dimensional. Movies and photographs appear to be compressed, mainly because humans see the world as 3D, but the camera renders it as 2D.
- Complement the subject. Let the background work for the subject. The interview in your skateboarding movie, for example, should have something going on in the skateboard park behind the subject, such as someone doing a halfpipe. In a skydiving movie, a plane or hanger could complement the subject.
Putting people first
Whether you’re posing the subject against a background or capturing yourself in an action scene, follow these guidelines:
- Determine whether the subject should look into the camera. Whether the subject is you or someone else, decide whether the subject is going to talk to the audience. Generally, in an interview, the subject shouldn’t look into the camera. But if you’re filming a first-person account of some event, it’s completely acceptable for the subject to look at the camera.
- Don’t ignore the basics. Follow the rule of thirds (see “Observe the rule of thirds” earlier in this chapter) for subject placement in the frame. Avoid putting the subject in the center. Also, keep an eye on the background.
- Find a flattering angle. Because the GoPro has a nearly fish-eye view, the difference between a subject’s looking like a man and looking like fish may be a matter of a few inches.
Use shadows and reflections wisely
Shadows and reflections not only look good onscreen, but also help unify a scene, especially when it includes a one-sided arrangement. Including shadows in the frame can provide a variety of effects, including a sense of depth, warning, or foreboding (see Figure 5-9). Reflected images tend to grab viewers’ attention, especially when they involve rich textures. Sometimes capturing shadows and reflections also works as the main subject.
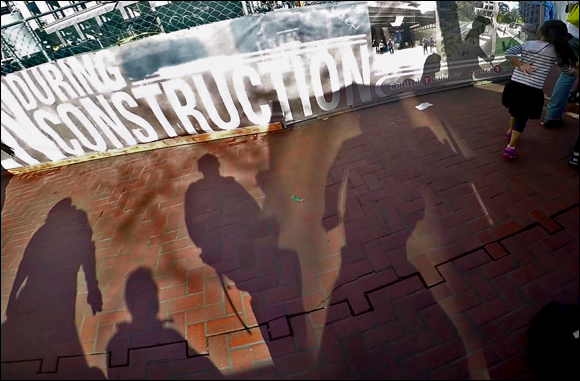
FIGURE 5-9: This wide view of pedestrian shadows creates an abstract depiction of the scene.
Balancing the frame with a shadow or reflection serves many purposes. It can make a statement about the scene, such as the time of day, or it can make a nice selection for your shot arrangement. Also, it makes a drab subject look more interesting.
Here are some things to consider about using shadows and reflections in your shots:
- Treat a shadow like any other subject, either by including it in its entirety or by defining a segment (shape, form, or feature).
- If the shadow or reflection is the center of interest, focus attention on it instead of the subject.
- Be careful not to get a reflection of your GoPro in the shot, and make sure that the light behind the camera doesn’t create a shadow.
Art-Directing the Scene
In this section, I present more advanced approaches to unifying your vision for the movie.
Arranging elements in the scene
It’s a bit deceptive to say that you’re arranging elements in the scene when you’re positioning the camera to include, omit, or capture the subject at a specific angle within the context of the frame. Because the GoPro has an incredibly wide-angle view, sometimes it’s challenging to compose a scene.
It’s visually effective to position the camera as close to the subject as possible for an intimate view. Using foreground objects to frame the scene works well as another creative device that makes for an interesting shot. Whether you’re capturing a doorway, archway, tree branch, peephole, or just about anything else on the periphery of the shot, this technique can define the center of interest in the frame.
Making the GoPro’s view work for you
Thanks to the camera’s super-wide view, it’s best to think of each scene you shoot with your GoPro as having a foreground, middle ground, and background. By paying attention to all three elements, you’ll be able to follow basic cinematic principles, and before long, the limitations of focal length will become an asset.
Here are a few pointers:
- Maintain attention on the subject. Don’t worry if the framing elements are out of focus, as in Figure 5-10. Besides, when you’re capturing such a wide view, it’s unlikely much of the scene will be out of focus.
- Frame the people too. If you frame the main subject with people in the shot, it’s best to have the people look into the center of the frame, as opposed to out of it. This technique affects the audience’s view of what’s important; that view is based on where the people onscreen are looking.
- Don’t place the subject on the edge of the frame. While dead center is often a boring place for the subject, the GoPro’s wide-angle view can severely distort it.
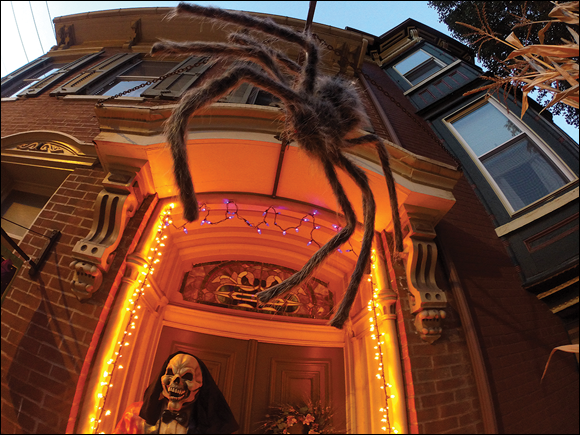
FIGURE 5-10: Framing the shot of this Halloween scene.
Keeping things in balance
Balancing elements such as color, shape, and light in the frame creates a legitimate order in which the viewer can process the scene. Another method places subject matter on both sides to form an even composition. In this sort of arrangement, it’s acceptable to put the subject in the center.
Then there’s asymmetrical balance, in which the subject shares the frame with negative or blank space to depict vastness or difference. Also, the juxtaposition of color is another means of making the scene look interesting. You can position a warmly lit subject against a cool blue backdrop, for example. Complementary colors are described as the opposite pairs of colors that produce the strongest contrast to one another. Here are a few colors and their complementary colors:
- Green/magenta
- Red/cyan
- Blue/yellow
Creating subtext in a scene
There are many definitions of subtext in film, but one of the most common ways of showing it is called mise-en-scène (a French term that translates to “placing on stage”). Mise-en-scène occurs when everything comes together in the frame to convey the intention of a scene. Essentially, it’s a poetic way of visually conveying what you want the audience to take from the scene.
This message comes together in a variety of ways, mostly through the decor of the set, the arrangement of elements, and the lighting. Sometimes, it’s created in the editing process. One example is cutting away to a locomotive blowing its whistle when the subject begins to show anger.
Here are a few other ways to get this message across to your viewer.
- Use cool blue lighting to depict the subject’s despair.
- Having the subject look up to the sky after a confrontation may suggest that he’s looking for guidance.
- Having the subject take a walk early in the morning can alert the audience to the start of something new.
Taking advantage of perspective
The GoPro sees the world through an ultra-wide-angle view, as shown in Figure 5-11, so you don’t have the luxury of varying focal length to alter subject size when you’re shooting from a fixed distance. Instead of treating this limitation as a liability, let it work to your advantage by concentrating on the way you frame the subject matter.
FIGURE 5-11: Ultra-wide-angle view
The first time someone loaned me a fish-eye lens for my SLR (single lens reflex camera), I was amazed by how much of the world it captured. At one point, I placed the camera on the curb to get a low-angle view of Times Square, and a cab blocked my shot as I pressed the shutter. After the film was processed, I saw an amazingly distorted image of the taxi, even though it couldn’t have been more than two feet from the camera. The GoPro provides a similar experience, and because you’re not always nearby, it may deliver similar surprises.
Thinking About Where to Put Your GoPro
Most cameras can only be mounted on a tripod or handheld. The GoPro, however, can go anywhere. This section focuses on ways to maximize your opportunities when out shooting with the camera.
Grabbing static shots
By its very nature, the GoPro thrives on action conditions, but that doesn’t mean you’re not going to need a static shot every now and again. A static shot is a still shot of a scene with very little or no activity. Think of it as being the movie version of a photograph. The length of the shot depends on the context.
Here are a few reasons to use a static shot:
- Setting a scene: A wide shot of a stadium before the big game, a downtown block on a Sunday morning, or a local landmark on a fall day can open the film to provide a sense of place.
- Depicting a living creature that isn’t moving: Static shots don’t always involve inanimate objects. You might take a static shot of your dog taking a nap, an athlete meditating before an event, or your dad snoozing on the couch.
- Focusing on details: Depending on what you’re shooting in the movie, concentrating on a key part of the scene gives the viewer a sense of the subject. For example, you can mount the camera on your motocross bike for an action movie.
Using motion
The GoPro allows you to use motion as a creative device. Besides capturing an action sequence with incredible sharpness and exposure, you can alter the speed of the action, creating both slow motion and accelerated activity onscreen. Here are some ways to alter the normal rate of motion:
- Slow motion: The GoPro offers a variety of frame rates with most resolution settings. Frame rates differ from model to model, with the HERO4 Black Edition offering the most options. If you want to shoot slow motion, you should pick the highest frame-rate setting available — generally, 120 frames per second (fps) or higher. Then you need to process the footage (more on that in Chapter 11).
- Fast motion: Although you can achieve this effect by playing with the frame rate in GoPro Studio Edit, you can also shoot a time-lapse movie. The latter technique surely provides better quality because the footage is constructed of individual still images.
Finding your unique point of view
Having a camera that provides a unique view of the world can stimulate your creative approach to arranging a scene. That’s why it’s important to find the best position for your GoPro by changing its position — higher, lower, or even tilted — to make a shot more interesting.
Where you position the camera speaks loudly about the message you’re trying to convey and affects how you edit your movie.
Try including some of these shots in your next movie:
- High angle: Whether you mount your GoPro on a pole or use a handheld extension device, you elevate the camera and change the perspective, providing a more graphical composition of the frame. Besides providing a unique perspective, this shot can make the audience look down on the character, perhaps to depict weakness. It can also produce a bobble head effect when you’re shooting a person (see Figure 5-12).
- Bird’s-eye: Although this shot isn’t easy for most cameras, GoPro makes it possible to capture an angle that would make Alfred Hitchcock proud. Positioning the camera high and directly above the action creates a topographical view, often making common objects unrecognizable.
- Low angle: Mounting the camera as low as possible and pointing it upward provides another dynamic option for your movie. With this perspective, you can change the horizon. A low-angle shot also shows the viewer something he or she normally doesn’t see. You can also use it to show the perspective of a child.
- Dutch angle: Intentionally tilting the frame provides a refreshing break in conventional viewing. This perspective, which is popular in horror flicks, independent films, and music videos, can depict alienation, uncertainty, and tension. Whenever possible, try to use this creative device; it can make your movies more visually appealing. But use it sparingly. It gets old rather quickly.
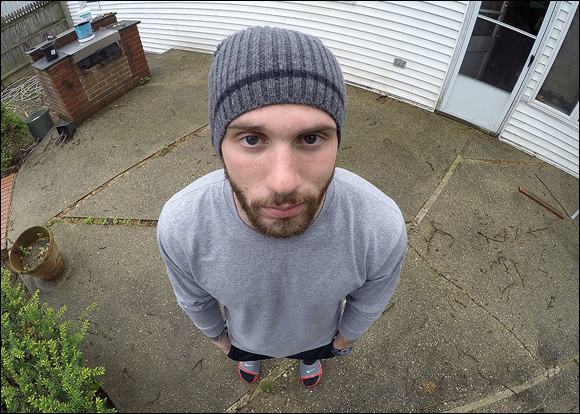
FIGURE 5-12: Bobble head effect.
Moving the camera
Because your GoPro is mostly attached to a mount, it’s going to move with the subject. At other times, you can also use it like a conventional movie camera when it comes to following the action or making a visual statement. Consider the following:
- Pan: A sweeping motion of the scene that goes side to side.
- Tilt: It’s the camera’s version of looking up, down, or up and down.
- Tracking shot: A means of using the focal length to draw the subjects closer or farther away while shooting the scene.
Working with the Capture App
The Capture app lets you control the camera and see what’s going on. All the tips in this chapter about managing the contents of the frame won’t matter much unless you can see exactly what you’re doing. Also, because the GoPro isn’t always in front of you, using your smartphone with the Capture app is the only game in town.
Controlling the camera remotely
Because of the interesting places you can put a GoPro, you’re rarely close to the camera. That’s what makes the Capture app so invaluable. You can not only see the shot, but also have complete access to camera controls. Among other things, you can start and stop the recording, adjust camera functions, switch modes, and check your battery level from a distance.
Monitoring the shoot
The first time I picked up a GoPro, it felt like something was missing. Of course, that something was the viewfinder. Most GoPro cameras do not have a viewfinder, nor do they need one since the camera is often in the middle of action that you are not. That’s what makes the Capture app, as seen in Figure 5-13, so important: It allows you to monitor the scene from a safe distance and make mode and settings changes.
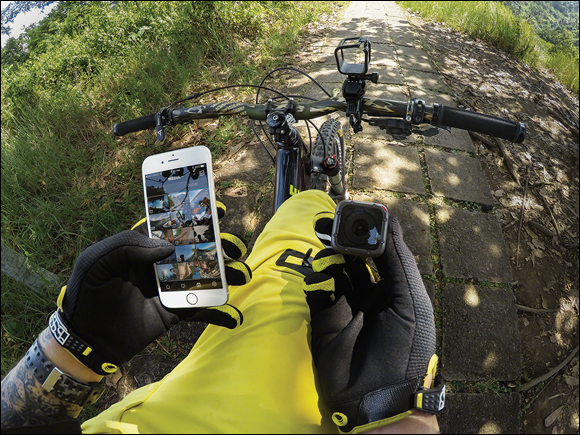
FIGURE 5-13: Monitoring a scene in the Capture app.
Viewing footage on a tablet or smartphone
After you shoot your footage, you can watch it on a mobile device. In film lingo, this footage represents dailies you can watch anywhere you want. You can even browse and delete content from your camera to free space or include more compelling footage.
Shooting Some Variations
Editing a movie is a lot like assembling a jigsaw puzzle: Success depends on putting the right pieces together. Puzzle pieces are predetermined, but your movie isn’t. That’s why you need to capture variations in your setup shots and cutaways.
Don’t be stingy when it comes to shooting your movie. That extra footage can not only better capture your movie, but also add more flexibility when it comes time for editing. So why settle for a single take when you can capture it several more times to get it perfect? Besides, it wasn’t unusual for a movie to have a 20:1 ratio when it was shot on film. You’re shooting on a memory card that you can download and erase.
But making sure you’ve shot enough variations of each scene differs from haphazardly capturing whatever you see and expecting to turn it into a cohesive movie. Instead, carefully decide the content of your film and then make sure that the technical and aesthetic settings match your intentions.