Chapter 8
Of Sound Movie and Body
IN THIS CHAPTER
![]() Breaking down microphone types
Breaking down microphone types
![]() Avoiding audio pitfalls
Avoiding audio pitfalls
![]() Monitoring your audio
Monitoring your audio
If you showed a group of viewers two movie clips — one a high-definition (HD) video with slightly distorted audio quality and the other a standard-definition (SD) video with clear sound — and asked them which video is better quality, chances are that they’d pick the SD version. That’s because the better your movie sounds, the more an audience will appreciate it.
Sound completes the sensory experience of a film, so always make sure that your movies sound great. That’s easier said than done with the GoPro, though, because it doesn’t always capture sound effectively. Maybe you didn’t place it in the right location to capture the right sounds, or perhaps the limitations of the built-in microphone came back to haunt you. Lots of things can make audio capture on a GoPro less than perfect.
Although the GoPro can’t handle every audio situation out of the box, a wide range of accessories can help you capture superior sound.
Capturing Sound on the Scene
The GoPro allows you to use the same range of microphones as any other camcorder, though some mikes require an adapter that plugs into the camera or mixer and captures audio directly on the camera’s memory card. DSLRs and some consumer-level camcorders generally use a 3.5mm (mini-plug), not much different from the one on your headphones, whereas more advanced models use the XLR input (that’s the bigger one with the prongs).
You can also use an audio recorder, which bypasses the GoPro’s memory card and captures sound as a separate file. Later you can match with the video in your editing program (see Part 3). If you have a professional-quality microphone that uses an XLR connection, you can use an adapter.
All microphones and audio recorders have advantages and drawbacks, as you see in the following sections.
Using a microphone
When you think of shooting a GoPro movie, capturing sound with a microphone is not the first thing that comes to mind. Most people start with the microphone that’s built into the camera, but some move on to other microphone types when they need to capture sound in a special way. It is especially important with scenes that depend on sound for a full sensory experience. Whether it’s a pool party or the din of an outdoor scene as shown in Figure 8-1, it’s equally essential that the viewer hears the action as much as seeing it.

FIGURE 8-1: The sound from this outdoor casino is as important as the visual aspect.
Capturing sound with the on-camera microphone
Whenever you record video on your GoPro, the camera captures both video and audio. That is, sound and picture come together in a single file on your memory card.
Thanks to advanced audio processing on the HERO5, you can capture left and right stereo audio channels on your GoPro. it provides better results when conditions are perfect: That’s when the subject is near the camera and there’s little, if any, ambient noise. Unfortunately, conditions are rarely perfect. (See Figure 8-2.)
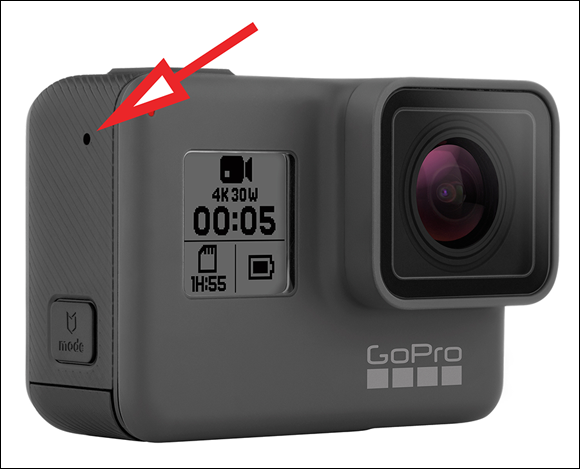
Photo courtesy of GoPro, Inc.
FIGURE 8-2: The GoPro’s microphone.
On-camera microphones like the GoPro’s have several drawbacks:
- They pick up all kinds of ambient sounds near the camera. Everything from barking dogs and screaming kids to planes passing overhead is recorded on your audio track.
- Even when those elements don’t rear their ugly heads, the sound quality of the camera’s microphone can lack depth and range, based on its proximity to the source.
- The GoPro is designed to capture unique visuals, not necessarily to record audio. Audio is a secondary feature. When the best source of sound comes from the side of your GoPro, there’s not much you can do about it.
On-camera microphones were never intended for serious recording. They were added as a cheap way to capture sound to go with video. Use the GoPro’s mike to capture sound for reference, and use it when it’s the only game in town.
Adding a microphone
Like just your new iPhone, the HERO 3.5mm mini-plug connector for internal audio is a thing of the past. But that’s no problem with the Pro 3.5mm Mic Adapter. It expands the potential for high-quality audio capture. Compatible with a wide range of external 3.5mm microphones, it enables stereo mic and line input for external audio sources like an audio recorder or mixer. Microphones come in various types and price ranges, one of which may be perfect for your needs and budget.
External microphones have their own sets of issues, but they capture better audio than the GoPro’s built-in mike. Here are several popular types of microphones:
- Shotgun: This long, narrow microphone (see Figure 8-3) picks up audio directly where you point it, but not necessarily close to it. Basic models are attached to professional camcorders; dedicated versions are used in television studios and on boom poles at movie shoots and red-carpet events. Think of the shotgun mike as being the audio version of a telephoto lens.
- Stick/Directional: Perhaps the most recognizable microphone on the planet. It’s the type that singers use on stage, comedians use in clubs, and television news reporters hold in front of interview subjects, held close to the mouth to isolate ambient sound. The stick/directional type of microphone covers a wide range of microphone types that you hold with your hand in front of the subject, or in front of yourself. These mikes are usually tethered to the camera by an XLR cable, though some inexpensive models use a 3.5mm connection cable. It’s ideal to use when interviewing a subject or singing into the camera.
- Lavalier: Also known as a lapel microphone, it’s commonly used during television interviews. The tiny device clips to the subject’s clothing near his face and is wired either directly to the camera or to a transmitter on the subject. When used correctly, this microphone provides great audio and isn’t visually obtrusive. When it’s used improperly, the audio is a rustling, muffled mess.
- Camera-mounted: Camera-mounted mikes are ideal for picking up natural sounds in the scene, such as the whoosh of a babbling brook or the pleasant sounds of a horse farm. They also work well for interviewing people when they’re close enough to the camera — say, 4 to 7 feet away.
- Boom: Basically, it’s a shotgun microphone connected to a pole so you can capture sound farther away from the camera.
- Wireless: Sometimes, you’re just better off using a wireless microphone. Instead of tethering the camera to a cable, connect the microphone to a transmitter and a wireless receiver on the camera. A wireless mike allows you to move independently of the camera if you’re within range of its receiver, but connecting one to your GoPro requires an advanced understanding of setting it up properly and staying in range.

FIGURE 8-3: Shotgun microphone.
Choosing the right mic for the job
Here are some common shooting situations and the right microphone to use in each situation:
Interviewing a moving subject: stick microphone. The trick is to get the microphone close enough to a subject on the move without knocking out his teeth. Make sure that the microphone is no more than 9 inches from the subject.
 Be consistent about how far away you hold the mike. If you move closer or pull away, you can alter the audio level, which is like raising or lowering the volume — only worse. If you’re not sure you can hold a constant position, have your sound person hold a boom microphone over the subject.
- Capturing natural sound: on-camera microphone. When you’re recording natural sound with an on-camera microphone, it’s important to get as close to the subject as possible. This can be a challenge when the audio source is at a different distance from the subject, so you may have to compromise between audio and video (see Figure 8-4).
- Shooting stationary talking subjects: lavalier microphone. When you have a stationary subject, you can control the audio portion of your recording much better than you can in other situations. Because the subject isn’t moving (or at least isn’t going to move far), it’s best to use a lavalier microphone to ensure that you capture sound at a consistent distance, as shown in Figure 8-5. Due to the wide view of the camera, it’s imperative to keep the wires out of the scene or go wireless.
- Shooting a movie scene: boom microphone. If you’re shooting a feature film, you’re most likely capturing the audio on a separate recorder (see the next section), so camera-to-subject distance isn’t an issue. The microphone and audio recorder can be much closer than the camera. The same can apply for your GoPro movie. Just make sure that the sound person holds the boom microphone appropriately. That means held from a consistent distance over the subject, and out of camera range.
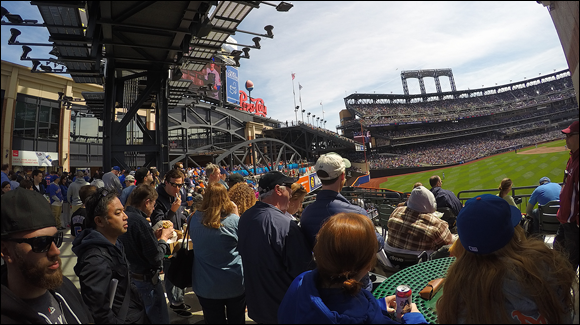
FIGURE 8-4: From casual conversation to the game itself, there are a variety of sounds near and far for Sunday afternoon baseball.
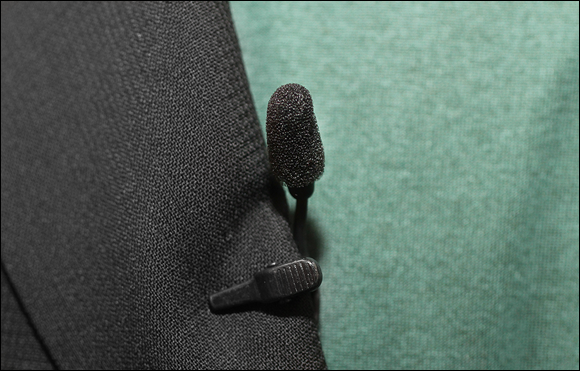
FIGURE 8-5: Lavalier microphone.
Using a digital audio recorder
Using a separate device to capture audio may seem to be complicated, but it’s much simpler than you’d think. Also, it involves minimal risk with a great reward: optimal audio.
A digital audio recorder (see Figure 8-6) captures sound independently of the GoPro. Add the audio recording to the video in postproduction by matching it to the audio track captured by the camera, by using a plug-in for your editing software, or by using a separate sound application.
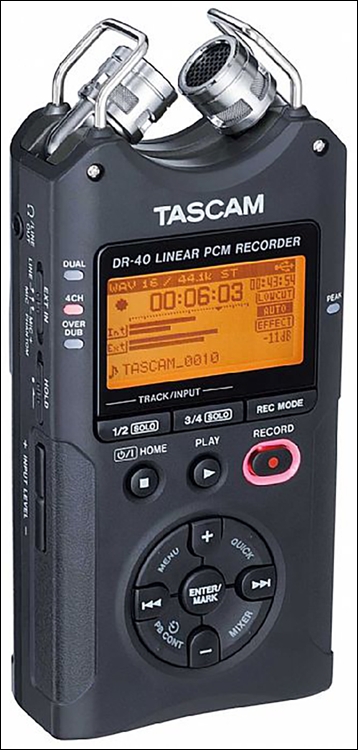
FIGURE 8-6: Digital audio recorder.
Here are some pointers for using a digital audio recorder:
- Capture sound on the GoPro too. It’s essential to record a reference track to match the better-quality audio that the recorder captures. Later, you can discard the weaker track when editing in a more advanced program such as Final Cut Pro or Adobe Premiere. (To aid in syncing the tracks, use a “scene clapper” or clap your hands several times.)
- Pick the proper audio format. Digital audio recorders offer a wide range of audio format choices, but not all of them are right for movies. Choose a WAV or AIFF file. You can capture sound in MP3 format too, but the audio quality won’t be very good. (Be sure to consult the documentation of your editing software to ensure the media is compatible.)
- Record on two or four channels. A digital audio recorder lets you decide the number of channels you want to record and the audio format. Select four-channel recording if you want more control at various levels; then mix the sound down later. (You will need four separate mics and four separate cables to four separate inputs.)
- Fine-tune your audio levels. Make sure that audio levels are within range (that is, not peaking and creating distorted sound) by looking at the meters before you start recording. (For more information, see “Maintaining proper levels,” later in this chapter.)
Using the Frame
While the HERO5 and Session models already use the Frame (they’re already waterproof), previous GoPro models require this accessory. The Frame, shown in Figure 8-7, provides a viable alternative to the waterproof case and captures cleaner audio because the microphone is directly picking up sound as opposed to being covered by the camera’s protective case. Thanks to its open design, this important accessory allows you to attach the camera to your favorite GoPro mount. But that’s not all it can do; other benefits include:
- Access to camera ports: You can change media card, offload data, and charge the camera without taking it out of the case.
- Easily Accessorize: Free of the cumbersome case, you can attach an LCD Touch BacPac to monitor the scene as well as the Battery BacPac for longer capture.
- Sharper optics: Because there’s not an extra piece of glass, less chance exists for lens fog or debris.
Photo courtesy of GoPro, Inc.
FIGURE 8-7: The Frame in action.
Preventing Audio Problems
In capturing audio, some elements are clearly out of your power. What matters is taking care of the ones that you can control. Sometimes, that’s as simple as being aware of ambient noise on the scene. At other times, it means using a specific microphone technique.
Working around background noise
The most common audio problems involve unwanted background noise. No matter where you are, something can ruin your audio capture. In urban areas, you may pick up honking horns, screeching truck brakes, or emergency-vehicle sirens. In the country, the problem may be tree branches rustling, crickets chirping, or animals making various sounds.
The microphone doesn’t discriminate when it comes to sound, so it picks up what you want to record and an assortment of unwanted noises that can distract attention from the primary audio. It’s your job to reduce as much background noise as possible.
To reduce background noise, try the following things:
- Use your ears. Your ears are made for more than just keeping your sunglasses from falling off your face. They’re designed to pick up lots of different sounds. Before you press the Shutter/Select button to start recording, listen for any potential problems. If everything sounds good, listen for noise patterns so you can shoot around traffic or wind gusts.
- Stay away from noisy locations. Airports, train stations, and high-traffic areas are obvious places to avoid, but chattering crowds and music blaring from passing cars also present challenges to recording audio. Whenever possible, position the microphone away from noisy locations.
Maintaining proper levels
Maintaining proper audio levels isn’t possible because you can’t see the meters on your GoPro, especially because it’s mounted somewhere far away, or maybe too close, like your forehead. That’s why it’s important to use a separate audio recorder (see “Using a digital audio recorder,” earlier in this chapter) when sound quality is high on your list. Watch its meters and use headphones to monitor the sound (see “Working with Other Sound Equipment,” later in this chapter).
Audio should peak no higher than 12 decibels (dB). Otherwise, you’ll get clipping: irreversible distortion caused by high audio levels. There’s no sense in capturing audio if it’s going to clip. Before rolling, ask actors or interviewees to speak their loudest lines to avoid recording distorted audio.
Coping with wind
 Using a separate microphone offers clear advantages over using the GoPro’s on-camera microphone, but it may not be free of problems. Shooting on location puts you at the mercy of forces outside your control. Regardless of what kind of equipment you have or what you know about audio, the second you step outside a controlled environment, you’re at the mercy of sound-related issues. Howling wind (or even just a whimpering one) can wreak havoc on a scene. Gusts can impede sound or render it unusable. Better-quality microphones reduce some wind-related problems, but only some.
The good news is that you can solve many sound-related dilemmas by using the proper techniques and accessories. Consider these coping strategies for shooting outdoors on a windy day:
- Put a windscreen over a stick microphone. A windscreen looks like a little hat for your microphone. It cuts down on the whistle of the wind (as well as heavy breathing sounds, if your subject is winded).
- Put a wind muff on your boom microphone. From a distance, a boom microphone with a wind muff looks like a comatose squirrel dangling on a pole over the subject. But this woolly accessory can deal with some of the worst conditions and reduce noise by nearly 10 dB. The big problem is keeping it out of your shot.
- Use a blimp. A blimp comes in handy when conditions are tough, such as when you’re recording in a howling wind. This accessory is a big hollow tube that fits around the microphone and creates a pocket of stillness around it by absorbing wind vibrations.
- Get creative: In a pinch, shelter your microphone from the wind using whatever means you have handy: a cupped hand, shielding with your jacket, put a sock on it, or whatever; otherwise, your sound will be wind-blown.
Staying close to the subject
If you’re a fan of the classic television sitcom Seinfeld, you may be familiar with the episode “The Puffy Shirt,” in which Jerry was asked to wear a puffy shirt by a low-talking fashion designer. Because he didn’t hear what the low talker was asking him to do, he ended up wearing the shirt during a television appearance. He should have gotten closer to hear what she was saying.
The same applies to using a microphone. The closer the microphone is to the subject, the better the audience can understand his words, and the less likely you are to have extraneous noise polluting the audio track.
It’s hard not to have the subject close to you when you’re shooting with GoPro. If you’re not using the GoPro’s on-camera microphone as your primary audio source, use a shotgun microphone or a wireless model closer to the subject.
You may want to use a pop screen, which is a circular foam accessory stretched across a frame that clips in front of a microphone. Besides looking cool, this inexpensive attachment reduces plosive noises — the “pop” sounds in words beginning with b, p, or t. If you don’t use a pop screen, the subject’s plosives may be the vocal equivalents of fingernails on a chalkboard.
Working with Headphones
It’s always a good idea to use headphones to monitor audio. You can not only hear when the sound overmodulates (that’s a fancy way of saying it’s distorted), but also listen for unwanted sounds and distortion.
Following are a few common types of headphones:
- Earbuds: The headphones you use with iOS devices can work with your DSLR. The audio quality is acceptable.
- Ear pads: These small, inexpensive, over-the-ear headphones are adequate, but they don’t isolate ambient sound.
- Clip-ons: Clip-on headphones clip directly to your ears. They can come in handy, especially when you can use a clip-on that’s clipped on one ear.
- Full size: Full-size headphones have large cups that cover your ears. These headphones are best for listening to music while relaxing in an easy chair — not for monitoring audio.
 Noise-canceling headphones aren’t recommended, because you need to pay attention to ambient sound to hear if it may affect audio capture.