
Chapter 2
The Typing Chapter
IN THIS CHAPTER
![]() Knowing the keyboard and mouse
Knowing the keyboard and mouse
![]() Using the spacebar
Using the spacebar
![]() Using the Enter key
Using the Enter key
![]() Observing the status bar
Observing the status bar
![]() Minding the space between pages
Minding the space between pages
![]() Showing and hiding hidden characters
Showing and hiding hidden characters
![]() Dealing with weird underlines
Dealing with weird underlines
Word processing is about using a keyboard. It’s typing. That’s the way computers were used for years, long before the mouse and all the fancy graphics became popular. Yep — ask a grizzled old-timer and you’ll hear tales of unpleasant text screens and mysterious keyboard commands that would tie your fingers in knots. Things today aren’t that bad.
Input Devices Galore
When you process words, you type: clickity-clack-clack. You use your fingers and one thumb to manipulate the computer keyboard. It’s an important part of getting text on a page, but also important is the mouse. No, you don’t type with the mouse, but you do some pointing and clicking in addition to clickity-clack-clacking.
Using the PC keyboard
I’m sure you can easily recognize a computer keyboard, but do you know the technical terms that refer to its various keys?
Relax: No one does.
Rather than look at all 100+ keys as a single, marauding horde, consider how the keys are clustered into groups, as illustrated in Figure 2-1. To best use Word and understand how the keyboard is referenced in this book, it helps to know the general keyboard areas illustrated in the figure.
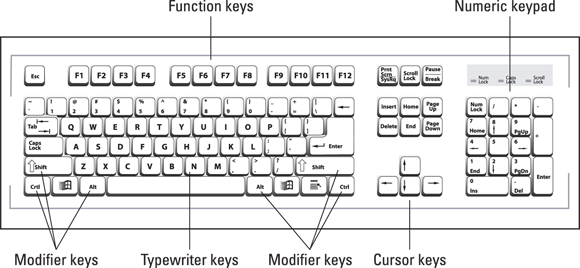
FIGURE 2-1: A typical PC keyboard.
Of all the keys, a few play important roles in the word processing task. They are
- Enter: Marked with the word Enter and sometimes a cryptic, bent-arrow thing, use this key to end a paragraph of text. See the later section “Pressing the Enter key.”
- Spacebar: The only key with no symbol, it inserts a space between words and sentences. Yes, just one space. See the later section “Whacking the spacebar.”
- Tab: This key inserts the Tab character, which shoves the next text you type over to the next tab stop. Using this key properly is an art form. Chapter 12 is dedicated to typing tabs and setting tab stops.
- Backspace and Delete: Use these keys to back up and erase text. Read more about these keys in Chapter 4.
Every character key you press on the keyboard produces a character in your Word document, on the blank part where you write. Typing those character keys over and over is how you create text in a word processor.
- A laptop keyboard’s layout is different from the desktop keyboard layout, as shown in Figure 2-1. Typically, laptop keyboards lack a numeric keypad. The cursor keys are clustered tightly around the typewriter keys in unusual and creative patterns. The function keys might be accessed by pressing special key combinations.
- Keys on the numeric keypad can be number keys or cursor keys. The split personality is evident on each key cap, which displays two symbols. When the Num Lock key’s lamp is on, the keys generate numbers. When the lamp is off, the keys serve as duplicate cursor keys.
- Cursor keys control the cursor, which is officially known as the insertion pointer in Microsoft Word. The cursor keys include the four arrow keys (up, down, left, right) and also the keys Home, End, PgUp (or Page Up), PgDn (or Page Down), Insert, and Delete.
- Ctrl is pronounced “control.” It’s the control key.
- The Delete key may also be labeled Del on the keyboard.
- The modifier keys — Shift, Ctrl, and Alt — work in combination with other keys.
Working an onscreen keyboard
Two-in-one laptops and tablets sport an onscreen keyboard, which you can use to type text in Word. You can also draw text, scribble, and perform a host of other options. For email or short missives, the onscreen keyboard is great! For true word processing, however, attach the keyboard.
When it’s not possible to use a real keyboard, here are my onscreen keyboard thoughts and suggestions:
- The onscreen keyboard’s operation works basically the same as a real keyboard: You type text using your fingers, albeit probably not as fast as on a physical keyboard.
- Accessing some of the specialized keys (function keys, cursor keys, and so on) is problematic. Sometimes they’re available by choosing a different touchscreen keyboard layout, but often they’re not available at all.
- Using the Ctrl key on the onscreen keyboard is a two-step process: Tap the Ctrl key, and then touch another key — for example, Ctrl and then the S key for Ctrl+S.
- Not all Ctrl-key combinations in Word can be produced by using the onscreen keyboard.
- Refer to Chapter 1 for information on activating Touch mode, which makes it easier to use Word on a tablet.
Understanding the mouse pointer
Though word processing is a keyboard thing, you inevitably lift your hand from the keyboard to fondle the computer mouse. Use the mouse to choose commands, move around the document, and select text. Specific information on these tasks is found throughout this book. For now, it helps to understand how the mouse pointer changes its appearance as you work in Word:
![]() For editing text, the mouse pointer becomes the I-beam.
For editing text, the mouse pointer becomes the I-beam.
![]() For choosing items, the standard 11 o’clock mouse pointer is used.
For choosing items, the standard 11 o’clock mouse pointer is used.
![]() For selecting lines of text, a 1 o’clock mouse pointer is used.
For selecting lines of text, a 1 o’clock mouse pointer is used.
The mouse pointer changes its appearance when the click-and-type feature is active: Teensy lines appear below and to the left and right of the I-beam mouse pointer. Refer to Chapter 32 for information on click-and-type.
 When you point the mouse at a command button or any icon on the Word screen, you see a pop-up information bubble. The text in the bubble describes the command and perhaps offers a hint on how the command is used.
Keyboard Do’s and Don’ts
You don’t need to be a 70-words-per-minute touch typist to use a word processor. And if you don’t know how to type, see the nearby sidebar, “Do I need to learn to type?” — although I can tell you that the answer is “Yes, you need to learn to type.” It also helps to know a few typing do’s and don’ts that are particular to word processing.
Following the insertion pointer
Text you compose in Word appears at the insertion pointer’s location. The insertion pointer looks like a flashing vertical bar:
|
Characters appear before the insertion pointer, one at a time. After a character appears, the insertion pointer hops to the right, making room for more text.
- The insertion pointer moves as you type, but its location can be set to any position in the document’s text. Chapter 3 covers moving the insertion pointer around in more detail.
 Some documentation refers to the insertion pointer as a cursor. The mouse pointer might also be referred to as a cursor. For clarity, this book refers to the insertion pointer and mouse pointer without using the term cursor.
Whacking the spacebar
Pressing the spacebar inserts a space character into the text. Spaces are important between words and sentences. Withoutthemreadingwouldbedifficult.
 The most important thing to remember about the spacebar is that you need to whack it only once when word processing. Only one space appears between words and after punctuation. That's it!
- I'm serious! Back in the dark ages, typing instructors directed students to use two spaces between sentences. That extra space was necessary for readability because typewriters used monospaced characters. On a computer, however, the extra space does nothing and potentially leads to formatting woes down the road.
- Anytime you feel like using two or more spaces in a document, use a tab instead. Tabs are best for indenting text as well as for lining up text in columns. See Chapter 12 for details.
Backing up and erasing
When you make a typo or another type of typing error, press the Backspace key on the keyboard. The Backspace key moves the insertion pointer back one character and erases that character. The Delete key also erases text, though it gobbles up characters to the right of the insertion pointer.
See Chapter 4 for more information on deleting text.
Pressing the Enter key
In word processing, you press the Enter key only when you reach the end of a paragraph. Do not press the Enter key at the end of a line.
When your text wanders precariously close to the right margin, Word automatically wraps the last word on the line down to the next line. This word wrap feature eliminates the need to press Enter at the end of a line.
- Don’t use the Enter key to double-space your text. Double-spacing is a paragraph format in Word. See Chapter 11 for more information.
- Don’t press the Enter key twice to add extra space between your paragraphs. That extra space is added automatically, provided it’s part of the paragraph format, also covered in Chapter 11.
- If you want to indent a paragraph, press the Tab key after pressing Enter. As with other word processing rules and regulations, paragraphs can be indented automatically, provided that format is applied, as covered in (you guessed it) Chapter 11.
Stuff That Happens While You Type
As you madly compose your text, fingers energetically jabbing the buttons on the keyboard, you may notice a few things happening on the screen. You might see spots. You might see lines and boxes. You may even see lightning! All are side effects of typing in Word. They’re normal, and they’re presented to help you.
Watching the status bar
The reason it's called the status bar is that it shows you the status of your document, updating information as you type. A collection of information appears, starting at the left end of the status bar and marching right, as shown in Figure 2-2.

FIGURE 2-2: Stuff that lurks on the status bar.
Use the status bar’s information to see which page and line you’re editing, the word count, and so on.
The details that appear on the status bar are customizable. Chapter 29 explains how to control what shows up and how to hide items on the status bar.
Observing page breaks
As your document gains length, Word shows you where one page ends and another page begins. This visual assistance helps you keep elements on the same page, but also shows you how text flows between pages.
The visual clue for a new page is shown in Figure 2-3. In Print Layout view, the page break appears graphically. Text above the ethereal void is on one page, and text below the void is on the next page.
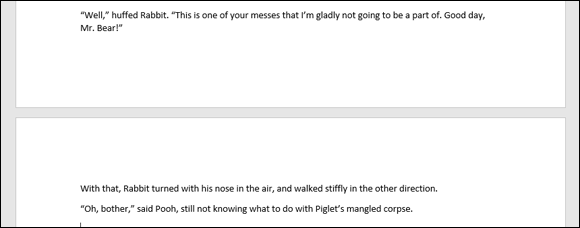
FIGURE 2-3: The page break in Print Layout view.
In Draft view, the page break appears as a line of dots marching from left to right across the document. In other views, the page break may not show up at all, in which case you use the status bar to determine the current page. For example, when the page-number indicator changes from 6 to 7, you’ve started a new page.
 You can change the gap between pages in Print Layout view. Point the mouse at the gap. When the mouse pointer changes, as shown in the margin, double-click to either close or open the gap.
- Don’t force a page break by pressing the Enter key a gazillion times! Instead, see Chapter 13 for information on inserting page breaks (new pages) in Word.
- The topic of page breaks brings up the concept of widows and orphans, which refer to a single line of text at the page's top or bottom, respectively. Word automatically moves such text to the next or previous page to prevent widows and orphans from happening.
Working collapsible headers
![]() You may see a tiny triangle to the left of various headings in your documents, as shown in the margin. These triangles allow you to expand or collapse all text in the header’s section. Click once to collapse the text; click again to expand it.
You may see a tiny triangle to the left of various headings in your documents, as shown in the margin. These triangles allow you to expand or collapse all text in the header’s section. Click once to collapse the text; click again to expand it.
See Chapter 25 for a longer discussion of collapsible headers, as well as information on Word’s Outline view.
Dealing with spots and clutter in the text
There’s no cause for alarm if you see spots — or dots — amid the text you type, such as
This•can•be•very•annoying.
What you're seeing are nonprinting characters. Word uses various symbols to represent things you normally don’t see: spaces, tabs, the Enter key, and more. These jots and tittles appear when the Show/Hide feature is activated:
- Click the Home tab.
 In the Paragraph group, click the Show/Hide command button.
The button features the Paragraph symbol as its icon, shown in the margin.
To hide the symbols again, click the Show/Hide command button a second time.
- Why bother with showing the goobers? Sometimes, it's useful to check out what's up with formatting, find stray tabs visually, or locate missing paragraphs, for example.
- WordPerfect users: The Show/Hide command is as close as you can get to your beloved Reveal Codes command.
- The keyboard shortcut for the Show/Hide command is Ctrl+Shift+8. Use the 8 on the typewriter area of the keyboard, not the numeric keypad.
- The Paragraph symbol is called the pilcrow.
Understanding colorful underlines
When Word underlines your text without permission, it’s drawing your attention to something amiss. These special underlines are not text formats. Here are a few of the underlines you may witness from time to time:
- Red zigzag: Spelling errors in Word are underlined with red zigzags. See Chapter 7.
- Blue zigzag: Grammatical and word choice errors are flagged with a blue zigzag underline. Again, see Chapter 7.
- Blue underlines: Word courteously highlights web page addresses by using blue underlined text in your document. You can Ctrl+click the blue underlined text to visit the web page.
- Red lines: You may see red lines in the margin, underneath text, or through text. If so, it means that you’re using Word’s Track Changes feature. See Chapter 26.
Beyond these automatic underlines, you can apply the underline format to your text, choosing the type of underline and its color. See Chapter 10.