
Chapter 17
Random Drawer Formatting
IN THIS CHAPTER
![]() Using fancy text formatting
Using fancy text formatting
![]() Swiping text formats
Swiping text formats
![]() Formatting quotes, fractions, and stuff
Formatting quotes, fractions, and stuff
![]() Creating automatic lists and borders
Creating automatic lists and borders
![]() Centering a title page
Centering a title page
Everyone has one, even neatniks who proudly profess to be organized. It’s the random-stuff drawer. Maybe it’s in the kitchen or a desk drawer in your home office. Perhaps you have several such random stuff drawers. These are necessary because everyone needs a location for stuff that just doesn’t fit anywhere else.
Welcome to the random-drawer formatting chapter. Here you find formatting commands various and sundry. They just don’t fit in well with the other formatting chapters found in this part of the book.
Weird and Fun Text Effects
![]() On the Home tab, in the Font group, is a button adorned with a fuzzy A, as shown in the margin. It’s the Text Effects and Typography button. Click that button to view the Text Effects menu, as shown on the far left in Figure 17-1. This menu lists special text decorations, well beyond the standard text attributes shown in Chapter 10. Choose an effect from the menu to apply it to your text.
On the Home tab, in the Font group, is a button adorned with a fuzzy A, as shown in the margin. It’s the Text Effects and Typography button. Click that button to view the Text Effects menu, as shown on the far left in Figure 17-1. This menu lists special text decorations, well beyond the standard text attributes shown in Chapter 10. Choose an effect from the menu to apply it to your text.

FIGURE 17-1: Text effects galore.
If the effects on the Text Effects menu aren’t exactly what you want, you can create your own: You can choose custom effects from the submenus on the Text Effects and Typography menu, or you can use the Format Text Effects dialog box, shown in the center and on the right in Figure 17-1. To access this dialog box, follow these steps:
Press Ctrl+D.
The Font dialog box appears.
Click the Text Effects button.
The Format Text Effects dialog box appears. It features two categories: Text Fill & Outline and Text Effects, shown in the center and on the right in Figure 17-1, respectively.
Manipulate the controls in the dialog box to customize text effects.
Choose a category, and then click a triangle to expand items in a subcategory. Controls appear, as illustrated in Figure 17-1, which let you customize the effect. Sadly, the dialog box lacks a preview window, so you have to make your best guess about the results.
- Click the OK button to dismiss the Format Text Effects dialog box.
- Click the OK button to close the Font dialog box.
The options that you select affect any selected text in the document or any text you type from that point onward.
- Font effects are best used for document headings and other decorative text.
 The Text Effects button is unavailable (dimmed) if you attempt to use this command on an older Word document. See Chapter 24 for information on converting older Word documents. If the document is based on an older template, you need to update the template and then reattach the document to that template. See Chapter 16.
Steal This Format!
It’s not a whisk broom, and it’s definitely not a shaving brush. No, it’s a paintbrush. Not only that, but it’s also a special paintbrush — one that steals text and paragraph formatting, lifting it from one place in your document and splashing it down in another. It’s the Format Painter, and here’s how it’s used:
Place the insertion pointer in the midst of the text that has the formatting you want to copy.
Think of this step as dipping a brush into a bucket of paint.
- Click the Home tab.
 In the Clipboard group, click the Format Painter command button.
 The mouse pointer changes to a paintbrush/I-beam, as depicted in the margin. Use it to select and reformat text.
- Hunt for the text you want to change.
Select the text.
Drag over the text you want to change — to “paint” it.
Voilà! The text is changed.
- The Format Painter works with character and paragraph formatting, not with page formatting.
 To change the formatting of multiple bits of text, double-click the Format Painter. That way, the Format Painter mouse pointer stays active, ready to repaint lots of text. Press the Esc key to cancel your Dutch Boy frenzy.
- If you tire of the mouse, you can use the Ctrl+Shift+C key combination to copy the character format from one location to another. Use the Ctrl+Shift+V key combination to paste the character format.
- You can sorta kinda remember to use Ctrl+Shift+C to copy character formatting and use Ctrl+Shift+V to paste, because Ctrl+C and Ctrl+V are the copy-and-paste shortcut keys. Sorta kinda.
- Don’t confuse the Format Painter with the highlighting tool, found in the Font group. See Chapter 26.
Automatic Formatting
Part of Word’s AutoCorrect feature (covered in Chapter 7) is a tool named AutoFormat. Whereas AutoCorrect fixes typos and common spelling boo-boos, AutoFormat fixes formatting fumbles.
Enjoying automagical text
AutoFormat controls some minor text formatting as you type. All its settings are visible in the AutoCorrect dialog box's AutoFormat As You Type tab, as shown in Figure 17-2.
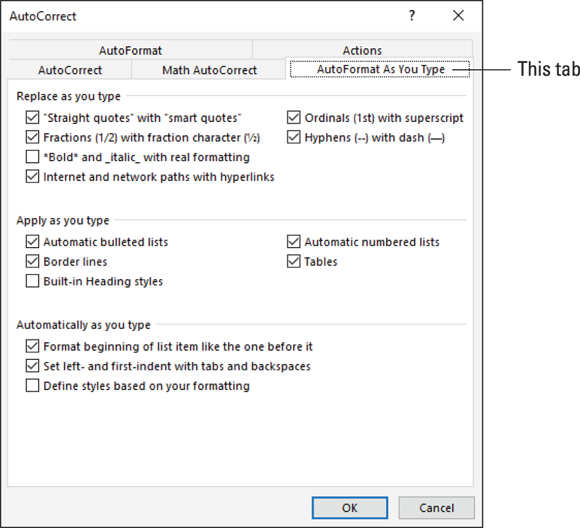
FIGURE 17-2: AutoFormat As You Type settings.
To display the AutoCorrect dialog box and access the AutoFormat As You Type features, heed these steps:
- Click the File tab.
Choose Options.
The Word Options dialog box appears.
- Select Proofing from the left side of the window.
Click the button labeled AutoCorrect Options.
The AutoCorrect dialog box says, “Hello.”
Click the AutoFormat As You Type tab.
This part of the dialog box you see is where all the AutoFormat options dwell. (Well, aside from the AutoFormat tab, which is redundant.) Add or remove a check mark to turn an option on or off, respectively.
The best way to demonstrate the AutoFormat-as-you-type concept is to have a Word document on the screen and then type the examples in the following sections. Note that these samples demonstrate only a few of the tricks AutoFormat can perform.
Smart quotes
The quote characters on the keyboard are tick marks:" and '. AutoFormat converts them into the more stylish open and closed curly quotes. Type hither:
He said, “Yes, I'm being honest. I really do love
you, but the monster is coming and you broke your
ankle, so I figured that you'd understand.”
Both the single and double quotes are converted.
Real fractions
You can format a fraction by formatting the first value in superscript and the second value in subscript. Or you can let AutoFormat do it for you. Here's an example:
I spend twice the time doing ½ the work.
The characters 1/2 are converted into the single character ½. This trick works for some, but not all, common fractions. When it doesn't work, use superscript/subscript formatting, as described in Chapter 31.
Hyperlinks
Word can underline and activate hyperlinks that are typed in your document, such as:
I've been to http://www.hell.com and back.
The website http://www.hell.com is automatically underlined, colored, and turned into an active web page link for you. (To follow the link, Ctrl+click the text.)
Ordinals
You're guessing wrong if you think that ordinals are a baseball team or a group of religious leaders. They're numbers that end in the letters st, nd, or rd, as this line demonstrates:
There were two of us in the race; I came in 1st
and Oglethorpe came in 3rd.
Word’s AutoFormat feature automatically superscripts ordinal numbers, making them look oh-so-spiffy.
Em dashes
An em dash is the official typesetting term for a long dash, longer than the hyphen (or its evil twin, the en dash). Most people type two hyphens to emulate the em dash. Word fixes that problem:
A red one is a slug bug—not a punch buggy.
After you type the - - (“dash dash”) and then the word that follows, AutoFormat replaces it with the official em dash character.
- The keyboard shortcut for typing an em dash is Ctrl+Alt+minus sign, where the minus sign (–) is the minus key on the numeric keypad.
- The single hyphen is also converted into a en dash when you follow it with a word.
- The keyboard shortcut for typing an en dash is Ctrl+minus sign.
- The en dash is approximately the width of the letter N. Likewise, the em dash is the width of the letter M.
Formatting tricks for paragraphs
At the paragraph level, AutoFormat helps you quickly handle some otherwise irksome formatting issues. Some folks enjoy this feature, some despise it. The following sections provide a few examples of what AutoFormat is capable of.
Numbered lists
Anytime you start a paragraph with a number, Word assumes (through AutoFormat) that you need all your paragraphs numbered. Here's the proof:
Things to do today:
1. Get new treads for the tank.
![]() Immediately after typing 1., you probably saw the infamous AutoCorrect Lightning Bolt icon and noticed your text being reformatted. Darn, this thing is quick! That's the AutoFormat feature guessing that you're about to type a list. Go ahead and finish typing the line; after you press Enter, you see the next line begin with the number 2.
Immediately after typing 1., you probably saw the infamous AutoCorrect Lightning Bolt icon and noticed your text being reformatted. Darn, this thing is quick! That's the AutoFormat feature guessing that you're about to type a list. Go ahead and finish typing the line; after you press Enter, you see the next line begin with the number 2.
Keep typing until the list ends or you get angry, whichever comes first. To end the list, press the Enter key twice to erase the final number and restore the paragraph formatting to Normal.
- This numbering trick works also for letters (and Roman numerals). Just start something with a letter and a period, and Word picks up on the next line by suggesting the next letter in the alphabet and another period.
- Bulleted lists can also be created in this way: Start a line by typing an asterisk (*) and a space to see what happens.
- See Chapter 21 for more information on Word’s numbering and bulleted list formats.
- You don’t press the Enter key twice to end a typical paragraph in a document, but pressing Enter twice to terminate an AutoFormat list is completely acceptable. Doing so doesn’t add an empty paragraph to your document.
Borders (lines)
A line above or below a paragraph is typographically called a rule, but Word uses the term border. Most folks call them lines. Here's how to use AutoFormat to whip out a border:
– – –
Type three hyphens and press the Enter key. Word instantly transmutes the three wee hyphens into a solid line that touches the left and right paragraph margins.
- To create a double line, type three equal signs and press Enter.
- To create a bold line, type three underlines and press Enter.
- Refer to Chapter 18 for details on borders and boxes around your text.
Undoing an AutoFormat
You have two quick ways to undo autoformatting. The first, obviously, is to press Ctrl+Z on the keyboard, which is the Undo command. That's easy.
You can also use the Lightning Bolt icon to undo autoformatting. Click the icon to display a drop-down menu, shown in Figure 17-3. Use the options displayed to control the AutoFormat options as you type.
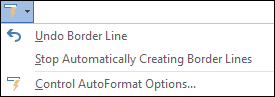
FIGURE 17-3: AutoFormat options.
Choosing the first option, Undo [whatever] (refer to Figure 17-3), is the same as pressing Ctrl+Z on the keyboard.
Selecting the second option, Stop Automatically [doing whatever], disables the specific AutoFormat feature so that it never happens again. People enjoy using this option.
Choosing the final option, Control AutoFormat Options, displays the AutoCorrect dialog box's AutoFormat As You Type tab, which is shown earlier, in Figure 17-2.
Also see Chapter 33 for more details on disabling AutoFormat features.
Center a Page, Top to Bottom
Nothing makes a document title nice and crisp like having it sit squat in the center of a page, as shown in Figure 17-4. The title is centered left to right, which is a paragraph formatting trick, but how can it be centered top to bottom on the page?

FIGURE 17-4: This title is centered on a page.
If you’re thinking about whacking the Enter key 17 times in a row to center a title top to bottom, stop! Let Word do the math to make the title perfectly centered. Here’s how:
Press the Ctrl+Home key combination.
The insertion pointer jets to the start of the document.
Type and format the document’s title.
It can be on a single line or on several lines.
To center the title, apply center paragraph justification: Press Ctrl+E. Apply any additional font or paragraph formatting as necessary.
If the title is split between two or more lines, use Ctrl+Enter to break a line, which reduces the spacing.
 Avoid the temptation to press the Enter key to add space above or below the title. Such space isn’t needed, and would wreck Word’s automatic centering powers.
Position the mouse pointer at the end of the title.
Press the End key on the last line of the title, or the author line. (Refer to Figure 17-4.)
- Click the Layout tab.
In the Page Setup group, choose Breaks ⇒ Next Page.
A next-page section break is inserted into the document. The title now sits on its own page as its own section.
Click the document’s first page.
You need to be on the page you want to format.
- Click the Layout tab.
Click the dialog box launcher in the lower right corner of the Page Setup area.
The Page Setup dialog box appears.
- Click the Layout tab.
- Click the Vertical Alignment drop-down list and choose Center.
- Confirm that the Apply To drop-down list shows This Section.
- Click OK.
The first page of the document is centered from top to bottom. Because that page is its own section, the top-to-bottom centering applies only to that page and not the rest of the document.
- Review Chapter 14 for more information on document sections.
- Also see the book Word 2016 For Professionals For Dummies (Wiley) for many additional formatting tips, tricks, and suggestions.