
Chapter 14
More Page Formatting
IN THIS CHAPTER
![]() Using sections
Using sections
![]() Placing a cover page on your document
Placing a cover page on your document
![]() Adding a header or footer
Adding a header or footer
![]() Creating unique headers and footers
Creating unique headers and footers
![]() Suppressing the header and footer on the first page
Suppressing the header and footer on the first page
![]() Working with headers and footers in sections
Working with headers and footers in sections
![]() Deleting a header or footer
Deleting a header or footer
Word’s page-formatting commands are few when compared with character- and paragraph-formatting commands, but they’re not lacking in complexity. Consider the document section, which helps you craft great-looking documents, yet navigating its implementation is akin to wandering cursed archeological digs in the Jungle of Doom. Add in headers and footers as the plucky-yet-disobedient sidekick, and you have yet another action-packed chapter on page formatting.
Slice Your Document into Sections
Word page formats — such as paper size, margins, orientation, and columns — apply to an entire document, from “once upon a time” to “happily ever after.” That is, unless the document is sliced into page format containers called sections.
Understanding sections
A section is a page-formatting container. All documents feature one section, which is why the various page-formatting commands affect the entire document; they’re applied to that single section. A document, however, can sport multiple sections. Each section can sport its own page format, independent of the other sections.
Figure 14-1 illustrates three examples of how a document can be sliced up into sections.

FIGURE 14-1: How sections control page formatting.
In Example 1, a single document contains two sections. The first section uses Roman numeral page numbers. The second section uses human numerals. Each section restarts page numbering.
The document in Example 2 contains a single-page section for its cover page. The second section — all remaining pages — uses page numbering.
In Example 3, the document has three sections. The first and third sections sport the same page formatting; the second section was created so that page 6 could be presented in landscape orientation.
In all three examples, the document’s text and paragraph formats remain unaffected by sections. Only page-level formatting is affected. Even then, you can choose whether to apply a page-level format to the current section or to the entire document.
Creating a section
A section is similar in concept to a page break, though it’s page formatting that’s “broken,” not a physical page in the document. To create a new section in a document — to insert a section break — heed these steps:
Position the toothpick cursor where you want the new section to start.
Click the mouse where you need to begin a new section, similar to creating a new page break. For most new sections, position the insertion pointer at the start of a paragraph.
- Click the Layout tab on the Ribbon.
 In the Page Setup area, click the Breaks button.
A menu appears, listing several items. The last four items are various section breaks.
Choose Next Page from the Breaks button menu.
A new section has started, which also serves as a page break.
Pages before the section break are in one document section, pages after are in the next. Page formatting commands can be applied independently to either section.
Here is a summary of the different types of section breaks:
- Next Page: Start a new section and break the page, like a hard page break. (See Chapter 13.)
- Continuous: Start a new section on a flexible boundary, depending on which page-formatting command is used. A continuous section break may start a new page, or it may not.
- Even Page: This one is similar to the Next Page break, but the page starting the new section will be an even-numbered page. For binding purposes, the even page is on the left side.
- Odd Page: It’s the same as an Even Page section break, though the page following the break will be odd, or on the right side of a bound manuscript.
 When working with sections, I recommend placing the Section item on the status bar: Right-click the status bar and choose Section from the pop-up menu. The Section item shows the current section by number as you work through the document.
Using sections
You have two options to apply a page-formatting command to a specific section within your document. In both instances, the insertion pointer must roost in the section you want to format.
To apply a page format to the current section, select that format from the Ribbon, as described in Chapter 13. For example, set a new page orientation, and that format affects only the current document section.
In the Page Setup dialog box, use the Apply To drop-down menu to apply page-formatting changes to the current document section, as illustrated in Figure 14-2.

FIGURE 14-2: Applying page formatting to one section only.
Each tab in the Page Setup dialog box features the Apply To drop-down menu. Use it to apply page-formatting changes to the entire document or to only the current section.
Removing a section break
Section breaks are invisible in Print Layout view, though you can see them in Draft view. To remove the section break, you delete it. Follow these steps, though you can start at Step 3 when using Draft view:
- Click the Home tab.
In the Paragraph group, click the Show/Hide command button.
Hidden codes and characters are revealed in the document.
- Position the insertion pointer to the start (left end) of the double-dashed lines that say Section Break.
Press the Delete key.
The section break is gone.
- Click the Show/Hide command button again to hide the codes.
After the section break vanishes, the page formatting changes, adopting the format from the previous section. That’s to be expected, but it may alter things you can’t see, such as page numbering and headers and footers.
 If you regret your decision to remove the page number, press Ctrl+Z to undo.
That First Page
Even when you’re blessed with a superior knowledge of paragraph formatting and you fully understand the magic of the section break, formatting that first page can be a bother. The kids at Microsoft are aware of your frustration, so they concocted some special first-page formatting features for Word.
Adding a cover page
The sneakiest way to slap down a cover page on your document is to use Word’s Cover Page command. Here's how it works:
- Click the Insert tab.
In the Pages group, click the Cover Page button.
If you don’t see the Pages group or Cover Page button, click the Pages button and then click the Cover Page icon.
The Cover Page button displays a fat, fun menu full of various cover-page layouts.
Choose a cover-page layout that titillates you.
The cover page is immediately inserted as the first page in the document.
Many preset cover pages feature replaceable text, such as [COMPANY NAME]. Click that text and type something appropriate, such as your actual company name, unless you actually work for the Company Name Corp. Do so for all bracketed text on the inserted cover page.
- You can change a cover page at any time by choosing a new one from the Cover Page menu. The new cover page retains any replacement text you typed.
- To remove a cover page, summon the Cover Page menu and choose the Remove Current Cover Page item.
- The cover page you add is followed by a hard page break. It is not a section break. Even so, it’s treated differently from certain page-formatting commands applied to the rest of the document. That means if you add page numbers or a header or footer to your document, the formatting applies to only the second page and later pages, not to the cover page.
Inserting a cover page manually
When you’re dissatisfied with Word’s Cover Page designs, you can craft your own cover page. All the formatting tools and document tricks presented in this book are at your disposal. You just need to insert the page at the start of the document.
Here are the general steps to take:
- Before writing the cover page, position the toothpick cursor at the tippy-top of the document.
- Click the Layout tab.
Choose Breaks ⇒ Next Page.
A section break effectively inserts a new, first page into the document as its own section.
Create the cover page.
Add a title, additional text, graphics, and various document froufrou.
Because the first (cover) page is now its own section, the page formatting it sports can be separated from the rest of the document. For example, you can apply page numbering to the second section, which keeps the cover page unnumbered. Refer to Figure 14-1, example 2.
Headers and Footers
It’s easy to confuse the concept of headers and footers with headings and footnotes. To help you understand the difference, consider these definitions:
- A header is text that appears at the top of every page in a document.
- A heading is a text style used to break up a long document, to introduce new concepts, and to help organize the text. See Chapter 15.
- A footer is text that appears at the bottom of every page in a document.
- A footnote is a tiny bit of text that appears at the bottom of a page, usually a reference to some text on that page. See Chapter 21.
In Word, headers and footers dwell in special, exclusive areas outside the realm of regular text. These areas are found top and bottom on all pages in a document. Unless you place some text or other items inside these areas, they remain invisible.
Text that typically finds its way into a header or footer (or both) includes page numbers, your name, the document name, the date, and other information that's handy to have on every page.
Using a preset header or footer
Most documents use standard, noncreative headers and footers, placing common information into one or both areas. To accommodate your hurried desires, you can quickly shove one of these preset headers or footers into your document. Heed these steps:
- Click the Insert tab.
From the Header & Footer group, choose the Header button.
The Header menu shows a list of preformatted headers.
Choose a header design.
The design’s contents are added to the document, saved as part of the page format. Also, the Header & Footers Tools Design tab appears on the Ribbon.
Change any [Type here] text in the header.
Click the bracketed text and type to personalize your header.
Use the commands on the Insert group of the Header & Footer Tools Design tab to add specific items in the header.
Examples are offered in the sections that follow.
 When you’re done working on the header, click the Close Header and Footer button.
Or you can double-click in the main text body.
To add a footer, choose the Footer button in Step 2 and think of the word footer whenever you see the word header in the preceding steps.
After you exit from the header or footer, you can see its text at the top or bottom of the document in Print Layout view. It appears ghostly, to let you know that it’s there but not part of the document. To edit the header or footer, double-click that ghostly text.
Creating a custom header or footer
When one of the preset header/footer designs doesn’t cut it, consider creating your own. The secret is to double-click the space at the top or bottom of the page in Print Layout view. This location is the header or footer area, respectively. When it becomes active, you can manually craft a header or footer to match your innermost desires.
A header or footer can contain text, a graphical goober, a field, or any other item you can slap down into the main part of the document. Common and useful commands appear on the Header & Footer Tools Design tab, but you can use other tabs on the Ribbon to create and customize a header or footer.
To switch between the header and footer while editing, click the Go to Footer or Go to Header button. These buttons are found on the Header & Footer Tools Design tab in the Navigation group.
Type text
Any text you type in a header or footer becomes part of the header or footer. It doesn’t have to be fancy text, — just whatever text you want appearing at the top or bottom of every page in the document.
The standard format for lines in a header or footer includes two tab stops: a center tab stop in the middle of the page and a right tab stop aligned with the right margin. Use these tab stops, as illustrated in Figure 14-3, to create useful header text.

FIGURE 14-3: Text in a header and a footer.
Add a page number
It’s tempting, and it seems like the obvious choice, but don’t use the Page Number command on the Header & Footer Tools Design toolbar. If you need a page number in a header or footer, add a document page-number field. Follow these steps:
- Position the insertion pointer where you want the page number to appear.
- Click the Header & Footer Tools Design tab.
In the Insert group, click the Document Info button and choose Field.
The Field dialog box appears. It’s a busy place, covered in full detail in Chapter 23.
- From the Categories menu, choose Numbering.
- In the Field Names list, click to select Page.
Choose a Format.
For example, choose the item 1, 2, 3, to use that numbering style.
Click the OK button.
The Page field is inserted in the header. It reflects the current page number for every page printed in the document.
- You don’t have to go to page 1 to insert a page number in a header. Word is smart enough to place the proper number on the proper page, no matter where you’re editing the header in the document.
- If you want one of those Page 3 of 45 indicators in a header or footer, you need two fields: the Page field, as described in this section, and the NumPages field. To add that field, repeat the steps in this section, but in Step 4 choose Document Information and in Step 5 choose NumPages.
Add the date and time
To place the current date or time or an updating time field in a header or footer, follow these steps:
- Position the insertion pointer where you want the date or time to appear.
- Click the Header & Footer Tools Design tab.
In the Insert group, click the Date & Time command button.
The Date and Time dialog box appears.
- Choose a format for the date or the time, or both.
- To keep the date and time information current, place a check mark by the Update Automatically option.
- Click OK.
Also see Chapter 23 for information on the PrintDate field.
Working with multiple headers and footers
Headers and footers come in a variety of types, allowing you to change them depending on whether the page is odd or even, or to alter the header or footer for a given document section. You can even suspend the header and footer for a page or two. Such agility requires knowing a few tricks, which I’m happy to share.
Odd and even headers and footers
See how this book has different headers on its odd- and even-numbered pages? The even-numbered pages show the page number and part title; the odd-numbered pages show the chapter title and page number. To configure such odd/even headers (and footers) for your document, obey these steps:
- Create or edit a header or footer, as described elsewhere in this chapter.
- Click the Header & Footer Tools Design tab.
Click the Different Odd & Even Pages check box.
With this feature active, Word sets up headers and footers for odd- and even-numbered pages. The Header and Footer tags in the document reflect the change as well, saying Odd Page Footer or Even Page Footer. The tag tells you which header or footer you're editing.
Create the header and footer for the odd-numbered pages.
Follow the suggestions listed in this chapter.
 On the Ribbon’s Header & Footer Tools Design tab, in the Navigation group, click the Next button.
Word displays the even page header or footer, allowing you to create or edit its contents. The Header or Footer tag changes to reflect which header you're editing.
If clicking the Next button does nothing, your document has only one page! Add a page to enable the even-page headers and footers.
 To return to the odd-page header or footer, click the Previous button.
- Close the header or footer when you’re done.
To return to using only one header and footer for a document, repeat these steps but in Step 3 remove the check mark. Any even-page header or footer you’ve set is removed, leaving only the odd-page header and footer.
The even-numbered page is always on the left.
No header or footer on the first page
Most people don't want the header or footer on their document’s first page, which is usually the title page or the cover page. Suppressing the header for that page is easy, if you follow these steps:
- Edit the document’s header or footer.
- Click the Header & Footer Tools Design tab.
In the Options group, place a check mark by Different First Page.
That’s it.
The Header or Footer tag on the first page changes to read First Page Header or First Page Footer. It's your visual clue that the first page of the document sports a different header from the ones in the rest of the document. If you don’t want anything to appear there, leave it blank.
Headers, footers, and sections
One way to apply different headers and footers to your document is to use sections. That way, you can change the header and footer between sections, but only when you unlink the headers and footers. Unless you know this trick, working with headers and footers in different sections can be frustrating.
To break the link between the current section’s header and footer and the previous section’s header and footer, follow these steps:
- Edit the document’s header or footer in the section that you want to be different from the previous section’s head and footer.
- Click the Header & Footer Tools Design tab.
- In the Navigation Group, click the Next button to locate the start of the next section’s header or footer.
The Header tag or Footer tag is updated to reflect the current section, as shown in Figure 14-4. You also see the tag Same as Previous, which is your clue that the header is identical to the one in the previous section. For example, if you change something in the first section’s header, the change is reflected in all linked headers.
 In the Navigation group, click the Link to Previous button.
The link is broken. The Same as Previous tag disappears. The header or footer doesn’t change — yet.
Edit the section’s header or footer.
Changes made apply to only the current section.
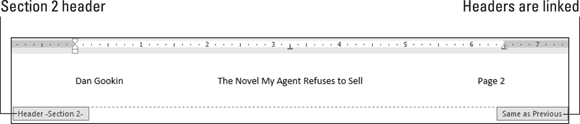
FIGURE 14-4: Header in Section 2, linked to Section 1.
The link is what confuses a lot of people. They know about sections, but when they change the header or footer in one section, the text isn’t updated. That’s because the link hasn’t been broken, as described in these steps.
To restore the link, return to the given section’s header or footer and repeat the steps in this section. Clicking the Link to Previous button a second time reestablishes the link.
- This trick may not work if your document uses different headers and footers on odd- and even-numbered pages, as described earlier in this chapter.
 The Different First Page option, described earlier in this chapter, doesn’t link the header or footer between the first page and the rest of the document.
Removing a header or a footer
You can’t destroy the header or footer area in a document, but you can remove all text and other stuff: Edit the header or footer, press Ctrl+A to select everything, and press the Delete key. Poof!
The more official way to remove a header or footer is to follow these steps:
- Edit the document’s header or footer.
- Click the Header & Footer Tools Design tab.
- In the Header & Footer group, click the Header button.
Choose Remove Header.
The header is gone.
Click the Footer button and choose Remove Footer.
The footer is gone.