
Chapter 8
Documents New, Saved, and Opened
IN THIS CHAPTER
![]() Understanding terms
Understanding terms
![]() Creating a new document
Creating a new document
![]() Saving documents
Saving documents
![]() Updating (resaving) a document
Updating (resaving) a document
![]() Opening a document
Opening a document
![]() Inserting one document inside another
Inserting one document inside another
![]() Retrieving a lost document
Retrieving a lost document
I like the word document. It’s elegant. It’s much better than saying “a file” or “that thing I created with my word processor.” A document could include everything from a quick shopping list to a vast cycle of medieval fantasy novels you keep reading despite knowing that your favorite protagonist will die a sudden, horrific death.
Regardless of size or importance, a word processing file is called a document. It’s the end result of your efforts in Word. You create new documents, save them, open up old documents, and close documents. That’s the document cycle.
Some Terms to Get Out of the Way
 To best understand the document concept, you must escape the confines of Word and wander into the larger dominion of computer storage. A basic understanding of files and storage is necessary if you’re to get the most from your word processing efforts.
File: A Word document is a file. A file on a computer is information stored for the long term, which can be recalled again and shared with others. Windows manages files and their storage, backup, copying, moving, and renaming.
Folder: Files dwell in containers called folders. A folder stores files and other folders, which creates a hierarchical system for data storage. This is how folders play a role in file organization.
Local storage: Files are kept for the long term, saved to your computer’s hard drive or solid-state drive (SSD). Because this hardware exists on your computer, it’s referred to as local storage.
Cloud storage: Files can also be kept for long-term storage on the Internet. This storage is commonly referred to as cloud storage. With regard to Word (and the rest of Microsoft Office), the preferred form of cloud storage is Microsoft OneDrive. Files saved to cloud storage are available to your computer as well, but the benefit is that you can access your cloud storage from any Internet-connected device.
Word also works with other cloud storage services, such as Dropbox or Google Drive. These locations are accessed through their shadow copies on local storage. For some quirky reason, only Microsoft’s OneDrive cloud storage is closely integrated with Word.
Behold! A New Document
To conjure a new document when Word first starts, choose a template thumbnail on the Word Start screen; the Blank thumbnail presents a fresh, empty document. But here’s a shortcut: Press Ctrl+N to summon a new document. It’s quicker.
If you’ve disabled the Word Start screen (as revealed in Chapter 33), you can see its contents and peruse various document templates to start a new document, by obeying the following steps. You can also follow these steps anytime you’re using Word, not just when it first starts:
Click the File tab.
The File screen appears.
Choose New from the left side of the window.
The New screen lists the same templates that appear on the Start screen. Category tabs are titled Featured and Personal for Word’s templates and your own templates, respectively.
Click the Blank Document thumbnail to create a new, blank document (probably because you forgot the Ctrl+N keyboard shortcut), or select a template.
A new Word window appears, ready for typing action.
You can produce as many new documents as are needed. Word lets you work with several documents at a time.
- See Chapter 24 for details on how to best work with multiple document windows all open at once.
- Chapter 16 contains information on templates, which can greatly boost your performance by providing common document elements, including preset text and styles, automatically for you.
Save Your Stuff!
It doesn’t matter whether you’re writing the next Great American Novel or jotting down notes for tonight’s PTA meeting, the most important thing you can do to a document is save it.
Save! Save! Save!
Saving creates a permanent copy of your document, encoding the text as a file on the computer’s storage system. That way, you can work on the document again, publish it electronically, or have a copy ready in case the power goes poof. All these tasks are possible, providing you save your stuff.
Saving a document for the first time
You don’t have to finish a document before you save it. No! You should save immediately — as soon as you have a few sentences or paragraphs.
To save a document for the first time, follow these steps:
Press Ctrl+S.
You see the Save As screen on the File tab. In fact, you could also click the File tab and choose Save As, but Ctrl+S is a universal keyboard shortcut and using it is quicker.
If you don’t see the Save As screen, the document has already been saved. See the later section “Saving or updating a document.”
Choose a location for the document.
All documents (files) are saved in folders, so your job is to pick an appropriate one. You can choose local storage or cloud storage, or select a pinned or recently used folder from the right side of the window, as illustrated in Figure 8-1.
To browse local storage, choose This PC.
To browse cloud storage on OneDrive, choose OneDrive.
To use a recent folder, choose it on the right side of the screen.
After you choose a location, the traditional Save As dialog box appears. Or you can quickly summon that dialog box by clicking the Browse button, as illustrated in Figure 8-1.
 You can use the Save As dialog box to navigate to a specific folder if it doesn’t appear on the Save As screen.
Type a name for your document in the File Name box.
Word automatically selects the first several words of your document as a filename and places that text in the File Name box. If that’s okay, continue with Step 5. Otherwise, type a better name.
 Be descriptive with the filename! The more concisely you name your document, the easier it is to recognize it by that name in the future.
Click the Save button.
The file is safely stored.
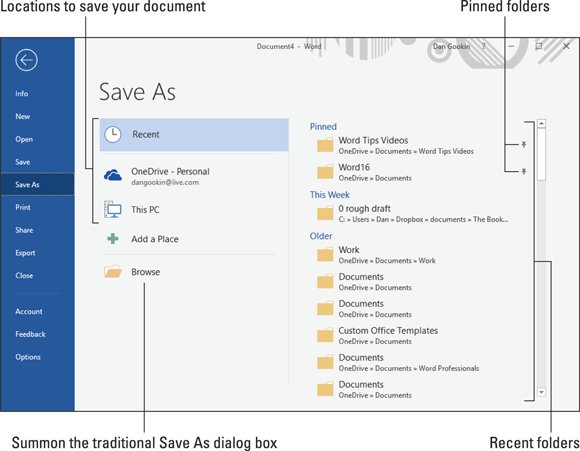
FIGURE 8-1: The Save As screen.
The document window doesn’t close after you save. You don’t need to quit Word. You can keep working. As you do so, continue to save. See the later section “Saving or updating a document.”
- The Save As screen on the File tab is known as the backstage. It’s an updated way to save documents and integrate cloud storage.
- If you prefer to use the traditional Save As dialog box directly, press the F12 key.
- If the computer’s current folder-organization scheme isn't to your liking, click the New Folder button to create a new folder in the current folder. Word proceeds to save your document in the newly created folder.
 For a folder you use frequently, such as a current project folder, point the mouse at the folder name and click the Pushpin icon, shown in the margin. Clicking the pushpin pins the folder to the top of the folder list, as shown in Figure 8-1. That way, you can keep favorite folders handy for quick selection when saving documents.
- Your clue that the document is saved successfully is that its filename appears on the document’s title bar, at the top center of the Word window. Further, when the document is freshly saved, you see the text Saved to … followed by the folder name. This extra text vanishes as you continue to work on the document.
- The Save As command can also be used to save a document with a new name, to a different location, or in a different format. See Chapter 24.
 Do not save a document to removable media, such as a thumb drive or media card. Instead, save the document to the computer’s main storage device: the hard drive or SSD. Then you can copy the file to the removable media. If you save directly to a thumb drive and it’s accidentally removed, you run the risk of losing your document.
- The advantage of using OneDrive cloud storage is that your document is available to any device you use with Internet access. If you have an Office 365 subscription, you can use Word on the web to edit the document. You can also employ Word’s collaboration features to share and work with others on the same document. See Chapter 26 for collaboration information.
Dealing with document-save errors
Saving a document involves coordination between Word and Windows. This complexity doubles the chances of something going wrong, so it's high time for an error message. One such error message is
The file whatever already exists
Here are your choices and my suggestions:
- Replace Existing File: Nope.
- Save Changes with a Different Name: Yep.
- Merge Changes into Existing File: Nope.
Choose the middle option and click OK. Type a different filename in the Save As dialog box.
Another common problem occurs when a message that’s displayed reads something like this:
The filename is not valid
That's Word's less-than-cheerful way of telling you that the filename contains a forbidden character. To be safe, use letters, numbers, and spaces when naming a file. Check the nearby sidebar, “Trivial — but important — information about filenames.”
Saving or updating a document
As you continue to work on your document, you should save as you work: Ctrl+S. The frequent re-save captures any changes you’ve made since the last time you saved, keeping it fresh. It never hurts to save a document multiple times.
- I save my document whenever I pause to think, rise to pour another cup of coffee, or answer the phone.
 You can also perform a quick save by clicking the Save button on the Quick Access toolbar.
- If you haven’t yet saved a document, using the Save command, Ctrl+S, or the Save button on the Quick Access toolbar, brings up the Save As screen. Refer to the earlier section “Saving a document for the first time.”
Saving automatically on OneDrive
If you’ve saved a document to OneDrive and the AutoSave feature is active, you never really need to save again. Word automatically updates your documents for you.
![]() To ensure that AutoSave is active, look for the AutoSave item on the Quick Access toolbar, similar to what’s shown in the margin. If the switch is off, click it. AutoSave is active when you see the word On (as shown nearby).
To ensure that AutoSave is active, look for the AutoSave item on the Quick Access toolbar, similar to what’s shown in the margin. If the switch is off, click it. AutoSave is active when you see the word On (as shown nearby).
- When the AutoSave item is disabled, the document has been saved to local storage or a location other than OneDrive. This feature might also be disabled for some versions of Word.
- If you don’t see the AutoSave item, click the menu button on the far right of the Quick Access toolbar. Choose Automatically Save from the menu.
Forgetting to save before you quit
When you’re done writing in Word, you close the document, close the window, or quit Word outright. No matter how you call it quits, when your document hasn't yet been saved, or was changed since the last save, you're asked to save one last time before leaving.
The warning dialog box that appears when you attempt to leave before saving features three options:
Save: Click this button to save the document and close. If you've been naughty and haven't yet saved the document, the Save As screen appears.
Don’t Save: When you click this button, the document is closed without saving. It might still be available for later recovery. See the later section “Recover a Draft.”
Cancel: Click this button to forget about saving and return to the document for more editing and stuff.
I recommend that you choose the Save option.
Open a Document
Saving a document means nothing unless you have a way to retrieve that document later. As you might suspect, Word offers multiple ways to open a document on either local storage or cloud storage.
The original “open” command in Word was File, Transfer, Load. I think “open” sounds better.
Using the Open command
Open is the standard computer command used to fetch an existing document. Once you find and open the document, it appears in Word's window as though it’s always been there.
To open a document in Word, follow these steps:
- Click the File tab.
Choose the Open command.
The Open screen materializes, similar to what’s shown in Figure 8-2.
Choose a location where the document may lurk.
Your choices are Recent Documents, which is shown in Figure 8-2, cloud storage such as OneDrive, or local storage titled This PC.
If you spy the desired document lurking on the Recent list, click it. The document opens on the screen. Congratulations — you’re done.- Choose a recent folder from the list.
Click a document when you find it.
The document opens, ready for editing.
If you can’t find the document, or you just yearn to use the traditional Open dialog box, click the Browse button.
The traditional Open dialog box appears, which you can use to locate the file you want to open: Click to select the file, and then click the Open button.

FIGURE 8-2: The Open screen.
The file you open appears in the Word window. Word may highlight the last location where you were writing or editing, along with a Welcome back message.
After the document is open, you can edit it, look at it, print it, or do whatever you want.
- The shortcut key to access the Open screen is Ctrl+O. Also, an Open command button appears on the Quick Access toolbar.
- The keyboard shortcut to directly access the traditional Open dialog box is Ctrl+F12. Good luck remembering that one.
- You can open a document by locating its icon in a folder window, which happens in Windows, not in Word. Double-click the icon to open the document. Refer to Chapter 1 for information.
- To access recently opened documents, right-click the Word icon on the taskbar. Choose a document from the pop-up list (called the jump list) to open it.
- Opening a document doesn’t erase it from storage. In fact, the file stays on the storage system until you use the Save command to save and update the document with any changes.
- When you position the mouse pointer at a recently opened document on the Open screen, you see a Pushpin icon, similar to what’s shown in the margin. Click that icon to make the document “stick” to the Open screen. That way, the document is always available for quick access later.
- To remove a document from the Recent list, right-click the document’s entry. Choose the command Remove from List.
- Avoid opening a file on any removable media, such as a thumb drive or media card. Though it's possible, doing so can lead to headaches later, should you remove the media before Word is done with the document. Because of that, I recommend that you use Windows to copy the document from the removable media to the computer’s main storage device. Then open it in Word.
Opening one document inside another
Inserting the contents of one document into another is possible in Word, and no surgery or screaming is involved. For example, at the end of a paper you can insert another document that may have a short bio – including your picture. To do so, follow these steps:
Position the insertion pointer where you want the other document’s contents to appear.
The text is inserted at that spot.
- Click the Insert tab.
 From the Text group, click the menu (down-pointing triangle) by the Object button.
The Object button is shown in the margin.
Choose the menu item Text from File.
The Insert File dialog box appears. It’s similar to the Open dialog box.
Locate and select the document you want to insert.
Browse the various folders to find the document icon. Click to select its icon.
Click the Insert button.
The document’s text is inserted into the current document, just as though you had typed and formatted it yourself.
The resulting combined document retains the name of the first document. The document you inserted remains unchanged.
- You can insert any number of documents into another document.
- Inserting text from one document into another is often called boilerplating. For example, you can save a commonly used piece of text in a document and then insert it into other documents as necessary. This process is also the way that sleazy romance novels are written.
- If you find yourself inserting common bits of text into documents consider instead creating a document template. See Chapter 16.
- Biography. Résumé. Curriculum vitae. The more important you think you are, the more alien the language used to describe what you’ve done.
Recover a Draft
When you forget to save a document or the computer crashed or the power went out, you can recover some — but perhaps not all — of an unsaved document. Valiantly make this attempt:
- Press Ctrl+O to summon the Open screen.
- Ensure that Recent is chosen as the file location.
Click the Recover Unsaved Documents button, found at the bottom of the list of recent files. (Refer to Figure 8-2.)
The Open dialog box appears, listing the contents of a special folder, UnsavedFiles. It’s Word’s graveyard. Actually, it's more like a morgue in a county with a lousy EMS.
Select a document to recover.
The document may have an unusual name, especially when it’s never been saved.
- Click the Open button to open and recover the document.
The document you recover might not be the one you wanted it to be. If so, try again and choose another document.
You might also find that the recovered document doesn’t contain all the text you typed or thought would be there. You can’t do anything about it, other than remember to save everything in the first place!
The recovery of drafts is possible because of Word’s AutoRecover feature. Refer to Chapter 31 for more information on AutoRecover.