CHAPTER 5
Making Calls and Messaging

You can make calls by holding your iPhone to your face, by using the speakerphone, or by using a headset or your car’s audio system. You can also make calls using Favorites and recent numbers, send and receive text and multimedia messages, and chat using the FaceTime feature.
Make Phone Calls and FaceTime Audio Calls
Using a Wireless Headset or Car System
Mute a Call or Put a Call on Hold
Make Video Calls Using FaceTime
Save Time with Call Favorites and Recents
Send Text and Multimedia Messages
Make Phone Calls and FaceTime Audio Calls
With your iPhone, you can make cellular phone calls anywhere you have a connection to the cellular network; you can make audio or video calls via FaceTime across Wi-Fi connections as well. You can dial a phone number using the iPhone’s keypad, but you can place calls more easily by tapping the appropriate phone number for a contact, using the Phone app’s Recents screen, using the Favorites list, or using Siri. When other people near you need to be able to hear the call, you can switch on your iPhone’s speaker; otherwise, you can use the headset for privacy.
Make Phone Calls and FaceTime Audio Calls

Open the Phone App
![]() Swipe up from the bottom of the screen.
Swipe up from the bottom of the screen.
The Home screen appears.
![]() Tap Phone (
Tap Phone (![]() ).
).
The Phone app opens and displays the screen you used last — for example, the Contacts screen.
![]() Your contact card appears at the top of the Contacts list for quick reference. You can tap it to see your phone number and other details.
Your contact card appears at the top of the Contacts list for quick reference. You can tap it to see your phone number and other details.
Note: You can dial a call by activating Siri and speaking the contact’s name or the number. See Chapter 3 for instructions on using Siri.
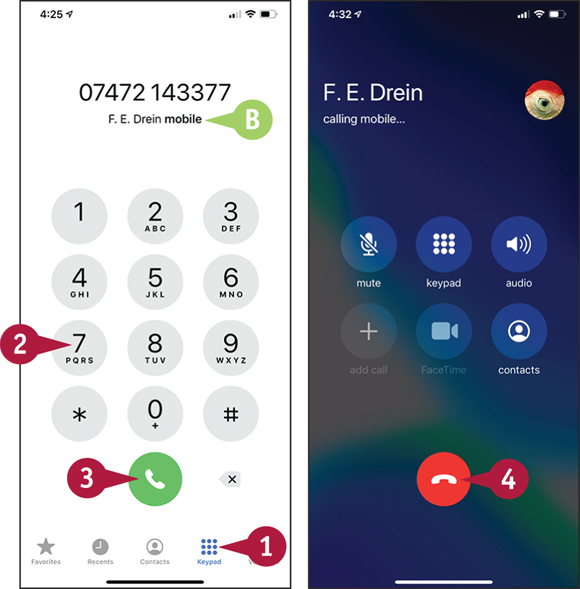
Dial a Call Using the Keypad
![]() Tap Keypad (
Tap Keypad (![]() changes to
changes to ![]() ).
).
The Keypad screen appears.
Note: On the Keypad screen, you can tap Call (![]() ) without dialing a number to display the last number dialed.
) without dialing a number to display the last number dialed.
![]() Tap the number keys to dial the number.
Tap the number keys to dial the number.
Note: You can tap Add to Contacts (![]() ) to add this number to your Contacts list.
) to add this number to your Contacts list.
![]() If you dial a contact’s number, the contact’s name and phone type appear.
If you dial a contact’s number, the contact’s name and phone type appear.
![]() Tap Call (
Tap Call (![]() ).
).
Your iPhone makes the call.
![]() Tap End (
Tap End (![]() ) when you are ready to end the call.
) when you are ready to end the call.
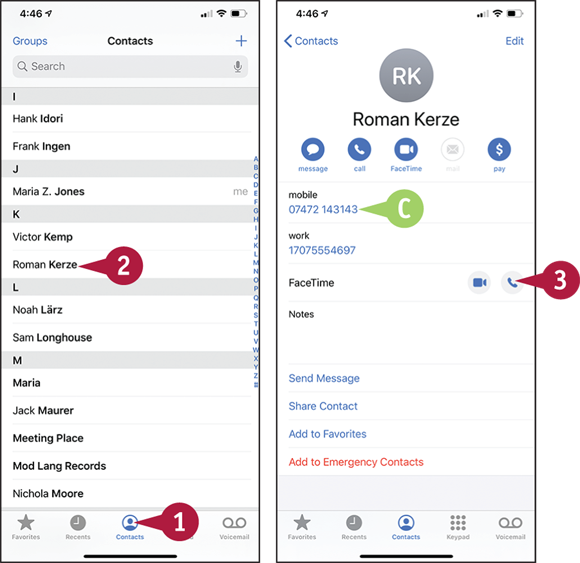
Place a Call to a Contact
![]() Tap Contacts (
Tap Contacts (![]() changes to
changes to ![]() ).
).
The Contacts list appears.
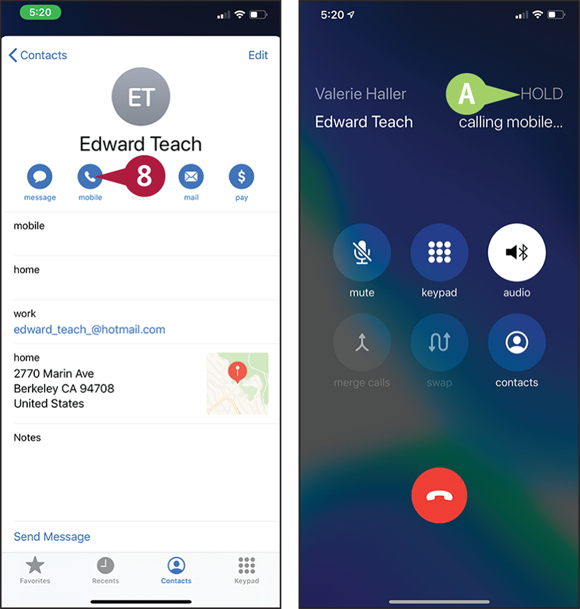
![]() Tap the contact you want to call.
Tap the contact you want to call.
The contact’s info appears.
![]() If FaceTime (
If FaceTime (![]() ) appears, tap FaceTime Audio (
) appears, tap FaceTime Audio (![]() ) to place a FaceTime Audio call. Otherwise, tap Call (
) to place a FaceTime Audio call. Otherwise, tap Call (![]() ).
).
![]() You can tap a number to place a phone call to that number.
You can tap a number to place a phone call to that number.
Note: You can also place a call to a phone number that the iPhone has identified — for example, by tapping an underlined phone number on a web page or in an e-mail message.
Your iPhone places the call.
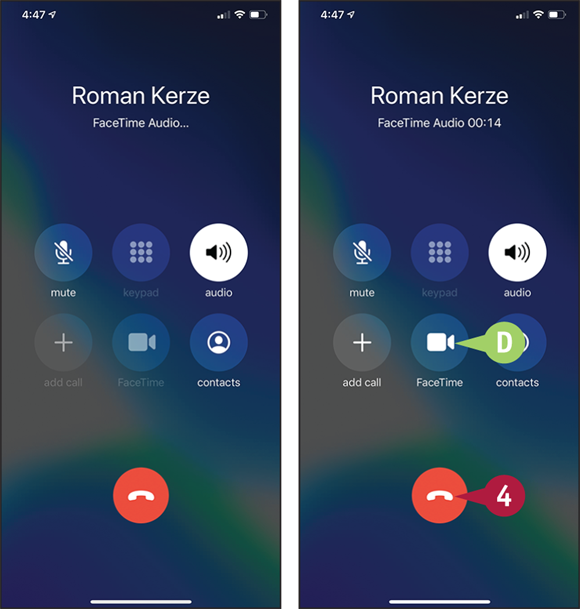
![]() In a FaceTime Audio call, you can tap FaceTime (
In a FaceTime Audio call, you can tap FaceTime (![]() ) to switch to a FaceTime Video call.
) to switch to a FaceTime Video call.
![]() When you are ready to end the call, tap End (
When you are ready to end the call, tap End (![]() ).
).
Your iPhone ends the call.
The Call Ended screen appears for a moment.
The screen from which you placed the call appears — for example, the Contacts screen.
Note: To end a call for which you are using the headset, press the clicker button.
Using a Wireless Headset or Car System
Instead of using the headset that came with your iPhone, you can use a Bluetooth headset. Similarly, you can use a car system with a Bluetooth connection when using your iPhone in your vehicle, perhaps also connecting the iPhone to a power source to charge it. For example, many new cars have systems that include Apple’s CarPlay standard, which enables the car system to act as the display and controller for a connected iPhone.
You must first pair the Bluetooth headset or car system with your iPhone, as discussed in Chapter 6.
Using a Wireless Headset or Car System

![]() Turn on the wireless headset or connection and make sure it works.
Turn on the wireless headset or connection and make sure it works.
![]() Swipe up from the bottom of the screen.
Swipe up from the bottom of the screen.
The Home screen appears.
![]() Tap Phone (
Tap Phone (![]() ).
).
The Phone app opens.
![]() Dial the call. For example, tap Contacts, tap the contact, tap Call (
Dial the call. For example, tap Contacts, tap the contact, tap Call (![]() ), and then tap the appropriate phone number.
), and then tap the appropriate phone number.
Note: You can also tell Siri to place the call for you.

Your iPhone places the call.
The Audio dialog opens.
![]() Tap the headset or other device you want to use.
Tap the headset or other device you want to use.
![]() If you have enabled Handoff, your Mac or Macs may appear.
If you have enabled Handoff, your Mac or Macs may appear.
The Audio dialog closes.
![]() You can tap audio (
You can tap audio (![]() ) to display the Audio dialog and switch to another audio device.
) to display the Audio dialog and switch to another audio device.
Note: If you are playing audio or video on a Bluetooth headset when you receive a call, your iPhone automatically pauses the audio or video and plays the ringtone on the headset.
Mute a Call or Put a Call on Hold
When you are on a call, you may need to mute your iPhone’s microphone so that you can confer with people near you without the person at the other end of the phone call hearing.
You may also need to put a call on hold so that you can make another call or take a break from the call.
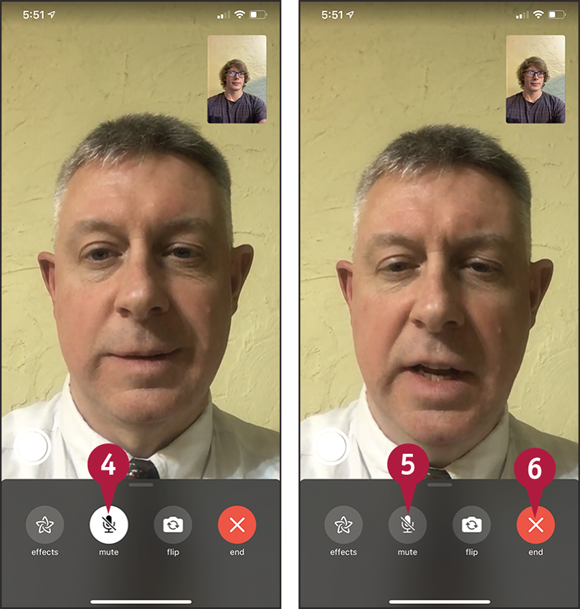
Mute a Call or Put a Call on Hold
![]() Establish the phone call as usual. For example, call a contact.
Establish the phone call as usual. For example, call a contact.
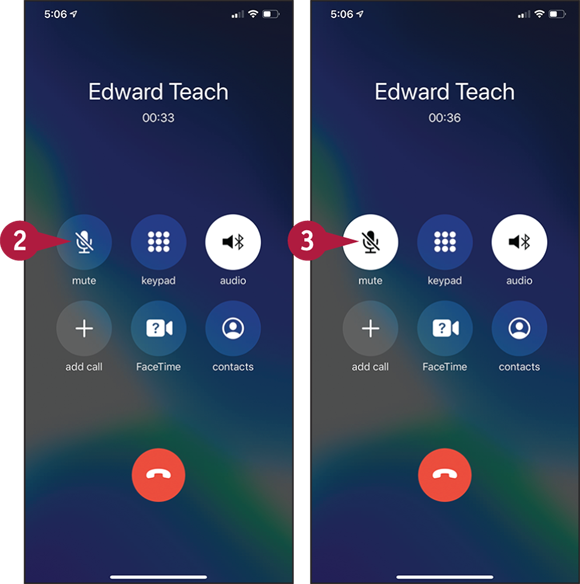
![]() Tap mute (
Tap mute (![]() changes to
changes to ![]() ).
).
The iPhone mutes the call.
![]() When you are ready to unmute the call, tap mute again (
When you are ready to unmute the call, tap mute again (![]() changes to
changes to ![]() ).
).
The iPhone turns off muting.
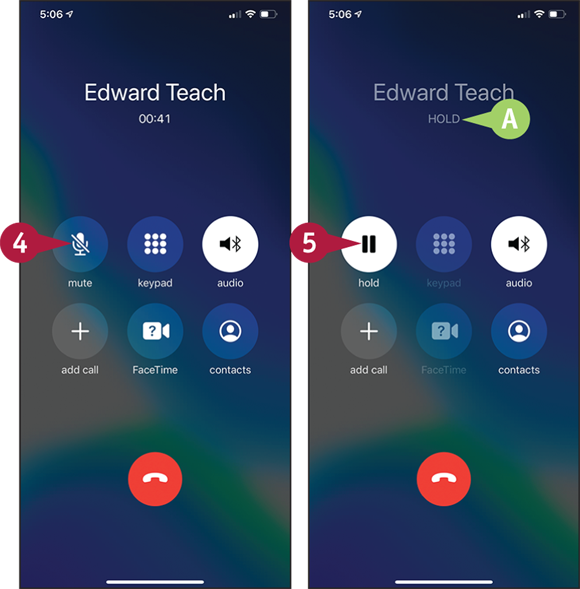
![]() To put the call on hold, tap and hold mute (
To put the call on hold, tap and hold mute (![]() changes to
changes to ![]() ) for several seconds.
) for several seconds.
The iPhone puts the call on hold.
![]() The HOLD readout appears in place of the call time.
The HOLD readout appears in place of the call time.
Note: After placing a call on hold, you can make another call if necessary.
![]() When you are ready to take the call off hold, tap hold (
When you are ready to take the call off hold, tap hold (![]() changes to
changes to ![]() ).
).
Make a Conference Call
As well as making phone calls to one other phone at a time, your iPhone can make calls to multiple phones at once, making either cellular calls or FaceTime audio calls, but not mixing the two. To make a conference call, you call the first participant, and then add each other participant in turn. During a conference call, you can talk in private to individual participants. You can also drop a participant from the call.
Make a Conference Call
![]() Swipe up from the bottom of the screen.
Swipe up from the bottom of the screen.
The Home screen appears.
![]() Tap Phone (
Tap Phone (![]() ).
).
The Phone app opens.
![]() Tap Contacts (
Tap Contacts (![]() changes to
changes to ![]() ).
).
The Contacts screen appears.
![]() Tap the contact you want to call first.
Tap the contact you want to call first.
The contact’s record appears.
![]() Tap Call (
Tap Call (![]() ) on the phone number to use.
) on the phone number to use.
Note: You can also add a contact to the call by using Favorites, Recents, or Keypad.
Your iPhone establishes the call.
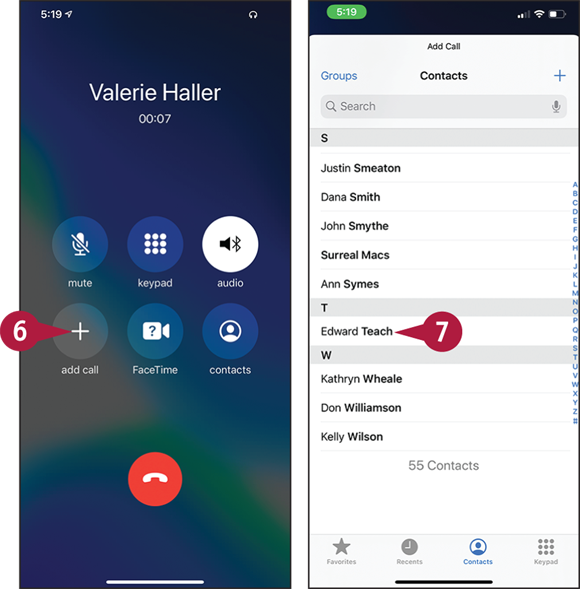
![]() Tap add call (
Tap add call (![]() ).
).
The Contacts screen appears.
![]() Tap the contact you want to add.
Tap the contact you want to add.
The contact’s record appears.
![]() Tap Call (
Tap Call (![]() ).
).
![]() The iPhone places the first call on hold and makes the new call.
The iPhone places the first call on hold and makes the new call.
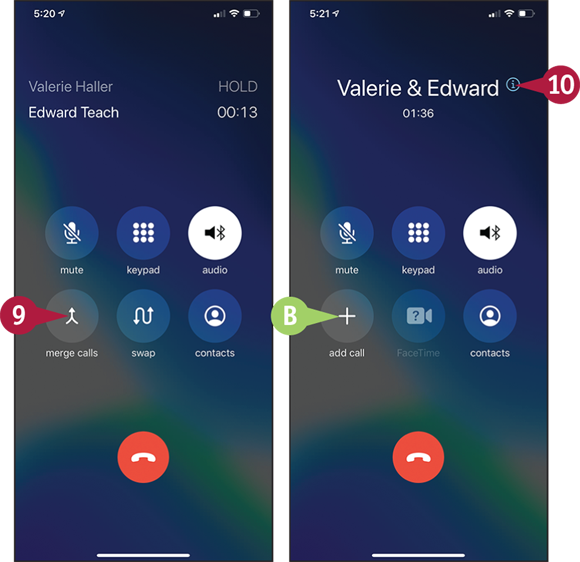
![]() Tap merge calls (
Tap merge calls (![]() ).
).
The iPhone merges the calls and displays the participants’ names at the top of the screen. You can now speak to both participants.
![]() You can add more participants by tapping add call (
You can add more participants by tapping add call (![]() ), specifying the contact or number, and then merging the calls.
), specifying the contact or number, and then merging the calls.
![]() To speak privately to a participant, tap Information (
To speak privately to a participant, tap Information (![]() ).
).
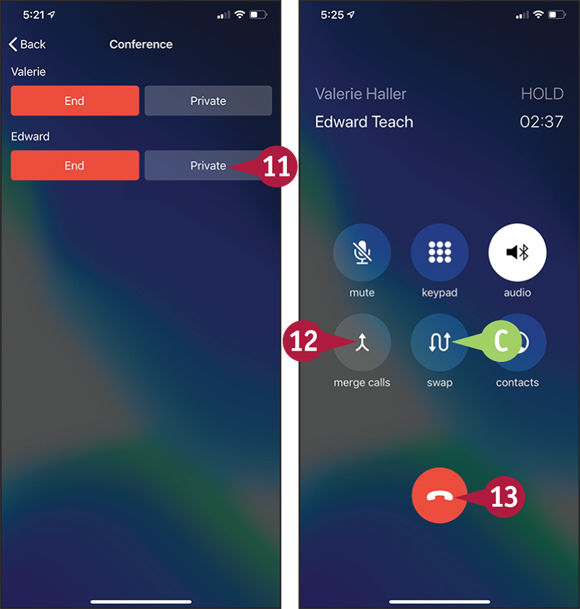
The Conference screen appears, showing a list of the participants.
![]() Tap Private next to the participant.
Tap Private next to the participant.
The iPhone places the other caller or callers on hold.
![]() You can tap swap (
You can tap swap (![]() ) to swap the caller on hold and the active caller.
) to swap the caller on hold and the active caller.
![]() When you are ready to resume the conference call, tap merge calls (
When you are ready to resume the conference call, tap merge calls (![]() ).
).
The iPhone merges the calls, and all participants can hear each other again.
![]() When you finish the call, tap End (
When you finish the call, tap End (![]() ).
).
The iPhone ends the call.
Make Video Calls Using FaceTime
By using your iPhone’s FaceTime feature, you can enjoy video chats with any of your contacts who have an iOS device — an iPhone, iPad, or iPod touch — running iOS 7 or later, an iPad running iPadOS, or a Mac with the FaceTime for Mac app.
To make a FaceTime call, you and your contact must both have Apple IDs. Your iPhone must be connected to either a wireless network or the cellular network. Using a wireless network is preferable because you typically get better performance and do not use up your cellular data allowance.
Make Video Calls Using FaceTime
Receive a FaceTime Call
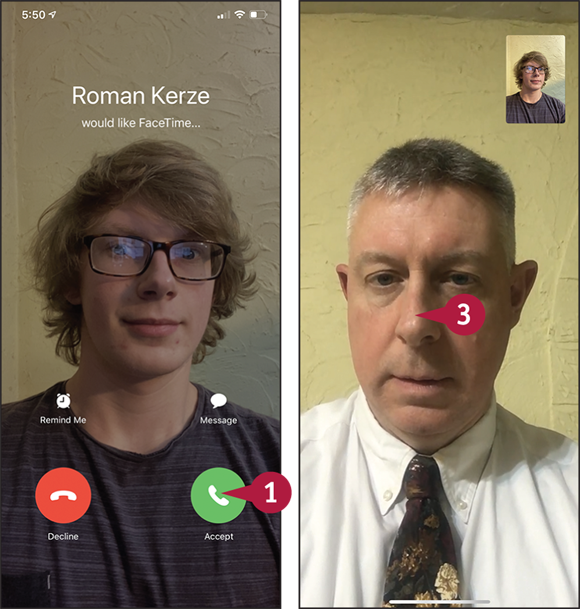
![]() When your iPhone receives a FaceTime request, and the screen shows who is calling, aim the camera at your face, and then tap Accept (
When your iPhone receives a FaceTime request, and the screen shows who is calling, aim the camera at your face, and then tap Accept (![]() ).
).
The Connecting screen appears.
When the connection is established, your iPhone displays the caller full-screen, with your video inset.
![]() Start your conversation.
Start your conversation.
![]() Tap the screen.
Tap the screen.
The controls appear.
![]() If you need to mute your microphone, tap Mute (
If you need to mute your microphone, tap Mute (![]() changes to
changes to ![]() ).
).
![]() Tap Mute again (
Tap Mute again (![]() changes to
changes to ![]() ) when you want to turn muting off.
) when you want to turn muting off.
![]() Tap End (
Tap End (![]() ) when you are ready to end the FaceTime call.
) when you are ready to end the FaceTime call.

Make a FaceTime Call
![]() Swipe up from the bottom of the screen.
Swipe up from the bottom of the screen.
The Home screen appears.
![]() Tap FaceTime (
Tap FaceTime (![]() ).
).
The FaceTime app opens.
![]() Tap the contact you want to call.
Tap the contact you want to call.

The FaceTime app starts a video call.
![]() When your contact answers, smile and speak.
When your contact answers, smile and speak.
![]() If you need to show your contact something using the rear-facing camera, tap Switch Cameras (
If you need to show your contact something using the rear-facing camera, tap Switch Cameras (![]() ).
).
![]() Tap Effects (
Tap Effects (![]() ) to access a variety of visual effects, such as replacing your head with a cartoon animal’s head or motion-tracking animated stickers to a location on the screen.
) to access a variety of visual effects, such as replacing your head with a cartoon animal’s head or motion-tracking animated stickers to a location on the screen.
![]() When you are ready to end the call, tap End (
When you are ready to end the call, tap End (![]() ).
).
Save Time with Call Favorites and Recents
You can dial phone numbers easily from your Contacts list, but you can save time and effort by using the Favorites and Recents features built into the Phone app.
Favorites are phone numbers that you mark as being especially important to you. Recents are phone numbers you have called and received calls from recently.
Save Time with Call Favorites and Recents

Add a Contact to Your Favorites List
![]() Swipe up from the bottom of the screen.
Swipe up from the bottom of the screen.
The Home screen appears.
![]() Tap Phone (
Tap Phone (![]() ).
).
The Phone app opens.
![]() Tap Contacts (
Tap Contacts (![]() changes to
changes to ![]() ).
).
The Contacts list appears.
![]() Tap the contact you want to add.
Tap the contact you want to add.
The contact’s record appears.
![]() Tap Add to Favorites.
Tap Add to Favorites.
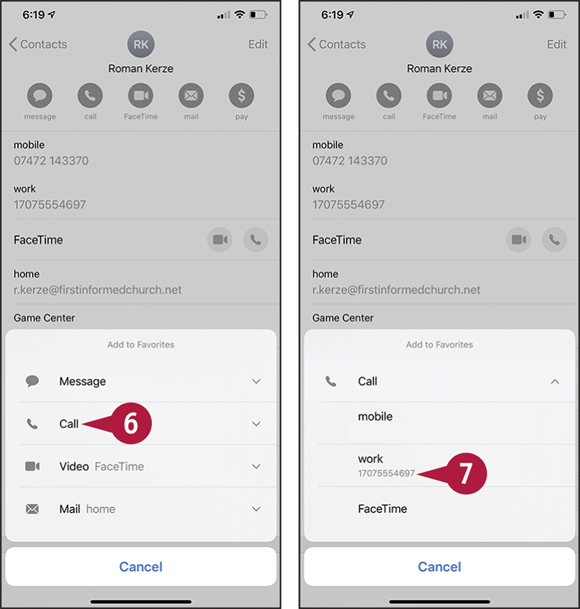
The Add to Favorites dialog opens.
![]() Tap the heading for the type of favorite you want to add. This example uses Call.
Tap the heading for the type of favorite you want to add. This example uses Call.
The list of phone numbers for the contact appears.
![]() Tap the phone number you want to add to your Favorites list.
Tap the phone number you want to add to your Favorites list.
The Add to Favorites dialog closes, and the iPhone creates a favorite for the contact.

Call a Favorite
![]() In the Phone app, tap Favorites (
In the Phone app, tap Favorites (![]() changes to
changes to ![]() ).
).
The Favorites list appears.
![]() Tap the Favorite you want to call.
Tap the Favorite you want to call.
Your iPhone places the call.
![]() To display the contact’s record, tap Information (
To display the contact’s record, tap Information (![]() ) instead of tapping the contact’s button. You can then tap a different phone number for the contact if necessary.
) instead of tapping the contact’s button. You can then tap a different phone number for the contact if necessary.
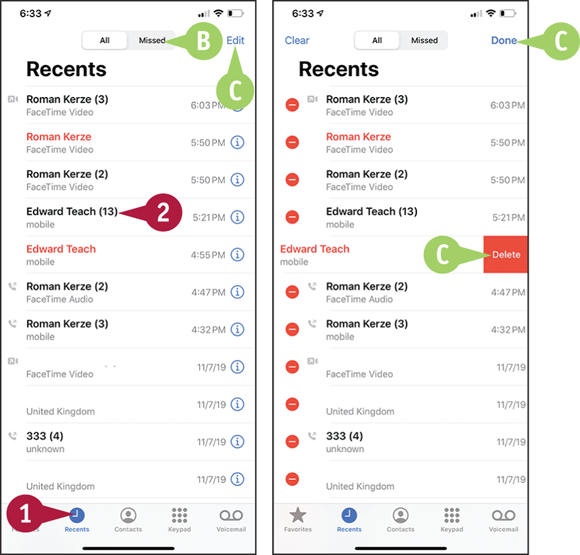
Call a Recent
![]() In the Phone app, tap Recents (
In the Phone app, tap Recents (![]() changes to
changes to ![]() ).
).
The Recents screen appears. Red entries indicate calls you missed.
![]() Tap Missed if you want to see only recent calls you missed.
Tap Missed if you want to see only recent calls you missed.
![]() To delete some recents, tap Edit; tap Delete (
To delete some recents, tap Edit; tap Delete (![]() ) to the left of the recent, and then tap the textual Delete button; and then tap Done.
) to the left of the recent, and then tap the textual Delete button; and then tap Done.
![]() Tap the recent you want to call.
Tap the recent you want to call.
Your iPhone places the call.
Note: If you want to clear the Recents list, tap Edit and then tap Clear. In the dialog that opens, tap Clear All Recents.
Send Text and Multimedia Messages
Your iPhone can send instant messages using the Short Message Service, abbreviated SMS; the Multimedia Messaging Service, MMS; or Apple’s iMessage service. An SMS message consists of only text, whereas an MMS message can contain text, videos, photos, sounds, or other data. An iMessage can contain text, multimedia content, emoji, animations, handwriting, and other features. The Messages app automatically chooses the appropriate type — SMS, MMS, or iMessage — for the messages you create and the ways you send them.
Send Text and Multimedia Messages
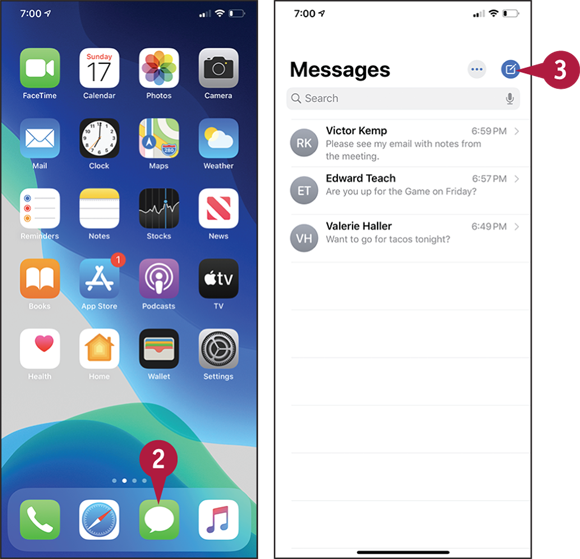
![]() Swipe up from the bottom of the screen.
Swipe up from the bottom of the screen.
The Home screen appears.
![]() Tap Messages (
Tap Messages (![]() ).
).
The Messages screen appears.
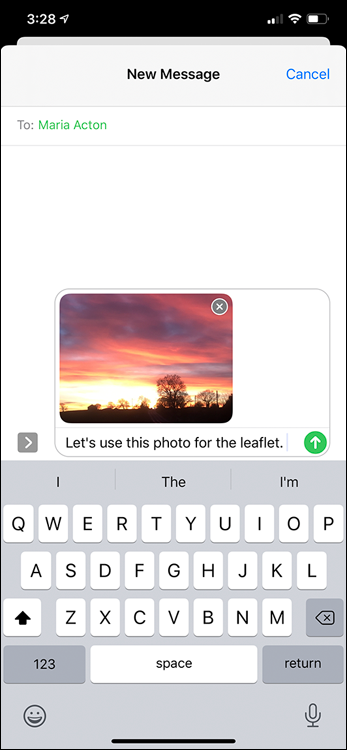
![]() Tap New Message (
Tap New Message (![]() ).
).
Note: Before sending an SMS or MMS message, make sure the recipient’s phone number can receive such messages. Typically, you do not receive an alert if the message cannot be delivered.

The New Message screen appears.
![]() Tap Add Contact (
Tap Add Contact (![]() ).
).
The Contacts list appears.
![]() Tap the contact to whose phone you want to send the message.
Tap the contact to whose phone you want to send the message.
Note: If the contact’s record contains multiple phone numbers, Messages displays the contact record. Tap the phone number to use.
Note: iMessage is available only for communicating with other users of Apple devices using their Apple IDs. SMS and MMS work with any device, but may use up your messaging allowance from your carrier.
The contact’s name appears in the To field of the New Message screen.
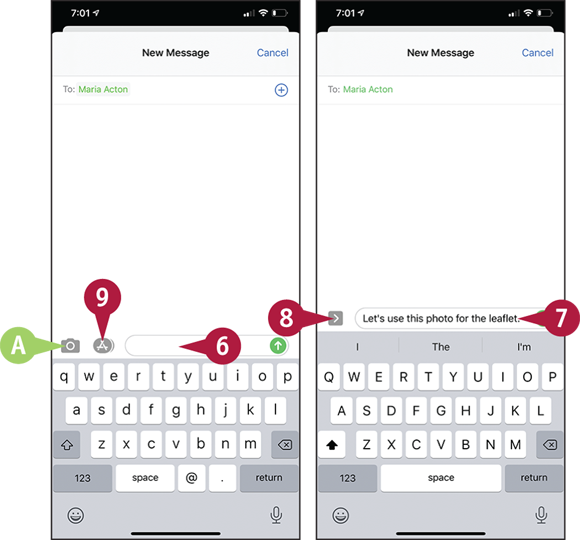
![]() Tap the text field.
Tap the text field.
The text field expands, and the More button appears.
![]() Tap in the text field, and then type your message.
Tap in the text field, and then type your message.
![]() Tap More (
Tap More (![]() ).
).
The other buttons reappear.
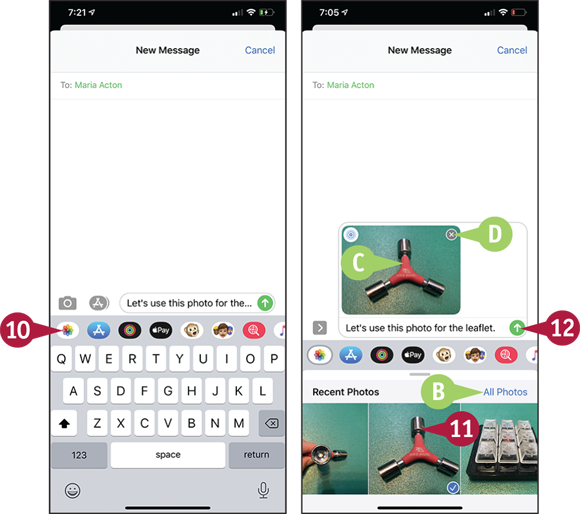
![]() To take a photo and add it, tap Photo (
To take a photo and add it, tap Photo (![]() ).
).
Note: Messages from contacts sent via iMessage appear in blue balloons. Messages from contacts sent via SMS or MMS appear in green balloons.
![]() Tap Apps (
Tap Apps (![]() ).
).
The Apps bar appears.
![]() Tap Photos (
Tap Photos (![]() ).
).
The Recent Photos list appears.
![]() You can tap All Photos to select a photo from your photo library.
You can tap All Photos to select a photo from your photo library.
![]() Tap a recent photo to add it. Scroll left to view other recent photos.
Tap a recent photo to add it. Scroll left to view other recent photos.
![]() The photo appears in the message.
The photo appears in the message.
![]() You can tap Remove (
You can tap Remove (![]() ) to remove the photo from the message.
) to remove the photo from the message.
![]() Tap Send (
Tap Send (![]() ).
).
Messages sends the message and the photo.
Using Emoji and iMessage Features
The Messages app makes it easy to include emoji — graphical characters — in your messages. You can send emoji to users of most instant-messaging services, not just to iMessage users.
When you are sending a message to another user of the iMessage service, you can also use a wide range of features that are not available for SMS messages and text messages. These features include stickers, handwriting and sketches, animations, and Digital Touch, which enables you to send a pattern of taps or your heartbeat. You can also respond quickly to a message by using the Tapback feature.
Add Emoji to Messages

The Messages app makes it easy to add emoji to your messages. After typing text, tap Emoji (![]() ) on the keyboard. Messages highlights with color any words in the message that you can replace with emoji; tap a word to insert the corresponding emoji icon, such as
) on the keyboard. Messages highlights with color any words in the message that you can replace with emoji; tap a word to insert the corresponding emoji icon, such as ![]() for “great!”
for “great!”
You can also insert other emoji manually by tapping them on the emoji keyboard. Tap the buttons at the bottom of the screen, or simply scroll the emoji panel left or right, to browse the available emoji.
Send a Handwritten Message or Sketch
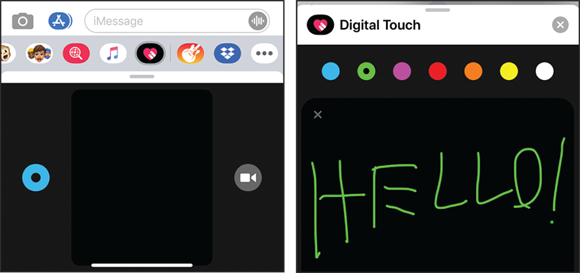
To send a handwritten message or sketch, tap New (![]() ) to begin a new message. Address the message to an iMessage user, tap Apps (
) to begin a new message. Address the message to an iMessage user, tap Apps (![]() ), and then tap Digital Touch (
), and then tap Digital Touch (![]() ) to display the Digital Touch controls.
) to display the Digital Touch controls.
Tap Expand (![]() ) to expand the panel to full screen, tap the color you want, and then write or draw what you want to send. Tap Send (
) to expand the panel to full screen, tap the color you want, and then write or draw what you want to send. Tap Send (![]() ) to send the message.
) to send the message.
Send Heartbeats or Taps
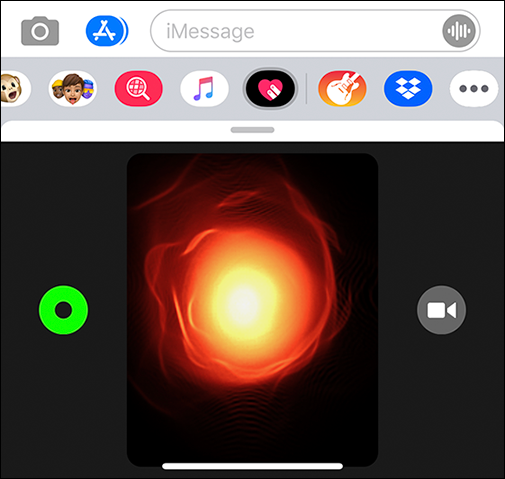
To send heartbeats or taps, tap New (![]() ) to begin a new message. Address the message to an iMessage user, tap Apps (
) to begin a new message. Address the message to an iMessage user, tap Apps (![]() ), and then tap Digital Touch (
), and then tap Digital Touch (![]() ) to display the Digital Touch controls.
) to display the Digital Touch controls.
To send a heartbeat, tap and hold with two fingers on the screen. Messages displays a heartbeat graphic and sends a heartbeat; you do not need to tap Send (![]() ).
).
Send a Message with Effect
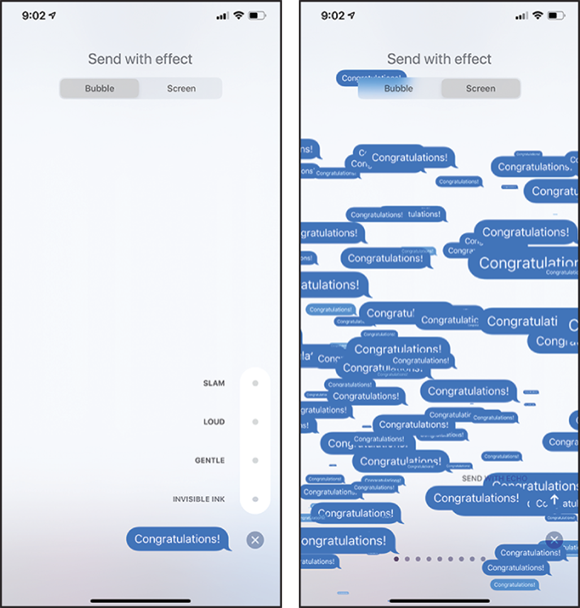
To send a message with effect, write the text for the message, and then tap and hold Send (![]() ). The Send with Effect screen appears. At the top of the screen, tap Bubble if you want to send a bubble with an effect such as Slam or Invisible Ink, and then tap the button for the effect; a preview then plays. To send text with a full-screen effect, tap Screen at the top of the screen, and then swipe left or right to reach the effect you want; again, a preview plays. When you are ready to send the message, tap Send (
). The Send with Effect screen appears. At the top of the screen, tap Bubble if you want to send a bubble with an effect such as Slam or Invisible Ink, and then tap the button for the effect; a preview then plays. To send text with a full-screen effect, tap Screen at the top of the screen, and then swipe left or right to reach the effect you want; again, a preview plays. When you are ready to send the message, tap Send (![]() ).
).
Responding Quickly Using the Tapback Feature
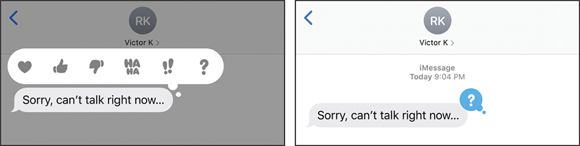
iMessage enables you to respond quickly to an incoming message by tapping and holding it. The Tapback panel opens, and you can tap the icon you want to send as an instant response.
Share the Music You Are Listening To
With iMessage, you can quickly share links to the music you are enjoying on Apple Music. Tap New (![]() ) to begin a new message, and then address the message to an iMessage user. Tap Apps (
) to begin a new message, and then address the message to an iMessage user. Tap Apps (![]() ) to display the Apps panel. Swipe left or right if necessary to display the Music panel, and then tap the item you want to share. A button for the item appears in the message box. Type any explanatory or exhortatory text needed, and then tap Send (
) to display the Apps panel. Swipe left or right if necessary to display the Music panel, and then tap the item you want to share. A button for the item appears in the message box. Type any explanatory or exhortatory text needed, and then tap Send (![]() ).
).
Send a Payment

With iMessage, you can send a payment to a contact. Tap New (![]() ) to begin a new message, and then address the message to an iMessage user. Tap Apps (
) to begin a new message, and then address the message to an iMessage user. Tap Apps (![]() ) to display the Apps panel. Swipe left or right if necessary to display the Apple Pay button, and then tap Apple Pay (
) to display the Apps panel. Swipe left or right if necessary to display the Apple Pay button, and then tap Apple Pay (![]() ). Use the controls to specify the amount, and then tap Pay. The payment ticket appears in the message box. Tap Send (
). Use the controls to specify the amount, and then tap Pay. The payment ticket appears in the message box. Tap Send (![]() ) to send it.
) to send it.
Manage Your Instant Messages
Messages is great for communicating quickly and frequently with your nearest and dearest and with your colleagues, so it may not take long before the interface is so full of messages that it becomes hard to navigate.
To keep your messages under control, you can forward messages to others and delete messages you do not need to keep. You can either delete messages from a conversation, leaving the conversation’s other messages, or delete the entire conversation.
Manage Your Instant Messages
Delete an Entire Conversation
![]() Swipe up from the bottom of the screen.
Swipe up from the bottom of the screen.
The Home screen appears.
![]() Tap Messages (
Tap Messages (![]() ).
).
The Messages screen appears.
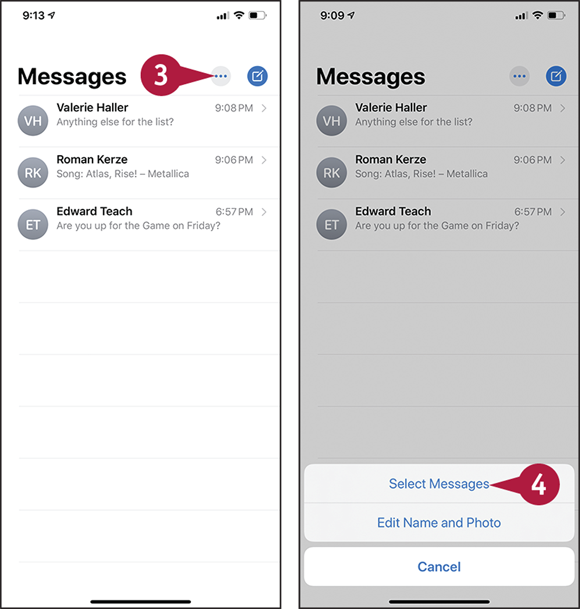
![]() Tap More (
Tap More (![]() ).
).
A dialog opens.
![]() Tap Select Messages.
Tap Select Messages.
The Messages screen switches to Edit Mode.
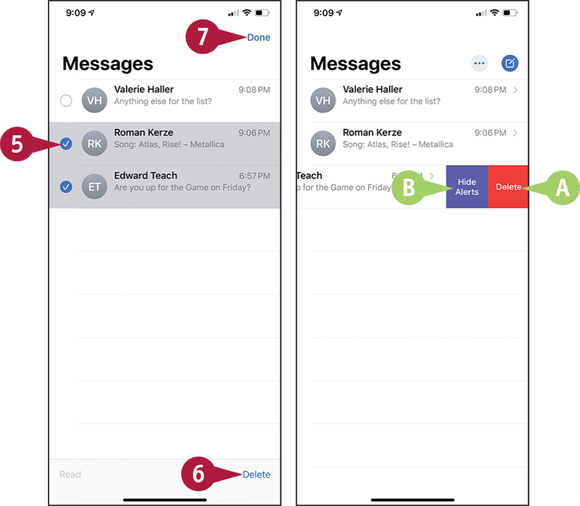
![]() Tap the selection button (
Tap the selection button (![]() changes to
changes to ![]() ) for each conversation you want to delete.
) for each conversation you want to delete.
The Delete button appears.
![]() Tap Delete.
Tap Delete.
Messages deletes the conversation.
![]() You can also delete a conversation by swiping it to the left and then tapping Delete.
You can also delete a conversation by swiping it to the left and then tapping Delete.
![]() You can suppress alerts for a contact by swiping a message left and then tapping Hide Alerts.
You can suppress alerts for a contact by swiping a message left and then tapping Hide Alerts.
![]() When you finish deleting conversations, tap Done.
When you finish deleting conversations, tap Done.
Messages turns off Edit Mode.

Forward or Delete One or More Messages from a Conversation
![]() On the Messages screen, tap the conversation that contains the message or messages you will forward.
On the Messages screen, tap the conversation that contains the message or messages you will forward.
The conversation appears.
Note: You can tap in a conversation and slide your finger left to display the time of each message.
![]() Tap and hold a message.
Tap and hold a message.
A dialog opens.
![]() Tap More.
Tap More.

A selection button (![]() ) appears to the left of each message.
) appears to the left of each message.
![]() Tap the selection button (
Tap the selection button (![]() changes to
changes to ![]() ) for each message you want to affect.
) for each message you want to affect.
![]() Tap Forward (
Tap Forward (![]() ).
).
Messages starts a new message containing the message or messages you selected.
![]() Instead of forwarding the selected messages, you can tap Delete (
Instead of forwarding the selected messages, you can tap Delete (![]() ) to delete them from the conversation.
) to delete them from the conversation.
![]() You can also tap Delete All to delete all the messages.
You can also tap Delete All to delete all the messages.
![]() Address the message.
Address the message.
![]() Type any extra text needed.
Type any extra text needed.
![]() Tap Send (
Tap Send (![]() ) to send the message.
) to send the message.
Choose Settings for Messages
Messages includes many settings that you can configure to control the way the app looks and behaves. These settings include whether to send messages as SMS if the iMessage service is unavailable, whether to use MMS messaging, and how long to keep messages.
A key setting is whether to send read receipts for the messages you receive. You can turn read receipts on or off for Messages as a whole, but you can also make exceptions for individual contacts.
Choose Settings for Messages

![]() Swipe up from the bottom of the screen.
Swipe up from the bottom of the screen.
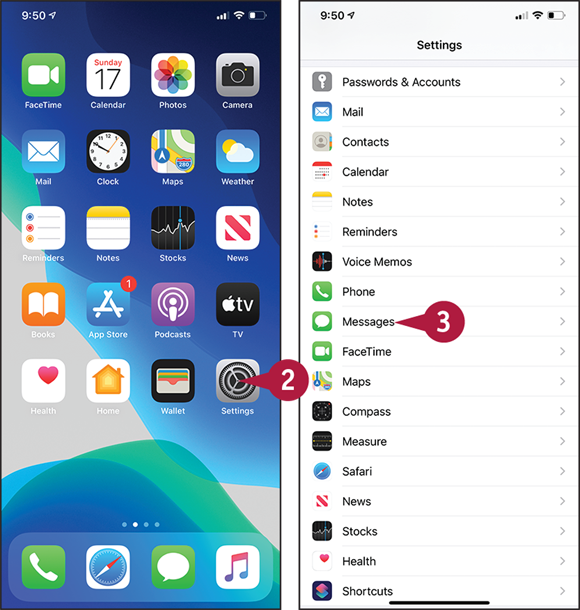
The Home screen appears.
![]() Tap Settings (
Tap Settings (![]() ).
).
The Settings screen appears.
![]() Tap Messages (
Tap Messages (![]() ).
).
![]() Set the iMessage switch to On (
Set the iMessage switch to On (![]() ) to use the iMessage service.
) to use the iMessage service.
![]() Set the Show Contact Photos switch to On (
Set the Show Contact Photos switch to On (![]() ) to display contact photos.
) to display contact photos.
![]() Set the Send Read Receipts switch to On (
Set the Send Read Receipts switch to On (![]() ) or Off (
) or Off (![]() ) to control whether Messages sends read receipts for all messages.
) to control whether Messages sends read receipts for all messages.
![]() Tap Send & Receive.
Tap Send & Receive.
The iMessage screen appears.
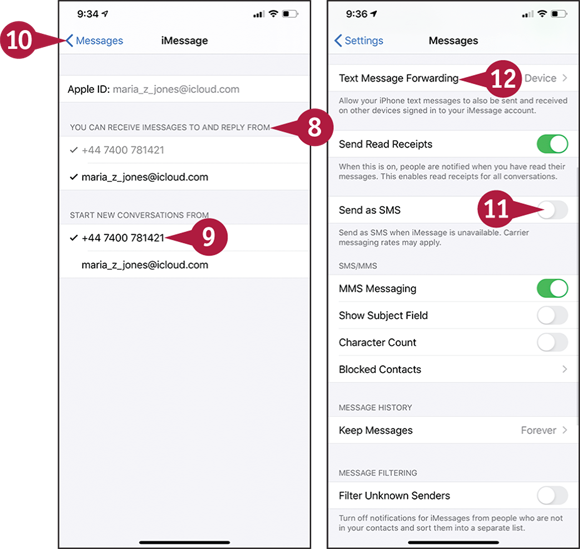
![]() Verify that this list shows the correct phone number and address.
Verify that this list shows the correct phone number and address.
![]() Tap the phone number or e-mail address from which to start new conversations.
Tap the phone number or e-mail address from which to start new conversations.
![]() Tap Messages (
Tap Messages (![]() ).
).
The Messages screen appears again.
![]() Set the Send as SMS switch to On (
Set the Send as SMS switch to On (![]() ) to send iMessage messages as SMS or MMS messages when iMessage is unavailable.
) to send iMessage messages as SMS or MMS messages when iMessage is unavailable.
![]() Tap Text Message Forwarding.
Tap Text Message Forwarding.

The Text Message Forwarding screen appears.
![]() Set the switch to On (
Set the switch to On (![]() ) for each Mac or device you want to allow to send text messages via the iPhone.
) for each Mac or device you want to allow to send text messages via the iPhone.
![]() Tap Back (
Tap Back (![]() ).
).
The Messages screen appears again.
![]() Set the MMS Messaging switch to On (
Set the MMS Messaging switch to On (![]() ) to enable MMS messaging.
) to enable MMS messaging.
![]() Set the Show Subject Field switch to On (
Set the Show Subject Field switch to On (![]() ) or Off (
) or Off (![]() ), as needed.
), as needed.
![]() Set the Character Count switch to On (
Set the Character Count switch to On (![]() ) or Off (
) or Off (![]() ), as needed.
), as needed.
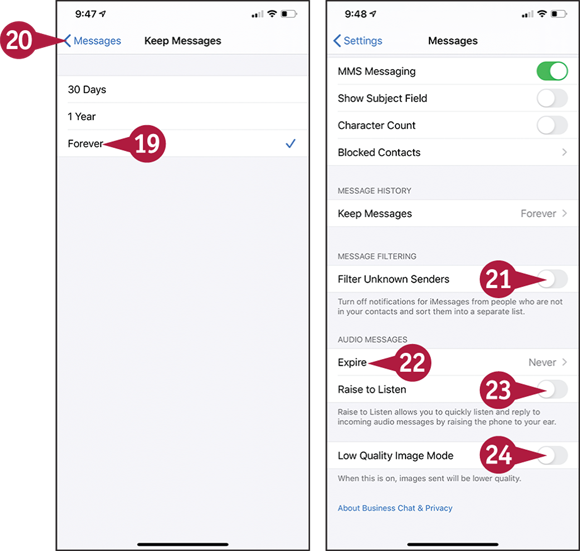
![]() Tap Keep Messages.
Tap Keep Messages.
The Keep Messages screen appears.
![]() Tap 30 Days, 1 Year, or Forever, as needed.
Tap 30 Days, 1 Year, or Forever, as needed.
![]() Tap Messages (
Tap Messages (![]() ).
).
The Messages screen appears again.
![]() Set the Filter Unknown Senders switch to On (
Set the Filter Unknown Senders switch to On (![]() ) if you want to keep messages from unknown senders separate.
) if you want to keep messages from unknown senders separate.
![]() Tap Expire and choose After 2 Minutes or Never for audio messages.
Tap Expire and choose After 2 Minutes or Never for audio messages.
![]() Set the Raise to Listen switch to On (
Set the Raise to Listen switch to On (![]() ) or Off (
) or Off (![]() ).
).
![]() Set the Low Quality Image Mode switch to On (
Set the Low Quality Image Mode switch to On (![]() ) or Off (
) or Off (![]() ), as needed.
), as needed.
Block and Unblock Senders
Messages enables you to block any sender from whom you do not want to receive communications. You can implement blocking from the Messages app or from the Phone app. Whichever app you start from, blocking the contact prevents you from receiving notifications when the contact phones or messages you.
You can review your list of blocked senders and unblock any sender from whom you want to receive messages again.
Block and Unblock Senders
Block a Sender from the Messages App
![]() Swipe up from the bottom of the screen.
Swipe up from the bottom of the screen.
The Home screen appears.
![]() Tap Messages (
Tap Messages (![]() ).
).
The Messages screen appears.
Note: If the screen for a contact appears, tap Back (![]() ) to display the Messages screen.
) to display the Messages screen.
![]() Tap a conversation with the contact you want to block.
Tap a conversation with the contact you want to block.
The conversation opens.
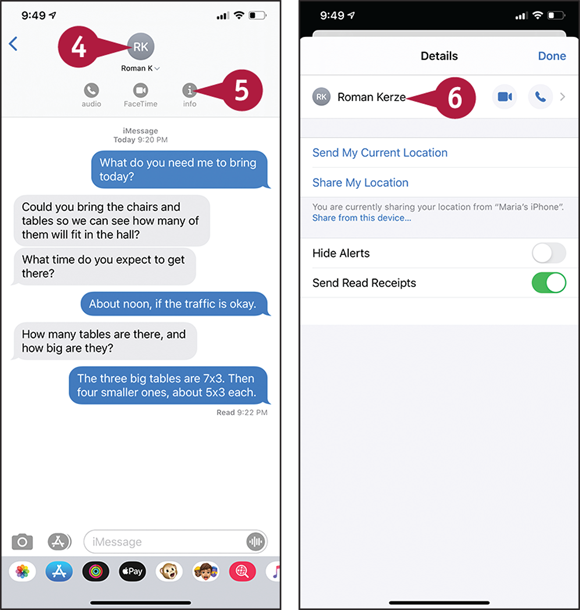
![]() Tap the contact’s icon.
Tap the contact’s icon.
The Audio button, FaceTime icon, and Info icon appear.
![]() Tap Info (
Tap Info (![]() ).
).
The Details screen appears.
![]() Tap the contact’s name.
Tap the contact’s name.

The contact record opens.
![]() Tap Block this Caller.
Tap Block this Caller.
A confirmation dialog opens.
![]() Tap Block Contact.
Tap Block Contact.
View Your Blocked List and Unblock Senders
![]() Swipe up from the bottom of the screen.
Swipe up from the bottom of the screen.
The Home screen appears.
![]() Tap Settings (
Tap Settings (![]() ).
).
The Settings screen appears.
![]() Tap Messages (
Tap Messages (![]() ).
).

The Messages screen appears.
![]() In the SMS/MMS section, tap Blocked Contacts.
In the SMS/MMS section, tap Blocked Contacts.
The Blocked screen appears, showing the list of contacts you have blocked.
![]() You can tap Add New to display the Contacts screen, and then tap the contact you want to block. Blocking the contact blocks all the means of contact, but you can then unblock any means of contact you wish to allow.
You can tap Add New to display the Contacts screen, and then tap the contact you want to block. Blocking the contact blocks all the means of contact, but you can then unblock any means of contact you wish to allow.
![]() To unblock a means of contact, swipe its button to the left.
To unblock a means of contact, swipe its button to the left.
The Unblock button appears.
![]() Tap Unblock.
Tap Unblock.
Set Up and Use the Emergency SOS Feature
The iPhone’s Emergency SOS feature can either display the Emergency SOS screen or dial emergency services automatically when you give the Emergency SOS shortcut, five quick presses on the Side button. Emergency SOS can also automatically text a group of emergency contacts to tell them you have dialed emergency services.
To be ready for an emergency, enable the Emergency SOS feature, configure its settings, and then set up your emergency contacts in the Health app.
Set Up and Use the Emergency SOS Feature
Set Up the Emergency SOS Feature
![]() Swipe up from the bottom of the screen to display the Home screen.
Swipe up from the bottom of the screen to display the Home screen.
![]() Tap Settings (
Tap Settings (![]() ) to display the Settings screen.
) to display the Settings screen.
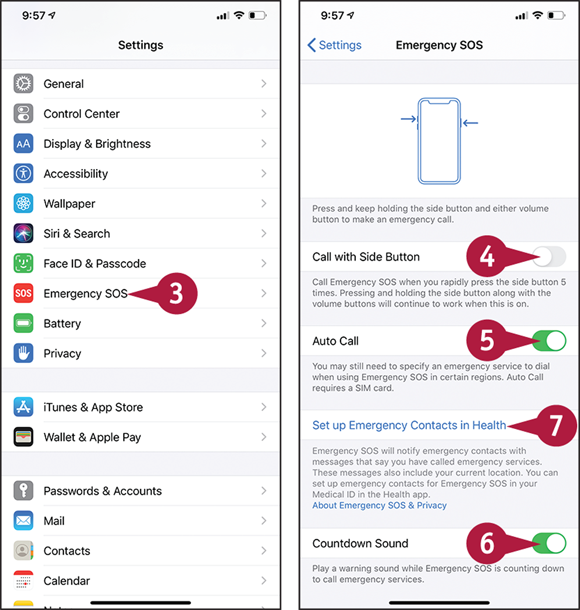
![]() Tap Emergency SOS (
Tap Emergency SOS (![]() ).
).
The Emergency SOS screen appears.
![]() Set the Call with Side Button switch to On (
Set the Call with Side Button switch to On (![]() ) if you want to make an emergency call by pressing Side five times in quick succession.
) if you want to make an emergency call by pressing Side five times in quick succession.
![]() Set the Auto Call switch to On (
Set the Auto Call switch to On (![]() ) if you want to invoke the Emergency SOS shortcut to place the emergency call. Set the Auto Call switch to Off (
) if you want to invoke the Emergency SOS shortcut to place the emergency call. Set the Auto Call switch to Off (![]() ) to display the Emergency SOS screen instead.
) to display the Emergency SOS screen instead.
![]() If you set the Auto Call switch to On (
If you set the Auto Call switch to On (![]() ), set the Countdown Sound switch to On (
), set the Countdown Sound switch to On (![]() ) to receive a 3-second countdown before your iPhone dials emergency services.
) to receive a 3-second countdown before your iPhone dials emergency services.
![]() Tap Set up Emergency Contacts in Health.
Tap Set up Emergency Contacts in Health.
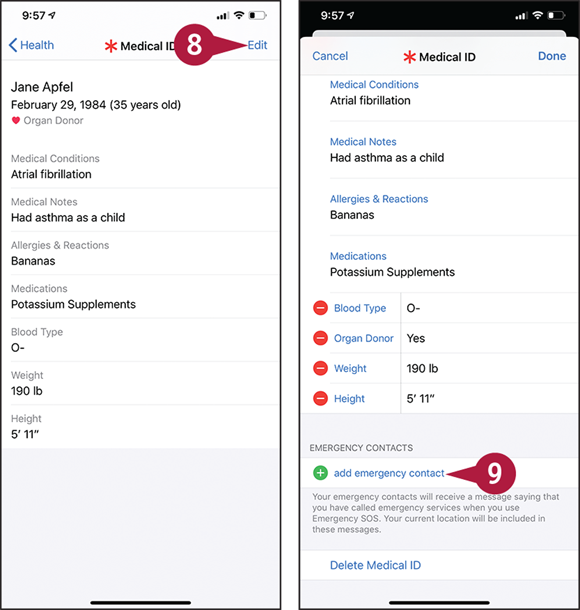
The Medical ID screen in the Health app appears.
![]() Tap Edit.
Tap Edit.
The Medical ID screen opens for editing.
![]() Tap add emergency contact (
Tap add emergency contact (![]() ).
).
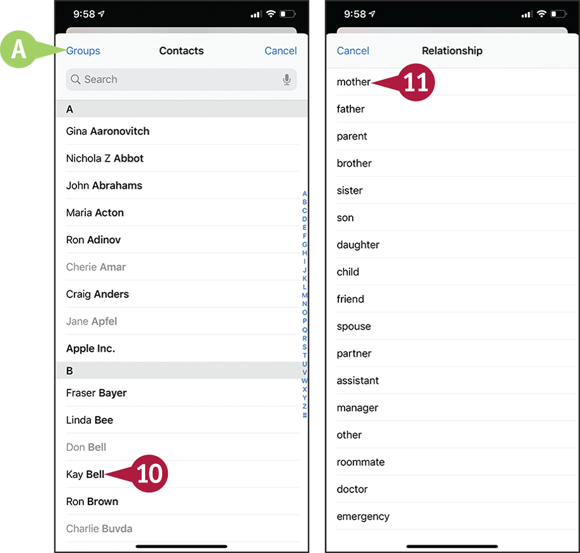
The Contacts screen appears.
![]() If the contact you want does not appear, tap Groups, select the appropriate groups, and then tap Done.
If the contact you want does not appear, tap Groups, select the appropriate groups, and then tap Done.
![]() Tap the contact you want to designate an emergency contact.
Tap the contact you want to designate an emergency contact.
The Relationship screen appears.
![]() Tap the button for the term that describes the contact’s relationship to you, such as mother, sister, or partner.
Tap the button for the term that describes the contact’s relationship to you, such as mother, sister, or partner.
The Medical ID screen appears again.
You can add other contacts by repeating steps 8 to 10.
![]() Tap Done.
Tap Done.

Use the Emergency SOS Feature
![]() When you need to place an emergency call, press Side five times in quick succession.
When you need to place an emergency call, press Side five times in quick succession.
![]() If you set the Auto Call switch to On (
If you set the Auto Call switch to On (![]() ), your iPhone starts placing an emergency call.
), your iPhone starts placing an emergency call.
![]() If you set the Countdown Sound switch to On (
If you set the Countdown Sound switch to On (![]() ), a 3-second countdown starts.
), a 3-second countdown starts.
![]() You can tap Stop (
You can tap Stop (![]() ) to stop the call.
) to stop the call.
![]() If you set the Auto Call switch to Off (
If you set the Auto Call switch to Off (![]() ), the Power Off screen appears.
), the Power Off screen appears.
![]() You can swipe Emergency SOS (
You can swipe Emergency SOS (![]() ) right to place the emergency call.
) right to place the emergency call.