
Chapter 15
Troubleshooting When Windows Won’t Cooperate
IN THIS CHAPTER
![]() Figuring out common setup problems
Figuring out common setup problems
![]() Checking out connection issues and how to resolve them
Checking out connection issues and how to resolve them
![]() Seeing how to reset your cloud PC
Seeing how to reset your cloud PC
![]() Looking into crashes in apps and your system
Looking into crashes in apps and your system
Whenever you work with any new product it can take time to get things figured out. Perhaps your problems are with the way the product works or perhaps they’re with the way you use the product. Windows 365 is no exception. Sometimes things just won’t work out the way you expect them to, and frustration will set in.
In this chapter, we look at some of the main issues you will experience with your Windows 365 cloud PC and how to resolve them. First, we look at issues related to setting up your cloud PC and then dive into problems with connecting to it after it is set up. Finally, we look at some general issues you might experience with crashes and how to reset your cloud PC when you want to start over.
Working through Problems with the Setup Process
In Chapter 1 you learned how to get set up with Windows 365. The process can require some patience when things don’t go smoothly. We remember when Office 365 was initially introduced and the pain and suffering we had to go through to sign up and use the product. Windows 365 is a much more streamlined experience than Office 365 was over a decade ago, but it is still a brand-new product.
When we signed up for Microsoft 365 in Chapter 1 and then added Windows 365 the process went smoothly. We didn’t experience any issues. However, if you are adding Windows 365 to an existing Microsoft 365 subscription, then there are some things to watch out for.
Azure Active Directory limits adding new devices
Azure Active Directory is the backbone for managing users and devices in the Microsoft cloud. If you use Microsoft 365, then you are using Azure Active Directory. It sits behind the scenes, but you should know about it and how to access it to solve certain problems.
You may run into issues with the settings in your Azure Active Directory tenant. For example, Azure Active Directory has settings to restrict or limit users adding new devices to the tenant. A cloud PC is just another device in the eyes of Azure Active Directory; if your tenant won’t allow you to add a device, then you won’t be able to create your cloud PC. You can find these settings by signing into the Azure portal at https://portal.azure.com, selecting Azure Active Directory, and then selecting Devices, as shown in Figure 15-1.
Multifactor authentication causes problems
Another feature that can cause problems is multi-factor authentication. Multifactor authentication is critically important for security and yet Microsoft recommends turning it off to set up your cloud PC. We find this incredibly unfortunate and hope that soon Windows 365 will have features that support multifactor authentication. Azure Active Directory has a setting to require multi-factor authentication in order to add a new device. If this is turned on, then you won’t be able to add your cloud PC because it is considered a device. These settings appear in the Azure portal along with the device settings mentioned in the previous section.
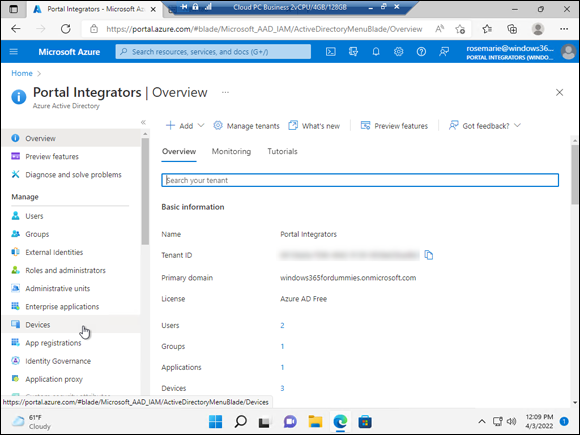
FIGURE 15-1: Managing devices in your Azure Active Directory tenant.
 Another area to check for problems is the Mobility section of Azure Active Directory. Microsoft recommends various paths to fix these problems depending on whether you want to use Microsoft Intune to manage your cloud PCs.
Troubleshooting the setup process for your Windows 365 cloud PCs is an ever-changing target. Microsoft continually fixes problems and adds new features that result in new problems. We have covered a couple of the top issues we have seen, and you can stay up to date with new guidance on troubleshooting on the Microsoft Docs website. The troubleshooting links are
- Business Subscriptions:
https://docs.microsoft.com/windows-365/business/troubleshoot-windows-365-business - Enterprise Subscriptions:
https://docs.microsoft.com/windows-365/enterprise/troubleshooting
We see extremely smart people spending massive amounts of time trying to solve problems in the Microsoft ecosystem. When you use Windows 365 you are also using Microsoft 365. Microsoft 365 provides a mechanism for opening a service request, also known as a support ticket, for someone to help you through your problems. We recommend opening a support ticket if the issue you are experiencing is not obvious. The Microsoft support engineers are smart and helpful, and they spend their entire day in and day out solving issues. As a result, it is likely they have seen the exact problem you are experiencing before and know exactly how to handle it. Your time is incredibly valuable and to make the most of it we recommend opening a service ticket as soon as you run into a problem that isn’t obvious to resolve.
Figuring Out Why You Can’t Connect to Your Cloud PC
Before you can work on your cloud PC you must first connect to it. As we covered in Chapter 3 you can connect using a web browser or, preferably, the Windows 365 Remote Desktop client. To connect to your cloud PC, you must use a physical device and you must have a stable Internet connection. Although this process is straightforward, after you get things set up and in a groove, it can be frustrating when things don’t work. When things don’t work you can start with the basics.
The first thing to check is whether you have a stable Internet connection. It is not always obvious that a simple Internet connection is the problem as shown in Figure 15-2. When there is no Internet access, a message appears saying that you cannot connect to the service. Another error message that threw us for a loop is shown in Figure 15-3. The message is complaining about connecting to a specific server; however, the root cause was that our physical computer had its network cable unplugged. This reminds us of the time we spent an hour trying to get a scanner to work on our computer and finally realized it wasn’t plugged in, had no power, and thus our computer couldn’t add it. Sometimes it pays to start with the simplest things first and work toward the outliers.
You can check for Internet connectivity by browsing to well-known websites and checking Microsoft connectivity by browsing to a site such as https://docs.microsoft.com.
If your network connection is solid, then the next thing to check is whether the Windows 365 Remote Desktop client is installed and working correctly. Follow the steps in Chapter 2 to get setup if you haven’t yet done it. In particular, you must subscribe to your cloud PC in the Remote Desktop client so that it knows how and where to connect.
If you are connecting using your web browser, then there are many more factors to consider. Every web browser handles things slightly different. One immediate step to try is to use a different browser. For example, if you are using the security-focused Brave web browser and things aren’t working, then try using Edge or Chrome. We have also had problems with web browser add-ons that are designed to block trackers and ads. These add-ons can usually be configured to allow specific sites, and you might need to add the https://windows365.microsoft.com site to get things working.
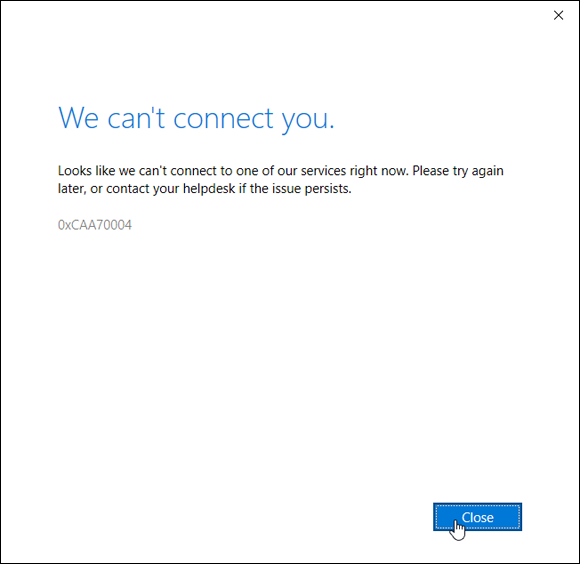
FIGURE 15-2: Windows 365 Remote Desktop client complaining it cannot connect to a service.
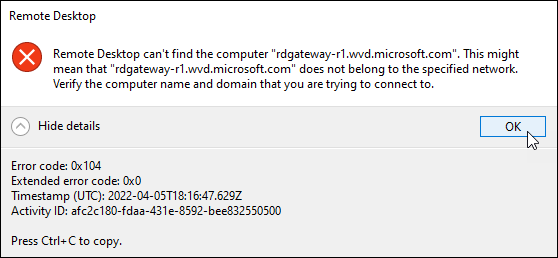
FIGURE 15-3: Windows 365 Remote Desktop client complaining it cannot connect to a server.
Web browsers store information in what is known as a cache. The idea of a cache is that the browser can load information from the cache faster than it can over the network. Unfortunately, the cache can also create problems when you want fresh information instead of the information from the cache. Every web browser has a way to clear the cache. In addition, every browser also includes a way to open a window that ignores the cache. The window is called InPrivate in the Edge browser and Incognito in the Chrome browser. You can open one of these windows by clicking the ellipsis in the upper right corner of the browser.
If you can load your cloud PC and are presented with a sign-in prompt, then you are close to solving your problem. When you sign into your cloud PC you are using your Microsoft 365 credentials. We walked through how to set these up in Chapter 2. To check your Microsoft 365 credentials, you point your web browser to https://admin.microsoft.com. If you can’t sign in and you are an administrator, then click the Can’t Access Your Account? link, as shown in Figure 15-4. When you have your credentials working, you can use them to sign in to your cloud PC.

FIGURE 15-4: Sign-in page for Microsoft 365 with a link to access account.
An Easy Solution to Problems with Your Physical Device
Your cloud PC is always on and always available. Of course, you need a physical device such as a desktop computer, laptop, tablet, or phone to connect to it and use it. If you experience a crash or problem with your physical device, then the fastest way to get back to work on your cloud PC is to simply switch to a different device. We have done this multiple times and have even used old computers that we thought were long beyond their life. Because the old computer only acts as a gateway to the cloud PC, we didn’t have a problem. The only limitation is to make sure the physical device meets the minimum requirements, and we cover those in Chapter 2.
A tablet or phone will work to connect to your cloud PC in a pinch, but we find we are most productive when we have a full keyboard, monitor, and mouse. The physical computer might be the most inexpensive thing you can find, and it still works great to get work done on your cloud PC. Assuming it meets the minimum requirements, of course.
Keeping Up to Date with Known Issues
As we mentioned, Windows 365 is a brand-new product, and it is bound to have problems. Some of these problems are known even if they are not yet fixed. We like to keep an eye on the known issues so that we don’t go down the road of chasing a problem resolution when none exists. Microsoft maintains a “known issues” list on the documentation site. You can find it at the following locations:
- Business Subscriptions:
https://docs.microsoft.com/windows-365/business/known-issues - Enterprise Subscriptions:
https://docs.microsoft.com/windows-365/enterprise/known-issues-enterprise
Recovering Deleted Files
Files, such as Word documents, Excel spreadsheets, PowerPoint presentations, OneNote notes, and countless others, are critical to storing information and getting things done. Microsoft keeps your cloud PC backed up and secure, however, there is nothing to stop you, or someone that uses your cloud PC, from accidentally deleting files. The good news is that there are multiple safeguards in place to help you recover deleted files.
If you are using a content management system, such as SharePoint and OneDrive then you have a powerful technology helping you keep things organized. When you delete a file from SharePoint you can view it in the recycle bin in SharePoint. We cover SharePoint in Chapter 11. And we love SharePoint so much we have written an entire book on the subject. If you want to dive deep on SharePoint, then check out SharePoint For Dummies (Wiley).
If you use Teams to store files, then you are using SharePoint behind the scenes. To view the files for a team you click on the team’s name and then click on the Files tab. We cover Teams in Chapter 10.
In SharePoint, you can turn on versioning so that every time you save a file a new version is created. You can turn on major and minor versioning. We find this feature incredibly helpful when we want to look back over previous versions and see what has changed.
Using a physical computer to access and use a virtual computer can often lead to confusion when it comes to deleted files and recovering those files. For example, you might have a file on your virtual computer and then look for it on your physical computer. It might initially seem like the file was deleted or “disappeared” when in actuality it is just in another location.
Even if you don’t use one of the powerful content management technologies we discussed previously, some features built into your cloud PC will help you recover deleted files. When you delete a file on your cloud PC, it is not really deleted right away. Instead, it is moved to the Recycle Bin. The Recycle Bin is a special folder that you can browse to see deleted files. By default, the Recycle Bin shows up as an icon on your desktop as shown in Figure 15-5. You can add or remove the Recycle Bin, and other icons, from your desktop.
To restore a file from the Recycle Bin, double-click the Recycle Bin icon on your desktop, and then right-click a file and select Restore.
To add or remove the Recycle Bin icon from your desktop:
-
Click the Start button and then type settings.
The Start menu appears, and the options are filtered to show the Settings app.
- Click the Settings app to open it.
-
Select Personalization from the left navigation.
The personalization screen appears.
-
Scroll down and select Themes.
The Themes options appear.
- Scroll down, click Desktop Icon Settings, and then select which icons you want to show on the desktop, as shown in Figure 15-6. Then click Apply.
-
Click Apply to save the settings.
The Recycle Bin icon now appears (or is hidden) on the desktop of your cloud PC.
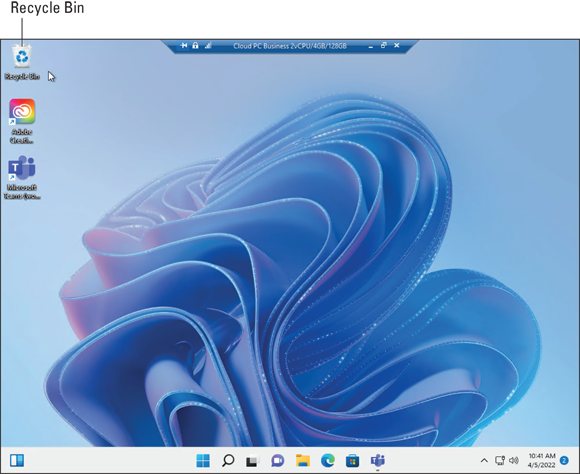
FIGURE 15-5: The Recycle Bin on a cloud PC.
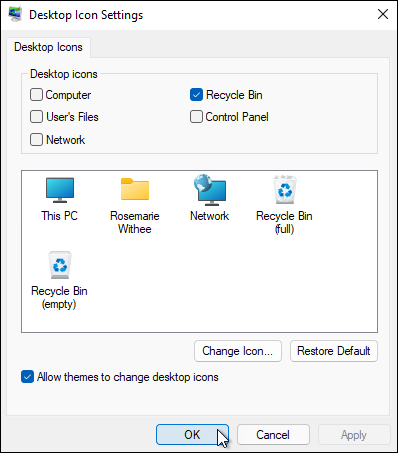
FIGURE 15-6: Choosing which icons to show on the desktop of a cloud PC.
Rebooting a Cloud PC
A Windows 365 cloud PC is always on and always available. However, it is still running Windows, and there comes a time when rebooting your virtual computer can be beneficial to problems you might be facing. The old joke in technical support is that step one is always to reboot the computer. The same adage holds true in the virtual world. If you are running into problems, try rebooting your cloud PC. You reboot your cloud PC by clicking the Start button and then selecting the power icon and choosing Restart as shown in Figure 15-7. Alternatively, you can restart your cloud PC from the administration page at https://windows365.microsoft.com. To reset the PC, sign in to the administration page, click the settings icon on the cloud PC, and then select Restart as shown in Figure 15-8.
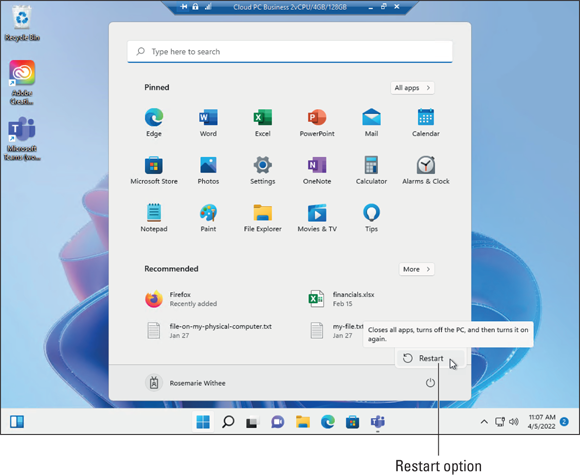
FIGURE 15-7: The Restart option on the Start Menu of your cloud PC.
A shortcut that has been around for ages is to press the Ctrl-Alt-Delete keys to bring up a menu. The shortcut is still available on your cloud PC; however, to differentiate between your physical computer and your cloud computer, you use the End key on your keyboard. So, the keys to press are now Ctrl-Alt-End and then the same menu you would see on a physical computer is shown on your cloud PC.
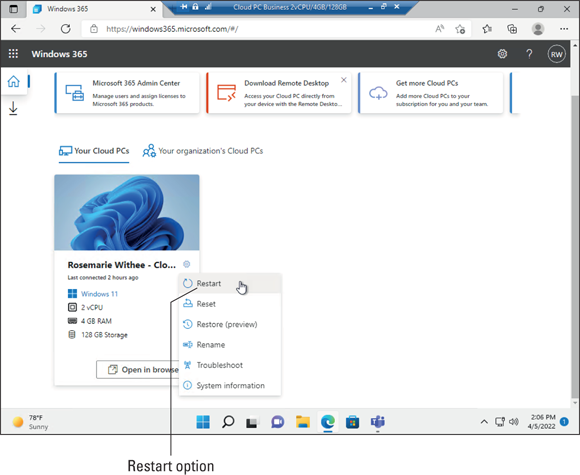
FIGURE 15-8: The Restart option on the Windows 365 administration page.
Finding Help within Your Cloud PC
Windows has had a shortcut to finding help information for ages. The shortcut is the F1 key on your keyboard. The result is a help window based on the app you are using when you press it or for Windows in general. For the most part, this shortcut still works on your cloud PC. Though in our experience Microsoft is moving away from this integrated help feature. We are still in the habit of pressing F1 on our keyboard though the result now is that a web browser opens to a help page. We have had better luck opening a web browser and searching Google for the problem we are experiencing.
Some keyboards have a function key you must press and hold before you press the key labeled F1 on your keyboard. In our case, the F1 key on our keyboard acts as the volume key by default. To trigger the F1 key, we must press and hold the function key, labeled Fn, and then press the F1 key.
As we have mentioned throughout the book, it is easy to get confused between your physical computer and your cloud PC. If you are entering a keyboard shortcut, like F1 for help, make sure you are working in your cloud PC and that the window is active. We have experienced times when we didn’t have our cloud PC window at full screen and even though we could see our cloud PC on the screen the window wasn’t active. So, when we pressed F1 for help, we were presented with help from our physical computer.
Crashing in the Cloud
Crashes are a fact of life when working with software. Applications crash, web sites crash, and entire operating systems crash. When working on your cloud PC you will experience the same types of crashes as you do on your physical computer.
When your physical device crashes you can restart it and reconnect to your cloud PC. If your physical device can’t recover from the crash, then the easiest thing to do is just grab another device and use it to connect back to your cloud PC. Your cloud PC is always on and always available, and it doesn’t matter what physical device you use to connect to it.
 If one of your applications on your cloud PC crashes, then you can potentially lose data. It is important to keep in mind that your cloud PC is very similar to a physical computer in the way applications run on it. For example, if you are working in Notepad and Notepad crashes before you remember to save your file, then all your data in that Notepad document is likely gone.
Depending on the application you are using when the app crashes, there are some possible solutions. When you are using Office, a crash file is created so the next time you open the Office application you will receive a message that the app crashed recently and a message asking if you want to recover the crashed document. If you are using Office and saving your files to SharePoint and OneDrive, then your files will have the auto-save feature turned on. If you aren’t using SharePoint and OneDrive, then you will need to remember to save the file every so often, so you don’t lose it.
Keep in mind that the term cloud is just another way to talk about software running in a data center somewhere that you connect to over the Internet. If your Internet connection goes down, then the cloud is down for you. Your cloud PC is still running and waiting for you to connect, but without an Internet connection you won’t be able to connect to it as shown in Figure 15-9. Therefore, a stable Internet connection is critical in the modern world and especially when working on a cloud PC. We cover network requirements and recommendations in Chapter 16.

FIGURE 15-9: An Internet connection is critical in order to access your cloud PC.
Microsoft has announced new Windows 365 features that allow you to work offline on your cloud PC and then sync the changes the next time you are connected to the Internet. We expect Windows 365 features like this to come fast and furious in the near future.
Resetting Your Cloud PC
We can’t tell you how many times we have reinstalled the operating systems on our computers. The number must be in the hundreds. We have reinstalled everything from Windows, to Mac, to Linux, and just about everything in between. Reinstalling an operating system is an extreme option. Many people would say it is a nuclear option because going through with it means you have completely obliterated your old operating system.
 You can lose data when you reset your cloud PC. Use extreme caution and make sure you are prepared by making sure all your files, data, and settings are backed up.
Because your cloud PC is not a physical computer, there is nothing to reinstall. What you can do instead is reset your computer back to an initial state. The process to reset your cloud PC can be found on the Windows 365 administration page. Earlier in the chapter you saw the option to restart your cloud PC on the same administration page. Refer to Figure 15-8. Just below the Restart option is an option to Reset the cloud PC. When you select this option, you receive a warning, as shown in Figure 15-10. Performing this task reinstalls Windows on your cloud PC, removes your personal files, removes changes you made in settings, and removes your apps. Like we said, it is a nuclear option.
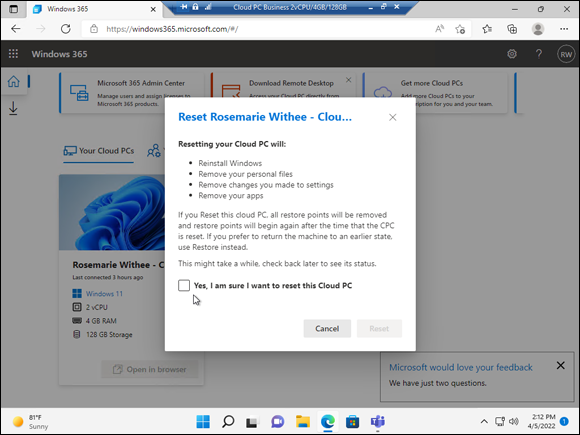
FIGURE 15-10: Resetting a cloud PC from the Windows 365 administration page.
Restoring Your Cloud PC to an Earlier State
A brand-new feature that is less destructive than resetting your cloud PC is restoring. The Restore option, which is still in preview, is like a time machine. It transports your cloud PC back (back to the future?) to a previous point in time, as shown in Figure 15-11. For example, let’s say a week ago you installed the Firefox browser and then created two new Word documents. If you now restore your cloud PC to that point in time two weeks ago, all the changes you made in the last week vanish. It’s like the last two weeks never existed. We love this feature because we can rewind the clock to a time before we thought it would be a good idea to start installing some wacky software on our cloud PC. Then poof, the crazy idea to install every browser known to civilization is erased and we are back to just the standard web browsers.
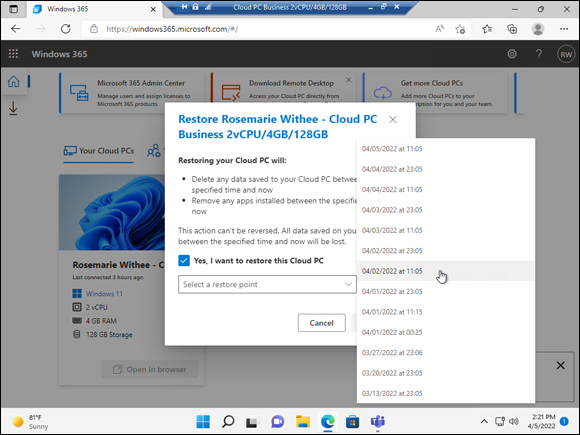
FIGURE 15-11: Restoring a cloud PC to a previous point in time from the Windows 365 administration page.