
CHAPTER 9
Microsoft Azure
In this chapter, we will cover:
• Creating instances of systems
• Developing network designs
• Implementing security controls
Microsoft has been involved in cloud computing in one capacity or another for many years. Office Web Apps was first introduced in 2008, though they had been talking about software as a service before that. Microsoft Azure started about the same time, though both Office and Azure took a couple of years to find their footing in terms of how they were going to offer services. Similarly, Microsoft OneDrive, formerly known as SkyDrive, was introduced in 2007, though Microsoft didn’t settle, at least in terms of marketing, for a little while. All of this is to say that in the last chapter we talked about using Amazon Web Services (AWS), but everything you can do in AWS can be done with Microsoft in their cloud environment. Additionally, Microsoft has some other advantages, not least of all that they have their own suite of operating systems to offer to the equation. On top of that, Microsoft has their own programming language, PowerShell, that can be used to interact with Azure to automate some of the tasks we’ve been doing through a web interface so far.
Actually, Microsoft has the full complement of cloud services. First, they have OneDrive for storage as a service. They also have Azure for infrastructure as a service and platform as a service. As a little kicker, they also own one of the platforms, .NET, as part of their server operating system family. Finally, they offer software as a service with Office Online. If you want to throw in mail online, we can talk about Office 365, which includes a lot of other cloud-based applications.
Just like AWS, Azure has a free tier that you can make use of. Essentially, the system is free, meaning you aren’t paying licensing costs to any vendor, whether it’s Microsoft or a third party. Instead, you are paying for usage. When you use computing time or network bandwidth, you are going to pay for that usage. Keeping an eye on how much of each of those factors you consume will help you keep your overall costs down. We are mostly going to be sticking with the free tier as we go through the different options that are available, though be assured there are a lot of pay-for systems available, no matter what component or system we are going to be using. The commercial vendors have flocked to the various cloud platforms and made sure their wares are available in some version of a cloud instance.
![]()
NOTE We spent a fair amount of time on physical servers and virtual servers at home, so don’t feel like you have to go all one way or all the other. You can do a hybrid approach where you can have your physical infrastructure that connects over virtual private connections to the cloud environment.
Again, because we will pass through a lot of functionality, just as we did with AWS, we’re going to use a traditional web architecture and then talk about how to cloudify your architecture using some modern designs and services.
Traditional Web Design
Our traditional web design looks much the same as the AWS design did, other than this was created using Visio so it uses all the Azure stencils. This means you see, in Figure 9-1, the objects from Azure’s catalog of services. Just as in AWS, we have a database, an application server, some web servers, and a load balancer. The right side of the diagram is the innermost trust layer. We could draw some additional lines here to show we have multiple layers of trust, but you can also see it just by looking at the tiers of systems. Vertically tiered systems are going to be at the same level of trust. Our database shown here looks like it’s a single system, but in fact it’s just a single database. The database could be served by multiple operating system instances as well as a large storage area network (SAN) sitting behind for storage, rather than a single disk or even an array of disks. For our purposes, since we are putting ourselves in the hands of our cloud computing betters, it doesn’t matter what the particular implementation details are. We are concerned with functionality, not how we get that functionality particularly.

Figure 9-1 Traditional web architecture for Azure
Where the database is most trusted, since that’s typically where the crown jewels, so to speak, are kept, the load balancer is least trusted, aside from the user, not shown here. When it comes to security, programmatic access is where trust is going to be the most problematic. Since load balancers aren’t doing anything aside from taking a request in on one side and passing it though on the other without any evaluation of any of the content in the request, these may not be the devices you worry about most. However, these devices provide the entry point to the application. So, let’s start with the load balancers and move through the application path until we get to the database.
Load Balancers
Remember that the purpose of a load balancer is to make sure one individual system doesn’t get overloaded. You would use a load balancer if you were offering a service where you didn’t think a single system could handle all the requests. This may be because there is a lot of computing power required to process the request or it could be that you don’t want to tune your kernel to handle more requests. Every system has a maximum number of connections it can handle at any given time. This is because the operating system maintains a table of these open connections and at some point, the table simply becomes full. This is less about bandwidth and just the number of connections any given system can maintain. This is part of what made denial of service attacks so easy many years ago, though it’s a different number being tracked there.
Every time a client sends a TCP SYN message to the server on an open port, the server will respond with a SYN of its own as well as an ACK to the original SYN. At this point, the server has a half-open connection. The server will only maintain a certain number of these before no more can be accepted. This is how a SYN flood works. The attacker sends a SYN message from a fake (spoofed) IP address. The server sends back to the source IP, which doesn’t belong to the attacker. If no one exists at the legitimate source IP address, the message to that IP with the SYN/ACK just disappears and the server continues to wait for the final ACK of the TCP three-way handshake. So, that’s a SYN flood. The reason there is a cap on the number of connections that can come in, both half-open and fully open, is in order to protect the operating system. If there are too many open connections, the server can simply get overloaded in keeping track of them all. It has to maintain these open connection tables so when messages come in, the operating system will know how to respond—either there is an open connection or there isn’t.
![]()
NOTE With a Hypertext Transport Protocol (HTTP) communication, there are probably multiple requests coming into the server. Every page comes with a number of components that are referenced and not in the page directly. This may be images, cascading style sheets, or JavaScript files. The client will send the request for the page the user is asking for, and, while rendering, finds there are a lot of other files needed to make the page fully functional in the browser. These additional requests are probably not sent one at a time. That would be time consuming. Instead, because HTTP requests can’t be pipelined in the sense of just bundling up a lot of file requests into a single big request, the client will send all of the requests in separate connections. This means every request, give or take, requires a separate TCP handshake and connection. That dramatically increases the number of network connections a single client may have to the server.
So, we have a system that has a limited number of requests it can handle at any given time, whether for processing reasons or simply because there is a cap on the number of requests that the server can handle. This means we need multiple systems in order to handle all of the requests. The problem is our clients need to be able to talk to a single host at once, meaning it needs to know about one name or address. We can’t leave it up to the client what system to talk to at any given point. That burden is on us. Because the network would get confused with ARP responses, we can’t have multiple systems on a single subnet that have the same IP address. We also can’t have multiple subnets that all share the same network address, because then routing gets confusing or confused. Either way, there is potential for breakage there. One way to handle this is to have a single system that doesn’t worry about connections and can feed client requests to appropriate servers. Thus, load balancer!
Now that we have a better sense of what a load balancer is and why we use one, let’s take a look at creating one in Azure for use in our web architecture. Figure 9-2 includes a list of the different networking services that are available in Azure. When we go to the Azure Portal and look at all the services that are available, there are more than 100 across a number of categories. Even just in the networking category, you can see that there are 28 different services. We’ll take a look at some of the others available in this category later on but for now, we’ll focus on the load balancer, so we’re going to select that. This will either provide a list of existing load balancers, if some have already been created, or just the button that says create load balancer.

Figure 9-2 Networking services in Azure
Figure 9-3 shows the configuration page for a load balancer. The first thing you may notice is the subscription, which is Pay-As-You-Go. The other option, which is not available for me here, is a reserved instance. With pay as you go, you pay for computing resources as you use them, so if your instance is off, you aren’t paying for it. With a reserved instance, you are committing to a multi-year term of having this resource available for you and you pay for that. If you are sure you are going to need one of these instances for a long period of time (multiple years) and they are going to be utilized a lot, you may find that having a reserved instance is valuable to you. Microsoft suggests that making the upfront commitment will save you 72 percent over a pay as you go instance. In a lab situation, it’s more likely that you’ll be standing up instances and taking them down over shorter periods of time so you will likely benefit from the pay as you go, since you aren’t committing to paying for something you aren’t using.

Figure 9-3 Creating a load balancer
One other thing you may notice in Figure 9-3 is the Resource Group selection. A resource group, in Azure parlance, is a collection of related objects. It provides a way to logically collect the various resources you will be using in a given solution. This means you have a single management layer, effectively, for all of those resources. Azure provides the Azure Resource Manager to manage your different resources together. This means you can manage your resources using templates and also deploy your resources as a group rather than needing to manage or deploy them all individually. Of course, if you have instance-specific management, like making changes to how your load balancer works, for instance, you would need to do that on an instance-by-instance basis, but if you want to make changes that affect all of your resources in a group, you can do it at the group rather than having to go into each instance to make the changes there. As an example, if you wanted to change what geographic region your resources are in, you can do it all at once in the resource group. Figure 9-4 shows the creation of a resource group, which can be done separately from an instance creation, though if you hadn’t done it ahead of time, you can just create a new one during an instance creation. When you create an instance, it gets assigned to a geographic region, which is where all the instances will be created.
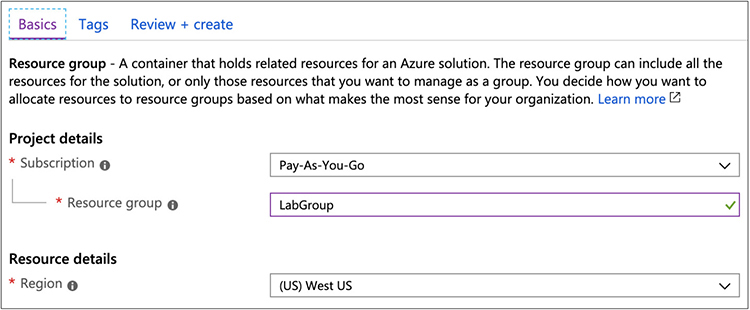
Figure 9-4 Resource group details
The important part of creating the load balancer is at the bottom of the window where we are creating the load balancer. We need to determine first how many instances are going to be in our application. If you have more than 1000 instances that you are balancing the load between, you need a Standard instance, rather than a Basic instance. The Standard instance will give you not only the capacity to support a large number of instances, where the Basic instance won’t, it will also give you a static IP address rather than a dynamic IP address. A dynamic IP address gets assigned when the instance spins up, just as any system using the dynamic host configuration protocol (DHCP). You may wonder how this works in the case of a public instance, where you need people to always be able to find where you are located, which is harder if the IP address is changing.
Because it’s worth calling it out specifically, Figure 9-5 shows the bottom part of the load balancer configuration again. This is where you are creating the IP address. You will have to create a name for your IP address. This is just the name you refer to it as within the Azure management system and has nothing to do with anything else. When you create your instance, you will be assigned a hostname that maps to the dynamic IP address. When you refer to the load balancer, as in when you provide a way for users to get access to your application, you would use that hostname. The hostname you will be provided is an Azure hostname with DNS managed by Microsoft. Since you may well want to use your own domain name, rather than Microsoft’s, you can create your own DNS record that points to the same location. Instead of configuring an address (A) record, you would create a canonical name (CNAME) record. The CNAME record is like an alias. It tells anyone performing a resolution on the first hostname to do a second lookup on the referenced hostname. So, if we had a hostname, www.mylab.com, that was a CNAME for mylabip.westus.cloudapp.azure.com, the first lookup would be for www.mylab.com. The DNS server looking for an IP address to hand back to the client requesting the lookup, would then have to do a lookup for an A record on mylab.westus.cloudapp.azure.com. This way, we can have dynamic addresses, not paying for a static IP, and still allow everyone to be able to find the system on the network.

Figure 9-5 Address creation
As noted earlier, using resource groups can allow you to better manage your overall implementation. This is something Azure exposes easily. In the process of creating the address we did previously, there is a way to get a template that allows for easy redeployment. The template itself is represented in JavaScript Object Notation (JSON) as seen in partial form in following configuration settings. However, if you want to implement the deploy, this particular resource in a language like PowerShell, .NET or Ruby, Azure will supply the actual code in those languages. Automation, which we will discuss more in Chapter 11, gives us the ability to constantly repeat a task in exactly the same way. Not only will you get the consistency from doing the same task over and over, but you will also get the speed that comes from automation rather than doing tasks by hand.

One nice feature of the Azure load balancer, especially in today’s world of everything is encrypted, is that the load balancer doesn’t terminate any communications. When a client is performing a handshake, whether a TCP handshake or a TLS handshake, the client is performing the handshake with the virtual machine instance and not the load balancer. The load balancer is entirely indifferent to protocols; it is entirely transparent. The load balancer is aware, though, of the services that sit behind it. When you create a load balancer, you want to configure health checks so the load balancer is always aware of whether the instances behind it are functional and responsive. If they are not responsive, the load balancer won’t bother trying to send any requests to the instance that has stopped being responsive. At this point, we should probably move on to getting those instances up and running since we have the load balancer in place.
Web Servers
Instantiating a virtual machine within Azure is not quite as quick and easy as it was within AWS. However, that doesn’t mean it’s difficult. It just may take a little more time doing it for the first time by hand, because of the number of options we have. First, we need to set some initial parameters, as you can see in Figure 9-6. We have to provide the name of the resource group this resource is going to be placed into. Then, the standard gives it a name field and the location of the resource, geographically. On top of that, we can indicate whether we want this to be highly available or be a standalone system. With high availability, you would create your instance as part of an availability set. With an availability set, your instances will be physically separate from each other. This means that within the Azure infrastructure, your instances will be put into different racks, attached to different switches. If power in one rack goes out, for instance, another system in the availability set will likely be able to pick up where the other failed, because of the separation. Essentially, you have redundant systems located in places where one failure likely won’t impact another system in the availability set.

Figure 9-6 Creating an instance
Once you have determined where your instance is going to go, you need to determine the image you want to use. Azure has all of the major Linux distributions available, including Ubuntu, RedHat, CentOS, OpenSUSE, and Debian. On top of that, you can select Windows Server or a Windows desktop image. From there, you can determine the machine size. This is the same as flavor from OpenStack. If you want to change the system size, you can select something larger or smaller. Azure will provide you with an expected cost per month to run each size instance.

VIDEO If you want to see how to create an Azure instance, watch the “Creating Azure Instance” video that accompanies this book.
The next consideration is the administrative account. Azure will configure an administrator based on either an SSH key, in the case of a Linux-based image, or a username/password combination in Windows. You can also select to use a username/password combination in Linux, but a Linux instance will default to an SSH key. If you use an SSH key, you would have to generate that yourself and then you paste the plaintext key value into the edit box provided. A public SSH key, generated using ssh-keygen on a Unix-like operating system like Linux (though this one was generated on a macOS, which is also Unix-like) would look like this:

Finally, at least for this set of configuration options before moving on, we need to select what ports we want to be accessible. By default, no ports are accessible, though we can open some ports if we want. The ports that are options are HTTP (80), HTTPS (443), RDP (3389), and SSH (22). You can select any of them you would like to remain open. Since this is a web server, what we probably want to do is make sure that at least HTTP if not HTTPS are open and available since those are the service ports we care most about. Once the port options are selected, we can move on to disk selection.
By default, you will get a disk for the operating system. With Azure, you can select a traditional spinning platter hard drive or from one of two solid-state drives (SSDs). The first is a standard SSH and the other is a premium SSD. The premium SSD gives you better availability guarantees and higher throughput than the standard SSD does. Beyond the disk the operating system is stored on, you may want a disk for data to be stored. This requires that you add a second disk. The default is a 1T premium SSD disk, though you can select any size you want. You can see the configured disks in Figure 9-7.

Figure 9-7 Disk configuration
At this point, we have a system with configured memory and processors as well as disk. We’ve added a secondary disk for data storage, which will be essential when we start adding content for the web server. Now, we need to move onto networking options. This isn’t hardware like some of what we have been configuring so far. We’ll get whatever network interface Azure presents, in terms of the hardware, and since the images are Azure-provided, all the drivers or kernel modules necessary for the hardware to operate will be in place. What we need to do, instead, is configure the subnet we want to place the instance on. Additionally, we will need to determine what sort of port rules we want to configure and also determine whether this is going to be behind a load balancer. Figure 9-8 shows the network configuration for our instance. The subnet is configured automatically by Azure, though you can substitute any network subnet you have previously configured.

Figure 9-8 Network configuration
There are some management decisions to be made in the next tab of the setup. This includes elements like monitoring of the system. You may need to capture boot diagnostics, including the startup screen, if you are having issues with the startup of your image. You can also configure identity, like whether you want to make use of Azure Active Directory (AD). AD offers the ability to manage resources across a domain. This includes user accounts. Rather than having individual accounts configured on every system, you can centralize the user administration and then each system knows to use the AD as its authentication server. AD also provides a lot of other useful capabilities, especially when it comes to ensuring configurations across all of the Windows systems remain the same. This is not about AD, though, so we’re going to skip that. It is, though, a management option to make use of Azure AD with your systems.
What we haven’t talked about so far is that the only thing we have here is a virtual machine. We’re supposed to be configuring a web server, but so far we haven’t seen anything to do with the web server. All we did was select a basic virtual machine instance. With some of the instances, we can do some additional configuration. Selecting Ubuntu, for instance, gives us the option of adding a cloud-init configuration. Cloud-init is a way of initializing cloud-based instances. This is more automation and a simple means of doing installation and configuration. Figure 9-9 shows the Advanced tab of the instance configuration. What you will see there is an edit box where we can add in cloud-init script. This is YAML (Yet Another Markup Language)-based configuration where we can install packages, add users, and various other configuration tasks. In this case, the configuration adds the Apache web server, a web application firewall designed to work with the Apache web server, and the hypertext preprocessor language PHP.

Figure 9-9 cloud-init configuration
One other thing we can do from this tab is add some extensions. Extensions are additional software packages supplied by third-party vendors. This includes functionality for backups and security monitoring, along with a lot of other capabilities. As an example, Azure Pipelines Agent for Linux is one of these extensions. This is an extension that enables DevOps functionality on the instance. If you want to use the Azure DevOps services, you could use this agent to deploy the software that is developed on another system and run through a development/testing pipeline. Any extension that gets added will be automatically installed into the instance and configured based on any options the extension has. Figure 9-10 shows an explanation of the Azure Pipelines Agent. This is something you would have to get installed on the target system you wanted to deploy software to. You need to have a development server and a project in order to get this extension configured so the agent knows what system to connect to and what pipeline to be an agent for.

Figure 9-10 Azure pipelines agent configuration
At this point, once we have added any extensions we want, the instance will be created. You will have the option to review all of the configuration settings before you actually create. In the review, you will be given the cost for the instance on a per hour basis. The instance we have created through this process will cost about 12 cents per hour, which is less than three dollars a day. Of course, that’s about $84 per month. This is quite a bit less expensive than going out and buying all your own hardware, though over time, especially since we’re going to have multiple instances of systems, the cost does add up so it’s best to be fully aware of how much everything is going to cost you.
Just as with the load balancer, we have the option to grab a template for the instance we have created. This allows us to deploy this particular instance over and over and it will be exactly the same each time. With so many options, it’s best to keep track of everything being done in a template rather than relying on remembering or comparing against an existing instance. A template is also time saving. It’s much faster to use a template, especially in conjunction with a script. Here you can see a fragment of the JSON-formatted template:


Now we have our virtual machine configured and an instance running. Of course, we have our load balancer so we should create multiple instances of this same virtual machine configuration. Without multiple instances, there isn’t a lot of point in having the load balancer. The next step in our web architecture is the application server.
VIDEO For more about Azure templates, watch the “Looking at Azure Templates” video that accompanies this book.
Application Server
Whereas with AWS we used a Java-based application server, since we are using Microsoft-owned Azure, we should really use a .NET server this time. A .NET server is a Microsoft Server instance with the .NET framework installed, as well as the Internet Information Server (IIS). The job of the application server is to take all the business logic, as it’s called, written in a programming language and execute it. It’s the application server because the application is being served to the user in a way that the user can make use of it—in other words, the application is written to generate Hypertext Markup Language (HTML) that can be displayed in the user’s browser and also to take input from the user, sent to the application using HTTP or perhaps even data that is wrapped in the eXtensible Markup Language, used to self-describe the data being sent if it’s not rigidly structured. Since the application is actually executing on the application server, the application server has to have an interpreter, generally, that can run the code.
In the case of a .NET server, the application server contains the Common Language Runtime (CLR), which is essentially an interpreter. The CLR takes the intermediate language that the source code (typically written in C# or VisualBasic) compiles down to. .NET languages don’t compile to processor-executable files. Instead, they use an intermediate language that has to be converted (interpreted) to processor-executable instructions. This intermediate code is sometimes called managed code, since the CLR takes care of a lot of overhead that programmers sometimes have to manage themselves if they aren’t using a language like one of the .NET languages. This includes memory management, type safety (making sure the data place into a variable or memory location is the data that is expected to be there), and exception handling. The .NET framework provides a lot of libraries that programmers can use to quickly develop applications without having to develop their own methods for, say, processing HTTP requests.
![]()
NOTE The CLR is effectively a virtual machine, used to execute programs that have been compiled to managed code. Java uses the same approach. All Java programs (not to be confused with JavaScript, which is a very different language) are compiled to intermediate code and executed within a virtual machine. The Java virtual machine (JVM) has the same functionality and tasks as the CLR.
In Azure, we create an App Service. In the process, we have to tell Azure what platform we are going to develop our Web app for (or on). Figure 9-11 shows the configuration needed for a Web app in Azure. We have to decide on what we are going to use for a runtime stack, for a start. This is the application server itself. With Azure, we have a lot of choices. It’s not as simple as just the language we want to use, though we have choices of .NET languages, Java, PHP, Python, Ruby, and Node.js, a JavaScript-based application platform. Within each of the languages there are versions to choose from and in some cases, like Java, the type of application server. Java has many application servers to choose from, after all. We also need to select the operating system, meaning we select Linux or Windows. We don’t get to select the specific version of either Windows or Linux. After all, we are selecting a platform, not an operating system. Azure will take care of the underlying operating system for us so we can focus on the application.

Figure 9-11 App service creation
Azure will default to a machine size for us, though we have options here as well. You will have 1.75G of memory if you go with the default, though you can select something else. Figure 9-12 shows the Spec Picker, where you can select the specifications. One note here is that rather than number of processors or processor speed, you will see ACU referenced. ACU is Azure Compute Unit, and it provides a benchmark that allows you to compare different options more easily; 100 is the standard. Basic systems will have an ACU value of 100. In the Spec Picker, you will also see that you have estimated costs per month. What we are looking at here, though, is production systems that have specifications necessary for when you want to start throwing users at your systems. We don’t have to go with production systems, though, if we are only doing testing. There is a tab at the top for Dev/Test. These systems are smaller but may be acceptable for testing purposes. The small option in Dev/Test is an F1 system that has 1G of memory and 60 minutes per day of compute usage.

Figure 9-12 Spec picker
On the top end, we can also create an entire app environment. This would be quite a bit more costly, though it provides more advanced features for our systems, including in the network space. Again, Azure provides details about pricing so you can make informed decisions about which way you want to go with the virtual hardware you are selecting. Remember, what you are getting are always estimates and those estimates will vary based on usage and uptime. If you are turning your systems off at night, for example, you aren’t going to get billed usage.
![]()
NOTE In your Account Center settings, you can set a spending cap, which will help you keep costs down. This is turned on by default with trial or new customers who haven’t set patterns of spending. This prevents Azure from handing out services that can’t be charged to the card provided with the account setup.
Finally, before we complete our application server specifications and get it created, we can look at application monitoring. Azure offers an application monitor. On the Monitoring tab, you will find the option to enable Application Insights. This turns on Azure Monitor for your application, which can provide you with performance data as well as usage and availability. Azure Monitor works with the .NET languages as well as Java and Node.js. When it comes to testing, any instrumentation you can enable may be very useful. This is, of course, a feature you will pay for since it requires disk space and processing. The cost will depend on the amount of data your application is generating and how long you want to store it for. If you are going to be generating enormous amounts of data because your application is very large, it may make sense to reserve capacity, which can lower the overall costs of the application monitoring over just paying as you go.
What we have been missing so far is the security groups from AWS. There are elements of it, as we saw in the web server we created. We were able to select the ports that we wanted to have open. If you really wanted, you could create your own firewall to place into your application architecture. You might put this in front of the load balancer if that’s what you felt you needed. Of course, what the firewall is doing, primarily, is restricting access to ports you configure to be open, but that’s what the load balancer is going to be doing anyway. If you really want to use a firewall, there are firewalls available. Figure 9-13 shows the configuration for a firewall in Azure, using the Azure firewall.
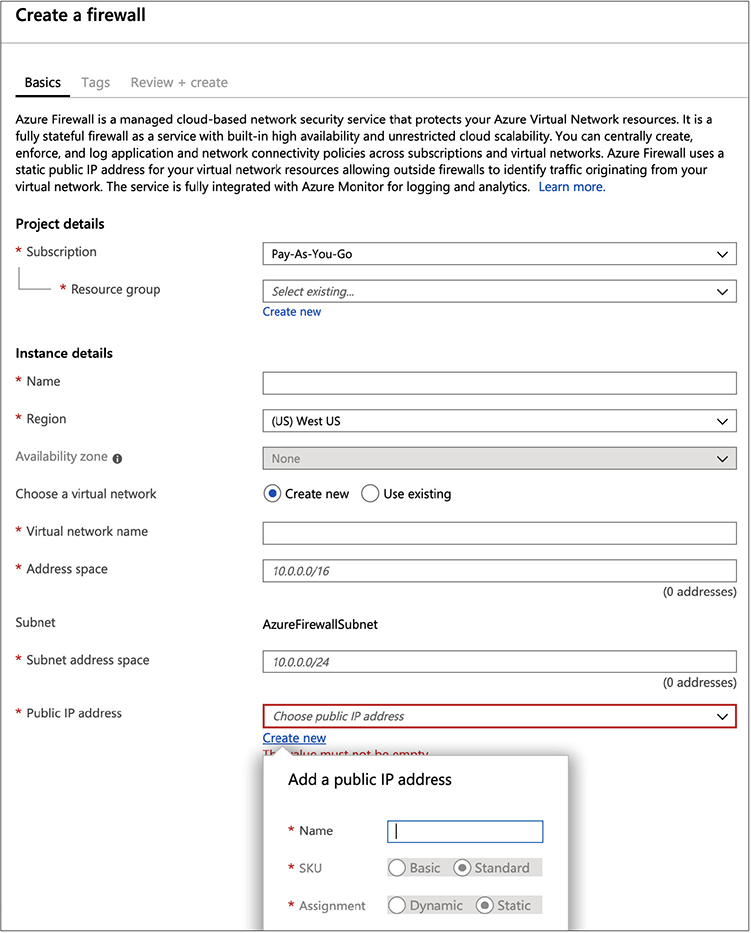
Figure 9-13 Azure firewall
![]()
NOTE We are using Azure services for the various components. This does not mean that there are no other services or instances available. There is a marketplace in Azure, just as there is in AWS. As we’re focused on keeping costs down, though, we’re using Azure services since they don’t incur additional costs from third-party vendors.
As you work through creating environments in Azure, you may notice there is a strong focus on DevOps. DevOps is short for development operations, which is a complete approach to developing applications that is too complex to get into here. However, part of DevOps is automating the entire build and deployment process. Since Microsoft offers a lot of development tools, it’s probably not surprising to see so much focus on DevOps within their cloud environment. After all, their tools support the functionality, so it makes some sense to extend that to the cloud environments Microsoft has. The same is true here in the application server, especially since this would be the endpoint of a deployment process. Any code developed would be built and tested somewhere else, and then the build would be pushed to the application server we’ve created.
Database
We now have our application server in place. We need a database for the application server to interact with to store data associated with the application. As we did with AWS, we’re going to look at a traditional database installation. Just as with AWS, we’re going to use the database server offered by the provider. Azure does offer many database options, even staying within Azure as a provider and not looking to other traditional database vendors. Selecting an SQL database deployment, we have many options. We can just select an SQL database, but we can also use Azure Database for Postgresql Servers, Azure Database for MariaDB Servers, or Azure Database for MySQL Servers. If you have a specific preference for one of these flavors, you can select one of those. However, for simplicity, we can just select an SQL database, called Azure SQL. Once you have selected Azure SQL, you have a choice to make. Figure 9-14 shows the question asking how you are going to use the database. Answering this question will guide you to an appropriate database selection.

Figure 9-14 Azure SQL selection
If you already have a database you just want to migrate into a cloud environment because of the advantages a cloud environment offers, you can select either an SQL Managed Instance or an SQL virtual machine. If you select an SQL virtual machine, you are focusing on choosing not only an SQL server version, but also the underlying operating system. This means you have more management to do rather than just focusing on the application needs and the fact that you are concerned primarily with storing data. Of course, that may not be your primary concern. You may want to take on the management of the operating system and database instance.
Let’s assume, though, that you want to take advantage of a potential serverless database, which means you are entirely unaware that there is an operating system. It doesn’t mean there isn’t a server at all, just that you don’t see it anywhere. The only thing you see is the database itself. You have no access to the underlying operating system. Figure 9-15 shows the configuration settings for the Azure SQL database. As always, we have to provide a name for the database and select the resource group you want to place the databased in. You will also need to create a server. This requires you to provide a name, which has to be unique across all instances, since it will be placed into the database.azure.net subdomain. If I were to select wasdb as the name of my database server, no one else could then use wasdb across the entire database.azure.net subdomain since you can’t have two hostnames that are identical in a domain. You’d essentially have two IP addresses for the same hostname, leading to undefined behavior.

Figure 9-15 Azure SQL database configuration
You will configure a server as part of this, which gives you compute and storage services. You could also select an elastic pool. This provides you a database server that you can use across multiple databases. With an elastic SQL pool, you are sharing the costs of your compute and storage. The advantage here is that you can share a database server across multiple databases so you are sharing the cost of the database server across multiple applications. Rather than paying for, say, six separate database servers, you can pay for a single database server and create multiple databases within that server.
At this point, we have the entire web application complete. We have a database server that we just created, the application server, the web server, and the load balancer. One thing to note here is that you can recreate this architecture in entirely different ways, given the breadth of the Azure offerings. In the case of the web server, for instance, we took a traditional virtual machine and added a web server package on top of it. There are other offerings you could have taken advantage of to get the same functionality. You are not bound to one way of creating your application. This is especially true if you are not bound, necessarily, by a need to use a traditional web application architecture and you want to move more toward a cloud-native approach.
Cloud Native
We have been so bound by the hardware for so long, defining a system through the Von Neumann architecture, that it’s hard to break away from that. John Von Neumann, in the 1940s defined the logical components required for a digital computer, though he was certainly not the only person to have come to these conclusions. He just happened to be the one who first documented it, and the computer systems we use today continue to use that same logical construction that bears his name. Von Neumann indicated that a digital computer requires the following components to function in a general purpose way:
• A processor that contains registers and an arithmetic logic unit (ALU)
• A control unit that can keep track of what operation is next to be executed
• Memory that can store data and operations
• A storage device for long-term storage
• Input and output capabilities
In modern terms, we have been focused on hardware elements like the amount of memory and the processor speed for so long. The reality is that modern processors are far more powerful than the needs of everyday computer users. We don’t need to be concerned with the processing speed anymore. This is especially true as modern processors usually have multiple cores, which means you effectively have multiple processors within your system. You may have taken particular note of the fact that Azure virtual machines use a baseline to compare the processing power. We don’t talk about the processor speed, especially since processor speed isn’t all that useful a measurement when it comes to understanding the performance needs of your application and the application should be king, since it’s all about how your users interact with what you have developed.
All of this is to say that we don’t need to be bound by hardware anymore. Ultimately, the functionality and performance is what matters, no matter what is underneath. This is why cloud-native designs are becoming more popular. You may have noticed this, to a degree, with some of the Azure offerings we have selected. In some cases, we weren’t selecting the underlying operating system. We weren’t even considering what application software was going to provide us the functionality we needed. Cloud-native designs are starting to divorce the ask from how it’s delivered. We ask for a database server because we want to store data using a relational language like SQL. We don’t care what operating system is providing that functionality. We don’t care about the database software. We care that we can issue SQL queries and data will be stored and retrieved.
Serverless
Serverless is becoming a very big thing, for the very reason just indicated. Why should developers have to be concerned about the operating system? Why do you want to spend your time managing the operating system or the application software? Any time you develop an application, either the developer has to become a system administrator, or you have to hire a system administrator to manage all the components the developer has no experience, if you are using a traditional model. If we go serverless, the developer can focus on developing the application code without having to think at all about how that code is going to interact with an operating system or whether the application server is going to have problems. The developer focuses on their code.
In Azure, we can create a Function App. Figure 9-16 shows the options for creating an Azure Function. The major choice here is the application platform. This determines what you are going to develop your application in. You can see we can develop in Java, Node.js, or .NET languages. Just as before, the name you select will have to validate, meaning it has to be unique across all other Azure instances that are using the domain name azurewebsites.net. You also need to determine what resource group you want to use and what geographic region you want your application to be in.

Figure 9-16 Create Azure Function
That configuration is just to allocate the function. It does nothing about what the function is going to do. Again, Microsoft is well-known for their development environment. After you create the function in Azure, meaning you have created a resource, you need to start developing the code. This means you need to select what development environment you are going to use and you can see the choices in Figure 9-17. If you want to develop in Visual Studio, Microsoft’s integrated development environment (IDE), you will have some capabilities for deployment directly to Azure. If you want to use Visual Studio Code, Microsoft’s standalone code editor, you will need to add some functions to your system to get to deploy. Selecting your code editor leads to a selection of deployment. You can use either direct publish, meaning you push the function straight from your environment, or you use Deployment Center. Deployment Center provides the ability to use a deployment pipeline that would do a build, test, and then push to the function resource.

Figure 9-17 Code editor choices
Once we have the resources created, we can add the project into our development environment. Currently, the Microsoft development environments run on multiple operating systems. You are no longer limited to Windows as your operating system to use the Visual Studio tools. After installing all the necessary prerequisites, like the dotNET software development kit (SDK), Visual Studio Code on a macOS system could connect to my Azure account and start developing functions. The one seen in Figure 9-18 is based around the template for HTTPTrigger. This is a function that is called when an HTTP request comes in. This would be the entry point for any application code you were developing.
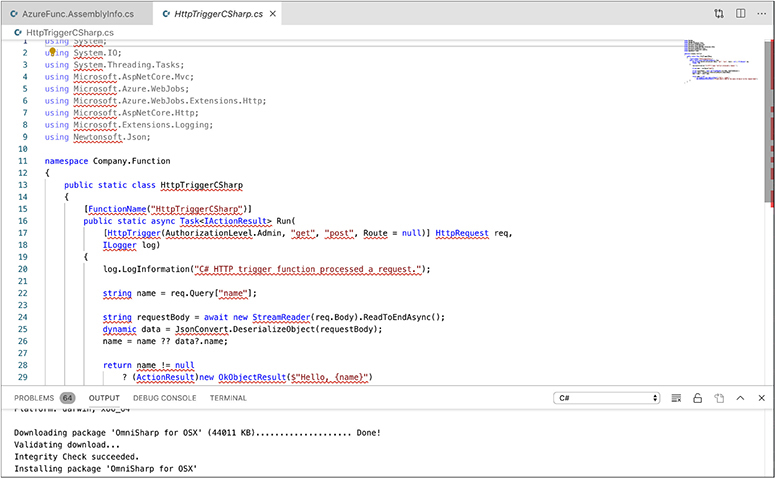
Figure 9-18 Azure Function
The Azure Function framework offers templates for your code to use, so you aren’t starting entirely from scratch. All of this puts the control into the hands of the developer without having to be concerned at all with what is happening with the operating system or even the platform, aside from knowing what platform your code needs to be developed against.
Containers
Speaking of going serverless, we can back away a little bit from going entirely serverless, as you would with Azure Functions. Instead, we can look at implementing containers. A container is a way of deploying an application without being at all concerned with the operating system. A container offers application isolation at the operating system level, because the operating system kernel separates applications using a technique known as a namespace. When a process is deployed in memory, the kernel tags that memory with a namespace. This contains the application in memory, meaning once a process is in one namespace in memory, it has no way of knowing anything about any other namespace, including the operating system space that the container resides in.
![]()
NOTE You’ve actually looked at a container already. Technically, Azure Functions are likely implemented in containers, but this is abstracted from you, the consumer, so your Azure Function could be implemented in any way that makes the most sense for Azure and you wouldn’t know the difference.
Azure offers a lot of container services. You may have noticed earlier that we had an option of deploying some of our choices into a virtual machine or a container. Specifically, the application server we deployed gave us the choice of deploying code or a Docker container. We can just directly deploy a container, of course. One of the compute offerings is a Container Instance. The configuration for this is very similar to the other compute instances we have created. One of the primary differences is that once you have indicated the operating system platform, since the container does use the same kernel as the underlying operating system and binary images are operating system specific, you can provide an image name. The image name will be used to automatically install the container image. In our case, shown in Figure 9-19, we are going to install the Nginx web server into the container. This is another way of getting a web server and with this approach, we don’t worry about the underlying operating system.

Figure 9-19 Azure container service
Once we have all of that decided, we can make some networking selections. For a start, we can determine the ports that are going to be open for our container. We can decide whether to include a public IP address or not. If you choose not to include a public IP address, you will have restrictions around access to the service your container is implementing. Last, you can see where you can add a DNS label. Since this container is in the US West2 region, it gets the subdomain westus2.azurecontainer.io. You don’t have to provide this name, but if you do, that name will be mapped to the IP address given to your container.
Databases
We have an SQL database, but what if we want to do something other than SQL? Azure offers a database service that abstracts what the underlying technology is. The Azure Cosmos DB service can be used to create a database account that can use multiple technologies underneath. Let’s take a look at creating a MongoDB database. MongoDB is a document database rather than a relational database. It can be used to store semi-structured data like XML or JSON. It’s a very popular database for web applications. Figure 9-20 shows the configuration settings for creating a MongoDB database account. MongoDB isn’t the only type of database you can get access to through the Cosmos DB service. You can also get a traditional SQL database through Cosmos, as well as a graph database. One thing you will notice here, in keeping with the whole serverless discussion, is that there is no option for identifying any underlying server infrastructure.

Figure 9-20 Azure Cosmos DB
Instead of creating a server instance, you’re creating an account. This account gives you the ability to create your database and interface with it. What you get is authenticated access to a database API. Where it is stored and on what system is irrelevant if what you are concerned with is just getting data into and out of the database. You may also have noticed in Figure 9-20 that there is an option to include an Apache Spark notebook. Apache Spark is a framework used for cluster computing and may be used for large-scale implementations. While we could do this, as Apache Spark is in preview on Azure, we’re just going with a basic MongoDB implementation.
On the network side, which is the next configuration set, there isn’t much. We need to define the virtual network the database is going to reside in. Beyond that, we need to configure the firewall rules, as you can see in Figure 9-21. There are two choices. First, whether you want to allow access from the address block where the Azure Portal is. Without allowing that access, you don’t get the instrumentation from the database that you may want. When you go to the Azure Portal to view the dashboard and see how all your resources are doing, you may want to see the database details in there. Additionally, you may want to allow access to the database from your own IP address for management and programmatic interaction. This is also an option available. You will also notice there is some data there, obscured because it’s my public IP address. Azure will use your public IP address to populate the firewall if you select this option.

Figure 9-21 Cosmos DB network options
And with that, we have a MongoDB account created so we can build the database and start to interact with it. There are so many other features that can be used in Azure, not only for database and data storage, but for a lot of other features. All of the capabilities we have looked at barely scrape the surface, and we’ll take a closer look at some of them later on in Chapter 11 when we talk about automation.
Summary
You’ll find with any of the major cloud computing platforms that there are a lot of capabilities to take a look at. On top of that, there are probably a lot of different ways to achieve the same outcome. It seems impossible to believe there wouldn’t be, considering all the different choices you can make for computing resources. As with AWS, we were able to create a full, traditional web application architecture starting with a load balancer then with a web server, application server, and finally a database server. There are differences, as you’d expect, between Azure and AWS. AWS has you create security groups, which are essentially firewall rules, to apply across your instances. In the case of Azure, it’s generally assumed that everything is disallowed without options to turn on more rules unless there is a specific need to. You saw this in cases where we could add access to ports in the networking options. This is primarily resource dependent since not all of the instances that were created had options to allow additional ports or create additional rules.
One focus in Azure is on the DevOps process. For each instance that was created, there was the option to download a template whereby the creation of that instance again could be automated. Microsoft makes it even easier to automate the creation of instances by providing code in multiple languages that can be used to deploy new instances with the same configuration parameters as what you created through the web interface. Additionally, with Microsoft’s development tools, many of the services can be integrated into build and deployment pipelines. As an example, you could install an agent onto a Linux system so code from a pipeline could be deployed straight to that system automatically. This alleviates the potential for human error causing deployment problems. Misconfigurations and mistakes can not only cause application failures but also introduce the potential for vulnerabilities in your web application.
As you’d expect, considering this is a cloud provider and also they are focused on modern features to enable DevOps, you are not bound with traditional perspectives of systems. Many of the offerings can be deployed serverless. This includes Azure Functions, which again integrates with the Microsoft development platform, Visual Studio. Once you have created an Azure Function resource, you can retreat to your development environment and write your code there, using templates that are built into Azure Functions and the languages typically used to write application code in.
Finally, as we are looking ahead and not back, we can use containers for easy application deployment, using either an existing image from a repository like the Docker Hub, or from our own repository where the container is defined. On top of that, we don’t have to use relational databases if we don’t want to. We can use graph databases or document databases. Azure offers an agnostic interface to a number of types of database called Azure Cosmos DB. You can create an Azure Cosmos DB account, which gives you API access to whatever underlying database technology you want.
In the next chapter, we complete the triumvirate of cloud providers by taking a look at Google’s Cloud Platform. We’ll be building the same application architecture with Google’s offerings as we have with Azure and AWS. We’ll also take a look at the different capabilities Google may have for modern application design so you can support a lift and shift model, meaning you take a traditional application and move it into the cloud, as well as developing a newer, cloud-centric application using a cloud-native approach to design and architecture.