Chapter 4
Image Capture: Special-Use Films, Processing, and Digital Negative Making
Film and the Photographer
Being a photographer involves learning how to make the camera and photographic materials function to fulfill your purposes and learning to see in the manner of various camera formats and lenses. Analog cameras use a light-sensitive substance on a support base called film to record an image. Digital cameras capture an image electronically and in combination with imaging software can perform or replicate the functions of convention cameras. But because they record images differently than film does, the effect and overall character of the image may differ. Although electronic imaging can deliver film-like quality and mimic the look of particular products, film remains the measuring gauge many photographers rely on to when evaluating their image capture results.
As this chapter covers special-use films, one should be confident in camera handling, exposure, and in processing a wide variety of general-purpose black-and-white films before proceeding. If you are uncertain about your abilities in any of these areas, a review of working procedures is in order. The films discussed can also be scanned, allowing for additional manipulation with imaging software.
Film Selection
Film is the fundamental material for recording an analog image, and its basic characteristics are crucial in determining the look of the final image. Brands and types of film differ in contrast, grain structure, sensitivity, sharpness, and speed. For these reasons, it is important for imagemakers to base their film selection on the aesthetic and technical requirements of the given situation.
Manufacturers regularly alter existing films, discontinue old favorites, and introduce new ones. Digital imaging has also resulted in numerous old favorites being dropped from production. Additionally, the life span of technical information has been greatly reduced, almost becoming obsolete as soon as it is printed. The Internet makes it easy to get up-to-date information, but beware, as there is often no way to ascertain the veracity of information from nonmanufacturers’ websites. Such data can be a treasure trove of valuable data or fool's gold of inaccurate blather. To deal with this situation, a photographer needs a sound conceptual understanding in a wide array of photographic processes. A process or product may change, but the underlying principles remain the same. Many photographers find that refining their working methods with one film—developer combination can be effective for most general situations. More than ever, as new products take the place of once familiar materials, a photographer needs to be willing to test new films in noncritical situations and make a judgment based on personal experience.
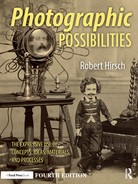
© Sylvia de Swaan. On the News, from the series Sub-version, 1992/2003/2007. 30 × 40 inches. Inkjet print.
Selecting a film is an individualistic decision in that many subjective aesthetic concerns take precedence over technical matters. Moreover, film image quality is also affected by the method of development. The same roll of film can produce a wide range of characteristics depending on how it is treated before, during, and after exposure and processing. It can be helpful to talk with other photographers and read widely. Remember, you can discuss and read about photography all you want, but this is not photography. Being a photographer means making images. The only way to know what is going to work in photography is to do it for yourself. The multiplicity of human experience shows that what makes up reality is a dynamic and complex issue. Let your selection of film reflect what actually works for you in a particular situation.
Compiling a Resource Guide
The information provided in this chapter is designed to offer aesthetic and technical possibilities that cannot be achieved through the use of conventional films. The data has been compiled through the personal working experiences of professionals, teachers, and students. Make these working procedures your own by changing them to suit your personal requirements. This can be done by keeping a detailed resource guide of procedures, ideas, and sources based on personal practice, which can save time and act as a springboard for new directions in your work. It is advisable to check processing recommendations against the manufacturer's data sheet and website before beginning to work with the film, and note changes in your guide.
General Film Processing Procedures
Certain general working procedures can be followed in film processing to ensure consistent high-quality results. These include the following:
Box 4.1 Film Processing Procedures
■ Read, follow, and understand all technical and safety data before processing the Film.
■ Ascertain your equipment and working area are clean, dry, and properly functioning.
■ Seal any light leaks in Film-loading and Film-processing areas.
■ Lay out your equipment in a manner so you can Find it in the dark.
■ Utilize durable, plastic funnels, graduates, mixing pails, stirring rods, and bottles, which are easy to clean, inexpensive, and applicable to most processes. Avoid possible contamination by using separate graduates and containers for developer and Fixer. Rinse all mixing equipment before and after each use.
■ Once a developer is mixed into a working solution, store it in a clean brown plastic container, removing as much air as possible from the container, to ensure maximum life.
■ Do not exceed the working capacities (the amount of Film that may be processed) of the solutions.
■ Mix the developer with distilled water to ensure consistency, especially in areas with problematic water.
■ Employ the same, accurate thermometer to ensure all solutions are at their proper operating temperatures and for processing consistency.
■ Presoaking Film removes the antihalation backing incorporated into the emulsion, increasing the potential for streaking. As the developer has to displace the water absorbed by the emulsion during the presoak, you may have to extend the developing time. Some people think that presoaking the Film for 1-2 minutes before beginning to process prepares the Film for developer and eliminates air bubbles, thus helping deliver superior quality. Try it and decide for yourself.
■ Follow recommended agitation patterns for each step of processing. With small single- or double-reel tanks, drop the loaded Film reel into the developer and attach the top to the tank. Firmly tap the tank on a Flat surface at 30 degrees to dislodge any air bubbles. Provide initial agitation of Five to seven inversion cycles in 5 seconds, i.e. extend your arm and vigorously twist your wrist 180 degrees. Then repeat this agitation procedure at 30 second intervals for the rest of the development time.
■ Include drain time in each processing step.
■ Stop bath rapidly changes the pH of film, causing the action of the developer to cease and also extending the life of the fixer. Prepare an acid stop bath by mixing it from a 28 per cent stock solution of acetic acid to avoid the problems that can occur when working with the highly concentrated 99 per cent glacial acetic acid. Dilute the 28 per cent stock solution to its recommended working strength. Use it one time (one shot) and dispose of it. If you want to reuse the stop bath, get one that contains an indicator dye that changes color to inform you when the solution is becoming exhausted. Discard the indicator stop after its orange color disappears. If you wait for it to turn purple, it may already be exhausted. Indicator stop bath may be used to make all film and paper stop baths. If you choose not to use a stop bath, rinse the film twice in the processing tank, with water.
■ Fixer or hypo comes in two forms: regular, which consists mainly of sodium thiosulfate powder, and rapid, which is usually ammonium thiosulfate in a liquid form. Either may be used for most processes. Check to make sure the dilution is correct for the process being carried out. Both types may be reused. Keep a record of the number of rolls processed or perform a hypo test to see when the fixer has become exhausted due to silver saturation. The general rule of thumb is to fix for twice as long as it takes the film to clear.
■ Hypo check is necessary to ensure the fixer is not exhausted due to use, age (oxidation) or other contamination. The most accurate method to determine the fixer's efficiency is to take a small piece of exposed film and fix it. The film should clear in about 30 seconds. If it takes more than a minute to clear dump the fixer. Some films, such as T-MAX, will have a pinkish cast after being properly fixed and will not completely clear until they have been treated in a hypo clearing agent. Although not as accurate, a hypo test solution can provide a visual guide to check the fixer for exhaustion. This test solution can be purchased commercially or made by following the formula at the end of this chart.
■ Using a film washer will facilitate the washing process. The constant turbulence created by introducing water and air into the bottom of the washing chamber helps remove hypo and debris. However, film may be washed in the processing tank. Make certain that the water is changed often, at least 12 complete changes of water, or get a film washer that does this automatically.
■ Use a hypo clearing agent to help remove fixer residue and reduce washing time.
■ Place the film in a wetting agent for about 2 minutes with light agitation before hanging it to dry in a dust-free area. Always mix the wetting agent with distilled water. Dispose of the used solution after each use. Do not use heat or forced air to speed film drying.
■ If the water you are using is extremely hard or if you are experiencing problems with particles drying on the film, try this procedure even though it violates the general rule not to touch film. On removing the film from the wetting agent, shake off excess solution in the sink. Hang film up and clip it on the bottom. Make sure your fingers are clean and smooth, put your index and middle fingers in the wetting solution and shake them off. Now use these two fingers to gently squeegee both sides of the film. With a lint-free disposable towel, such as a Photo-Wipe, carefully wipe the nonemulsion (shiny) side of the film from top to bottom. Do not wipe the emulsion side, as it is still soft and can be damaged easily. Hold the film at a slight angle with one hand. Using the other hand, slowly bring the disposable towel down the full length of the film. Keep your eye on the film just behind where the towel has passed to check for any spots, streaks, or particles. If any are visible, go back and remove them. A rainbow effect on the film surface indicates that you are carrying out the procedure correctly. Allow to air dry.
■ After the film is dry, place it in archival plastic sleeves or acid-free paper envelopes. Store it in a cool, dry place. Do not use glassine, kraft paper, or polyvinyl chloride (PVC) materials for storage, as they contain substances that can damage film over time.
■ Record all yours procedures in your Resource Guide. List the date, type of film, developer, time, and temperature; any procedures that are different from normal; the outcome; and the changes to be made in working methods if a similar situation is encountered in the future.
■ Refrigerate or freeze the film in a zip-lock plastic bag before and after exposure for maximum quality. Let the film reach its operating temperature before loading, exposing, or processing it.
■ Problems may be remedied by scanning the film and then using imaging software to make adjustments or corrections.
Box 4.2 Hypo Check Formula
|
Potassium iodide |
2 g |
|
Distilled water (68°F/20°C) |
100 ml |
This solution can be stored in a dropper bottle, available at most drugstores. It should keep indefinitely. For the most accurate results, pour a small amount of the fixer into a clear beaker and then add a few drops of the solution. Wait a few seconds. If any cloudiness is visible within about 10 seconds, replace the fixer.
Infrared Black-And-White Film
Black-and-white infrared (IR) films are sensitive to all wavelengths of the visible spectrum of light but also extend into the IR region. IR film is sensitive to radiation that the human eye cannot detect. Conventional panchromatic film, sensitive to the visible spectrum, is designed to record a subject in tones that approximate those of human perception. IR film sees and records beyond human parameters but also has a reduced sensitivity to green wavelengths of light. These two factors combine to render objects differently than panchromatic film does and can cause dramatic shifts in tone, producing images that appear unworldly, and sometimes almost phantasmagoric, providing the apparent perception of being able to capture something that is not present in our normal vision.
To understand IR film, it is necessary to experiment with and test it as the roster of selections changes and each brand has its own unique characteristics and responds differently to filtration and processing. Such experiments will show you a variety of pictorial responses that IR film can generate by altering a subject's tonal relationships, distorting the conventional sense of photographic time and space. Although the roster of black-and-white IR films continues to change, there are some general characteristics that can be gleaned.
Handling
IR film is sensitive to IR radiation, so should be handled in total darkness when loading or unloading either the camera or the developing tank. The felt strips of the film cassette can permit IR radiation leaks. Check the darkroom to make certain it is light-tight. When a darkroom is not available, use a high-quality changing bag. Keep the bag in an area shaded from direct sunlight. Be aware that changing bags can leak IR radiation; check the bag with a test roll. IR film can also be fogged by high temperature and/or high humidity. Whenever possible, keep it refrigerated before and after exposure. IR films are susceptible to static markings at low relative humidity. If static problems occur, especially when rewinding the film, it may be necessary to ground the camera to avoid a static electricity buildup. For most consistent results, process film as soon as possible after exposure.
Many IR films have no antihalation backing, which makes the film thinner and trickier to load on to developing reels. However, many users favor the lack of antihalation because it can produce flare that adds to IR's mysterious look.
Focusing
Regular camera lenses are not designed to focus IR wavelengths. This is because IR radiation has longer wavelengths than those of the visible spectrum, making the focus point further from the camera lens. Therefore, the lens must be moved slightly farther from the film to focus an IR image. This focus difference is critical when using filters to block all visible radiation from the film. To correct this problem, most lenses have an auxiliary IR focusing index marker engraved on the lens barrel. It is often a red dot or the letter R located close to the normal focusing mark on the lens. Check the camera manual to ascertain the location of the IR marking.
To obtain correct IR image definition, focus the camera in the normal manual mode. Note the distance indicated by the regular focusing index mark, then manually rotate the focusing ring to place that distance opposite the IR focusing index mark. The image may be fuzzy in the viewfinder, but the IR film will record it sharply. It is not necessary to make this adjustment when using a wide-angle lens or a small lens aperture (f-8, f-11, f-16), as the increase in depth of field will compensate. It is necessary to do this at distances of 5 feet or less and with all telephoto lenses. If your lens does not have an IR focusing index marker, adding about 0.25 per cent of the focal length to the lens—film distance can make the correction. For instance, a 200 mm lens would need a 0.50 mm extension as 200 mm × 0.0025 = 0.50 mm.
Filters
Because IR film is sensitive to visible and IR spectra, filters can be used to alter and control the amount of spectrum that the film records. Note that each film will respond differently to filtration. The following describes filters commonly used with IR film.
The Wratten No. 87 filter absorbs all visible light, allowing only IR radiation to pass through and be recorded. With a single lens reflex (SLR) camera, it is necessary to remove this filter to focus, as it appears opaque to the human eye. Subjects will be recorded in tones proportional to the amount of IR radiation they reflect. Those reflecting the most IR radiation will appear in the lightest tones. Objects that appear to be the brightest to the human eye are not necessarily those that reflect the most IR radiation. For this reason, the tonal arrangement of the scene recorded by the IR film will often seem unreal when compared with the same scene recorded on a panchromatic film that is sensitive to the visible spectrum. Other filters that block UV and most or all visible radiation are Wratten No. 89B, No. 88A, and No. 87C. Each of these filters removes different wavelengths of light, creating different effects.
The Wratten No. 25 filter (red) is commonly used with IR film. It prevents blue and green light from passing through but transmits red and IR radiation. It enables the photographer to focus through the SLR viewfinder. This filter can produce bold visual effects. The sky may appear black, with clouds seeming to pop out into the third dimension. Caucasian skin can lose detail and take on an unworldly glow. Surface veins in the skin can become extremely noticeable.
The Wratten No. 29 (deep red) filter can produce an even greater effect, but requires one f-stop more exposure than the Wratten No. 25.
IR film is excellent for use in penetrating haze and can be used with a polarizer in conjunction with a No. 87 or No. 25 filter.
Almost any colored filter will block certain wavelengths of visible light and permit IR radiation to pass through. A polarizer and the Wratten No. 12 (yellow), Wratten No. 58 (green), and Wratten No. 15 (orange) filters offer varying effects by removing part of the blue wavelengths of light. Try different filters and see how the film responds. Keep notes so that you can replicate the results.
Without filtration, IR film reacts more strongly to the visible spectrum. This produces less dramatic images than those produced with filters and generally results in a noticeable increase in graininess.
Exposure
Determining the correct exposure for IR film requires experience. It is impossible to determine the precise film speed needed to set the exposure meter. This is because the ratio of IR to visible light is variable and most metering systems do not respond to IR radiation.
Table 4.1 offers ISO speed starting points. When possible, determine exposure with a hand-held meter in incident light mode. Note: When using through-the-lens (TTL) metering systems, make your readings before mounting the filter over the lens. Then ignore the meter reading/readout after attaching the filter. Bracket in one-half f-stops and when in doubt, overexpose.
Changes in exposure cause noticeable differences in how IR film records the image. A correct exposure delivers a scene with a wide contrast range that is easy to print. Underexposure causes the scene to lose depth and appear flat. Details in the shadow areas are lost. Overexposure produces a soft, grainy image often possessing a sense of visual weightlessness when compared to the original scene.
The amount of IR radiation will vary depending on the time of day, season, altitude, latitude, and distance of the camera from the subject. As a general rule, the lower the sun is on the horizon, the greater the amount of IR light. Faraway scenes such as a landscape often require less exposure than a close-up such as a portrait. This is due to the increased amount of IR radiation that is reflected and scattered by the atmosphere over greater distances. Various subjects will also respond in different ways. As variations are likely and unpredictable, it is initially advisable to bracket exposures by at least two f-stops in each direction to ensure the desired aesthetic and technical results with IR film.
Table 4.1 Starting ISO Settings for Black-And-White Ir Film
Wratten Filters |
Type of Illumination |
|
|---|---|---|
|
ISO for Daylight* |
ISO for Tungsten* |
|
|
No filter |
80 |
200 |
|
25, 29, 70, and 89B |
50** |
125 |
|
87 and 88A |
25 |
64 |
|
87C |
10 |
25 |
*Film processed in Kodak D-76 or Ilford ID-1 1 stock solution.
**When in doubt, use this ISO rating as a starting place.
Processing
Manage IR film with care, as it can be more prone to damage from handling than conventional film. Handle IR film only by its edges when loading it onto a processing reel, as it has a remarkable ability to capture and incorporate fingerprints into the processed image.
Process the film in closed stainless steel tanks with stainless steel lids. Some plastic tanks can leak IR radiation and fog the film. Test them to be safe
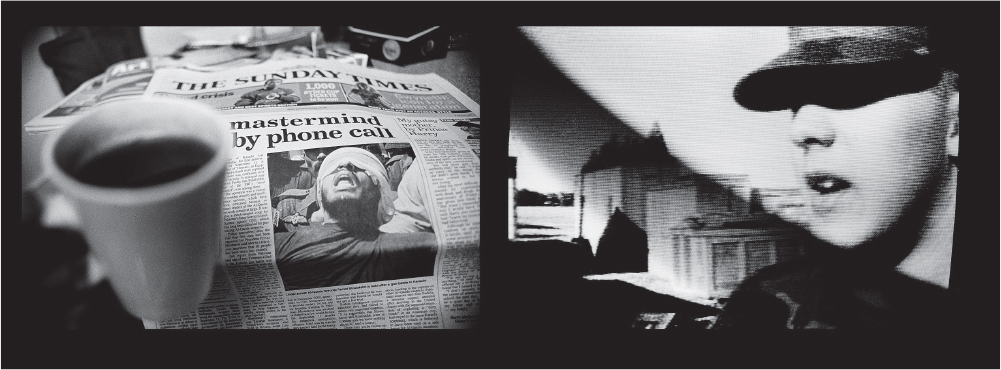
Table 4.2 lists suggested beginning processing times for the most commonly used developers with IR film. D-76 produces a tonal range similar to that of a panchromatic film. D-19 greatly increases contrast and graininess. After development, follow standard processing procedures. Do not hesitate to modify these recommendations.
Flash
IR film can be used with an electronic flash in a variety of ways, including the following:
■Use a Wratten No. 25 filter and normal flash methods.
■ Cover the flash tube with Wratten No. 87 gel. This will make the flash almost invisible to the human eye, enabling the flash to be used without people being aware of it.
■ Get an IR flash unit designed to emit light at the wavelengths to which IR film is most sensitive. Some flash units have detachable heads that can be replaced with the IR type.
Table 4.2 Starting Development Times for IR Film*
IR Exercise: Gaining Experience
Obtain three rolls of IR film, such as Efke IR820. Use the first two rolls to photograph a variety of subjects people, buildings, plant life, and landscapes — at different distances and at different times of the day. Keep a record of your bracketed exposures. Process one roll in D-76 and another roll in D-19 and note your procedures. Make contact sheets of each roll. Now take the third roll and apply what you have learned.
IR Films and Their Characteristics
IR film is known for the textural, dreamlike images it can generate. When used with filters that are deep to opaque red, IR film can generate scenes where foliage and clouds are glowing-white, while water and blue sky look coal black and the overall contrast is slightly soft. Warm skin tones and lips will appear white. When used without filtration IR film behaves much like a conventional panchromatic black-and-white film. Depending on its IR sensitivity, each film will deliver different results and therefore should be tested before undertaking any important work.
Extended Red Sensitivity Film
Films, such as Ilford's SFX 200, are not true black-and-white IR films; rather they have an extended red range that can give similar effects. SFX 200 has a panchromatic black-and-white emulsion that is sensitive beyond the visible spectrum into the IR (about 740 nanometers) as opposed to a true IR film, which goes farther (about 900 nanometers). SFX has a useful speed rating of ISO 200 and can be processed in a wide range of conventional developers.
Filters
An R72 IR filter is recommended for IR effects. With a Wratten No. 25 (red) or No. 89B (very deep red) filter you can get image effects similar to IR film. The extended red sensitization allows the film to record the IR fluorescence of chlorophyll, the effect that turns foliage bright white and darkens skies. With these filters the film relies on the extended red sensitivity for exposure, so testing and experience are helpful. Without filters, its full panchromatic sensitivity allows it to be used as a normal black-and-white film.
Focus
No focusing correction is needed as the film is not sensitive much beyond the visible spectrum and therefore does not record the wavelengths that are out of the designed operating range of the lens. As a result, Ilford SFX generally produces sharper images, with less flare, than IR film. The film also does not need to be loaded in complete darkness, although it is still recommended.
Table 4.3 Development Times for Ilford Sfx Film at ISO 200

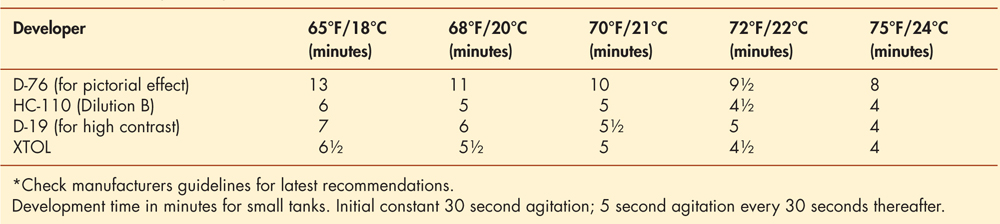
© Ann Ginsburgh Hofkin. Sicily 05 2, 2005. 18 × 23 Inches. Gelatin Silver Print. Courtesy Flatfilegalleries, Chicago, Il; Sande Webster Gallery, Philadelphia, Pa; Nina Bliese Gallery, Minneapolis, Mn.
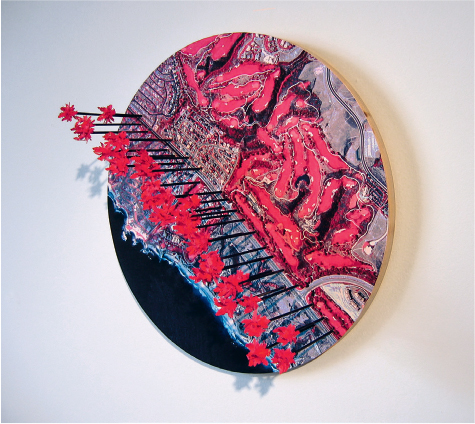
© Kim Abeles. Infrared Coast, 2007. 18 × 18 × 6 inches. Ultrachrome print with mixed media. Courtesy of a private collection.
High-Speed Black-And-White Film
High-speed panchromatic stock, often with extended red sensitivity, is designed for low-level light situations or any time when a flash cannot be used. Such films are useful for capturing very fast action; in dimly lit situations where you can not use flash; for subjects requiring good depth of field combined with fast shutter speeds; and for handholding telephoto lenses for fast action or in dim light. It is an excellent choice for indoor or nighttime sports events and available-light press photography, as well as law-enforcement and general surveillance applications that require exposure indexes of 1,600-25,000, thus allowing photography in situations where it was previously impossible.
High-speed films are designed to be used at multi-speeds and possess excellent push processing capability, allowing it to be effectively processed at an ISO greater than it is normally rated at. The speed depends on your application; testing is recommended to determine the appropriate speed and processing details.
High-speed panchromatic film is very sensitive to environmental radiation and should be exposed and processed as soon as possible.
Load and unload your camera in subdued light, and rewind the film completely before unloading the camera. Store processed film in a cool, dry place.
In the darkroom, unprocessed high-speed panchromatic film must be handled in absolute darkness and cannot be developed by inspection. Timers and watches with fluorescent faces should be turned away from the unprocessed film. Even the afterglow of certain white lights (incandescent bulbs) can fog these films. Double-check to be sure the darkroom is totally dark before handling unprocessed film.
Store unexposed film in its original sealed package at 75°F (24°C) or below. For protection from heat in areas with temperatures consistently higher than 75°F (24°C), you can store the film in a refrigerator. If film has been refrigerated, allow the package to warm up to room temperature for 1-1½ hours before opening it.
Request visual inspection of high-speed films at airport X-ray inspection stations.
Some older cameras have ISO settings that go up to only 1600. If your camera does not have ISO settings above 1600 but has an exposure compensation dial, set it at minus 1 to get a speed of 3200 or minus 2 to achieve an ISO of 6400.
To expose film at speed settings that are higher than the maximum setting on your camera or meter, set the meter at a lower speed; then reduce the aperture or increase the shutter speed to compensate.
To use high-speed film in conventional lighting situations, it is helpful to have a camera with high-speed shutter capabilities. The shutter speed should at least be able to equal the film's speed rating. If it is not possible to use such a camera, neutral density (ND) filters can be used to reduce the amount of light reaching the film.
Ilford Delta Professional 3200 High- Speed Film
When extremely fast black-and-white film speeds are required without sacrificing image quality and tonality, Delta Professional 3200 is capable of delivering high to ultrahigh film speeds with a fine grain and broad tonal range, good shadow detail, and open highlights. Delta 3200 Professional is based on Ilford's proprietary core-shell crystal technology, a complex four-part emulsion package. This emulsion gives the film heightened tonal rendition and wide exposure flexibility. The technology of this film allows exposure at very high ISO ratings while still retaining a fine grain structure and a great deal of sharpness that permits the retention of detail in large-scale enlargements. The larger grain size does cause higher contrast but offers good tonal separation, wide exposure latitude, and minimal reciprocity failure.
Expose
Delta 3200 is a multi-speed film, whose ISO rating depends on its application. Testing is necessary to determine the correct speed for your equipment and circumstances. When exposing your first roll, begin bracketing/rating the film at 3200 and bracket two f-stops over (1600 and 800) and four f-stops under (6400, 12 500, 25 000 and 50 000). When exposing your first roll, start with ISO 1600 and bracket, in one-half f-stops, two full f-stops in the minus direction (underexpose). Based on this visual test, select the exposure that best represents the subject. Continue to bracket and analyze the results until confidence and experience are gained. There is a big increase in contrast and graininess, with a distinct loss of shadow detail at speeds above 6400, but image sharpness remains surprisingly good.
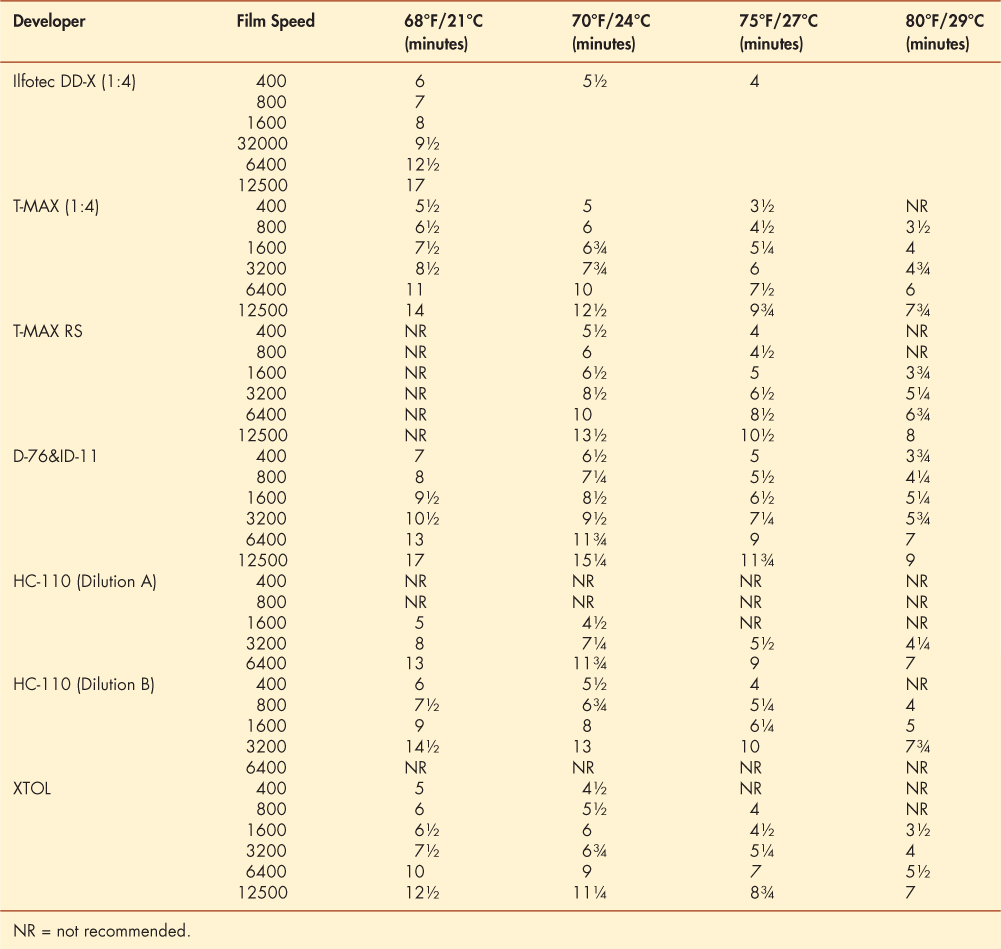
Ilford Delta 3200 Development
Delta 3200 Professional does not require any special development steps. The film can be processed in all types of processing equipment including spiral tanks, rotary processors, dishes or trays, deep tanks, and automatic processors. Standard capacity figures and replenishment rates can be maintained. Delta 3200 requires careful fixing using a rapid fixer (1:4) without a hardener for 3-5 minutes at 68°F (20°C) with vigorous agitation. This film will also exhaust the fixer more quickly than conventional films. Ilford recommends a hardener only when processing at high temperatures (above 86°F/30°C). Table 4.4 provides temperatures and times in a variety of developers.
Table 4.4 Development Temperatures and Times for Ilford Delta 3200 Film
Box 4.3 General Characteristics of Delta 3200 at Various Isos
-
400 This produces an extremely solid, not quite opaque (bulletproof) negative, resulting in a mushy print lacking in sharpness and having blocked highlights. It is not recommended for general pictorial use.
-
800 One f-stop faster delivers much better results, but still lacks good tonal range and sharpness.
-
1600 This speed produces gorgeous quality. Shadows are fully separated and highlights are open and unblocked. Tonal range is excellent, with grain and sharpness compatible with conventional ISO 400 films. A slight increase in contrast results in a snappy print and is useful with low-contrast subjects.
-
3200 The negative has a full tonal range with a small loss of detail in the shadow areas. Grain and sharpness are outstanding. These 3200-speed films dispense with the technique of “cooking” film in exotic developers, which often produces chalky and extremely grainy images at this ISO.
-
6400 This speed still produces a highly acceptable negative, but the loss of shadow detail is more apparent. Contrast and grain size start to increase, but highlight retention and tonal range remain good.
-
12500 Tonal range is compressed, contrast starts to become excessive, and granularity is much more visible. Pictorial print quality begins to degrade, but good press or Internet quality prints can made.
-
25000 This is the outer limit for a printable negative. Highlights begin to become chalky, and shadows lack detail. Subtleties disappear as the tonal range becomes greatly compressed. Image quality remains sharp but very grainy. Prints are still useable for newspapers, some magazines, and the Internet.
-
50000 This astronomical speed pushes the film's capability to the edge. Try it when a picture is a “must” and traditional print quality is not a factor. Contrast and grain are way up, but the image is still sharp. Shadow detail is almost nonexistent. Printing requires expert care and patience, with dodging needed to make shadow areas recognizable.
Heightening Grain and Contrast
Kodak Tri-X in Dektol
Generally, the faster the film, the more grain it will produce. Using a conventional, moderately fast film such as Kodak TRI-X, you can increase the amount of grain by altering the standard processing method. Developing TRI-X in fresh Dektol produces much coarser grain than normal, with an increase in contrast. This combination works well in both flat and average contrast situations, but there is a noticeable reduction in the tonal range.
Exposure
Rate TRI-X at 1600 for daylight and 800 for tungsten. Bracket your exposures — one f-stop under and two f-stops over. Note: Developing TRI-X in Dektol reduces the film's exposure latitude so meter carefully.
Development
Table 4.5 gives a starting point for development. After development is completed, continue to process normally.
Table 4.5 Development Times for Kodak Tri-X in Fresh Dektol*
|
Temperature |
Time (minutes) |
|---|---|
|
68°F |
4 |
|
72°F (22°C) |
3½ |
*Use continuous agitation for the first 15 seconds and then agitate for 5 seconds every 15 seconds to avoid potential streaking, which may be caused by the high activity and strength of the developer.
Kodak Tri-X and Sodium Carbonate
Another way to increase the grain pattern in films like TRI-X is to use sodium carbonate. Expose the film normally, then soak the film in a 10 per cent solution of sodium carbonate for 2-5 minutes before putting it in its normal development. The amount of soaking time determines the increase in the grain pattern. The sodium carbonate is a moderate alkali that increases the pH of the film, causing the action of the developer to accelerate. If the film carbonic absorbs too much sodium carbonate, gas bubbles can form in the emulsion when an acid stop bath is used. These gas bubbles will create pinholes in the emulsion; for this reason it is advisable to avoid using an acid stop bath with this procedure.
Ultra-Fine-Grain Black-And-White Film: Ilford Pan F Plus
Ilford PAN F PLUS is an extremely fine-grain film that can be used to produce incredibly sharp normal-contrast pictorial images and/or mural-size enlargements with minimal grain. The film has an outstanding range of tone and detail as well as excellent resolution, sharpness and edge contrast. With a rated ISO of 50 and normal film-processing techniques, it is a good choice where fine detail and lack of grain are more important than film speed, especially when exposed at ISO 25. The film has minimum exposure latitude, lacking the leeway of higher-speed films and therefore requires accurate exposure.

© Robert Hirsch. Tucson, from the Series Remembering and Forgetting, 1983. 16 × 20 Inches. Toned Gelatin Silver Print.
Table 4.6 Ilford Developers and Pan F plus at ISO 25 with Standard Agitation
|
Desired Outcome |
Developer |
65°F/18°C (minutes) |
68°F/20°C (minutes) |
70°F/21°C (minutes) |
|---|---|---|---|---|
|
Normal results |
ID-11 (stock) |
7½ |
6½ |
6.0 |
|
Fine grain |
Perceptol (stock) |
10½ |
9 |
8 |
|
Maximum sharpness |
ID-11 (1:3) |
16 |
14 |
12½ |
Processing
Ilford PAN F PLUS is a moderate-contrast film and can be processed with a variety of different developers to achieve outstanding pictorial results at ISO 25. Table 4.6 shows how a variety of developers can be used to produce finer grain or maximum sharpness (greater contrast).
High-Contrast Litho Films
High-contrast litho films are orthochromatic (not sensitive to red light) and can be handled under a red safe-light. They are designed primarily for the production of halftones (they create a dot pattern, based on tonal graduations, that allows a photograph to be reproduced using printer's inks) and line negatives and positives for use in photomechanical reproduction. Conversely, they can be used for dramatic pictorial effects because of their ability to drop out most of the midrange tonal gradations of a subject. This creates a composition that relies on graphic black-and-white shapes for visual impact.
High contrast can be produced in the darkroom through the use of a graphic arts litho film in conjunction with high-contrast litho developers. Most commonly used by the offset and screen printing industry, litho films are manufactured by a number of firms and are available in rolls and sheets. A variety of sizes and brands of litho films can be found at photography dealers and offset printing suppliers.
Applications
Litho films offer an extensive visual array of effects that cannot be achieved with conventional films. Litho films also offer a quick and convenient method for producing many generations, in different forms, from an image on a negative or transparency. A normal negative can be used to make a high-contrast positive that can be used to form a new high-contrast negative, which in turn can be reversed back to a positive. This film can be drawn or painted on, sandwiched together with other film images, scraped, scratched, cut up, collaged, or used directly as a final image itself. Litho film can also be presented in a light box. Small-format images can be enlarged to be contact printed in a variety of other processes.
Images from other sources also can be incorporated into the process. For instance, a magazine picture can be contact printed, ink side down, on litho film. Both sides of the image will be visible. If this is not acceptable, try one of the transfer methods discussed in Chapter 11. Litho films may be exposed directly in a camera. Photograms can be made by placing objects on top of the film and exposing it. A bas-relief print can be produced by combining a contact-size positive, slightly out of register, with the original continuous-tone negative. For instance, a high-contrast bas-relief can be produced if a litho negative and positive of the same size are sandwiched slightly out of registration. A high-contrast black-and-white positive can be used to make a high-contrast positive print. The original negative and the contact litho positive and negative can all be sandwiched together and printed. Posterizations are possible by making a series of positives and negatives to be combined and printed.
Unfortunately, some people abuse litho films’ ability to transform a subject, trying to make a boring and trite image magically daring by converting it to a high-contrast print. An image that is dull to begin with will not become new and exciting by transferring it to a litho film.
Do not force the process on an image. Work with an image that will be enhanced by the process. Do feel free to experiment with this type of film, however, for it offers the thinking photographer an abundant source of possibilities.
Litho Production and Materials
One can make litho negatives and positives by contact or projection methods starting with a negative or a positive (transparency). You need these basic materials:
-
1. Original continuous-tone negative or slide (black-and-white or color).
-
2. Contact printing frame or clear glass.
-
3. Litho film.
-
4. Litho film developer.
-
5. Orthochromatic safelight filter, such as Wratten Series 1A (red).
The darkroom set-up, with the exception of the litho developer and 1A safelight, is the same as for processing a regular black-and-white print. Follow the manufacturer's instructions for mixing the litho developer.
©J. Seeley. Chart, 21 Steps Edition, 1994. 22 × 30 inches. Carbon-dusted photographic litho.
Mix all chemicals in advance and allow them to reach a processing temperature of 68-72°F (20-22°C). Due to its rapid oxidation, a working solution of litho developer is generally prepared by combining equal amounts of mixed stock solutions at the time of processing. Use trays that are slightly larger than the size of the film being processed. Have enough solution to cover the film completely during each step. One quart of working litho developer solution will process about fifteen 8 × 10 inch sheets before exhaustion.
Making a Litho Negative
To make a litho negative, take the dried positive and contact print it, emulsion to emulsion, with an unexposed piece of litho film. Follow the same processing procedures as in making a litho positive. Starting with a positive (transparency film) will enable you to make a direct litho negative, thus eliminating the need to make a litho positive. Bear in mind that litho film is orthochromatic and may not properly record the red and orange hues from the transparency.
Box 4.4 Making an Enlarged Litho Positive
-
1. Place a clean original continuous-tone negative in the enlarger.
-
2. Project the image onto a clean opaque surface like a paper easel that has been painted with a black matte finish or attach black paper to the easel instead to ensure there is no reflectance. Adjust for the desired enlargement size. Focus on a piece of white paper.
-
3. Position the litho film on the opaque surface, emulsion side up. The emulsion side is lighter colored and more reflective than the base side. Cover it with a clean piece of glass.
-
4. litho film, like any type of film, will attract dust more than photographic paper. Use air or a soft brush to clean off any dust that may be clinging to the surface of the film. The use of a static brush on unexposed litho film is not recommended as it may cause fogging.
-
5. Set the lens to about f-11 and make a test strip at 3 second intervals. The times should be similar to those used for making test strips with black-and-white paper of the same size. Develop the film by sliding it, emulsion side up, into the developer solution. Agitate by lifting one corner of the tray slightly and setting it down. Repeat by lifting the opposite corner. Standard development time is between 2¼ and 23/4 minutes. Development time can be altered to change the contrast and tone.
-
6. Development can be carried out by visual inspection. To duplicate the results, use the same developing time. Normal development is complete when the dark areas are completely opaque. Not enough development time can produce pinholes and streaks. If the image appears too quickly, reduce the exposure time. If it looks too light after 2 minutes, increase the time.
-
7. After development is complete, follow normal processing procedures. Fixing time should be twice the time required for the film to clear.
-
8.Based on the test, determine the correct exposure and make a new high-contrast positive.
This process can also be carried out by contact printing the original negative, emulsion to emulsion, with the litho film.
Continuous Tones from Litho Film
Although litho films were designed to produce high-con-trast negatives, they can be processed to give continuous tones, from light to dark, like a normal black-and-white camera made negative. Professor Brian Taylor and his students at San Jose State University have successfully used the following method.
Box 4.5 Processing Litho Film for Continuous Tone Negatives
-
1. For normal contrast, start with Kodak Dektol Paper Developer at a dilution of 1:10. Develop for 2 minutes at 68°F (20°C). For less contrast, dilute the developer by adding more water to make a dilution of 1:12. For more contrast, add more developer to make a dilution of 1:8. Use constant tray agitation, just like photo paper, with all processing steps.
-
2. Weak acid stop bath (one-half paper strength) for about 15 seconds.
-
3. Fix in regular rapid Film Fixer for about 3 minutes. Paper Fixer can be used, but is not recommended unless it has a hardener to guard against scratches later in handling.
-
4. Wash as you would other Film: hypo neutralize, wash, and Finish with Photo-Flo to reduce water spots. Hang to air dry in a dust-free environment.
What you will now have is a continuous tone positive, which will require contact printing with another piece of Film, like making a contact sheet, to reverse it back to a negative.
Two-Step Enlarged Negatives Place a clean black-and-white negative in the enlarger. Under red safelight conditions, identify the emulsion side of the litho film by gently folding one side over on itself until you can discern the lighter side. This lighter side is the emulsion, and should face up when printing. Treat the litho film just as you would conventional photographic paper in terms of cutting test strips (overexposure may be in order), establishing correct exposure times, using your easel, and tray developing (see “Making an Enlarged Litho Positive” box). As litho film is contrasty it is necessary to use a diluted developer mix of 1:6 to 1:15, which is processed for between 1½ and 3 minutes, to generate continuous tones.
Enlarged Negatives Alternatives One can produce a negative in a single step by putting a film positive, such as a color transparency, in an enlarger and carrying out the previous steps.
A second method involves first contact printing your original camera black-and-white negative onto a special continuous tone orthochromatic film, such as Efke Print Film, which is designed to hold highlight and shadow detail as opposed to having to coax it out of a standard litho film. In either case, after exposure, process and place these black-and-white positives in an enlarger to produce your enlarged negatives.
A third solution is to make an enlarged negative by contact printing a resin-coated (RC) print on top of a piece of ortho film. This procedure allows you to do your burning and dodging when making the original print, then contact print it with litho film to convert it into a same-sized negative.
Retouching Litho film is highly susceptible to pinholes, which can be blocked out by opaquing the base side of the film. Opaque also conceals scratches or unwanted details. Place the litho film, emulsion side down, on a clean light table. Apply the opaque with a small, pointed sable brush (size 0-000). Opaque is water soluble, so mistakes can be corrected with a damp Photo-Wipe.
Brian Taylor recommends simply using a red magic marker, which can be used to opaque areas more easily than conventional opaque fluid applied with a brush. However, opaque and a brush are still best for spotting out pinholes. Even if light passes through the red color of the magic marker, it will be a “safelight” red and not expose the emulsion. Professional red opaque pens are available for graphic artists, but most permanent red markers work quite successfully.
Orthochromatic Film
Orthochromatic films were once widely used to produce dramatic portraits. By eliminating the red sensitivity of the film, flesh tones take on a rich gray hue and lips become very dark. Continuous-tone orthochromatic films include Ilford Ortho Plus and Rollei Ortho 25. Check with the manufacturers websites as to format availability. An effect similar to ortho film can be achieved by using a general use panchromatic film with a No. 80A filter.
Paper Negatives and Positives: Contemporary Calotypes
Today most photographers use clear-base flexible film to record images in the camera. This was not always the case. Photographic pioneer William Henry Fox Talbot invented a process called photogenic drawing. This process used high-quality writing paper sensitized with salt and silver nitrate to make photograms and contact-print copies of drawings and objects. By 1835, Talbot was using this paper process to record images in a camera obscura. The process relied on a printing-out exposure (light made the complete image) for camera negatives and prints. In 1841, Talbot patented an improved process called the calotype. It was much faster because the light was used to create a latent image that was completed during the development process. This process has served as the model for all current analog negative/positive imagemaking systems.

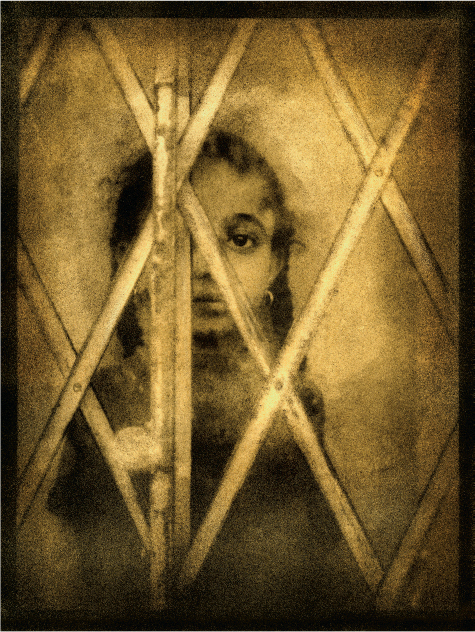
© Frederic Weber. Untitled No. 80, from the series Memento Mori, 1995. 10×8 inches. Dye-destruction print. Courtesy Klompching Gallery, Brooklyn, NY.
Compared with clear film negatives, paper negatives are less sensitive to light, do not record as much of the visible spectrum, capture less detail, and have a reduced tonal range and higher contrast. Since the final image is printed through the fibers of the paper, the completed photograph has a soft, highly textured, impressionistic appearance.
Applications
Any paper may be treated with a light-sensitive emulsion and exposed (see Chapter 7). Regular photographic paper is usually used. Paper can be exposed directly in a view or pinhole camera. The processed paper negative can be contact printed with an unexposed piece of photographic paper to make a positive print. An image from a normal negative can be used by enlarging it on a piece of photographic paper at the desired size. This paper positive is contact printed onto another piece of photographic paper to form a paper negative. The paper negative is now contact printed onto another piece of photographic paper to create the final print.
A transparency image can be used to make an enlargement on a piece of photographic paper. Since the transparency image is a positive, it can be used to produce a paper negative that is in turn used to produce a paper contact print. Images on any type of translucent surface, such as the paper used in magazines, newspapers, and posters, can be contact printed and used in this process. Paper negatives can be combined with normal negatives to make a multi-image composition. Paper negatives and positives are easy to retouch. The photographer can make additions such as clouds or remove unwanted items.
Box 4.6 Paper Negative and Positive Process
-
1. Place a continuous-tone negative in the enlarger and make a print at the exact size of the final image. The print should be flatter in contrast and darker than normal, having discernible detail in both crucial highlight and shadow areas. If possible, use a low-contrast single-weight paper. Variable-contrast papers are handy for this process. Avoid papers that have the manufacturer's name imprinted on the back. RC paper can be used because the plastic diffuses the trademark so it is not visible in the final print. RC paper makes good contact when two pieces are placed together for contact printing.
-
2. Tape the corners of the completed print, image side down, to a light table for retouching. Dark areas can be intensified by adding density on the back of the print, thereby giving the printmaker control over the shadow areas. Soft pencils, pastels, ink, or even a ballpoint pen can be used. If retouching materials do not adhere properly, coat them with a clear Retouching Spray such as McDonalds Professional Photo Lacquer, which is formulated with a non-nitrocellulose resin system that provides archival qualities in clarity and color transmittance, and neutral pH.
-
3. Contact print the retouched print onto a piece of unexposed photographic paper to make a paper negative. Remove the enlarger's lens board to reduce exposure time. Make sure the two pieces of paper are in as close contact as possible. If you are having trouble making good contact, try soaking the paper positive and the unexposed paper in water and pressing them together with a squeegee or roller.
-
4. After processing and drying the paper negative, tape it, image side down, to the light table for retouching. During this stage, added density from retouching will block out and intensify the highlight areas.
-
5. Contact print the retouched negative onto unexposed paper. The choice of paper will determine the amount of control the printmaker has over contrast and surface texture. Coating the back of the paper negative with a very thin layer of oil can increase the contact, making the negative more transparent and reducing exposure time.
Control of Detail and Texture
For maximum texture in the final print, expose the paper normally, emulsion side up. For minimum texture and maximum detail, briefly (about 1 second) flash light from the enlarger through the paper's base side (emulsion side down). Turn it over (emulsion side up) and contact print it with the paper negative. For minimum detail and texture, expose the paper through its base side with no flash exposure.
Paper Digital Negatives
Paper negatives can also be created using a digital process. Desktop printers connected to a computer offer a variety of quick, print attributes. Although the quality of a desktop printer may not be suitable to create a negative for enlargement printing, outstanding results can be achieved through contact printing (see section on “Digital Negative Making”). Check with the manufacturer for details about the weight and consistency of paper put through the printer. Negatives from an inkjet, color, or black-and-white electrostatic printer (photocopier) can also be used as negatives (see Chapter 12).
© Peter Liepke. Spanish Harlem Girl, 2003. 10×8 inches. Bromoil print.
Reversing Black-And-White Film
Today most photographers present prints as their finished product. This has not always been the case. At the turn of the nineteenth century, lantern slides were most popular in photographic clubs and salons. A lantern slide is a positive transparency, named after the nineteenth-century projectors called magic lanterns, made or mounted on glass for projection. With slides, what you see is what you get. There is no second step needed to arrive at the final image as in the negative/positive process. This enables the slide to depict a greater amount of detail and a wider range of tones than can be expressed by a traditional print. This is because film (the lantern slide) has a wider tonal range than paper. Lantern slides were fragile, heavy, thick, and larger than their 35 mm heirs. The glass ensured image flatness during projection, giving the scene incredible sharpness. The bigger formats added to the retention of detail and the luminosity of the original subject.
A present-day photographer could still choose to work with black-and-white positives when making photographs expressly for the following purposes: reproduction in the print media, when images are needed for analog projection, for copying any continuous tone material, when a complete darkroom with a printing facility is not available, or simply for the sheer beauty the slide image is capable of bestowing on the subject.
Ilford supplies information on how to reverse process its Pan F Plus, FP4 Plus, and 100 Delta Professional films at: www.ilfordphoto.com/Webfiles/20114271220441194. pdf. Photographers’ Formulary offers a reversal kit for T-MAX 100 or 400. See: http://stores.photoformulary.com/content/01-0600.pdf.
In both cases contrast and exposure are controlled most effectively by bracketing, in one-third f-stops, within an effective range of about one f-stop in the plus or minus direction. The film's dark values can be intensified by combining 20 milliliters of Rapid Selenium Toner with 1 liter of hypo clear solution.
The Impossible Project: Instant Positive Film
There are advantages to working with “instant” materials from the predigital age. These include: no need for a darkroom; rapid feedback, allowing corrections and changes to be made while still shooting; a reliable way to test equipment, lighting, and subject poses; and a good icebreaker that can help establish a rapport between photographer and subject.
The Impossible Project makes instant film for classic Polaroid cameras, such as the SX-70, Spectra, and 600, plus 8×10-inch for large-format cameras. They also have a new format, I-Type, which features a new instant camera system with a built-in diffused light ring flash. The camera can be connected to your smartphone, which allows one to utilize creative tools like double exposure and light painting. Plus it allows the photographer to control the lens aperture and shutters. Both black-and-white and color film is available in all formats. Also, a 4×5 inch black and white positive/negative film is available, which works with the 545 Polaroid series film holders. Additionally, there is an Instant Lab Universal that allows you to make instant photographs from your smartphone. For details see: https://us.impossible-project.com/.
Fuji also makes a line of instant color and black-and-white films in various formats.
Processing Black-And-White Film for Permanence
Most serious photographers want their efforts to last as long as possible. To accomplish this goal, it is necessary to follow working procedures that deliver maximum permanence. With archival methods, it is possible for contemporary black-and-white film well into the future. Table 4.7 lists the basic working procedures to process black-and-white film for maximum permanence.
Digital Negative Making: An Overview
The hand-coated platinum/palladium print in Figure 4.9 was made from a digital negative. One benefit of working from a digital negative is that every print gets the same exposure time without having to manually burn or dodge the print as all the corrections are made in Photoshop before exposing the paper. This allows one to make the desired print with a higher rate of success and saves on consumable resources, such as expensive light sensitizers.
At a time when large format film and duplicating films are more difficult to obtain, digital negatives combine classic chemical based photography with the latest digital capture and control to offer a precise way to generate the larger negatives needed for contact printing processes. This mix of analog and electronic methods allows one maximum leeway to experiment with numerous processes requiring a large negative.
The simplest way to make digital negatives is using Photoshop and a desktop inkjet printer. The resulting inkjet negatives can be used to print on classic photosensitive silver gelatin materials or with nineteenth-century cyanotype or platinum/palladium methods. When properly done, you can make contact prints rivaling the quality of those made from camera-original negatives. The following procedure for making a basic digital negative has been provided by photographer and digital negative expert Dan Burkholder.
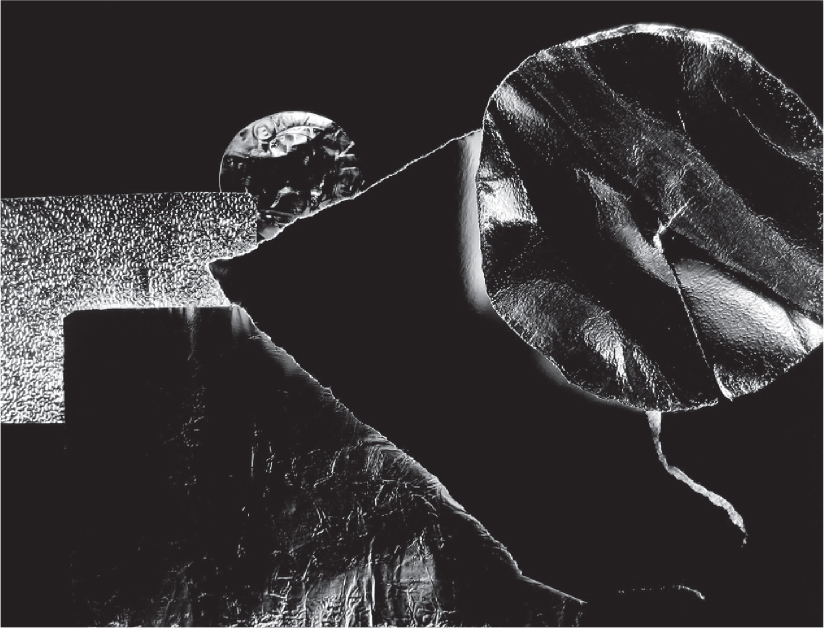
© Carl Chiarenza. Untitled 253, 1994. 16×20 Inches. Gelatin Silver Print. Courtesy Stephen Cohen Gallery, Los Angeles, Ca; Robert Klein Gallery, Boston, Ma; and Alan Klotz Gallery, New York.
Table 4.7 Processing Black-And-White Film for Permanence*
|
Procedure |
Time (minutes) |
|---|---|
|
Presoak (optional) |
1 |
|
Developer |
As required |
|
Acid stop bath (28 per cent) |
½ |
|
Fixer (one or two baths) |
Twice clearing time |
|
Selenium toner (1:20) (optional)** |
Until a slight change in color occurs (about 6 minutes) |
|
First Wash |
2-5 |
|
Washing aid |
2 |
|
Final wash |
10 (minimum) |
|
Wetting agent in distilled water |
1-2 |
|
Air-dry |
As needed |
*Use fresh solutions at 68°F (20°C).
**Film is immersed in toning solution directly from the fixer with
no water rinse. Toner is used only once and then discarded.
Table 4.8 Sources of Archival Equipment and Supplies
|
Century Photo Products |
|
|
Conservation Resources International |
|
|
Freestyle Photographic |
|
|
Light Impressions |
|
|
University Products |
Table 4.9 Sources of Alternative Photographic Chemicals, Lab Equipment, and Processing Kits
|
Artcraft Chemicals |
|
|
Bostick & Sullivan |
|
|
Fisher Scientific |
|
|
Photographers’ Formulary |
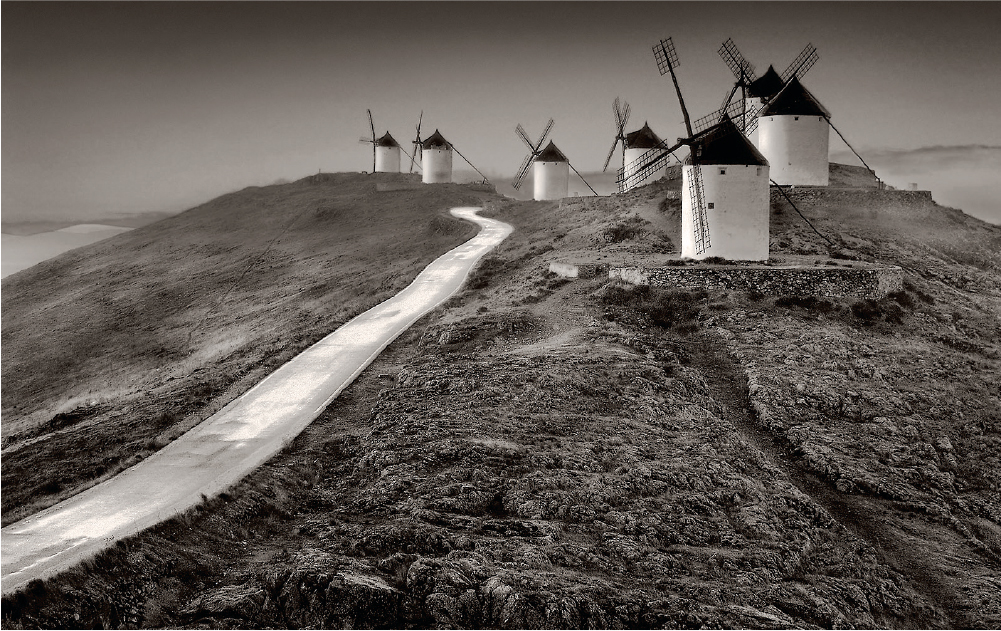
© Dan Burkholder. Windmills, Spain, 2002. 6×9 inches. Platinum/palladium print. Sun to Moon Gallery, Dallas, TX.
How to Make a Digital Negative
The following are the fundamental steps for making a digital negative (see Box 4.7).
Box 4.7 Basic Steps for Making a Digital Negative
-
1. Editing your image in Photoshop to make it look exactly like you want it to print as a final wet-process contact print. An image resolution of 240-360 pixels per inch (p.p.i.) works for most printers.
-
2. Including a step tablet with your image until your negatives are printing exactly as you want them.
-
3. Preparing your image with the proper contrast via Curves.
-
4. Inverting the image so it prints as a negative instead of a positive.
-
5. Printing the negative on clear transparency material using specific print dialog box settings.
Step 1: Making Your Image Look Just Right
Using your Photoshop image adjustment tools, such as Curves and Levels, correct your image so it looks just the way you want it to print (other imaging programs can also be utilized). Factors like the quality of your initial camera capture or scan, Photoshop skills, and monitor calibration will all affect the speed and ease of preparing your images. Use Image Size to check or adjust the physical dimensions of your image; try to keep your pixels per inch between 240 and 360.
Step 2: Including a Step Tablet
Our goal is to make beautiful prints, not beautiful step tablets. But as in any scientific testing procedure it is useful to have a control that allows us to clearly judge the visual results. The step tablet performs this function by providing a set of densities — from black to white — that you print simultaneously with your image, making it easier to visually evaluate contrast problems. For beginners not wanting to make their own step tablets, a few basic examples can be downloaded for free at: www.danburkholder.com/steptablets. It is a good idea to include the step tablet on its own Photoshop layer so it can be turned on and off as needed during testing and printing.
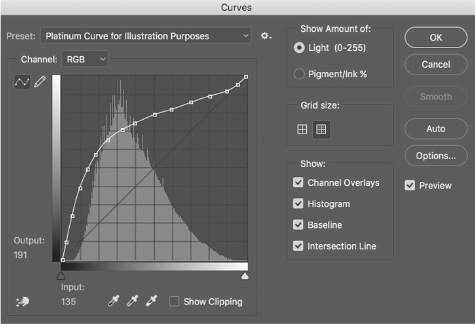
Step 3: Preparing Your Image with the Proper Contrast for Making a Negative
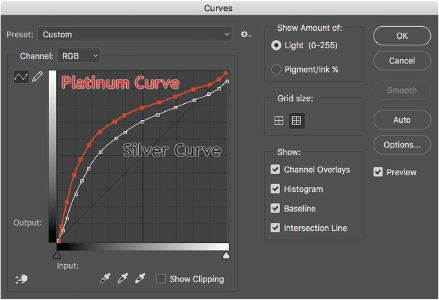
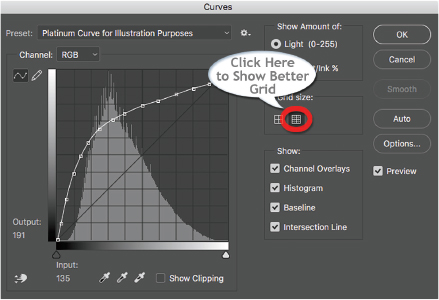
Since inkjet printers are not designed to make negatives, images need to be specifically prepared, which necessitates changing the image's contrast before printing. Using a Photoshop Curve is an ideal way to achieve this end. Figure 4.10 shows a typical Epson printer curve used to make a negative to print on hand-coated platinum/palladium sensitizer. Notice the steepness of the curve, especially in the shadow region toward the bottom of the graph. This is typical of how most of the curves for our purposes will be shaped, regardless of the final printing process for which they are intended. For comparison, Figure 4.11 shows the curve used for making a negative for gelatin silver printing.
Notice subtle differences between the two curves. The silver gelatin curve (Figure 4.11) is not quite as steep and therefore will not create as much density in the final digital negative in the highlight part of the curve. This is because most platinum/palladium printmakers prefer a negative with more contrast than is typically used to make a full-scale gelatin silver print. Other processes, such as cyanotype and Vandyke or even pure palladium, will have slightly different curve shapes to prepare the image with the proper contrast for that specific printing medium.
The curve will not make your image look better on your computer monitor. In fact, it will make your image look too light. This is normal; bear in mind the finished negative will have the proper contrast required/ necessary for printing on photosensitive materials. Just as a glob of clay does not represent a finished piece of pottery, your contrast-adjusted image on your monitor is one of the raw materials you shape to obtain the desired results.
One other thing to pay attention to in these illustrations is that the curve grid is showing 10 per cent increments instead of the default 25 per cent. This detailed grid only changes the cosmetics of the curves dialog box; the functionality remains the same. The advantage to having your grid in the detailed mode (10 per cent increments) is you can easily place points on your curve corresponding to the densities in the step tablet. Figure 4.13 shows the icon to click to change your curve increments from 25 to 10 per cent.
Courtesy Dan Burkholder Collection.
The myriad variables of printer type, ink formulations (dye and pigment) and printing processes mean you might have to adjust your image contrast (via Curves in Photoshop) before you get your desired contact print (see “Troubleshooting” section). Keeping careful notes of your experiments can be helpful to ensure consistency and repeatability.
Step 4: Inverting Your Image to Create Negative Densities
After applying the curve to the image, it needs to be inverted (Photoshop: Edit > Adjustments > Invert) otherwise you will produce a positive on the transparency material.
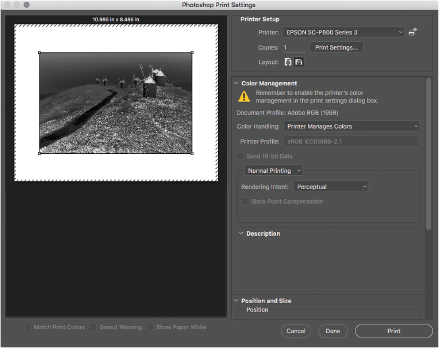
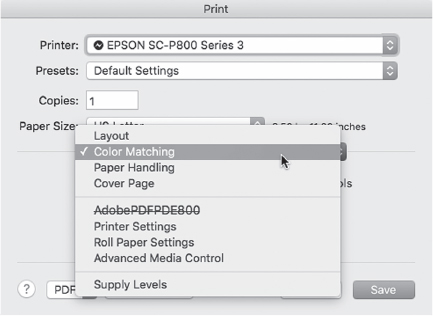
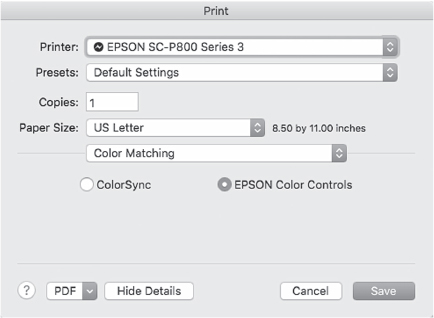
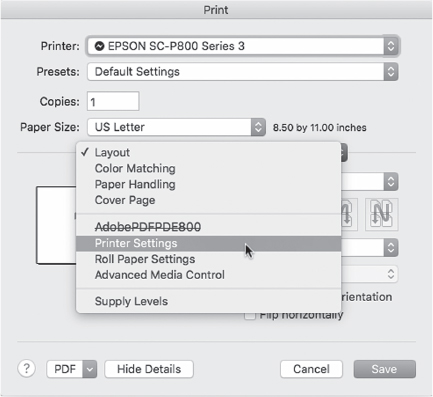
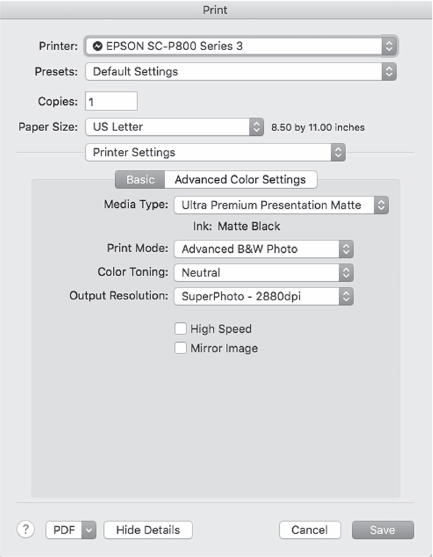
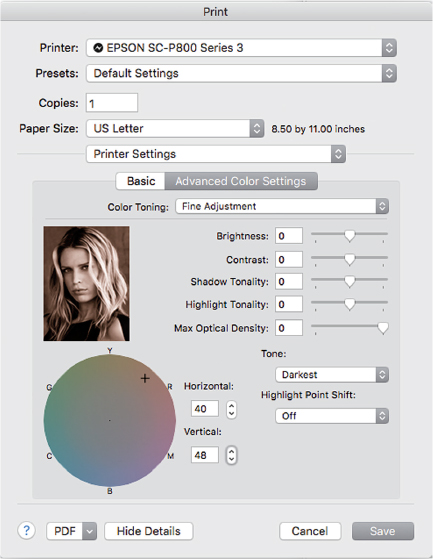
Step 5: Printing the Negative on Clear Transparency Material Using Specific Print Dialog Box Settings
Every inkjet printer has its own method of depositing ink onto a surface. This lack of uniformity means there is no one set of print dialog box settings that will work for every printer. The figures accompanying this section show the settings for an Epson printer using Epson's Advanced Black and White Mode to create a slight red-dish/brown color cast in the negative. This color helps block UV light, which is especially useful for making cyanotype and platinum/palladium prints. Overhead projection (OHP) films from Pictorico (www.pictorico.com) have been consistent and reliably hold ink.

Courtesy Dan Burkholder Collection.
Courtesy Dan Burkholder Collection.
Courtesy Dan Burkholder Collection.
Courtesy Dan Burkholder Collection.
Courtesy Dan Burkholder Collection.
Courtesy Dan Burkholder Collection.
Courtesy Dan Burkholder Collection.
Courtesy Dan Burkholder Collection.
Courtesy Dan Burkholder Collection.
Courtesy Dan Burkholder Collection.
Courtesy Dan Burkholder Collection.
Troubleshooting
Before printing your image on transparency film, it is a good idea to make a normal print (positive image) on inkjet paper. This proof will let help you notice flaws in retouching and tonality that you might otherwise miss on your computer monitor.
If your negative does not print with the desired tonality, the most common cause is improper image-editing that can produce shadows that are too dark or highlights that are too gray. This can be corrected by revisiting your image in Photoshop and making the appropriate adjustments.
If your negative is properly prepared and it still prints unsatisfactorily, the problem is likely due to your digital negative's contrast. If this occurs, carefully examine your step tablet and learn how to judge the tones so you can move curve points to alter the negative's contrast. You can easily change tonality in shadows, mid-tones and highlights by moving the corresponding curve points up or down in the Curves dialog box. The skills you acquire in learning how to tweak curves will serve you well in all of your digital photography work.
It is common to have to alter your first curve adjustment and it may take a number of curve point changes to produce a negative that prints flawlessly. Of course, if you change any variables, such as printer, developer temperature, or even humidity, it may be necessary to readjust the curve shape to match the new set of conditions.
Your Color Management settings can induce problems and you may have to temporarily turn off Color Management to get consistent results. For instance, you will know Color Management is working against you if your step tablet densities have strayed from their stated values (5, 10, 20 per cent, etc.).
Most printers deliver better results with the Matte Black (MK) ink rather than with the Photo Black (PK) ink. This can vary with printer brands and ink sets so comparing the MK and PK results is a good idea.
Resource Guide
Burkholder offers publications, such as the New Inkjet Negative Companion, Inkjet Negative Template, and tutorials, which can be downloaded from his website www.danburkholder.com.
Scanners
Scanners are input devices that digitize information directly from flat printed or photographic materials in a method similar to photocopiers. It is also possible to scan three-dimensional items. Aside from a digital camera, scanners are the most widespread means of making images digital. Scanners provide a convenient pathway for accessing analog material and bringing it into one's working procedures, such as making negatives for contact printing.
The most common scanners use a line of charge-coupled device (CCD) cells to record one row of the image at a time, which the scanner then assembles into a grid that digitally reconstructs your original image. Light is reflected off or through an image or object and interpreted by light sensors. Color scanners use red, green, and blue (RGB) filters to read an image in single or multiple passes. After the scan is complete, software is typically used to make color and contrast corrections and to crop and adjust image size. Scanners also have optical scanning recognition (OSR) programs that allow text to be scanned and converted into digital data, which gives one the ability to combine text and pictures with imaging software. Although manufacturers use their own software drivers, there are some basic scanning features and procedures (see section on “Scanning Steps”) that are useful to know.
Flatbed and Film Scanners
Flatbed scanners, capable of digitizing images in a variety of resolutions, are frequently utilized to digitize a document and can be thought of as large, flat cameras. These devices allow the user to preview an image and make minor corrections before scanning. Although designed to digitize prints, some flatbed scanners can do a good job of handling transparencies (slides) or negatives, especially when coupled with quality software, which may be optional.
Film scanners are specifically designed to capture the minute details of small negatives and transparencies by transmitting light through an image. They are more expensive than flatbed scanners.
Drum Scanners
Drum scanners are generally the most accurate way to digitize flat media. An image is read on a glass drum while being spun at several thousand revolutions per minute. Scans of both prints and transparencies made on these more expensive devices are more precise and translate images with greater detail than with traditional flatbed scanners. Some high-end flatbed scanners are capable of scanning prints, 8×10 inch transparencies, or film at a quality that can rival drum scans.
Scanning Guidelines
Although there are numerous types of scanners, some basic principles can be applied in most scanning situations. Scaling and resolution must be set at the time the image is scanned. The input settings draw reference from the original image, producing the best-quality scans. A common mistake is to allow the scanner's photo-imaging software to automatically set the final size (scaling) and resolution, which may force interpolation/resampling to occur (creating new pixels that did not exist in the original capture) and degrade the final image. Select the appropriate resolution based on the intended use (see Table 4.10).
The best resolution for continuous tone prints is dependent on the maximum dots per inch (DPI) of the printer being used. Good scanning software will allow a user to input a scaling factor into a dialog box and then will automatically do the file size math. If your software does not do this, use the simple formula in Table 4.10 to calculate input resolution based on printer resolution and the scaling of the image.
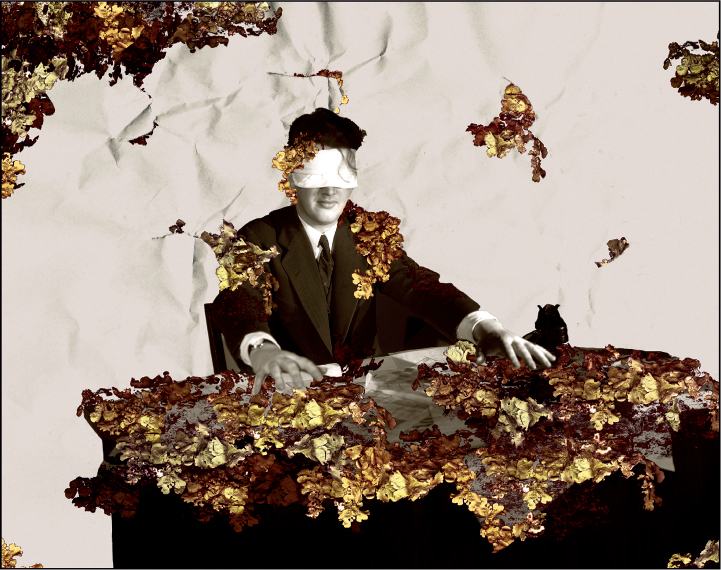
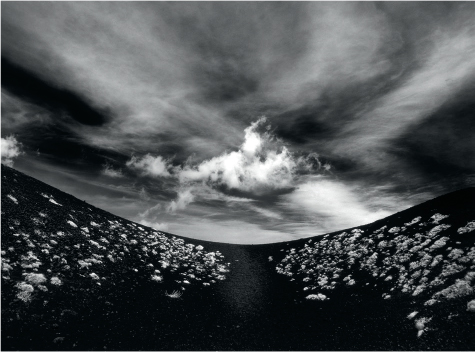
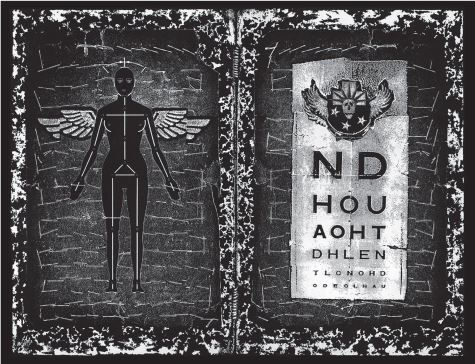
© Kathleen Campbell. Man with Blindfold, from the Series Relics from the Garden, 2007. 19×24 Inches. Inkjet Print.
Table 4.10 Scanning Resolutions for Printing
|
Application |
Scan Resolution (DPI) |
|---|---|
|
Internet |
72 |
|
Newspaper |
150 |
|
Glossy magazine |
300 |
|
Photo-quality print |
300+ |
|
Large fine art print |
4000+ |
Scanning Steps
-
1. Open the scanning software. Often this can be done through imaging software, under File > Import > name of the scanning software. Many scanners use an independent software application to drive the scanner. In this case, open the independent application and proceed to the next step.
-
2. Set the scanner for positive or negative. Many scanners are dual use, with the ability to scan photographic positives (reflective) and negatives or slides (transparent). Make sure the scanner is properly physically configured for reflective or transparent materials and set to the proper media before scanning.
-
3. Select grayscale or color. Even though scanning in grayscale is possible, scanning in color often provides superior results because the scan is occurring in three channels (RGB) instead of one. If a black-and-white image is desired, simply change the saturation levels to remove all color with the saturation adjustment tool and print in RGB to maintain quality.
-
4. Place the image/negative or object on the scanning bed. For flat artwork, be sure to place the image squarely on the scanning bed, as this will reduce the amount of postscanning scaling and rotating.
-
5. Preview the scan of the entire scanning bed. This will allow you to see the entire scanning area and the image to be scanned. Use the marquee tool to select the target area as closely as possible.
-
6.Make tonal adjustments. Most good scanning software will create a preview of the image based on the area you selected with the marquee tool. All scanning software has settings to control the contrast, brightness, and color balance of images. Change these settings to get the previewed image color-balanced as closely as possible before scanning. The most important adjustment to make is contrast. An image that has excessive contrast contains less information about tonal values. Slightly flat-contrast images contain more information in the highlight and shadows and generally provide better results in postscan processing. After scanning, use your photo-editing software to make final color and contrast adjustments to an image.
-
7. Set the file size. Before scanning, decide what size your final print is going to be. Scanners display and define size in two ways: image size and resolution. Most scanning software will display the size of the area being scanned, multiplied by a scaling factor. Increasing the scale of the image increases the dimensions of the final scanned image. Increasing the resolution of the scan increases the potential quality of the image. Both operations increase the file size. As a general rule, the larger the file size, the more options you have in working with the finished scanned image. Know the limitations of your scanner and select the appropriate file size. There is no need to scan at a greater resolution than you need, as larger files are slower to work with and take up more
-
8. Scan the image.
-
9. Save the file. Once your image is scanned, immediately save the file. If you regularly work in Photoshop, save it as a PSD file. Keep these original scans protected and work only with copies of these scans.
Frame Grabber
A frame grabber is another form of input that enables one to capture an individual analog video frame and digitize it as a still image. The resulting image file can be handled just like one made by a still digital camera. Frame grabbers can be either stand-alone devices that plug into a computer port or a program function built into a video capture board or display adapter. Software can also be used with digital camcorders to grab an already digitized image.
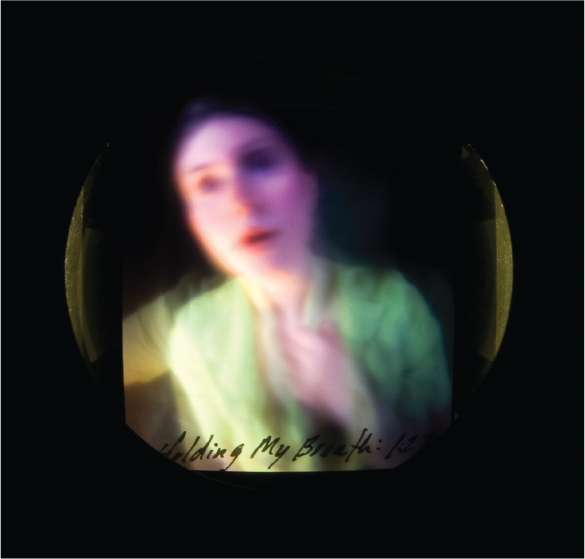
© Elizabeth Raymer Griffin. Holding My Breath: 1:27, 2003. 4×5 inches. Chromogenic color transparency.