CHAPTER SEVEN
3D PRINTING
___________
“Because he’s an artist, he’s pushing the envelope further than an industry would. An artist just has a creative vision and they kind of ignore what the tools are supposed to be able to do and they realize their creative vision.”
Autodesk director Maurice Conti speaks about the work of Joris Laarman
3D Printing—Rapid Prototyping
This book has taught us quite a bit about 3D technology and how it is influencing the arts and how artists can use this technology to create some very inspirational work. You may even begin to feel more comfortable with the virtual world in which artists create these masterpieces. We have looked at how computer numerically controlled (CNC) milling subtracts material, carving it away as it makes the physical object. In contrast, let’s now take a look at additive fabrication. Additive fabrication adds material layer by layer to create a physical object. Industry and artists refer to additive fabrication technology by many different names—3D printing, rapid prototyping, solid freeform fabrication, layered manufacturing, and others. The name “3D printing” seems to be the term most commonly used. Artists, craftsmen, engineers, architects, and scientists, as well as many others, use 3D printing. The wide use of 3D printing in many different applications has contributed to it evolving. The hacker community is very excited about the idea that a 3D printer is evolutionary. In other words, it can print its parts for other 3D printers or offspring. The interdisciplinary nature of the medium and the great amount of materials available to print, combined with the decreasing cost and the inspiration and influence of hackers and open source, brings an incredible toolset to any creative person’s studio.
As with CNC milling, 3D printing was produced for manufacturing, but the interest in the technology, outdated patents, and a strong hacker community has influenced the technology, making it more available for the mainstream user. Now, artists, hobbyists, and people working in crafts are using 3D printing, and they are printing in a variety of materials from chocolate to bronze. The cost of owning a 3D printer has also changed. In 2009, a 3D printer might cost $20,000–30,000 or more. Now you can go to Office Depot and pick up a desktop printer for $1,300 or you can become a part of the hacker DIY community and build a 3D printer for a few hundred dollars. It is no wonder that the technology has spread. With the understanding of the possibilities of this new technology, artists and craftspeople find their creative and inspirational process expanded. Understanding the process helps an artist imagine what they can create.
You just don’t know what you can do, until you know what you can do.
Sculptor and author Bridgette Mongeon
With 3D printing, artists can create pieces inside of pieces, voids with objects in them, intricate detail, complex sculptures with interconnecting articulating parts, and much more. Artists are creating and manufacturing objects so intricate that they were not even possible to create before 3D technology.
Types of 3D Printing
3D printing is a large and broad category that consists of not only many different materials, but also many different processes. Understanding the manufacturing and the processes of creating in 3D will help the artist to know the best process for their work. Within additive manufacturing there are several processes to choose from and many are readily available to the average consumer. In this chapter, we will look at some of the most common—fused deposition modeling (FDM), selective laser sintering (SLS), and stereolithography (SL/SLA), as well as a few others. It can be a bit confusing to understand the nuances of each process at first, but understanding the details of each of these forms of output will help to determine the best output for your art.
Fused Deposition Modeling (FDM)
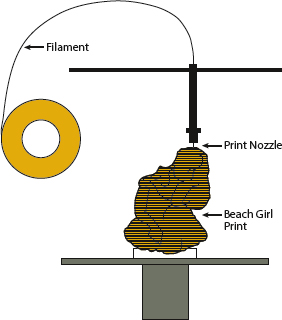
In fused deposition modeling, a machine prints small layers by extrusion. Most familiar to individuals is the extrusion of plastic filament through a heated nozzle. Building from the bottom up, the art emerges with layers—each layer bonded to the other as they harden. The nozzle moves over the object as it deposits the material.
In some cases, there are fragile overhangs in a design that will not print without assistance. It is important to add support structures to these areas when 3D printing weak parts using FDM. The artist can remove the support structures after printing. You or your service bureau may add these structures in the pre-fab process. Support structures are common in many types of 3D printing; for example, SLA will also require support structures. In 3D printing, some support structures are water-soluble. Removing these is as simple as washing them away. A breakaway material is another type of a support structure; however, plastic pieces can fly off, and many artists recommend wearing safety glasses when breaking these off. However, even if a sculpture makes it through the process of 3D printing, please remember that protruding parts still may be fragile or they may not ship well.
Fused deposition modeling (FDM).
Most of the low-cost desktop 3D printers that are available on the market today use the fused deposition modeling process of 3D printing. FDM 3D printing is affordable and is easy to come by. Examples of 3D printers are the RepRapPro Ormerod 2 Kit at $747 (www.reprappro.com), the MakerBot Replicator at $2,899 (www.makerbot.com), and the Cube X Duo at $2,999 (www.3dsystems.com). However, the detail and resolution of images printed with FDM are often not as good as other 3D printing processes.
Joel Mongeon printed Head with his Airwolf3D HD fused deposition modeling (FDM) printer (http://airwolf3d.com). He has had great success with using a 3Doodler 3D printing pen to fix errors in his models (http://the3doodler.com).
Selective Laser Sintering (SLS)
In selective laser sintering, a laser passes over a bed of deposited powder. This powder can be plastic, metal, even glass or ceramic. The laser fuses the powdered material together. After one layer is complete, the build bed lowers, and the machine adds another layer of powder on top. The process continues through the building of the product. Once it is printed, the operator brushes the powder off the object revealing the art as an archeologist would reveal an artifact among the dirt. Some applications and materials may require additional steps that consist of firing or curing.
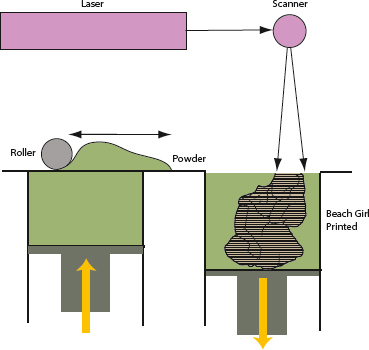
Selective Laser Sintering (SLS).
The advantage of SLS 3D printing and a few others is that the support structure is within the material. The powder that creates the object during printings supports the object as well as any of the overhangs that may be in the design. And as long as the powder has a way to escape, it is feasible to print an object inside of an object. Creating objects inside of objects is very difficult in traditional processes such as ceramic or bronze casting. SLS holds wonderful possibilities for artists.
When can you purchase a home SLS 3D printer? There was a surge in desktop models of FDM 3D printers available to the public when patents for that process expired in 2009. The key patent for SLS machines expired in 2014. But SLS technology is a bit more detailed; the SLS process means fusing metals and the laser used in SLS compared to SLA is different and not as safe. Also, there are still many patents that are in effect that are a part of the SLS process. So SLS home 3D printers are not yet available; however, consumers have access to all of the 3D printing processes through online service bureaus.
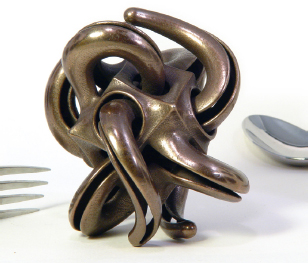
Artists can create intricate intertwining or nesting shapes with 3D printing. Tentacon Fork by Bathsheba Grossman.
Stereolithography (SL/SLA)
Stereolithography also works with divided layers. In SLA, a laser beam passes over a photocurable liquid resin. Just as in SLS, an SLA machine adds layers as the table lowers; but instead of adding a fine layer of powder, the lowering of the build table allows a fine layer of resin to accumulate over the top of the object. The laser cures the resin. The artist may still need to incorporate support structures for overhangs as in the FDM process. Watching the SLA process, one feels eerily like a mad scientist with their creation emerging out of the liquid resin on a rising platform. Removal of support structures is all that is necessary to reveal the finished 3D product.
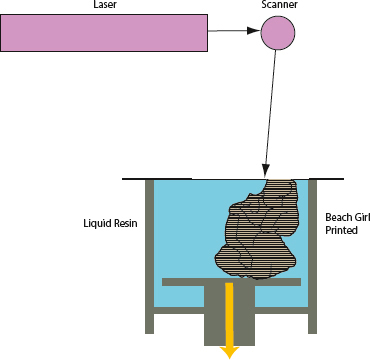
Stereolithography (SL or SLA).
There are desktop SLA printers coming onto the market, sparked by the expiration of some of the patents in the process. Individuals see the necessity of creating an affordable 3D SLA printer, as this is one of the processes of 3D printing that holds the most detail. Formlabs put together a kickstarter that closed October 6, 2012, and raised $2,945,885. To see such funding happen so quickly, it becomes apparent that others have a desire to see SLA made available to the general public at a reasonable cost. However, the large 3D printing companies are watching and they are filing lawsuits.
A few of the SLA printers on the market are the Form 1 3D Printer at $3,299 (www.formlabs.com) and the 3D Systems Pro Jet at $4,900 (www.3dsystems.com).
Autodesk, a leading software company, announced in 2014 that they plan on getting into the 3D printing industry on the hardware side. In a Bloomberg TV interview, CEO Carl Bass states that he was, like many, “fascinated by the promise but frustrated by the reality.” There are a lot of steps involved in 3D printing, and Bass believes that it needs to be simpler. The interesting concept is that this large company will be creating an open source SLA 3D printer. Bass understands the concept of how the input of others can play a role in the evolution of the product. As the product evolves so will the creative thinking: “Things you design should be different” (http://spark.autodesk.com).
Other Types of 3D Printing
Fused deposition modeling, selective laser sintering, and stereolithography are not the only types of 3D printing processes available. There are others. Some of the processes are not known by a single name or are proprietary to the manufactures. One example is the process of ExOne used by Bathsheba Grossman. We will look at another in the feature section of 3D printing of jewelry by Krikawa Jewelry Design. The amount and types of 3D printing available is no doubt confusing, but if you can familiarize yourself with these processes (FDM, SLS, SLA, the proprietary process of Ex One used by Bathsheba Grossman, and the 3D wax jet printing used by Krikawa Designs), you will begin to have a base understanding about the processes and the possibilities.

Get Off My Yard by Mathieu Aerni. Created in ZBrush and printed through Mold3D (www.mold3d.com).
Brian Chan creates his articulated (moving) sculpture inspired by the ancient Japanese decorative art called jizai okimono. With jizai okimono the intricate metal art moves freely. Chan models in Wings3D, creates individual joints and copies and pastes them in the correct positions. He prints his pieces with Shapeways that are either sintered nylon or investment cast in metal from 3D printed wax.
Metal Bowls by Carl Bass of Autodesk, printed in 420SS/Bronze, ExOne. Photograph courtesy of ExOne.
3D Printers for the Home/Studio
There is a variety of 3D printers available for the home. As we said, most of the 3D printing technology standard for home use incorporates fused deposition modeling (FDM), but more options are becoming available such as stereolithography (SLA). The difference between the detail and resolution of SLA compared to FDM is drastic. Although the build envelope on many home machines, especially SLA, is rather small at 4.9 × 4.9 × 6.5 inches, the detail is quite good. Some SLA providers are even working on a resin that will easily burn out for investment casting. It will not be long before we begin to see other types of 3D printing processes made more accessible through home 3D printers and, in turn, the cost of 3D printers will decrease.
There are many online sites that review and compare 3D printers. There is also a special annual issue of Make magazine: “Ultimate Guide to 3D Printing $300-$3000: Which Printer is Right for You? 3D Printers Buyers’ Guide With 23 Printer Reviews.” Not only does it review printers, it inspires and makes the reader think of the possibilities. If you want to purchase a home 3D printer, it is a good idea to take some time to research and compare the different machines. Technology changes quickly, and suggestions mentioned in this book could become obsolete before the book goes to print. The book’s accompanying website contains additional links to sites that review printers.
There are several things to consider when purchasing a home 3D printer.
Printing or Tinkering
Some people like the experience of building and tinkering with their 3D printer. If you are not a tinkerer and only want to print, then be sure that your 3D printer review criteria factors in the temperamental nature of home 3D printers. If you do prefer to tinker, then you might want to purchase a 3D printer that is hackable, extending or modifying the machine’s capabilities. For example, a hacker can add an extruder to a RepRapPro machine and, instead of printing out filament, the 3D printer can extrude clay slip.
Build Envelope
What size item would you like to print? Be sure to check the build envelope or build size in comparison with the type of material you are seeking to print. Many home printers print small pieces 5 inches by 5 inches, while the Cubify reaches a build envelope of nearly 10 inches. Some artists slice their designs in the computer and then print them in multiple parts. Understanding how you will use your home printer and the maximum size 3D print you will need will help to determine the best 3D printer for you.
Detail-resolution
At first, understanding and comparing what some refer to as resolution of 3D printing machines can be confusing. One could go into a great extent talking about all aspects of the detail such as the axis, thickness, and even dots per inch (DPI), but let’s simplify this. We can see the many layers of 3D printing in the close-up photographs of the baby and the tiger. Whether FDM, SLS, or SLA, they all work in layers. It makes sense that the detail of the 3D print is in the layers. The layer height determines the resolution. 3D printing manufacturers measure layer height in millimeters: 0.1 mm is approximately the thickness of a piece of paper. The 3D printing machines that print in thicker layers often will leave a noticeable “stair-stepping” effect in the finished piece. As the layers get thinner, the stair-stepping effect is less noticeable and, in some cases, post-processing can help to eliminate layers. Some artists embrace the machines’ limitations and use the stair-stepping effect as a part of their art. They incorporate it into their design.

A close-up of the layering in the 3D printing from Captured Dimensions in Chapter 3.
Even though you may get very good print results from a specific 3D printing machine, it will be important to research how consistent the machine is. If, for example, every third print is considered usable, then it might be worth looking elsewhere. Users of printers will talk about the consistency of various 3D printers openly on user forums.

A close-up of Bridgette Mongeon’s tiger printed in SLS displays the layering of this process of 3D printing. The layering is not as noticeable and the direction of the layering seems to give movement to the fur.
Print Material
What does the 3D printer print? There are two primary sources of printing material for FDM printers, ABS and PLA. When you buy your printer, you will be printing with this “thermoplastic filament” to create your excellent 3D designs. The term thermoplastic means that it becomes soft when heated and hardens when cooled. Take note—the spools of 1.75 mm and 3 mm thick thermoplastic products are a usable product. You will have to replace and purchase filament for a 3D printer just as you would paper for your copier. Understanding the pros and cons of each of the plastics is important.
ABS stands for acrylonitrile butadiene styrene. ABS is petroleum-based thermoplastic. There are both positive and negative aspects of ABS. It is more flexible, which makes it a good choice when creating interlocking parts. It is also easier to sand than PLA. However, humidity can affect ABS during long-term storage. ABS can warp and requires a heated bed for better performance. Unlike PLA, it is not biodegradable and smells like burning plastic when it comes out of the machine.
The other thermoplastic used in the FDM 3D home printers is PLA—polylactic acid or polylactide. PLA is a plant starch base made from corn, beets, or sugar; therefore, it is biodegradable. Print a shoe for your child on your 3D printer and, when it no longer fits, simply toss it in the compost and print another. The smell, when extruding at 180–200 degrees, is more like burning cooking oil. PLA is strong and rigid and is less prone to warping during printing, but you would not want to leave a printed piece in a car in the Texas heat.
Many arts and crafts people are experimenting with using their PLA and ABS 3D printed pieces as a positive burnout design for a mold. Instead of using the lost wax method of casting featured in Chapter 8, you could say they are using the “lost PLA” and “lost ABS” methods of casting. Although SLS printing brings better detail, the incorporating of the technology in art and craft is often about experimentation. There are more details on this process in the next chapter. Because of the toxic fumes of ABS, it appears the preferred plastic for burnout is PLA. If you are planning on experimenting with this, you should note that the chemical makeup of each filament is different, and so is the melting temperature.
Filament can be costly, which is important to remember, especially when it is a consumable resource—3D printed practice pieces pile up. A spool of filament can run anywhere from $35 to $100, depending on the type, manufacturer, and machine. Plans are already underway for recycling machines that take your old PLA or ABS, grind it up, and melt it into new filament. It is important to note that, when choosing a 3D printer, some companies will not allow the use of anyone else’s filament but theirs. Their filament can cost nearly three times the amount of buying filament elsewhere. Being bound to one supplier for filament is limiting. Having to stay with one company’s filament may also leave you with fewer choices in printing colors and price.
When purchasing filament from a supplier, check on the grade of the filament. Standard grade for PLA is 4043D, and the standard for ABS is PA-747. While comparing and deciding on what material to print in, it might also be necessary to look at the price per roll of filament as well as the price to print each piece. Many comparison charts will have this information in them.
Varieties of Printing Colors
Some FDM machines have multiple extruders and print multiple colors at the same time. Most have just one extruder head and print in one color. Filament does come in different colors. Different filaments have variations even if they are the same material and color.
There are also specialty filaments. Form Futura offers a variety of filaments such as Laywood D-3, which is a 40 percent recycled wood with a binding polymer. This wood filament can change color depending on the temperature upon extrusion. There is no doubt there will be many other filaments available for FDM. Anything you can mix with the plastic and extrude with precision is a candidate for new FDM filament.
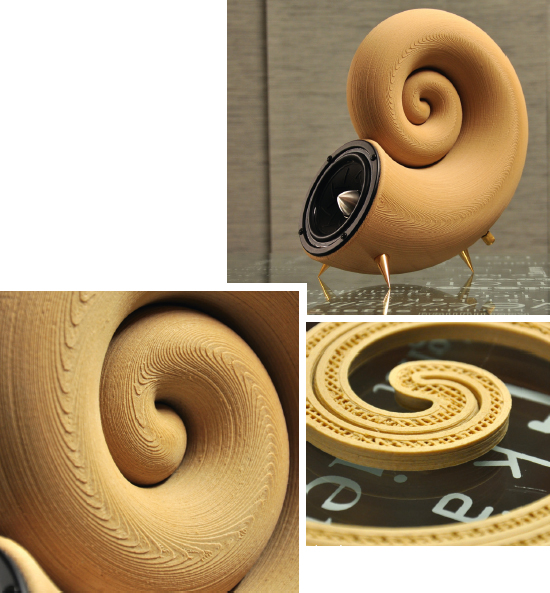
Using 100 percent natural Timberfill material from Fillamentum, Akemake created a wooden speaker. Ondra Chotovinsky designed Spirula 4.0. Chotovinsky uses a variety of CAD software to create his 3D designs and Martin Hreben prepares the files for 3D printing. Spirula 4.0 was printed on a highly modified Leapfrog 3D printer re-engineered by Hreben. The design is currently available for free download and can be found at www.akemake.com. You can print it out on your own 3D printer but be prepared; it may take up to 36 hours to print one pair.
Speed of a Print
If you are printing a 3D print on a home 3D printer you can specify if you want a quick print that will take less time. Time and resolution work hand in hand. Less time means you will sacrifice resolution. A higher resolution print will take more time to generate on the 3D printer. For example, one 3D printer may take 15 minutes to print a cell phone case and another printer may take three hours. Time is money, so when weighing the many criteria of buying a 3D printer be sure to take print time into consideration.
Software
With the many varieties of printers on the market, it makes sense that some will be easier to operate than others. When considering operating a 3D printer it is necessary to consider the software. Does the software come with the machine? Is it a plug and play? Is the software designed for engineers or the general consumer? These are all things to look at when considering the purchase of home 3D printing systems and software.
Operating System
Most printers use both Windows and Mac operating systems, a few do not. If a Mac operating system is important, be sure to look for this aspect of a 3D printer in your review process.
Other Considerations
Accuracy of print, warranty, ease of use, and customer support are all important considerations with a temperamental piece of equipment like a 3D printer.
There are many criteria to consider when purchasing a home printer. With a little exploration and out of pocket cash, an artist or craftsperson will be up and running, creating new designs while friends and family look on in amazement, but that is not the only way to print your art.
Accessible Technology and the Possibilities
It was not long ago that if you wanted to have something printed using 3D printing you had to invest in to some expensive equipment. Now, there are many alternatives. Just as with the use of both scanners and CNC equipment there are options to investing into your own equipment. There are 3D printing service bureaus. Service bureaus are both national and local. Many makerspaces and hackerspaces also have at least FDM 3D printing machines.
Service Bureaus
There is an ever-increasing community of online service bureaus now available to the consumer. The artist creates a model in a 3D program and then logs onto the service bureau website. Prepare a file for printing, upload the file, pick the material, and then print. The service bureau will then send the printed item to your home or studio. The nice part about the service bureaus is that it gives artists and craftspeople a variety of materials and processes from which to choose. Without the 3D service bureau, the artist might not be able to have their work recreated on such expensive machines, and artists might not have access to such expanding possibilities in the 3D printing process. An artist can easily have something printed in plastic, glass, metal, ceramic, and much more. The variety of materials and the cost of 3D printing can be quite reasonable. With so many national service bureaus to choose from you can even compare prices. Many have a strong community where you can seek answers to your questions. The disadvantages to using these national service bureaus is that you may not get the one-on-one service that a local company can offer. Working out design problems can be costly if you have to print the product out multiple times before you work out the problem.
There are websites that are taking the search for price comparison between national service bureaus out of the equation. An example is http://3dprintingpricecheck.com: upload your file and they will check the prices of several 3D printing service bureaus such as Ponoko, Shapeways, Sculpteo, i.materialise, and Kraftwurx. The website Supply Better offers quotes from vendors on your specific projects. So, if your goal is either a “one off” or many pieces of one design, consider providing specs to a website such as Supply Better and let different companies bid on your project. Prior to uploading files to these sites, it is advisable to read the chapter on intellectual property rights, as well as their terms of service. Always check into the standards of each website and company where you submit your work. It is necessary to protect your intellectual property rights wherever you are submitting your files.
Some Staples office supply stores and UPS stores around the world are offering FDM 3D printing services, although it will be interesting to see how stores train the employees that will be printing your pieces. Depending on where you live, there may be local vendors or individuals who own expensive equipment that will print your work for you. No matter what type of 3D printer it is, all 3D printers have moving parts. The owner of the machine needs to use it on a regular basis. Working with a local vendor, you have the luxury of asking questions and, if you have a good relationship, the vendor can even help you to push the limits of the process. It is often advantageous to scout out a smaller local company that can offer you the kind of 3D printing that you need and with whom you can develop a relationship. Even if a local service bureau is more expensive, in the long run, the one-on-one time will pay for itself.
Working with the Service Bureau
Companies like Shapeways, i.materialise, Sculpteo, Ponoko, and Kraftwurx are the most recognized names in full service, online, multi-material 3D printing service bureaus. See the Appendix and website for a list of service providers, and special offers.
These personal service bureaus cater to the novices, hobbyists, and small entrepreneurs that wish to use 3D printing as part of their production, but who don’t want to invest in a 3D printer. They are a bit different from the commercial companies that specialize in creating prototypes for manufacturing, industry, and the sciences such as RedEye (www.redeyeondemand.com). Although the technology in the personal service bureaus is not any different than the commercial, the personal service bureaus target their marketing strategies and price points to the general consumer. These service bureaus have certainly helped to make 3D printing more accessible. Before we look at some of the many elements of a service bureau, let’s take a closer look at how many service bureaus are helping artists sell their work through 3D printing storefronts.
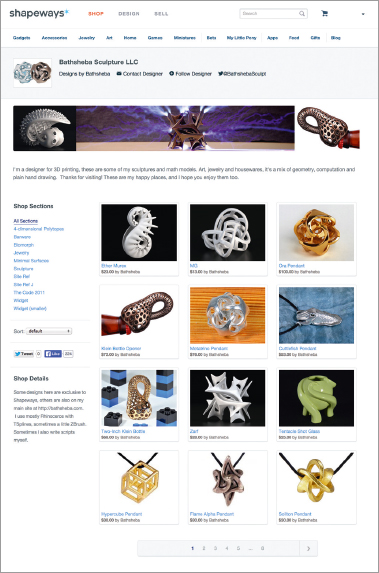
Some service bureaus offer storefronts for artists to sell their designs. Featured artist Bathsheba Grossman uses storefronts at Shapeways and i.materialise websites, but states that her primary sales venue is still her own website at www.bathsehba.com.
3D Printing Storefronts
Some of the personal service bureaus also make selling 3D products easy by offering storefronts to their customers. Storefronts at i.materialise, Sculpteo, and Shapeways offer not only printing services that print in a variety of materials, but also the opportunity for designers to set up a shopping cart and create a place to market their work. It is very similar to Etsy, but with 3D printed products and a built-in manufacturer. Artists create their designs, pick their materials, and then set their retail prices. Shoppers come to their storefronts, pick an item, and order a 3D print. The service bureau manufactures and prints the design. The artist’s account grows with the deposits made by the service bureau shopping cart. Some shops also offer individualized products, such as a bracelet created with your child’s name. Many designers love the ease of having an online storefront through these websites. It relieves them from marketing, sales, and even shipping. They can simply sit back and create, and they don’t have to pay attention to the business side of things. However, before we look at the service of the personal service bureau, let’s take a look at the storefront option. There are some things to note when weighing the option of a storefront for your 3D printed arts and crafts.
OVERWHELMED BUYERS One of the online shopping cart sites states that they have “Over one million objects” in their storefront. Can the buyer easily navigate the website? For example, can I search “necklaces,” and then navigate to necklaces of a particular material or the best sellers? If not, then your work may be harder to find. Also, what are the demographics of the storefront? Who is coming to Shapeways, i.materialise, or Sculpteo to buy these things? It is safe to say that the majority of people floating through the websites are those who are themselves creating items using the 3D printing. This may not be the demographic that is the best for purchasing your gifts.
Many artists have reported regular substantial income through their storefront. This type of “easy” revenue has an appeal. As these storefronts become more known by the general consumer they may increase the profits of small artists, offering them income with little overhead. There are other things to watch out for with these online 3D printing shopping sites if you decide to go that route.
THIS DESIGN CANNOT PRINT When you upload a design to the sites, you are sure it can print because it goes through a review process. On occasion, artists have reported that the design has printed with no problems, but then a client orders it and the client receives a message that the design is not printable. The service bureau notifies the artist, but the sale is hardly redeemable. Buyers just move on to an item that is printable. So, why would a piece print one time, but not all of the time? There are several reasons why your previously reviewed design might not print and cause your client to receive this error in their order. Perhaps someone else reviewed the printing file or the post-processing requires more work. 3D printing is rarely just a push of a button, there are many steps in creating a 3D print. The service bureaus are friendly and work with you to solve this issue; however, there is no recouping the damage to that sale. The client only sees that it is unprintable and may wonder why a professional artist has put an unprintable design on the site. The artist’s reputation is at stake. The sale is lost.
No matter what storefront you decide to try, it is important that you first create your designs and have them shipped to you. Designs are rarely created perfectly the first time. Modifications mean multiple prints with tweaking of the design between printings. Any manufacturer knows that periodically you have to check what is coming off the assembly line. Quality control means that the product meets the design standards of the designer. Materials can change, employees can change, and even machines can change. The quality can change from order to order. Does the product that is going to your customer meet your standards? If the service bureau creates and ships it to the customer, you may never know if it did. It is important to monitor your work. After all, it is your name on the product. For this reason, even if it is more convenient to have the service bureau print and ship your item to the end-user, it is advisable to revise that process. Sending designs directly to your client from these service bureaus means you are blindly trusting that the quality is to your standards.
SPEED OF SERVICE The complaints about turnaround time are consistent in the world of designers concerning personal service bureaus. The Shapeways website states an order can take between one and three weeks or more, while Sculpteo and i.materialise both give a range of between one day and 21 days. When a customer orders a product from you, they are anxious. They want to receive what they have purchased and would prefer not to wait. Investing into purchasing a few of your products is a viable business alternative. Build a little inventory, and then ship from your studio. With the build envelope or build size available for 3D printing, the products will take little room to store, and shipping, although inconvenient, is possible.
CLIENT RELATIONSHIP Knowing your customer or those purchasing from your store is important. If you are an artist or craftsmen and are trying to make a living by the labor of your hands, then studying a bit about marketing and applying that to your business is important. As the saying goes, “You don’t get a second chance to make a first impression.” With e-tailing, selling retail in an online space, the artist makes that impression in moments. When another person has control of the website and the manufacturing then you are giving up control of an important element of business. Placing your work on an online store means an artist does not have to worry about sales, shipping, and many other things, but you may also give up the client contact. The information collected by the shopping carts on 3D printing websites is owned by the service bureau and often is not shared with the storefront owner. If you created a new design and felt that those people who purchased a similar previous design might like it, you may have no way of letting them know.
There is a marketing saying that states, “It is all in the list.” Collecting data, such as name, email, and phone number from your clients is crucial. At the time of writing this book, many of the 3D printing service bureaus do not pass the client information on to the artist.
MARKETING AND BRANDING YOUR PRODUCT When you use a storefront, the products ship from the company that makes them. In other words, i.materialise will ship your designs in i.materialise’s packaging, and with any marketing material that i.materialise decides they would like to put into a shipping box. It would be far better to have your packaging, created with your labels. Marketing of this sort does not have to be expensive. A designer selling only a few products can easily purchase quality packaging and print their marketing material on their home inkjet printer.
Using a Personal Service Bureau
Many people make online storefronts work for their business, and have fun doing so. Even if you are not going to get a storefront at a personal online service bureau, they have so much else to offer. Let’s look at what else these personal service bureaus have to offer and the things to consider when working with the service bureaus.
THE TYPE OF 3D PRINTING PROCESSES In the many online service bureaus, you will find all types of 3D printing at your fingertips. However, whether it is SLS, SLA, FDM, or others, how do you know what is the right type of printing for your design? There are several factors that you will want to consider. What is it used for? What detail or resolution do you require? What size do you require? Can the object be printed in the size you require with the process and in a material that you need? What is the desired texture or finish of the print? How strong does your print need to be? What is the cost of the 3D print?
Scanning a sculpture or object and modeling or designing it in the computer are some of the ways to obtain an object for print. You can also find free 3D models at such places as Thingiverse (www.thingiverse.com). Some processes, such as scanning and sculpting, can provide very detailed 3D images. If the specific 3D printing processes, and the material and resolution available for those processes, cannot preserve and print the detail, then modifications need to be made. An artist can choose to change the type of printing process, choose a different 3D material, or modify the design.
The cost of the many different materials varies greatly. The service bureau websites are becoming increasingly helpful in aiding the consumer in deciding the best material and cost.

Searching the service bureau’s sites you can get a better understanding of material prices and characteristics. Photograph courtesy of Shapeways.
COST When considering the cost of a 3D print, it is important to understand that the cost may change depending on a few criteria: the material, the size, and the mass or volume of your piece. If your art is difficult to print then this will also affect the cost. Costs also vary between vendors, so you should compare service bureaus. There is another aspect of the designing and printing in the 3D process that most artists beginning to 3D print do not realize. It is important to take into consideration how many test prints and revisions you will need to print before a 3D piece of art is correct. Many of those designing and printing in 3D find that 3D prints rarely come out correct the first time. Sometimes a design needs modification for the material and size. An artist may find that they need to thicken, thin, or change certain elements of design for aesthetic or manufacturing reasons. If that is the case, it might be advisable to do a test print or two in the appropriate size and in a less expensive material before creating something in, say, gold or bronze.
Does the price of your sculpture come down per centimeter? If there is more volume in the sculpture, is it cheaper? Can you gang up some pieces; for example, print four on a plate and bring the cost down per piece?
Sometimes the direction of the build axis may need changing. The placing of a design on the build box in the 3D printer will affect the layering, and if there is stair-stepping, this may change the look of a piece. The 3D printer prints from the bottom up. Sometimes turning the 3D design in the computer as it sits on the build table, so that the 3D printer builds layers from another direction, say on its side instead of standing, can make a difference. If there is no desire for a finished polish on the piece, then the print orientation and the stair-stepping effect could be essential to the design process. This is something that cannot be seen without a test print.
SIZE The build size or build envelope available in 3D printing changes depending on the material and the machine. The service bureaus list the build envelope for each of their materials. Although there was a time when the build envelope was very small, you could say technology is really pushing the envelope on this, no pun intended. Artists and hobbyists might be limited to what they can get out of their own home printer or the service bureaus. Keep an eye on the technology. Artists are pushing the technology to accommodate their needs, and it might just feed your need as well.
SHIPPING What is the cost for shipping compared to the price? Where is the service bureau located and how much will it cost to receive your items from them?
Materials
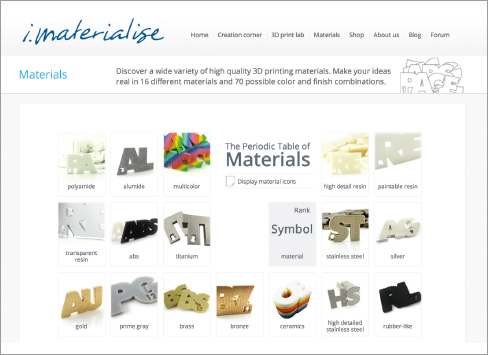
The service bureaus have a variety of materials available, and they present them in different ways. It is worth visiting the websites of these service bureaus regularly as new materials are added. i.materialise has a periodical table of materials (www.materialise.com).
The types of material that are 3D printed are expanding every day. The i.materialise screen shot on this page depicts the table of their materials that are readily available to the average consumer through 3D printing at just one service bureau. Many of the service bureaus have a tremendous amount of information on their websites concerning the properties of each material and suggestions for their use.
It is not until you begin to really research each material on the service bureau’s website, that you will see the creative possibilities. Be sure to explore deeper into the materials to find specific design guidelines for each material in which you are interested. From the Shapeways website.
METALS Aerospace, the automotive industry, medical fields, jewelers, artists, and many more are 3D printing in metal. The applications of 3D printing in metal are growing daily. There is a variety of metals listed on the service bureau websites including stainless steel, alumide, titanium, brass, bronze, and gold.
Not all of the metals listed are directly printed using the 3D printing process. Alumide 3D printing uses the SLS printing process but is really nylon plastic mixed with aluminum powder. 3D printing service bureaus offer some metals such as bronze cast, sterling silver, and gold that uses 3D printing but in a different way. These 3D printed materials use the lost wax method of casting. The process begins with a wax 3D print. This wax can retain great detail. Gating up the wax helps the metal to flow and the gases to escape. Just like the traditional lost wax method of bronze casting detailed in Chapter 8, a mold or the vestment holds all of the details of the original wax after the foundry burns out the wax. Pouring molten metal in the mold cavity, and breaking away the mold reveals the final cast metal. The finishing process will consist of grinding off supports and gates just as in the investment casting of a bronze in a foundry. There is no need for artists to worry about the entire mold-making process and cost when working with a service bureau. They include these costs in the total cost of printing 3D metal using these processes. However, it is important to note how the service bureau will print your 3D model in metal. They can make the metal using the lost wax method or by 3D printing using ExOne’s process of printing in metal. The process may influence how you design.
It is convenient to be able to order these lost wax metal 3D printed materials through online service bureaus. Or you can have the wax pieces go through the investment casting process right through the service bureau. Some service bureaus print metal using selective laser sintering (SLS) or a process referred to as direct metal laser sintering (DMLS). Others use ExOne’s process of a bonding agent to sinter the metal. Then they cure the (stainless steel) metal with heat. In both processes of 3D printing, whether using a bonding agent or sintering, removing the excess build powder is necessary for the next step to take place (see page 206).
3D PRINTING OF JEWELRY BY LISA KRIKAWA, KRIKAWA JEWELRY DESIGN
Lisa Krikawa has been using 3D technology, CAD design, and 3D printing at Krikawa Jewelry Design, since 2003. She shares much more in her interview with the author on the Art and Technology podcast found on the book’s accompanying website. Krikawa’s primary software is Rhino. She also likes the organic feel of ZBrush; however, there are no measuring tools.
Krikawa Jewelry Design owns both a T66 Solidscape and a T76 Solidscape 3D printer that prints in a workable but brittle wax that is good for burnout (www.solid-scape.com). These Solidscape printers are different types of printers. It is like an inkjet printer along with CNC milling. The printer is precise, but 3D printing can take a long time; one ring may take 8–12 hours to print. They also explored the purchase of a Viper (www.3dsystems.com). A Viper is a resin printer, which is good quality and prints many rings in a short amount of time. However, Krikawa favored the burnout of wax and preferred not to have to deal with the residue left from resin. These are all commercial level printers that begin at $40,000. If an individual wanted to use a service bureau to 3D print their ring, it would cost approximately $50–$150 depending on the design. This price is just for the wax.
Krikawa states that incorporating 3D technology in her workflow has expanded her creative process. In traditional design, you don’t always know if things are going to line up, but in 3D design the modeler can check in with the designer to see if what is on the screen is their vision. Of course, they are zooming into rings that are a foot across on the screen. It looks great on the screen, but there is always some change, even if they measure. After all, they work with a tenth of a millimeter as their smallest unit of measurement. Other hints from Krikawa:
• Measure, and if possible put the sprues for gating right into the wax.
• On designs that are more complex, they will create nubs where the foundry can add the wax sprues.
• Remember that files always have problems. It behooves the designer to know what makes a good file for printing and make that a part of your modeling.
• Make sure you allow a tenth of a millimeter for clean-up on all sides.
• Finally, don’t do everything digitally. Leave space for handwork.

Krikawa Jewelry Design print their jewelry using a Solidscape T76 3D printer that uses a “drop-on-demand (DoD) thermoplastic ink-jetting technology and high-precision milling of each layer with the company’s proprietary graphical front-end software, 3Z®Works.”
Krikawa says it is important to leave some room for handwork in your digital creations.
3D PRINTING IN METAL WITH BATHSHEBA GROSSMAN
Bathsheba Grossman began as a math major that moved into creating sculpture and 3D technology in 1997. A pioneer in the industry, she was one of the first artists to create art using ExOne’s process of 3D printing using a binder powder and sintering (www.exone.com). In the Art and Technology podcast at www.digitalsculpting.net, Grossman and the author talk in detail about 3D printing in metal.
For the same reason that Krikawa Jewelry Design creates nubs for spurring the jewelry line, Grossman prefers to incorporate the infiltration stilts into her 3D designs. Just as the foundry has to cut the metal sprues in the lost wax method of casting, so does the 3D service provider have to cut off the infiltrate stilts in the 3D print. The cutting produces a break in the surface texture, which the artist then needs to match by hand.

Hyperwine by Bathsheba Grossman.
Grossman describes the finish on a piece that has not been post-processed as, “So toothy you don’t want to even touch them…. They are super repulsive.” Shapeways and i.materialise do the postprocessing on the smaller pieces, and Grossman does her post-processing on her larger pieces of art. Post-processing consists of tumbling the pieces in a ceramic cut-down medium and then also with a stainless steel burnishing medium. Some pieces of art are also hand-buffed and hand-polished.
Grossman is in transition with her software. She has been working in Rhinoceros 3D, combined with some Pearl coding and uses T- Splines with a Rhino plug-in. Rhino has been her chosen software for 15 years, but she has a desire to transition to a mesh modeling software that is more organic, instead of NURBS modeler that models with splines. She uses Magics Materialise to condition meshes for 3D printing, although she suggests Netfabb and MeshLab for those on a budget (www.software.materialise.com/magics, www.netfabb.com, www.meshlab.sourceforge.net). Grossman has storefronts on both the i.materialise and Shapeways websites and sells her lighting and home designs through .mgx as well as on her own website (www.bathsheba.com). You will find these links along with math resources that Grossman shared in the Appendix.
Grossman has had a long relationship with .mgx that sells her lighting designs. Quin, MGX by Materialise

Her newest piece Tetrabox also contain magnets. The pulling apart and putting together of these designs is meditative.
INFILTRATES Several types of 3D printing processes use infiltrates. An infiltrate is a powder or liquid that a 3D print absorbs. Infiltrates then change the make up of the final product. In the case of 3D printing in metal, the infiltrate is bronze powder. The 3D print has infiltration stilts, similar to the sprues we have seen in other processes; however, these sprues or flutes will absorb the metal and infuse it into the 3D printed piece. The 3D print is fragile and porous when first printed in steel. A 2,000-degree oven heats the 3D print. As the bronze powder melts and turns to liquid, the 3D print absorbs the bronze as it wicks up throughout the infiltration stilts in to the 3D print.
The vendor then gradually cools the art. The gradual cooling anneals and strengthens the piece.
The bronze wicks into the metal. Photograph courtesy of ExOne.
In traditional casting processes at an art foundry, the castings are usually done with one of the two combinations of metals. Everdur Bronze contains 95 percent copper, 4 percent silicone, and 1 percent manganese. Another combination of traditional fine art foundry casting is 85-5-5-5 and consists of 85 percent copper, 5 percent zinc, 5 percent lead, and 5 percent tin. However, the pieces created with a bonding agent or sintered have entirely different metals and properties. The ExOne website does state that artists can weld or solder a 3D printed piece printed with their process.
In traditional sculpture, a foundry creates a patina by putting chemicals on the sculpture. These chemicals interact with the metal. We talk more about this in Chapter 8. As far as patina or the coloring of the metal art, it would take some trial and error for an expert in patina to see if they can match patina on digital prints.
There is a variety of surface finishes available. The metal can be sandblasted, bead-blasted or polished, plated, and have color added with patination. Check back with the service bureaus often as they seem to be adding more finishes all the time.
CERAMICS 3D printing of ceramics is also available from the service bureaus. The 3D printing of ceramics with the service bureaus uses powder fused with an organic binder. Once the part comes off the 3D printer it is like a traditional piece of greenware pottery and very fragile. The service bureau must then fire the piece in a kiln, glaze it, and fire it again. Remember, when creating art using a powder process, printing the powder offers a support structure, and this enables artists to create intricate shapes. If you are creating for this process of ceramic 3D printing, just be sure to provide places for the powder to escape.
This is not the only type of 3D printing of ceramics that is available. Artists and universities all over the world have been exploring many possibilities of 3D printing and ceramics. Many of these individuals are documenting their processes on the Internet; each building upon the success and failure of the next. 3D printing in ceramic offers artists an opportunity to explore the detail and precision of 3D printing while easily incorporating post-processing handwork.
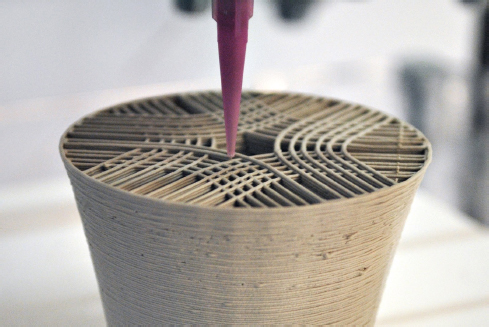
Unfold Design Studio creates intricate designs using a process similar to FDM, but with an extrusion of clay instead of filament. The exploration of 3D printing of ceramics is extremely exciting.

Various single wall ceramic prints created using the G-code Stacker software tool developed in collaboration with Tim Knapen. © Unfold, photograph by Kristof Vrancken.
As in traditional firing of ceramics, there is shrinkage when drying and firing 3D printed ceramic. With the high temperatures used in creating ceramic 3D art, warping can also be a problem. Just as in traditional pottery, glazing can fill in the detail that an artist creates. 3D printed ceramics do not necessarily have to be fired. Solheim Additive Manufacturing Laboratories and others are using all sorts of infiltrates with their 3D printing of ceramics. Infiltrates added to ceramic include waxes, glues, polyurethanes, and epoxies. These products supplement the 3D ceramic powder and give it strength.
Solheim Additive Manufacturing Laboratories (SAML)
Solheim Additive Manufacturing Laboratories, Mechanical Engineering Department at the University of Washington, is one of several universities conducting 3D printing research in ceramics (and the first to publish information on 3D printing glass). They began by taking an old Z Corp Machine that creates 3D prints with inkjet binding. The laboratory forfeited the warranty by using “dirt” (really any one of 50 art ceramic or cement mixtures) as their 3D printing powder. A 2009 Ceramics Arts Daily magazine article (“The Printed Pot”) printed a workable recipe for the ceramic powder used in SAML’s machine. As a matter of fact, if you check out their blog (http://open3dp.e.washington.edu) you will find recipes for 3D printing for such things as printing in glass, salt, bone, and even cookie dough and other materials. Making their ceramic and glass recipes public is just a sample of how Open3DP shares information. They encourage collaboration and open sharing of the experiments and technology that pertains to 3D printing in ceramics and glass, and their website holds a wealth of information.
Center for Fine Printing Research
Stephen Hoskins is working as the director of the Center for Fine Printing Research at the University of West England in Bristol. Through grants, the university is setting out to research how to use 3D printing technology to make advances in 3D printing for artists and craftsmen, and 3D printing of ceramics for industry. They are also working on an ancient Egyptian recipe of self-glazing 3D printing. They are another resource to watch concerning 3D printing of ceramics (http://uwe.ac.uk/sca/research/cfpr/research/3D/index.html).
Jonathan Keep
“As difficult as it is to pull all the technology and computerization together I suggest it is even more difficult to do something creative, fresh and meaningful with this technology.”
Although Jonathan Keep considers his homebuilt 3D clay printer primitive by 3D printing standards, he feels it offers an accessible way to a new and creative process of working in clay (Jonathan’s work and printer are featured in Chapter 1). Keep was inspired by Unfold-fab and continues with the sharing of information on 3D printing in ceramic (www.keep-art.co.uk/Self_build.html). He uses open source software, developing digital code in the Processing 2 environment (http://processing.org). He edits his models in Blender and creates G-code for printing with Repetier-Host (www.blender.org, www.repetier.com).
This work is about the beauty to be found in apparently random natural form. The algorithm used to generate these forms has a built-in randomness set within natural parameters as with the formation of icebergs (see page 5). The DIY studio based 3D printing technique offers a timeless sense of layering while the porcelain echoes the translucency of ice.

Ceramic Printing by Jonathan Keep.
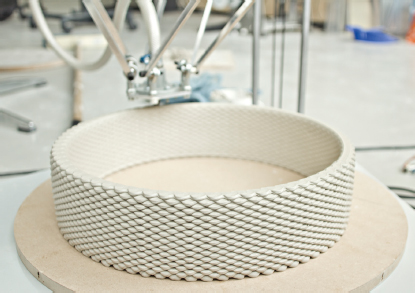
UNFOLD
In 2010 Unfold celebrated their first successfully printed ceramic vessel. Unfold-fab, a Belgian design studio, decided to be both tinkerer and artist. They took an open source 3D printer called the RepRap and modified it for clay. The RepRap uses fused deposition modeling; however, it has been modified by adding an extruder. The RepRap now extrudes porcelain clay instead of plastic filament. Unfold have documented their entire process on their blog (http://unfoldfab.blogspot.com). The prints are intricate and combine technology and craft perfectly. They display how impossible these pieces would be to make using traditional processes, but are now possible with this marriage of technology and art. Their documentation is also influencing others.
Ceramic 3D printer as seen in the l’Artisan Électronique installation (2010). ©Z33, photo by Kristof Vrancken.

Experiment with self-intersecting single line printing. ©Unfold, photo by Unfold.
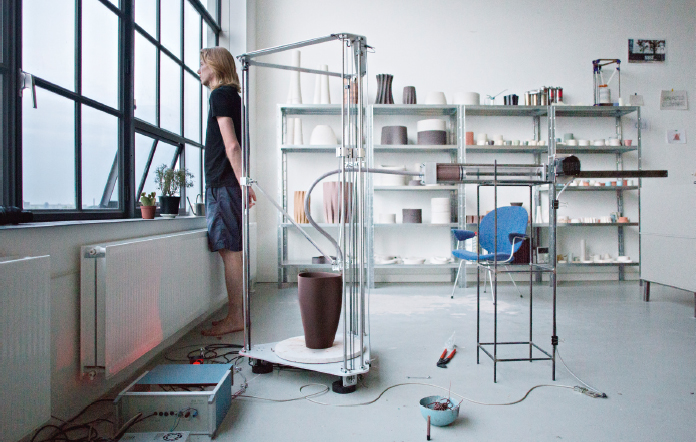
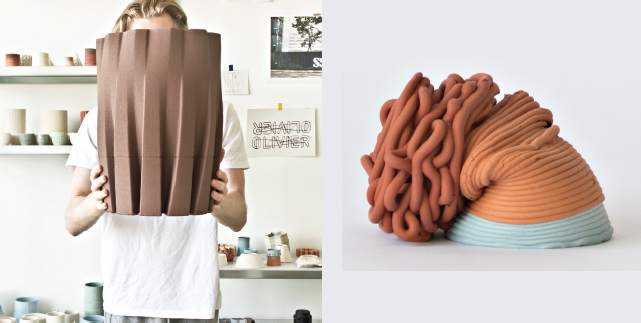
OLIVIER VAN HERPT
Olivier van Herpt wants to push the limits and also wants the limits to push back. He has created his own 3D printer and clay extruder. With this 3D printer van Herpt can 3D print clay objects that are as tall as 80 centimeters and as wide as 42 centimeters. van Herpt not only creates large pieces, but he is also interested in the failures and limitations, and what those look like.
“At the time of my first 3D printed ceramics project there were a lot of random process events occurring naturally. I had to account for these and try to limit them to improve the output. Simultaneously I did realize I was surprised by these events sometimes and there are some failed and collapsed pots that are stunning failures. This made me experiment with a deliberate introduction to random events in the 3D printing process.
We are in a world where machines surround us. In such a world when making a machine one is confronted with the search for perfection and also the coldness of a repeatable manufacturing process. You strive hard for repeatability and good results, but then miss the human element. In a 2D printing scenario the paper output of graphic design is “perfect” but when we move into 3D manufacturing, there are a lot more variables and process constraints. Also, with 3D printing each object can be unique. You don’t have to, as in mass manufacturing, have everything looking exactly the same. So, it would be a shame not to use this capability, a shame to have identical things all the time. So, I’m looking to “bake in” the randomness, uniqueness into the process in order to every time get a truly unique piece.”
Color
The 3D printing service bureaus offer other materials for 3D printing, including sandstone, and plastics. There are limited options if a 3D full color print is desired—i.materialise offers 3D printing in full color using a binder and powder process of printing. 3D printing companies geared toward commercial and manufacturing have a wider variety of material. At this time, there are only a few methods of 3D printing in color.
3D color printing of sandstone leaves a soft sugary color on the 3D print. This material is fine in certain designs but may detract from others. When printing a picture from your computer on paper with your inkjet printer, the colors can be different than those on the screen—so it is with 3D printing in color. When creating your sculpture in the computer and then translating it to a 3D print, the colors may vary. Shading does not work well with the 3D printing of sandstone, and an artist may find that using solid colors with hard edges is better. As with four-color printing on a press or your inkjet printer, the mixing of cyan, magenta, yellow, and black (CMYK) creates all of the color. Some colors that are a blend of colors, such as brown or those used in flesh tones, are harder to print in 3D. It is important to note that, when printing in color, the color in sandstone does not permeate the entire sculpture but instead is only on the surface. If you are hollowing out your object then wall thickness can affect the saturation of the color applied to the surface. It is advisable to keep wall thickness the same throughout the piece. Also note that, although the 3D printed resolution of your design may be high, the actual resolution of the color on the surface is not that high (see Eric van Straaten’s examples on page 217).
Z Corp prints color 3D prints that can be purchased through i.materialise and Shapeways. The process of 3D printing for these full color sandstone/gypsum shapes is with a binder material, but color ink is incorporated in the process. This is an economical material for color, but the Z Corp material is not the strongest. The 3D print does go through postprocessing to make it stronger.
3D printing in color using paper by Mcor Technologies.
Another form of full color printing that is less expensive than traditional printing is Mcor’s 3D color printing in paper. (Some people in the industry hesitate to call this 3D printing.) It offers creative possibilities and it will be interesting to see what artists do with this process. In 3D printing in paper, the thickness of the paper determines the thickness of the layers. Glue adheres the paper, attaching each layer to the next. A 3D laser cuts each layer in the shape of the 3D object before applying another layer of paper. What is incredibly spectacular about this process is that the object can be created using full vibrant color. Once again, the artist must keep the printing process in mind when they create using this process. The paper, once cut, must be removed. This makes creating designs with objects inside of objects difficult if not impossible, unless the artwork is first sliced. This technology is available through Mcor machines that print in more than one million colors.
Another 3D printing of color that is new to the market as of the writing of this book is Stratasys’ new Objet500 3D printer. This printer not only prints in full CMYK, opaque and transparent, but also in a variety of materials—some rigid and others flexible like rubber. The creative possibilities continue to grow with the technology.
Interior Journey by Assa Ashuach. Image by Assa Ashuach Studio. Ashuach used mixed techniques (NURBS and poly modeling) as platforms for scripting and coding. Color multi-material printing. Printed on an Objet500 Connex3. Photograph courtesy of Stratasys.
Gnilicer by Nick Ervinck. Created with 3ds Max. Photograph courtesy of Stratasys. Color multimaterial 3D printing. Printed on an Objet500 Connex3.
3D PRINTING IN COLOR BY ERIC VAN STRAATEN
Eric van Straaten 3D prints his piece as fine art. His process consists of using DAZ 3D as template designs, ZBrush to deform the templates, and Magics Materialise to prepare his files. If he needs to change the file format he uses AcuTrans 3D Object Conversion (www.micromouse.ca). He takes the objects into Photoshop to adjust the saturation—it takes some trial and error to get the correct color. He prints his 3D printed art pieces at i.materialise in color on a Z Corp machine (3D Systems purchased Z Corp in 2012). He describes the product as a gypsum product that when printed resembles sugar or marzipan. This is a material that lends itself to the subject of children that is key in van Straaten’s work. The strength of the material is comparable to ceramics/baked clay, but a bit flexible because of the glue.
PiezaH by Eric van Straaten, 2014, 100 × 37 × 25 cm.
When asking van Straaten for tips on 3D printing in color he states that skin tones are hard to get and black is a problem because it comes out grey. He suggests that when you are using red, use less, and notes that the 3D process of printing is not consistent in the color. The process is all about experimentation. Generally, he says to keep the colors lighter than you think. In the process, the binder changes the color. An artist cannot do much post-processing on the pieces because when you sand the art you may hit the glue and it changes the color. It creates white spots. If you try to paint it, the paint stays on the translucent portion.

He has pushed the build envelope by creating a large print measuring 3 feet 7 inches. He designed it in individual parts and took advantage of the seams of the clothing such as a sock to hide the seams in the leg. The sculpture consists of ten different hollow pieces that he strengthened inside with a two-part component resin and a rod.

Wasp by Eric van Straaten, 2013, 55 × 20 × 20 cm
van Straaten has also set himself up as a middle man between artists and vendors to help them to achieve what they want without having to concern themselves with fixing files for 3D printing. This is a new area of service. He realizes that some artists just want to create but don’t want to have to worry about fixing files. To hear more about Eric van Straaten’s process concerning 3D printing in color, listen to the Art and Technology podcasts.
Permanence?
Let’s talk about permanence with art. First let’s look at some traditional art examples that are less than permanent.
The intent of some artists when creating their artwork is not permanence. Andrew Goldsworthy balances ice upon ice upon ice, or he strings maple leaves together that float in a stream. The photograph that he takes of the art documents the moment. Descriptions of the art are included with the image. For example, for the artwork Ice Arch Goldsworthy comments, “Left to freeze overnight before supporting pile of stone removed. (Made in a field of cows—tense wait.) Pissed on stone too frozen to come out.”
Some artwork is a combination of art and performance. Brazilian artist Néle Azevedo created 5,000 figurative miniature ice sculptures for people to place on the steps of Birmingham’s Chamberlain Square in August 2014. She created this collaborative art in remembrance of the soldiers and the lives affected by WWI. The action of “melting” infused even more meaning and thought to the art. These are examples of fine art that is temporary or “in the moment.”
Many artists are not looking for transience in their work. In fact, having unstable mediums such as the colors that have faded in van Gogh’s paintings, is far from desirable. With the deterioration, the paintings no longer depict the true intent of the artists. Manufacturers of paint categorize pigments with their permanence or light fastness. Many artists, collectors, and galleries want to be sure that their investment of time and money will appreciate and not disintegrate.
For those of us using digital technology in fine art and realizing our artwork in a physical form, we must ask, “If I 3D print a piece of fine art, how permanent is the material?” Collectors collect bronzes because they know that it is a proven material. The metallurgy of bronze has changed very little over hundreds of years. But how permanent will a mixture of materials be? How permanent will a powder and binder be over time?
Other Types of Printing
Sweet Idea
The material and printer list grows. If you have a sweet tooth or are into confections, then it might be good to know that people have been printing in sugar for a while. Some hackers have used the MakerBot to print sugar in 3D, but 3D Systems offers ChefJet™, a home printer on the expensive side, advertised at around $10,000, which prints in edible materials. But, as with all aspects of the technology, by the time this book is in print, many other sweet 3D printers will follow, and hackers will push the limits to bring more affordable technology to the average consumer.

3D printed cake stand and cake topper. ChefJet by 3D Systems.
Biology
It appears that it is all about what you can push through a printer. We have seen this as experimenters have pushed such things as sugar, wood pulp, and even dirt through a 3D printer. As science asks the question, “What can be shoved through a 3D printer?”, we enter bioprinting and regenerative medicine. Scientists are printing bone, skin, and will eventually move to printing organs. In the future, if you need a kidney, instead of getting a donor kidney from someone and taking anti-rejection drugs the rest of your life, you will simply be wheeled into surgery and a 3D printer will print you a new kidney with your own biomass.

In Chapter 1, we mentioned the combination of hackerspace and science to create a vascular system for living tissue using a RepRap printer. Artists are not the only ones pushing the limits of technology. Photograph from the University of Pennsylvania, printed with permission of Jordan Miller.
Art and Biomass?
Oron Catts with the Tissue Culture and Art Project (TC&A) uses “living tissue to create/grow semi-living object/sculptures and to research the technologies involved in such a task.” There are several projects at TC&A that are using 3D printing. Oron’s art titled Victimless Leather, which is skin that is kept alive in a biosphere, feels almost Frankenstein-like. After the exhibition is over, the coat of skin is “killed” by opening the biosphere. Victimless Leather does not incorporate 3D printing but does bring attention to how we are removed from what is happening in the lab. As the TC&A website states, TC&A examines, “the gap between the fast pace of development in science and technology and the slower pace of cultural understanding and adaptation.” They are indeed pushing the limits of acceptance both socially and culturally. They hope that the term “semi living object/products and sculptures” will make the art more palatable. “Our art challenges many people to examine their perception of the boundary between the living and the inanimate.” With bioprinting comes responsibility. Just because we will one day be able to replace our kidneys, does that mean we have the right to abuse our bodies? Through his art, Catts hopes to bring attention to what is happening in the laboratories. He takes the distance and the impersonal aspect of this science and makes it gut-turningly personal. More about this topic is found on the Art and Technology podcasts.

Victimless Leather, a prototype of a stitch-less jacket grown in a techno-scientific “body.” The Tissue Culture and Art Project (Oron Catts and Ionat Zurr). Medium: biodegradable polymer connective and bone cells. Dimension of original: variable, 2004.
The type of materials being 3D printed grows daily. Scientists print bone, skin, and one day will print human organs from a patient’s own biomass. New filaments for 3D printing are being created out of wood, tie-dyed nylon, seaweed, glass, rubber, and many more. Some of these are filaments that an individual can experiment with in their own home printer, other materials are available through local and regional 3D printing companies and service bureaus. The question “what can I shove through a 3D printer?” continues to intrigue the scientists and hobbyist alike. Now that we have looked at what can be printed, let’s look closer at how to print.

Pig Wings. The Tissue Culture and Art Project. Medium: pig mesenchymal cells (bone marrow stem cells) and biodegradable/bioabsorbable polymers (PGA, P4HB), 4 × 2 × 0.5 cm each, 2000–2001. While critically engaging in the hype surrounding the human genome project, Pig Wings became a political science project. TC&A creates art that tends to poke, provoke, and disturb. They bring to light in an artistic way the issues surrounding tissue engineering and what is happening in the lab. Pig Wings is grown on a 3D printed scaffolding.
Getting Your Model Ready for Print
An artist does not create a 3D printed object at the push of a button. There is much more to it, and there is a learning curve in preparing files and using the service bureaus. Leave plenty of room for deadlines when working with these companies. Feeling overwhelmed when considering 3D printing is natural, but this book will help. Many of the service bureaus also have online tutorials to assist in this process, and be sure to check this book’s online support documentation and resources. Once you get past these hurdles, then the creative opportunities are vast. Creating something in a virtual world is pretty amazing. Holding your 3D printed artwork in the palm of your hand, artwork that, at one point, was just an image in the computer, is a type of “birthing.” How do you get it into the physical world? How do you create it so that it is sturdy? We could feature many more processes and incredible artists who are pushing their limits, but in the remaining portion of this chapter, let’s focus on the “how to” of 3D printing.
Steps for 3D Printing—Design
A sculpture or design that comfortably exists in a virtual world, with no gravity or pressure, may not be easily reproduced for the real world. That is why the first consideration of 3D printing must begin with the design. It is important to look at the design of the piece while understanding both the qualities and downfalls of the 3D printed material and the 3D printing process in which you desire to print your art. You must be sure that the design prints well.
A Poor Design
The 3D model of this dodo is a poor design for many 3D printing materials. Its thin legs hold up a large body mass. If the dodo were 3D printed in metal, then the sculpture might stand up on its own. However, some 3D printing processes that print in metal first create a fragile piece before the post-processing strengthens it. Therefore, it might still make it difficult to print. When printing in sandstone, ceramic, or some plastics—that are much weaker materials—breakage will occur or it may not print at all. A good suggestion is to change the design to incorporate thicker legs. If your design does not have a solid mass and has weak sections to it, then having three points of contact will help distribute the weight. A suggestion would be to add a base to the dodo, and maybe a rock or some foliage that touches or presses against the bird will help. Large masses attached to small pieces create pressure on certain areas of a 3D print. Modifying the design by thickening weight-bearing areas to accommodate that stress or provide support may help. Even so, some 3D printing materials are not suited for some designs. We will say it again; in many 3D sculpting programs, you can create a tremendous amount of detail. It takes a trained eye to know how much ofthat detail will print in the 3D printing process you choose, and in the material and the size in which you wish to print. Also, a designer will need to modify some designs. For example, in the design of Bridgette Mongeon’s monumental tiger, what works as a 15-foot tiger may not work as a 7-inch or smaller 3D print. Depending on the medium, teeth and claws might disappear. It takes experience to realize how much detail is necessary and what will translate into a 3D print at what size.

Stability
If you feel you want to push the limitations, this can cause creative headaches. Fragile pieces in manufacturing mean fragility in shipping. This is where having a good relationship with your service bureau is important. In traditional manufacturing, the artist/designer works closely with the manufacturer reviewing the proposed design. The design must fit the process of manufacturing. The manufacturer, with their years of wisdom, can offer suggestions for changes. These simple changes may not affect the overall design. That is where working with a local company is helpful. The large service bureaus will answer your questions —in time. Solutions will come through many emails or online forums. A small local or regional vendor can offer face-to-face or over the phone service in a timelier manner. Working with the different 3D printing processes, the materials and the vendors will bring experience and a bit of expertise that an artist may not have in the beginning. Over time, an artist develops confidence and becomes familiar with the 3D printing process and the materials. Until then, it is advisable to contact the vendor and forums for their suggestions on such things as design modification and maximum and minimum wall thickness that will best accommodate your design and the material.
We mentioned stability as it pertains to being able to hold up or withstand the mass of other parts, like the dodo. Stability of a design with the intended material is important; however, for those interested in pushing the limits, you might want to check out Make it Stand (http://igl.ethz.ch/projects/make-it-stand). The Interactive Geometry Lab is a research group within the Institute of Visual Computing of ETH Zurich. They continue to work on code that helps dictate how to make 3D prints stand in challenging poses. For example, is it possible to make a 3D horse stand on one leg?
When trying to figure out all the ins and outs of 3D printing materials and the processes of 3D printing it can, at first, feel overwhelming. The service bureaus have gone to great lengths to offer online tutorials to educate the consumer. For example, if you go to the Shapeways’ website, click on “Design,” and then on “Materials,” you will see some of their materials. The properties of the material are important to any designer. Strength, detail, smoothness, flexibility, glossiness, and transparency are all depicted on the site, in an easy-to-understand visual chart.
On this same website, when you decide on the material, be sure to look at the “Design Guide” for each material. The Design Guide gives designers some clear hard facts about the product and the capabilities. Be sure to scroll down on this page, as the “Design Tips” found under “Design Guide” will help you to perceive what problems you may come up with and how to avoid them. Don’t feel like you are sacrificing design to manufacture to the specifications of materials and process. All areas of manufacturing need design modifications from time to time, not just 3D printing. Modifying designs for the least amount of material usage and little or no breakage during shipping is part of good business.
You will also want to note which 3D printing process that the 3D printing company uses for each of the materials in which you want to print. For example, the bronze casting process shown on the Shapeways website is not done with the powder and binder and infiltrate as Bathsheba’s work is printed, it is instead printed in wax and then goes through a traditional casting process. The process of printing will play a big role in how you create your art as well as what limits you can push.
Thin Walls
As with fragile connections on a design, support pieces, and sections that protrude, another area to watch is thin walls. If you are printing in ABS and PLA plastic material, some parts may print fine, but some thin areas of plastic may warp during shipping. This means both the shipping to you from your service bureau and from you to your client.
Thickness and Hollowing Out
When you create your work using a 3D sculpting program, there is no thickness. You are working with the surface area of the geometry. As you consider which material to print, you must also give your 3D model thickness. You can, of course, make your artwork solid, but the more material used in a sculpture, the more money you will pay for printing. It may feel a little daunting, at first, to balance the minimum thickness of a sculpture against the necessary requirements for strength and durability while also considering the material properties and warping. The savings in material when hollowing out a sculpture can be substantial—sometimes you can save up to 80 percent of the cost. Once you have chosen a service bureau, note their minimum thickness requirement for the material for which you wish to print.
Besides accommodating and making a hollow object, there are cases where escape holes will be needed. Once again, depending on the 3D printing process, excess material will need to escape. These holes will give the material a place to exit the design. Selective laser sintering, stereolithography, and powder fused with a binder will need holes for the liquid or powder to escape in postprocessing. It is often best to have more than one hole in case one hole gets clogged during post-processing. A minimum of 4 mm diameters is good for one hole. Another option is to create a plug in an area where the material can escape; you can then attach the plug after post-processing.
The tiger, upon a rock, has a lot of weight. Printed with selective laser sintering the material in the belly will need to escape. The only place this can happen, without a plug, is through the legs or possibly the ears. Now the question is, at 7 inches, can holes fit in the center of the legs and will these allow material to escape in post-processing? Will this make the legs considerably weaker when someone lifts the entire sculpture while holding only the tiger? It is also interesting to note, if the sculpture is to go smaller, how much smaller can the design be to accommodate the minimum amount of hole thickness needed for the material to escape from the stomach? Also, if the artist wishes to create the tiger in other processes, how do escape holes differ in size between materials and processes? The artist may also find that, as she reduces the tiger’s size, she will need to make it a solid object.
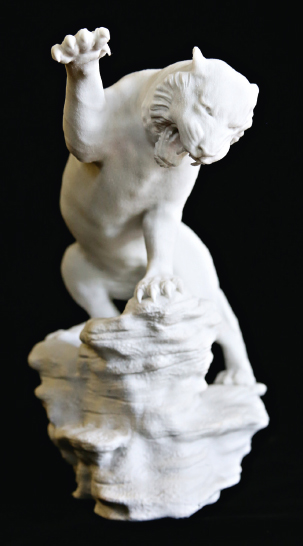
3D print of Bridgette Mongeon’s tiger printed by 3D Rapid Prototyping, http://3drp.com. Photograph by Christina Sizemore.
All of these considerations and hollowing out are done as an artist prepares the file for print. An artist can do many of these processes themselves with free software such as MeshLab, Netfabb, and MeshMixer. If you do not want to do this step, contact a 3D printing product design liaison to prepare your files for printing. Bridgette Mongeon contacted Dotsan (www.dotsan.com). Dotsan recorded the many steps of preparing Mongeon’s tiger file. Communication is the key with any company. Files are easy to transport; it does not matter if your service bureau liaison is in another state or another country, although you should always take precautions to protect your intellectual copyrights. Visit the book’s accompanying website for full tutorials on these processes and a list of design liaisons.
File Size
The more detail that you have, the larger the file. You should check with your service provider to see the maximum file size they allow. For example, Sculpteo has a maximum size of 50 MB, Shapeways 64 MB or 1,000,000 polygons, and i.materialise 100 MB. Remember the larger the file, the longer it will take to upload.
How do you change the file size, if your file is too big, without sacrificing the detail or quality of the design? You will need to decimate the file. Decimation reduces the polygons without sacrificing detail.
Many of the graphics programs offer a decimation tool, but if you don’t have one, MeshLab will decimate the file for you. However, be careful. If you decimate the file and then try to decimate it again, MeshLab may crash. So, save your incremental files.
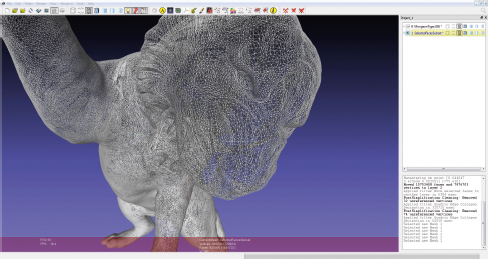
The original tiger created in ZBrush is 560 MB and 16,500 faces. The file was first decimated and sized using MeshLab. Then Mongeon’s tiger is imported by Dotsan into Netfabb Cloud. Netfabb reviews several of the possible errors, such as reversed or missing normals, and fixes them providing a watertight shell.
Hollowing Out the Sculpture
It would be nice if there were a free 3D printing program, for which you could upload your sculpture file, press a button, and watch the magic of hollowing out a sculpture. It would be a bonus if the program were sensitive enough to tell you where the problems of the design might occur. As of the printing of this book, the technology does not offer one single, free, computer program that does these things at the push of a button. Some computer graphics or sculpting programs can help you to hollow out your model. As with many other areas of this book and this technology, what is available changes often. For complete tutorials on hollowing out models using other software programs for 3D printing please visit the book’s accompanying website.
At this time, the service bureaus do not provide hollowing out of the model. Dealing with a local supplier or regional 3D printing company may offer you more service in this area. Of course, their time is money. They may charge you a fee for hollowing out your design. If you are 3D printing more than one copy of the design, then it will be worth it for you to have a hollow model for further prints. Even if it is just one print, the cost of paying a technician to hollow out a design as compared to the extra cost in the material is worth exploring. If you do it yourself and end up having to print a few to “master” the process, then you would be better off having paid someone else. Service bureaus may not offer all the personal interaction needed to relieve the stress of preparing files. It would be nice if they could remedy the fears of those artists who just want to create and don’t want to learn software to prepare their files. Vendors do need to step up to the plate. Software companies need to find a solution to making this process of preparing files easier. 3D printing liaisons who fix files and offer suggestions to artists for modifications may soon be a booming intermediary business. Of course, the person running such a business would need to be dependable, and also be willing to respect the intellectual property rights of their clientele.
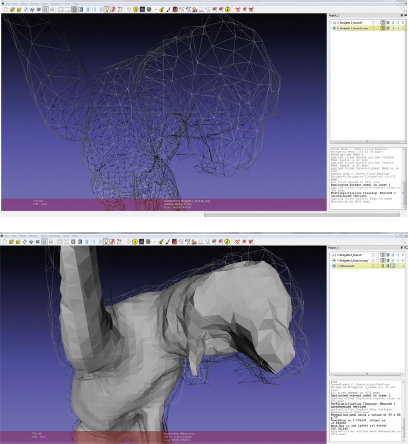
Back into MeshLab, Dotsan creates a duplicate layer and once again decimates that layer. This second layer is an offset to create an internal wall. Photographs by Vijay Paul from Dotsan.
The cost for printing Mongeon’s 7-inch high tiger as a solid sculpture at a smaller local company was $468 solid and $370 hollow. Machine time, set up, and material is what determines the cost of the print. The less material you use, the less you will pay for your 3D print. Uploading the same file to Shapeways, the cost states it is $89.44, which is considerably less. There are advantages to going with the larger service bureaus. A professional has prepared the tiger files, but there is no telling if it will take multiple prints from the larger service bureaus to get the print correct. They may get it correct on the first try. Other than pressing a button to send your file, there is little interaction with a larger service bureau as compared to the smaller local companies. It may take several prints and many weeks at a large service bureau. An artist must consider all of these things when considering the appropriate vendor for their work.
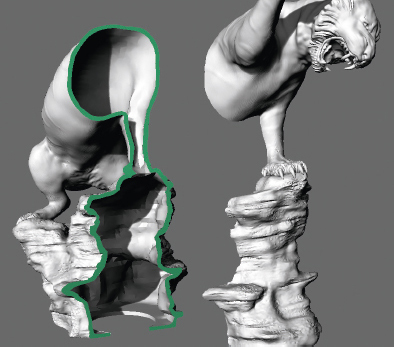
The leg is now hollow. The hollow legs give a place for material to escape from the torso of the tiger. Photograph by Vijay Paul from Dotsan.
File Format
To print something in 3D, you will need to have a file with the proper supported file format. As we have seen in our previous chapters, you can make a 3D file in many ways. Your design software may have its own proprietary format for saving files. The program may also give you the option to export the file in different formats. A standard file format for creating 3D printed pieces is STL (stereolithography). However, many of the 3D printing service bureaus will accept other files, as well. It is best to contact your 3D printing service to see what file you need. Here again, the file type may depend on the 3D printing machine. If you are using FDM, SLS, or SLA, the file type may be different. The material can play a role in the file that you will need, as well. If you are printing in full color, then an STL file is not a file format you want because this file does not save the color information. You will have to use a VRML, PLY, 3DS, or ZPR. You may also be able to send the service bureau a couple of files together. For example, send an OBJ file that will give the machine the shape of the 3D model. Along with that file, include a materials (mtl) and a texture file, to indicate color. Some companies may charge extra for applying the material and texture to your file. Communication with your 3D printing company will help to understand these factors. Printing in color is another beast to tame. There are many tutorials on the service bureau websites to walk you through the process and additional support material and videos on this book’s accompanying website. If you need to convert your working file to an acceptable file format and your software program does not allow you to export it in another way, MeshLab will convert files.
Physical Size
The build envelope or the maximum physical size that the 3D printer can print is different for each machine and process. For example, Sculpteo reports their maximum build envelopes are: for white plastic, 26.7 × 14.5 × 22 inches; for alumide, 12.2 × 12.2 × 23.6 inches; and for sterling silver, 2.3 × 3.15 × 3.15 inches.
Of course, the larger the build envelope, the larger the file size. If it is a very detailed model or sculpture, the artist will have to weigh this against the maximum poly count allowed by the vendor.
There may be problems with the geometry in your model or, as mentioned before, parts of the design may be too thin or protrude. Some of the service bureaus will fix your files for you. For example, Mesh Medic provided by Netfabb analyzes your files and, according to the Netfabb website, it fixes 95 percent of the files that come through Shapeways. There is also a free version of Netfabb. Sculpteo and i.materialise both state that their websites will fix some files. However, they don’t fix all files. Adobe Photoshop CC offers a 3D printing add-on to their Photoshop program. Photoshop designed this program to take the guessing out of preparing files for print. It is not a free program, and monthly membership is $49.99. You can also purchase a single app for $19.99.
If you own a 3D printer, a software program may have come with the purchase, making file preparation easier. The accompanying 3D printer software is something worth looking into when purchasing a 3D printer. Keep a watch on the technology. It won’t be long before a software company offers free or affordable software for consumers that integrates well with the service bureaus and printers.
Even though you might be able to fix some of your problems through the service bureau websites it is good to know some of the potential problems found in files, so that you can avoid them. If a service bureau puts your file through a check, it may send you an error message. You will have to fix that error and resubmit. It may then send you a different error message. It is a process. If you do not want to fix files, you can hire an intermediary company to do this as Mongeon did with the tiger.
Watch for These Errors
Watertight and Non-manifold Edges
A watertight file is one that has no holes (see Chapter 1). A 3D model might look solid as you are working on it in the computer, but non-manifold edges or places where the geometry does not come together can play havoc when 3D printing. Non-manifold errors indicate that the model may have additional faces or edges that may go undetected. There may also be overlapping vertices.
Extruded Planes
Everything in your design must have a thickness. For example, a flat plane will not print until it has a thickness. Extrude the plane to at least the minimum amount of thickness needed for your material.
Remove Unnecessary Geometry
Another obstacle in the printing is unnecessary geometry that may go unnoticed while it is in your computer, but makes the 3D print impossible or difficult to print, and of course, more geometry means more cost.
No Reversed Normals
A normal is a vector perpendicular to the surface of a polygon. A reversed normal in 3D printing means that the normal points inside the model.
More Exploration
Postproduction or Post-processing
Postproduction/processing is the work done on the sculpture after the 3D printing has taken place. These steps are as vast as the materials and 3D printing processes. Those 3D prints using selective laser sintering will have to have the powder removed from the piece. Post-processing may also consist of firing or curing the 3D print. To be able to handle and prevent breakage, some materials require a postproduction process of the 3D print. Many of the postproduction processes happen before the artist even receives the 3D printed piece from the service bureau. However, many artists are experimenting with their own post-processing. The book’s accompanying website has tutorials on post-processing and the experiments of other artists.
Articulation of a Model
It is possible to create articulation or movement of the 3D printed model. For example, you can create joints that will print together. The joints will never need assembly, and they will move after printing. Articulation is a bit tricky. When creating articulated 3D designs, be sure to leave a 0.5 mm gap. For further hints on creating articulated 3D prints, visit the book’s accompanying website.
_________________
Before we finish out this book, there are just a few more things to discuss. We have learned so much, and seen examples of how 3D technology is changing the way some people create and offering them many more opportunities and ways to create than they ever had before. Now let’s look at one more change. The bronze casting process has changed very little over hundreds of years, until now. In Chapter 8, we will see how some of these processes are affecting the way some artists make fine art—processes that may just introduce us to the foundry of the future.
JOSHUA HARKER
Many of the pioneers or those working in the 3D industry are doing so because they had access to 3D printing machines as they worked in universities or in industry. Joshua Harker was one of those. Harker entered 3D technology by first creating action figures. The 3D printing machines created the prototypes. Harker felt stifled by the traditional methods of creating, feeling that no process could express what he was after—until he found 3D printing. Voxeljet 3D printed his intricate designs with a material that would burn out with no ash content. As is the case with many in the field of 3D printing, Harker had to wait for the technology, costs, and resolution to come to a point where he could use the technology in his studio.
Harker finds a satisfaction in 3D technology. It allows him to finally create designs that he has wanted to create, but was unable to until this technology evolved.
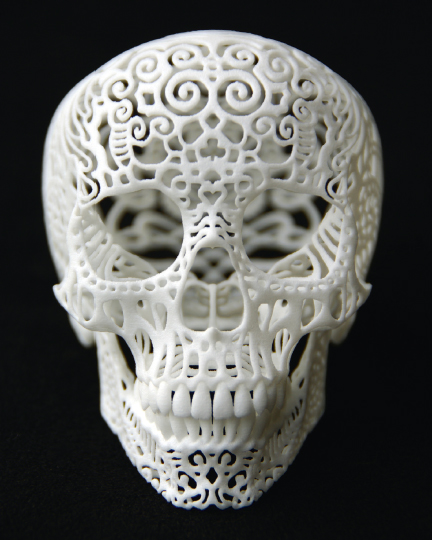
Joshua Harker facilitated a very successful kickstarter campaign back in 2011 to create his Crania Anatomica Filigre.
The author interviewed Harker for an Art and Technology podcast. There she inquired about his secrets of 3D printing pieces that articulate. Harker states:
“As much as anything, it is experience, working in product development and toys, working on the mechanics of things…. gears, clothes…. When you are designing it, mechanical engineering and physics apply, and as you scale things up, things change as well. Intuition is a bit of it…. form follows function. Mechanical things have to happen; you work back and forth between the aesthetics and the functionality.”
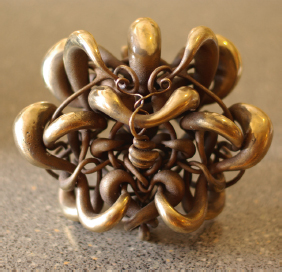
Permutation Prime by Joshua Harker.
Harker uses Blender, ZBrush, and Solid Works, but in the beginning he used many more types of software just to be able to get his work to the printers, which he described as tedious and frustrating. His vendor list consists of Paradigm development group (www.pardev.com), Voxeljet (www.voxeljet.de/en), and eos (www.eos.info/en). He also uses Shapeways, Sculpteo, and Ponoko.

Harker likes articulation, as is apparent in his sculpture Anatomica di Revolutis.
CHRISTIAN LAVIGNE
A pioneer in 3D, Lavigne has been working in 3D technology since 1981. His work experimented with both virtual and physical art as well as a variety of tools including water jet cutting, machining, electronic installations, laser cutting, laser engraving, and more. He is also the cofounder of ARS Mathématica (www.arsmathematica.org).
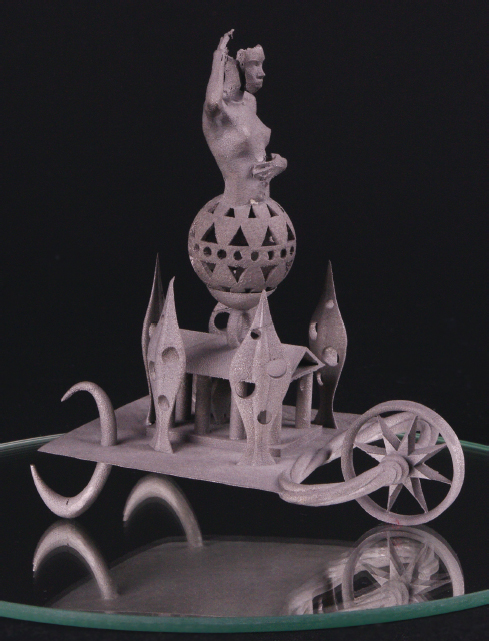
L’Age Du Fer by Christian Lavigne, France 1999–2010. Created with a Minolta 3D scanner, CAD and SLS metal by GM PROD.
EYAL GEVER
Eyal Gever has spent 18 years developing 3D technologies. His art is about freezing time and creating an emotional situation. Gever has an extensive knowledge of art and technology that he uses to develop computer simulations of extreme events. He 3D prints some pinnacle moments from his simulations and transforms them into cutting-edge physical sculptures.
Gever works with math, physics, animation, code, and modeling to create simulated physics as art.
“We will see a lot more artists who will be breaking down the boundaries of art and looking outside of traditional art to incorporate other aspects into their work. Less about the static work and more time-based, live experiences. The genres will be getting blurred and new vocabulary within the art world of how we define different media will be developed.”

Waterfall Gallery Room. Render/printed on Object 200 vera by Eyal Gever. ©2011/14, www.eyalgever.com.
LIA
Lia has gone on a deep exploration of FDM 3D printing and its filament. She did not want to just print things to print them she wanted to know “what can be achieved with the actual properties of filament and the movements of the print head.” She discovered that, “surfaces can be continuous or chaotic; lines can be rigid or organic, and filament can be closely controlled or let free to find its own form.”
The speed and movement of the extrusion, as well as the location of the print head, are all a part of her process. She achieves this by writing her own code and documents the entire process on her blog where she features the fluid pieces of filament that seem to dance (www.liaworks.com).
“I actually quite like the fact, that small errors become bigger and bigger with each layer.”

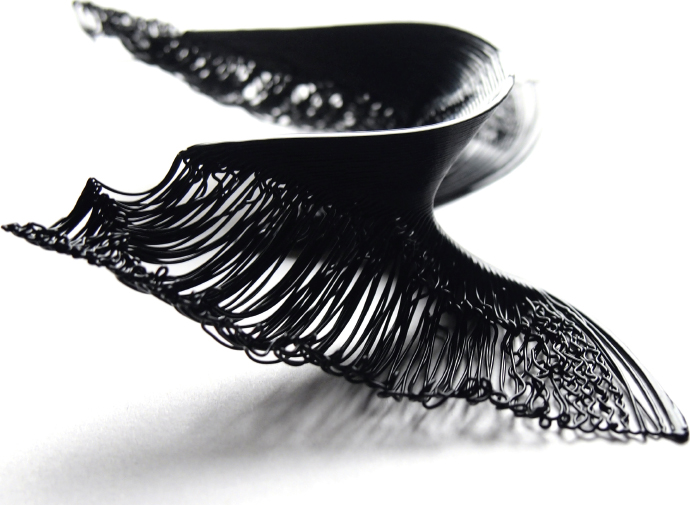
JORIS LAARMAN LAB
The project team at Joris Laarman Lab developed the MX3D-metal 3D printer. The MX3D is part robot and part welding machine. It allows the design team, with the help of Acotech, HAL robotic programming and control, to 3D print metal without the need for support structures. They can print with metals, such as steel, stainless steel, aluminum, bronze, or copper. By adding small amounts of molten metal at a time, they print lines of metal in mid air. The sculpture Dragon Bench was one of the first objects created with the MX3. Once again, the software company Autodesk steps in with support for the project. Working with Joris Laarman Lab is allowing Autodesk to explore the limits of its digital design tools. They are working together to create the new tools necessary to achieve Laarman’s creative vision.
“Autodesk is particularly interested in collaborating with artists because they are focused on realizing their creative visions, as opposed to a more traditional engineering approach, which is to solve problems within a given context with the tools available.
These new digital manufacturing techniques are having a profound effect on creativity, for two reasons: First, they disassociate handcraft from the creative vision. A designer or artist no longer needs the skills to make what they imagine, because that intelligence and skill is built into the automated system. Second, the artist/designer is able to instantiate ideas that previously simply could not be manufactured. With additive and robotic processes we can achieve forms that are otherwise impossible to fabricate.”
Maurice Conti
director of strategic innovation,
Autodesk

NERVOUS SYSTEM STUDIO
Nervous System Studio create their designs using computer simulations. They write computer programs that mimic nature and patterns in nature to create their incredible art, jewelry, and housewares.
The website of Nervous System offers a variety of ways for visitors to be a part of the design process. They offer their work as interactive web applications (programs that take visitors’ input and react to them visually). Visitors can design their own jewelry and art objects using the Kinematics, Cell Cycle, Radiolaria and Dendrite software at http://n-e-r-v-o-u-s.com/tools.

Kinematics Concept Dress—Variations by Jessica Rosenkrantz and Jesse Louis-Rosenberg, Nervous System.
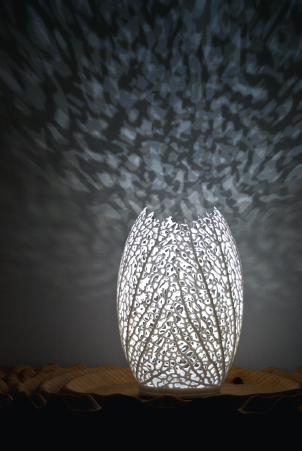
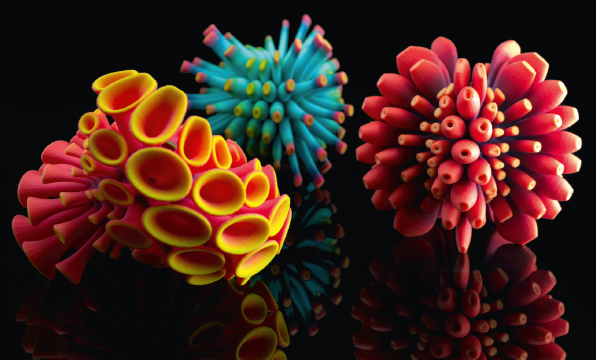
Colony 3D prints. Meshes generated by processing. 3D-printed by Shapeways by Jessica Rosenkrantz and Jesse Louis-Rosenberg, Nervous System.
On the book’s website at www.digitalsculpting.net you will find:
* Links to further descriptions on the process of creating the artwork featured in the galleries.
* Podcasts with the artists.
* Videos featuring the artists at work.