CHAPTER ONE
PRIMER
___________
“It is like a composer sitting down with notes and chords to get a feel for where the music is going.”
Bruce Beasley discusses the freedom of creating fine art in a computer without any physical constraints
When a traditional artist enters into the world of 3D technology and they begin to listen in on a dialogue between seasoned 3D technicians and/or computer graphics (CG) artists, the conversation might begin to sound more like the wah-wah-wah of Charlie Brown’s teacher in the Peanuts cartoon. Those entering the world of technology and hearing such discussions can quickly become overwhelmed and feel that they need a translator or a crash course in computer graphics before they can continue. Relax and take a deep breath, this journey will be as painless as possible. We structured this book to give the reader inspiration in the world of 3D art and we break down the processes, steps, and technology. The resource section and the book’s accompanying website hold even more information, including links to videos that will help to get you up to speed. Take your time. Use this section of the book to become familiar with 3D technology. Refer back to this section when necessary. Meanwhile, enjoy the artists featured throughout the book. They all share their process, tools, and vendors, which takes the guesswork out of your creative exploration. You might even try some of the free options for software and other tools to get your feet wet. Once you proceed past the unknown and familiarize yourself with the tools, along with dabbling a little in the processes, you will find a world full of possibilities.
There are certain terms that relate to 3D technology that will be helpful for you to know as you travel on your journey of incorporating 3D technology into your traditional art and craft processes. If you are already working in computer graphics, then this chapter will be very elementary, and you can probably think of a dozen or two more things to add to it. However, this chapter is a very basic primer to assist those who are working with a traditional artistic background. It is here to help you begin to understand this new virtual world. To those traditional artists, this chapter may seem daunting. Don’t let it scare you away from the wonderful possibilities available to you. You don’t have to know everything here to get started. This book and your vendors, the service bureaus, and support team can assist you in creating some marvelous projects while becoming more familiar with the technology. As the technology grows and becomes more accessible to the general consumer, the learning curve will decline. The technology will even become easier. Vendors are providing a great deal of assistance. With many vendors, their technical support team takes care of the back end of the business of incorporating the art and technology. The vendors realize the importance of educating the public in this new technology, and many take the time to do so. Also, as you will see in other chapters, new businesses are positioning themselves as middlemen between artist and vendor. They understand that not everyone thinks in the same way. Some artists may not want to immerse themselves into the technology; they just want the technology to work for them. They can visualize the final product but don’t know how to get there, especially when they only have the experience to create in the traditional fine art sculpting world. Dependable individuals and companies that offer their service as a go-between for the artist and service bureaus, help to take the mystery and confusion out of the technology. However, if you plan on using the computer to create digitally, you will need to become more familiar with the digital world. You will also want to translate your ideas succinctly, and the most exciting part about this new technology, that you will see demonstrated over and over again in this book, is that if you know how it works, you can manipulate it, change it, and push it to do things that have never been done before. To do this, you will need to communicate in the language from this other world. This means learning the dialogue. Consider the digital processes as just another tool that you are trying to master. Now, let’s familiarize ourselves with some things that at first may seem confusing, but eventually will become clearer on your own creative journey of using 3D technology.
Open Source
Open source is a concept for development of software, hardware, and other items. It is a great concept and for many it means “free” software. When the public considers software open source it means that not only is the software free, but the code that runs the software is also made available. By making both the code and the software free, the software or product will evolve and improve through shared development. People from all over the world will be contributing to improving the product.
A user of open source software may think that because there is not one owner, there is no support. However, open source often brings a strong community of followers. The followers have a commitment; they feel invested as if they own a part of the product. The community wants it to grow and get better, to be the best that it can be. Usually documentation, forums, videos, and other tools for users are readily available. For example, the software Blender became open source in 2002. Artists use Blender for modeling, animation, and movies. In this book, we will refer often to another open source software called MeshLab. MeshLab began as a course assignment at the University of Pisa in 2005. Artists may use MeshLab to change files from one extension to the other, or reduce the polygon count. Extensions, polygons… don’t let these terms confuse you. These are covered further in this chapter.
You are probably getting excited thinking about the possibilities that are available to you, and that you can use these tools with no cost. Let’s look at a few more things in the digital world first.
Open source has grown from just free software and hardware. Open source is now considered more of a movement in technology. For example, in 2007 Adrian Bowyer and a team at the University of Bath created the RepRap (short for Replicating Rapid Prototyper) as an open source 3D printer design. Many of the parts that are available for the RepRap are actually made by a RepRap 3D printer. In other words, it reproduces itself. The hope of those that created the first RepRap 3D printer is that it will develop and grow as others work with it and modify the design.
The user community is involved in the advances of open source software. For example, Vilem Novak developed a Blender CAM add-on that can export the code needed for CNC milling.
There are many quality open source products that this book will refer to and that we will list on the accompanying website. What that means to the artist or craftsperson who might like to use these tools is that there may be little or no cost involved with obtaining and using them. Those artists or craftspeople that think that there will be a large investment into using technology in conjunction with their traditional methods of creating can put their minds to rest. Yes, you may need a computer, but investment into expensive equipment and software may not be necessary, due to the increased participation in the open source movement.
Hacker
The word “hacker” has had negative connotations. We all dread hearing “someone hacked into your system.” We picture dark basements with seedy characters trying to get into our checking accounts and draining our savings. We see hackers as the invisible Internet black-hat bandits versus the white-hat good guys.
But the word “hacker” has another meaning entirely. In another, more positive and adventurous, light the word “hacker” refers to a person who modifies software and hardware or other things to make them better. This “hacking” is at the root of how art and creativity help the technology evolve. The technology must change to suit the needs of the user. Creative people push the limits. In the case of art and technology, “hacking” is a term that can make things exciting. Hacking is solving problems creatively. It is what this book is about. For example, Solheim Additive Manufacturing Laboratory in the Mechanical Engineering Department at the University of Washington has pushed the limits of their 3D printing machines. In Chapter 4 we will see how they are using ceramics, glass, and other materials in their 3D printers. They share their progress in “hacking” as they push their machines and the technology. They encourage others to share their development of open source technology through their blog and through collaboration with other universities and individuals.
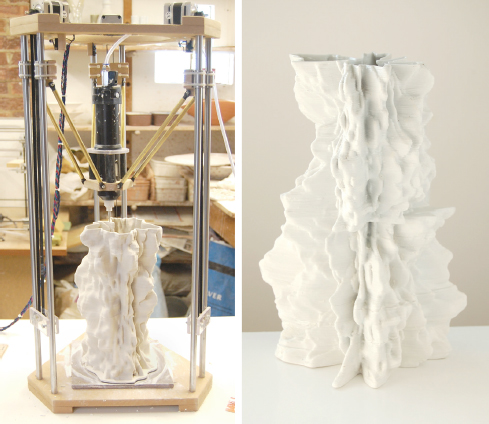
Jonathan Keep, Iceberg, www.keep-art.co.uk, self-build DIY delta ceramic 3D printer and Iceberg. Artist 3D-printed porcelain clay and glaze, 16 × 12 × 24 cm.
The combination of open source, hacker, and sharing is a progressive and creative endeavor. Ceramic artists at Unfold featured in the 3D Printing chapter share their process of ceramic 3D printing openly online. Artist Jonathan Keep was able to create his own work environment and experiments using 3D printing of ceramics because of the willingness of others to share in the open source community. Keep now shares his exploration in 3D printing from his website. For links to these websites and information on how Keep or Unfold built their 3D ceramic printers, visit this book’s accompanying website at www.digitalsculpting.net.
The educational initiative of STEAM featured in the appendix incorporates art with the former STEM educational initiative of science, technology, engineering, and math. In STEAM, the art element encourages us to be creative thinkers. Art helps us to look at things in a different light, to creatively hack our thinking.
Makerspaces, hackerspaces, or the maker communities are other revolutions that combine creative collaboration, hacking, and often open source software and hardware. Creative individuals combine their resources—including knowledge, art supplies, machines, and tools—and make them available, usually for a fee, similar to a club or creative co-op. The Appendix goes into more detail about makerspaces, hackerspaces, and the maker community.
Hacking and collaboration can have powerful results. Jordan Miller is a great example of those who wanted to think outside the box for creating bioprinting. Yes, with the advances of 3D technology they are 3D printing biology. It has developed into an entirely new form of medicine called regenerative medicine. Miller, a professor of bioengineering at Rice University, was trying to create something very delicate, a network of blood vessels. All regenerative organs, organs that they print using bioprinters, will need working blood vessels to be of use. Miller combined the hacker mentality and hacked an open source RepRap 3D printer with an extruder that can extrude fine sugar and gels that will make a vascular system. Discovering the strength in sharing of information, open source, and hacking, he has developed the Advanced Manufacturing Research Institute (AMRI) at Rice University, an entirely new program that combines scientists and the maker community. The results of this combination might just be lifesaving. Hacking and open source is an excellent concept, especially when, in the past, individuals, companies, and universities would like to patent, save, and distribute their knowledge for commercial gain.
3D printing has been around for several decades but commercial, closed-source companies didn’t want us to modify their printers and wouldn’t make the printer schematics available to us to modify on our own. So, I brought my scientific challenge to our local hackerspace Hive76, and we learned how to use the open-source RepRap printer and modify it to extrude molten sugar for our scientific experiments. Makers and Scientists are on a quest for knowledge, and through sharing and learning together we were able to push bioprinting to a whole new level.
Jordan Miller
ESTUDIOS DURERO HELPS THE BLIND TO SEE
Sometimes hacking and collaboration come out of a creative necessity. That is the way it was for Estudios Durero in Spain. Sparked by the need of photographer Juan Torre, who was losing his eyesight, Estudios Durero created a new process for blind people to “see” photography through touch. The Didú technique gives textures and relief of up to six millimeters to flat images. Estudios Durero creates the image from a high-resolution photograph. Their trained technicians select the most suitable textures and volumes to guide the blind person’s hands. They understand that small details may appear insignificant at first sight, but can be fundamental in understanding the composition or the theme developed in each image. They define the volumes and textures and print with special ink. Then they apply a chemical that gives volume to the initially flat elements. On these, they print the real image with the original colors, at a suitable size. The artwork takes on a three-dimensional quality in relief format so that the “viewers” can explore the textures and the volume of the reproductions by touch. Estudios Durero continues researching to develop and improve their technique, always with the same philosophy: “touching to see in a different way.”

Photographer: Chema Madoz (top left + bottom); Clive Egginton (top right) www.EstudiosDurero.com
How to Get Your Work into the Computer
If you want to use some of the technologies mentioned in this book such as 3D printing, CNC milling, laser cutting, and more, you will need to get your work into the computer. There are a few ways to do this. You can create artwork in the computer using a 3D sculpting or modeling program. You can find and use existing models and scans from the Internet—many of which are free—or you can use 3D scanning to scan existing work. Don’t let the idea of 3D scanning frighten you. Now, you can even scan on your cell phone. You will find an introduction to each of these technologies within the chapters in this book.
A Workstation
If you are a traditional artist or craftsperson entering the digital field you may, at one point, ask the question, “What kind of computer do I need?” The answer to this will depend on what you want to do when you combine 3D technology and your fine art and craft. Do you want to sculpt in the computer, or do you plan on doing your work traditionally and then scanning it in? Are you going to buy your own scanner, or have a vendor do it for you? If you are planning on purchasing such things as scanners, 3D printers, CNC milling machines, and other external 3D products (peripherals) then you will need to think about these things in advance. If you plan on buying your own equipment you might work backwards. Research what requirements are necessary for each of these machines before upgrading or buying a computer.
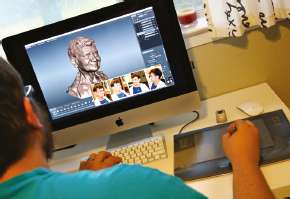
There are many types of workstations. A workstation consists of a computer, monitor, keyboard, and other devices. This workstation features an iMac and a Intuos3 graphics tablet by Wacom. When you are working in a 3D program, a tablet is easier to use than a mouse, and a lot less expensive then a Cintiq.
It is interesting to note that as you make a transition into a digital world you may not need a new computer at all. How is that possible? Makerspaces and hackerspaces are popping up everywhere. You can even find makerspaces and 3D printers in libraries across the country. If you want to get your feet wet, but don’t want to invest into a computer, try these spaces. Another option to purchasing or updating a computer to handle robust software is that many of the service bureaus offer programs online. For example, if you go to the Shapeways website (www.shapeways.com), you can create using a computer and their online software programs. There is a list of these in the Appendix of this book and on the book’s accompanying website.
If you are using vendors to scan, prepare, and print your files, there may be a chance that you don’t need any computer at all. The point is, don’t let the thoughts of expensive equipment dissuade you from the adventure of using these technologies, but if you do decide to invest into these new and exciting tools, you may need to update your computer or invest into a new one. Maintaining digital tools is just as important as maintaining traditional tools. That means it will be necessary to update computers and software when needed. This should become a part of your studio budget.
If you already own a computer, it is important to know what your computer can do before giving it a program and a task. Otherwise, the entire process of sculpting, modeling, or posing in the computer will be very frustrating. There is nothing worse than getting so far on a project and feeling like you are beginning to get a grasp of the software only to have it freeze or crash. When you are comparing software or peripherals to the computer that you will need, or your own computer, there is a list of things you may want to consider.
Getting to Know Your Computer
OPERATING SYSTEM The operating system is the communication hub of your computer. It manages memory, software, hardware, and everything that your computer will do. You will need to update your operating systems every few years. As new software becomes available, the software may require a newer operating system. Be sure you know what operating system you have or what operating system you will need for the software and the peripherals that you desire to work with. Not all software is cross-platform. Cross-platform software works on Mac, PC, and Linux. Some of the software for machining is not even available for the Macintosh operating system. If you are unsure of your present operating system on your computer, you can easily find this information. For a Mac simply click on the Apple icon in the left-hand corner, and then click on “About This Mac.” A window will come up in the center of your screen with the version of the operating system. On a PC, right-click on “My Computer,” and then click on “Properties” then review the information under “System.”
PROCESSOR The operating system communicates, and the processor or central processing unit (CPU) is the brain of the computer. There are many different kinds of processors. People refer to the processor speed of a computer in hertz (Hz), megahertz (MHz), or gigahertz (GHz). A hertz is a way we measure the frequency in the computer. One hertz is a cycle or refers to the instructions per second. A megahertz is one million hertz, a gigahertz is 1,000 MHz or one billion Hz. The higher the CPU’s processing number, the faster the processor. When you are preparing to purchase peripherals or software, knowing your computer’s processor or the required speed for the software or peripherals will be necessary.
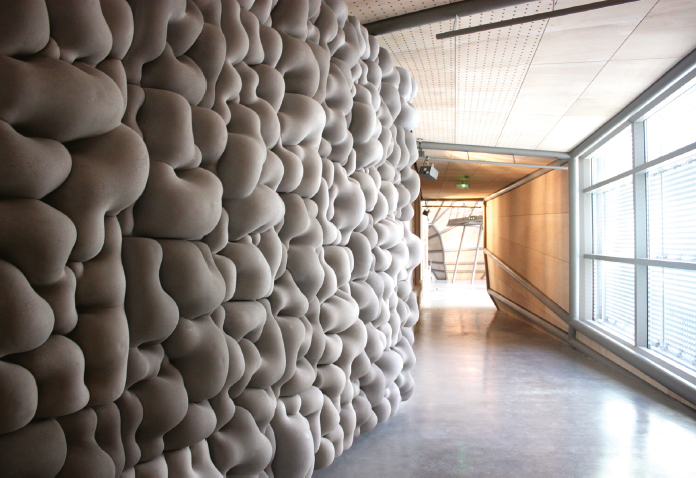
Many artists travel back and forth between the tactile traditional world and the digital world. Andrew Kudless, from Matsys Design, will sometimes experiment in the traditional and then try to replicate the effects digitally, or—as in the case of P_Wall—create a design in the traditional process but use a master pattern through a computer algorithm to work out the entire design. To learn more about Andrew Kudless and his process, listen to the Art and Technology podcasts and visit the videos at www.digitalsculpting.net. P_Wall, 2013, by Matsys, 2013, photo by Andrew Kudless.
32-BIT OR 64-BIT? There are two types of CPUs—32-bit and 64-bit. Around the mid-1990s, computer manufacturers introduced 64-bit computing to home computers, and it will eventually become the mainstay. Unfortunately, the transition is here and does cause a bit of confusion. “32-bit” and “64-bit” describe how the CPU handles information. If your computer is older, there is a good chance it is a 32-bit operating system. The difficulty is that some software and peripherals are 64-bit and will not run on 32-bit. However, some 32-bit software will run on 64.
Basically, a 64-bit computer can handle larger portions of information and will work faster. Understanding the architecture of your computer’s processor, and the needs of the software and the peripherals, is something to consider. Whatever software you choose, be sure it matches the bit rate of your computer.
GRAPHICS CARD/VIDEO CARD A graphics card is the graphic processing unit (GPU). It helps the processor to display images properly. Those individuals who play games on their computer may be familiar with a graphics card. If an animation or game is robust, it will require a good graphics card. Without a good graphics card, the computer tries to render the graphics, but there are interruptions; so the gamer may be right in the middle of shooting someone and the screen will look all fractured. For the most part, understanding a graphics card or changing your graphics card is not necessary. It comes into play more with those who play these video games or those who are creating video or animation. Changing or modifying your computer graphics card is not usually a concern for a fine artist or craftsman working in 3D on a computer. However, some 3D sculpting programs and peripherals do demand a specific graphics card, and you may find you need a graphics card for rendering your presentation, which we mention below. So, when comparing your computer and desired 3D sculpting program, be sure that you note the graphic card requirements or suggestions.
MEMORY There are many traditional artists who may use a computer and never think about how their computer works. When they search the Internet, they simply turn on their computer and wait. Not until they want to use 3D sculpting programs or 3D modeling programs or add peripherals will they begin to think about memory.
Here are the basics of memory. RAM stands for random access memory. Programs will require a minimum amount of RAM so that they can run properly and with speed. The more RAM you have, the faster your computer will run. Your CPU or processor uses RAM while it is accessing everything to create on your computer.
You store your information on your hard disk drive (HDD). When you are writing a paper, using RAM, and the power goes off, if you have forgotten to save your file to the hard drive then you have lost your document. In the simplest terms, your processor is the worker. Your hard drive is where you store everything that you need to work, and your RAM is the place where you are working on things. When the work is complete, or when you shut down your system, everything goes back into the hard drive, unless, of course, your computer crashes and you lose everything from the RAM before saving it into your hard drive.
A computer can have multiple hard drives. There are external drives and internal drives. A boot drive is the hard drive where you store your operating system. Your computer starts up from this drive. There are some drives, such as solid state drives (SSDs), that can make your operating system and applications run faster. SSDs are more expensive, but worth the investment.
Increasing the memory of your computer is not that hard. RAM has gotten much less expensive over the past few years. You may not even know that you can add or change your RAM, and you can often do it yourself. Increasing the amount of RAM on your computer may increase the speed of your computer. If you are unsure how much RAM you have, or how much your computer can hold, you can check for yourself. Your computer has a series of slots inside of it. Depending on your computer, the slots or bays may be full, or some may even be empty. A user can add DIMM modules in the slots, or they can replace existing modules in their computer with modules that have more memory. When purchasing RAM, it is important to note that some computers require that you add the DIMMs in pairs. For example, if you want to add RAM you might purchase two 4 GB DIMMs and insert them in separate slots. Some retailers sell them this way. But you would not buy a 4 GB and an 8 GB DIMM. Again, check with your manufacturer or retailer for their suggestion, and always buy your hard drives and RAM from a reputable dealer. When it comes to purchasing hard drives or memory, this is not a place to try to find the “best deal.”
There are many tutorials online for those who would like to add memory themselves, or you can take your computer to a service center to add memory. To find out how much memory your computer has and the capacity it can hold there is no need to unscrew it and look inside. Instead, follow these simple instructions or call the maker of your computer. If you are on a Mac go to “About This Mac” in your Apple menu and when the window comes up, click on “More Information.” There are four tabs, “Overview,” “Displays,” “Storage,” and “Memory.” If you click on “Memory,” it will tell you how many slots your computer has and how much you can install. If you are unsure, you can call your Apple dealer, or Other World Computing (www.macsales.com). They will help you to figure out how much memory your computer will hold and how many slots you have. To find how much memory your PC has or can hold is a little harder; it will depend on what version of Windows is on your computer. In Windows 8, right-click on the windows icon in the corner of your screen and then choose “System.” In other versions of Windows, choose “My Computer,” and then “Properties.” If this is confusing, don’t worry, just call the maker of your computer or a vendor that sells RAM and ask them to help you figure out these details. This book’s accompanying website has a list of vendors. When considering adding software or peripherals, check out how much RAM or memory you need to run them. If your computer has sufficient memory, and you have checked the other suggestions such as the operating system, CPUs, graphics card, and the type of computer, then you are good to go.
TABLET Many artists working with 3D in the computer find it easier to use a pen and a drawing tablet instead of a mouse. For those sculpting or modeling, it may feel more intuitive than pushing a cursor around with a mouse. There are different types of tablets. Tablets have two parts: the pen or stylus and the flat tablet. Many of these tablets have pressure sensitivity, which may be more enjoyable for creating artwork. A Cintiq is a computer screen where you can draw directly on the screen. Just as with the tablet, you draw with a stylus pen.
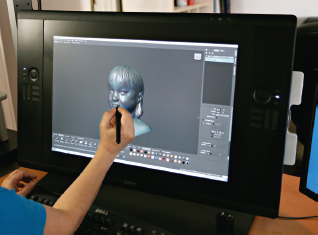
Creating art on a computer can make an artist feel a bit detached from their work. Incorporating a Cintiq in an artist’s workstation, such as this Cintiq 24HD, feels more natural as the artist sketches and sculpts directly on the screen.
Software
A fine artist or crafts person has a variety of tools to choose from when entering the digital world. We have listed a few of them in the Appendix and on the website. Exploring the software applications listed in this book is a good place to start. However, it will be necessary to conduct your own investigation into your future software tools. It will, after all, be your time and your money that you will use to make these tools work for you. If a particular software program interests you, spend time researching the relationship between the software and the user community. Visit online communities of users of the programs. Register and ask questions or search their forums for the questions you may have. Check out the online videos to see how easy the program is to use, and to be sure that the software does what you need. A strong user community means that if you have problems with the software, you may be able to get help quickly. Sometimes you can join the user groups and either post your question or search the group for the answers. You will want to know: How often is the software updated? Do updates come free or do you have to pay for them? How steep will the learning curve be? If you are a student, you will want to research if a student version is available for a lower cost. If you find an artist who is doing something similar to what you would like to do, ask them about their software, hardware, etc. Some sculpting programs may be good for designing jewelry, but not as good for creating art that is CNC milled. We have asked all of the artists in this book to share the software that they use.
Many of the software companies offer free trials. Carve out a month of time to check out the free trial version before purchasing. If it is your first time using any program dealing with 3D art, you might also try open source software. This allows you to experiment and get your feet wet with no out-of-pocket expense. There is a list of software programs in the Appendix and on the book’s accompanying website (www.digitalsculpting.net). Whatever programs interest you, often using the tool on a trial basis is the only way to know if the tool is right for you. A great example of that is the difference between what users say about ZBrush and Mudbox. ZBrush and Mudbox are the two top sculpting programs on the market. Many will say that the comparisons are hard to make. Each software program seems to work differently for them, even though they do very similar things. Sometimes, it may just be an interface, or the way the program looks that shows a user’s preference. With these comparisons, ZBrush has many hidden drawers of tools, which can be overwhelming for some, yet others swear it is the best program. Others describe the simpler interface of Mudbox as less chaotic and more enjoyable. When it comes to the software choices, it may be a matter of your personal learning styles and individual preference, and these can only be experienced from taking the software on a trial run.
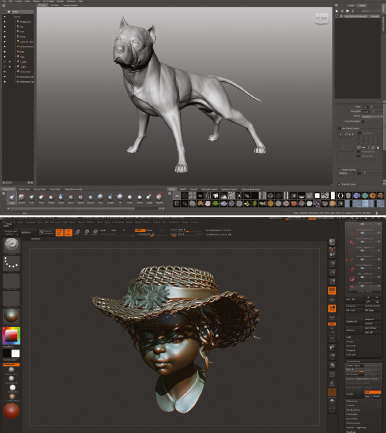
Although different 3D sculpting programs may do the same thing, their interfaces can vary. Often it is a matter of preference. Mathieu Gautier’s sculpture Dog exhibits the Mudbox interface and Magdalena Dadela’s The Straw Hat exhibits the ZBrush interface.
It is unfortunate that you will not be able to find just one software program that will fit all of your needs. It seems to be a recurring complaint with the many artists interviewed for this book. On average, the amount of programs each artist in this book uses to create their work and realize it in a physical form is approximately three to four. With certain programs, the artist may only use one or two things in a software program. A few years ago, the amount of programs an artist might need was more than three. Many artists have additional programs to make sure that their files are sufficient to be able to print on a 3D printer or be CNC machined. Today, the amount of programs needed to complete all of the tasks necessary to realize the work in a physical form is fewer than just a few years ago, because as software developers understand the needs of the users, they change and incorporate other tools into their programs. Each chapter in this book will introduce you to many different programs and you will begin to understand their use.
When comparing your needs as a traditional artist or craftsman entering the digital field it may not help to ask a computer graphic (CG) artist. Those individuals working in computer graphics for animation or gaming need a lot more out of their computers and software than someone who is simply working with a 3D sculpting program or bringing models into a computer. The workflow, “pipeline,” or steps of those working in computer graphics to render images for a movie are different than the steps needed by an artist to create artwork using traditional and digital processes and to realize artwork in a physical form.
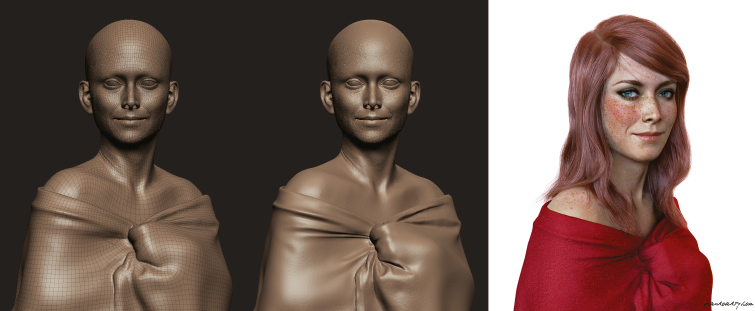
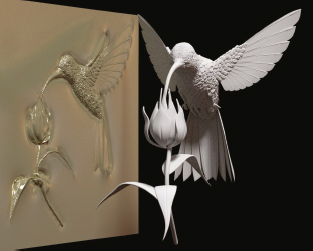
CG artists have a specific workflow to complete an image. Often this incorporates many different software programs. Dan Roarty sculpted the image Freckles in a Blanket for 3D Artist Magazine. It was modeled in a software called Maya, textured in another software—Mudbox—and rendered in Vray. The hair was created with Shave and for the haircut and spec maps he used Knald. A link to the tutorial for this project is found on this book’s accompanying website.
With that said, some 3D sculpting programs do have special requirements. Figuring the specification may feel overwhelming at first. When you are sorting out the question of what type of computer you need, you will be comparing. You will compare the needs of software such as 3D sculpting programs or your new and marvelous peripherals, such as 3D printers or CNC milling machines, to the computer required to run them.
Beta Test
Sometimes a software program will be a beta version. If software is considered a beta version then it is not officially released. Beta testing is when a software company or designers offer the software to certain end users who will try the software in real world settings to see if it functions as it is supposed to. Alpha testing is for those end users who have positioned themselves as experts. Become known for your work in a certain program and program developers will take note and make it worth your while to be a beta or alpha tester of their software.
Add-ons/Plug-ins/Extensions
“Add-on,” “plug-in,” and “extension” are terms that you will often see in association with a software program that you might choose. Although it may depend on the software program that you are using, these terms are very similar. An add-on is an additional feature that you can add to a software program. It is usually a script or coding created to add functions to the program that you are working with. Often a program can have many add-ons. These add-ons can do many different things, and these are usually free. For example, Blender has an add-on called “Add Mesh Walls.” So, if an artist were creating a castle using the software program Blender, they might want to get this add-on to quickly be able to make the brick walls.
Many software programs—both the programs that you purchase and free programs—have add-ons or plug-ins. Developers create “extras” that they think complement a program. Users can usually self-install the add-ons simply by clicking on the add-on link. Other add-ons might require that the user install the add-on into a designated folder.
A software company may eventually merge the add-on or plug-in into the program. But add-ons can give great functionality to a software program and are worth checking out. A ZBrush plug-in called “3D Printer Exporter” was available with ZBrush 2009. This plug-in allowed a user to export their ZTool into STL or VRML file formats. These are the file formats that an artist will need for having a 3D model printed with a 3D printer. Another necessary plug-in with ZBrush is “Decimation Master.” Sculptures created using a computer program can be very large, much too large to transport or often to use with a 3D printer or milling machine. “Decimation Master” preserves the detail, but lowers the polygon count, making the files much smaller. Unless the program offered these two plug-ins it would be necessary to move the project to another program to do these steps before the file can be output for printing and milling.
An extension is something that the software company may release that will add one or more things to the software that you already own. The maker of the software usually sends out a notice to those who own the program to let them know that the extension is available for download.
As you read this book, you will continually find that many artists have tweaked software to get it to do what they wanted it to do. If you are new to the world of technology, this may seem like an overwhelming endeavor. However, we have listed some information on learning code and creating with code that is quite simple. This new endeavor just might entice some readers to go a bit further with their creative involvement with their software.
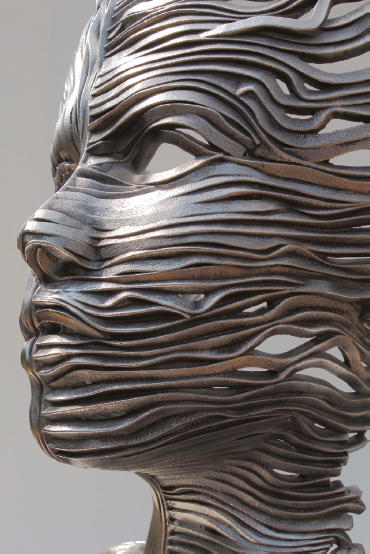
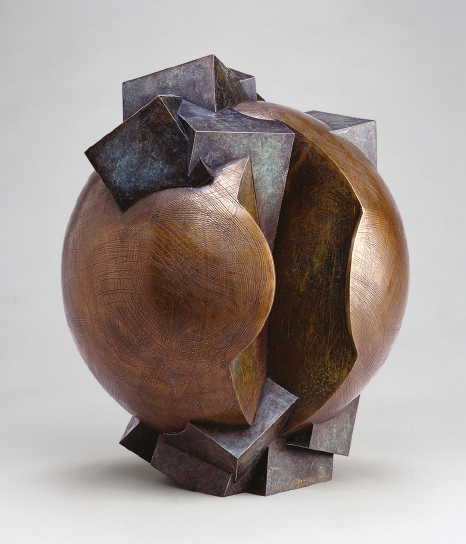
Many artists go back and forth between digital and traditional. You might not recognize how their work is done, and not know that new digital technology was a part of the creation process. Dichotomy by Gil Bruvel, 28 × 14 × 27 inches, stainless steel.
Many applications have scripting environments and application program interfaces (API) embedded in them for developers to write custom plug-ins or addons themselves. And on top of that, many companies offer entire software development kits (SDK). These kits allow developers in the community (i.e. not employed by the company) to develop all kinds of plug-ins and extensions that access very low-level functionality in the application.
A creative person that is interested in getting more involved with their software would use an SDK to develop a plug-in or extension that has a deeper or lower level of functionality or integration into the core application. A scripting environment or API is a way for community developers to interact with the application at a higher level.
3D Sculpting vs 3D Modeling
Although the terms “3D sculpting” and “3D modeling” are often used interchangeably, they do refer to two different types of processes. A bit of history on 3D might help. It all began with a teapot. What does a teapot have to do with 3D sculpting or modeling? In 1975, a computer scientist named Martin Newell created one of the first graphic elements; a simple teapot using math and three-dimensional coordinates in the computer. The teapot was a great subject to represent graphically as it presented many design challenges. The teapot is now a sort of computer icon or inside pun in the computer world. The Simpsons features the Newell teapot and designers have slipped it in some of the first computer-generated films. 3D technology has come a long way since 1975. Software evolved; now creating a 3D model or design does not depend on an advanced degree in math and geometry. With 3D sculpting and 3D modeling the software automatically does all the mathematical equations to create your 3D object using the Cartesian system and the x, y, and z axes.
3D modeling was the precursor to 3D sculpting. The description of modeling versus sculpting is debatable. Also up for debate is which is more important to learn. Modeling works with the underlying structure. In modeling, the modeler creates with the polygons, faces, edges, and vertices. 3D sculpting is often described as a more organic process like traditional sculpting where one pulls and pushes on virtual clay. With 3D sculpting programs polygonal modeling and the geometry behind the art are not an issue; instead, the artist shapes the form that they desire.
Entering the process of creating digitally does not mean spending a great deal of money on software programs. As we have already pointed out, there are many options that are free. Chapter 4 will feature more about the details of 3D sculpting and 3D modeling. Now, let’s look at a quick and basic geometry lesson about 3D.
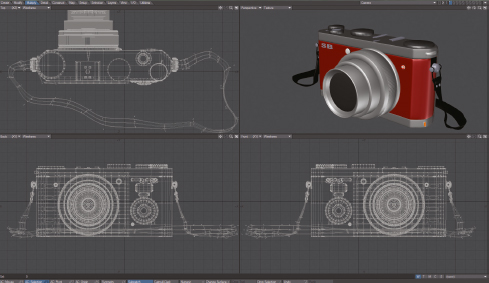
When creating with a modeling program like Lightwave 3D, the artist creates using the underlying geometry. Camera by 3D artist Marco Valenzuela.
Looking at the Structure of 3D Technology
Entering the digital world is a different environment entirely. There are things that may take some time to get accustomed to. There is terminology that will at first be hard to understand but, as you work through the processes, it does become clearer. Once again, be responsible for your own education with your new tools. When a word or process comes up during your workflow, create an investigation and learn around that process or word. There are also links to several excellent online tutorials about 3D technology basics. You can find these on this book’s accompanying website. One such resource is the Guerrilla CG Project, created by Andrew Silke. Both Vimeo and YouTube have these videos. It is difficult to comprehend some of the terms that pertain to 3D space on this 2D page. However, the Guerrilla CG Project tutorials on such things as “Subdivision Topology: Artifacts,” “The Polygon,” “Object,” and “Multisided Polygon” describe these things in 3D on the screen. Accompany these videos with the tutorials in this book and you will have a much clearer understanding. To watch these videos, visit this book’s accompanying website at www.digitalsculpting.net.
X, Y, and Z Axes
The term “3D” refers to three-dimensional objects using the Cartesian coordinate system, in the computer. The Cartesian coordinate system is a geometric system that works on three points or axes. Don’t fret. Working in the computer is not going to require that you brush up on geometry or work with math. The process is much simpler. The geometry related to the Cartesian coordinate system is not something you will need to know in order to create in such programs as Sculptress, Mudbox, or ZBrush. You won’t need to know it to pose a model using Poser or DAZ 3D, or to have something scanned or printed using 3D printing, but the understanding of these systems will be helpful.
When you create in the computer in sculpting or modeling software, the computer software calculates the coordinate system for you. Whether you are scanning an object or making one in a computer graphics modeling or sculpting program, what is happening behind the scene is code—numbers in Cartesian space.
RIGHT-HANDED RULE Hold up your right hand with the middle finger horizontal to the ground, the index finger pointing up, and your thumb pointing to you. In this configuration, the thumb is the y-axis, the pointer finger the z-axis and the horizontal middle finger the x-axis. The “origin” is at the center where the x, y, and z coordinates meet. Coordinates can be expressed in negative and positive numbers depending where they fall in comparison to the place of origin. These coordinates and right-handed rule apply in many cases; however, some applications will show their coordinates differently.
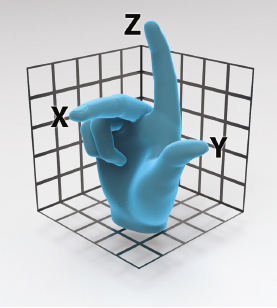
The right-handed rule.
As an artist gets deeper into the process of creating in 3D, the x, y, and z axes may become of interest. Knowing the Cartesian coordinates will also be helpful when you are sending your objects to the CNC milling machine or a 3D printing vendor. For example, CNC milling machines always mill on the z-axis. Even the description of a CNC milling machine uses the term “axis.” There are three-axes, five-axes, even seven-axes milling machines. The number refers to the number of axes in which the machine works. Understanding how the 3D equipment will print or cut your object may help you to obtain a better final product. However, don’t fret. When you begin using these processes, the computers, vendors and service bureaus often do all of the Cartesian calculations and thinking for you.
Now, let’s take a look at some more terms that you will come across when hearing people talk about the topology of a 3D object.
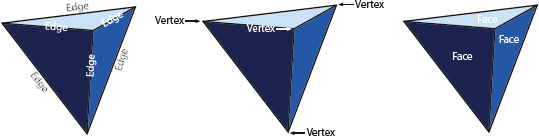
Edges, Vertices, and Faces
An edge, in the underlining geometry found in 3D technology, is the line between two vertices. A vertex or vertices in 3D is a meeting of two or more straight lines in the corner. The faces in geometry are the flat surfaces between the edges and the vertices.
Polygons
The prefix “poly” means many. A polygon is a two-dimensional shape that consists of three or more vertices. The polygons that we use most often in 3D are those with three edges or triangles, or those with four edges known as quads. However, in 3D modeling and 3D sculpting it is best to use polygons with four vertices or quads.

The preferred polygon for 3D sculpting is quads.
Topology
When someone refers to the “topology” of a 3D object, they are talking about the geometry that makes up the surface. Good topology for sculpting in 3D has several characteristics.
1. The mesh consists of quads instead of triangles.
2. There is an even distribution of polygons.
3. The topology has edge loops.
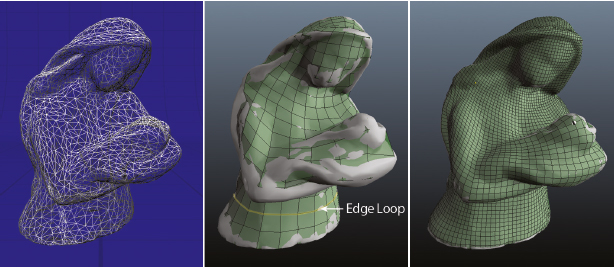
Retopology by Mike de la Flor using 3DCoat. When 3D scanning an object, the scanner creates a mesh made in points or triangles. If you want to sculpt on that 3D scanned object in the computer you will need to retopologize it and make it into a mesh with quads and good edge loops. Retopologizing in this manner will also prevent subsurface artifacts from appearing and annoying you when you sculpt. We will learn more about retopologizing and preparing files in Chapters 3, 4 and 7.
If you are sending your artwork to a company that creates 3D scans, and enlarges or reduces your 3D scan to send to a 3D printer or for CNC machining, you won’t have to worry about the topology or the mesh, the service bureau may do that for you. But if you are creating work in the computer or modifying scanned work for 3D printing and CNC milling you will have to work a bit with the topology software programs to prepare your work. We will cover this in greater detail in Chapters 4 and 7.
• Tris or triangle—triangles are polygons with three vertices and three sides.
• Edge loop—an edge loop in the topology is a loop that goes around the object in one continuous flow and is not interrupted.
• Quads—are the preferred polygon for sculpting. Artists prefer them because they can easily divide. Sometimes, dividing a mesh may cause triangles to appear. These tris can cause bumps on the surface known as “artifacts.” An artifact in 3D sculpture is like having a foreign object in your traditional clay. No amount of smoothing will get rid of it until you remove the artifact. If you continue to subdivide the mesh, it may only compound the problem.
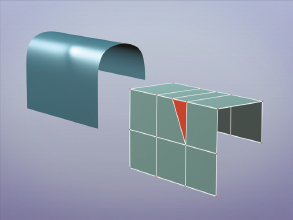
A bump or a smoothing artifact occurs when a three-sided face causes a bump in the mesh. For a clear and animated explanation of artifacts and topology, visit this book’s accompanying website at www.digitalsculpting.net and watch the Guerrilla CG video prepared by Andrew Silke. This image was created for Guerrilla CG by Greg Petchkovski.
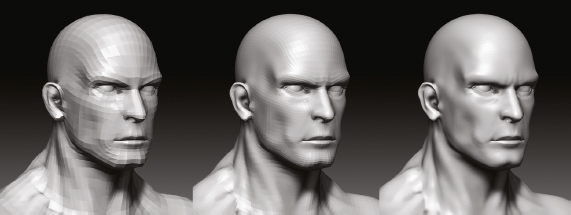
3D models built in the computer start with a mesh that has a low poly count and large quads. Subdividing means that the computer divides the faces on the object. When you divide the model, you get more polygons and, in turn, you will get more detail. The computer takes one quad on the model and divides it into four sections. In another subdivision, the computer takes that same surface and divides it again into 16 sections. The image becomes smoother with each subdivision. The higher the resolution in the models, the more faces it will have. High-resolution models also take up more memory in the computer. Once again, depending on the software, all of this geometry happens behind the scenes; you never have to worry about the math to create it. All the artist needs to know to subdivide the surface is how to press a button, how many times to subdivide, and the best time in the sculpting process to press that button.
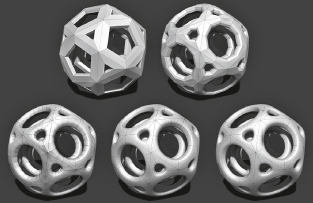
With a polygon mesh, the mesh becomes smoother as you subdivide. 3D artist Marco Valenzuela.
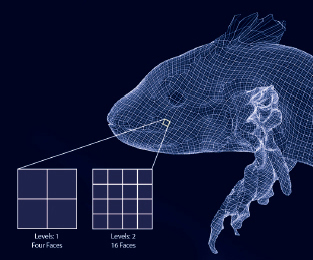
When sculpting in the computer, you can make a model smoother by adding more subdivision. A polygon mesh made up of quads is easily divided. Each subdivision is a division of four.
Normals and Reversed Normals
You may hear the term “normals” or “reversed normals” when you are trying to get your model or sculpture out of the computer through 3D printing or CNC machining. Polygons are two-sided, and the “normal” is the face of the polygon that faces out. During the process of sculpting in the computer, the computer may reverse a face normal. Then the surface points to the inside on that polygon. Sometimes a 3D model might even be missing a face. These incidents are not something that you will necessarily see while sculpting or modeling, but the 3D printer and CNC machines will detect these. There are free software programs that will help you to locate and fix such things as reversed normals or missing faces. You may need to take your model into these free software programs when preparing files for 3D printing and CNC milling, or your vendor may do this for you. See Chapters 4 and 7 for more information.
A polygon is two-sided; the normal is the part of the polygon that faces out. If there are reverse normals or missing faces in the model then a 3D printer cannot print and a CNC machine cannot mill. Reversed normals and missing faces are hard to see, but there are programs that help you fix your files for 3D printing and find the reversed normals and missing geometry.
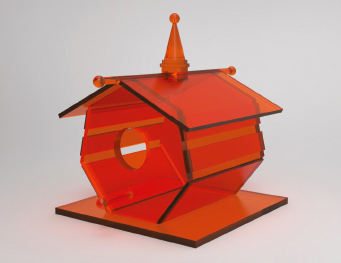
3D artist Marco Valenzuela creates a birdhouse from simple primitives.
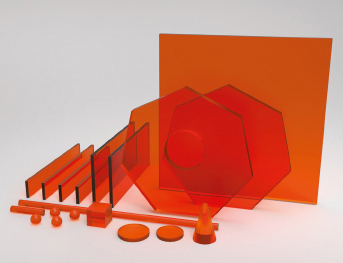
Primitives
Primitives are usually simple objects like cubes, cylinders, or spheres. Just like in sketching, an artist will use simple forms to block-in a drawing: a cylinder for the legs of a fat rabbit connected to an oval. Primitives come with the computer program. A 3D artist uses them to rough-in a model.
Decimation
We have seen how we start at a low polygon count or low resolution and then slowly build the polygons by subdivision to get more detail. However, when a 3D sculpture has a high poly count, an artist cannot send it to a 3D printer or CNC milling machine. The files may be too large. It is an art in itself to be able to determine how far you need to push the polygons and subdivisions to get what you need, without overloading the system. Remember that, as the technology is today, there is no output device able to create with the same detail with which the computer can create the model inside the computer. The detail of the output devices will change, as technology advances.
Each of your vendors will have a maximum size polygon count that they can handle and will let you know in advance. If your file is too large then you can reduce the poly count without affecting the overall look and detail of the art. Decimation is the process of reducing a poly count. Some 3D graphic programs have a decimation tool within them. There are also free tools like MeshLab, where you can bring your 3D file in and decimate it. We will look at decimation more in Chapter 4.
Rendering
We have already stated that it takes a lot of RAM to work on 3D models or scenes in the computer. The image that you see on the screen is often an approximation of what you are creating. To work on the image, as it would appear, would take too much time and slow down the computer. When an artist finalizes a figure, they may want to render it. An artist creating something in the computer to go to a CNC milling machine or 3D printer will not need to render. Rendering would be necessary if an artist were creating a presentation for a client to see what a sculpture or object may look like in its final physical form. The artist chooses materials and the lighting for the model. They can then render the scene and provide this render or photographic image for the client’s approval. Rendering is one of those things that is affected by the graphics card. If rendering is something that you are considering in your regular workflow, then it will be important to pay attention to your computer’s graphics card.
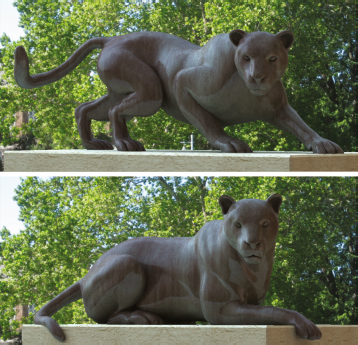
Mike de la Flor renders several views of a proposed panther for Prairie View A&M. Sculptor Bridgette Mongeon. See complete bronze on page 32.
Retopology
Retopologizing is the changing of the topology of a 3D sculpture or model. There are several instances where retopologizing becomes necessary. Imported models from other programs may have bad topology. A scanned model can come in with triangles or points. Pushing and pulling on the vertices while sculpting in the computer can change the underlying topology. There was a time, not long ago, when retopologizing seemed to be the holy grail of 3D sculpting, or at least the missing element. Computer graphic artists would describe the process of sculpting in the computer as organic, but if an artist destroys the sculpture’s topology when they are moving the clay, it is hardly like traditional sculpting. In the past, an artist retopologized a sculpture by drawing each point, edge loops, and vertices all around the sculpture. Now, in some programs, an artist does it with a push of a button.
Navigation in 3D
Digital artists create 3D models and sculptures in a computer program. For an artist to create a digital model, it will be necessary to learn to move around or navigate in a 3D program. The terms found in these 3D programs are similar to terms used by cameramen. Each software program will have its process for the artist to navigate. It may be a keystroke accompanied by a mouse movement or a tool that the artist selects in the navigation screen. Another way to navigate is to use your tablet and the keys provided on your tablet. Your software and tablet tutorials will explain these types of navigation. Using a tablet or stylus pen to navigate is similar to using a right-click or left-click with the mouse. Some graphics tablets have programmable buttons on the side for easier navigation. This type of navigation offers a way to navigate without having to move your hand to the keyboard. Until an artist masters stylus pen clicks while working on a tablet in a computer 3D sculpting or 3D molding program, they will be moving the object around with their stylus hand, while they balance their other hand on the computer keyboard ready to push the memorized keys. As you develop a workflow and your workspace, you will find a navigation flow that fits your preferred sculpting software, your personal needs, and your working style.
Camera
Many 3D programs will have camera views and refer to these views such as “top view” and “side view” in the navigation window. When creating work in 3D, just as sculpting in a traditional studio, it is necessary to work on more than one view, moving back and forth. A sculptor in the traditional studio trains himself or herself to move back and forth between views of their physical model. They make changes to a portrait, checking it from the front, and then rotating the object to look at it from the side to see if these same changes look good from all views. Just as in the traditional studio, a digital artist can work on one area and then rotate the object in the computer. Some software programs will allow the user to alternate between views. With a couple of windows on the screen at the same time, the user may be able to look at both views simultaneously. So, while they are changing the nose while looking at the front of the face, the artist will see the same changes taking place to a profile image.
It is difficult, at first, to know where you are in the virtual space. It may look like you are clicking on the object from one view, but once you rotate the sculpture you may find that you are far away from the object. For someone just entering 3D sculpting or modeling and becoming used to the navigation, it can be a challenge at first. Terms to look out for include:
• Rotate—rotating simply means rotating around the object or turning the object. The object rotates on a predetermined pivot point. The user may change the pivot point. For example, instead of an object pivoting around its center, it may pivot around one edge.
• Zoom—as simple as rotating, zoom does just what it says it will do. Zoom makes the camera or the viewer zoom into a 3D model. You may even zoom so close that you end up inside the model.
• Pan—pan means to move the camera back and forth or up and down with your object staying in the same place.
Lighting
Lighting is important in any scene. It would make sense then that 3D sculpting or graphics programs offer the user different lighting. With 3D, the shape and form can change and pop out as the artist lights it. Sculptor Augusto Rodin would place a candle on the side of his work so that he could see the shadows. Placing lights around your digital scene will help to illuminate and shade the work while you are sculpting. Later, if an artist needs to render the scene for presentation they can arrange the lighting so that it highlights the art.
Mapping
UV Mapping
You will hear the terms “UV mapping” or “texture mapping” often in the 3D world. As mentioned before, CG artists or those working in the film industry, animation, etc., will use UV mapping much more than an artist who is sculpting in the computer and going to have their sculptures CNC machined or 3D printed. For the most part, an artist who is working with 3D scanning, 3D printing, milling, or even 3D sculpting to create their artwork into a physical form will not need to know about UV mapping. The exception to that is when you are working with photogrammetry or other scanning where you are collecting not only the geometry of the subject but also its color. We will also talk about UV mapping when you want to create a 3D print in full color—at the writing of this book, there are only a few ways to 3D print in full color.
Because there are few times when an artist will need UV mapping, we include it here. UV mapping is a type of texturing. Some may also refer to it as texture mapping. Let’s try to simplify just what UV mapping is. Do you remember those globes that you might have had as a child or that were in school? You could run your hand over the mountains and feel their texture. You could look at the blue and know where the lakes or oceans were. Hauling a globe around was not possible. The traveler needed a two-dimensional map. But how do you depict three-dimensional information in two-dimensional space? What if we sliced the globe apart? We know that the world is round, but to make a flat image of the world it might look like the image of the map above. It would become a two-dimensional representation, both in color and texture. What we did to this globe is similar to UV mapping in 3D. UV takes a three-dimensional object and creates maps that are in two dimensions. We learned about the x, y and z coordinates earlier. In UV these are also coordinates. Thinking of our world map again, consider the “V” coordinates the longitude or north and south or up and down and the “U” coordinates the latitude or east and west. When an artist puts the color and texture back on the object they align the UV coordinates with the x, y, and z coordinates.
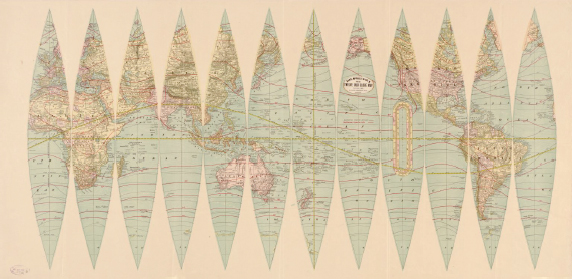
UV mapping or texture mapping is similar to unwrapping the color and texture from a globe. When you learn to work with UV maps you can unwrap the color and/or texture of your object that you sculpt in the computer, and bring it into a program such as Photoshop. There you can add more color or adjust the color, before bringing it back into a sculpting program. Then the artist applies the UV coordinates to the 3D geometry. That way, if you make changes to the 3D object, the changes will also apply to the UV map. Source: Geography and Map Division, Library of Congress.
Most of the 3D sculpting and modeling programs will create UV maps for you, should you need them, and you can then modify the UV map. Working with UV maps can be tedious when it comes to a complex shape. Keep watching the technology though; there is no doubt someone will eventually develop a better process for texturing and adding color. At that time, UV mapping may become obsolete.
Projection Mapping
Although projection mapping is not used anywhere in this book, you may come across the term as you are learning about 3D technology and beginning to socialize with those working in 3D. Projection mapping is another way of texturing an object. In projection mapping, the two-dimensional texture is projected on the image. This type of texturing will not apply to art that is coming out of the computer using 3D printing or CNC machining.
Projection mapping also has another meaning. 3D projection mapping is a form of audiovisual performance art that uses technology and specialized software to project images onto objects. This type of projection mapping is something to see. For example, in 2010 the Macula and Tomato Production used AV equipment and a computer to project images onto the old Prague clock in celebration of its 600th birthday. In 2013, Bot and Dolly took projection mapping and robotics and made them interact with an actor to create the work known as Box. For an interesting reflection of how technology and another form of art meet, check out the projection map videos on this book’s accompanying website.
_________________
See, this primer in 3D wasn’t that bad. But take a deep breath, we are about to get into the real creative process. There is quite a bit of information in this primer chapter. As we said, it is not necessary for you to understand everything in this chapter for you to proceed with incorporating 3D technology in your art or craft, and there is probably much more that we could put in this primer chapter to help you. This primer should help you. You may begin to see 3D a little clearer, and you now have a starting point from which to work. You will continue to add to your knowledge every time you incorporate a 3D process into your traditional workflow.
Perhaps you still feel a little apprehensive about using 3D in your studio or workshop. You are not alone. Before we look at some of the incredible art and processes created with 3D scanning, sculpting, and milling, let’s take a moment to review the internal conversations that others who enter this 3D world have had. Let’s also look at the dialogues that have been taking place between artists, collectors, and museums since the introduction of these processes. And finally, lets talk about the physiological challenges as well as the psychological and social aspects of marrying the digital world with the traditional world to create incredible art.
BRUCE BEASLEY
Bruce Beasley is one of the United States’ most prominent sculptors. He is also a pioneer and has been working using 3D technology and fine art since 1987. The software company Autodesk created one of the first art shows incorporating 3D technology in 2008, featuring the work of several artists including Bruce Beasley.
Bruce describes sculpting in 3D as a process that enables him to make more subtle or complicated changes without material consideration. When he creates, he does not see the work in his head ahead of time. Instead, the tools give him a place for discovery.
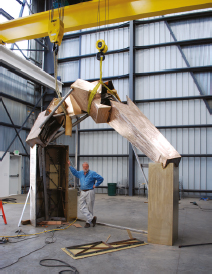
Bruce Beasley and the assembly of Arpeggio IV, www.brucebeasley.com. Photograph by Lee Fatheree.
Bronze sculpture Tenacity by Bruce Beasley. Photograph by Lee Fatheree.
In the Coriolis series, Bruce creates fine art using Autodesk software Alias, 3ds Max, and Inventor. The pieces are then 3D printed. This 3D printed fine art takes 3D printing to an entirely new level.

Coriolis VII by Bruce Beasley
BRIDGETTE MONGEON
Sculptor Bridgette Mongeon uses ZBrush and Mudbox to create digital designs, or sculpts them and has them 3D scanned. She enlarges the 3D designs and CNC mills in foam. After carving the foam and adding detail with a thin layer of clay, molds are made of the art and the sculpture enters the lost wax process of bronze casting.

Prairie View A&M Panther by Bridgette Mongeon. Photograph by Bill Petty.

Called to Pray by Bridgette Mongeon. Photograph by Christina Sizemore, Diliberto Photo and Design.
ANDREW KUDLESS of MATSYS DESIGN
Andrew Kudless of Matsys Design moves back and forth between digital and traditional processes to create unique designs. For Kudless it is more than 3D, he also uses algorithms and physics when working on his art.
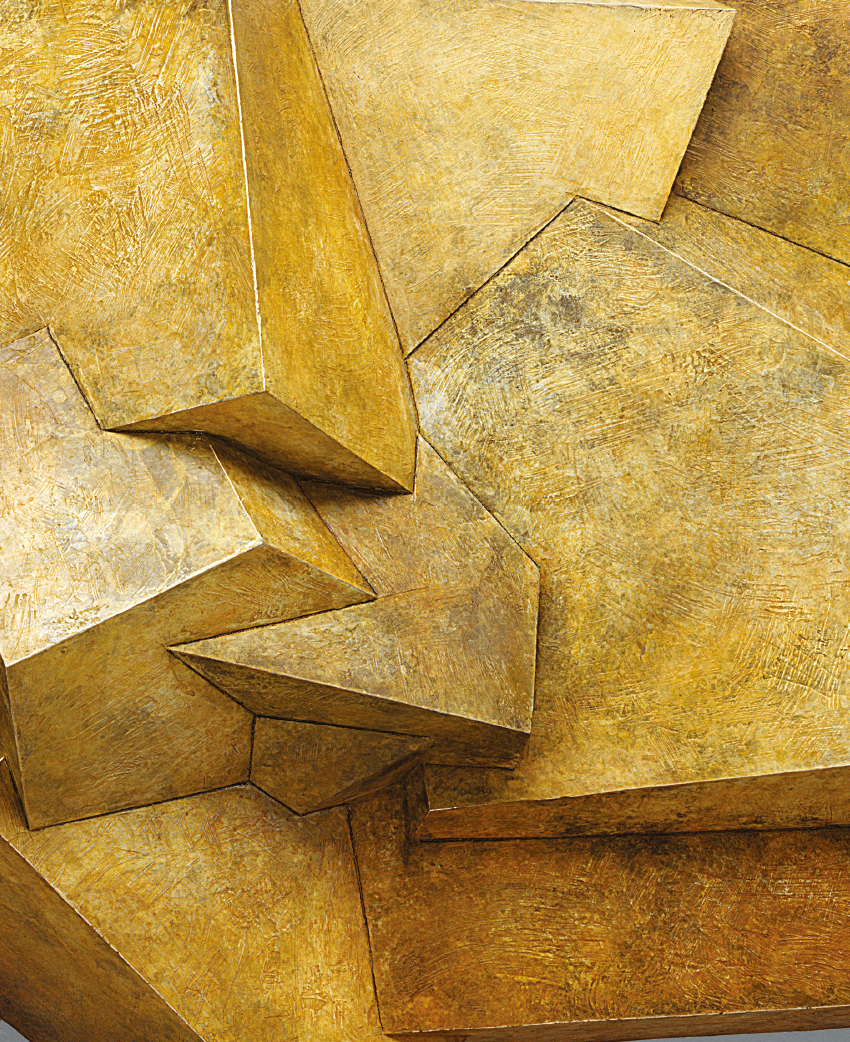
Kudless made Chrysalis III out of composite paper-backed wood veneers from Lenderink Technologies (www.lenderink.com). It contains cherry veneer (exterior) and poplar veneer (interior). To create each of these designs Kudless used the software program Rhino with Grasshopper, Kangaroo, Python, Lunchbox, and Rhinoscript.
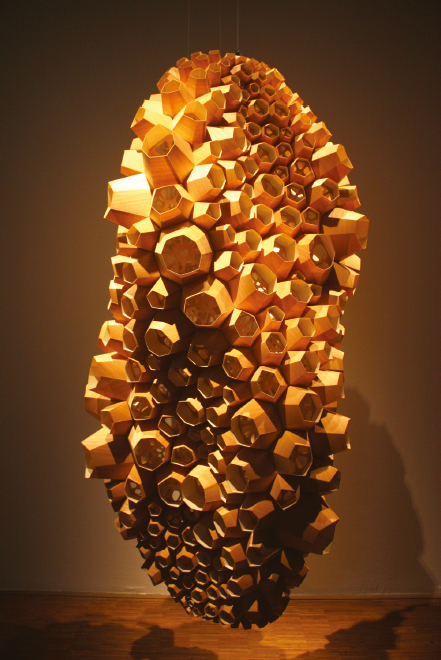
Chrysalis III by Andrew Kudless, Matsys, 2011. Photograph by Andrew Kudless.
On the book’s website at www.digitalsculpting.net you will find:
* Links to further descriptions on the process of creating the artwork featured in the galleries.
* Podcasts with the artists.
* Videos featuring the artists at work.