CHAPTER EIGHT
THE FOUNDRY OF THE FUTURE?
___________
“Digital tools incorporated in my process save me time and money. These digital tools also relieve me from the monumental tasks that are the least creative—armature building. In the long run, this gives me more time to create. When it comes to bronze—one day the build size, cost, and resolution of 3D technology will catch up to a fine artist’s needs. I don’t expect that will be too far in the future.”
Sculptor Bridgette Mongeon
Bronze casting has been in existence for thousands of years. In that time, the process of casting a bronze has changed very little. We have already seen the possibilities of creating in metal through 3D printing. However, with 3D printing of metal, the build envelope or size, the cost, and the resolution at this time leave larger sculptures or even monumental sculptures impossible to create at an affordable cost. However, new 3D technology strives to infiltrate the bronze casting process and is doing so in a variety of different ways and stages. Let’s walk through the traditional process of bronze casting and see how the new technology is influencing the processes. These influences may change the way we make fine art bronzes in the future.
Limited Editions
When an artist decides a sculpture is a limited edition, they reserve the right to pour a designated number of bronze copies ofthat same sculpture. Collectors often seek out numbered limited editions. Because the artist may have a mold for a long time, and the mold may deteriorate, many collectors feel that the lower the number in the bronze edition, the more detail it will retain and the more valuable the sculpture. Artists reserve rights to pour multiples, up to a certain number, and will label the artwork indicating the number in the edition during the casting process. At times, the sculptor may mark the art with “AP.” An AP means that the foundry poured this bronze first in the edition, and it is an Artist Proof.
If the artist or foundry places a mark of 1/20 on a bronze, it means that the individual bronze is the first copy in an edition of 20. There may be one original of the artwork, one mold of the artwork, but there will be 20 waxes made from the mold in the lost wax method of bronze casting. The foundry makes one wax for each number in the bronze edition. They are not made at the same time. The artist will have the waxes poured from the molds as needed. That means a seasoned sculptor may have a large repository of molds. When they sell out the edition, they destroy the mold. Of course, some editions sell out fast, others may take the artist’s lifetime or even the lifetime of their heirs before the artist or their heirs sell out the edition and destroy the mold. Rubber does deteriorate over time. That is why early numbers, as well as smaller numbered editions, are more desirable to fine art collectors. Art collectors believe that a sculpture that has an earlier mark of perhaps 10/100 (ten of an edition of 100) will hold the original detail and intent of the art, as compared to 80/100 (80 in the edition of 100). The artist and their foundry use the mold made of the original art prepared for the lost wax method of bronze casting to reproduce multiple pieces. They do this for either the life of the mold or the amount in a limited edition. Because the artist has accrued a great deal of time and expense when creating the first piece of art, producing multiples is where the artist and their heirs can see additional rewards of their labor—financially.
The process of bronze casting is thousands of years old and has changed little, until now.
Traditional Casting in Bronze—Investment and Sand Casting
There are two types of bronze casting. Each bronze casting process will require several steps. When we are talking about the casting process, it is important to think in both a positive and negative. The positive refers to the art, or something that looks like the art. The negative is usually the mold, the reverse image of the art or a mold that is used to create the positive. “Positive” and “negative” will become clearer with the examples in this chapter.
The first type of bronze casting is sand casting. Sand casting uses a temporary mold—the negative. Once the foundry uses this mold they cannot use it again. The foundry will need to make another sand mold for additional bronzes. Another process of bronze casting and the most-used process is the lost wax method of bronze casting, or investment casting. In the lost wax method of bronze casting, the foundry requires a rubber mold or plaster mold (negative) to create a wax (positive). There are many steps to the lost wax method of bronze casting and many ways that 3D technology is influencing this age-old process, but first let’s look at the influences on sand casting.

When talking about casting we refer to the negative and the positive. In this lost wax example, the sculpture is a positive image, a mold is the negative of the sculpture and a wax created from this mold is another positive.
Sand Casting
A foundry may choose to use the process of sand casting for an object that does not contain undercuts. A low relief medallion or machine parts can easily be sand cast. In sand casting, the foundry uses a flask or box to hold the sand.
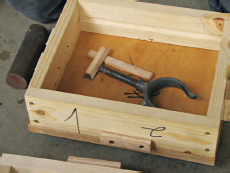
They place the object in the flask and cover it with a fine release powder and sand.
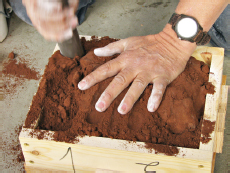
It is important to tamp and vibrate the sand firmly into the drag of the flask.

They then flip the flask over and sprinkle separating powder over the top of the part.
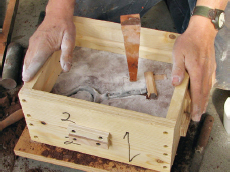
The foundry adds a pouring channel so that they can pour the molten bronze into the flask. Then, the foundry continues to add the second part of the flask, the cope. They pack the sand into the cope.
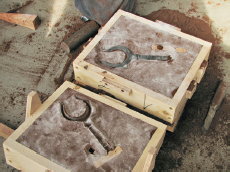
At this point, the part is now captured within the two halves of the sand casting flask. Before they can pour metal, they separate the flask, and the part is carefully removed, leaving the top and the bottom impression of the part.
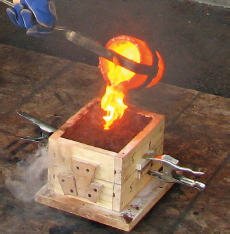
Once the foundry secures the flask together again, they heat the metal and pour it into the pouring cup or pour channel of the flask. Once cast, they simply break away the sand from the metal.

In sand casting, the foundry presses and vibrates molding sand around the art. The art is in a multi-part box called the casting flask. The art is removed and the bronze is poured into the cavity of pressed sand.
The process of sand casting is inexpensive and takes less material and time than the lost wax method of bronze casting. It is primarily used on simple pieces of art with no undercuts and where the artist only needs one part.
In several instances, the new 3D technology is borrowing from the old processes of sand casting and pushing the limits of possibility. In Chapter 7, we learned a great deal about printing objects in different materials. We have seen the detail and intricacy that is available with many types of 3D printing. Now, let’s think a little differently, let’s think about 3D printing the negative, the mold of an object. In this process, the CAD (computer-aided design) file will print not the positive (the art), but the negative (the mold section). That is exactly what Martin Dirker did in his experiment. Dirker wanted to push the limits of the 3D technology to see if it were possible to create a piece of art with many undercuts, something that could not be sand cast traditionally. He desired to create a mold using a 3D printer that prints sand. The undercuts and intricate design of Dirker’s Aztec art would be a challenge for any foundry working with a lost wax method and impossible with sand casting. Dirker creates the mold in the computer and even includes the sprues or gates, a pour cup, and vents all with the final production of the pouring in mind. He creates his designs using Wildfire CAD from PTC.com. Then Dirker 3D prints the mold using the services of Hoosier Pattern Inc. on an S-Max made by ExOne. The S-Max prints the sand mold set and leaves the void of the art where the metal foundry pours the metal. The total time to 3D print the mold set is one day. The sand mold is then sandblasted away from the metal after pouring.

Dirker’s Aztec 3D model depicts the difficulty of the cast. The pouring sprues and gates were a part of the digital design and were later cut off of the sculpture, just as they would be in traditional bronze casting.
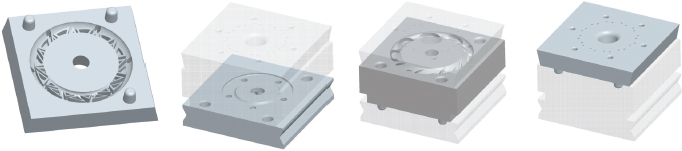
Dirker prints the 3D molds in sections with sprues, gates, and vents incorporated in the design.
Once again, the build envelope or size limitations of this 3D printing process are strong considerations. The size of the next example of 3D printing compared to the traditional process may just surprise you.
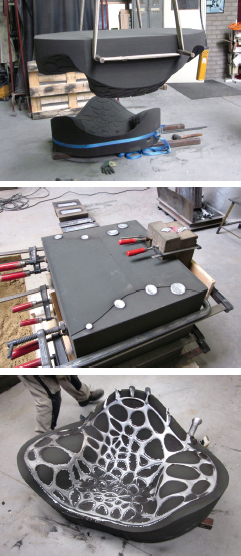
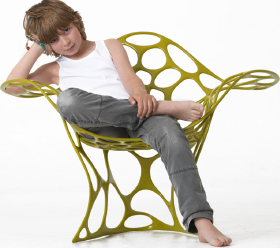
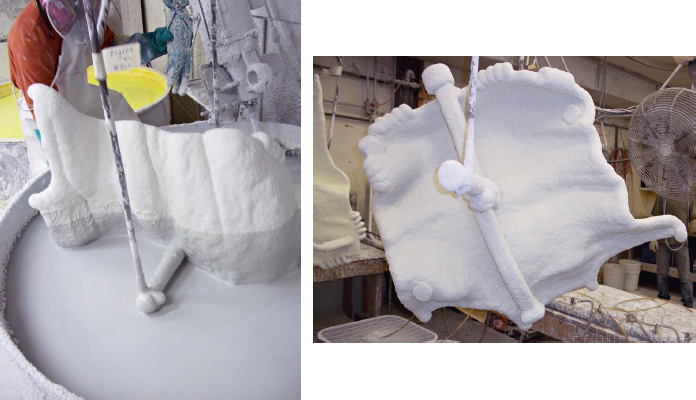
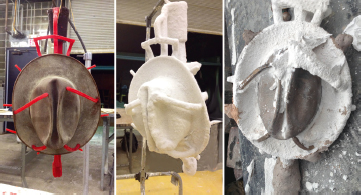
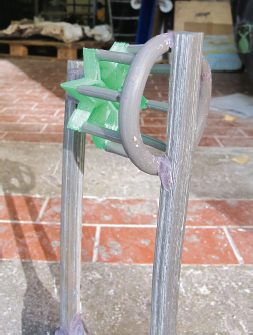
Voxeljet creates and 3D prints using methods pulled from sand casting. They 3D print the negative or mold for Peter Donders’ chair titled Batoidea or Stingray.
Another example of 3D printing and sand is Peter Donders’ Batoidea or Stingray aluminum chair created with Voxeljet. Donders created the chair in the software Rhino 3D. The sculpture Stingray required five 3D printed mold parts all 3D printed to fit together perfectly as designed in the computer. The largest sand part was 1,105 × 713 × 382 mm (approximately 3 feet 7 inches × 2 feet 4 inches × 1 foot 3 inches). This was easily achieved with the Voxeljet machines that have a build size of 4,000 × 2,000 × 1,000 mm.
Lost Wax Method of Bronze Casting or Investment Casting
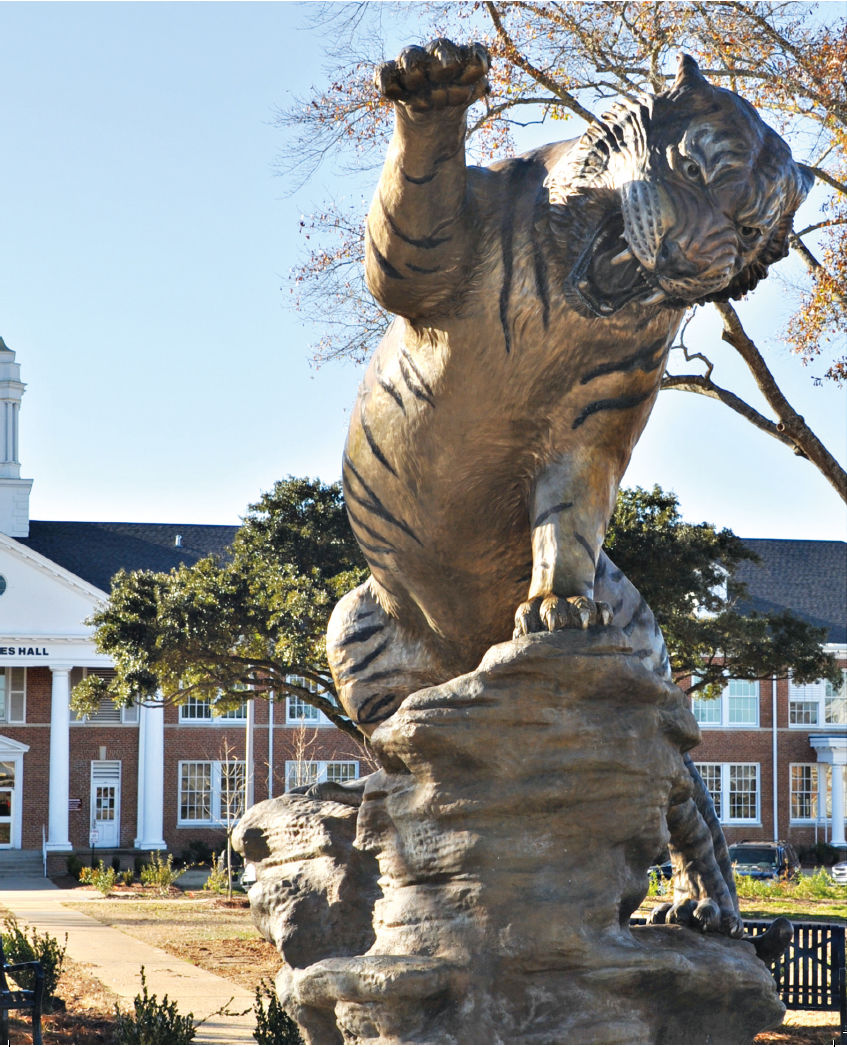
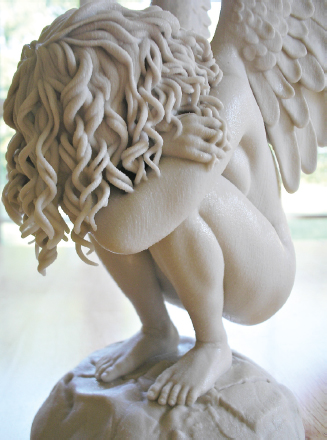
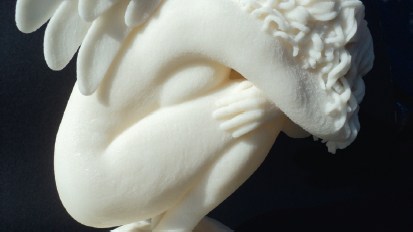
We have taken a look at sand casting, and how the digital processes are beginning to influence this type of bronze casting. Let’s now take a look at the traditional process of investment casting or the lost wax method of bronze casting and compare how 3D technology is influencing these ancient processes. There are many steps involved in the lost wax method of bronze casting. We will examine each as we travel through the foundry with the Grambling Tiger created by Bridgette Mongeon from Chapter 6. The first step in this long process is mold-making.
Mold-making
If a sculpture has many intricate pieces with many undercuts, and an artist wants to create it in bronze, then they will use the lost wax method or the investment process of bronze casting. When an artist completes a job, whether small, life-size, or monumental, they send the art to the foundry to begin the process of bronze casting, or they do the first stage of the foundry process themselves, the mold-making. This mold-making process has a few steps. In the first step, the artist divides up the sculpture. They then seam up the sculpture to prepare it for rubber. The rubber process consists of coating the sculpture with mold release, painting rubber, and making a mother mold. Perhaps examples of this process will help to make it clearer. Let’s go back to the tiger.
The artist separates the tiger into many pieces. The individual pieces may be both large and small. The artist determines where to cut the sculpture by what they need to obtain a good mold and what will facilitate the bronze casting process. Here the artist removes the tiger’s fangs to create a separate mold.
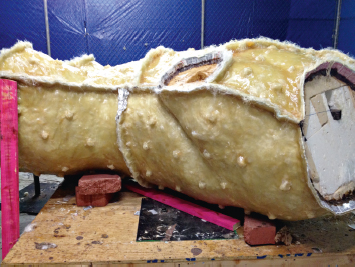
DIVIDING THE SCULPTURE With the first part of the mold-making process, the artist or the foundry determines how to divide up the sculpture. They must create pieces that are manageable and that can pour properly. If the sculpture is a life-size or monumental sculpture, they divide up the sculpture using whatever cutting device will work, such as knives or even reciprocating saws. It does seem a shame to have to destroy the work of art to make it into bronze. But this is all a part of the process. When dividing up the sculpture, they are cutting through not just clay, but also the armature. As we have already learned, armatures may consist of a variety of materials such as rebar, chicken wire, foam, plumbing pipe, or other products that will support the clay as the artist works. If the artist has used the CNC milling process to create their armature, then cutting apart and even moving a sculpture to a foundry is a lot easier. Sculptures created using armatures made of CNC foam are much lighter to handle and easier to slice.
On large sections, the mold maker divides up the mold by creating seams. They can section off the sculpture by either using shims or claying-up the seams. With shims, the mold-maker paints rubber over the shims. This allows them to make both sides of the mold at one time. The mold-maker can also clay up a seam using clay, but this takes a bit more time as they can prepare and paint rubber over only one side at a time. When claying-up one side, the mold-maker paints rubber and then, after making the mother mold, the mold-maker removes the clay wall and repeats the process on the other side.
The artist creates seams by claying-up or using shims. The mold-maker uses playing cards that are taped up and stuck into the clay. These edges create the shims on the tiger’s torso.
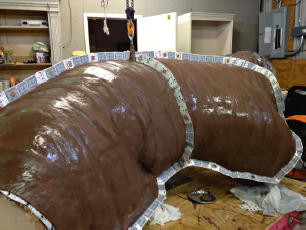
There are more than 30 mold pieces to the tiger, and each of these pieces has multiple sections or seams. After the artist divides up the sculpture, she prepares each section. She sprays a releasing agent on the clay surface, so the rubber will peel off later, and then paints or pours several layers of rubber over the artwork and seams to reach the correct thickness. The rubber must be flexible enough to allow the wax to release, but strong enough to take the wear and tear of pouring multiple waxes for each number in the edition.
Once the artist makes the rubber mold, it is necessary to contain that rubber mold in something. If it is not contained, the rubber will lose its shape when it is taken off the sculpture. The artist makes a “mother mold” from fiberglass or plaster.

The artist paints multiple layers of rubber over each section of the tiger.
She covers the entire rubber area. She may section the mother mold further so that it can release from the art. The mother mold holds the rubber in place during the next part of the process when the foundry pours or paints in the wax. Once the artist creates the mother mold over the rubber she takes off both the mother mold and rubber from the original art. The pieces are then cleaned and prepared for the next step—the wax. The process of mold making does destroy the original, though the artist may be able to salvage the clay for the next job.
The mold-making process is time-consuming and costly. Usually the mold costs about half to two-thirds the cost of casting the art. For example, if a sculpture costs $7,000 to cast at a bronze foundry, it is safe to estimate the mold will be an additional $5,000–$6,000, and can take a considerable amount of time to create. The mold for the tiger took a team of seven people approximately five weeks to complete.
Mother molds made from plaster or fiberglass resin hold the rubber in place.

The clean molds hold the detail of the original art and are ready for the next step—the wax.
The Influences of the Digital Processes
Individuals who work in 3D technology continuously develop new materials. It is only a matter of time before we may begin to see the possibility of rubber molds for investment casting printed from a 3D printer. However, digital technology is already entering the next step of the traditional process of investment casting, the creating of the wax. In fact, there are several types of digital technology that are making their way into the bronze process from this step forward. That means that any 3D process that we talk about from here forward, if used, can do away with all of the steps that we have already discussed in the traditional investment process of casting. It may even do away with the physical sculpting if it can be created in the computer. However, we still need to look at the big three criteria—build size, resolution, and cost. A new technology that can provide a large build size, with good detail—including the artist’s desired texture and undercuts, and do so at low or comparable cost to the traditional process of bronze casting will become a viable part of the process in the foundry of the future. These processes will be practical and important alternatives in future bronze casting and will eliminate the laborious step of mold making altogether.
We have already seen how the process of 3D printing of sand casting is outshining the traditional sand casting method, although even that process must measure up to the big three criteria. The 3D sand printing must be comparable in build size, have good detail, and comparable cost before it will be a true alternative to traditional sand casting. Let’s take a look at the rest of the process of investment casting—the wax, shell, and burnout.
The Wax, Shell, and Burnout
When you look at a life-size bronze sculpture figure on the street or in a museum, they are not solid bronze. The bronze is only a shell of bronze. The next step of the foundry process, the wax pour, determines the thickness of this bronze shell.
In each of the rubber molds, tucked securely and held in position by their mother mold, the foundry will either pour or paint several coats of foundry wax. The wax, when it reaches the appropriate thickness, is a replica (positive) of the original sculpture. The thickness of the wax varies with each piece, with a minimum thickness of ⅛ of an inch.

The foundry paints layers of wax in each shell to create a wax positive of the original art. Photograph courtesy of Shidoni Foundry, NM.
Once the waxes are cool, the wax worker cleans and chases them. They work on cleaning up the many parting lines from the mold and other imperfections that are in the wax. The foundry men and women work tirelessly to make the art perfect, while still retaining the integrity of the artist’s work. The artist may even work the waxes to create even more detail. The foundry process of working in wax is just one more area of the traditional process that is hands-on. It can influence how each bronze sculpture in the edition is different from the next. If you remember the Remington bronzes mentioned in Chapter 2, you can now begin to see why each of the pieces in the Remington edition might not look exactly alike; so many hands had to touch and work the waxes to get to the finished bronze. In each step there are nuances of the process and the hands of each foundry worker that works on them affecting the look of each piece. Each set of hands leaves their mark on the art. At this point, in the foundry process of the tiger, whatever is in the wax will show up in metal.
Once the wax worker cleans the wax, it is then sprued or gated up. They place wax gates or rods strategically on the wax positive. Gates are a series of tubes or branches that allow gases to escape and provide a smooth pour. The wax worker also adds wax sprue cups. The cups will give a channel for the wax to exit and a place for the foundry to pour the metal. We will see this in the future steps, but before this can happen, each of the molds must once again enter a new stage of the foundry process—creating the ceramic shell.
As we have already seen in Chapter 7, jewelers have been using the 3D technology to their advantage by having their designs 3D printed in wax for casting. These wax castings hold an incredible amount of detail. Once again, if the build envelope or size of 3D prints can increase, and do so without costing more than the traditional process of bronze casting, it is feasible that 3D printing in wax will be a very viable resource, and probably the best, for eliminating the step of a rubber mold altogether.
The foundry adds sprue cups and gates to the waxes to help the metal to flow into the investment casting and for the gases to escape. Photograph courtesy of Shidoni Foundry, NM.
Some artists create their original sculpture in foundry wax. When providing this to the foundry, unless the foundry makes a rubber mold from the provided wax it is then just a one-up process. The foundry will gate up the wax, adding sprue cups just as in the tiger sculpture. The foundry will burnout the provided wax. When an artist creates a sculpture this way, they can only make one bronze from one wax. Without a mold, they cannot make multiple pieces.
The Shell
In this part of the process, the foundry creates another mold of each piece. This time they make a mold from the wax. They call this the investment or ceramic shell, though it is not made out of ceramic. The foundry first dips the wax pieces into a silica slurry and then covers it in sand or dry silica. The foundry repeats the dipping and covering process until they have covered the entire wax with the appropriate amount of shell. Shidoni Foundry in New Mexico transfers the pieces on pulleys throughout the dip room. The pulley system allows them to work on very large sections.
The burnout removes the wax, leaving a cavity in which the foundry will pour bronze. Photograph courtesy of Shidoni Foundry, NM.
In the traditional process of bronze casting, the foundry puts the ceramic shells into the burnout oven, upside down, and heats them up very slowly to prevent cracking of the shells. The foundry captures the melted wax for recycling. They lose the wax in the casting. This is why the process is often referred to as “the lost wax method of bronze casting.” The cavity that once held the wax is now a negative space reflecting all of the detail of the original artwork found in the wax. The burnout temperature of a typical investment mold is around 1,300–1,500 degrees Fahrenheit. The heat in a burnout not only melts the wax, but the high temperature also vitrifies or solidifies the shell.
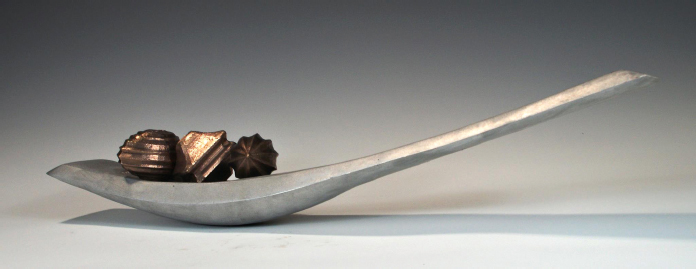
The foundry uses wax for investment or lost wax method of bronze casting because it is inexpensive, it burns away at a low temperature nicely, and it has little to no toxic fumes. Sculptors have been using other objects, besides wax, to create artwork. An artist can use anything that they can dip in a slurry mixture, and that will burn away clean.
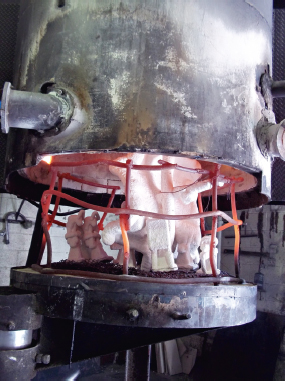
An artist can use anything that can burnout clean in an investment cast. Cindee Travis Klement takes an old derby, sprues it up, dips it, and burns it out, pouring bronze into the investment to create Heritage.
Artist Cindee Travis Klement’s work Heritage is an example of using other items in investment casting. Cindee dipped her grandfather’s hat and made the investment casting right around the original object instead of going through the mold and wax process. Of course, Cindee sacrifices the original hat that she burns away. As long as the object can burn away clean and leave no residue or ash, an artist can use it in investment casting. Unlike when an artist makes a mold of an object, this artwork becomes one-of-a-kind. To make additional hats, Cindee will have to make rubber molds with mother molds from the bronze that she cast. Each rubber mold would provide waxes of Heritage to cast further pieces in the edition. Let’s follow the rest of the process of traditional bronze casting and then review some of the other things that are being 3D printed and burned out.
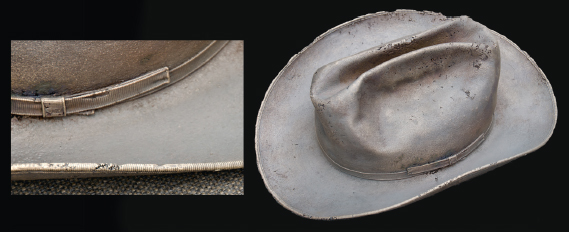
Investment casting can retain great detail. Heritage by Cindee Travis Klement. From the Houston, Texas, George Bush International Airport “Portable Works Collection,” Permanent Collection 2014.
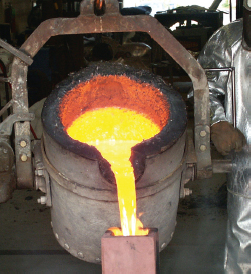
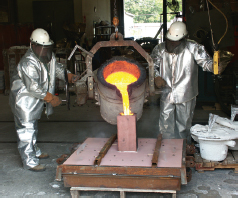
The ceramic shell, once it comes out of the furnace and is now void of wax, is hollow, heated, glowing, and ready for metal. In the crucible, the bronze ingots melt to about 2,000 degrees. It is quite something to see as workers in the foundry don their fireproof suits, the furnaces roaring in the background. The workmen place the ceramic shells in the sandpit and then, with the help of an electronic crane, the suited foundry men pick up the crucible filled with the molten bronze and pour the bronze in each warm investment. It has been an extremely long journey, from sculpting, mold-making, wax, and metal, but we are still not done with this foundry process. Before we read about more ways that 3D technology is entering these age-old processes, let’s complete this bronze process on the tiger.

Shidoni Foundry pours molten bronze in the ceramic shells.
Divesting and Metal Chasing
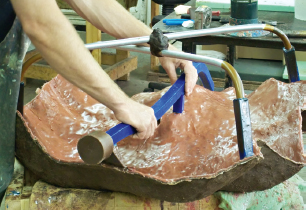
The foundry must remove the ceramic shell to reveal the art. This process is called divesting. They carefully use hammers, chisels, and sandblasting machines to break away the investment shell from the metal, revealing the detailed tiger. The result of all of this labor is a pile of bronze casted tiger pieces. The sprues, gates, and pouring cups that were once in wax are now extremities cast in metal. They must be carefully cut off of the sculpture. The foundry cast the sculpture in many pieces. Now they must weld all of the pieces together. Welded seams must be flawless. The foundry men “chase” the metal using hand-tools that will blend the welded seams, matching the artist’s textures and hand-strokes.
After the long laborious process of bronze casting, the foundry welds the pieces together. They go to great lengths to match the style of the artist as they pull the massive metal sculpture together.

Patination
In our bronze process, the patina is a coloration of a metal surface made by time or a chemical process. However, metal is not the only thing that has a patina. A wooden dresser darkens with age and usage. The brilliant green color of the Statue of Liberty is there because of the chemical reaction on the copper. All of these are examples of coloration of a surface by time and/or chemicals. Poet and architect John Ruskin called patination “the golden stains of time.” The foundry’s final process before shipping the sculpture is the patina.
Creating a good patina is an art in itself. The person who creates the patina in the foundry is a sort of chemist. He creates a patina on bronze by exposing the bronze to chemicals that cause the metal to react. He knows just when and how to apply, dilute, and mix his pallet to create the effects he is after. He may mix ferric nitrate with distilled water and sulfurated potash to get a blackish brown, or sodium thiosulfate, ferric nitrate, and distilled water to obtain a blue-green. He knows what chemicals to apply and at what temperatures to apply them to get the look the artist desires while enhancing the details of the metal. As a final application, the foundry applies either a wax or plastic coating to protect the precious metal.
A patina is a chemical reaction to metal. The person who creates patinas in the foundry must be a great artist and a type of chemist.
We have talked a bit about patinas used with 3D printed objects in Chapter 7. It will be interesting to see how artists experiment with the patinas of 3D printed metal objects using chemical processes. Will the reaction in the metal be the same as in traditional processes? The author, at the writing of this book, has not found anyone who is documenting their process of exploring traditional patinas created by different chemical reactions with 3D printed metal. Of course, any artist desiring to explore the traditional patination process on 3D printed metal will have to investigate the metallurgy of each 3D printed piece. As we have seen in Chapter 7, 3D printed metal is not always done with the same combination of metals as in the traditional process of bronze casting. Such is the case with the “bronzes” that 3D printing companies create through an infiltration process as described in Bathsheba Grossman’s sculpture in Chapter 7. In this process, the 3D print is porous and absorbs the infiltrate. An artist applying a traditional chemical patina to 3D printed art may not have the same control over the application and may not be able to create consistent color over the entire piece of art. Although, as is often the case with art, maybe the lack of control and randomness of traditional patina on 3D prints will become a part of the art.
As you can see, the steps to create a traditional bronze sculpture are laborious and costly. 3D technology is making great advancements, and if the big three criteria—build envelope, detail, and cost—can begin to match the traditional process then we may be on our way to creating the foundry of the future. Now that we are familiar with the traditional processes let’s take a look at a few more ways that 3D technology and the experiments of others are pushing the limits.
Investment Casting of Other Materials
Burnout of 3D Print Created in PLA Plastic
Brussels-based artist Haseeb Ahmed (USA) worked in collaboration with Kunstgiesserei St. Gallen while at a residency at Sitterwerk in Switzerland. There he explored the possibilities of 3D printing and investment bronze casting. It is always a creative adventure when vendors work with artists who want to explore the possibilities of technology. Together Sitterwerk (www.sitterwerk.ch) and Haseeb collaborated in taking a 3D model printed in the fused deposition processes of 3D printing from his open source RepRap Mendel Prusa 3D printer using PLA plastic (www.reprap.org). Haseeb also owns a Cartesio by Mauk CC for its large build envelope (www.mauk.cc). What Haseeb wanted to do was use the 3D printed part as others would use the wax in the lost wax method of bronze casting. He wanted to see how this 3D print would react as the burnout substance instead of wax in bronze casting.
In the Art and Technology podcast with the author, Haseeb states:
It was interesting to see how it wasn’t exactly the same object. On the one hand, it was very similar and very high resolution. You can see all of the traces of the 3D print itself, like moving layer by layer, but at the same time there were new artifacts that were present with this form of transformation.
The idea of having an object that is at first a virtual object, then is a physical object in PLA bio-plastic, and then develops real permanence by making it into bronze, was a transition that the artist found interesting.
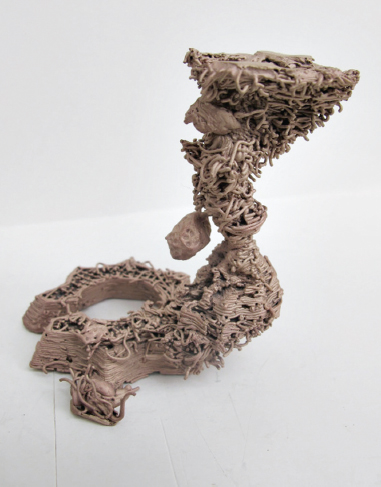
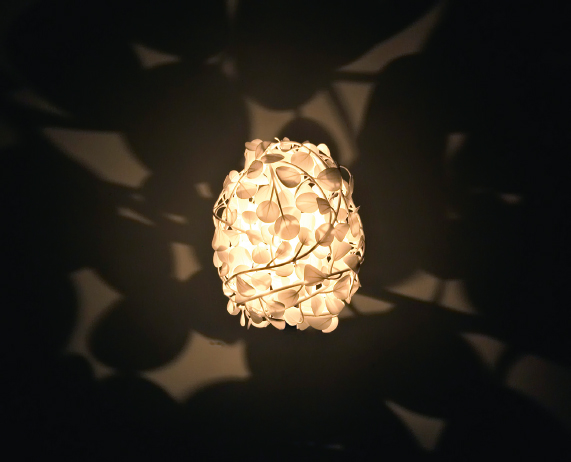
In another experiment, Haseeb explored the limitations of the 3D process and used them to his advantage by taking the exactness of the 3D printer and using it to the point of failure. His hourglass piece entitled Stern, which he cast in bronze, left things to chance. “A new type of materiality. The limitations are what defines it as a unique form of production,” states Haseeb. The art clearly exhibits the layering of the PLA plastic created with a low-resolution 3D printer, but as the model builds, and the artist pushes it to the limits, the pieces collapse. The result is a fragile art that resembles a bird’s nest.
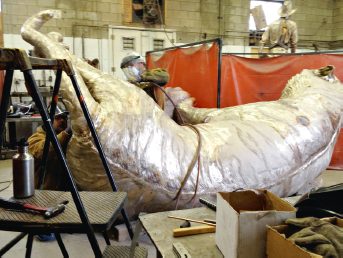
The foundry gates up Haseeb’s 3D print. Photograph courtesy of Haseeb Ahmed and Tim Buechel.

Haseeb’s bronze sculpture after pour and before chasing. Photograph courtesy of Haseeb Ahmed and Tim Buechel.
It is well known that other types of 3D printing such as stereolithography create higher resolution models, but Haseeb wanted to use fused deposition 3D printing, as it is more available to artists. What interested Haseeb was exploring randomness and chance while combining it into something highly controlled.
Haseeb notes that in the experiment, the PLA burned clean and didn’t interfere with the bronze pour. It is, after all, thermoform plastic and melts at a lower temperature. An artist should use precautions when burning out any plastics.
Haseeb’s future experiments will include 3D printing the sprues for the print with the 3D art. His list of vendors and software are as follows: he has been using Rhino software and claims, “It is the most intuitive and is the closest to drawing” (www.rhino3d.com). He is thinking of moving to Blender because of the large toolset for 3D printing and the fact that it is open source (www.blender.org). He cleans up his files using Netfabb (www.netfabb.com) and for a G-code generator he uses the open source software Slicer (www.slicer.org).
Paper
Artists are always experimenting. Many desire the opportunity to shorten the time that it takes to create a bronze with the lost wax method of bronze casting, as well as decrease the cost. Paul Effinger of Effinger Design and Foundry has been one of those experimenters (www.effinger.us). In 2009, Paul spoke with AGS 3D and together they collaborated on taking Paul’s digital design Artifice, created in ZBrush, and 3D printing the sculpture.
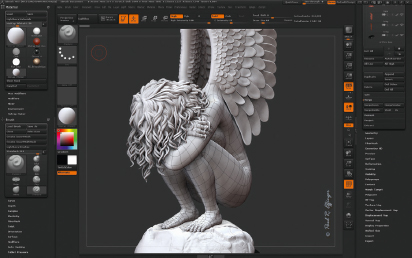
Paul Effinger created Artifice in ZBrush. He had the sculpture printed on a ZCorp 510 in ceramic powder and then proceeded with a cellulose (paper) print. He used this cellulose print as the investment cast to create a bronze of the art.
They first printed Artifice in ceramic and then experimented with paper cellulose printing with a wax infiltrate.
The cellulose piece went through the traditional investment casting process at Michael Hall’s foundry (www.studiofoundry.com). Effinger abandoned this particular process because he felt that he wanted a smoother finish on the art. The pattern in the surface of the art created by the 3D printer’s paper layering process transferred to the bronze. The chasing on the bronze to reduce or eliminate these lines would be laborious and costly.
The layering of the papers shows in the 3D print.
There are others who are promoting the use of paper as investment casting for machine parts. An artist can embrace the nuances of the machining layering process of 3D printed paper and make the lines a part of the art. Unless there is a process to remove these lines before investment casting, it might be better to use other options such as 3D printing using SLA and resin for investment casting and burnout.
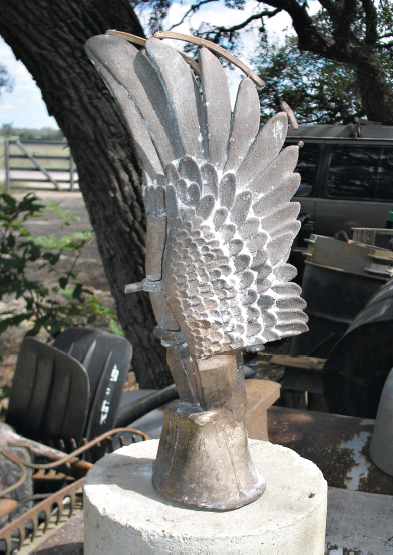
Wings of Artifice, direct cast bronze from 3D printed medium, produced at Michael Hall’s Studio Foundry, Driftwood, Texas.
FACTUM ARTE MERGES FINE ART AND TECHNOLOGY
Factum Arte located in Madrid, Spain, is a combination of artists, technicians, coders, conservationists, and more (www.factum-arte.com). The many creative people at Factum Arte have done what so many artists featured in this book have done. They have combined art and technology, and pushed the limits to find “original solutions to specific artistic and cultural challenges.”
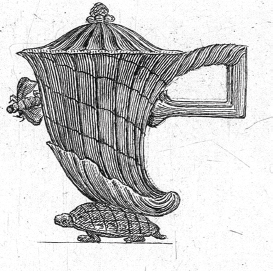
From a print in Diverse Maniere d’adornare i cammini ed ogni altra parte degli edifizi desunte dall’architettura Egizia, Etrusca, e Greca con un Ragionamento Apologetico in defesa dell’Architettura Egizia, e Toscana, opera del Cavaliere Giambattista Piranesi Architetto, Rome 1769, Wilton-Ely 878 (Factum Arte, www.factum-arte.com).
In 2011, Factum Arte assisted in creating an exhibition of work by Italian artist Giovanni Battista Piranesi (1720–1778). Piranesi designed works of art on paper around 250 years ago. Factum Arte merged the technologies and the art and craft mentioned in this book and were able to make the Piranesi sketches into a real object of art in 3D physical form.
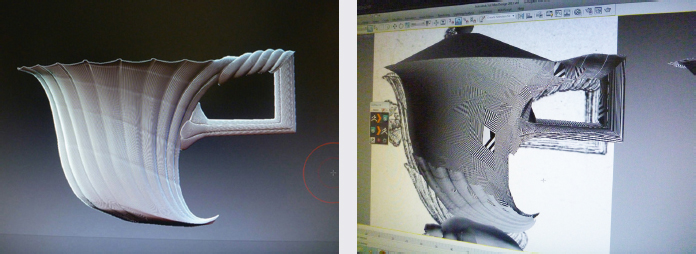
A 3D computer render placed over the sketch of Piranesi’s coffee pot created at Voxelstudios, Madrid (www.voxelstudios.es).
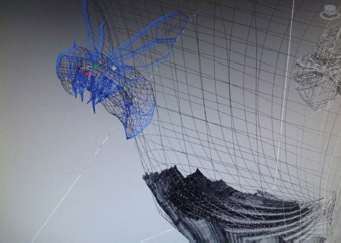
A render of the 3D model.
Recreating works of art from a sketch takes a bit more thought than just copying a design in 3D and printing it out. Factum Arte wanted the art to fulfill its original intention. A coffee pot had to look and feel like a coffee pot. They could not know when they copied the sketches that the weight of the coffee pot would be too much for the size and the position of the handle. Touching and holding the object is a vital part of the 3D design process. It is possible, had Piranesi had access to this modern technology, that he would have discovered the same thing. Factum Arte experimented with the thickness, along with paying attention to directions from the silversmith and the foundry limitations. They adjusted the weight so that the coffee pot would feel comfortable in the hands of the user.
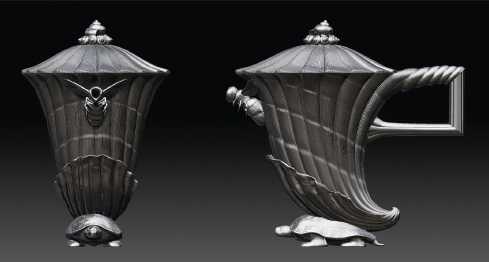
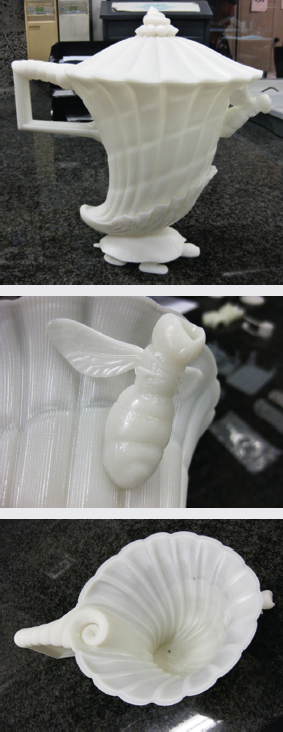
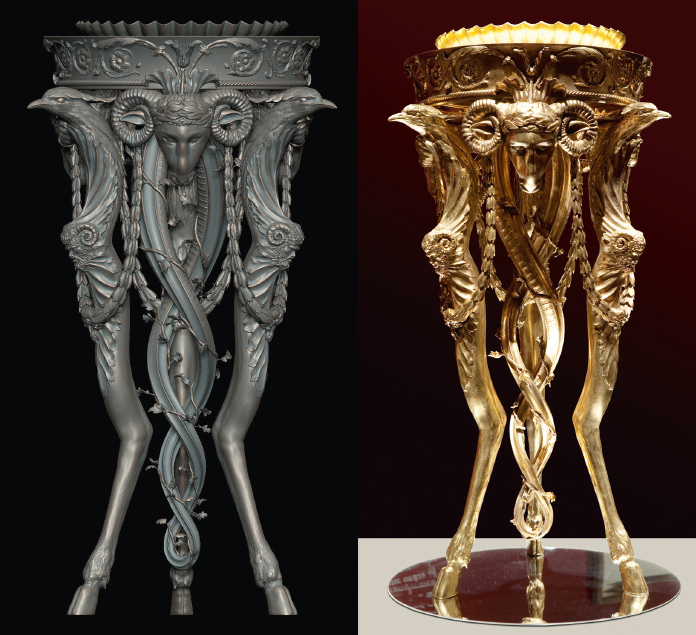
Factum Arte 3D printed each piece of the Piranesi coffee pot using the company Materialise and SLA prototypes. These were not created for direct burnout. The SLA prototype still went through the traditional process of lost wax casting with a mold created from the SLA 3D print and a wax created from the mold. Besides the complications with the thickness, Factum Arte found that the traditional lost wax process allowed them to put handwork into the piece and detail that they would not get from lost SLA. They recreated Helix Tripod (see following pages) using the same methods, as well as other works of Piranesi using other processes. Each of the pieces made and realized in a physical form are for sale and fund further exhibitions at Fonaione Giorgio Cini. Visit the Factum Arte website for more details on their process.
“Indeed the results may be seen as being much more faithful to Piranesi’s intentions than if they had been made by craftsmen in his own day. This operation is the practical proof that the ideas of the past can travel through time to blend and interweave with those of the present, driven by today’s desires and expectations. Through new technologies, Piranesi’s ideas have finally ‘materialised’ in pleasurable new works of art. At the same time, the process has provided remarkable insight into Piranesi’s mind, practice and works in a way that could not have been possible in the past.”
Pasquale gagliardi
Secretary General of the Cini Foundation,
Factum Arte website
Materialise, in Belgium, joins the team of craftsmen on the Piranesi project (www.materialise.com). Materialise makes these prototypes using the stereolithography (SLA) process of 3D printing (see Chapter 7).
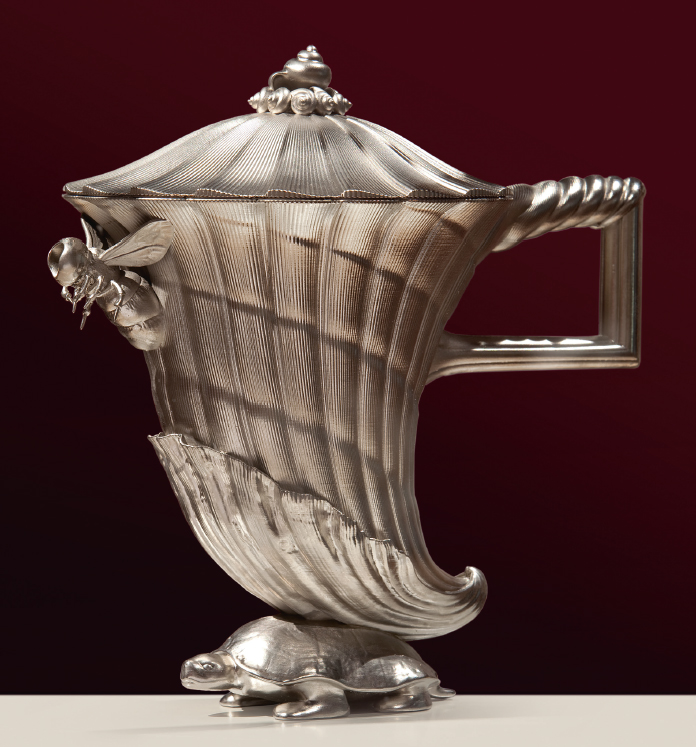
Piranesi Coffee Pot. Edition of 9, sterling silver, 25 cm high, www.factum-arte.com.
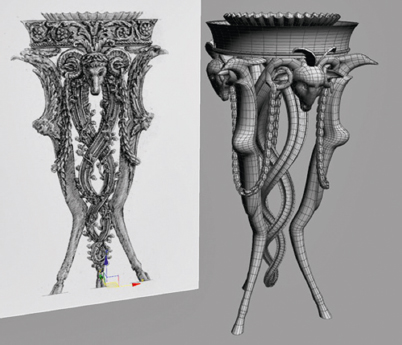
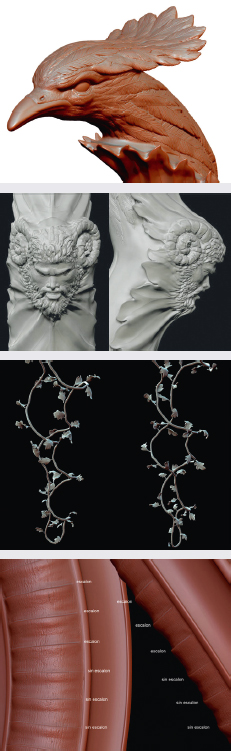
Helix Tripod, details of the ZBrush model created by Voxelstudios—figures, leaves, and details in the ram’s horns.
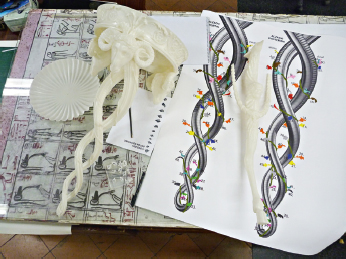
3D printed resin model by Materialise.
Burnout of SLA for Large Sculpture
We have examined 3D printing in detail in Chapter 7. Many consumers are becoming aware of 3D printing through their exposure to fused deposition modeling (FDM) consumer 3D printers. We have explored how jewelers have led the way with casting metal by creating detailed 3D printing using 3D printing of wax, which they then cast into metal. Jewelers have been using 3D technology this way for years. However, the build envelope or sizes that are available for wax printing is small and the cost per inch is high. We have also explored how stereolithography (SLA) offers good detail for 3D printing as seen in the examples of the Piranesi project with Factum Arte. There are even some affordable consumer SLA machines that print very detailed objects, again with a small build envelope.
What about the possibility of the lost SLA process of bronze casting? There are a few foundries in the world who are working with investment casting and burnout of large SLA 3D printed pieces; three such companies are Polich Tallix (USA, www.polichtallix.com), Pangolin Editions (UK, www.pangolin-editions.com), or Fademesa Bronze Art Foundry (Spain, www.fademesa.com).
To burnout large SLA pieces in investment casting you first need to have large SLA printed pieces. These printed pieces come from Materialise in Belgium. The Mammoth SLA 3D printer at Materialise has a build envelope of 2,100 × 700 × 800 mm. In a 2010 Art and Technology podcast, Joris Debois from Materialise in Belgium, expressed an interest in finding foundries in the US that might like to work with the lost SLA process of investment casting. He did say that a foundry would have to modify their casting process a bit.
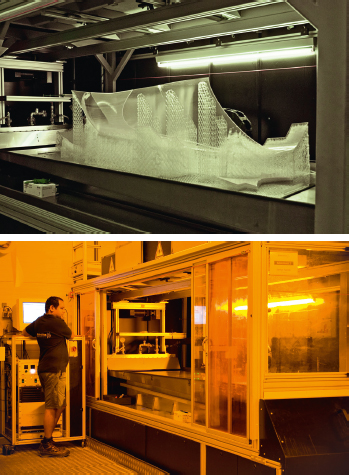
The printing of the Areion by Formula Group on the Mammoth SLA 3D printer.
We can’t expect the foundries now casting in SLA to give up their secrets. Knowing what we do about both 3D printing, and now the lost wax method of bronze casting, we can assume there are several problem areas that a foundry of the future will need to address when trying to use SLA as a burnout material. The following are only suggestions and are not meant as guidelines for burnout process of SLA or other materials. A foundry interested in modifying their processes to include burnout of SLA should contact Materialise or 3D Systems for recommendations and suggestions.
We have already seen how creating a monumental sculpture in the traditional process of bronze casting, as with Bridgette Mongeon’s tiger sculpture, has its challenges. Let’s examine the foundry steps again and consider what modifications might be necessary to create a monumental sculpture using the lost SLA process with large 3D prints.
How thick is the print? The traditional foundry process is, of course, much more involved than what we describe in this chapter. We could go deeper into the process when we talk about how thick a wax needs to be in the lost wax method of bronze casting to accommodate the welding, or metalwork, even the engineering, installation, and safety of the art are considerations. Or, as in the case of the Piranesi coffee pot, the thickness of the walls will affect the usability of the object. The foundry takes all of these factors into consideration when creating the wax in the lost wax method of bronze casting. It makes sense then that the same thoughts will have to translate to the 3D print in a possible lost SLA process. That means that instead of thickening up a wax or a portion of a wax in a mold with a few additional coats of wax brushed on by hand, the designer will need to consult with the foundry to adjust for these considerations within the computer, long before they make a 3D print. They will have to take into account the thickness of each SLA piece, including a variation of thickness in one SLA print or model section. Will the metal department need to weld an area and therefore do they need more or less mass to provide for this? Will the heat from one area in the pour affect another area? Where is the best place to join a seam in the sculpture? These are all things that the foundry will consider. Remember, SLA 3D printing using laser and resin to capture great detail is costly. Materialise bases the cost of the project on four factors. The first factor is the machine time. The second factor is the amount of resin used and the amount of the supports needed. The third is the complexity of the file. For example, if the laser has to jump from one detail to the other it will take longer to build the part. The fourth consideration is the size of the object. The size affects pricing, especially in the z-axis. The higher the object, the more time that it will take on the machine.
Thickening areas in an SLA 3D model for printing will add mass, and mass means expense. However, if the lost SLA process is viable, we could weigh it against the costs of parts of the lost wax method of casting that we no longer need. SLA investment casting means no rubber mold, no mother mold, no wax, and no wax clean up. The lost SLA investment casting offers a tremendous amount of design opportunities, especially for complex geometries that would be difficult to create in a traditional process. It would also serve a purpose for large sculptures. At this date, even with the considerations of what the foundry no longer requires, like wax and mold with a lost SLA investment, the costs of SLA far exceed the costs of the traditional process.
Foundries who work with casting monumental sculptures are set up to produce molds, pour waxes, create investments, and pour metal in larger sections. They have modified their process to be able to accommodate larger pieces—right down to cranes and track systems throughout the foundry. These extras assist them with the dip and transfer of heavy investments. They also have larger crucibles and cranes in the pouring room. Large molds and large waxes have a tendency to bend out of shape. Deformation of pieces can become a nightmare down the road when the sections are no longer in wax but are instead in metal. There are many pieces of a sculpture that need to fit together. Flexible SLA parts might be a bit of a challenge. If they warp then they will not fit together when they are in metal.
Cleaning the SLA
There is less of a chance of marring or damaging a 3D print created for the lost SLA for investment as compared to having to clean up wax made from a rubber mold. However, the artist or foundry may still desire to change, modify, or clean-up areas of the SLA. When working in the traditional foundry process and wax, the wax worker will use a soldering iron, hot tools, buffing cloths, and wax polish to clean up the wax before it goes into the slurry to create the investment. The softness of the wax is good quality to work in. When working with SLA, the foundry worker or artist may still want to add or change elements by hand. The SLA 3D print is made with resin. The cleaning is different and will consist of using an X-Acto knife, foam sanding block, sandpaper, nail files, and possibly chemicals.
Gating Up
Before the foundry can make the investment, they will need to gate up the SLA pieces just as in the lost wax method of bronze casting. Remember the gates help gases to escape and the metal to flow. One option is to create the gates in the computer and have them printed out in the SLA along with the art. Printing the gates with the sculpture may assist in keeping the large sections from warping; however, the cost of using printed gates or sprues can add substantial expense to the project.
We have seen how jewelers are using 3D printing of wax and burnout on a small scale. In Chapter 7 and the corresponding Art and Technology podcast, Lisa Krikawa of Krikawa Jewelry Design discusses how her company will often incorporate nubs into the design of her jewelry for sprues. Creating nubs and adding wax gates for the lost SLA process of casting can give the artist more control over the work. They can choose the best place for them. But, of course, the artist must educate themselves to know exactly where to put such extensions so as not to interfere with the foundry process. It would also make sense to remember that the vestment will now contain two materials—the SLA resin piece and the gates made of wax. Each will need to burnout and not interfere with each other. For example, how does the wax affect the resin when the foundry tries to burn it out at a high temperature? Does it make a cleaner mold or cause problems?
Investment and Burnout
Materialise is not the only company exploring 3D printing and the lost SLA method of casting metal. Many other 3D printing companies support investment casting for a variety of applications including the automotive, marine, and defense industries.
The biggest change in the casting process using SLA appears to be in the investment and burnout. We have looked at how artists are burning objects other than wax out of an investment, such as Cindee Travis Klement’s sculpture Heritage. The foundry and the artist must take two things into consideration during a burnout. The first is how clean is the object as it burns away? Does it leave behind a lot of ash or residue that will change the surface detail of a fine art bronze? The other element to consider is the expansion on the investment during burnout. If the object is solid instead of hollow and there is no place for the object to expand inside the investment during burnout, then the shell may crack. There are two options during the lost SLA process; one is a stronger investment. Indeed some companies are making investment products just for 3D printing burnout. The other is to 3D print a collapsible interior wall, such as QuickCast™ by 3D Systems or TetraShell by Materialise. These hexagonal support structures, printed within the 3D piece, allow the 3D print to collapse inwardly when burned away. Be careful when using these hollow support structures: if there is a hole in the surface, then slurry mixture will enter the top layer. Also, having a thicker cast wall may not be suitable for the design. A thicker casting adds weight and, as with the Piranesi coffee pot, the “feel” of this end product may not be a part of the artistic intention. Also, using a collapsible 3D interior may make dipping the pieces more difficult. The trapped air may make dipping in the dip room like trying to push a ball under water.
Tom Mueller, the author of the Guide to Casting Using QuickCast™ Patterns by 3D Systems, Inc. talks about the trend to “over gate” a sculpture when using QuickCast™ and SLA. Gates not only allow the gases to escape but also help with the oxygen flow. Oxygen is necessary because, unlike wax, which melts and flows out of the sculpture during the burnout, many stereolithography resins must burn away. If they do not burn clean then the foundry will need to clean the shells. If it is necessary to cool down a shell to clean out residue before pouring the bronze then the shell becomes weaker.
In the traditional processes, foundries gate up the pieces using as many gates as necessary. Remember that gates turn into metal that the metal workers will have to grind off. They will also need to add detail back to the surface.
These are only a few considerations for a foundry of the future using the lost SLA process of casting. Of course, there are many more factors such as the air emissions and safety of using these processes in a foundry, and the shrinkage of the metal. Still, artists and vendors continue to combine talents, technology, and curiosity to meet the possibilities.
When it comes to digital processes making an impact on the creation of a piece of artwork, there is no bigger impact than the influences that 3D technology will be playing in the creation of a monumental sculpture called The American. The sculptor, Shan Gray, has big ideas for the bronze sculpture of a Native American with a bald eagle resting on his right arm. The height of the 217-foot sculpture scheduled for installation in Sand Springs, Oklahoma, is 100 feet taller than the Statue of Liberty. Visitors can enter the sculpture, travel up the cloak and leg to see a panoramic view of the Oklahoma area’s pioneer days, projected on screens at about the height of the Native American’s belly.
Gray was like many artists and created bronze sculptures the traditional way for years. To create The American in the traditional lost wax method of bronze casting would mean a great deal of time and material. Even if the artist had the sculpture milled in foam for enlargement, like Bridgette Mongeon’s tiger sculpture, and it traveled through the lost wax method of bronze casting, the use of foam, rubber, wax, and investment would require a great deal of time and disposable material. Synappsys Digital Services in Norman, Oklahoma, developed Digital Direct to Mold (DDTM) with The American sculpture in mind (www.synappsys.com). The new process will save millions of dollars on the entire project.
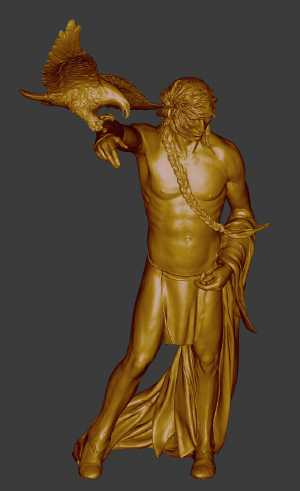
Artist Shan Gray makes monumental achievements in alternative processes of bronze casting that incorporates 3D technology and casting of the sculpture The American.
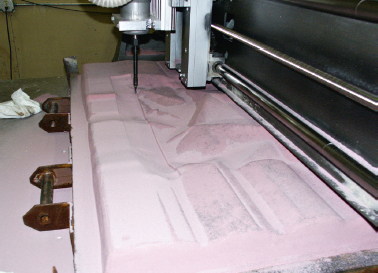
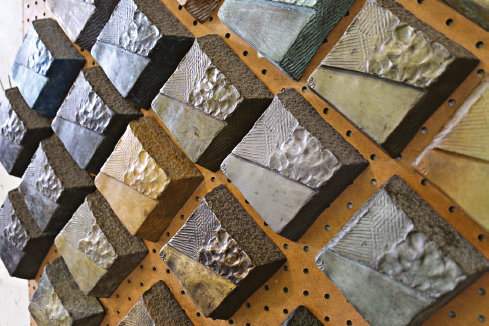
The development of Digital Direct to Mold (DDTM) and the experimental process of The American began with CNC milling the mold of Kevin Box’s sculpture Folded Paper out of resinbonded sand mixture.
Synappsys Digital Services debuted their first DDTM bronze molds and casting process on Kevin Box’s sculpture of Folded Paper in 2007. Synappsys created a 3D scan of Folded Paper just as if they were to enlarge it and cut it out in foam. Instead of carving a positive of the art or in this case “the paper,” the computer carves a two-piece mold out of a hardened mixture of resin-bonded sand. This carving leaves a ¼-inch cavity for bronze pouring. Once poured, the foundry releases the art from the sand resin mixture, chases the metal, and adds a patina to the sculpture.
For the DDTM process of The American, Synappsys Digital Services will divide up the sculpture into 4-foot sections horizontally and then again vertically to create 4 × 5 foot manageable pieces. They will make these divisions within the computer graphics image of The American, exhibiting a perfect match piece to piece. This is something that is difficult to obtain in traditional casting using shims or claying up, because each section is a two-piece mold created with DDTM. They can even print information on the inside of the cast to manage the organization and facilitate putting the sculpture together. If they choose, they can honor those who are contributing to the project by engraving their names on the backside of the mold. A foundry will be working in conjunction with Synappsys, to create the 3,600 panels; a process that they expect will take two and a half years. A foundry will pour the bronze pieces working with Leidos Engineering for the added steel substructure.
The milled resin-bonded sand becomes the refractory mold for the bronze casting process.
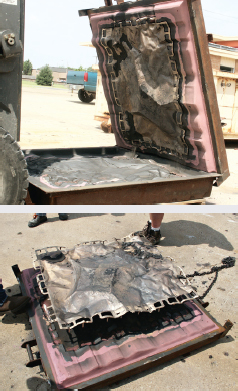
The foundry releases the sculpture from the CNC mold. It then travels through the traditional chasing process.
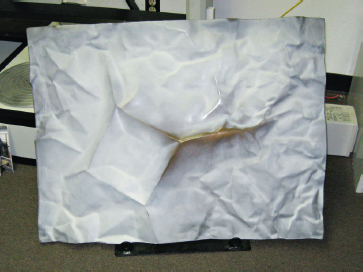
Folded Paper by Kevin Box.
Working with a combination of traditional sculpting and digital modeling has several advantages in the design process. The digital image offers the artist an opportunity to view the project from many vantage points, including the way a viewer could see the sculpture from the ground. The engineers at Leidos Engineering, the project manager on The American, used these same images to view the inside of the sculpture. This inside view was a crucial element in the planning stages because an elevator and stairs had to fit in the left leg of the Native American. With the 3D model, the engineers could anticipate difficulties with allotment of space within the sculpture, which gave the artist an opportunity to modify the design of the left leg and drapery to accommodate the engineer’s needs. The architects may change the sculpture again as they finalize the design of the gallery area located on the inside of the sculpture at approximately 78 feet, about the navel height in the sculpture. In the gallery, viewers will see real time, closed-circuit panoramic views of the Tulsa Oklahoma area displayed on high-definition plasma screens. Periodically the scene will change to another period as visitors view the Oklahoma settlers complete with buffalo roaming the surrounding hills. Viewers may continue their journey in the sculpture taking the flights of stairs to the observation deck at approximately 156 feet where they can observe Tulsa from behind The American’s hair.

The American team will create a monumental sculpture, in the same process as Kevin Box’s Folded Paper. Synappsys Digital Services will mill the mold’s 3,600 panels for casting. Synappsys will divide this 4-foot tall section further.
In the planning process of The American sculpture, the technology continues as The American team meets new challenges. For example, engineers will have to find ways to prevent clouds and condensation from forming inside. They will also need to find a way to change the 50-pound light bulb needed in the wing of the eagle for airplanes to navigate the sculpture safely.
The creating of The American has been a challenge from the inception, pushing the design team toward the development of technological advancements that are the beginning of a change for the foundry industry. DDTM does have its drawbacks. Because it goes from maquette to computer to casting, there are no revisions as there might be in the latter stages (wax) of traditional casting. If an artist could think and carve using the negative shape, he or she could hand-carve into the foam. With the creation of robotic milling machines that mill on many axes, it would be possible to create more depth in smaller pieces. However, the artist would still have to do handwork and be able to think and carve on the foam as a negative space, instead of a positive sculpture image.
DDTM casting is an advancement in our technology and in the process of bronze casting that, until this time, has changed very little over thousands of years. Looking back from the future, we may one-day state, “It began with The American.”
LIONEL T. DEAN
Tangle by Lionel T. Dean, FutureFactories. Selective laser sintering polyamide, followed by a “quick glass blast medium.” Photograph by John Britton.
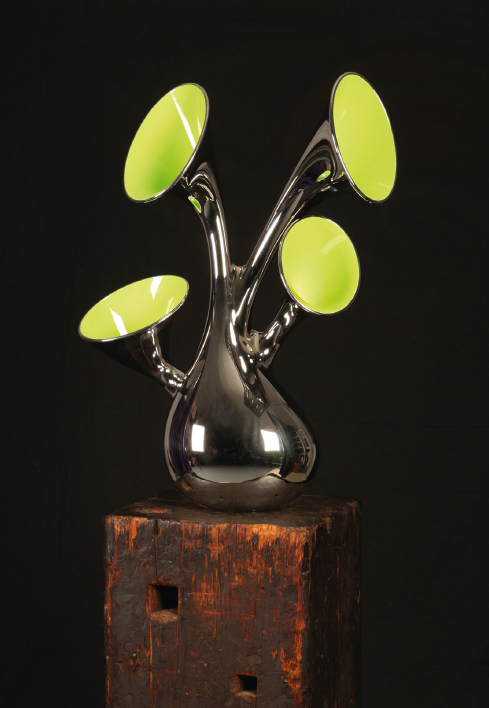
HEATHER GORHAM
Heather Gorham creates her work using Geomagic Freeform software (http://geomagic.com). Combined with a haptic device, it allows her to make her digital work as she would her traditional art in the studio.
“Having come from more traditional mediums like bronze and wood, it took me a while to embrace digital sculpting for my own work. It wasn’t until I held my first 3D printed piece and was able to recognize my own ‘hand’ in the work did I really begin to enjoy the process. I now use digital work as another tool, a really wonderful tool that gives me a new dimension of freedom and flexibility in my work.”
Heather Gorham
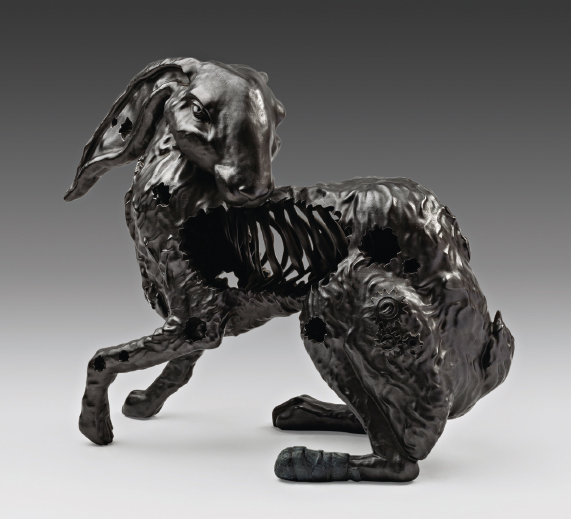
One Grey Hare by Heather Gorham. Printed on a Connex500 in Vera White and painted with graphite paint, 15 × 17 × 9. Photograph by Barry Snidow.
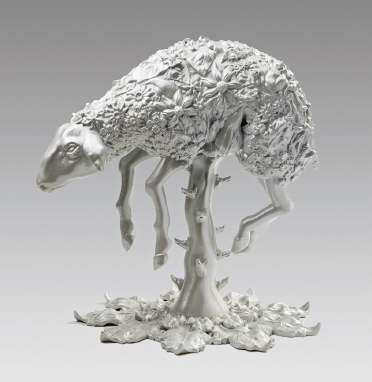
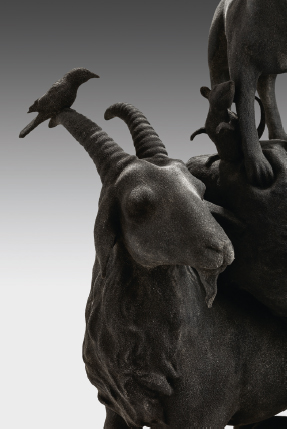
Beast Mountain by Heather Gorham. Printed by Voxeljet in a resin impregnated sand/silica and painted with acrylics, 27.5 × 12 × 13. Photograph by Barry Snidow.
JASON WEBB
Jason Webb also experimented with the “lost ABS” process of investment casting through the University of Nebraska at Kearney. He created his shapes using the math and code of superformula. Excited about computational art, Jason used bit.craft’s Superdupershape Explorer to tweak the formula variables (www.k2dg2.org/blog:bit.craft, www.openprocessing.org/sketch2638). He used Super Shapes Script for Open SCAD to create a 3D model, before entering the “lost ABS” process of bronze casting.
Lost ABS process with cast aluminum cradle, Jason Webb.
On the book’s website at www.digitalsculpting.net you will find:
* Links to further descriptions on the process of creating the artwork featured in the galleries.
* Podcasts with the artists.
* Videos featuring the artists at work.
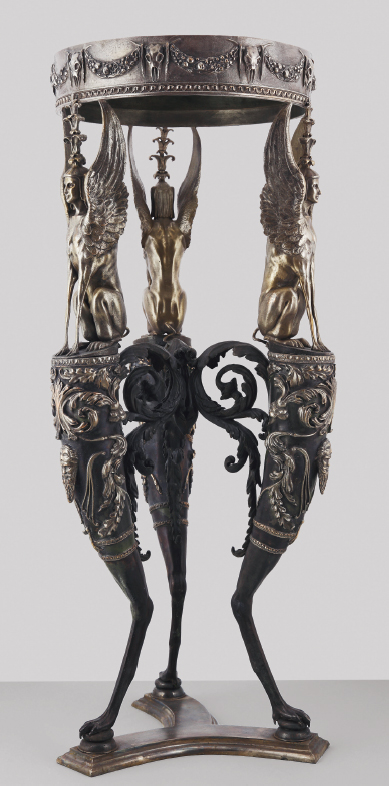
FACTUM ARTE
Factum Arte Isis Tripod Piranesi Collection. Edition of 6 numbered copies. Made in silver patinated bronze. Dimensions: 90 cm high, 32 cm diameter. 3D model created by voxel studios, Madrid. Prototype worked by hand after being printed out by Materialise. Proceeded through mold making and the traditional lost wax method of bronze casting at Fademesa, Madrid.