CHAPTER THREE
3D SCANNING
___________
“I work with all of this imagery not because I want to be morbid, but because I am interested in exploring the ways that technology can fail to capture life, and what the poetics of that failure might look like. We live in a world where we are so bombarded with claims for all seeing, all-powerful, imaging technologies. It is my belief that as artists destabilizing those, through poetics, might actually prove to be the strongest weapon that we have.”
Sophie Kahn, from the Digital Scanning Leaders in Software and Art Conference, Guggenheim Museum, New York
Creating artwork in the computer is one way to obtain a 3D model. An alternative way of bringing a 3D model into the computer is through digital scanning. Digital scanning is the process of taking an existing physical object and creating a digital representation of it as a 3D model using data that the scanner collects.
3D scanning was created for industry but, as with other forms of 3D technology, others have adopted the technology and use it in many different disciplines. It was not long ago that 3D scanners were hard to come by, and it was cost-prohibiting for a small studio to purchase a 3D scanner. Today, high-quality digital scanners are more affordable. Another option to making an investment into a digital scanner is a scanning service bureau. One day, scanning an object may be as easy as taking it to your local office supply store, but even if you don’t have a scanning service bureau near you, with some preparation you can send small maquettes or sculptures to a scanning bureau for detailed scanning. For those interested in creating a basic 3D model from a real object, you can find the novelty of 3D technology right in your phone. Phone scanners do not provide the fine detail of the high-end scanners, but they may be sufficient for getting a base model. It is also worth noting that the technology is advancing at an enormous pace. Even as the author writes this book there is cutting-edge technology being beta-tested. Now, let’s look at 3D scanning in more detail.
The Digital Michelangelo project (http://graphics.stanford.edu/projects/mich/) is just one of many different ways the technology of 3D scanning and fine art are coming together. Documentation, preservation, and creating art combine perfectly with the technology of 3D scanning.
Scanners
There are multiple ways of making a 3D model using scanning processes. There are two types of scanners—contact and noncontact digital scanners. The difference between the two is that the contact scanners are scanners that collect information through physical touch of the object. A 3D probe touches many points. The scanner uses collected points to digitize the object and translate it into a 3D model. Engineering, machining, and manufacturing may use probe scanners. A scanning facility may use a probe scanner on geometric shapes, but they do not recommend contact scanners for organic shapes. Just as with other scanners, contact scanners come in a variety of styles and prices.
Noncontact scanners are the preferred type of scanner for scanning art, and they come in two types—active and passive. In very simplified terms, active noncontact scanners use structured light or lasers that pass over an object. The scanner measures the time that it takes for the light or laser to bounce or reflect off the object and come back to the scanner. It collects this data as points to make a 3D shape of the scanned surface.
Another form of noncontact scanning that we will review in this chapter is photogrammetry. Photogrammetry is considered passive noncontact because a light source does not actively probe the surface. Rather the shape is generated using algorithms that combine multiple 2D images to interpret a 3D shape. You might think of photogrammetry as a combination of photography and geometry. The artist takes many overlapping photographs of the image, and a software program splices these images together to create a 3D model.
As we walk through the many examples and tutorials of scanning in this chapter, you will begin to become more familiar with the scanning process and perhaps see the many options and ways that you can use 3D scanning as you incorporate it into your art or craft.
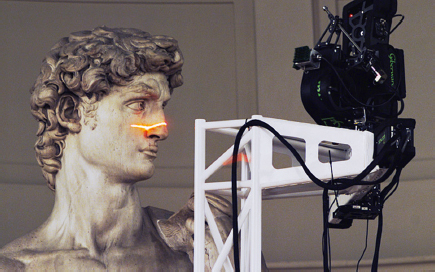
The CarveWright CNC System (www.carvewright.com) has a scanning probe that attaches to their 3D CNC milling machine. This addition offers the home user an opportunity to scan and create.
Saving Cultural Heritage
Tsunamis, earthquakes, floods, wars, and hatred can have detrimental effects on art, artifacts, architecture, and culture. When these treasures are gone, they are gone forever. Preservation of art, history, and culture is important for many different individuals and organizations working with 3D laser scanning using noncontact scanners. For example, the Smithsonian is beginning to scan their collection. They provide the 3D models online and believe that offering their collection in this format makes it more accessible. Students anywhere can see it. Touching an artifact with our hands causes deterioration and damage, but in the computer individuals can rotate and examine the 3D collection without ever causing any damage and, with access to digital files, anyone who has a 3D printer can print the models. The Smithsonian provides educational resources so that students can learn from the data, and they hope that students will even join the Smithsonian in investigation and exploration, making discoveries. Being able to interact with the art or artifacts digitally gives us a connection to our history. Many believe that having access to other people’s culture and being able to interact with it digitally from anywhere in the world gives us a greater understanding of who we are as mankind. The history, the art, and the cultural artifacts are a part of our “cultural DNA.”
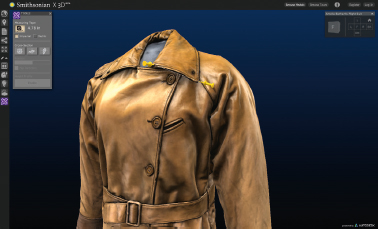
Smithsonian X3D (http://3d.si.edu) offers online visitors a chance to explore the collection of the Smithsonian in a digital world. The Smithsonian makes Amelia Earhart’s suit and Lincoln’s life mask, as well as many other historical artifacts, available online. Educational material for teachers is also available. To find out how to download digital models for printing or educational resources, visit this book’s accompanying website at www.digitalsculpting.net.
Humankind takes for granted that these wonders of architecture, art, and cultural significance will always be available. The sad truth is that they will not. Such things as time, environmental factors, and vandalism can destroy these objects, and we will lose them forever. This loss is painfully apparent in the following sections.
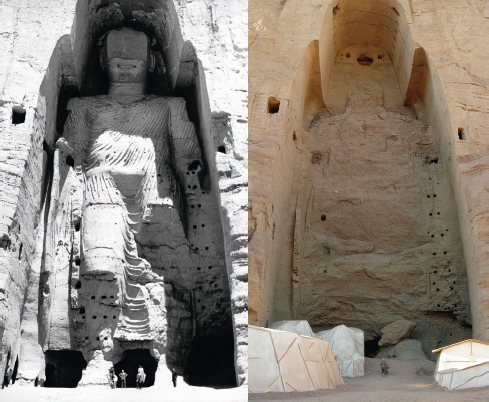
Buddhas of Bamiyan
In 2001, the Taliban declared a spiritual war against idolatry and dynamited the Buddhas of Bamiyan. The two Buddhas standing at 55 meters (180.446 feet) and 38 meters (124.672 feet) were colossal, ancient, carved sandstone figurines that were a fine example of Gandhara art, and estimated to be more than 1,500 years old. The Taliban declared the Buddhas to be idols and destroyed them. In one act, they destroyed ancient monuments that have stood for thousands of years.
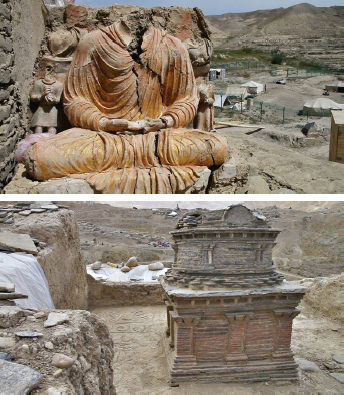
Saving Mes Aynak
In 2007, there was another threat to the heritage of this region. This time it was not incited by warfare, but by economic gain. The Afghanistan government awarded a contract to the China Metallurgical Group Corporation. Mes Aynak, “Little Source of Copper” outside of the desert of Kabul, is not so little—reports state that it is one of the largest untapped resources for copper with an estimate of value of more than $100 billion. Archeologists consider it a treasure. Thousands of years ago, the site was the home of a Buddhist monastery and archeologists believe it was also a hub of commercial interaction. Archeologists are working to uncover the site’s treasures, despite death threats from those wishing to halt their efforts. They labor on through unbearable heat, all the time watched by armed guards. They work to document and save this cultural treasure of Afghanistan’s history. However, after much excavation they have discovered that they will only get to approximately 10 percent of the excavation before the China Metallurgical Group will destroy the site in search of copper. They are certain that they would find more treasures deeper if they had time to excavate. Also, many of the artifacts are either too fragile or too big to move and will, like the Buddhas of Bamiyan, meet their demise.
I feel like a mother whose child is going to die. We work so hard uncovering the artifacts and protecting them, they have become like children to me. Seeing the artifacts getting destroyed would be like a mother watching her child dying in front of her.
Abdul Qadeer Temore, lead Afghan archeologist, from Brent E. Huffman’s documentary A Chinese Threat to Afghan Buddhas
Archeologists estimated the excavation project would take ten years minimum, and more likely 25–30 years. However, the Chinese mining company scheduled the destruction of the site to create their open pit style of mining to begin in three years. Political unrest in Afghanistan caused a delay in the project. Desperation motivates those whose interest it is to preserve the site. Instead of just saving artifacts, teams are pulling together to try to quickly document this lush cultural heritage before the Chinese mining company destroys it. It is possible to use 3D scanning to preserve what archeologists cannot move.
The same alloy that drew the monks to this site two thousand years ago, and caused them to make such incredible art, is what threatens the continued existence of that same art. Some artifacts are too fragile to move. Archeologists believe they have not scratched the surface of the treasures of Mes Aynak, but we may never know. Brent E. Huffman, from the documentary Saving Mes Aynak, www.savingmesaynak.com.
CyArk
In 2003, spurred by the destruction of Bamiyan Buddhas, individuals with a love of cultural heritage created CyArk. CyArk is a not-for-profit organization that specializes in using cutting-edge technology to preserve the world’s heritage sites digitally. Their mission is to use emerging technologies such as 3D laser scanning to create a free, 3D, online archive of cultural heritage sites from around the globe before they are lost to natural disasters, destroyed by human aggression, or ravaged by the passage of time. In 2013, they launched the CyArk 500 Challenge, an unprecedented initiative to digitally preserve 500 heritage sites from around the world in five years.
For example, the Black Hills of South Dakota is the backdrop for Mount Rushmore. Sculptor Gutzon Borglum directed the carving of the 18 meter (60 foot) high heads from 1927 to 1941. CyArk scanned Mount Rushmore in 2010. The data collected on Mount Rushmore took CyArk two and a half weeks. It consists of more than 200 georeferenced laser scans along with traditional photography.
CyArk offers many different resources for educators interested in culture, art, and the technology of 3D scanning. CyArk’s initiative does not stop at documentation. Educators are using the 3D data captured of heritage sites to create interactive curricula for many different age levels. CyArk offers these free on their website at www.cyark.org.
CyArk’s mission has already been invaluable. In 2009, CyArk went to Kampala, Uganda, to scan the tombs of Buganda kings at Kasubi, a UNESCO World Heritage Site. The tombs are considered one of the most religious and spiritual locations within the Buganda culture. From 1884 to 1969 four kabakas (kings) of Buganda were interred in this structure.
In 2009, a partner of CyArk traveled to the tombs at Kasubi and conducted 3D laser scanning of the entire UNESCO site. A year after CyArk completed the onsite preservation and processing of the 3D data, fire consumed a portion of this grass-thatched cultural heritage. There are plans to rebuild the tombs using the 3D data stored securely in CyArk’s archive, which contains measurements of the site down to millimeters of accuracy.
Your Own Scanning
There is much more that individuals can use 3D scanning for besides capturing culture. Artists are using 3D scanning in a variety of ways. They use it to create art, to enlarge or reduce designs, to repurpose artwork, and in the preservation of design; they are even using it as part of their legacy and inheritance that they leave to their children. Perhaps further exploration of 3D scanning will spark creative inspiration and collaborations in the readers of this chapter.
Service Bureau
Creating a good detailed 3D scan requires a good scanner and considerable time. If an artist is not yet ready to invest into a scanner, a 3D scan created through a service bureau that offers high-powered processes is an option. Sending the work to a 3D scanning service bureau relieves the artist from having to have the tools or technology and the patience that it takes to get a good 3D scan. The scanning service bureau will look at several factors when they estimate the cost for scanning. The amount of time that it takes to scan, the size of the object they are scanning, and the color or texture of the objects are all considerations. Some objects, such as those that have a shiny or see-through surface, do not scan well. The scanning service bureau may be able to dust the surface of the object with powder to kick back the shine. When using a service bureau for a 3D scan, schedule a consultation session. Also remember, if an artist is scanning art that they already installed, there may be travel charges incurred from a scanning service bureau.
Using a service bureau is convenient. Farming out the 3D scanning and leaving scanning to the experts frees up creative time for the artists. For a list of 3D scanning companies and those that sell scanners check the resource chapter or the book’s accompanying website (www.digitalsculpting.net). Many scanning companies work in industry rather than art, but it is worth getting to know your local scanning company, if you have one.
When using a professional scanning company, often their scanners provide huge amounts of data. A scan that comes from a consumer scanner that you purchase for the art studio and the scan that comes from a professional high-end scanning service may be different. When working with a scanning service bureau requesting a high-resolution scan may be more data than the artist needs. As always, it is important to develop a working relationship and clear communication with your service bureau to obtain the best results.
Fine artists that are enlarging artwork through 3D processes such as those featured in Chapter 6, will first need to scan a small sculpted maquette. The artist, with the help of vendors, will later translate these maquettes into a sculpture that is different in size from the original. The artists can create monumental works using 3D scanning combined with other resources in this book, such as CNC milling. If a sculptor creates a maquette in soft clay or water-based clay, it cannot be shipped to a scanning company without causing damage to the original. The alternative to scanning the fragile original at a service bureau is for the artist to make a mold of the original art and then cast a wax or plaster to send to the scanning company. Digital scanning is rarely done with just one scan. Instead, the scanning service bureau creates many scans from all directions. Once the service bureau scans all the pieces of the sculpture, they align the scans and splice them together in the scanning program or additional software.
When using a professional scanning company it may not be necessary to request the highest resolution scan. Doug Smith from Smart Geometrics uses a Leica C10 scanner. He reports that 95 percent of the projects created through Smart Geometrics for industrial applications only require medium resolution.
Having a cast model that the service bureau can cut apart before they scan is helpful. For example, it may be necessary to separate an entire arm that rests close to the body. This process will help the scanning service bureau to obtain an appropriate scan that will also include all the undercuts. Without these sculptural divisions, the laser or light beam must squeeze into these areas and, if the scanner cannot read the area, it will appear as a hole in the scan.
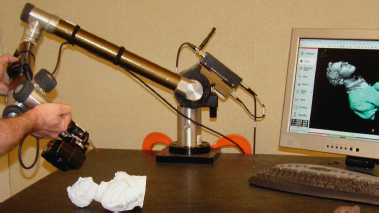
Synappsys Digital Services scans Harry Weber’s artwork using a Model Maker laser line scanner mounted on a Faro Gold Arm to create a digital file for CNC milling.
It is interesting to note that by the very nature of making a mold of the original art to send to the scanning company, it is now a generation away from the original. Each generation may mean loss of detail. Therefore, having a good studio scanner is another option.
The process of scanning using your own studio 3D scanner has its advantages. A digital scan of a small maquette of a full figure that measures 12–14 inches tall may cost between $500 and $1,000 to scan at a service bureau. Unless you have a service bureau around the corner, it means you may have to ship something to the scanning company to scan and, as we said, you may also need to make a mold.
As is the case with most of the 3D technology in this book, 3D scanning is slowly making its way into homes and studios. Also, as 3D printing becomes more commonplace, so is 3D scanning. Unfortunately, desktop 3D scanners are flooding the market, which may lead to confusion among the consumers. A high-end professional scanner can cost hundreds of thousands of dollars and home/studio scanners range from a few hundred dollars to several thousand dollars. When looking at noncontact scanners on a general consumer budget, those scanners with the best advertising budget are not necessarily the best choice for the home studio. If you are in the market for a scanner, then you will certainly be asking the question, “how do I choose a 3D scanner?”
For the best scan from a service bureau, send artwork that they can divide into pieces. The Pledge by Harry Weber.
Your Own Studio 3D Scanner
Gathering information to compare 3D scanners is extremely confusing. Spatial resolution, field of view, scan volume, dimensional accuracy, scan speeds, and scan volume are some of the terms that you will find on websites that sell scanners. It does make a consumer’s head spin. Let’s break this down a bit differently. When researching the purchase of a home/studio 3D scanner it is important to look at a few things not mentioned in the specs of the many 3D scanning websites. The criteria we suggest to review are quality, flexibility, and ease of use.
Quality—or Quality of a Scan
When researching scanners, it is intuitive for a buyer to look for a number, such as the resolution. The buyer uses these resolution numbers, as advertised on one scanner ad, to compare to the resolution numbers advertised on another scanner. When the buyer gathers and compares numbers, they may feel they have done their homework and have purchased a quality product with the “highest resolution.” The term “scanner resolution” can be misleading. As mentioned before, some scanners are better with close-up scans, and others are better at long range or distant scans. When referring to home scanners, “long range” in this instance is not referencing Mount Rushmore. The “long range distance” referred to with home scanners is the difference between a small 3-inch figurine and a person in the room. The sales material for home scanners may provide a number for “resolution”; however, it is difficult to know how this number applies to each distance.
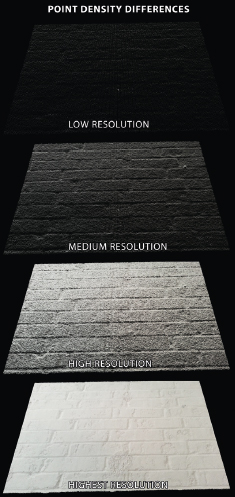
It is better to look at other parameters in addition to the resolution. The most important parameter to look at is the quality of the scan. It is difficult for the average consumer to scan the same item with a few different scanners. A picture is worth a thousand words. We have included some comparison scans from readily available desktop processes of 3D scanning.
Flexibility and Ease of Use
Don’t let advertisers persuade you by “click of a button” scanning. “Click of a button” is not what we are referring to when we say “ease of use.” As you will see in the scanning tutorial of the concrete children in this chapter, scanning with your own home scanner is a process. The artist does not create a good scan by just a push of a button. In fact, scanners that claim to have an automatic process can have a detrimental effect on the scan. How much control an artist has and how flexible the scanning system is during scanning, as well as in the post-processing of the scan, can play a large part in the quality of the scan. Therefore, when picking a scanner, it is good to look at the software behind the scanner. How easy is the software to use? Do the process and the software allow for some flexibility and interaction by the user? Also, be aware of the limitations of the scanner’s scanning size. Artists create in many different sizes. Don’t let your choice of scanners limit your creativity. It will take time to compare scanners, but be sure to choose a scanner that will encourage your inspiration, not frustrate you.
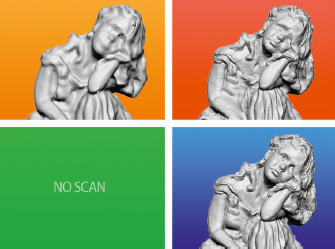
NextEngine Scanner has created some tests of scanning different objects with four different scanners. The orange is the Sense Scanner, priced at $399. The red is MakerBot, priced at $799. The green is the free app 123D Catch from Autodesk, and the blue is the scan with the NextEngine Scanner $2,995.
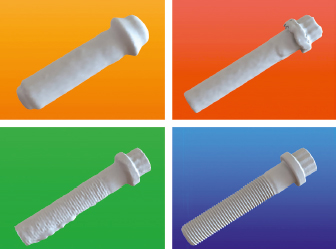
Sculptor Bridgette Mongeon conducted her own research with three scans of a broken sculpture for repurposing. The orange is the Sense Scanner, the red is the MakerBot, and the blue is NextEngine. There was no scan created with 123D app. The artist could not use the 123D app on her personal work because, according to the terms of service on the Autodesk site, if she creates a model using 123D Catch and uploads it to their server, she may be giving up her rights to her creation.
Scanning Considerations
When scanning either through a service bureau or in your studio with your own desktop scanner, there are some things to consider.
Quality and Use
Quality is the sum of the errors that are possible and the resolution, also referred to as “accuracy and resolution.” As stated before, the artist’s intent for the scan may determine what amount of detail they will need. If they are going to retopologize a rough maquette and then bring it into a sculpting program for further refinement, they will not need a high-resolution scan. However, if they are trying to obtain as much detail as possible for restoration or documentation of art, then they may need a higher resolution scan.
It is important to note that what limits an artist, at the time of this writing, is the resolution of the output devices, as well as the size of today’s output devices. A 3D printer has size limitations. However, technology is changing rapidly and who is to say that the technology that will be available in two, five, or ten years will not be able to output your art in different mediums and sizes? In the future, your heirs may be able to reproduce your work in ways you would not even dream of today. They will be able to do so because they documented and preserved the scans of your inspiration and creations.
Management of the Data
As we stated, the 3D scanner measures many points on an item. The larger the item, and the higher the resolution of the scan, the more data the scanner will capture. If you plan on working on this data in your computer, then you need to understand whether or not your computer can handle this data. That is why Chapter 1 stated that familiarizing yourself with what you want to have your peripherals do for you and even perceiving what you may need them to do in the future will be important to understand when you are purchasing your computer, software, and peripherals. You may start out scanning small objects, but later find that you need to scan life-size pieces. The processing of scan data takes a good deal of computer power. Plan ahead. It is also necessary to know how far you need to go with a digital scan to get the optimal resolution necessary without bogging down your system.
Size and Material
The size of the object does not matter. Depending on your scanning company, they can scan a jet or a piece of jewelry. Remember dark, shiny, or transparent objects are difficult to scan. Knowing your final output of the project when scanning will help you decide which scanner or scanning service will fit your needs.
Color
Most scans provide a colorless digital model. If you need to preserve the color with the geometry in your scan, this is another element to consider. If you have a service bureau scanning your work and you desire color, ask them if this is a possibility. If capturing color is something that is important to you in your home/studio 3D scans, consider purchasing a scanner that also scans for color.
File Formats
Scanners can produce files in many different formats. Again, knowing what you are going to do with your scan will help. If you need color in your scan for 3D printing in color and a 3D scanner captured the color with the object, you will want to have the appropriate file format for this (see Chapter 7). Do you need to do additional work with the files? Are you going to want to change or manipulate the design in a sculpting program? If so, then you may want to use polygonal models. Do you need to obtain measurements from the data? If so, then you will want the raw point cloud data to bring into an appropriate CAD (computer-aided design) program. If you are unsure what file format you need, just ask your service bureau what they recommend.
Changing a File Format
Even if you do not have the file format you need for the next step in the process, you can always change the format of the file using several free software programs. MeshLab and MeshMixer are two such programs.
Photogrammetry/Stereophotogrammetry
Another way of creating a 3D model is a process known as photogrammetry. Photogrammetry is a combination of photography and geometry. The artist takes multiple photographs of an object all around the subject and common points are referenced in the computer. Photogrammetry can be done as aerial shots for larger scans or at close range. The advantages of photogrammetry are that it is accessible. If you have a camera and the software, you can use photogrammetry to obtain a 3D model. Of course, the better the camera, the better the detail in the model.
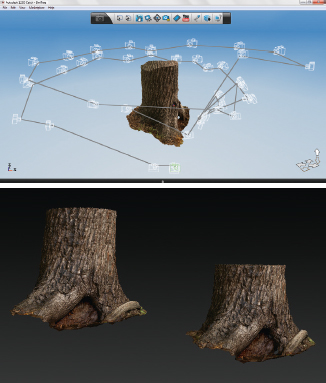
Several websites offer free photogrammetry software. 123D Catch is a well-known free and easy photogrammetry software. Here it is used to scan a tree, which is brought into ZBrush and hollowed out. Tree by Bridgette Mongeon and Katherine Dewey. Photograph by Christina Sizemore.
Free Photogrammetry Software
There are several free photogrammetry software sites on the Internet. One of the leading software companies providing 3D software internationally is Autodesk. They have a suite of tools that they offering for free and one called 123D Catch works with photogrammetry. For example, with 123D Catch you simply take many incremental, overlapping photographs 360 degrees around the model with your phone and the 123D Catch application. When you are done simply upload the files to Autodesk’s 123D Catch and wait for it to process. Autodesk even has a web application where you can clean up your scan. The plus side of 123D Catch is its simplicity. You really need little training to make 3D models with your phone. The downfall of 123D Catch is that you can only load a small amount of images using your account.
Free online photogrammetry websites may have their limitations. They do not compare to high-end scanner files. Also, check to see what type of file the “free” sites will let you export. If you can only create the file but can’t export that file then it is useless. Also, the free version of 123D Catch cannot be used for commercial purposes.
But there are even more things to be aware of when using online services providing photogrammetry processing. Some photogrammetry sites require that you upload your image to their server to process your 3D model. It is easy to be persuaded to use such accessible tools, especially if they are free, but be sure to read the fine print in the box of “terms of service,” which most people skip over, and some sites make it impossible to understand and follow all of the links. In many cases, the “ownership” of your scans is in question. That means the scans you are processing on their server, once they are uploaded, you may have just given away. The software company may now own them. It appears that offering the free service may be a way to gain the rights to many 3D models. According to the “terms of service” they might just be able to do what they want with your images. That means that if you scan your own artwork or ideas with these tools and upload them, you just might be giving them away. Or if scan your child, their image may, one day, be available to anyone.
An alternative to a free photogrammetry site is to purchase photogrammetry software. Photogrammetry for the studio is not just for art studios with big budgets. There is reasonably priced photogrammetry software that allows you to create 3D models with textures from photographs. Agisoft is such software. This software works on your own computer. The standard edition costs $179 and a professional version costs $3,499 (www.agisoft.ru). Because you are processing your images on your own computer, there is no concern about you uploading and processing elsewhere or the possibility of you losing or “sharing” the rights to your files or accidentally transferring your copyrights. Agisoft runs cross-platform. You will have to take note of the limitations of your personal computer. When using Agisoft the processing of splicing of the photographs will be done in the computer instead of, as 123D Catch does, in the cloud. The more photographs you have, the larger the memory needed and the more time that it will require to process. Of course, these types of software programs are memory hogs. Agisoft will require a computer with a great deal of RAM. The Agisoft website suggests up to 32 GB of RAM for basic configurations.
Type of Camera
A consumer digital camera is suitable for most photogrammetry. Of course, you can hardly expect a good scan if you have poor pictures. The higher the resolution of the image that you are shooting, the better the scan. At least a 5-mega-pixel camera is suggested.
Taking Photographs
When taking photographs for photogrammetry it is important to get the correct images for your needs. When shooting an area, stay perpendicular to the surface. In the case of shooting a sculpture or a person, it is important to take photographs at an equal distance around the subject, including the top. Each photograph should overlap the previous photograph by 25–30 percent. Taking photographs for photogrammetry is not like taking personal photographs. When you are taking a picture, the camera focuses on the center or the focal point. For example, if you take a picture of a face, the subject’s ears and shoulders will be not be as sharp as the face. Therefore, overlapping images give the software sharp detail and shared reference points.
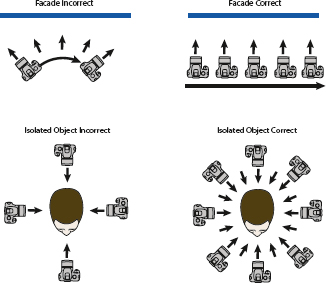
When taking photographs for photogrammetry it is important to get the correct images. For a façade, it is necessary to photograph the façade with a minimum of 1/3 overlap of photographs. Each photograph must be taken parallel to the surface. To take photographs of a single object, move around the object shooting photographs at the same distance.
There are more details on shooting photogrammetry on this book’s accompanying website.
SERVICE BUREAUS FOR PHOTOGRAMMETRY
A service bureau such as Captured Dimensions is an alternative to doing your own photogrammetry (www.captureddimensions.com). Captured Dimensions uses 80 DSLR cameras that shoot simultaneously. Once the 3D photo sitting is complete and an image is chosen, Captured Dimensions cleans up the files and the color using ZBrush, Mudbox, and Photoshop. Photogrammetry with Captured Dimensions can provide much finer detailed models than we are showing here. There are many uses for fine artists using 3D models created with photogrammetry. Many are mentioned in this chapter.
The final output of our sitting is a miniature 3D print. A full color 3D mini selfie is a novelty, but it will be interesting to see how artists creatively incorporate photogrammetry into their fine art. Using a service bureau that offers photogrammetry has an advantage as it can capture data even with movement, something that most scanners cannot. Movement is not a problem because the camera is shooting all sides at the same time. The disadvantage to this type of service bureau is that they are not mobile.
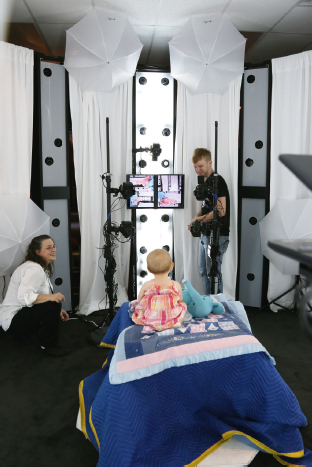
Photogrammetry captured with this type of system offers many advantages. 80 DSLR cameras take pictures simultaneously. Because photographs are taken from all sides at the click of a camera shutter, there is no worry about movement. It makes capturing a 3D model of such things as gesture, activities, and even pets or a crawling baby, quite easy.

Captured Dimensions uses Agisoft software incorporated with their own scripting to splice all of the images together (www.agisoft.ru). The software shows all of the many camera angles. After splicing the shots together, Captured Dimensions cleans up the scans using other 3D sculpting programs such as Mudbox and ZBrush.
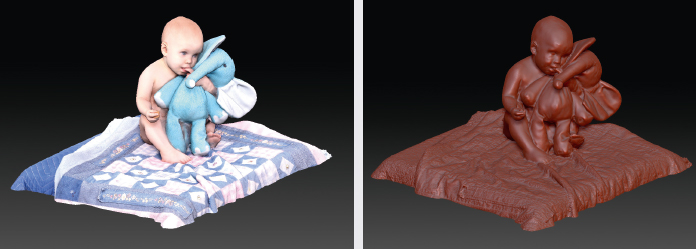
The process can capture color and great detail. As with most 3D scanning and modeling, the amount of detail depends on the needs of the client for the final output. Captured Dimensions will create this model as a 3D print with color and does not require that much detail in the model. The color on the 3D print helps to fool the eye into assuming there is a lot of detail; however, before the scene is printed in 3D the experienced 3D modelers will clean up the file.

The mesh is created using triangles or points. The detailed point cloud is very dense.

The final output for this process is a small 3D model printed with a 3D Systems printer in a gypsum powder with a CMYK colored binder (glue) injected.
Enlarging and Reducing—History of Art Enlargements and Reductions in Fine Art
Over the years, sculptors and craftsman have been enlarging and reducing work in a variety of ways. Traditionally, the artist first creates a smaller version of a large or monumental sculpture. With this small maquette, the artist can focus on the composition, movement, and proportions of a sculpture. It is much easier to modify a small maquette than it is to adjust a large or monumental piece.
Enlargement and reduction both in 2D and 3D has always been about measuring points and copying, enlarging, or reducing the distance and spaces. Artists and engravers use a pantograph invented in the early seventeenth century to enlarge or copy writing or two-dimensional art. A 3D pantograph similar to the seventeenth-century pantograph is one of the tools used by sculptors before creating 3D scanning and enlargements in foam. The 3D pantograph’s predecessor, the 3D pointing up machine, was like the 3D pantograph. The pointing up system assists the artists in measuring each point on one three-dimensional model to a point on the armature of an enlarged or reduced sculpture. Linked mechanical arms in pointing up recreate motion from one end to the other. The motions, depending on the size and creation of the pantograph or pointing up machine, can give the appropriate points to enlarge or reduce a sculpture. In recreating a monumental sculpture, the studio apprentice holds one point to a designated part on the original maquette. The artist then recreates the thickness and recreates the design at the other end. This traditional process of enlarging or reducing is painstakingly slow and takes many man-hours.
There are other ways to enlarge and reduce. You can use calipers. Regular calipers can capture a measurement of point-to-point distance. The artist then holds the calipers to a ruler and notes the measurements. They calculate the enlargement and translate the new measurement to the larger sculpture. An artist’s proportion wheel can also help artists with proportions when measuring points from one sculpture to another. Measuring this way is a time-consuming process.
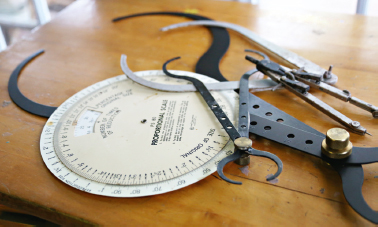
Other tools used for enlarging are calipers and reduction wheels.
Enlargement calipers have a designated ratio. The artists must measure a point with the smaller end of the calipers on the small sculpture and translate the distance that the calipers open up on the fixed larger end.
A pantograph is a machine used to reproduce, enlarge, reduce or copy drawings.
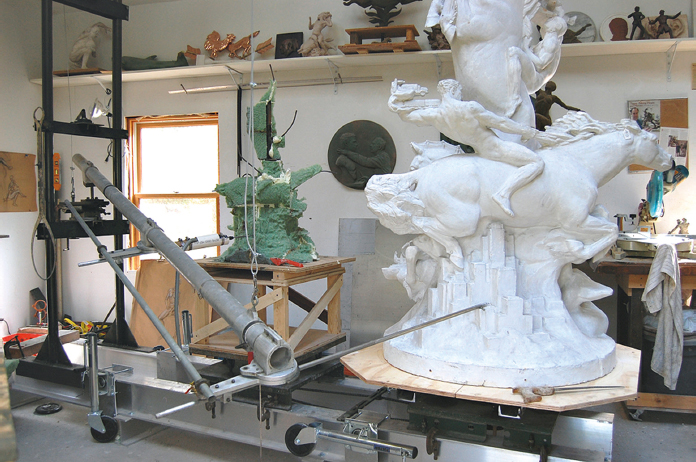
Michael Keropian Sculpture Studio uses a 3D pantograph to enlarge and reduce sculpture. Sculptor Berthold Nebel patented the original design of this particular manual machine on May 28, 1929. The sculpture shown is a reduction “in progress” of a sculpture created by sculptor Chester Beach called Riders of the Elements.
Photosculpture
Artists have been trying to capture the physical form of a person and translate it to appropriate dimensions in art for as long as they have been creating. One creative process found in 1864 has some very strong similarities to many of the chapters in this book—François Willème’s photosculpture and mechanical sculpture.
In a traditional sculptor’s studio, a portrait artist will move around their subject slowly, copying what is before the eye. The negative space or the space around the subject is as important as the nose or mouth. When trying to obtain the mass and contours of a sculpture, the artist finds these shapes by examining the space around the object. They look at the edges of their model and copy that to the clay. They move sequentially around the model while moving their sculpture in the same position and same angle. In other words, it is as if the artist is paying attention to all of the silhouettes of the figure and putting them all together. The silhouette from all sides will make up the figure. That is what transpired with François Willème, who applied for patents in 1860 and 1861 for his processes of photosculpture and mechanical sculpture.
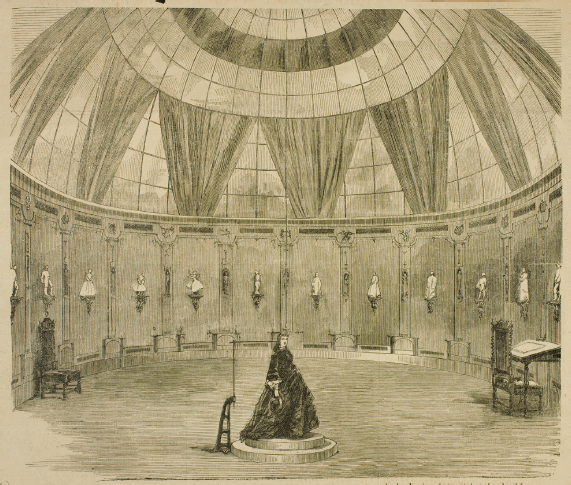
Twenty-four strategically placed cameras are hidden behind the walls of François Willème’s photosculpture studio. Courtesy of George Eastman House, International Museum of Photography and Film.
The processes that Willème employed resembled photogrammetry, and one can even see similarities of 3D printing and CNC milling. There were several steps in the process of photosculpture. The first is to obtain the 3D model through photography.
Within Willème’s specially designed circular studio, the subject stood or sat on a circular pedestal. The pedestal contained reference numbers and segmented lines that resemble 24 slices of a pie. Behind each wall, Willème hid cameras—24 of them. Within moments, Willème could create photographic reference material from every angle of the subject in a pose. This type of visual information is necessary and would be a luxury to even a sculptor working in today’s world. And remember, prior to photosculpture, for dignitaries to have their image forever captured in sculpture they would have to sit for hours. They might also have to subject themselves to the process of having their face covered in plaster as artists often created a life mask to use as reference. For his elite clientele, Willème’s photo sculpture promised accuracy and ease.
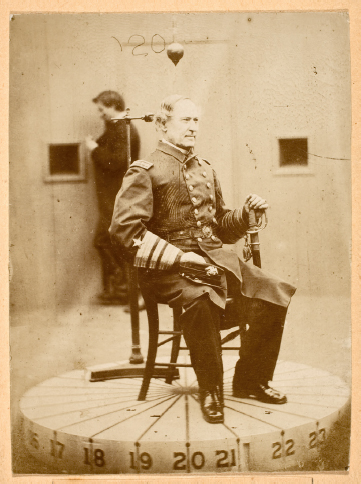
The subject sits or stands beneath a plumb bob on a platform divided up into the same number of sections as the cameras in the room. Admiral Garragut seated on a dais, posing for a photosculpture, Huston & Kurtz, ca. 1862. Courtesy of George Eastman House, International Museum of Photography and Film.
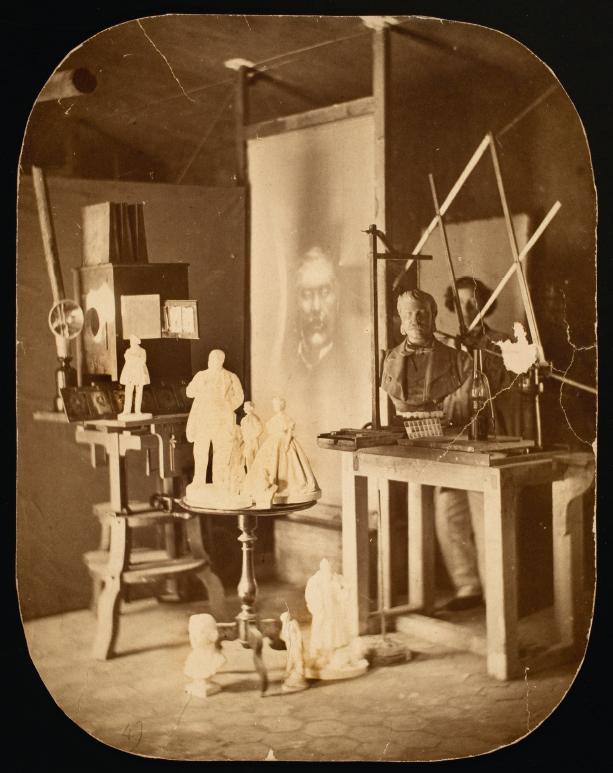
But this was only a part of the process. From here, Willème transferred the photographs to clay. Willème projected each lanternslide onto a large screen. Not far away from the screen, he placed a slab of clay on a round pedestal. The pedestal contained the same pie numbering system as in the photo gallery. The translucent quality of the screen allowed the craftsmen to stand behind the screen and copy the image with a pantograph from the screen to the clay.
Willème also had another process of recreating the form. In mechanical sculpture, Willème photographed the subject, but this time in up to 50 positions. Willème sliced the images and put them together to make a sculpture in the round. Although Willème made a positive, it appears by his patent information that he was trying to obtain the negative so that he could use the negative as a mold for reproductions.
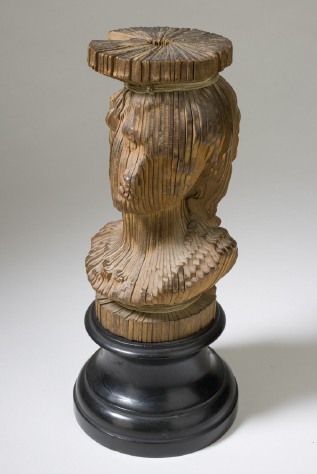
Unfinished photosculpture: portrait head of a woman. François Willème, France, ca. 1865, oak maquette compiled of profiles. Courtesy of George Eastman House, International Museum of Photography and Film.
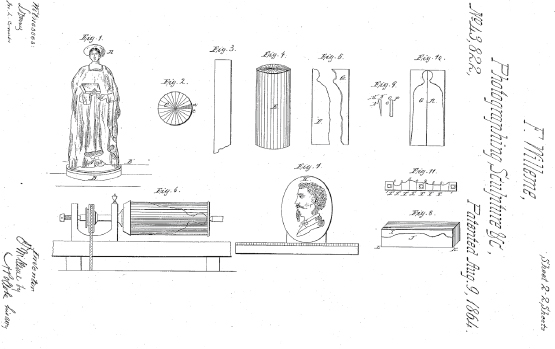
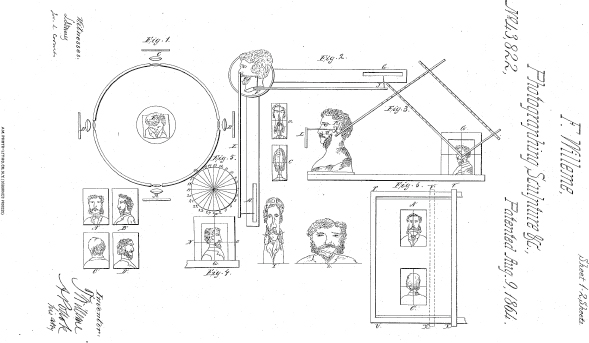
Photosculpture patent August 9,1864.

In 2012, Ian Dawson, Louisa Minkin, and the undergraduate students from the Winchester School of Art, University of Southampton, recreated François Willème’s photo sculpture studio and the mechanical sculpture process. They built a round sculpture photography studio with 24 cameras. The students project the images on a translucent screen, and the artist transfers the dimensions of the subject to the clay using a pantograph. To read more about their results and to listen to a podcast about the process, visit this book’s accompanying website.
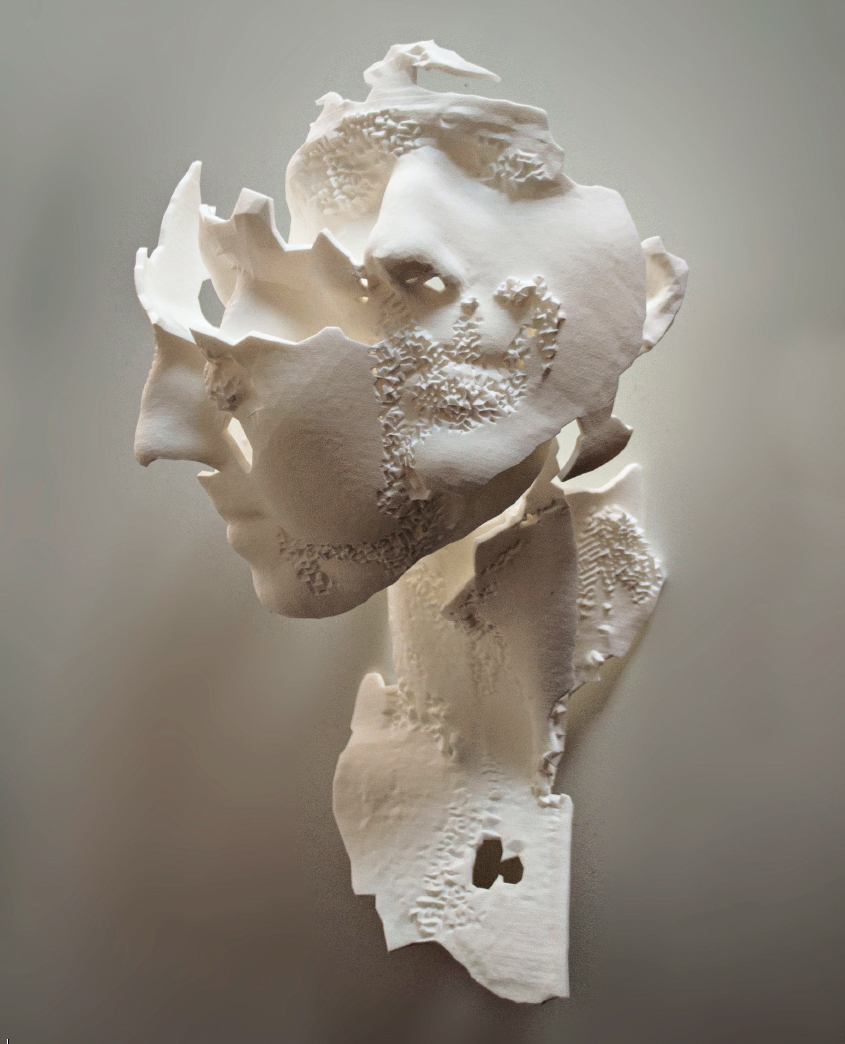
PRESERVING ART—THE DIGITAL MICHELANGELO PROJECT
In 1997–1999, students and staff of Stanford University and the University of Washington began a project that brought them to Italy to create 3D scans of the works of Michelangelo. Marc Levoy, professor of computer science at Stanford, and his team wanted to be able to work so closely with the works of Michelangelo while combining 3D technology that they would capture chisel marks smaller than a millimeter. The technology of laser scanners has been around since the 1960s but back then the technology was not as readily available. As we learned, a 3D scan is not made with one scan. There are multiple scans that require a great deal of post-processing. The scanning process creates large files that taxed the memories of computers of that time. The Digital Michelangelo project team was one of the first groups that felt it important to document art and culture. They wanted to preserve the cultural heritage in 3D.
With a variety of scanners made for this project, they made scans of many of Michelangelo’s works. The sculpture of David has a very large dataset with two million polygons and 7,000-color images. The Michelangelo project has made its datasets available to “established scholars, for non-commercial use only.”
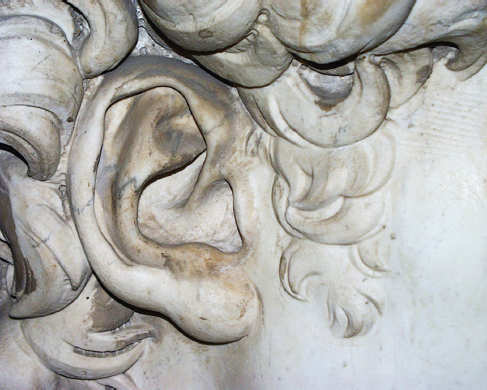
It is the goal of the Digital Michelangelo project to capture all of the sculpting nuances with 3D scans, even fine chisel marks (http://graphics.stanford.edu/projects/mich).
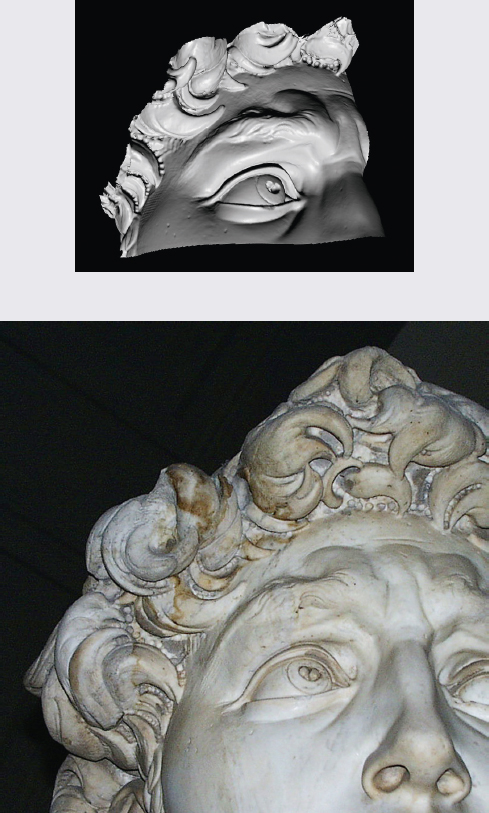
At 23-feet, no one gets to see close-up detail of the work of this master. The photographs and scans show drill holes under the hairline (http://graphics.stanford.edu/projects/mich).
3D Technology for Enlargement and Reduction
Now, thanks to 3D scanning, fine artists who are entering a digital world, who do not want to design in a computer program, can create a sculpture in traditional clay, another medium, or a mix of media. They can then have their work 3D scanned. Once scanned, the artist can add more details to the art in a computer-sculpting program. Or, the artist, in just a few keystrokes, can send the file to a vendor and have it enlarged and/or milled in foam, stone, or wood. Transporting the art is easy. The artist transports the work digitally. An artist in Texas can easily send the digital file to a stone-sculpting facility in Tuscany. The artist can also use these same digital files to create 3D prints in a variety of materials from the many vendors that we talk about in Chapter 7. To learn more about CNC milling of enlargements refer to Chapter 6: 3D for Presentations and CNC Milling for Enlargements.
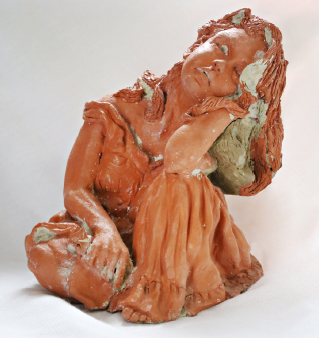
Artists’ work can fall into disrepair, but 3D technology offers the opportunity to repair and repurpose artwork. Beach Girl by Bridgette Mongeon.
You don’t have to be a Michelangelo to think about preserving artwork. Over time, the artist’s work can fall into disrepair or even deteriorate. 3D scanning of the art revives the inspiration. An artist can repair the artwork in the computer and 3D print or CNC mill it in another medium. Another option for artists and 3D scanning is repurposing of their art. An artist can take a life-size figurine created for one purpose, scan it and then recreate the art at a different size and medium.

Chile Pepper 2 by Jan Kirsh, 20 × 36 × 15 inches, cast resin with automotive paint, sealed with clear coat. Bronze and stainless steel with silver-tone finish, 1.75 × 3 × 1 inches.
Art that might be more transportable interested Jan Kirsh. She also desired to enlarge her artwork and create it in another medium such as stone. She had her red pepper sculpture scanned and modeled by Direct Dimensions. ExOne then repurposed her pepper artwork by creating it in metal as a small version. She states, “I’m trying to have fun with my work and trying to take it to different levels. It means continuous exploration with a constant learning curve” (www.dirdim.com, www.exone.com).
Tutorial—Scanning for the Repurposing of Art
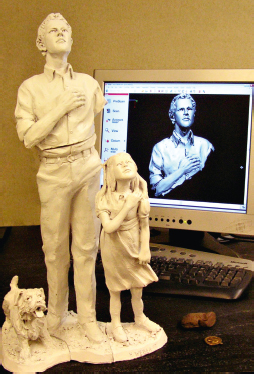
Sculptor Bridgette Mongeon creates digital files of old concrete sculptures of children and broken art. This gives the artist an opportunity to rework the art digitally and repurpose the figures.
Every sculptor knows that you must create art with the end product in mind. If you are creating artwork in clay, you cannot have a heavy figure balancing on a tiny ankle. The limitations of the medium of production and the modification of designs will become even more apparent in Chapter 7: 3D Printing. Whether creating art traditionally to be cast in bronze or digitally for 3D printing in ceramic, it is important to create and design the art with the final output in mind. The nuances of a piece of artwork created for a mold for concrete casting is different from the artwork created for 3D printing. With a sculpture created with the intent of concrete casting, the artist fills in undercuts, creating a design with more of a solid mass. However, as we will see in Chapter 7, 3D printers make art layer upon layer, and deep recesses are not a problem. With the use of scanning, the artist can scan the figure, then bring it into a sculpting program such as ZBrush or Mudbox, rework the designs, and repurpose the concrete children or broken art in other mediums with the final digital medium in mind.
Preparing the Art
There is no need to prepare the white surface. White surfaces will scan well, although shiny or transparent surfaces might need a coat of powder. The artist adds colored dots to the sculpture to help with registration. She places the art on a turntable for easier rotation and secures the scanner safely to a tripod.
System Requirements
As stated in Chapter 1: Primer, when it comes to having the right computer system, often it is best to work backwards. Find the peripherals such as a scanner or the software that you would like to use and then work backwards to find the type of computer that you will need. Will the computer handle the data coming from the 3D scanner? Users can find the system requirements on the peripheral or software websites. Presently, the minimum system requirements for using the NextEngine scanner on Windows XP/Vista/7 are 2 GHz CPU, 3 GB RAM, and a 256 MB graphics card. The scanner connects to the computer through a USB port. Support from NextEngine lists the minimum requirement, but a quick phone call reveals that the computer may require more RAM to accommodate larger data rich scans created when scanning life-size concrete children. As stated in Chapter 1, sometimes you will need to modify or even purchase a new computer workstation to accommodate your intent. Because this is a larger sculpture, the scanner will collect more data, which means it will require more memory in the computer than if you were only scanning a smaller sculpture.
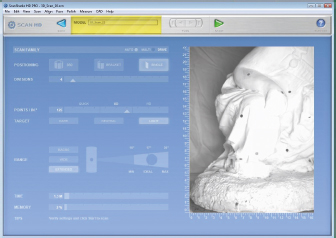
Scanner Setup
The NextEngine scan setup window has many options. The artist chooses the “Single” position. This means that instead of an object rotating on the turntable the scanner will create individual scans. In the “Points/In.2,” the slider is set to the “High” range of SD. The higher HD settings would give more detail, but this is a case where that much data is not necessary. A single test scan shows that the middle-range SD, set at the high end, is sufficient. The “Target” is the material. This material is a bright white plaster sculpture and so the artist applies the “light” setting. We can already see that working with this scanner is giving us one of our criteria in searching for a scanner. We have “Flexible” options when scanning.
Range
The NextEngine scanner makes it easy to remember the positioning of the art. In the “Extended Mode,” the scan’s best image is at a range of 17 inches. The sculpture and scanner are then placed to accommodate the 17 inches.
It takes many scans to move around the sculpture with a 25–30 percent overlap of each scan. The final count of scans to scan the entire figure using the NextEngine scanner and individual area scans is 22. It takes approximately two to five minutes to scan and align each section, depending on the experience of the user. Scanning is a fine art. It is important to get the overlap of each scan needed in the preferred range. Making excessive scan to align does not always mean a better digital file.
A scanner that offers flexibility may not be automatic. The options that the scanner offers can lead to a better scan. The artist scans the little boy at a range of 17 inches from the lens of the scanner. It will take quite a few sections to scan and align the entire large sculpture.
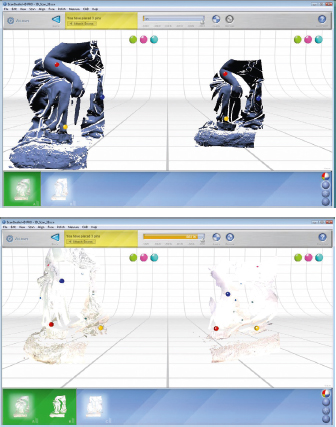
The Process
The steps in the scanning process are: scan, align, trim, fuse. The viewing window allows the artist to clearly see what data is missing or needed. The artist rotates the art and creates individual scans. Each scan may have excess data in the image, and this is easily deleted using the software’s “trim” function. Registration dots on the scanned sculpture help the artist to visually align the multiple scanned images in the computer software program. These different images are then fused together using the software. There may be recessed areas in the art where the scanner cannot gather information. These hidden areas will create holes in the scan. If any holes remain, the program can fill these holes with the “fill” command.
The NextEngine scanner can scan color, which makes it easier to see registration dots on the sculpture. The artist matches up the dots on the scanned art with three dots in the software, placed preferably in a triangular position. The computer then aligns and fuses each of the scans. If any holes remain after all of the scans are complete, the scanner can fill the holes.
Output
The NextEngine scanner comes with operating software called ScanStudio that provides output of the following Mesh file formats: STL, PLY XYZ, VRML, OBJ, and JPG texture files. See Chapter 7: 3D Printing for further discussion on file formats. Other file formats are available for this scanner; for example, file formats for CAD programs are available with the NextEngine software upgrades. It is important to know the file output format available from either your scanner or your service bureau. To finalize the details within a sculpting program, the artist uses this digital model created by the scanner. It is important to be able to import the file into the sculpting program. Once the artist refines the 3D model he or she can send it to a 3D printer to print the art in other media and sizes. See Chapter 4 for information on sculpting or refining a file in a sculpting program, as well as preparing the file for printing.
This tutorial of scanning concrete children has helped us to understand the process of scanning using a studio digital scanner that provides a quality scan, with ease of use and flexibility. Now let’s take a look at some other types of scanning and the way that artists are using this 3D process to create incredible pieces of art.
OBJECT BREAST CANCER
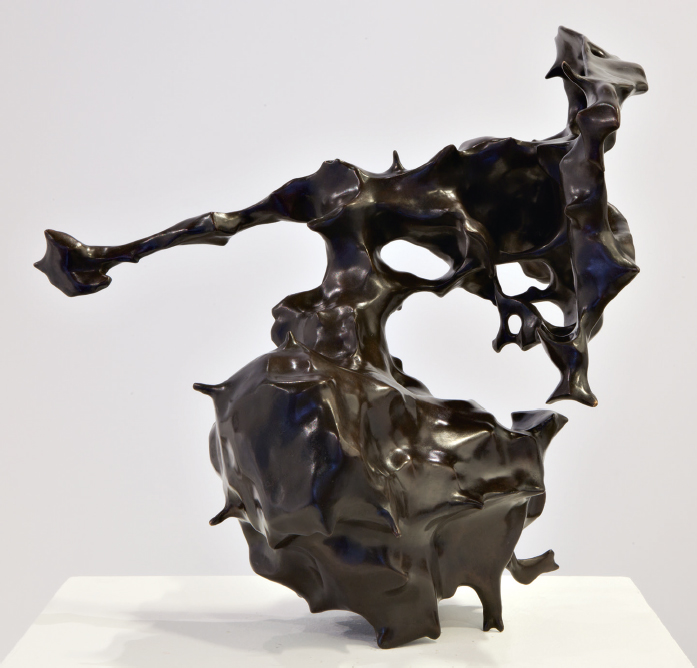
Leonor Caraballo is an artist who was diagnosed with breast cancer. As a visual person, she wanted to see her tumor, to give it shape, to know what it was instead of it being this unseen monster. In collaboration with her husband, Abou Farman, they took her MRIs and created a digital model that they then turned into a 3D print. The artist changes the cancerous mass into a bronze jewel. When viewing the tumor at an art show, breast surgeon Alexander Swistel told the artists, “These tumors are saying something.” Through the art, another collaboration takes place. Because of this artwork, Swistel and Dr. Michele Drotman have decided to look at the volume of cancer and see if it can change the way doctors treat breast cancer.
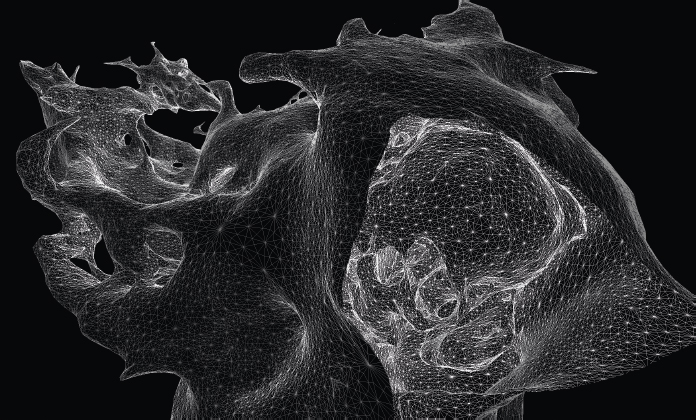
Object Breast Cancer by Caraballo-Farman.
Other Types of Scanning and Capturing Data
Artists are taking more than 3D scans using scanners and photogrammetry to create art. They are also using such things as medical scan and motion capture. You don’t have to have sophisticated equipment and medical software to work with your own medical scans. InVesalius is free software that can create 3D images from 2D medical files like CT or MRI scans (http://svn.softwarepublico.gov.br/trac/invesalius).
Motion Capture
The military, game developers, and those who work with robotics, medical applications, and film have all used motion capture. In film, motion capture or “match moving” on a computer records the movements of the figure, brings that information into a computer as data, and transfers that information to a character in animation. Motion capture does not copy the physical characteristics of an individual, but only their movement or actions.
There is similar technology used in the Xbox Kinect game console or the Nintendo Wii that copies the motion, movement, and gestures of the person and passes those movements on to the characters on the screen for use in a game or Wii sports activity. Hackers are already using the Kinect to create a room scanning system. It won’t be long before we see artists begin to hack the Wii or Kinect to create their own motion art. On this book’s accompanying website, there are links to hacker sites that show how to use your Kinect as a room scanner.
An artist who is taking motion capture and movement as data and translating that into art is Raphael Perret. Perret captures data not by scanning but by probes that he places on the body. This motion capture is then transferred into the computer and later printed out as a physical object.
_________________
Using 3D data capture with archeology, art, and cultural digital preservation of sites that are subject to deterioration through the elements is a way to preserve earth’s cultural heritage. Using digital files in education to explore without damaging the artifacts and art has great potential, not only in education, but also in encouraging awareness and acceptance of other cultures.
The capturing of data, whether through scanning, photogrammetry, 2D data made into 3D files, or motion capture, opens up a world of possibilities for artists. It helps the blind to see and, who knows, as in the case of Leonor Caraballo and her breast tumor, the exploration and art might just spark a thought process that could have greater potential for mankind. 3D data for enlargement, reduction, repurposing, and documenting for a legacy for loved ones extends the artist’s toolset and creative life journey. Whatever you see, you can now capture, change, and modify easily in a digital world. Put these tools in the hands of creative minds, and it is amazing what will come forth.
Motion Capture Milton #10.2.1 by Raphael Perret. Rendering by Vladimir Jankijevic.
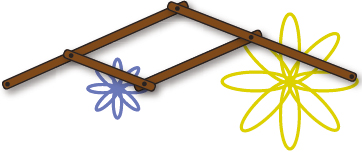
KEVIN BOX and ROBERT J. LANG
Kevin Box collaborates with origami artist Robert J. Lang to create monumental origami sculptures in metal.
There are several ways that Kevin Box and Robert J. Lang continue to push the boundaries of the process, art, and technology. Box and Lang incorporated 3D technology with laser scanning of a paper/wax original art titled White Bison. Thai Metal Crafters Co., in Thailand, enlarged and CNC milled the work in foam (www.tmcbronze.com). The artists finish the foam with clay and wax to restore edges and “wrinkles” before it travels through the traditional lost wax method of bronze casting. This process is similar to the process detailed by Bridgette Mongeon’s tiger sculpture featured in Chapters 6 and 7.
Box continues to push the limits while exploring technology and his personal inspiration. In Chapter 8, we will see how Synappsys Digital Services uses Box’s work to create yet another advancement in digital technology.
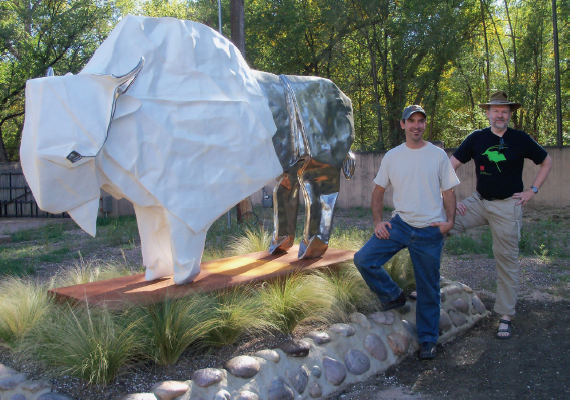
White Bison, bronze by Kevin Box and Robert J. Lang.
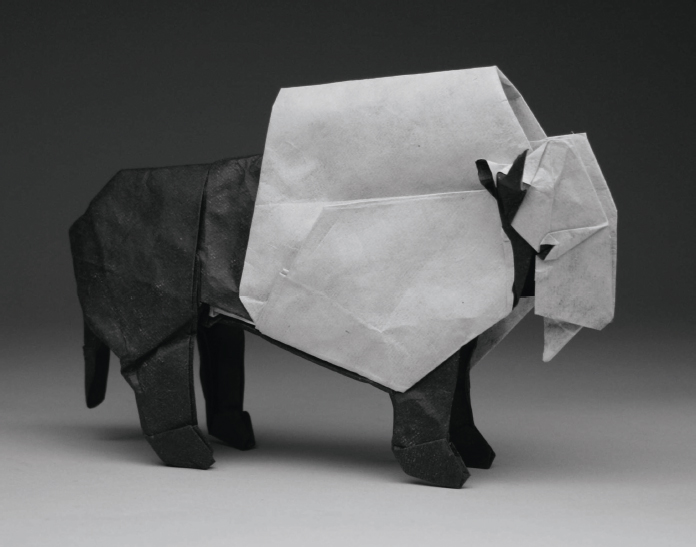
Origami Bison, folded paper by Kevin Box and Robert J. Lang.
BARRY X. BALL
Barry X. Ball is another pioneer who has incorporated 3D technology and fine art since 1997. Ball 3D scanned his own head with a Cyberware scanner at Cyber F/X in Burbank, California, then he had the head CNC milled in foam. He refined the foam heads and used them as models to create works like Flayed Herm found on his website (www.barryxball.com).
Ball created the artwork Envy from a scan of La Invidia, the work of sculptor Giusto le Court (1627–1679). Although these are scans of other artists’ works, Barry and his team try to bring the work past what the original artist has done, past the compromises that the original artist made at the time of the commissions. In an interview for the recent Museum of Art and Design exhibition Out of Hand, Ball states:
“I think I make a distinction in my work, between copies and what I do. I’m definitely not copying or re-presenting historical works. I’m using…. historical artists’ end point as my starting point. Trying to analyze what my historical fore bearers where trying to do, and attempting, in my way, to do it better.”
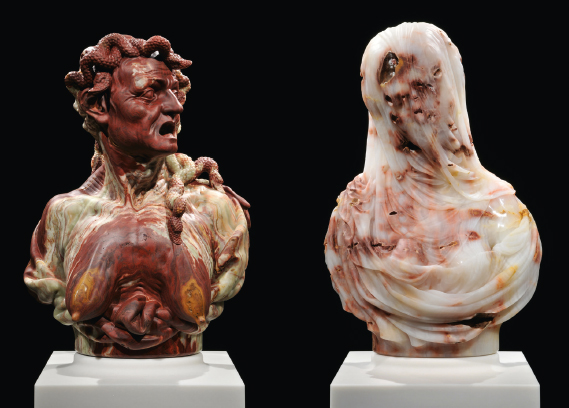
Envy/Purity by Barry X. Ball. Pakistani onyx/Mexican onyx, 2008–2012. Private collection, New York.
Ball created the artwork Purity from a scan of the sculpture La Purità by Antonio Corradini (1668–1752). These two images quickly display Ball’s influence on the work by the materials he has chosen.
Ball works with a variety of software including ZBrush and Rhino 3D. For scanners he prefers the Breuckmann white-light scanner and vendors that he has used are Unocad (European scanner, www.unocad.it/cms), Direct Dimensions (US scanner, www.dirdim.com), Fine Line Prototyping (www.finelineprototyping.com), Materialise (www.materialise.com), and Repliform (www.repliforminc.com).
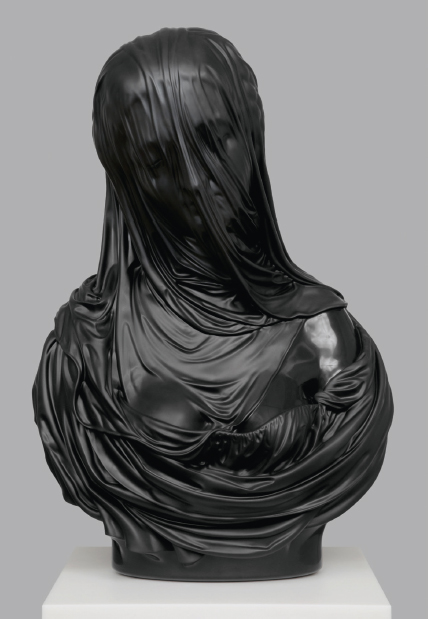
Purity by Barry X. Ball. Belgian black marble, 2008–2010. Private collection, Paris.
ROBERT LAZZARINI
Robert Lazzarini creates art of distortion that invites a type of artistic vertigo in the viewer. These sculptures look like two-dimensional objects that a photographer might skew in Photoshop. They are instead, three-dimensional works of art. The art compels the viewer to walk around it. The viewer hopes to rectify the visual distortion as one would walk around a tromp l’oeil painting trying to find the artist’s intended perspective. However, with the viewing of Lazzarini’s work, rectifying the 3D image in your mind is impossible, no matter how many times you walk around it. They are spatial paradoxes.
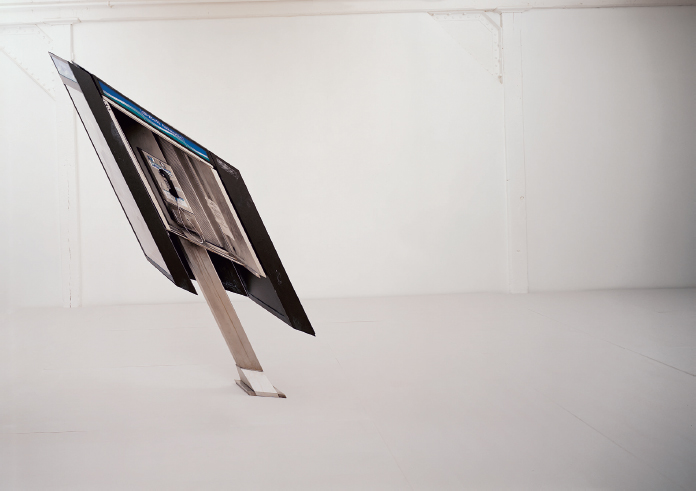
Pay Phone, 2000, by Robert Lazzarini.
Lazzarini’s process, although unique to each object, combines digital design, industrial processes, and hand-finishing. One of the aspects of his work is that there is no material translation. In other words, the sculpture that he creates is made from the same material as the object it is based upon. His series Skulls are cast bone.
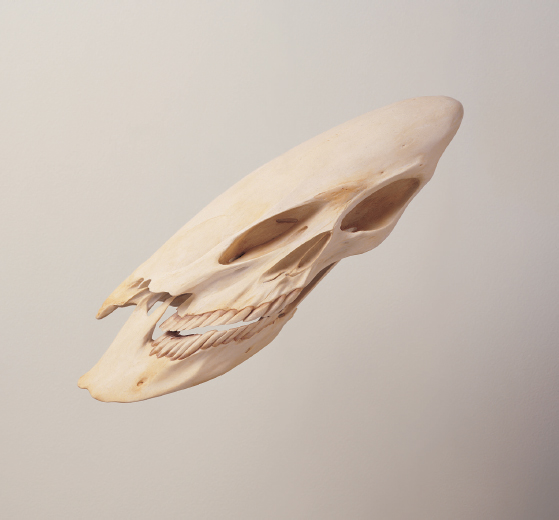
Skull, 2000, by Robert Lazzarini.
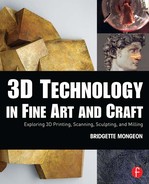
SOPHIE KAHN
Sophie Kahn comes from a background of capturing the stillness of life in photographic images two-dimensionally. What she now embraces while working with 3D technology is the movement of stillness. Kahn has incorporated 3D scanning in her workflow since 2010, combining the technology with bronze casting and other mediums. When using a 3D scanner, it is difficult to capture the human form. As we have seen, 3D scanning takes a bit of time and patience. When creating a 3D scan of a person, distortions of the image happen through subtle movement of the subject. What some might consider the limitations of the 3D scanner when trying to capture figures, Kahn sees as a creative part of the medium. The movement of the body makes what a scanning technician would refer to as noise or “motion blur.” Noise is something a scanning company would try to avoid, or cut out of the project. However, Kahn embraces it. Kahn incorporates the noise from that movement in her work and creates new art that looks fractured, old, and broken, more like an artifact that an archeologist would find on a dig.

L:Gold by Sophie Kahn. Bronze (cast from 3D print), 2012.
She describes seeing a 3D scan of herself without color or movement, looking like a death mask—eerie and haunting. The technology of the 3D scanner strips the life away from the body, which intrigues Kahn. Using this new medium was a continuation of her exploration and questions about the human body, time, memory, loss, and history. She is also interested in how the advance of technology, the use of social media, becomes a way for us to “continue living” or entomb ourselves.
In a lecture at the leaders in Software and Art conference at the Guggenheim Museum in New York 2012, she states.
“I work with all of this imagery not because I want to be morbid, but because I am interested in exploring the ways that technology can fail to capture life, and what the poetics of that failure might look like. We live in a world where we are so bombarded with claims for all seeing, all-powerful, imaging technologies. It is my belief that as artists destabilizing those, through poetics, might actually prove to be the strongest weapon that we have.”
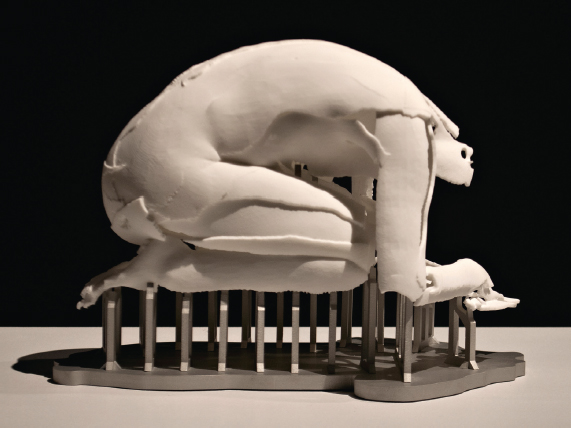
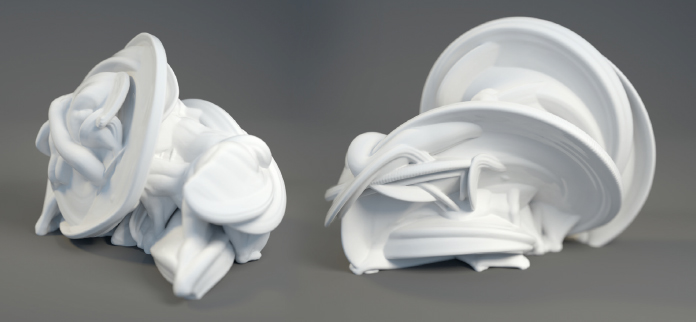
Période de délire, K, by Sophie Kahn. 3D print from 3D laser scan, aluminum base, 2014, 12 × 11 × 8 inches (without base).
On the book’s website at www.digitalsculpting.net you will find:
* Links to further descriptions on the process of creating the artwork featured in the galleries.
* Podcasts with the artists.
* Videos featuring the artists at work.