CHAPTER 12
How to Get Very High Magnification
Macro photography refers to close-up photography; the classical definition is that the image projected on the “film plane” (i.e film or a digital sensor) is close to the same size as the subject.
—Wikipedia
Life is a tragedy when seen close-up, but a comedy in longshot.
—Charlie Chaplin
12.1 Introduction
Images of objects that fill up most of the picture frame are often called close-ups, but that is not the subject here. This chapter is concerned with real close-ups and “macro” photography. This distinction is made clear by the concept of magnification, m, which just means the ratio of the size (height) of the image of an object to the actual size (height) of the object (see Chapter 7):
m = (image size)/(object size) (12.1)
Standard camera lenses permit maximum magnifications from about 0.1 to 0.3; and those at the high end of this range often have a “macro” label displayed on the lens barrel, on a push button, or in an accompanying menu. True macro lenses permit magnifications at least to 1.0. This is also called lifesize, 1X, or 1:1. Similarly, m = 0.5 might be denoted as ½ X or 1:2.
The magnification concept is the key to understanding the essential features of both telescopic and close-up photography. In the photography of birds and animals the magnification is usually quite small (m < 0.1). A lion may fill up the entire frame, but the image height will only be 24 mm or less for DSLRs and smaller cameras. In this regime, the magnification is proportional to the focal length of the lens and also inversely proportional to the distance from the lens to the object. This explains the need for very “long” lenses to photograph distant animals and birds. In the absence of a long lens, the photographer has no recourse but to get closer to the subject.
At the opposite extreme, e.g. plant and insect close-ups, the magnification is often 0.25 or greater. Strange as it may seem, in this region the magnification can be increased by decreasing the focal length. This is, in fact, the effect of “close-up” supplemental lenses. The magnification can also be increased by increasing the distance from the lens to the sensor, i.e. adding extension. These may sound like arbitrary rules, but, in fact, they follow directly from the simple conjugate equation.
Here, again, science unifies apparently disparate sets of observations, and it is worthwhile to spend a few minutes to see how everything fits together in conformity with the laws of optics. This will require a few equations. If equations are not helpful for you, please skip to the next section. For simplicity, I will begin with a single thin lens (Figure 12.1), but the results can easily be generalized to compound lenses of any complexity. (Note that the right triangle formed by ends of the object and the center of the lens is similar to the right triangle formed by the ends of the image and the center of the lens. Therefore, (image height)/(object height) = q/p.)
As shown in Chapter 7, the working distance, p, and the image distance, q, are related to the focal length, f, by the conjugate equation:
![]() (12.2)
(12.2)
In the telescopic limit, the object is located so far to the left that p is much greater than the focal length f. In this limit, light rays from the object form an image in the plane where q > f, and the magnification is close to zero. Now suppose we move the object closer and closer to the lens to increase the magnification. When p = 2f, it is easy to show with the help of Equation (12.2) that p = q and m = 1. This benchmark arrangement is shown in Figure 12.2.

FIGURE 12.1. Magnification with a single thin lens.
Now suppose we need a magnification greater than 1X. One way to accomplish this is to move the object closer to the lens so that p < 2f. Of course, the image will not be in focus unless q can be increased to satisfy Equation (12.2). As p approaches the value f, the rays on the right-hand side become parallel and the image plane is infinitely far from the lens (on the right). The conclusion is that the entire “macro” range (m = 1 to m = ∞) is confined between p = 2f and p = f. Of course, when p is less than f, the image is virtual, and the lens functions as a magnifying glass. (Virtual means that the image appears to be where it does not actually exist, as with reflections in a mirror. A real image exists where the rays from a point on an object are brought together in another point.)
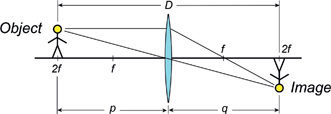
FIGURE 12.2. The arrangement for 1X magnification.
This discussion may leave the false impression that focus is always obtained by moving the lens relative to the sensor. This type of focusing, moving the entire lens unit, is known as unit focusing. The important parameter in unit focusing is the extension, or distance added between the lens and the sensor. Focus may also be obtained by the movement of elements inside a compound lens. For example, the front element may be moved relative to the other lens elements to produce a change in the focal length. Modern compound lenses may, in fact, use both extension and focal length change to achieve focus.
Useful expressions for the magnification can be obtained from Equation (12.2) and the definition m = q/p. For example, it is easy to show that
![]() (12.3)
(12.3)
Therefore, in the macro range we can increase the magnification by either increasing q (the total extension) or by reducing the focal length f. In the other limit where p is large and q/f approaches 1, the magnification vanishes.
Another useful expression for m (obtained by multiplying Equation (12.2) by p and rearranging) is
![]() (12.4)
(12.4)
In the telescopic limit where p is much greater than f, we find that m = f/p. This result justifies our comment that at great distances the magnification is proportional to the focal length.
Equation (12.2) appears to have all the answers, but there is a catch. Practical camera lenses are compound lenses. The object distance p is measured to the first nodal point and the image distance q is measured from the second nodal point as described in Chapter 9. Therefore, the distance from the object to the sensor is usually not equal to the sum of p and q. Furthermore, as mentioned above, the internal movement of lens elements may change the focal length as well as the distance of the lens elements from the sensor. The bottom line is that the simple equations shown above are only useful for compound lenses when the nodal points are close together or when the locations of the nodal points are known.
Another factor that must be considered is the increase in the effective F-number, Neff, relative to the value of N, reported by the camera, that occurs when the magnification is increased. This, of course, can greatly increase exposure times and exacerbate the effects of diffraction. It turns out that Neff is related to the magnification m by the equation Neff = N(1 + m), except when magnification results from the use of a supplemental close-up lens. However, there is a caveat. Lenses are characterized by an entrance pupil and an exit pupil. For a “symmetrical lens” the entrance and exit pupils are equal, but in general they can be quite different. Typically, the entrance pupil is larger than the exit pupil for telephoto lenses, while for wide-angle lenses the exit pupil is larger than the entrance pupil. This can be verified by simply looking into a lens and estimating the apparent size of the aperture stop from the front and the rear. The pupil ratio is defined as pr = (exit pupil)/entrance pupil), and a more accurate equation for the effective F-number is:
![]() (12.5)
(12.5)
So where does this leave us? The simple conjugate equation is not very useful for macro photography, the positions of the nodal points for the lens are in general not available, and the entrance and exit pupil diameters can only be estimated. (Actually, these numbers have been reported for a few prime lenses.) The situation is not ideal, but with a modern digital camera we can measure all the quantities needed for macrophotography.
Consider the standard set of close-up accessories:
1. Macro lens or close-focusing tele-zoom lens
2. Supplemental lenses (1 to 50 diopter)
3. Extension tubes or bellows
4. Teleconverter (1.4X or 2X).
With a prime lens and any combination of supplemental lenses and extensions in place, the following quantities can be measured (or estimated) at close focus and far focus (∞):
1. Working distance: w (distance from object to front of lens combination).
2. Distance from object to sensor plane: D.
3. Magnification: m (from measurement of image height on sensor).
4. The effective F-number: Neff (from the automatic aperture setting at fixed shutter speed).
5. Resolution as a function of Neff.
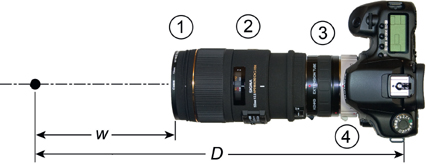
FIGURE 12.3. Illustration of the working distance w and the distance D to the sensor for a camera with accessories: (1) supplementary close-up lens, (2) macro lens, (3) extension tubes, and (4) tele-extender.
The accessory lenses and distances are shown in Figure 12.3.
In the next few sections I will cover the various combinations and arrangements for increasing the magnification and point out their advantages and limitations.
12.2 Supplemental Lenses
Probably the easiest and least expensive way to obtain close-up or even macro capability with a standard lens is to add a supplementary lens. The simplest of these is a one-or two-element screw-in lens that attaches just like a filter; though, of course, they are not filters. These close-up lenses are sometimes called diopters or plus diopters because their strength is rated in diopters. (Recall that the optical strength is proportional to the inverse focal length or d = 1/f and the dimensionless strength in diopters is obtained when the focal length is measured in meters.) If the focal length is measured in millimeters, as is usually the case, the optical strength is d = 1000 mm/f = 1000/(f/mm) diopters. For example, 100 mm lens has a strength of d = 1000/100 = 10 diopters.
The magnification expected from a camera lens (prime lens) with an attached diopter can be estimated with the simple lens equations. The basic idea is that the strength for the combination of two closely spaced lenses is just the sum of their strengths in diopters. This result can be expressed either in terms of diopters as d = dPrime + dDiopter or focal lengths:
![]() (12.6)
(12.6)
Suppose that the prime lens is described by fPrime = 100 mm and a +2 diopter close-up lens is added. The effect is to decrease the combined focal length and hence to increase the optical strength. In this case the strength becomes 10 diopters + 2 diopters and the combined focal length is 83 mm. The magnification can easily be estimated when the prime lens is set at the far-focus (∞) position so that q = fPrime. This, of course, means that all parallel rays entering the prime lens will be brought to focus in the plane a distance fPrime from the lens. Also, we know that rays from a point on an object at a distance p = fDiopter from the close-up lens will be parallel when they exit the plus diopter. As illustrated in Figure 12.4, the combination of a close-up lens with a prime lens always gives a working distance (w) equal to the focal length and a magnification is
![]() (12.7)
(12.7)
Equation (12.7) is useful for standard lenses with limited focusing ranges. For the 100 mm lens with a +2 diopter supplementary lens, we obtain m = 0.2. As a test, I attached a +2 diopter lens to a zoom lens and set the focal length to 100 mm. I found that at far focus the working distance was approximately 50 cm and the magnification was m = 0.20. When the lens was focused as closely as possible, the working distance was reduced to 16 cm, and I measured m = 0.27. As a more extreme example, I attached the +2 diopter to a 105 mm macro lens that is capable of 1X without attachments. Here again, at far focus the working distance was 50 cm and m = 0.2; however, at close focus the working distance is only 8.5 cm and m = 1.24. With the macro lens, it would be crazy not to use the close focus capabilities, and Equation (12.7) is not very helpful. Still the close-up lens increases the maximum magnification a bit by reducing the effective focal length. This can be useful when the amount of extension is limited.
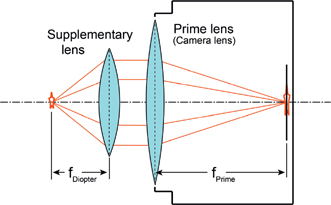
FIGURE 12.4. The operation of a close-up lens when the prime lens is focused at infinity.
Supplementary lenses have important advantages. They are small and easy to use, they have little effect on the effective F-number,1 and their contribution to the magnification increases with the focal length of the prime lens. The main drawback is their effect on optical quality. Inexpensive sets of diopters typically contain single element lenses and it is necessary to stop down the prime lens to maintain acceptable resolution. I have obtained good results with a set of HOYA coated diopters (+1, +2, and +4). However, in general photographers are well advised to use two-element (achromatic) close-up lenses whenever possible. These are now available from a number of manufacturers. I know from experience that high-strength, single element diopters, e.g. d = 10, can severely limit resolution.
I have saved the best part for last. It is possible to obtain very high quality supplementary lenses with high optical strengths up to at least +20 diopters. Furthermore, these lenses are widely available at reasonable prices; and many people may already own one or more of them. I am, of course, referring to fairly short focal length, large aperture camera lenses that can be reversed and used as supplementary lenses. A 50 mm, f/1.8, Canon lens makes a fine +20 diopter close-up lens and can easily be mounted on a variety of prime lenses by means of “macro coupler” reversing rings. I have also used lightweight Olympus OM system 50 mm, f/1.8, and 100 mm, f/2.8, lenses as +20 and +10 diopter supplementary lenses. Lenses like this are available on the used lens market at very reasonable prices. The combination of a telephoto lens with a reversed 50 mm lens is shown in Figure 12.5.
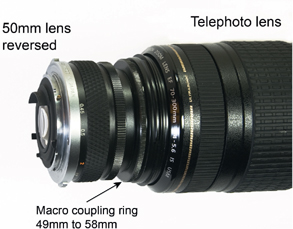
FIGURE 12.5. The combination of an Olympus 50 mm lens, a macro coupler, and a Canon 70–300 mm lens that permits magnifications of 4X and greater.
12.3 Extension
Another common method for making any lens focus “closer” is to add some extension between the lens and the sensor plane. A convenient way to accomplish this for DSLRs is to use a set of extension tubes. For example, the set sold under the name Kenko includes 12 mm, 20 mm, and 36 mm tubes that can be used separately or stacked together to give 68 mm of extension. These tubes contain no glass elements but do provide electrical connection between the prime lens and the camera body for automatic focusing and exposure control. It is also possible to obtain extension bellows with a focusing rail for some cameras. These systems with (automatic) electrical connections are very expensive and are rarely used by amateur photographers.
So how much good does added extension do? As an example, consider the Canon 50 mm, f/1.8 II lens. At close focus the distance from the object to the sensor plane (D) is approximately 44 cm, the working distance (w) is 34 cm, and the measured magnification (m) is only 0.15. Close focusing with this lens only adds a small amount of extension and q remains approximately equal to the focal length. Now I add an additional 68 mm of extension with the entire set of stacked tubes. With this addition, the measured magnifications for close and far focus become 1.46 and 1.31, respectively. This is true macro capability, but the combination is not very flexible, and the working distances range is only from 4.8 cm to 5.3 cm! Furthermore, the effective F-numbers are approximately 2.5 times larger than the values of N reported by the camera.
The following, often quoted equation, relates the magnification to the added extension: m = (added extension)/(focal length). This equation is, of course, just Equation (12.3) with q = f + added extension. It gives some guidance for standard prime lenses, but in real-world macrophotography, where one usually works with zoom lenses and/or macro lenses having considerable built in extension, the equation is almost useless. The Sigma 105 mm macro lens proves the point. With 68 mm of added extension the magnification ranges from 0.66 to 1.89 in going from far to close focus because of the considerable extension in the lens mount. The only practical way to characterize a combination of lens and extension tubes is to measure its performance. The macro lens with extension tubes may be practical when magnifications greater than 1X are required, but here again there is considerable loss of light. I estimate the effective F-numbers are two to four times the reported values.
In general, extension becomes cumbersome as the focal length increases. However, the increase in magnification with an extension tube may be more than expected because the prime lens is likely to achieve close focus by decreasing the focal length. Also, a small amount of extension can be useful with short focal length (wide-angle) lenses to obtain striking images of extended objects such as almost flat flowers. Of course, fisheye and ultra wide-angle lenses often focus very close without any extension. For example, the photograph in Figure 12.6 was taken with a 15 mm fisheye lens (APS-C size sensor).

FIGURE 12.6. A rose photographed in the late afternoon without flash (f/11, 1/30 sec). Background blur was increased by computer processing.
The conclusion is that extension tubes can be useful and are well worth owning. They are relatively inexpensive and offer increased magnification without decreasing optical quality. Also, they can be a lifesaver when your favorite telephoto lens does not focus close enough. In this situation, an added extension tube may well do the trick.
12.4 Teleconverters (Tele-Extenders) for Cameras with Interchangeable Lenses
Teleconverters are lens accessories that are usually mounted between a lens and a camera body in order to increase the effective focal length of the lens. Teleconverters, sometimes called tele-extenders, are negative lens elements (or groups) that are not capable of forming an image on their own. Peter Barlow (1776–1862) recognized that the introduction of a diverging lens element would multiply the focal length while maintaining approximately the same overall length of the lens. The basic idea is the same as that encountered in the design of telephoto lenses and was even noted by Galileo in about 1609. As illustrated in Figure 12.7, the focal length of a simple or compound prime lens can be stretched by introducing a negative (diverging) lens after it. The combination produces a simple telephoto lens with the focal length f, and the telephoto ratio is defined as L/f.
When simple lenses with paraxial rays are involved (Chapter 7), the focal length of the closely spaced combination is related to focal lengths of the separate components by Equation (7.6).
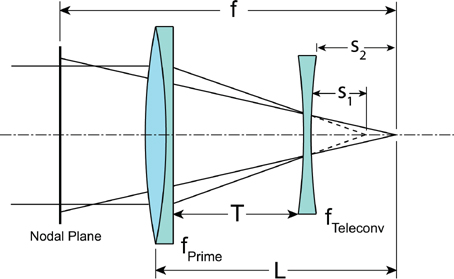
FIGURE 12.7. The effect of a teleconverter or Barlow lens on rays from a prime lens.
In the real world, with long telephoto lenses and rather thick teleconverters, simple equations are not very useful. The important point is that the teleconverter provides a magnification increase by the factor m = s2/s1. This means that a 100 mm lens can act like a 200 mm lens at least at far focus, but at any focal distance the magnification is increased by the same factor. Furthermore, this factor increases the magnification already achieved by macro lenses or extension tubes. Therefore, converters act as multipliers of magnification. Teleconverters also preserve the working distance as well as the full focusing range of the prime lens out to infinity. So, what is the down side? Everything in photography involves compromise. With teleconverters, we lose light intensity. Since the focal length increases while the aperture remains the same, the F-number must increase. The 1.4X teleconverter costs one stop and the 2X unit costs two full stops. Besides this, the introduction of additional glass always reduces the quality of the image. The decrease in quality may be small with 1.4X, especially if the lens is stopped down; but with 2X and higher magnifications the reduction can be noticeable.
Even with some reduction in image quality, the use of a 2X teleconverter may be worthwhile. The Juza photo site has reported excellent macrophotography with a 180 mm macro lens combined with a 2X teleconverter.2 This combination provided increased working distance with impressive resolution at small apertures when stopped down to f/11. Of course, diffraction is the limiting factor. The effective F-number is at least twice as large with the 2X teleconverter, and the rule of thumb is that diffraction becomes significant when the F-number exceeds one half of the sensor diagonal expressed in mm, i.e. about f/14 for an APS-C (1.6 crop factor) type sensor.
12.5 Afocal Teleconverters for Fixed Lens Cameras
Compact cameras and less expensive cameras usually do not have interchangeable lenses. Therefore, telephoto and wide-angle accessories for these cameras must be attached in front of the camera lens. This is analogous to using a fixed lens camera to take photos through the eyepiece of a telescope, thus replacing the human eye with a camera. For this to work with any camera lens, an afocal arrangement (illustrated in Figure 12.8) is required. The magnification in this arrangement is given by m = f1/f2 = feff/fcamera when the camera is focused on infinity. For closer distances the actual magnification measured from the image size on the sensor depends somewhat on the focal length of the camera lens. The same principles can be used to make a front mounted wide-angle converter.
Afocal teleconversion lenses can be quite satisfactory for point-and-shoot cameras and camcorders. They also work well on lenses designed for DSLRs, but tend to be bulky, and they offer no advantage over the rear mounted teleconverters. In fact, there is a serious problem for close-up photography. In contrast to rear mounted teleconverters, the front mounted units greatly increase the minimum focusing distance. So there might be an advantage when photographing a bird at 10 ft., but at close distances the maximum magnification is actually decreased. In addition, afocal teleconverters usually lack threads for mounting polarizers and filters, and they may put unacceptable stress on lens barrels. In particular, they are not recommended for lenses with rotating front elements.
12.6 Combinations of Lenses and Extenders for Real World Macrophotography
I have shown that magnification can be increased by changing the focal length and/or changing the amount of extension. Your best course of action, of course, depends on the application and the equipment at hand. There are pros and cons for the various options. Here is a summary that repeats some previous advice and adds some information about useful combinations of techniques. I am assuming that extreme magnification is not required and that a maximum of 1X suffices with occasional excursions to 3X or 4X.
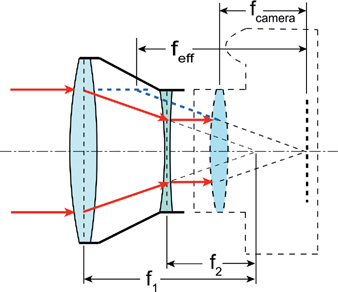
FIGURE 12.8. Front mounted teleconverter.
Macro lenses: It is convenient to shoot everything from birds to small insects with a macro lens on an interchangeable lens camera. Large apertures (f/2.8) and long focal lengths (100 mm, 180 mm, etc.) that permit good working distances and reasonable exposures, when there is good light, are readily available. The working distance can be increased when needed by adding a 1.4X or 2X teleconverter lens at the cost of reduced light transmission and perhaps image quality. When higher shutter speeds are necessary, supplementary light sources may be required (see Section 12.8). It should be noted that Canon also offers a special purpose manual focus macro lens (MP-E 65 mm f/2.8) for magnifications from 1X to 5X. Experienced photographers can obtain remarkable results with this lens, but it is not for everyone. I recommend experimentation with magnifications less than 5X before considering the MP-E. Figure 12.9 shows photographs taken with a 105 mm macro lens in good light.
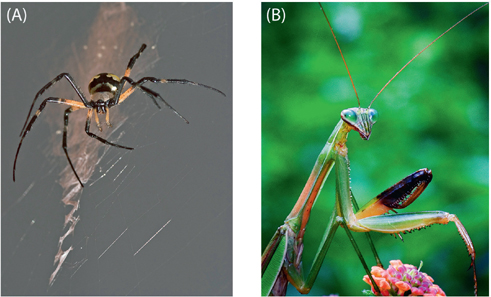
FIGURE 12.9. Photographs taken with a 105 mm macro lens: (a) an argiope illuminated by a bright sky and reflector with a gray card in the background (f/6.7, 1/250 sec); (b) a praying mantis illuminated by flash (f/11, 1/15 sec).
Supplementary lenses: A diopter increases magnification by permitting closer focusing without much change in extension. The diopter makes up for limited extension by decreasing the effective focal length of the camera lens. Because the increase in magnification is offset by the decrease in focal length, the effective F-number is unchanged and there is little loss of light. The cons are:
1. loss of image quality because of the added glass
2. loss of working distance
3. limited focusing range.
The image quality problem suggests it is not a good idea to stack many supplementary lenses together or to use supplementary lenses in combination with rear mounted teleconverters. However, a single diopter of medium strength, e.g. +2, in combination with a zoom lens can be quite useful when a light mobile setup is needed for butterfly photography.
Extension tubes and teleconverters: Given enough extension one can obtain large magnification, but this is often not very practical. Large extensions are bulky and very sensitive to vibration. Also, the effective F-numbers are large and long exposures are required. It is usually a better idea to use a moderate amount of extension, i.e. less than the focal length of the lens, to enhance the magnification already obtained with a macro lens or to reduce the minimum focusing distance of a telephoto lens. It is also possible to obtain high quality macro images by combining the use of supplementary lenses and extension tubes. The effect of the added diopter is to amplify the effect of the extension.
Another popular technique is to use both extension tubes and a teleconverter. The first question is about the best arrangement of the components. We know that a rear mounted teleconverter increases the effective focal length, but it also multiplies whatever magnification has been obtained by the combination in front of it. The added extension produces magnification equal to the added extension divided by the focal length of the lens at least when the prime lens is focused at infinity. For example, a 105 mm macro lens at far focus has the magnification m = 0, but with a 68 mm extension the magnification becomes m = 68/105 = 0.65 (measured value 0.66). When a 1.4X teleconverter is added without any extension, the magnification remains zero at far focus. Now we use both multiplier and extension. First attach the teleconverter to the lens and then the extension. The result is to increase the focal length to 1.4 × 105 mm = 147 mm followed by the effect of extension, and we find a magnification of m = 68/147 = 0.46 (measured value 0.47). Now we reverse the order and first attach the extension to obtain 0.64. The teleconverter is then attached, and the result is m = 1.4 × 0.64 = 0.90 (measured value 0.93). It is obvious, that at far focus, the best plan is to mount the extension first followed by multiplication with a teleconverter. These calculations are easy and accurate but may be useless because no one does macrophotography with their macro lens focused at infinity!
So, what is the real story about the stacking order? The conclusions reached above have some validity for normal lenses with limited focusing ranges, but for macro lenses and lenses with a macro mode, the stacking order is far less important. This is to be expected because macro lenses have a lot of extension built in at close focus. Consider again the 105 mm macro lens that gives 1X magnification at close focus. When I mounted 68 mm extension on the lens followed by 1.4X, I obtained m = 2.82 at a working distance of w = 7 cm. The reverse, 1.4X followed by 68 mm, gave m = 2.71 and w = 9.5 cm. It makes sense always to attach the teleconverter last (closest to the camera) even though the order might not make much difference at close focus. An extensive set of measurements for the Sigma 105 mm macro lens with various combinations of extension tubes, diopters, and a teleconverter are presented in Appendix E. An immediate conclusion is that an extension tube in combination with a teleconverter gives a versatile, high magnification setup.
12.7 Special Problems Resulting from High Magnification
The accessories and their combinations described in Section 12.6 all permit large magnifications to be obtained. Magnification is, of course, required for macrophotography, but that is only the beginning. Most of the arrangements require that we work with large F-numbers. Additional requirements may include:
1. Photographing moving objects that require high shutter speeds.
2. Optimizing F-number for depth-of-field and resolution at high magnifications.
3. Enhancing the depth-of-field within the restrictions imposed by diffraction.
A number of decisions are required here, and the restrictions become severe at the highest magnifications. As always photography involves compromises. Section 12.8 provides some suggestions for dealing with the most common problems.
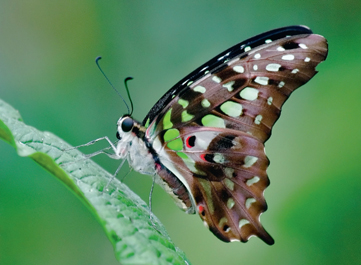
FIGURE 12.10. Tropical butterfly photographed with a 70–300 mm (at 240 mm) IS lens hand-held (f/6.7, 1/90 sec). Supplemental flash enhanced the illumination.
12.8 Lighting for Close-Up Nature Photography with High Shutter Speeds
For butterflies and other large insects, the necessary magnification is not very high and in bright sunlight there may not be a problem. I recommend the following:
1. a long focal length macro lens
2. a zoom lens with a diopter, or
3. a close focusing telephoto lens with a short extension tube if necessary to reduce the minimum focusing distance.
This can be very effective for butterflies and small birds, as illustrated in Figure 12.10. If the subjects are much smaller, e.g. ants and aphids, the magnification and the effective F-number may become large so that high shutter speeds will require supplemental light sources. The aphids in Figure 12.11 were illuminated with bright sunlight and a flash. The only way to stay mobile is to use flash attachments mounted on the camera lens or on brackets. A number of vendors sell macro ringlight flash units that mount on the camera lens.
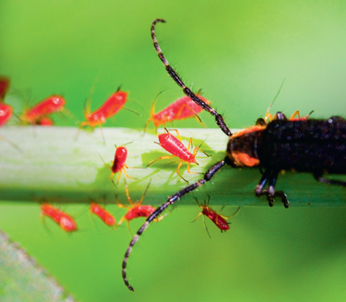
FIGURE 12.11. Aphids and intruder taken with a 105 mm macro lens with extension (f/11, 1/125 sec).
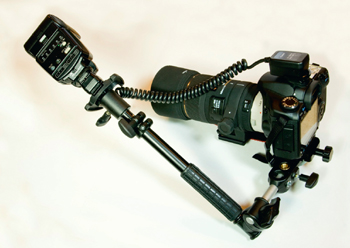
FIGURE 12.12. Flash with off-camera extension cord and a mounting bracket.
These units are good for clinical work, photographing coins, etc., but they can give flat, shadowless lighting that does appear to be natural. The best bet for portable macro lighting in the garden is to use brackets for mounting one or perhaps two flash units close to the lens. Kirk, Manfrotto, and others offer a variety of brackets.
A Manofrotto telescoping camera/flash bracket is shown in Figure 12.12. Another possibility is to mount slave flash units near a target area so that they can be triggered either by a camera mounted transmitter or the light from a flash unit.
Several inexpensive slave units can be used to illuminate a subject as well as the background. However, since some flash units emit preflashes for focusing or red eye reduction, the slave units must be able to select the appropriate flash for the exposure.
12.9 The Optimum F-Number for Macrophotography
Recall that the depth-of-field becomes very shallow at high magnifications. For close-up and macrophotography the depth-of-field can be expressed as:
![]() (12.8)
(12.8)
Here CoC is again the circle of confusion, Neff is the effective F-number, and m is the magnification. The calculation of the depth-of-field proceeds by selecting an acceptable value of CoC to define resolution that is “good enough.” The choice of CoC is subjective, but I previously suggested that a reasonable value would be the sensor diagonal (Diag) divided by 1500. This divisor is probably larger than necessary for small prints and too small when large prints are planned. The maximum resolution possible and the minimum depth-of-field would require that CoC be set equal to approximately two times the pixel width for the sensor in use. For example, an APS-C type sensor with 10.1 megapixels has Diag = 28 mm and a pixelpitch of 5.7 µm. The rule Diag/1500 gives 19 µm, while two times the pixel dimension is 11 µm.
Next a value of Neff is chosen to obtain the desired DoF. However, as discussed in Chapter 11, the diameter of a diffraction broadened spot in the image is approximately 2.44 • λ • Neff, and this quantity controls the resolution when Neff is large. If the maximum DoF is desired, then the maximum Neff value consistent with the CoC must be determined. This is easily accomplished by setting the diameter of the diffraction spot equal to the CoC.
![]() (12.9)
(12.9)
The value of N to set in the camera is obtained by combining Equations (12.5) and (12.9):
![]() (12.10)
(12.10)
The substitutions, Div = 1500, λ = 555 nm, and pr = 1, produce a useful expression for N.
![]() (12.11)
(12.11)
Equation (12.11) is similar to the rule of thumb presented in Chapter 11, except for the inclusion of the magnification.
As an example, consider a setup with Diag = 28 mm and pr = 1. With the resolution specified by Div = 1500, I find that the maximum allowed value of N is 7, i.e. f/7. The corresponding DoF is about 0.5 mm. This may seem restrictive, but consider what happens as the magnification increases. When m = 2, the maximum N value is 4.7 and DoF = 0.13 mm; and when m = 4, the maximum N is 2.8 and DoF = 0.03 mm. If one is willing to sacrifice resolution for DoF, then a smaller value of Div can be chosen, but the depth-of-field at large magnifications is still paper thin. For this reason, it is very hard to get acceptable photographs with magnification above 4X. Patience, good technique, and a lot of practice are required.
12.10 Expanding the Depth-of-Field
So how can the DoF be expanded? The laws of physics cannot be violated, and there is no way to capture an image that simultaneously offers high magnification (>1X), high resolution, and large DoF. There are, however, ways to combine a series of photographs obtained with different focal points to produce an image that appears to have a much larger depth-of-field than any one of the component images. This is a much more difficult task than stitching together images to increase the field of view or even combining images obtained with different exposures to generate an image with a higher dynamic range (HDR). When the focal point is shifted, objects that are out of focus may shift, become larger, and become fuzzy. Combining a set of such images requires judicious cropping and pasting (or erasing), and the attempt may fail to produce an acceptable image.
Fortunately for photographers, very clever programmers have devoted a lot of time to automating the job of compositing images with differing focus points. The programs HeliconFocus, Zerene Stacker, and CombineZP (freeware) are results of this work. Also, focus stacking is available in Photoshop CC. These programs have been reviewed and compared online. A photographer must produce a set of images with different points of focus and store them as a “stack.” The stack is then specified as input for the compositing program. The program rescales and rotates the images as needed and aligns them. The sharp parts of each image are selected and then blended to make the final composite. An example is shown in Figure 12.13.
The production of a satisfactory composite at high magnification may require 30 or 40 images, and depending on the amount of overlap of image components at different distances from the lens, the automated result may not be satisfactory. Sometimes manual manipulation of the composite images or selection of images to remove from the stack is necessary. This requires experience and trial and error. It is, of course, essential to capture enough images that the regions of good focus overlap. I have found that a focusing rail with micrometer adjustment is much more satisfactory for stepping through the focusing range than trying to change the focus of the lens. An arrangement for macrophotography with a Manfrotto focusing rail is shown in Figure 12.14. This tedious procedure has been automated in the StackShot Macro Rail Package by Cognisys. Another option is offered by the CamRanger wireless DSLR control system.
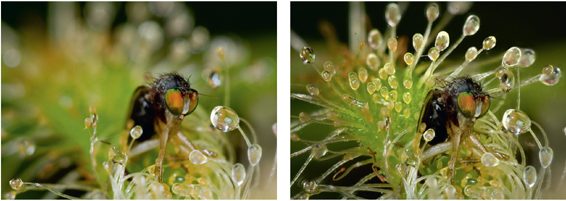
FIGURE 12.13. A fly trapped on a sundew leaf. The left-hand shot was taken at f/5.6, 1/8 sec; the image on the right was constructed by CombineZM software from eight photographs.
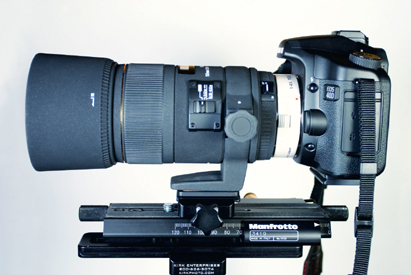
FIGURE 12.14. A focusing rail that is convenient for capturing images with different focal points.
12.11 Conclusions
Photography at its best gives us new ways to see the world. Macrophotography permits us to see things that are almost invisible to the naked eye and details that escape our attention. Without high magnification, I would not know the beauty of a single deadly drop on a sundew leaf (shown in Figure 12.13) or be able to see the interaction of aphids with other insects. Also, the details of butterflies and spiders would elude me, and the tiny flowers of the sundew plant would remain unappreciated. All of these examples are from nature, and nature seems to provide the best hunting ground for the macrophotographer. Through natural selection the biosphere creates a vast array of structures ranging from nanoparticles to whales by construction with one atom at a time. And in the micro and macro (hundreds of microns) range, nature is vastly more prolific and interesting than the creations of technology up to this time. So, for the time being, there is not much interest in the macro photography of inanimate objects outside the science laboratory. Thus, coins and paper money only serve to demonstrate magnification and to test resolution.
Whether or not the macrophotographer feels limited to the world of nature, macrophotography is now accessible to almost anyone with enough interest. The least expensive digital cameras offer macro modes that are surprisingly good though with very short working distances. For those able to afford more expensive equipment, the capabilities are truly impressive. Mirrorless cameras and most DSLRs provide “live view” that permits the live image on the sensor to be magnified tenfold to aid in achieving focus. The image can also be displayed in real time on a computer screen, and this opens the possibility of video at the micro scale. Macro lenses are getting better and better, and computer processing methods such as image combination open new possibilities every year. I think it is a great time to investigate this area of photography.
Futher Reading
Canon Workshop Series (1996). Close-Up & Macro Photography. Lake Success, NY: Canon USA, Inc., Camera Division. Publ. Code No. 9-01700. A classic, but somewhat dated.
Covington, M. A. (1999). Astrophotography for the Amateur, 2nd Ed. Cambridge: Cambridge University Press. This book covers afocal coupling of lenses to telescopes.
Frankel, F. (2002). Envisioning Science. Cambridge, MA: MIT Press. Photography of small inanimate objects.
Gerlach, J. and Gerlach, B. (2014). Close Up Photography in Nature. New York: Focal Press. One of many recent books on close-up photography.
Shaw, J. (1987). John Shaw’s Closeups in Nature. New York: AMPHOTO.
Notes
1Plus diopters have little effect on the F-number. It is easy to understand what is happening here. As shown in Figure 12.4, neither the distance to the sensor nor the aperture are changed by the added diopter. Therefore, the effective F-number, which is the distance (q) to the sensor divided by the aperture (δ), is unchanged. Another way to understand the effect of the added diopter is the following. The diopter effectively reduces from fPrime to fCombo as described in Equation (12.6), and this means that the defined F-number is reduced to N(fCombo/fPrime). At the same time the magnification becomes m = fPrime/fDiopter, which is equal to (fPrime/fCombo) – 1. The final step is to use the expression for effective F-number to obtain Neff = N (fCombo/fPrime) (1 + m) = N. This more lengthy derivation shows that the intensity increase expected from the reduced F-number is cancelled exactly by the increase in magnification. Furthermore, the magnification results from the fact that the lens to sensor distance (q) exceeds fCombo.
2Juza, E. A., Macro and Flora Photography: http://www.juzaphoto.com/article.php?l=en&article=15