
Database transactions help you group a set of operations into a single unit of work. All operations either succeed or fail as a group.
Spring's powerful and flexible transaction support is another factor responsible for the framework's success and popularity. Before Spring, complex or declarative transactional features typically required that an organization use EJB, along with a heavyweight JEE container. Using aspect-oriented programming (AOP) techniques, Spring helped democratize enterprise-level transactional support, allowing developers to cleanly apply transactional rules to their code whether they were using a full-fledged JEE application server, a lighter-weight web container, or even a stand-alone unit test.
Not only did Spring help to obviate the need for a heavyweight container, but it also provided a generalized abstraction for transaction management. It no longer mattered whether you were using Hibernate transactions, local database transactions, or even the Java Transaction API (JTA), which allows for distributed transactions across multiple datasources. In much the same way that Spring provides a generic DataAccessException hierarchy, Spring's abstraction for transaction management and demarcation helps to simplify and decouple transactional specifics from application code and business logic.
Much of the popularity of EJB stemmed from its transactional support. EJB provided a way to specify transactional rules via configuration, preventing these details from adding too much complexity to data access code. By leveraging its AOP features, Spring is able to offer similar flexibility, but without the overhead of a heavy EJB container or the addition of complexity or features that an organization doesn't require.
Using Spring, transactional rules can be consolidated into configuration so that code need not be muddied with these types of concerns. Switching between a JEE application server using a JTA datasource and a simple unit test using a local datasource is just a matter of modifying the Spring configuration— no code needs to be altered. Spring can leverage some of the advanced features offered by JTA when employing a JTA transaction manager. The key benefit, however, is that Spring provides a transactional programming model that is consistent—whether you need to have transactions span across multiple datasources (a feature offered by JTA) or across a single datasource, the way you define these transactional concerns will always be the same.
In rare cases where you actually want to define transactional rules for your application programmatically, Spring offers a means for accomplishing this as well. You could just rely on Hibernate's transactional programming model, but by leveraging Spring's abstractions, you reduce your coupling to Hibernate by basing your persistence code on generalized APIs. This might come in handy if you decide to move away from Hibernate in the future, or (more likely) if your persistence layer utilizes both Hibernate and JDBC.
Spring allows you to control how transactions are performed at a per-method level. Transaction management can be applied via XML configuration or using annotations. In this chapter, we will demonstrate both approaches. However, we recommend using annotations, as this strategy is the most intuitive, and allows transactional metadata to be embedded directly within a service layer class or interface.
Before we begin adding transactions to our application using Spring, let's discuss some of the fundamental and theoretical concepts. There's quite a bit to know about transactions, but the most important details to understand are encapsulated in the acronym ACID, which defines the four core requirements of a transaction:
Atomicity specifies that all operations within a single transaction must complete together or not at all. In other words, a transaction allows multiple database operations to be applied together. In the event of an error, the entire set of operations is rolled back.
Consistency refers to the requirement that transactions must transition a database from one consistent state to another consistent state. A successful transaction cannot leave the database in a state that violates the integrity constraints of the database or the schema. In other words, transactions must comply with database constraints and referential integrity rules during every insert, update or delete before a transaction may be committed.
Isolation defines the rules about how one running transaction affects or interacts with other concurrently running transactions. The isolation strategy used on a transaction is very important. If the chosen isolation level is too loose, hard-to-find bugs can be introduced, which may adversely impact the integrity of your data. If your isolation level is too high, however, you run the risk of slowing down your application or deadlocking your database. This setting is both application server and database server dependent. While there are technically eight isolation levels, generally you will only need to concern yourself with the four that are defined by the ANSI/ISO SQL standard. You should also note that the default isolation level varies quite a bit amongst DBMS vendors.
Durability ensures that once a transaction is committed, the changes will not be lost and should survive database failures.
In this chapter, we will cover the fundamentals of ACID transactions, as well as how to declaratively apply transactions using Spring. These concepts will undoubtedly prove useful for any type of application development, and might also come in handy during your next job interview! (Although we recommend waiting for these topics to come up themselves in the context of a job interview—we do not recommend starting out by confessing your love for ACID.)
ACID can be perceived as a bit trippy, but it has a way of keeping your data safe and will definitely maintain your sanity when dealing with persistence.
So why should you care about ACID? It's important to understand the available rules and options of database behavior so that you can effectively leverage these features in the context of your application.
These details are critical for controlling how a group of operations are applied to a database or how concurrent database modifications can affect each other. Improper transaction management can also adversely affect performance in an enterprise application.
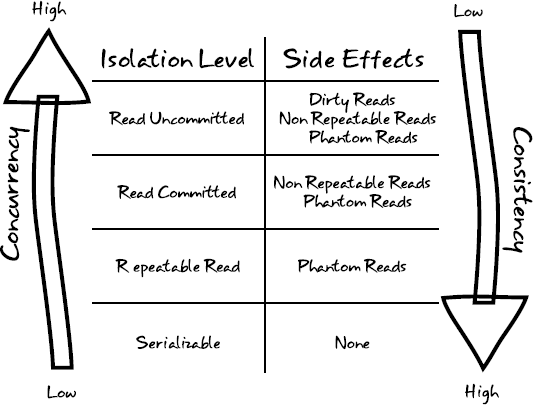
The four isolation levels that you'll encounter in practice, listed from least isolated to most isolated, are Read Uncommitted, Read Committed, Repeatable Read, and Serializable. These isolation levels also have an impact on concurrency. The least stringent isolation level allows for the highest number of concurrent database operations, while the most stringent are all but guaranteed to slow down your systems. Figure 7-1 highlights the ramifications of each isolation level including a demonstration of the correlation between isolation level and concurrency.
In order to explain the side effects outlined in Figure 7-1, consider the following scenario in our art gallery application:
Paul opens a database transaction, T1, and
SELECTs everything from theArtEntitytable.Brian initiates a separate transaction, T2, to
DELETEa piece of art from theArtEntitytable.Brian, still in his same T2 transaction,
UPDATEs a record in theArtEntitytable, correcting a typo.Paul, still in his same T1 transaction,
SELECTs all pieces of art in theArtEntitytable a second time.Brian's transaction, T2,
COMMITs.Mary initiates a new transaction, T3, and
INSERTs a new piece of art to theArtEntitytable.Paul, still in his same T1 transaction,
SELECTs all pieces of art in theArtEntitytable a third time.Mary's T3 transaction
COMMITs.Paul, still in his same T1 transaction,
SELECTs all pieces of art in theArtEntitytable a fourth time.Paul's transaction, T1, finally
COMMITs.
What should Paul see in step four? What about steps seven and nine? Your database vendor will have default behaviors defined, but it's important to know that you have absolute control over the outcome by choosing the isolation level you prefer for your transactions. Let's take a look at how the four isolation levels impact this scenario.
The easiest isolation level to understand is serializable, which mandates complete isolation. If we choose serializable as our isolation level, Paul will never see any of Brian's or Mary's changes until Paul begins a new transaction. From Paul's perspective, the database remains completely consistent and there are no side effects; Paul will see the same results for his query all four times because they all take place within a single transaction that is insulated from any other modifications. That sounds pretty ideal, right? So what more is there to talk about? Unfortunately, there is a lot of overhead associated with this setting. Using serializable vastly reduces the number of concurrent operations that may occur and can result in nasty performance problems involving database locks. As such, the serializable isolation level should be used sparingly, when the use case really requires absolute consistency and it's acceptable to risk the chance that concurrent transactions may be forced to abort with an error.
Relaxing isolation a bit by employing the repeatable read isolation level in our scenario would allow Paul to see any inserts that are committed, but not updates or deletes. In order to guarantee that rereads of the same row stay consistent, the underlying database will ordinarily implement either row-level, shared read locks or multiversioning. Under this isolation level setting, Paul would not see Brian's update or delete at any point in the scenario. However, Paul will see Mary's insert at step nine after she has committed her transaction. This side effect—where newly inserted and committed rows are visible to Paul's query (step nine) that weren't visible earlier (steps four and seven) within a single transaction (T1)—is known as a phantom read.
Read committed is the default isolation level used by most RDBMS vendors, including Oracle and PostgreSQL. This isolation level states that a transaction may read only data that has been committed in the database. When choosing read committed, Paul will see any changes made by Brian or Mary after their respective transactions have completed and been committed. This provides some data consistency while still delivering high concurrency. As with the repeatable read isolation level, Paul is still susceptible to phantom reads. As was the case with the repeatable read isolation level, Paul's query at step nine will return a new record that wasn't visible earlier in his transaction. When choosing read committed, Paul is also exposed to a second type of side effect; a nonrepeatable read. A nonrepeatable read occurs when rereads of the same row return different data within the same transaction. This becomes possible after Brian's update and delete are committed in step five. Unlike what happened under the serializable or repeatable read isolation levels, these row level modifications become visible to Paul in step seven, even though Paul read these two rows earlier and he's still in the context of his first and only transaction, T1. When in doubt, choose the read committed.
On the polar opposite end of the spectrum from serializable is the read uncommitted isolation level. If we employ read uncommitted for our scenario, there will be no transactional isolation whatsoever. Consequently, Paul's first three identical queries will all return different results. If Mary's commit in step eight succeeds, Paul's fourth query will return the same results as his third query.
At step four, Paul sees Brian's typo correction (SQL UPDATE) as well as the removal he performed (SQL DELETE) before Brian's transaction commits. This third side effect is commonly referred to as a dirty read because Paul is reading in tentative data. If Brian's commit fails at step five, forcing his transaction to roll back, the data Paul is looking at will be rendered completely inaccurate. Reading in Mary's insert at step seven, prior to her commit, is also representative of a dirty read because that too represents tentative data.
Choosing the read uncommitted isolation level exposes you to all three of the possible side effects. Intuitively, this represents a strategy that is not ideal. However, there is a silver lining with the read uncommitted isolation level. Because this isolation level offers the highest degree of concurrency, one can expect each of Paul, Brian, and Mary's SQL operations to be incredibly fast. You might adopt this isolation level when you need to emphasize speed and you're confident that your application can cope with the side effects. As with serializable, read uncommitted should only be considered for fringe use cases.
Transactions define how and when data is committed to a database. They are indispensable in grouping persistence logic together, ensuring that all methods complete successfully or that the database is rolled back to its previous state. For most operations, you also need to be concerned with transactional details, ensuring that transactions are started at the beginning of an operation and are either committed or rolled back when the operation completes. Spring enables these features through three core concepts:
Platform transaction management refers to Spring's abstraction for handling commits and rollbacks. Frameworks like Hibernate and iBatis have their own transaction implementations. Furthermore, transactions typically operate differently in a testing environment than within an EJB server. Spring's platform transaction management abstraction hides these details, allowing developers to specify transactional rules in a consistent manner.
Declarative transaction management allows developers to specify the transactional requirements for a particular method through metadata or configuration. Obviously, the code to set up, commit, and roll back a given transaction is still being executed. However, these details may be separated from the code itself and externalized into configuration files or annotations.
Programmatic transaction management explicitly controls the transaction through code. Spring provides a
TransactionTemplateclass that can greatly simplify the code required to apply transactional semantics to a given method. However, this approach requires that transactional details be blended with business logic and requires your code to directly interact with the Spring APIs.
We'll look at each of these types of transaction in the following sections.
Spring offers several TransactionManager implementations, each of which fills the role of (drum roll please) managing transactions. TransactionManager instances typically extend the AbstractPlatformTransactionManager class, which in turn implements the PlatformTransactionManager interface. These classes form the foundation of Spring's transactional support, and provide the know-how to access, initiate, rollback, and commit transactions. The interface looks like this:
public interface PlatformTransactionManager {
    TransactionStatus getTransaction(TransactionDefinition definition)
       throws TransactionException;

    void commit(TransactionStatus status) throws TransactionException;

    void rollback(TransactionStatus status) throws TransactionException;
}
There are quite a few TransactionManager implementations. For example, the DataSourceTransactionManager is used for JDBC and iBATIS implementations. For our purposes, we are predominantly interested in Spring's ORM-based TransactionManager implementations: HibernateTransactionManager and JpaTransactionManager.
You'll even find TransactionManager implementations for JTA used by EJB. JTA is typically used to enable transactions to span across multiple databases and even disparate technologies, such as Java Message Service (JMS). These include the generic JtaTransactionManager and implementations for specific EJB servers like OC4JJtaTransactionManager for Oracle's server, WebLogicJtaTransactionManager for BEA's server, and WebSphereUowTransactionManager for IBM's server.
By adding the <tx:jta-transaction-manager/> XML tag to your Spring configuration, you can empower Spring to determine which JTA transaction manager to use, based on runtime information, so that you don't need to explicitly reference the platform-specific details in your configuration.
You might have noticed the TransactionStatus and TransactionDefinition interfaces that are part of the PlatformTransactionManager interface. You rarely need to use these interfaces yourself. They are set up by Spring's declarative transaction management (discussed in the next section), but they are still worth knowing about, as these details help to explain how Spring's transactional features work under the hood.
TransactionStatus:Encapsulates key information related to an actively running transaction, such as whether a new transaction has been created and whether the transaction should be rolled back or committed. It also allows the transaction to be marked as
Rollback-Only. Setting a running transaction to beRollback-Onlytells the transaction system that the transaction should be rolled back. For example, in the event of an error condition, you might write code to callsetRollbackOnly()on aTransactionStatusinstance, which will ensure that the actively running transaction is rolled back.TransactionDefinition:Defines the ACID properties we talked about earlier, including details such as the isolation rules for the transaction, whether your transaction will perform any writes (or is read-only), how long the transaction is allowed to run before timing out, and how to handle transaction propagation.
We will learn more about how these classes are used later in this chapter when we discuss programmatic transaction management.
Declarative programming employs metadata to define the requirements for a particular set of application logic, rather than coding the steps that define this behavior directly. Typically, you use declarative programming within the context of a framework, which is designed to analyze the metadata in order to tailor its behavior accordingly. Using declarative transaction management, therefore, implies that you define the rules or attributes that compose your transactions' behavior, rather than interspersing this logic directly in your code. As you can probably guess, Spring applies these cross-cutting concerns to your code by levering its excellent AOP support. However, because transactions are such a prevalent and critical feature, the AOP details are a bit abstracted to provide a clearer and more transaction-specific approach.
Spring has a fantastic annotation-driven approach for transaction management. An alternative is to use an XML-driven strategy based on Spring configuration. We will discuss both of these approaches, beginning with annotation-based transaction management, since you have seen examples of this in earlier chapters.
Using the @Transactional annotation, you can set some transactional behavior and attributes.
Propagation defines the transactional behavior for the specified method. This setting determines whether a new transaction should always be created, whether a nested transaction should be created, or even if no transaction should be created at all. Here are the Propagation values you can use in Spring:
REQUIRED: If there's a transaction, support it; otherwise, create a new one.SUPPORTS: If there's a transaction, it will be supported, but this is not a requirement.MANDATORY: There must be a transaction; otherwise, throw an exception.REQUIRES_NEW: Create a new transaction and suspend the current one if it exists.NOT_SUPPORTED: Execute the code within the "transactionalized" method non-transactionally and suspend the current transaction.NEVER: Throw an exception if a transaction exists.NESTED: Perform a nested transaction if a transaction exists; otherwise, create a new transaction. Nested transactions offer a way to provide more granular transactional behavior, allowing a group of inner transactions to be executed. This can be useful, for example, for cases in which some nested transactions may get rolled back, but without aborting the entire operation.
Isolation is the "I" in ACID, and defines how a running transaction affects (and is affected by) other database processes occurring within the application. The settings to control isolation behavior for a given transaction are:
DEFAULT: Let the datastore define the isolation level.READ_UNCOMMITTED: This isolation level allows changes made by other running transactions to be read by the actively running transaction, even when the other transactions have not committed. In other words, this setting enables dirty reads.READ_COMMITTED: Dirty and nonrepeatable reads are not allowed, but phantom reads are. Only changes applied by successfully committed transactions are visible.REPEATABLE_READ: Indicates that dirty reads and nonrepeatable reads are prevented but phantom reads may occur.SERIALIZABLE: Indicates that dirty reads, nonrepeatable reads and phantom reads are prevented.
Spring also provides a way to specify some of the fundamental attributes of a transaction. For instance, you can use the readOnly attribute to indicate whether a transaction is read-only (as opposed to a transaction in which inserts or updates are performed). A readOnly value of true ensures that the method performs only read operations.
The timeout attribute defines how long a transaction can live without committing or rolling back. If the timeout for a running transaction elapses without the transaction completing, Spring will automatically roll back the transaction.
Spring's transactional support provides a means to specify how a transaction should behave if an exception is thrown. For example, we could specify that whenever an InvalidImageException is thrown from a method within our ArtEntityService, the currently running transaction should be rolled back. Spring provides the attributes rollbackFor and rollbackForClassName to enable this behavior. This setting allows you to specify an array of either classes or class names (depending on the setting used) of exceptions that, when thrown, will trigger the currently executing transaction to be automatically rolled back.
Similarly, you may specify the inverse of this behavior (which exceptions should not trigger a rollback) through the use of the noRollbackForClass and noRollbackForClassName attributes. These options work the same way as rollbackFor and rollbackForClassName, but prevent a transaction from being rolled back if one of the specified exception classes is thrown while this transaction is being executed.
Armed with a clearer understanding of some of the configuration options for Spring transactions, let's take a look at how we can specify the transactional semantics for our service class. To keep things simple, we will examine a scaled-back version of our ArtEntityService class.
class ArtEntityServiceImpl implements ArtEntityService {

    @Transactional(rollbackFor=InvalidImageExeption.class,
                   readOnly=false,
                   timeout=30,
                   propagation=Propagation.SUPPORTS,
                   isolation=Isolation.DEFAULT)
    public void saveArtEntity(ArtEntity artEntity) throws InvalidImageException {
        this.getArtEntityDao().saveArtEntity(artEntity);
    }
}
Here, we define a transactional service method that specifies a timeout of 30 seconds, and will automatically roll back if an InvalidImageException is thrown. Notice that we have also configured the transaction to be writable (readOnly is set to false).
Now that we've configured the details of our transaction, we need to set up our transaction manager. As noted earlier, Spring provides a PlatformTransactionManager interface, along with a set of implementations for use with different persistence strategies. For global transactions that span multiple datasources, we would need to use Spring's JTA support. For our example, we will use Spring's JpaTransactionManager. Our spring-jpa.xml should be updated to reflect the following (the important bits for transaction support have been bolded):
<?xml version="1.0" encoding="UTF-8" standalone="no"?>
<beans xmlns="http://www.springframework.org/schema/beans"
       xmlns:p="http://www.springframework.org/schema/p"
       xmlns:tx="http://www.springframework.org/schema/tx"
       xmlns:aop="http://www.springframework.org/schema/aop"
       xmlns:context="http://www.springframework.org/schema/context"
       xmlns:xsi="http://www.w3.org/2001/XMLSchema-instance"
       xsi:schemaLocation="http://www.springframework.org/schema/beans
            http://www.springframework.org/schema/beans/spring-beans-3.0.xsd
            http://www.springframework.org/schema/context
            http://www.springframework.org/schema/context/spring-context-3.0.xsd
            http://www.springframework.org/schema/tx
            http://www.springframework.org/schema/tx/spring-tx-3.0.xsd">

    <!-- JPA Entity Manager Factory -->
    <bean id="entityManagerFactory"
          class="org.springframework.orm.jpa.LocalContainerEntityManagerFactoryBean"
          p:dataSource-ref="galleryDataSource"/>

    <bean
       class="org.springframework.orm.jpa.support.PersistenceAnnotationBeanPostProcessor" />
<!-- Database LOB Handling -->
<bean id="defaultLobHandler"
class="org.springframework.jdbc.support.lob.DefaultLobHandler" />
<!-- Read in DAOs from the JPA package -->
<context:component-scan base-package="com.prospringhibernate.gallery.dao.jpa" />
<!-- Transaction Config -->
<bean id="transactionManager"
class="org.springframework.orm.jpa.JpaTransactionManager"
p:entityManagerFactory-ref="entityManagerFactory"/>
<tx:annotation-driven mode="aspectj" transaction-manager="transactionManager"/>
</beans>The XML configuration in this example specifies our artEntityService bean, along with our PlatformTransactionManager. We are using Spring's JpaTransactionManager, but the way in which we are able to declaratively configure transactions would not be different if we decide to create a JDBC implementation, or even if we required global transactions via JTA. Spring allows us to use a consistent strategy for specifying transactions, regardless of the underlying implementation details.
Also notice the tx:annotation-driven bean that Spring includes in its tx namespace. This XML snippet is necessary to enable the usage of our @Transactional annotations. Without it, Spring would not enable transactions for our ArtEntityService. The tx:annotation-driven annotation supports the following features:
transaction-manager: This supplies the name of the bean used for the transaction manager. Theoretically, you can have more than one transaction manager in your Spring application context and use only one. The default value istransactionManager.mode: This specifies the type of proxying mechanism you want. You have a choice ofproxyto use Spring proxying oraspectjto use AspectJ, an industrial-strength AOP framework. The default isproxy.proxy-target-class: By default, Spring creates a Java proxy object, and attaches only the interfaces that the object implements. For example, if you have aPersonDaoJPAclass that implements aPersonDaointerface, the proxying process will create an object that implementsPersonDao, adds on the implementation of your transactional semantics, and passes the request on to your implementation. If the class doesn't implement any interfaces or you need the proxy to extend the class and not just its interfaces, Spring will then use the Code Generation Library (CGLIB) open source bytecode manipulation framework to perform the proxying. The CGLIB approach does have a limitation: you need to put the transactional annotations on the class itself, not on the interface.order: There are plenty of other frameworks that take advantage of proxying, but to use them, you may need to explicitly order the transactional and other proxying mechanisms. Lower order numbers are processed first.
Rather than using the @Transactional annotation for applying transactional semantics, you can take a pure XML-driven approach. This approach is useful in cases where you prefer not to apply annotations, or you can't use annotations because you need to use JDK1.4 or you want to apply transactional semantics to a library that you can't change.
Coupling the tx:advice XML configuration with an XML-based AOP configuration makes for a synergistic combination. For example, you can use method names to automatically figure out what kind of transactionality you want to apply.
Here's an example that specifies that methods starting with save, update, and delete require a transaction, and everything else supports (but does not require) a read-only transaction:
<tx:advice id="txAdvice" >
    <tx:attributes>
        <tx:method name="save*" propagation="REQUIRED"/>
        <tx:method name="update*" propagation="REQUIRED"/>
        <tx:method name="delete*" propagation="REQUIRED"/>
        <tx:method name="*" propagation="SUPPORTS" read-only="true"/>
    </tx:attributes>
</tx:advice>
tx:advice does support a transaction-manager XML attribute, but by default, it uses the name transactionManager, just like tx:annotation-driven.
In addition to the flexible method name matching, the tx:method element has the same types of parameters as the @Transactional annotation. You can set values for propagation, isolation, timeout, read-only, rollback-for, and no-rollback-for. These tx:method XML attributes have the same values as their @Transactional counterparts.
One more detail needs to be added to this example in order to make it complete. You need to use Spring's AOP framework to define which beans require the advice. You can accomplish this by using the aop namespace in your Spring XML file. For example, if we wanted to apply the transactional advice to all of the classes that are in the com.prospringhibernate.gallery.service package, we can add the following to our Spring XML file:
<aop:config>
    <aop:pointcut id="allServices"
                  expression="execution(*com.prospringhibernate.gallery.service.*.*(..))"/>
    <aop:advisor advice-ref="txAdvice" pointcut-ref="allServices"/>
</aop:config>
Spring AOP is pretty flexible, and even lets you use annotations to define the pointcut. If you want to apply txAdvice to any class that is annotated with @Transactional, you can change the allServices pointcut to this:
<aop:pointcut id="allServices"
           expression="@target(org.springframework.transaction.annotation.Transactional)"/>
You can even combine the two pointcut approaches, like so:
<aop:pointcut
    id="allServices"
    expression="execution(*com.prospringhibernate.gallery.service.*.*(..)) &&
        @target(org.springframework.transaction.annotation.Transactional)"/>
Let's take a look at one more Spring AOP trick: using the bean name to define a pointcut. Here's how to apply a transaction to a bean named personService:
<aop:pointcut id="allServices" expression ="bean(personService)"/>
You can also use the asterisk (*) wildcard character to match against all beans that end with Service or Dao, as follows:
<aop:pointcut id="allServices" expression ="bean(*Service) || bean(*Dao)"/>
If applying complex AOP pointcuts to ACID transactions is still a bit too mind-altering for you, you'll find plenty of documentation out there.[1] However, the information you've gleaned here should give you a running start in understanding how to get your ACID transactions in order.
We can't think of many real-world use cases for working with programmatic transactions rather than leveraging Spring's simpler declarative transaction support. However, understanding programmatic transactions can prove helpful in comprehending the way in which Spring transactions work under the hood.
To demonstrate how programmatic transactions work, we will rework the ArtEntityService example to use programmatic transactions, as follows;
public class ArtEntityServiceImpl implements ArtEntityService {

    private TransactionTemplate transactionTemplate;

    public ArtEntityServiceImpl(PlatformTransactionManager transactionManager) {
        this.transactionTemplate = new TransactionTemplate(transactionManager);
    }

    public Object saveArtEntity(ArtEntity artEntity) {
        return transactionTemplate.execute(
            new TransactionCallback() {
                public Object doInTransactionWithoutResult(TransactionStatus status) {
                    try {
                        this.getArtEntityDao().saveArtEntity(artEntity);
} catch (ImageErrorException e) {
status.setRollbackOnly();
}
return;
}
}
);
}
}In this snippet, we rely on constructor injection to provide a reference to our JpaTransactionManager (which is an implementation of the PlatformTransactionManager interface). Using transactionManager, we create an instance of TransactionTemplate, which we use to wrap our persistence behavior within the scope of a transaction.
The usage of the TransactionTemplate should look very familiar to you. This is a common Spring idiom, and works in a similar fashion to the HibernateTemplate we use within our DAO classes. The key difference here is that we are using the TransactionTemplate to handle the boilerplate process of transactions, rather than database connection setup and closing.
To wrap our persistence code within a transaction, we call the execute method on our transactionTemplate property, passing in an anonymous implementation of TransactionCallback as a parameter. In the example, our service method does not return a value, so we implement the method doInTransactionWithoutResult. However, if we needed to return a value from our transaction, we would instead use doInTransaction.
Within the scope of the TransactionCallback, we are calling the same persistence code that we used in our annotation-based example. We delegate to our artEntityDao to do the heavy lifting. Notice, however, that we catch the ImageErrorException, and should the exception get thrown, we use the TransactionStatus parameter to rollback the transaction.
Clearly, this approach is not as clear or as elegant as using declarative transactions in Spring. Nevertheless, it is helpful to see how the various components fit together without relying on AOP to inject this behavior implicitly.
Now that we've covered the main transactional concepts, let's go through a couple of real-world scenarios. We'll look at a batch application and transactions involving two datasources.
Batch applications can be a bit of a drag, especially with ORM frameworks. Both the database and the ORM framework need to reserve valuable resources for each operation performed in a transaction. The database needs to keep locks on the tables that you've changed. The ORM, for a variety of reasons, needs to cache the objects that you've persisted and read from the database. The more operations a transaction executes, the more resources the ORM and database need to dedicate to it.
Let's start out with the following example, which updates a whole bunch of records:
@Transactional(readOnly = false, propagation = Propagation.SUPPORTS)
public void batchProcessAll() {
    int count = dao.getCount();
    // do your ACID business in a big for loop
}
Here, we're attempting to update all of the data in a single transaction. Depending on the amount of data and system resources, this may not be possible, or it may lead to degraded performance for our application. Instead, we may be able to find a way to define smaller units that can be committed, which will free up some of the resources utilized by the database and ORM framework. However, the process of committing the transaction consumes resources as well. If we commit too often, we'll probably decrease performance. There's a balance between committing too often and too little—for example, committing after a certain number of items have been processed.
We can create a method that processes x number of units and commits after it completes. It's actually quite simple to set this up. We'll choose 100 as an arbitrary number of units of work.
// no transaction on this method anymore
public void batchProcessAll() {
    int count = dao.getCount();
    for(int i=0; i<count; i+= 100) {
        doMyUnit(i, i+100);
    }
}

@Transactional(readOnly = false, propagation = Propagation.REQUIRES_NEW)
public void doMyUnit(int start, int finish) {
    // do your ACID business from the unit's
    // start to finish
    dao.flush();
}
Note the use of Propagation.REQUIRES_NEW. It tells Spring that a new transaction begins when the method gets invoked and commits when the method completes. It's just that simple to create and commit a transaction. There are many variables, ranging from server capacity to application load, to be able to prescribe an ideal batch size, so determining the best size for your application will likely require some trial and error.
Assume you have two databases, and you want to apply the right transactions to the right beans. You need to create two different transactionManagers that must be applied to the appropriate subsets of Spring beans. You can do that with some fancy AOP work.
Assume that you have already configured transactionManager1 and transactionManager2 beans. You'll need to start with the following XML:
<tx:advice id="txAdvice1" transaction-manager="transaction-manager1" >
    <tx:attributes>
        <tx:method name="save*" propagation="REQUIRED"/>
        <tx:method name="update*" propagation="REQUIRED"/>
        <tx:method name="delete*" propagation="REQUIRED"/>
<tx:method name="*" propagation="SUPPORTS" read-only="true"/>
</tx:attributes>
</tx:advice>
<tx:advice id="txAdvice2" transaction-manager="transaction-manager2" >
<tx:attributes>
<tx:method name="save*" propagation="REQUIRED"/>
<tx:method name="update*" propagation="REQUIRED"/>
<tx:method name="delete*" propagation="REQUIRED"/>
<tx:method name="*" propagation="SUPPORTS" read-only="true"/>
</tx:attributes>
</tx:advice>
<aop:config>
<aop:advisor advice-ref="txAdvice1" pointcut-ref="allDatabaseOneBeans"/>
<aop:advisor advice-ref="txAdvice2" pointcut-ref="allDatabaseTwoBeans"/>
<!-- Add pointcuts here -->
</aop:config>The tx:advice element tells Spring what needs to be done, and the aop:config element tells Spring where it needs to be done.
The question now is what beans should have which advice? Some beans need txAdvice1; others need txAdvice2; and others may need both. Thankfully, Spring AOP provides several mapping options. You might chose to organize your classes into packages that differentiate between the two datasources to which they relate and apply an expression pointcut, or you can devise logical bean names that clearly infer which advice to apply. You can also create our own annotations, @Transaction1 and @Transaction2 for example, and use the expression="@target(...)" approach.
Let's go through a quick bean name example. Imagine we have two datasources: datasource1 and datasource2. Let's say that all of the datasource1 beans have ds1 as part of their bean name. For example, if PersonDao is intended to interface with datasource1, it would be called ds1.personDao. If PersonService depends on personDao as well as a DAO from datasource2, it should be called ds1.ds2.personService. Our pointcuts will look like the following:
<aop:pointcut id="allDatabaseOneBeans" expression ="bean(*ds1*)"/>
<aop:pointcut id="allDatabaseTwoBeans" expression ="bean(*ds2*)"/>
We've defined two pointcut expressions that utilize a bean-naming convention to properly infer which datasource and transactionManager to utilize for a given transaction.
In this chapter, you've learned both the fundamentals and low-level details for managing database transactions with Spring. We've explored two different avenues for applying transactions declaratively with Spring: via annotation and through XML-based Spring configuration. It's also possible to utilize Spring's transaction management programmatically, through the use of the TransactionTemplate. However this approach couples transactional behavior with the application's business logic.
Understanding how transactions work, along with the available configuration options, is critical for developing and debugging multiuser applications. We've discussed both simple and complex scenarios in this chapter, and we hope they give you a taste of what's possible when using Spring for transaction management.
Most important, Spring provides a consistent approach for applying transactional semantics to an application, no matter what the architecture or environment. This means that you can configure and code your application the same way, regardless of whether you're deploying to a JEE app server using a JTA datasource or to a lightweight container with a local datasource. The difference is just a matter of configuration.
[1] If you would like to learn more about the huge and important field of transaction processing, consider reading Transaction Processing: Concepts and Techniques by Jim Gray and Andreas Reuter (Morgan Kaufmann, 1992); Principles of Transaction Processing, Second Edition, by Philip A. Bernstein and Eric Newcomer (Morgan Kaufmann, 2009); and Pro JPA 2: Mastering the Java Persistence API by Mike Keith and Merrick Schincariol (Apress, 2009).