
SpringSource has a growing track record of delivering software that removes impediments that plague enterprise software engineers. Spring Roo is its latest ambitious attempt to bring rapid application development (RAD) to Java developers.
In this chapter, we're going to rebuild our art gallery application from scratch so that you can see just how quickly Roo can jump-start a project. This will also provide you with an excellent opportunity to compare and contrast what we've done by hand up to this point with everything that Roo generates automatically. The productivity gains will be immediately obvious.
Roo's architecture revolves primarily around Spring and AspectJ, the AOP framework that Spring uses to express pointcuts throughout the various Spring modules. AspectJ provides a feature called inter-type declaration (ITD), which Spring Roo uses as a part of its code-generation process. ITD allows for a clean separation of your source code (.java files) and Roo's generated source code (.aj Aspect ITD files). These two source files are then combined during a compilation step to fabricate bytecode representing all of the intended functionality.
This clean separation provides exactly what you would expect from a RAD framework: convention over configuration is realized via the generated .aj source files, and you may code your normal .java classes, overriding the conventions as you deem appropriate, without extending or implementing any Roo-specific classes or APIs. As a result of this clever approach, all Roo code will look and feel completely natural for Java developers.
While an IDE isn't required to use Roo, IDEs like Eclipse and SpringSource Tool Suite (STS) can take advantage of Java's static typing to provide full integration for the conveniences like code completion.
Because of the compilation approach Roo takes, the framework imposes absolutely no requirements on your runtime at all! It's a simple, effective vehicle for speeding up development and empowering developers to be productive with Java, without the learning curve associated with picking up new languages and runtime frameworks.
The core infrastructure of Roo delivers capabilities like file monitoring, metadata management, and type introspection. One of Roo's greatest assets is its add-on infrastructure. Roo is a very young project, but its library of add-ons is already impressive. Roo 1.0.x was implemented as a single classloader. As of 1.1.0, however, Roo is entirely based on OSGi.
OSGi (formerly known as the Open Services Gateway initiative, now an obsolete name) is a module system and service platform for the Java programming language that implements a complete and dynamic component model. These modules, referred to as bundles in OSGi parlance, can be installed, started, updated, and uninstalled without restarting the application. Each bundle has its own classloader, and bundles may interact with each other through a service registry. The modularity provided by OSGi offers an extensible platform for Roo. All of the key components that you interact with, such as Hibernate and automated integration testing, are actually built as OSGi bundles. This architecture enables the community to continue to extend Roo.
At first blush, it might seem a bit strange that SpringSource has two distinct RAD frameworks in its stable: Grails (covered in the previous chapter) and Roo. But we believe that the two are sufficiently different to coexist. On green field projects where a team is afforded the luxury of time to learn something new and open to using dynamically typed languages, we would be hard-pressed not to recommend using Groovy and Grails. But if you're working in the context of a legacy application, or just want to stick with the tools and language you know best, Roo is a fantastic alternative. In this chapter, we hope to show you why.
Domain-driven design (DDD) is a methodology for developing software popularized by Eric Evans in his exceptional book Domain-Driven Design: Tackling Complexity in the Heart of Software
(Addison-Wesley Professional, 2003). DDD attempts to model real-world systems or processes in software by focusing on and refining your application's domain layer throughout the entire development process. To achieve this, Evans advocates that you begin your work in a highly iterative and interactive manner with a domain expert to define a ubiquitous language. This ubiquitous language provides consistent terminology and definitions so that engineers and domain experts can effectively communicate about entities in the system.
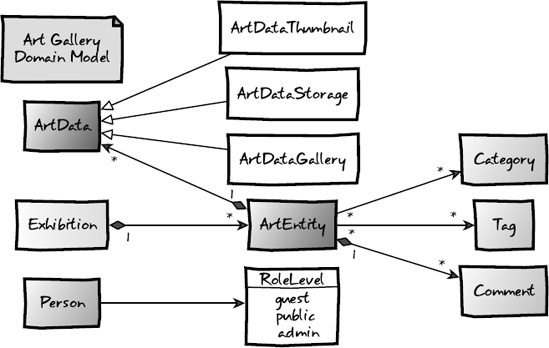
Spring Roo doesn't explicitly advocate DDD, but since Roo places so much emphasis on your entity layer, the principles of DDD are a natural fit. As an introduction to Roo, we'll walk through using it to create our art gallery applications domain, shown in Figure 12-1.
Be sure that you have the prerequisites, Java 5 or higher and Maven 2.0.9 or higher, configured on your system. Then download and follow the installation instructions for the stand-alone version of Roo available at www.springsource.org/roo to ensure that roo is available on your path.
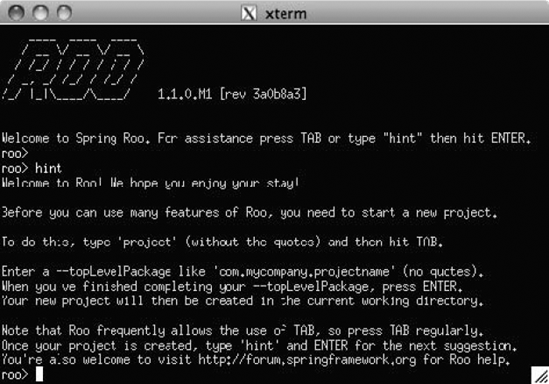
Next, create a directory on your machine for your new project, named rooGallery. Change into this new directory and execute roo. You'll enter the Roo shell environment and be presented with a Roo welcome screen, as shown in Figure 12-2.
Tip
As you explore Roo, you can use hint and tab completion liberally to get contextual help from Roo. Each Roo command has an extensive list of options that you may specify. Be sure to fiddle with the intelligent tab completion in the Roo shell as you tinker with commands to see how Roo steers you down the right path, eliminating any need to memorize the Roo commands.
Before we create a new project, in the Roo shell, type in the osgi command and use tab completion to see all of the options that Roo provides. One of the most basic OSGi commands supported by the Apache Felix runtime upon which Roo is based is ps. Executing osgi ps will list all of the OSGi bundles in the Roo runtime, along with version information and the status of the bundle, such as ACTIVE, STARTING, and so on
Let's get down to business. First, create your project using the project command at the Roo shell, as follows:
roo> project --topLevelPackage com.prospringhibernate.gallery

Created ˜/rooGallery/pom.xml
Created SRC_MAIN_JAVA
Created SRC_MAIN_RESOURCES
Created SRC_TEST_JAVA
Created SRC_TEST_RESOURCES
Created SRC_MAIN_WEBAPP
Created SRC_MAIN_RESOURCES/META-INF/spring
Created SRC_MAIN_RESOURCES/META-INF/spring/applicationContext.xml
Created SRC_MAIN_RESOURCES/log4j.properties
This command creates all of the necessary directories for a Maven project. Additionally, it sets up your Maven pom.xml file and creates a Spring applicationContext.xml file.
From the Roo shell, execute hint to see how the messaging has updated to reflect the current context of your application. You'll see that you have the basic structure, but no mechanism for persistence. So we'll follow Roo's suggestion and configure our JPA provider and associated database using Hibernate and the H2 in-memory database, as follows:
roo> persistence setup --provider HIBERNATE --database H2_IN_MEMORYYou'll notice in the resulting output that Roo creates a JPA persistence.xml configuration as well as a database.properties file. It also modifies the applicationContext.xml file and introduces a handful of dependencies to the pom.xml file.
After just two commands in Roo, you now have a completely configured Spring 3 and Hibernate 3.5 application. Roo has created many of the constructs we covered earlier in this book automatically with sensible defaults, including all the Spring beans necessary for JPA and declarative transaction management.
Note
As someone who has been using Unix variants for almost two decades, it's hard not to fall in love with Roo's interactive shell. The Roo shell is so much more than just an interface for executing commands. Whenever you start up a Roo shell, whether it's from a Unix prompt or within an IDE, Roo keeps tabs on the files in your project and seamlessly makes modifications to your project on the fly in the background as you make changes to the code. This may sound a little disturbing at first, but those ITD files we mentioned earlier localize Roo's changes. Roo won't touch your Java files unless you explicitly issue commands to do so. And you, as a developer, just need to respect Roo's turf and shy away from editing the ITD files themselves.
As we'll demonstrate later in this chapter, it is incredibly easy to override Roo's automatically generated behavior. All of these considerations give you a lot of choice when developing an application. You may modify your code within your IDE as you normally would (for instance, to add fields to entities), or you can hop into your Roo shell and create your code in a command-line savvy way. This automation and flexibility of choice frees up precious development time to focus on what matters: the business problem at hand.
Now we've created a project and configured our persistence layer. Again, execute the hint command within the shell, and you'll see that Roo is suggesting that we begin fleshing out our domain with the entity command. The entity command generates a simple JavaBean with JPA annotations. We'll start by creating our ArtEntity type using the entity command, as follows:
roo>entity --class com.prospringhibernate.gallery.domain.ArtEntity --testAutomatically Created SRC_MAIN_JAVA/com/prospringhibernate/gallery/domain Created SRC_MAIN_JAVA/com/prospringhibernate/gallery/domain/ArtEntity.java Created SRC_MAIN_JAVA/com/prospringhibernate/gallery/domain/ArtEntity_Roo_Entity.aj Created SRC_MAIN_JAVA/com/prospringhibernate/gallery/domain/ArtEntity_Roo_ToString.aj Created SRC_MAIN_JAVA/com/prospringhibernate/gallery/domain/ArtEntity_Roo_Configurable.aj Created SRC_TEST_JAVA/com/prospringhibernate/gallery/domain Created SRC_TEST_JAVA/com/prospringhibernate/gallery/domain/ArtEntityDataOnDemand.java Created SRC_TEST_JAVA/com/prospringhibernate/gallery/domain/ArtEntityIntegrationTest.java Created SRC_TEST_JAVA/com/prospringhibernate/gallery/domain/ArtEntityDataOnDemand_Roo_Configurable.aj Created SRC_TEST_JAVA/com/prospringhibernate/gallery/domain/ArtEntityDataOnDemand_Roo_DataOnDemand.aj Created SRC_TEST_JAVA/com/prospringhibernate/gallery/domain/ArtEntityIntegrationTest_Roo_Configurable.aj Created SRC_TEST_JAVA/com/prospringhibernate/gallery/domain/ArtEntityIntegrationTest_Roo_IntegrationTest.aj
The entity command gives you your first real glimpse into Roo's impressive code generation. It automatically created an ArtEntity.java entity bean with JPA and Roo annotations. It also created the folder structure that corresponds to our Java packaging scheme.
At this juncture, you also get your first taste of those AspectJ ITD files we mentioned earlier. The generated ArtEntity class itself is pretty lean, as Roo has tucked as much of the classic boilerplate code required in a series of ITD files. Remember that everything in the .aj files will be combined with the code you place in your .java source files at compile time.
Let's take a look at some of what was created. Our ArtEntity.java class follows.
package com.prospringhibernate.gallery.domain;

import javax.persistence.Entity;
import org.springframework.roo.addon.entity.RooEntity;
import org.springframework.roo.addon.javabean.RooJavaBean;
import org.springframework.roo.addon.tostring.RooToString;
@Entity
@RooJavaBean
@RooToString
@RooEntity
public class ArtEntity {

}
By now, the @Entity annotation and its behaviors should be quite familiar to you. The @Roo annotations warrant some explanation:
@RooJavaBeantells Roo to generate accessors and mutators for each field present in theArtEntity. Those getters and setters will show up in a file namedArtEntity_Roo_JavaBean.ajonce we add some fields.The
ArtEntity_Roo_ToString.ajsource file corresponds with the@RooToStringannotation. This source file will construct atoString()method representation for our entity by concatenating all of the field names and their values.@RooEntityis responsible for the majority of the generated code related to persistence.The
ArtEntity_Roo_Configurable.ajsource file created adds Spring's@Configurableannotation to ourArtEntitytype. This annotation allows you to inject any types from the Spring bean factory, such as a JPAEntityManager, into theArtEntitytype.
At this juncture, the most interesting ITD file is probably ArtEntity_Roo_Entity.aj. It contains all of the boilerplate code you would expect to find in JPA entities. In the following listing, notice the code that has been automatically created contains an autogenerated id, a proper version field, and an EntityManager reference, as well as methods for operations (like persist, remove, merge, and flush) and several convenience finders.
package com.prospringhibernate.gallery.domain;

import com.prospringhibernate.gallery.domain.ArtEntity;

import java.util.List;
import java.lang.Integer;
import java.lang.Long;
import java.lang.SuppressWarnings;

import javax.persistence.Id;
import javax.persistence.Column;
import javax.persistence.Version;
import javax.persistence.EntityManager;
import javax.persistence.GeneratedValue;
import javax.persistence.GenerationType;
import javax.persistence.PersistenceContext;

import org.springframework.transaction.annotation.Transactional;

privileged aspect ArtEntity_Roo_Entity {
@PersistenceContext
transient EntityManager ArtEntity.entityManager;
@Id
@GeneratedValue(strategy = GenerationType.AUTO)
@Column(name = "id")
private Long ArtEntity.id;
@Version
@Column(name = "version")
private Integer ArtEntity.version;
public Long ArtEntity.getId() {
return this.id;
}
public void ArtEntity.setId(Long id) {
this.id = id;
}
public Integer ArtEntity.getVersion() {
return this.version;
}
public void ArtEntity.setVersion(Integer version) {
this.version = version;
}
@Transactional
public void ArtEntity.persist() {
if (this.entityManager == null)
this.entityManager = entityManager();
this.entityManager.persist(this);
}
@Transactional
public void ArtEntity.remove() {
if (this.entityManager == null)
this.entityManager = entityManager();
if (this.entityManager.contains(this)) {
this.entityManager.remove(this);
} else {
ArtEntity attached = this.entityManager.find(this.getClass(), this.id);
this.entityManager.remove(attached);
}
}
@Transactional
public void ArtEntity.flush() {
if (this.entityManager == null)
this.entityManager = entityManager();this.entityManager.flush();
}
@Transactional
public ArtEntity ArtEntity.merge() {
if (this.entityManager == null) this.entityManager = entityManager();
ArtEntity merged = this.entityManager.merge(this);
this.entityManager.flush();
return merged;
}
public static final EntityManager ArtEntity.entityManager() {
EntityManager em = new ArtEntity().entityManager;
if (em == null) throw new
IllegalStateException(
"Is the Spring Aspects JAR configured as an AJC/AJDT aspects library?)
");
return em;
}
public static long ArtEntity.countArtEntitys() {
return ((Number) entityManager().createQuery(
"select count(o) from ArtEntity o"
).getSingleResult()).longValue();
}
@SuppressWarnings("unchecked")
public static List<ArtEntity> ArtEntity.findAllArtEntitys() {
return entityManager().createQuery("select o from ArtEntity o").getResultList();
}
public static ArtEntity ArtEntity.findArtEntity(Long id) {
if (id == null) return null;
return entityManager().find(ArtEntity.class, id);
}
@SuppressWarnings("unchecked")
public static List<ArtEntity> ArtEntity.findArtEntityEntries(int firstResult,
int maxResults) {
return entityManager().createQuery(
"select o from ArtEntity o"
).setFirstResult(firstResult).setMaxResults(maxResults).getResultList();
}
}As with the @Entity annotation, this code should feel very familiar and natural. Therein lies Roo's beauty. It is just normal Java code. It's no different than the code you would have needed to write on your own. It is already adhering to best practices, and will be upgraded to apply newer Spring and Hibernate conventions as you upgrade to newer versions of Roo. This alone is likely to save developers countless hours. It will also save your company a large amount of money in reduced costs to upgrade and fewer defects introduced by silly oversights and mistakes.
The utility of the field command is fairly self-evident. With it, you can add members to a given entity. The field command allows you to specify attributes that are translated into JPA and JSR-303 annotations.
In the series of commands that follows, we'll add a few fields of type string and date, with some validation checks for field sizes and whether a given column in the database should allow null values.
˜.domain.ArtEntity roo>field string --fieldName name --sizeMax 50 --notNull˜.domain.ArtEntity roo>field string --fieldName title --sizeMax 255 --notNull˜.domain.ArtEntity roo>field string --fieldName subtitle --sizeMax 255 --notNull˜.domain.ArtEntity roo>field string --fieldName description --sizeMax 255 --notNull˜.domain.ArtEntity roo>field string --fieldName caption --sizeMax 255 --notNull˜.domain.ArtEntity roo>field date --fieldName createDate --type java.util.Date --notNull˜.domain.ArtEntity roo>field date --fieldName displayDate --type java.util.Date
After executing each of those commands, you should see output like the following in your Roo shell. Each field is added to our Java class, and the ITD files are updated accordingly.
Managed SRC_MAIN_JAVA/com/prospringhibernate/gallery/domain/ArtEntity.java Managed SRC_MAIN_JAVA/com/prospringhibernate/gallery/domain/ArtEntity_Roo_JavaBean.aj Managed SRC_MAIN_JAVA/com/prospringhibernate/gallery/domain/ArtEntity_Roo_ToString.aj Managed SRC_TEST_JAVA/com/prospringhibernate/gallery/domain/ArtEntityDataOnDemand_Roo_DataOnDemand.aj
Now our entity looks like this, complete with annotations for JSR-303 bean validation:
package com.prospringhibernate.artgallery.domain;

import java.util.Date;
import javax.persistence.Entity;
import javax.persistence.Temporal;
import javax.persistence.TemporalType;

import javax.validation.constraints.NotNull;
import javax.validation.constraints.Size;

import org.springframework.roo.addon.entity.RooEntity;
import org.springframework.roo.addon.javabean.RooJavaBean;
import org.springframework.roo.addon.tostring.RooToString;
import org.springframework.format.annotation.DateTimeFormat;

@Entity
@RooJavaBean
@RooToString
@RooEntity
public class ArtEntity {
@NotNull
@Size(max = 50)
private String name;
@NotNull
@Size(max = 255)
private String title;
@NotNull
@Size(max = 255)
private String subtitle;
@NotNull
@Size(max = 255)
private String description;
@NotNull
@Size(max = 255)
private String caption;
@NotNull
@Temporal(TemporalType.TIMESTAMP)
@DateTimeFormat(style = "S-")
private Date createDate;
@Temporal(TemporalType.TIMESTAMP)
@DateTimeFormat(style = "S-")
private Date displayDate;
}Of course, Roo can't do everything for us. In the interest of simplicity, the framework designers needed to pick and choose which conventions they could realistically support. As an example, in our gallery application, we want the name field to be unique. Although this is a manual step, it can be accomplished quite simply. As you would on any project using a bean validation implementation, just apply the JSR-303 annotation to declare the value of the column as unique, like so:
@NotNull
@Size(max = 50)
@Column(unique=true)
private String name;
Now it's time to take a look at the --testAutomatically parameter used when we created our ArtEntity class earlier.
As we stressed in Chapter 8, unit and integration testing are essential for enterprise development projects. Roo's approach to configuring everything you would need in your test harnesses is another boon for productivity. Roo created fixture data in the ArtEntityDataOnDemand_Roo_DataOnDemand.aj source file and an integration test in ArtEntityIntegrationTest_Roo_IntegrationTest.aj. In addition, two Java source file stubs were generated for us to enhance the data fixtures further and to write our own integration tests that exercise business logic that Roo couldn't hope to infer. This gives us some basic test coverage with zero effort, as well as all the plumbing required to flesh out the tests on our own. You'll notice this exceptional attention to detail throughout your Roo experience.
Here is a snippet from the Data On Demand ITD:
package com.prospringhibernate.gallery.domain;

...

privileged aspect ArtEntityDataOnDemand_Roo_DataOnDemand {

...

    public ArtEntity ArtEntityDataOnDemand.getNewTransientArtEntity(int index) {
        ArtEntity obj = new ArtEntity();
        obj.setCaption("caption_" + index);
        obj.setCreateDate(new java.util.Date());
        obj.setDescription("description_" + index);
        obj.setDisplayDate(new java.util.Date());
        obj.setName("name_" + index);
        obj.setSubtitle("subtitle_" + index);
        obj.setTitle("title_" + index);
        return obj;
    }

    ...

    @Transactional(propagation = Propagation.REQUIRES_NEW)
    public void ArtEntityDataOnDemand.init() {
        if (data != null) {
            return;
        }

        data = com.prospringhibernate.gallery.domain.ArtEntity.findArtEntityEntries(0, 10);
        if (data == null)
            throw new IllegalStateException(
               "Find entries implementation for 'ArtEntity' illegally returned null"
            );
        if (data.size() > 0) {
            return;
        }

        data = new java.util.ArrayList<com.prospringhibernate.gallery.domain.ArtEntity>();
        for (int i = 0; i < 10; i++) {
            com.prospringhibernate.gallery.domain.ArtEntity obj =
            getNewTransientArtEntity(i);
            obj.persist();
            data.add(obj);
        }
    }

}
This is a nice, simple approach for generating a small amount of data for each entity in a given application, and it provides the perfect springboard to strive for complete test coverage. You may verify that all of the generated tests are working by executing perform tests within your Roo shell or by running mvn test from your command prompt.
The field command has some special properties that deliver support for associations between entities as well. From the shell, you can specify one-to-many or one-to-one relationships with the reference attribute, or you can build many-to-many mappings via the set property.
In the following example, we re-create our Category entity, and then establish a many-to-many relationship between our ArtEntity and Category types.
˜.domain.ArtEntity roo>entity --class com.prospringhibernate.gallery.domain.Category--testAutomatically˜.domain.Category roo>field string --fieldName name --notNull --sizeMax 50˜.domain.Category roo>field string --fieldName description --notNull --sizeMax 2000˜.domain.Category roo>field set --fieldName artEntities--element com.prospringhibernate.gallery.domain.ArtEntity˜.domain.Category roo>focus --class ˜.domain.ArtEntity˜.domain.ArtGallery roo>field set --fieldName categories--element com.prospringhibernate.gallery.domain.Category
Creating the Category type is nearly identical to what we did previously to create ArtEntity, until the last property, artEntities, which establishes a collection of ArtEntity objects. We then use the focus command to change the context of our shell over to the ArtGallery type, and we add a collection of Category objects, again using the set command. The tilde (˜) character offers a shorthand reference for the topLevelPackage we defined when we initiated the project.
Here's how the many-to-many association appears within the ArtEntity class:
@ManyToMany(cascade = CascadeType.ALL)
private Set<com.prospringhibernate.gallery.domain.Category> categories =
     new java.util.HashSet<com.prospringhibernate.gallery.domain.Category>();
This, too, should be quite familiar to you by now, and Roo makes the setup trivial.
Now we will walk through setting up an aspect of our domain that requires inheritance. Here too, the framework designers have elected to keep Roo simple, rather than allow enormous complexity to bleed into the syntax in the Roo shell. Having a strong grasp of the inner workings of Spring and Hibernate becomes vital on any real project, whether or not you're using a RAD framework. As you'll see, Roo will help you stub out these classes, but you'll still need to do a small amount of work on your own to actually make the associations work.
First, the following commands create our entity and establish a one-to-many relationship between ArtData and ArtEntity.
˜.domain.ArtGallery roo>entity --class com.prospringhibernate.gallery.domain.ArtData--testAutomatically˜.domain.ArtData roo>field set --fieldName artEntities--element com.prospringhibernate.gallery.domain.ArtEntity
In order to introduce single-table inheritance between ArtData and its three subclasses—ArtDataThumbnail, ArtDataStorage, and ArtDataGallery—we need to manually add several annotations via either an IDE or text editor. The code in bold should be added manually.
package com.prospringhibernate.gallery.domain;

import java.util.Set;

import javax.persistence.Lob;
import javax.persistence.Basic;
import javax.persistence.Entity;
import javax.persistence.ManyToMany;
import javax.persistence.CascadeType;
import javax.persistence.Inheritance;
import javax.persistence.InheritanceType;
import javax.persistence.DiscriminatorType;
import javax.persistence.DiscriminatorValue;
import javax.persistence.DiscriminatorColumn;

import org.springframework.roo.addon.javabean.RooJavaBean;
import org.springframework.roo.addon.tostring.RooToString;
import org.springframework.roo.addon.entity.RooEntity;

@Entity
@RooJavaBean
@RooToString
@RooEntity
@Inheritance(strategy=InheritanceType.SINGLE_TABLE)
@DiscriminatorColumn(discriminatorType = DiscriminatorType.STRING)
@DiscriminatorValue("GENERIC")
public class ArtData {

    @Lob
    @Basic(fetch=javax.persistence.FetchType.LAZY)
    private byte[] file;

    @ManyToMany(cascade = CascadeType.ALL)
    private Set<com.prospringhibernate.gallery.domain.ArtEntity> artEntities =
        new java.util.HashSet<com.prospringhibernate.gallery.domain.ArtEntity>();

}
You'll also likely recall that our ArtData class and its subclasses had a BLOB field for storing the binary representation of the images. Roo doesn't yet support byte[] fields, but they're simple enough to add and annotate on our own via the adjustments shown in the preceding listing. We also need to add a Spring bean to our application context for LOB handling.
Now let's create the ArtDataThumbnail type, which extends ArtData.
˜.domain.ArtData roo> entity --class com.prospringhibernate.gallery.domain.ArtDataThumbnail
                             --extends ˜.domain.ArtData --testAutomatically
The --extends parameter sets up our class hierarchy. But again, since Roo doesn't have built-in support for JPA entity inheritance, we need to add a @DiscriminatorValue annotation ourselves.
package com.prospringhibernate.gallery.domain; import javax.persistence.Entity;import javax.persistence.DiscriminatorValue;import org.springframework.roo.addon.entity.RooEntity; import org.springframework.roo.addon.javabean.RooJavaBean; import org.springframework.roo.addon.tostring.RooToString; @Entity @RooEntity @RooJavaBean @RooToString@DiscriminatorValue("THUMBNAIL")public class ArtDataThumbnail extends ArtData { }
Creating the ArtDataGallery and ArtDataStorage types involves the same steps. The other entities in our model have some nuances as well. Check out the rooGallery code that accompanies the book to see the details.
Once your model is in place, the next logical step is to add Spring MVC to the mix to provide a HTML or RESTful front end for your application. Roo makes this ridiculously easy. If you don't need fine-grained control over each generated class, you can scaffold out the entire web front end in a single command.
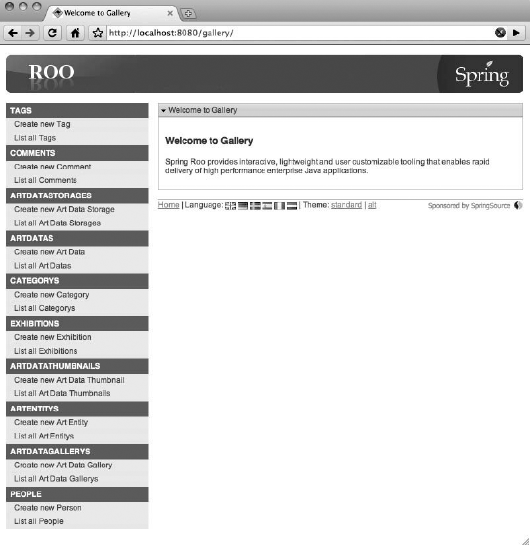
controller all --package ˜.web
And that's it! In another shell or within your IDE, execute mvn tomcat:run or mvn jetty:run and point your browser at http://localhost:8080. You should see something like the page shown in Figure 12-3.
Of course, this is only very basic scaffolding for a web application, but it proves that everything you need for a Spring MVC web application is in place. From here, you would create more controllers or edit the generated ones to tailor the application to the needs of your business.
In the pursuit of simplicity, Roo will generate only the classes that are strictly necessary. When building a truly simple application, you can place business logic in either your controller or your domain class.
For nontrivial applications, we harbor strong preference for creating a service layer. This way, your controllers can strictly revolve around the management of HTTP semantics and view resolution. Your business logic is kept within your domain model and wrapped with a nice service layer façade as appropriate. This is especially important when modeling code that manipulates multiple entities in the same transaction.
Roo can't reasonably be expected to predict the intent of your application well enough to generate service layer classes for you. Fortunately, because Roo applications are just normal Spring projects, you can create a service layer class, annotate it with the @Service stereotype annotation, and your Roo application will automatically detect it and incorporate it into your application context.
As with a service layer, there's nothing about Roo that would prevent you from wiring DAOs into your application. The biggest shortcoming would be that the Roo add-on infrastructure doesn't support them, so you wouldn't enjoy some of the benefits we've shown here, like automatic integration tests.
One of our favorite aspects of Roo is that it's easy to remove it from a project. Since you can use Roo on existing legacy projects, and since it's easy to remove any trace of Roo from your source code, there's very little reason not to try it out. If you get any pushback from the team or your organization, you remove it in just a few moments, so there's very little risk involved.
Removing Roo is a task best undertaken from an IDE that understands AspectJ, such as Eclipse or STS. Here are the steps in Eclipse with AspectJ Development Tools (AJDT) installed:
Stop any Roo shells that might be running
In Eclipse, within the Java Browsing perspective, right-click your project and choose Refactor

You will see a dialog box listing all of the ITDs. Select OK to push all of that code from your
.ajsource files into the appropriate.javasource files.Perform a recursive find and replace on the files in your project where you replace the regular expression
.*Roo.*withRemove any Roo dependencies from your maven
pom.xmlfile.
And that's it. Because there are no runtime dependencies and because Roo is built atop standard Java technologies, it's easy to walk away from the framework and not lose any of the work that you've done.
As you've seen in this chapter, although Roo isn't yet magical enough to put programmers out of work, it does give you an enormous jump-start in terms of raw development speed. It helps eliminate much of the tedium associated with developing enterprise Java applications by automatically generating boilerplate code into AspectJ ITDs and modifying your Spring application context configuration as your project grows.
Roo boasts a strong architecture based on OSGi and add-ons. With the backing of SpringSource, it's likely to evolve at a frantic pace as the Roo team strives to deliver more best-of-breed solutions that simplify the lives of developers around the globe.
One of the biggest hurdles for adopting most RAD frameworks on the JVM is that using them is a viable option only when writing a new application or in the rare circumstance that a total application rewrite is in order. But Roo can be introduced into an existing application without forcing any changes to the way other team members write their code. As the framework is proven in your environment, the productivity gains should be irrefutable, and your development team will likely embrace the positive change. We highly recommend that you try using it to implement a new feature on your existing Spring- and Hibernate-powered application.