
C H A P T E R 3
![]()
Basic Computer Graphics
In This Chapter:
- Choosing a file format for your Image
- Image Resolution
- Preparing Images for the Internet
- Preparing Images for Printing
Digital images appear in advertisements, in newspapers, magazines, the Internet and on television. The relatively low cost of digital imaging has enabled more and more people to explore their creativity via digital art. It has been possible for some time to print your digital images or upload them to the Internet. Now your digital images can go onto business cards, calendars, clothing, drink coasters, flags, flyers, key rings, logos, mouse mats, mugs, newsletters, placemats, rulers etc. The places where images appear seems to grow each year, no space is too small, too large or too obscure.
It is possible to download photos from your digital camera and have them printed to your medium immediately. However, there comes a time for many people when they want more control over the look of their images. GIMP gives you control over the size, shape and exposure of an image. It allows you to add text, other images or parts of an image and many other creative concepts. In fact, you probably feel like jumping to a later chapter and doing something creative right now. If you are a beginner, please answer these questions first. Do you know what digital resolution is? Do you know when to use low resolution images and when to use high resolution images? Do you know the most appropriate file type for your digital project? Do you know how to save an image in GIMP? If you are not sure about any of these questions, keep reading this chapter.
Choosing an Image File Format
Choosing the correct file format for your image is one of the most important things you can do to ensure your image displays well and is available, in good condition, for future reuse.
GIMP works with a large number of image file formats. Here is a list of the most common file formats available in GIMP.
Suggested File Types for Beginners
For beginners and those in a hurry, you can get by using two file types, XCF and JPG. Save the work you are editing as an XCF file. When you have finished editing, export your image as a JPG. It is worth noting that GIMP saves files by default to the XCF file format. This is a good thing because your image is saved to a format which helps you avoid some errors beginners often make. To save an image to another file format the image is exported. We explain the simple procedure for exporting images later in this chapter.
Why not save the file as a JPG and forget about XCF you may say. Read the paragraph on JPG below, to find out why that is not a good idea.
JPG
JPG or JPEG is a very popular format for images. If you are downloading files from your camera or phone, your image files most likely have .jpg at the end of them. JPG images get compressed in the camera to reduce the file size.
It is a very good idea to make a copy of your JPG image before you start editing. Many people do not realize that each time a JPG image is saved there will be some loss of quality. This loss of quality is permanent.
JPG files are ideal to use on the Internet because it is possible to reduce the file size of a JPG when you are saving an image. Smaller files sizes make web pages open faster. Later this chapter explains how to save (Export) a JPG image.
Some beginners compromise on quality by choosing a camera setting which allows the largest number of JPG images for their card. Once information is reduced in size, it gives little room to move when you may want to tweak your colors or contrast in image editing software.
GIF
GIF is a low quality file format used for graphics with very few colors (256 colors). GIF can be useful for simple animation on the web. A better choice for web graphics is PNG.
PNG
PNG (Portable Network Graphic) replaces the GIF file format for graphics on the web. Why is PNG better than GIF? PNG supports a greater range of transparency and handles a much larger range of colors. PNG has better file compression than GIF. However, PNG does not support animation.
PSD
GIMP can open and save Photoshop PSD files. It is possible to edit each layer separately in GIMP, save it as a PSD and then open it in Photoshop. However, PSD images opened in GIMP that have had Adjustment Layers applied to them in Photoshop will not show up in GIMP. A PSD image created in GIMP will open in Photoshop without problems. PSD is comparable in complexity to XCF the native file format for GIMP.
RAW
RAW files are available from higher end digital cameras. RAW files are larger than JPG files because they contain a lot more information about your image. The advantage of RAW files (unlike JPG files) is that the image is preserved in an uncompressed format. RAW files give you a greater control over the dynamic range of your image, that is the range from the brightest part of the image to the darkest part of the image. White Balance can be changed in a RAW image. RAW files also contain the Meta Data belonging to the image. Meta Data includes such things as the time and date the image was taken, the camera make and model, the camera settings such as the F stop and speed and if available it will also record the GPS location.
In GIMP for MAC, RAW files open via an already installed plugin called UFRaw. Windows users will need to install the UFRaw Plugin (see Chapter 10) or convert RAW files to TIF before opening them in GIMP. Linux users may have to also install UFRaw to open RAW files.
Once a RAW file is opened in GIMP it cannot be saved back as a RAW file. Once a RAW image has been worked on in GIMP it can be exported as a JPG for web or printing work. If saving/exporting to JPG make sure the quality is set to high. An opened RAW file can be exported as a TIF, this can be a good option if you are working with large file sizes for images to be printed. If you hit Save in GIMP the RAW file will be saved as an XCF file. This is a good option if you intend to do more work on the image.
TIF
TIF (Tagged Image File Format) is a high quality format. TIF files are larger than JPG files. TIF use a lossless compression format. This means if you save a few times, while working on the image, it does not lose quality. TIF is a popular file format for printing, scanning and archiving images.
XCF
XCF is the GIMP native file format. This format stores all of the data making up your image. XCF saves your image layers, guides, transparency, paths and active channels and meta data. This file format is the recommended file format to use in GIMP when editing your images.
XCF files are for use within GIMP only. When you have finished editing an image, the final step is to export (save) the image to another file format. You can export an XCF image to a JPG for the web or TIF for printing or to any of the other file formats supported in GIMP. Exporting is explained later in this chapter.
This format does not save your Undo History. No file format saves your undo history in GIMP. Save progressive versions of your image if you think you may need to roll back to an earlier state.
Quick Quiz
- Name two advantages with JPG images
- Why does a JPG lose quality every time you open and edit an image?
- What is the best file format for extensive editing in GIMP?
![]() Tip To improve the quality of your digital images, check your digital camera manual, to see if your camera can take RAW images. A RAW image contains all the digital metadata about the image. GIMP can open RAW image with the aid of a Plugin called UFRaw. For example, there is the ability to change the white balance, to increase the dynamic range or to recover better from an overly dark or overly bright image. RAW files are larger than JPG files.
Tip To improve the quality of your digital images, check your digital camera manual, to see if your camera can take RAW images. A RAW image contains all the digital metadata about the image. GIMP can open RAW image with the aid of a Plugin called UFRaw. For example, there is the ability to change the white balance, to increase the dynamic range or to recover better from an overly dark or overly bright image. RAW files are larger than JPG files.
Zooming in GIMP
The size of the image you see on your computer screen does not necessary mean that is the actual size of the image. Check that you are zoomed at 100%. Zoom changes your view of the image on your screen.
There are many ways to zoom in GIMP:
- Zoom by typing these numbers on your keyboard: 1 to zoom 100%, 2 to zoom 200%, 3 to zoom 400%, 4 to zoom 800%.
- Zoom via the menu options in View
Zoom.
- Zoom using the Magnifying Tool located in the Tool Box.
- Zoom via the pull-down menu at the bottom edge of the workspace window.
- Keyboard Shortcuts for Zooming:
- Fit Image in Window Shift +Ctrl+E
- Zoom In +
- Zoom Out −
When editing a digital image it is a good practice to zoom to 100% or greater. This is particularly useful if you are editing a small area of an image.
Image Basics
It is sensible to start digital editing with some good work practices. Beginners often disregard any thought about image resolution until it bites them. For example, a beginner may have an image uploaded to a website and people have commented favorably about the image. One day the beginner decides to make a very large print of this image and hang it on a wall. They are horrified to see that the printed image is fuzzy. It is not good enough to hang on a wall. Why did this happen? The short answer is the only copy of the image was optimized for the Internet. We will guide you to avoid disasters like this.
Make a Copy of Your Image
Before you start editing an image, we recommend you work on a copy of your original image. There are a few reasons for this.
- You might make a mistake and ruin your only copy
- You might make your only copy smaller to fit on a web page. Thus making the only copy of your image, smaller and lesser in quality
- Opening, editing and saving a JPG image many times will deteriorate the quality of the image.
- Disk space is relatively cheap compared to going back and taking that special photo again.
The easiest way to make another copy of your image is save it as an XCF file. XCF is GIMP's high quality native file format. This means you keep the same name as the original but it has a different file ending. For example, myimage.jpg could be the original and myimage.xcf. could be the copy of the original.
Save Your Work
Don't forget to save as your work as you go, rather than at the end of the entire editing process. Save your working copy in GIMP's native file format .xcf. The .xcf file retains quality, and preserves layers, if you are using them. When the editing is complete, you can save the image as a JPG or TIF or the recommended file for your project. Some people protest that saving images as .xcf files, uses too much disk space. We are recommending this only for the images you do extensive work on not for every image you own. If you have invested an hour or so editing a special image, we think you should retain the best quality for that image.
Save Your Image as an XCF File
Saving your image as an XCF file, preserves quality as you work on your image. You have the choice later to export the image to a JPG or any other image file type.
- Open an image in GIMP by going to File
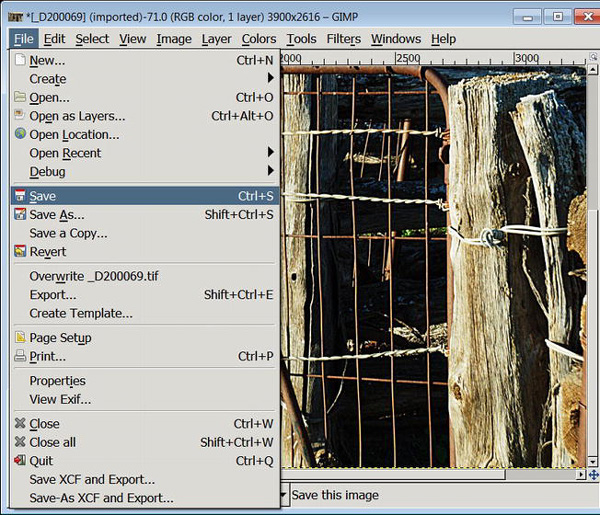
- To save the image as an xcf file, go to File
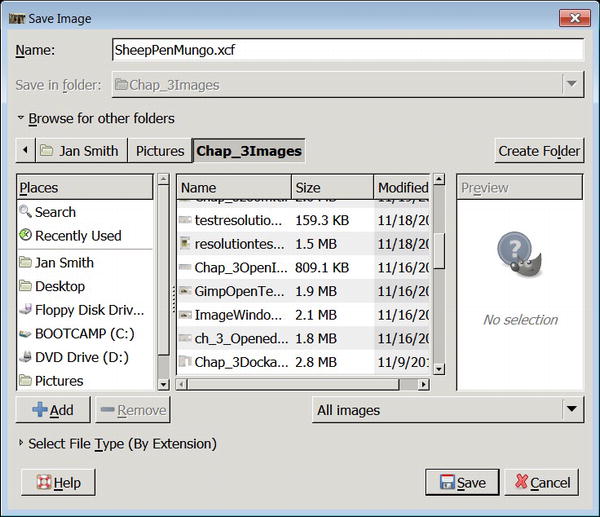
Figure 3-2. Name your file in the Name area and click on Save in the bottom right corner
What Is Image Resolution?
When taking photos, choose the highest resolution your camera will allow. This will give you the best quality and the biggest file size. You can always reduce the size of the image later.
So what is image resolution? Digital images have thousands and thousands of tiny pixels. Figure 3-3 shows pixels enlarged many times, normally you cannot see the actual pixels. The number of pixels per inch (ppi) determines resolution. In other words, the resolution is the number of pixels along the width and height of an image. The more pixels packed together per inch the higher the resolution, similarly the fewer pixels per inch the lower the resolution.
When you edit an image in GIMP or any other digital image editor, you are editing pixels. Pixels are tiny elements storing variations of brightness and color. The word pixel is an amalgamation of the words picture and element. GIMP edits pixels by coloring, shading, counting, selecting, moving, blending or removing pixels.
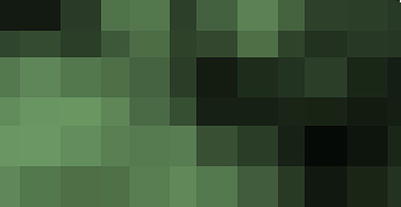
Figure 3-3. An extreme close up of individual pixels
![]() Note For geeks only, the digital images GIMP edits are raster images. Raster images are made up of pixels. Another type of digital image is the vector image. Vector images use geometrical points, lines and curves to represent images. GIMP can open a vector image and export it as a raster image but GIMP cannot export the image as a vector image. The one exception is that GIMP Paths can export to SVG, which is a vector graphics format. If you are looking for an open source vector image editor, try Inkscape.
Note For geeks only, the digital images GIMP edits are raster images. Raster images are made up of pixels. Another type of digital image is the vector image. Vector images use geometrical points, lines and curves to represent images. GIMP can open a vector image and export it as a raster image but GIMP cannot export the image as a vector image. The one exception is that GIMP Paths can export to SVG, which is a vector graphics format. If you are looking for an open source vector image editor, try Inkscape.
It is difficult to see the individual pixels in the image in Figure 3-4, because the resolution is high. The blossom image has a resolution of 300ppi. Its pixel measurements are 1056 × 755 pixels or 804,075 pixels.
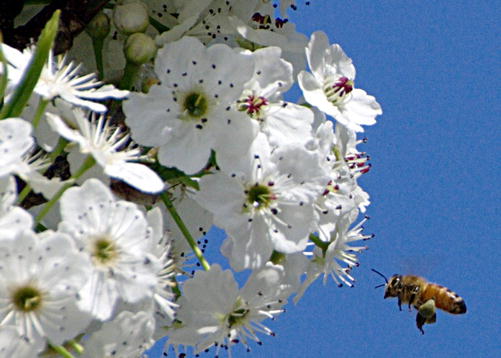
Figure 3-4. This image has a high resolution of 300 ppi (pixels per inch)
![]() Note Image Resolution is measured in ppi. The term ppi stands for the number of pixels per inch. An image with 300ppi is a high resolution image. An image with 72ppi is a low resolution image.
Note Image Resolution is measured in ppi. The term ppi stands for the number of pixels per inch. An image with 300ppi is a high resolution image. An image with 72ppi is a low resolution image.
You may hear people refer to dpi – this stands for dots per inch. dpi refers to the resolution of a printer. A printer with a resolution of 1200 dpi should print good copies of images saved at 300ppi. A printer with a resolution of 400dpi would give a less satisfactory result. The reason being a printer printing 1200dpi is printing many more dots per inch compared to a printer with a resolution of 400dpi which is only printing 400 dots per inch.
Comparing Image Resolution
Figure 3-5, has two versions of the same image. However, the images have different resolutions. The image on the left in Figure 3-5 has a resolution of 300 ppi. This is a high resolution image. The image on the right in Figure 3-5 has a resolution of 72 ppi. Although the image on the right has a poorer quality on the printed page, on a computer screen it would appear normal. Images for the web will load faster the smaller the file size. An image with a low resolution will have a smaller file size than the same image with a high resolution.
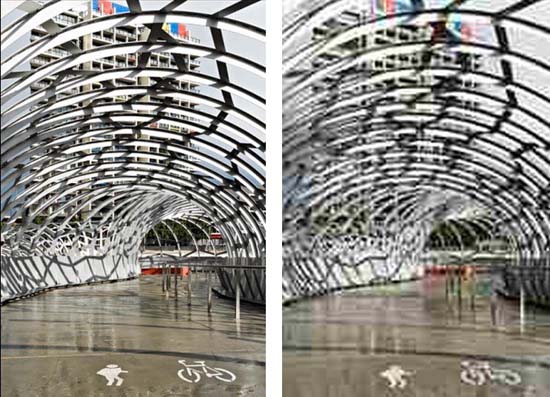
Figures 3-5a and 3-5b. The image on the left has a resolution of 300 ppi and a file size of 1 MB. The image on the right has been scaled to a resolution of 72 ppi and a file size of 50 KB.
Quick Quiz
- What does ppi stand for?
- What resolution should you save an image for the Internet?
- What resolution should you save an image to be printed?
Checking Image Resolution in GIMP
As mentioned, an image with a high resolution will have more pixels than a low resolution image with the same height and width.
To check the resolution of your image:
- In the top menu, go to File
- To see the image resolution and other properties for your image in GIMP, go to the Image Menu
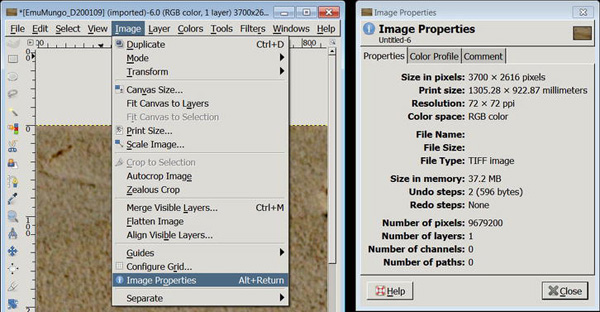
Figure 3-6. On the left, Image Properties is selected, on the right the pop-up Image Properties dialog showing a resolution of 72 ppi and other information about the image
- A pop-up panel or screen will appear showing the image properties for the open image. See the Image Properties dialog on the right in Figure 3-6.
Resolution for Printed Images
Printed images need a high resolution, 300 ppi is a recommended resolution for printed images.
When you change the image resolution, the following occurs:
- Decreasing the resolution means the width and height of an image increases. This happens because you are assigning fewer pixels per inch so the images expands in size.
- Increasing the resolution, means the width and height of an image decreases. This is because you are squeezing in more pixels in per inch.
When saving (File ![]() Export in GIMP) an image for printing, choose a resolution of 300 ppi. Export the image as a TIF file. TIF files are a high quality option.
Export in GIMP) an image for printing, choose a resolution of 300 ppi. Export the image as a TIF file. TIF files are a high quality option.
To Increase or Decrease Resolution
To change the resolution of your image:
- Go to the top menu click on the Image menu and scroll down and click on Print Size. See Figure 3-7.
- In the pop-up Set Image Print Resolution dialog, in the resolution box change the resolution, then click OK.
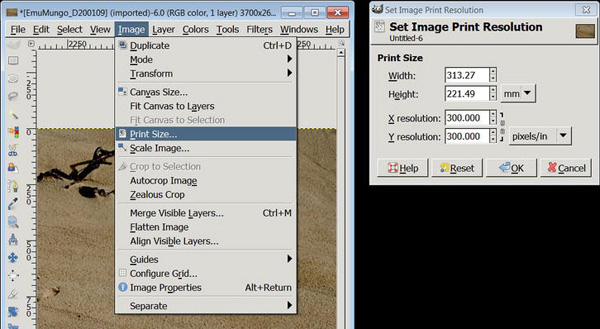
Figure 3-7. To change the resolution go to Image
Print Size and change the resolution in the Set Image Print Resolution dialog
Saving a JPG, PNG, PSD, and TIF File in GIMP
Unlike most software programs GIMP 2.8 saves most image files via the File ![]() Export Menu not File
Export Menu not File ![]() Save. File
Save. File ![]() Save is only used for GIMP's native file format XCF.
Save is only used for GIMP's native file format XCF.
Saving Files in GIMP via the File Export Menu
To save a JPG, PNG, PSD, TIF or other file in GIMP:
- Click on the File menu.
- Scroll down and click on Export. See Figure 3-8.
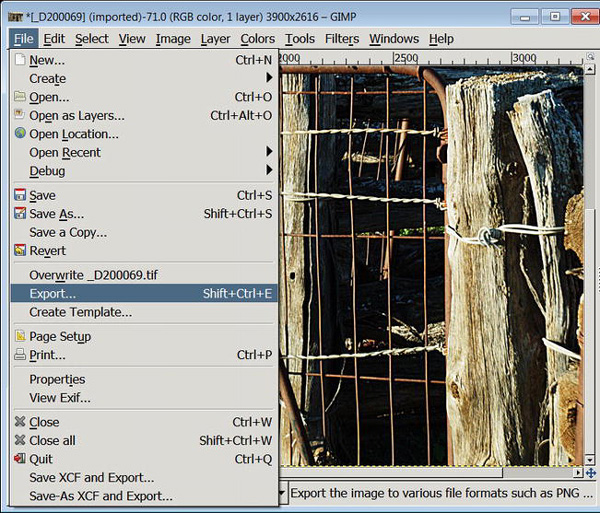
Figure 3-8. Save JPG, GIF, PNG, PSD, and TIF files via the Export menu not the Save menu
- In the Export Image window, check the correct name for your file. See Figure 3-9.
- In the Export Image window, choose a folder to save your image. Either choose a folder from the folders shown in the ‘Save in folder’ drop down list. Alternatively, browse for the correct folder by clicking on the + next to Browse for other folders. See Figure 3-9.
- Choose a file by clicking on the small arrow next to Select File_Type (By Extension). See Figure 3-9.
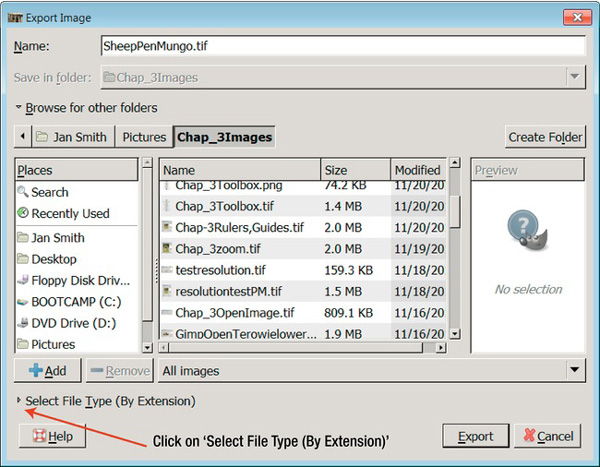
Figure 3-9. The Export Image pop-up window. Click on the + next to Select File_Type (By Extension). A list of file choices will open.
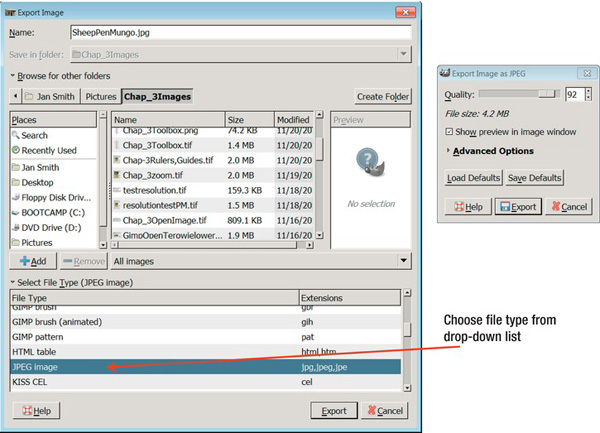
Figure 3-10. Scroll down and select JPEG, the pop-up Export Image as JPEG will appear.
- From the list, select the image file format, the example has JPG selected. See Figure 3-10.
- Click on Export.
- A pop-up Export Image as JPEG Window opens. See Figure 3-10.
- For a good quality image, move the quality slider between the numbers 92 to 100.
- Then Click on Export
If you intend to upload your image to a website such as eBay or the photographic website Flickr, take a note of your file size. If your file is smaller than 5MB, you image will up load ok. Flickr can take files up to 10MB. If however your file size is larger than this or you need your image as part of a web design, move onto the next example to reduce your file size further.
Saving (Exporting) and Reducing JPG File Size
The difference between this and the last exporting task is that we reduce the file size further. This is done by taking an extra step in the Export process.
To save or (export) an image:
- Go to the File
- The Export Image window opens. See Figure 3-11.
- Type the name for your file, in the Name area, see Figure 3-11.
- Select a folder to save your image in.
- Choose a file type by clicking on the the small arrow next to Select File_Type (By Extension). See Figure 3-11
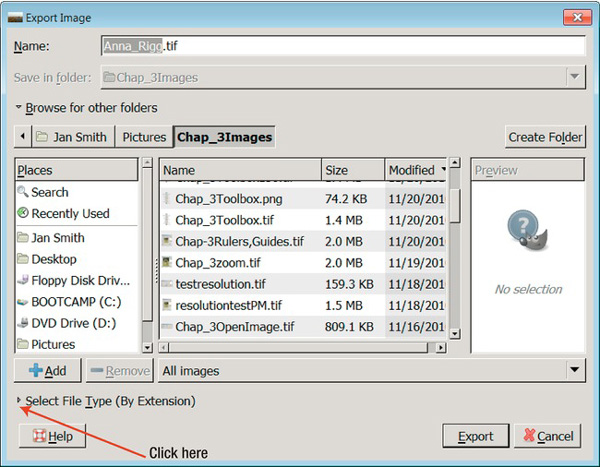
Figure 3-11. The pop-up Export Image dialog, click on Select File Type (By Extension)
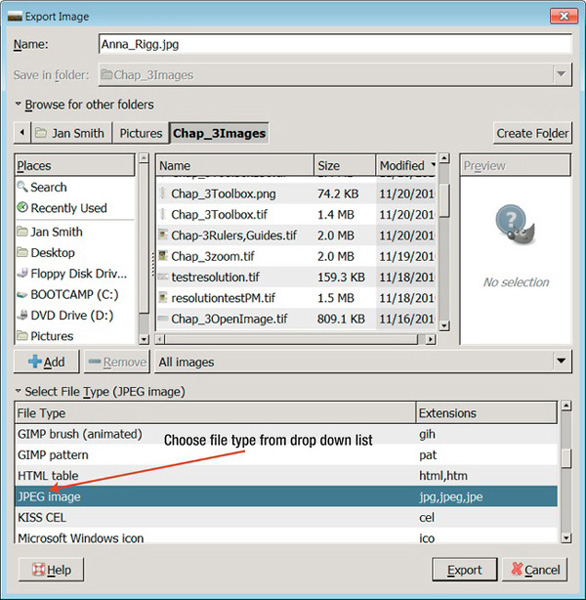
Figure 3-12. In the drop down list of files choose JPG Image
- Scroll down and choose JPG. See Figure 3-12.
- In the pop-up ‘Export my Image as a JPG’ window, click the checkbox next to ‘Show preview in image window’. This allows you to see the effects on your image of reducing the file size. See Figure 3-13.
- Make sure you are viewing your image at 100% (Press the number 1 on your keyboard to zoom to 100%).
- Use the Quality slider in the Pop-up window, Export Image as JPEG, to reduce the file size of your image, see Figure 3-13.
- Click on Export in the pop-up window when you are happy with the file size and the look of the image.
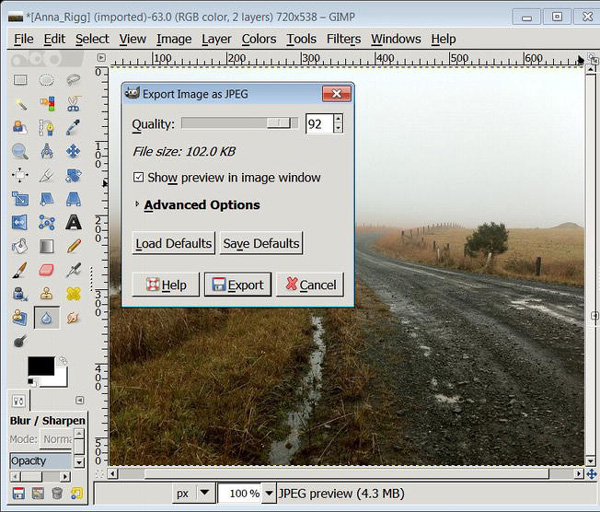
Figure 3-13. Exporting or Saving a JPG image for the Internet. Use the Quality slider to reduce the file size of your image.
Once you have exported an image in GIMP, you can use Control E to update the file. GIMP remembers where you exported the file. Alternatively, you can go to File ![]() Export As to update the image.
Export As to update the image.
![]() Caution Settings in GIMP such as Zoom and Dot for Dot changes your view of an image on your screen it is not permanent. To permanently change the size of an image, the image is scaled in the Image
Caution Settings in GIMP such as Zoom and Dot for Dot changes your view of an image on your screen it is not permanent. To permanently change the size of an image, the image is scaled in the Image ![]() Scale Image menu. Disable Dot for Dot by going to the View menu and unchecking Dot for Dot.
Scale Image menu. Disable Dot for Dot by going to the View menu and unchecking Dot for Dot.
Summary
We highlighted some traps for beginners when they start saving images. We discussed the importance of image resolution and file size in determining the successful outcome of a digital project. The major image file types were discussed to help choose the best file type for your project. We showed you the slightly quirky way to save images in GIMP. With some sensible basic information under your belt, it is now time to edit your images.