
C H A P T E R 2
![]()
Getting to Know the GIMP Workspace
In This Chapter
- The quickest way to learn GIMP
- Starting GIMP
- GIMP 2.8 workspace
- Simplifying GIMP's workspace
- GIMP workspace tour
- Opening an image
- Toolbox tour
- Menus tour
- Utility docking window tour
Is This Chapter for You?
- Yes, if you are new to GIMP.
- Yes, if you have used another image-editing program and are trying out GIMP. If you know Photoshop, also look at the Chapter 10 in the “Hints and Tips” section for Photoshop comparisons.
By now you should have GIMP installed on your computer. Congratulations! One of the hardest things for most beginners is getting started. The next step, starting to use a new program, can be equally daunting. These are the two biggest hurdles for most beginners. For most people, once you have completed a couple of tasks in GIMP you will begin to relax and get used to the new processes.
In this chapter, we show you how to open GIMP and give you a tour of GIMP's tools and features. We also show you how to set the workspace to single-window mode, which makes finding things easier. The chapter has some quizzes to help you check your progress. Because this is a book for beginners, at any one time, you will be using only a couple of options. Importantly we will show you clearly where and how to do a task at the time we are discussing the task. We don't expect you to memorize this chapter. This chapter is just to give you a feel for GIMP's layout and its possibilities; you should feel free to come back here at any time.
Quickest Way to Learn GIMP
A tip to help you remember where things are in GIMP is to have a problem you want to solve, such as how to open and save an image. By the end of this chapter, you should know how to open GIMP, how to open an image, and how to see the information GIMP is giving you about your image. You should know how to find the toolbox, where the menus are located, and the options the menus provide. Finally, you will know where the dialogs or panels are located and have an overview of how they can help you.
Reading or working through this section is the fastest way to use GIMP efficiently—for some people. Not everyone learns an activity in the same way. Some people learn by doing, others need to get an overview first. If you want to start doing something in GIMP, rather than taking this tour of the interface, skip this chapter. You can always come back later.
Starting GIMP
GIMP starts the same way as other programs on your computer. If you are not sure, follow the directions below for Windows, Apple Mac, or Linux.
Windows
To start GIMP in Windows, in the bottom left hand corner of your screen, choose Start ![]() All Programs
All Programs ![]() GIMP. The first time GIMP opens, it will open slowly. GIMP is configuring one-off options and directories. Don't worry; it will open faster next time.
GIMP. The first time GIMP opens, it will open slowly. GIMP is configuring one-off options and directories. Don't worry; it will open faster next time.
Mac
To start GIMP in Mac, go to the Applications folder, scroll down and click on GIMP. GIMP will open slowly the first time because it is configuring behind the scenes options and directories. It will open faster next time.
Linux
GIMP starts the same way as other applications for your distribution. The latest versions of Ubuntu do not have GIMP installed. See Chapter 1 for installation instructions for Ubuntu. To open GIMP, click on Applications, scroll down to Graphics; in the Graphics submenu, click on GIMP to open it. See Chapter 1 for full installations details.
What Version of GIMP Do You Have?
This book covers GIMP version 2.8. If you don't know what version of GIMP you have, click on the Help menu located at the top of the Image Window (the window with the menus on top), scroll down and click About. A small window will open with details about the version of GIMP running on your computer. If you have a version older than 2.8, consider updating to 2.8; it's free and worth the effort. Earlier versions of GIMP look a little different and don't have some of the newest features. Using an older version of GIMP will make this book more difficult to follow. See Chapter 1 to find out how to get the latest version of GIMP.
GIMP 2.8 Workspace
GIMP may look strange to you when it opens. Most new programs do seem odd at first. The relatively simple-looking windows contain a huge number of useful features and can be confusing at first glance. Don't worry, we will work through it and you'll learn where to find everything.
When GIMP 2.8 opens, you should see three separate windows, as shown in Figure 2-1.
- The Toolbox window has tools for your projects.
- The Image window is used for editing images and accessing menus.
- The Utility Docking window is available to organize layers, history, color pallets, etc.
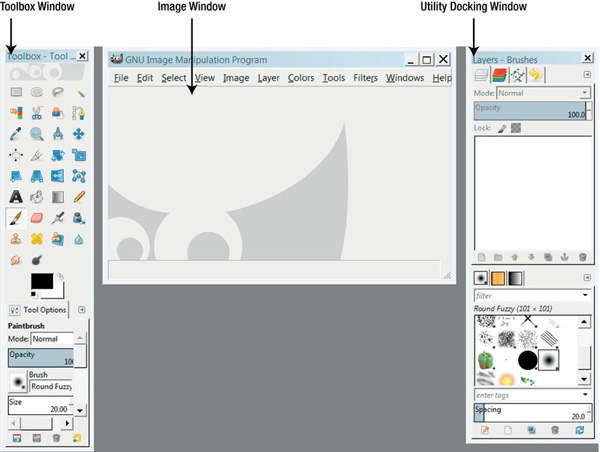
Figure 2-1. GIMP's three windows: the Toolbox Window, the Image Window, and the Utility Docking Window
Simplifying GIMP's Workspace
You may have opened GIMP 2.8 and not been able to see the three windows in Figure 2-1. Don't worry; there is a simple option available to fix this and it's called single-window mode.
Single-Window Mode
We suggest all beginners and people new to GIMP set up single-window mode. Single-window mode joins GIMP's three windows together. This means you will always see a combined workspace. This will save you the bother of looking for buried windows, a problem that can occur using the three-window workspace default. Figure 2-1 shows GIMP's three separate windows. Compare this with Figure 2-2, which shows GIMP in single-window mode. In single-window mode, the Toolbox window, the Image window, and the Utility Docks windows are combined into one larger window.
Flexible Workspace
The walls of the windows in single-window mode are flexible. You can drag on the internal divisions to make a window larger or smaller. You can drag on the edges to make the window taller or wider. As you start to edit you will find how useful it can be to be able to push the workspace around to suit you.
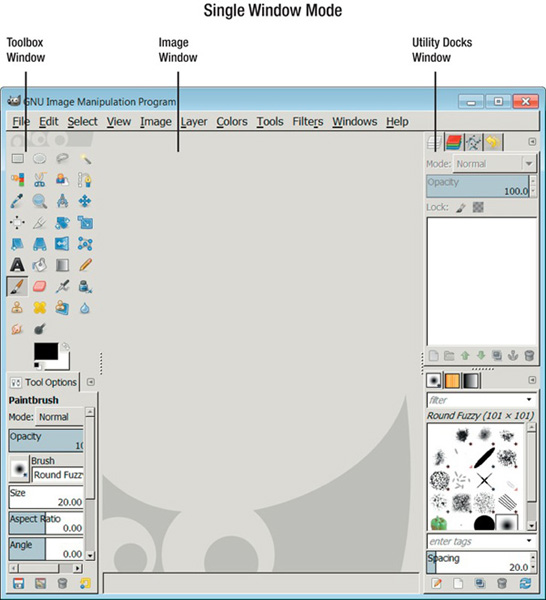
Figure 2-2. The Toolbox window, Image window, and Utility Docking window are joined in single-window mode. Drag on the edges and the internal divisions to see the flexibility of single-window mode.
Getting Single-Window Mode
To change from three separate windows to single-window mode, in the Image window top menu, click Windows (see Figure 2-3). A submenu or list of options will open; scroll down with your mouse and click “Single-Window Mode.”
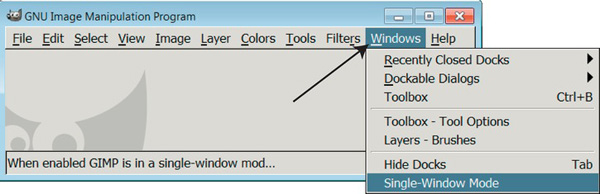
Figure 2-3. Changing to single-window mode via the Image Window menu
MISSING TOOLBOX WINDOW OR UTILITY DOCKING WINDOW
If you don't want to use the single-window mode and prefer to use GIMP as it comes out of the box with three separate windows, that's fine. However, occasionally you may find you have lost your Toolbox window or your Utility Docking window. There are ways to get the windows back.
To view your lost Utilities Docks window, in the Image Window top menu, go to Windows ![]() Recently Closed Docks and click “Channels, Paths, Undo” (see Figure 2-4). Channels, Paths, and Undo are the default dock windows for GIMP.
Recently Closed Docks and click “Channels, Paths, Undo” (see Figure 2-4). Channels, Paths, and Undo are the default dock windows for GIMP.
To view your lost Toolbox window, go to Windows ![]() New Toolbox or use the keyboard shortcut Control+B (see Figure 2-4). For Mac users the shortcut is Command+B.
New Toolbox or use the keyboard shortcut Control+B (see Figure 2-4). For Mac users the shortcut is Command+B.
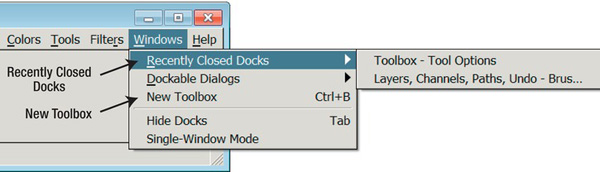
Figure 2-4. Locating the workspace windows in the Image Window menu
You should now see the Toolbox window, the Image window, and the Utility Docking window.
Single-Window Mode Screenshots
The screenshots in this book use the single-window mode because we believe it is the most useful mode for new users. In single-window mode, GIMP's three windows are joined together and stay together; this was a much requested feature. If you have decided to stay with the GIMP default of three separate windows, it should be easy enough to follow the instructions with the single-window mode screenshots.
Quick Quiz
With GIMP's workspace visible on your computer screen, answer the following questions.
- Can you locate GIMP's Toolbox area?
- Can you locate the image editing area?
- Can you locate the utility docking area?
Don't worry if you have no idea what these areas do. You need to know where things are before you can perform any actions.
GIMP Workspace Tour
Before you can do most things in GIMP, it's essential to know how to create, access, and open a image. A blank image is useful for painting and drawing. As a beginner, it's also useful to have a blank image open when you explore the tools in the Toolbox.
Opening a Blank Image
- In the top menu, click File (see Figure 2-5).
- In the drop-down File menu, click New.
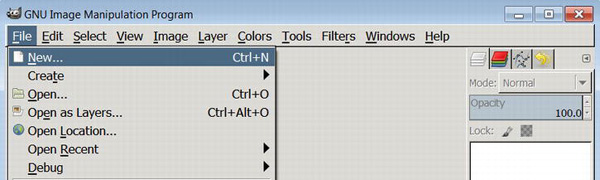
Figure 2-5. To open a blank image, go to File
New.
- A small dialog called the Create a New Image window pops up (see Figure 2-6).
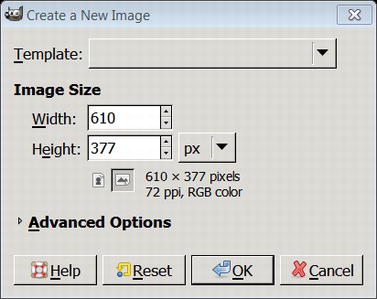
Figure 2-6. In the Create New Image window, you can choose the size of your blank image.
- You can keep the height and width of the image at 610 × 377 pixels, or you can make the image larger or smaller by changing the numbers in the Width and Height area (see Figure 2-6).
- For the adventurous, you can click on the Advanced Options and change the resolution to 300 pixels per inch. In the Comment area under Advanced Options, you can change “Created with GIMP” to “Created by a budding GENIUS.”
- Click OK.
Opening a Photo in GIMP
The image editing area is the place where you open images. The image editing area also contains GIMP's editing menus and more. It is not important what image you choose to open at this stage.
If you have never opened an image before, images are stored as files. You find images the same way you would find a Word document on your computer.
- To open an image located on your computer, go to the menu bar located at the top of the Image window. In the File menu, click Open (see Figure 2-7).
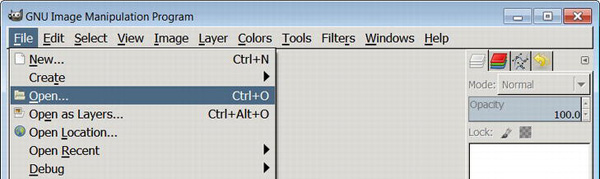
Figure 2-7. To open an image, go to File, scroll down, and click Open.
- A pop-up menu shows your computer's folder structure. Search these folders for an image and then click Open. See Figure 2-8 for an example of a picture folder.
Usually images are stored in a Picture folder but you may have stored your images in another folder on your computer. Your folder and file system structure will probably look different than those in Figure 2-8; basically you are looking for an image on your hard drive. When you find an image to open, click Open, as shown in Figure 2-8.
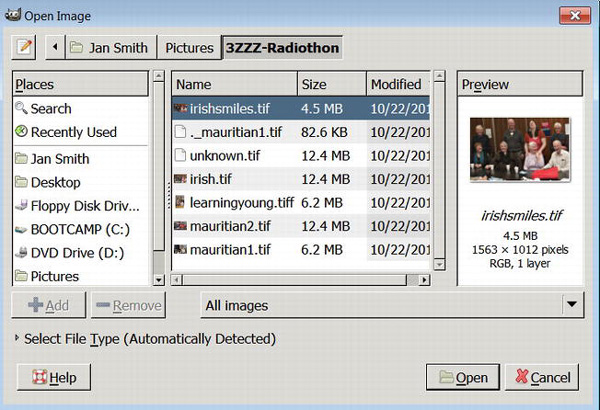
Figure 2-8. Pop-up window in GIMP showing images in a Picture folder located on a hard drive. Different computer operating systems will have slightly different ways of displaying files located on your hard drive.
- You should now have an image open in the image editing area. Congratulations if you have progressed this far on your own. If you can't find your images on your computer, ask a friend to help you.
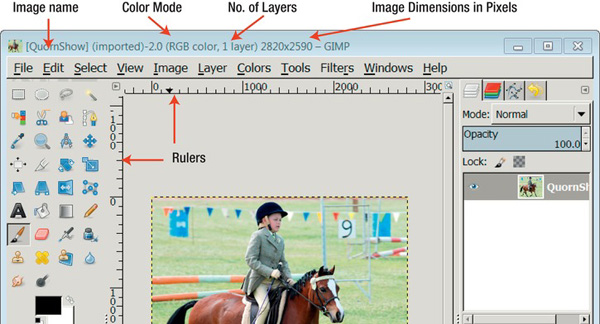
Figure 2-9. Image open in GIMP's single-window mode workspace
Information About Your Image
When an image is open in GIMP, there is a lot of information about the image available at a glance.
- The name of your open image is at the top of the window. In Figure 2-9, the name of the image is QuornShow.
- Color mode and Color/Index/Grayscale information is located at the top, next to the image name. In Figure 2-9, the color mode is RGB color. Don't worry if you are new to color modes; they are explained in Chapter 3.
- The number of layers the image has shows up at the top of the window. In Figure 2-9, QuornShow has one layer. You'll look at layers in Chapter 6.
- The dimensions of the open image are located at the top of the Image window. In Figure 2-9, the image dimensions are 2820 × 2590 pixels.
Rulers
The rulers are located at the top and one side of the image editing area, as you can see in Figure 2-9.
Rulers are useful to
- Understand the exact location of the mouse.
- Create accurate guides.
- Create sample points.
The default ruler measurement is in pixels. To change the unit of measurement for the rulers to other units, go to the drop-down list located on the bottom left of the workspace (see Figure 2-10). This is useful if you are going to print your image and want to see the size of your current image in inches or centimeters.
Guides
Guides are movable lines you can place vertically or horizontally over your picture to help line up items, visualize changes, etc. To place a guide on your image, drag your mouse from the side or top ruler into your image. This action will drag a guide onto the workspace (see Figure 2-10).
Guides can be handy when drawing or checking to see if the horizon in an image is level. You can drag the guide off the screen when not needed. To remove a guide, click the Move Tool and drag the guide back to the ruler (see Figure 2-10).
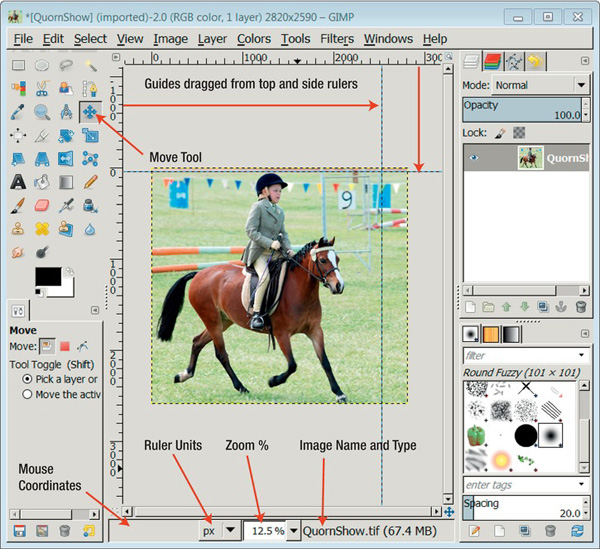
Figure 2-10. Workspace showing ruler units, zoom options, guides and the Move Tool.
Mouse Coordinates
Once again, beginners may not need this option but it can be handy if you need to know precisely where your mouse is located so you can come back to that spot later. As you move your mouse or pointer across your workspace, you can read the exact mouse coordinates near the bottom left corner of the window. The units used are the same as for the rulers (see Figure 2-10).
Zoom
When GIMP opens your image, it adjusts the view of the image to fit the available space. As you work in GIMP you may want to zoom in to see how something looks at 100% or you may want to zoom out to see the whole picture on the screen. Zooming in or out on an image doesn't affect the final size of your image. It's just the view of the image you see on your screen. In the next chapter, we show you how to find the exact size of your image.
To zoom in or out of your image, at the bottom of the window click the tab with the percentage value and choose from the drop-down list of sizes (see Figure 2-10). You can also enter in a Zoom level in the text box. Some people prefer zooming by clicking on the image and using the mouse wheel to zoom in and out. Perhaps the easiest way to zoom is to click the numbers on your keyboard: 1 = 100%, 2= 200%, etc. In GIMP, there is often more than one way to do something.
Image Resize to Fit Window
Image Resize is a handy option many people miss. Clicking the Image Resize button will zoom the image to fill the editing area. (Your image may already be filling the editing area). If you look at the image in Figure 2-10, you can see it is not filling the editing area. Compare this to the image in Figure 2-11, which is filling the editing area. Notice that the percentage indicator in the bottom of the window lets you know the percentage of the zoom.
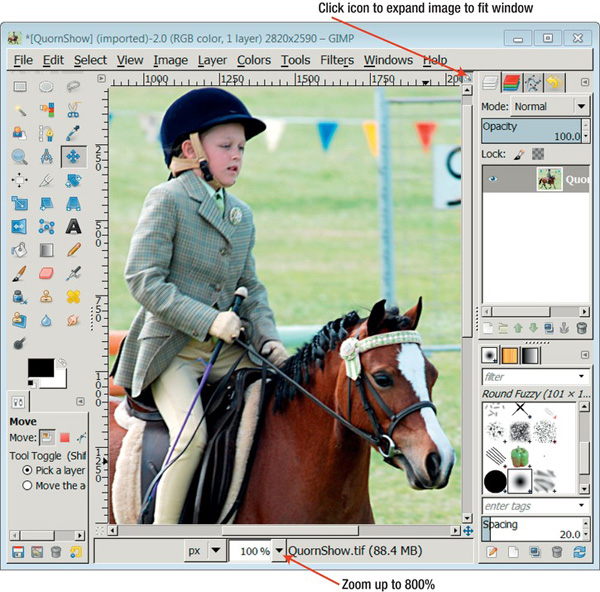
Figure 2-11. One of the Zoom options in GIMP.
RAM Usage, Not File Size
This is not something that beginners need to worry about but just in case you are curious, GIMP tells you at a glance how much RAM you are using. Located at the bottom center of Figure 2-11, is the measurement (88.4 MB). This number indicates the amount of computer RAM the image is using at that moment. This is not an indication of the file size of the image. We show you in the next chapter where to check the size of your image.
Quick Quiz
How much do you remember about the GIMP's workspace? Try this short quiz.
- How do you zoom in on an image?
- Where are the dimensions of your image located?
- Where do you change the unit of measurement for your rulers?
- How do you drag guidelines over your image?
Toolbox
The Toolbox has tools for painting, drawing, and working on photos (see Figure 2-12). It contains
- Selection tools to identify and isolate an area to work on.
- Paint tools to add strokes to your image.
- Transform tools to alter the shape or area of an image. New to GIMP 2.8 is Cage Transform.
- Color tools to alter colors across a selection or image.
- Text tools to add text to an image.
- Cloning and healing tools.
- Path tools and reusable shapes, such as the Bezier curve—an advanced option.
Go to your Toolbox and roll your mouse over a tool. A small description for that tool will pop up.
![]() Note If you can't see the Toolbox on your screen, use the keyboard shortcut Control+B to bring the Toolbox in view. For the Mac, use the shortcut Command+B.
Note If you can't see the Toolbox on your screen, use the keyboard shortcut Control+B to bring the Toolbox in view. For the Mac, use the shortcut Command+B.
To turn a tool off, click another tool in the Toolbox.
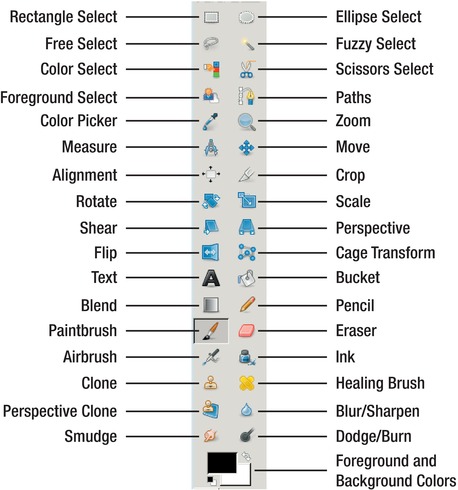
Figure 2-12. The tools in the Toolbox. Roll your mouse over a tool to see its name and some information about it.
Open a blank image and experiment as you read on. It is probably obvious what the Brush, Pen, Ink, and Airbrush Tools do. However, you may not know that apart from a simple brush stroke, strokes can be made dynamic. This means the brush or pen responds to the speed you use your mouse or graphical tablet's pen. To turn on brush dynamics, select the brush tool in the Toolbox. In Tool Options, located below the Toolbox, click on the icon next to the word Dynamics. In the pop-up Dynamics menu, choose Basic Dynamics (see Figure 2-13). The Tool Options in the area below the Toolbox change with the selected tool.
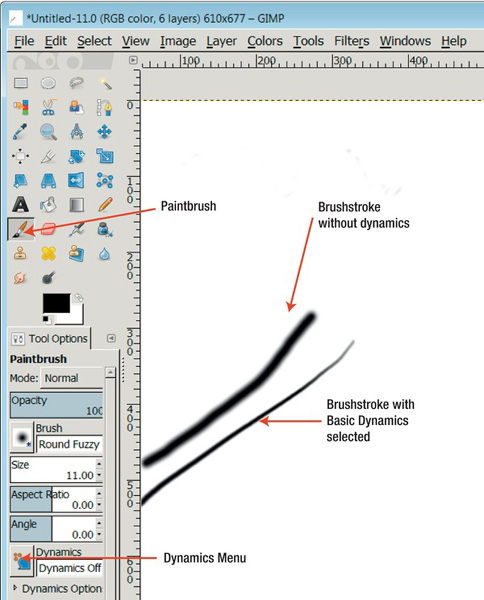
Figure 2-13. The Paintbrush Tool options. Each tool has its own tool options located below the Toolbox.
Quick Quiz
- Can you name three ways of selecting part of an image?
- What tool adds text to an image?
- How many tools have brush-like strokes?
- What tool do you use to remove or erase parts of an image?
Menus in GIMP
GIMP is a fully featured image editing program. Nowhere is this more evident than when you glance through GIMP's menus.
All GIMP's functionality can be accessed via the menu bar located at the top of the window in single-window mode. (If you are using GIMP's three separate windows, the menu bar is located at the top of the Image window).
Glance through the menu screenshots next to get an idea of the possibilities with GIMP. Some of the menu items will be obvious. However, the purpose of a number of menu items will not be obvious. We don't expect you to be an expert. When a menu item is needed later in the book, we show you when and—more importantly—where a menu item is located.
File Menu
The File menu is similar to File menus in many other programs (see Figure 2-14). In the File menu, you can
- Open, create, save, save as, and export images.
- Open recently closed images.
- Create or acquire a screenshot or an image from a camera or scanner.
- Close your images.
- Quit GIMP.
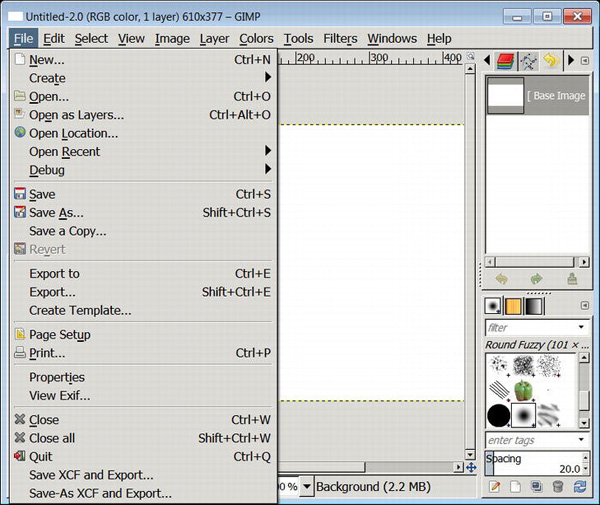
Figure 2-14. The File menu is where you open, save, or export an image. It's also where you quit or exit GIMP.
Edit Menu
The Edit menu has some very useful tools for beginners (see Figure 2-15). These are
- Undo or Undo History removes your last action; the Undo History Tab is useful when experimenting. (Control+Z will also undo your last action.)
- Redo restores your last action. (Control+Y will also redo your last action.)
- Cut, copy, and paste. (Control+C to copy and Control+V to paste; for Mac users, it is Command+C to copy and Command+V to paste)
- Preferences for GIMP are extensive and include boosting performance, setting up a graphics tablet, customizing the workspace, etc. Suggested preferences for beginners are in Chapter 10.
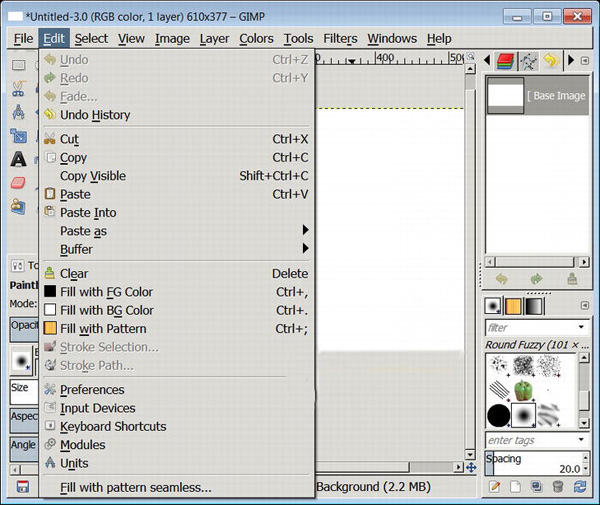
It is worth trying Undo and Redo by going to Edit ![]() Undo. (Control+Z will also undo an action.)
Undo. (Control+Z will also undo an action.)
Try also copy and paste. First, use a Tool from the Toolbox to select an area on an image, then go to Edit ![]() Copy, and then Edit
Copy, and then Edit ![]() Paste to paste it somewhere else on your image.
Paste to paste it somewhere else on your image.
Select Menu
Many of the items in the Select menu are used on selected areas of an image (see Figure 2-16).
- All selects the whole image.
- None is useful when you wish to remove a selection.
- Invert reverses the current selection. Everything that was outside the selection is now included and vice versa.
- Float is a temporary layer; use a separate layer instead. Attach a floating layer to a layer before any editing can continue (Control-H). We explain this in full in Chapter 6.
- Feather softens a selection at its edges by blending into the surrounding pixels. You can choose how many pixels to feather.
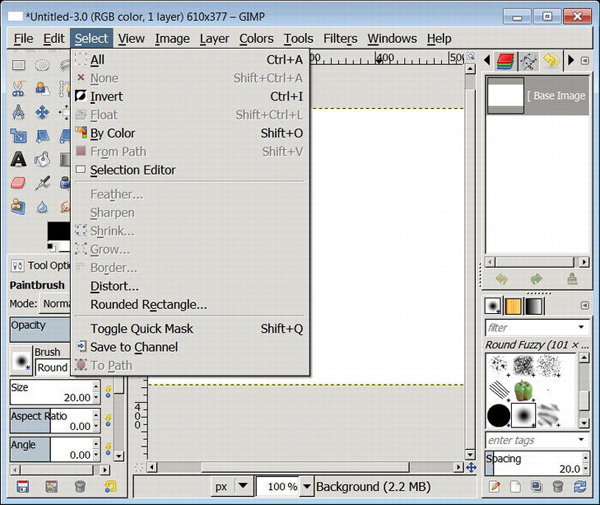
Figure 2-16. The Select menu
View Menu
For beginners, the View menu (Figure 2-17) offers a number of useful ways to view your image.
- New View makes another copy of your current image. This new view can be zoomed in or out. All editing affects both viewing copies. This is helpful when you are working on details in an image and at the same time need an overview of the image. Digital painters use this feature.
- Dot for Dot is useful for images for the web only. Please disable Dot for Dot for images intended for printing. You will see the images at their true size.
- Zoom gives options for zooming.
- Show Grid is a grid that will overlay your image. Use the grid to line up image elements.
- Snap to Grid works like a magnet. It is useful when lining up picture elements.
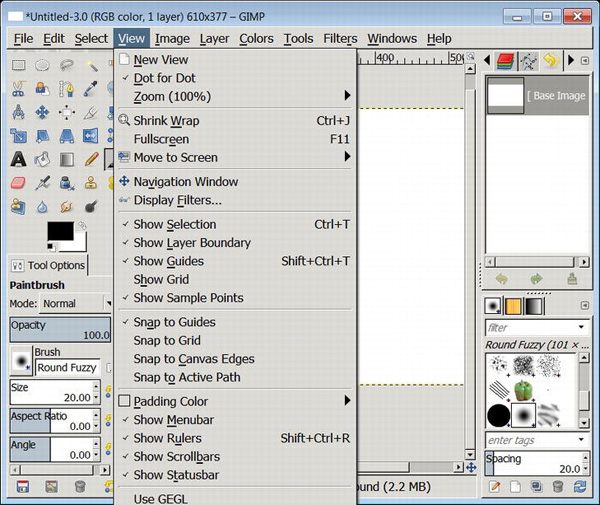
Figure 2-17. The View menu provides a range of ways to view images and options for showing rulers, guides, and selections.
Image Menu
The purpose of the Image menu (Figure 2-18) is to let you make some permanent decisions about your image.
- Duplicate makes an exact copy of your current image, including all layers, channels, and paths (the keyboard shortcut is Ctrl-D). Editing the duplicate image will not affect the original image.
- Mode changes the color mode of the image. Images in GIMP are RGB by default but it is possible to change the mode to Grayscale mode or Indexed color. An image with Indexed color only contains a limited set of colors and can be useful for graphics. The safest thing for beginners is to use RGB color.
- Transform will flip, rotate, or guillotine based on image guides.
- Canvas Size allows you to create extra space outside the image. This can be useful if you want to add text outside your image.
- Print Size allows you to change the resolution and dimensions of an image.
- Scale Image changes the number of pixels an image contains. Scaling up (making an image larger) loses quality.
- Flatten Image merges all layers. There is much more about layers and their uses in Chapter 6.
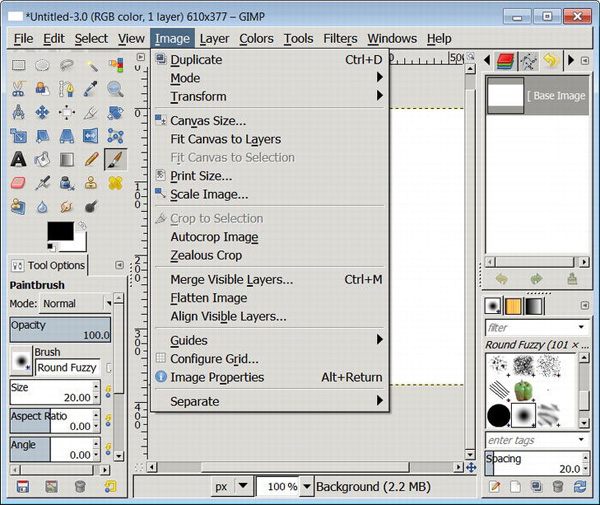
Figure 2-18. The Image menu
Layer Menu
You can skip this menu for now; layers are covered in Chapter 6. You will use layers when you add another image to your image, add text, create a montage, etc. However, if you're curious, the Layer menu contains layer management tools (see Figure 2-19).
- New Layer adds a new empty layer to your image, just above the active layer.
- Duplicate Layer adds a new layer, which is an exact copy of the active layer.
- Delete Layer deletes the active layer.
- Stack offers options to reorganize the layer order.
- Mask offers options to create, select, and apply a mask.
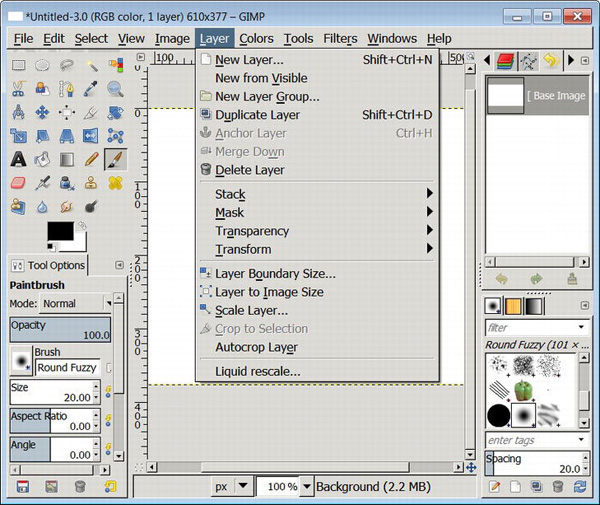
Figure 2-19. The Layer menu is only useful when working with layers. Chapter 6 explains the uses for layers.
Colors Menu
This area manages color. It has a range of tools to add snap and zing to images and drawings (see Figure 2-20). As beginners, you will learn how to use this menu when you work on optimizing or getting the best out of your images. Chapter 5 uses some of the options in the Colors menu for photographs. We also look at this menu in the chapters on drawing and painting.
- Color Balance increases or decreases the amount of cyan, magenta, or yellow in your image.
- Hue-Saturation is sliding scale to optimize the hue and saturation of your image.
- Levels controls shadows, midtones, and highlights in an image.
- Curves is a tool to change the color, brightness, and contrast of an image. Curves can bring life to a photo.
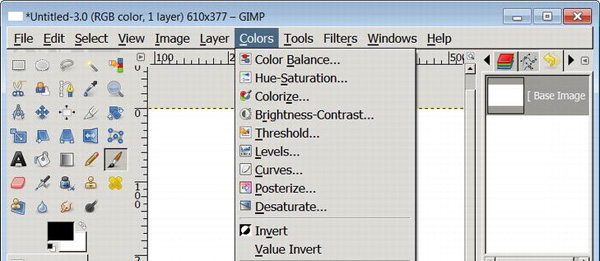
Figure 2-20. The Colors menu
Tools Menu
Most of the tools listed in this menu are also available from the Toolbox window located on the left of your screen in single-window mode. If you lose your Toolbox, press Ctrl+B and it will come to the top of your desktop. Alternatively, choose the tool from the Tools menu (see Figure 2-21). The letters opposite the Tool names in the menu are the keyboard shortcuts to select a tool.
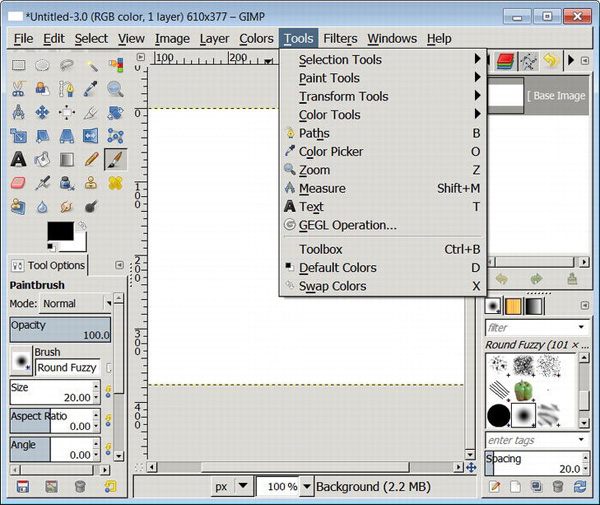
Figure 2-21. The Tools menu provides an alternative way of selecting items usually accessed from the Toolbox. This can be useful if you have closed the Toolbox to create more screen space.
Filters Menu
The filter section is one of the largest areas in GIMP (see Figure 2-22). You could spend days experimenting on your photos or drawings with the various filters here. In later chapters, we will work with filters.
The Enhance filters are important for beginners. These filters help improve imperfections of an original image such as lack of sharpness. The very useful but unhelpfully named Unsharp Mask is located at Filters ![]() Enhance
Enhance ![]() Unsharp Mask.
Unsharp Mask.
The filters in this menu are available for the whole image, a layer, or a selection inside an image. How and when filters are applied is an individual choice. Open an image and try some of the filters. You will be amazed to see how much they can change your image.
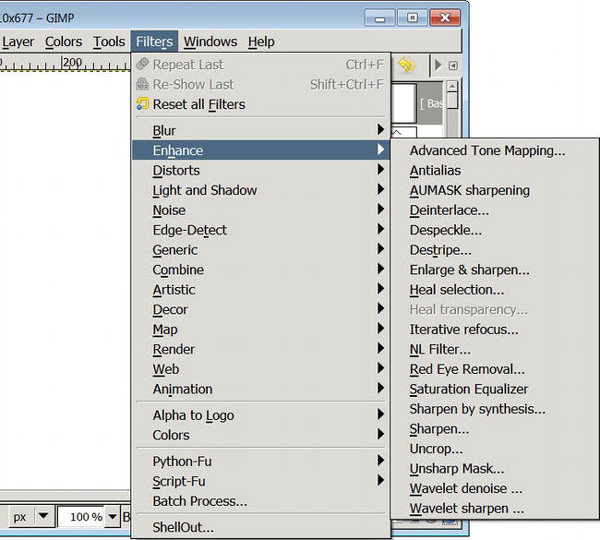
Figure 2-22. The Filters menu
Windows Menu
The Windows menu gives you access to a large range of dialogs or panels available in the Dockable Dialogs submenu (see Figure 2-23).
- Dockable Dialogs or Dockable Panels contain Layers, Undo, Paths, Brushes, Pallets, Gradients, and Fonts.
- Single-Window Mode is new to GIMP 2.8+. Scrolling down the Windows menu and clicking on “Single-Window Mode” joins the three separate GIMP windows together (it joins the Toolbox to the Image window and the Dialog or Panels window). If you are new to GIMP, we strongly recommend you try single-window mode. It makes it easier for you to remember where items are located.
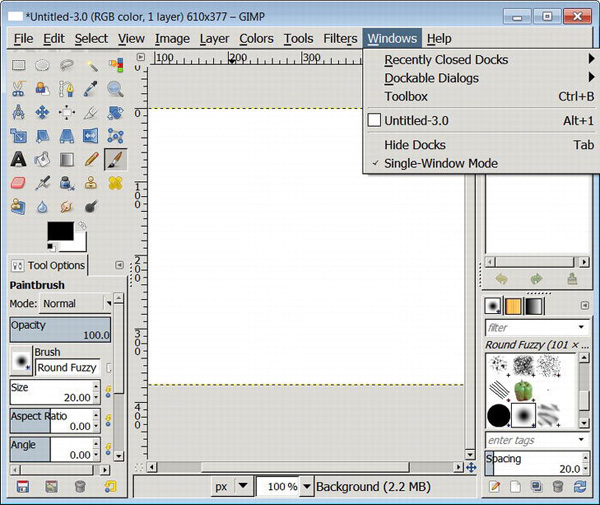
Figure 2-23. The Windows menu
Help Menu
The Help menu (Figure 2-24) offers additional resources and information.
- GIMP Online links to several GIMP web sites that provide additional free documentation and useful resources for users and developers. It is possible to download the Help and run it from your desktop.
- About offers information about the version of GIMP you have on your computer.
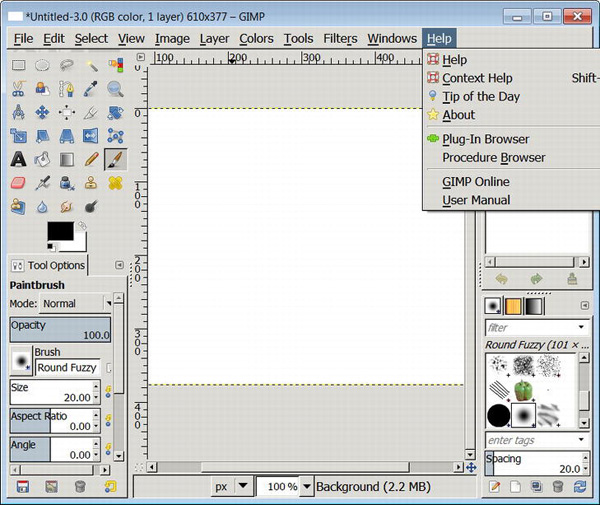
Figure 2-24. The Help menu
Alternative Ways to Access Menu Items
In GIMP, there is often more than one way to access a tool or an option. In the top menu bar you can access all the Toolbox tools when you click on Tools. The tools are also available in the Toolbox. To access the top menu bar items another way, right click with your mouse on the Image window screen and the main menu list appears.
Quick Quiz
- How do you undo your last action?
- Is Dot for Dot used for screen or print images?
- Where are the image sharpening tools located?
- What menu do you use to add a layer to an image?
Dockable Dialogs or Dockable Panels
GIMP offers dockable dialogs. But what is a dockable dialog? A dialog is a small box or window with a number of options available for the current tool or image such as a brush. In single-window mode, the dialogs are located on the right hand side of the screen.
The most useful dialog or panel for new users is the Undo History.
In other photo and image editing software, dialog docks are referred to as panels. There are a number of other dialogs or panels for Layers, Channels, etc. When GIMP first opens, on the right of your screen, you can see the Layers dialog and below this, the Brushes dialog (see Figure 2-25). There are many more dialogs out of sight.
(Each of the dialogs or panels can be dragged around the workspace to suit your needs. This option is really for experienced users. It is not useful to move dialogs around before you are comfortable with the whole GIMP workspace.)
Undo History—Great for Beginners
The Undo History is by far one of the most useful dialogs or panels for beginners. On the top far right of your screen, click on the curved yellow arrow to reveal your undo history. If you can't see the yellow arrow, drag the far right edge of your workspace to reveal the area.
In Figure 2-25, Undo History is selected and you should be able to see a four-step rough drawing of an eye. Clicking on any of those steps will undo that image to that point.
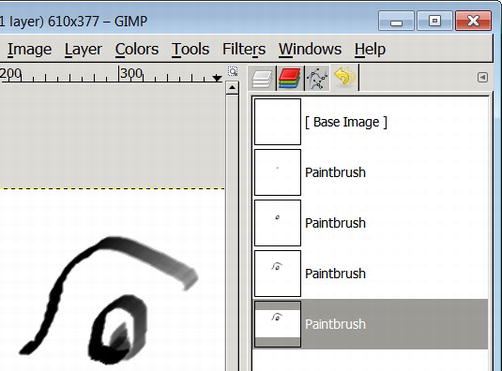
Figure 2-25. Clicking on the yellow curved arrow opens the Undo History area.
Quick Quiz
- What is a dialog or panel?
- Where is your image's Undo History area?
Summary
This chapter was a tour through GIMP's workspace. We looked at GIMP's three workspace windows: the Toolbox, the Image window, and the Dockable Dialogs window. To make things easier to find, we joined these three windows into single-window mode. You saw how to open an image and view the information available at a glance about that image. We listed and explored some of the Tools in the Toolbox. We toured through the menu area. In the Dockable Dialogs area, we looked at dialogs and how to find the Undo History area. We included four quizzes to help you move through this material.