
C H A P T E R 4
![]()
Image Straightening, Cropping, Scaling, and Perspective
In This Chapter
- Rotating or cropping an image
- Making an image larger or smaller
- Fixing leaning buildings and other perspective work
- Applying different frames to your image
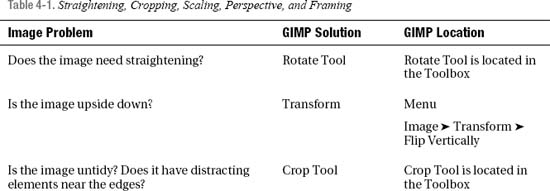
In this chapter we will show you how to add a frame or border to your image and how to crop and resize an image. We will also show you how to straighten an image and correct perspective distortion. Most importantly, we show you where to find these options in GIMP. Table 4-1 gives an overview of the tasks in the chapter. We don't expect you to work through every exercise, choose the tasks that interest you. This way you will have more fun.
Straightening or Rotating an Image
An image might be horizontally or vertically crooked. This is a very common task and an easy one for a beginner.
To Straighten an Image
- Open an image by going to the menu at the top of the screen, File
Open. (See Chapter 2 if you need help opening an image.)
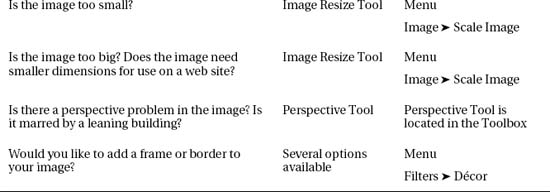
- Go to the Toolbox and click on the Rotate Tool (Figure 4-1).
- In the Rotate Tool options (Figure 4-2), set the following:
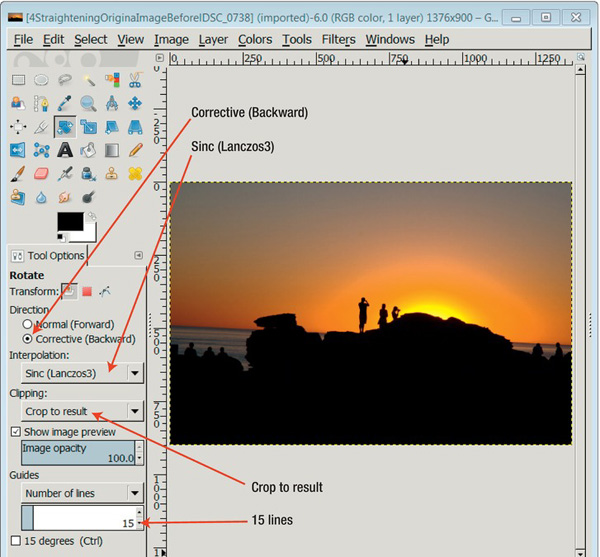
- Under Direction, select Corrective (Backward).
- (Optional) For Interpolation choose Cubic or Sinc (Lanczos3).
- Under Clipping, select Crop to result.
- Under Guides: Number of lines for grid, select 15. You may find you want more or less lines in your grid.
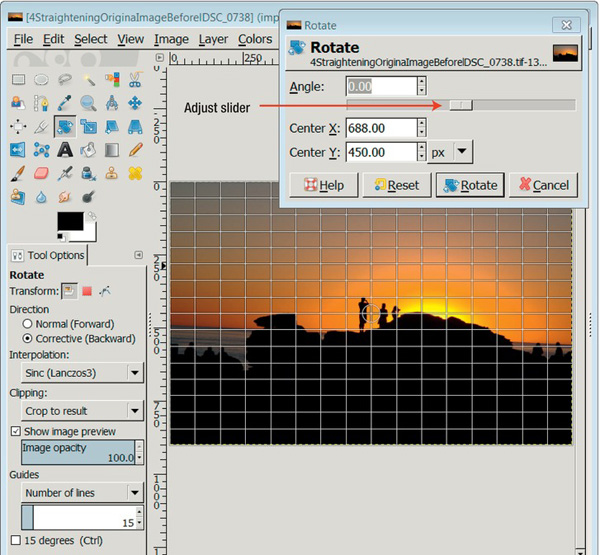
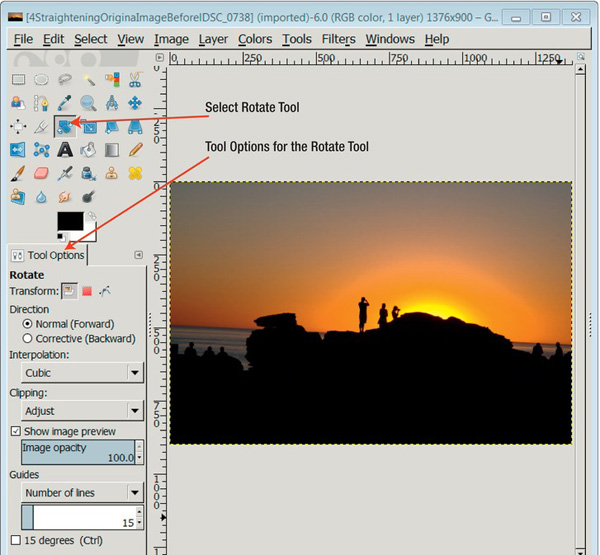
- Click on the image. The grid is on top of the image, as you can see in Figure 4-3.
- In the Rotate dialog, adjust the slider to line up the horizon with the grid. See Figure 4-3.
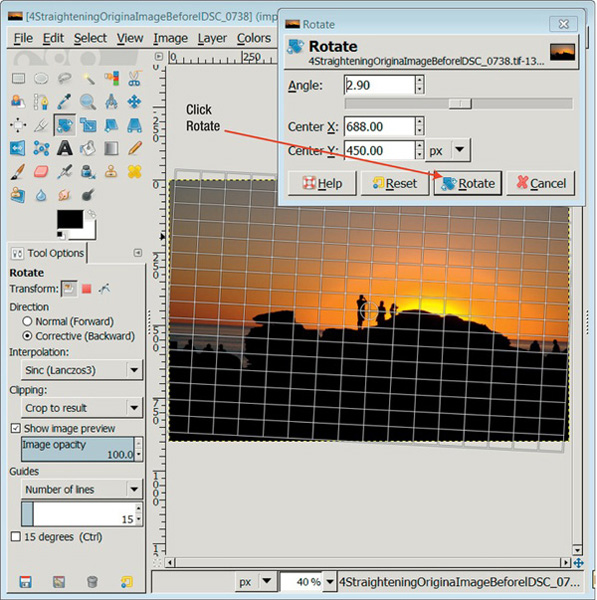
- When you line up your image to the grid, click Rotate, as shown in Figure 4-4.
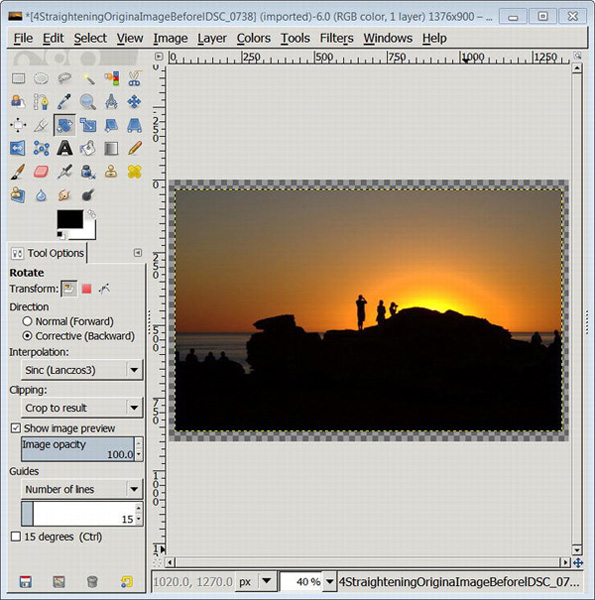
Figure 4-5. Image is now straight but it has blank space around the edges.
- The image is corrected but it has empty space around the edge (see Figure 4-5).
- To remove the empty space around the image, go to Image
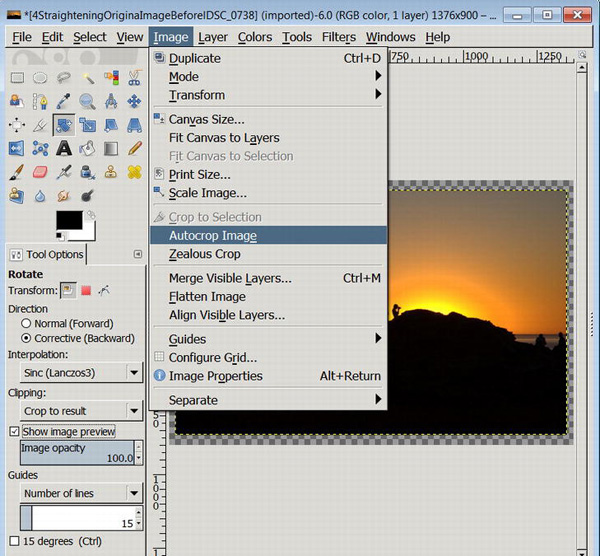
Figure 4-6. Choose Image
Autocrop Image to remove the blank space around the outside of the image.
![]() Tip Saving Files Is Slightly Different in GIMP. An unusual design feature of GIMP 2.8 is that only GIMP's native file XCF is saved via File
Tip Saving Files Is Slightly Different in GIMP. An unusual design feature of GIMP 2.8 is that only GIMP's native file XCF is saved via File ![]() Save. File formats (such as JPG, TIF, PNG, PSD, etc.) are saved by going to File
Save. File formats (such as JPG, TIF, PNG, PSD, etc.) are saved by going to File ![]() Export. See Chapter 3 for further details.
Export. See Chapter 3 for further details.
Image Opens Upside Down
From time to time an image may open upside down in GIMP. For example, an image might appear upside down if it was scanned that way.
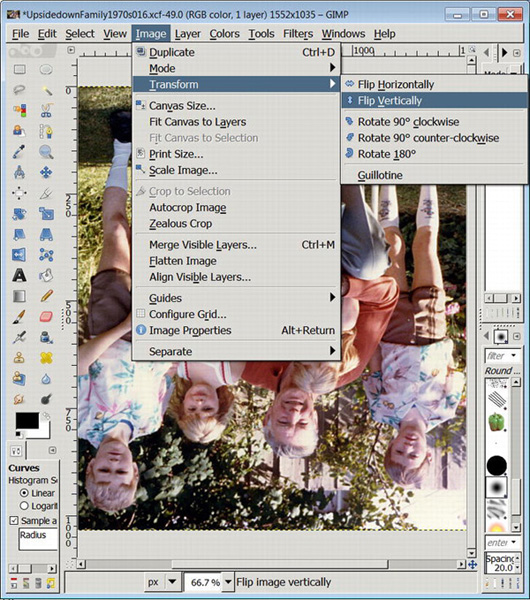
Figure 4-7. Flip or rotate an image with Image ![]() Transform.
Transform.
To Flip an Image Vertically
- Go to Image
- Select Flip Vertically. Your image will turn 180 degrees.
The Image Menu has a range of ways to turn your image in the Transform menu. You can
![]() Tip The screenshots in this book use GIMP's single-window mode. We recommend single-window mode for beginners as it joins the three workspaces together. To move to single-window mode, in the top menu go to Windows
Tip The screenshots in this book use GIMP's single-window mode. We recommend single-window mode for beginners as it joins the three workspaces together. To move to single-window mode, in the top menu go to Windows ![]() Single-Window Mode. Further details are in Chapter 2.
Single-Window Mode. Further details are in Chapter 2.
Cropping an Image
Often the only improvement a photo needs is a little cropping. When you crop a photo, you are removing some of the original edges from the photo. Cropping is useful to remove distracting items and to make the photo more artistic or pleasing. Cropping an image can sometimes turn an ordinary image into something special. No matter what the reason, if you are unhappy with the framing of your image, one solution is to use the GIMP Crop Tool.
Before cropping, make a copy of your image by saving or exporting the image (see Chapter 2 if you need a refresher). Decide before you crop how you are going to use this image (print or web site), then set the correct resolution. (See Chapter 3 for further information about setting the correct resolution for your image).
Basic Crop
In this example, you can select any part of your image to crop. This means the image will change its shape and dimensions. If you need to crop to a specific width or to an aspect ratio, move on to the next exercise.
- Select the Crop Tool in the Toolbox (see Figure 4-8). The Crop Tool is located in the Toolbox on the left of the screen if you are in single-window mode. If you have the default layout and can't see the Toolbox, use the keyboard shortcut Control+B to bring up the Toolbox.
- To help decide where to crop, use Golden sections from the drop-down list. (see Figure 4-8) The Golden sections will display over your image when you select the photo with your mouse. (Golden sections are a variation on a long-standing photographic idea, the rule of thirds. The guide divides a photo horizontally and vertically into thirds. Some people say the eye more naturally goes to points of interest located in these divisions rather than the center of an image.)
- To start selecting, drag the mouse diagonally across the image.
- To align the crop selection more accurately, the selected area has a square box in each corner of the selection. Drag the mouse inside any of those square borders to make your crop selection larger or smaller (see Figure 4-8).
- To crop the image, press Enter. Figure 4-9 shows the result.
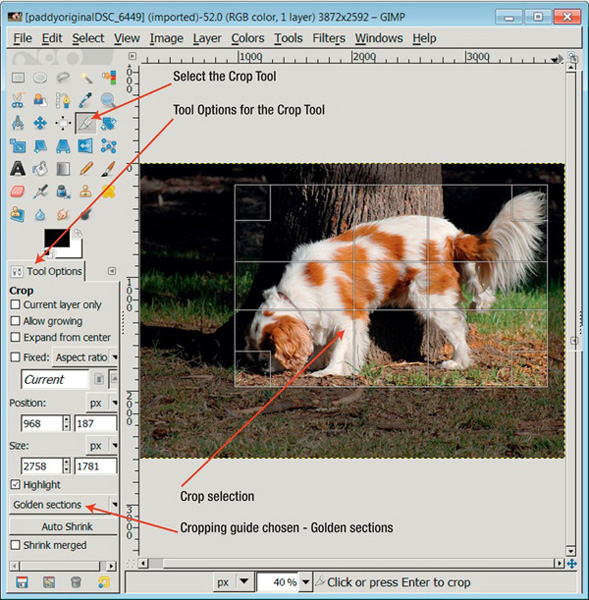
Figure 4-8. The highlighted area is to kept in the crop.
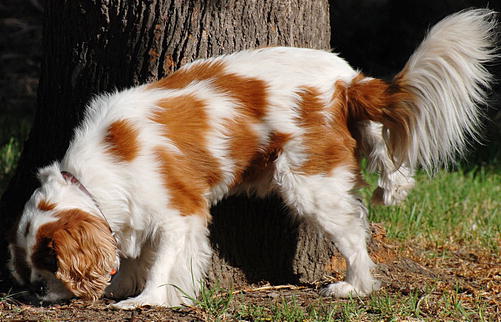
Figure 4-9. The photo has been cropped using the cropping tools in GIMP.
![]() Note Have you ever noticed that the framing of your image does not always turn out the way you expected? If you use a point-and-shoot camera, the framing of the scene you see in the camera is not accurate. Viewfinders in point-and-shoot cameras give an approximation of the framing of the image you are taking. The viewfinder is usually located above and to one side of the lens. In contrast, DSLR cameras have through-the-lens viewing so it's much easier to frame a shot.
Note Have you ever noticed that the framing of your image does not always turn out the way you expected? If you use a point-and-shoot camera, the framing of the scene you see in the camera is not accurate. Viewfinders in point-and-shoot cameras give an approximation of the framing of the image you are taking. The viewfinder is usually located above and to one side of the lens. In contrast, DSLR cameras have through-the-lens viewing so it's much easier to frame a shot.
Cropping to an Aspect Ratio
The aspect ratio is the relationship between the length and width of an image. In the excitement to work on a photo, it is easy to overlook the fact that the aspect ratio of your image may be different from the aspect ratio where your edited image will be displayed. You may display your images on a screen, a digital photo frame, or as a printed photograph. Each of these display media has aspect ratios that may be different from the aspect ratio of your image. These discrepancies are described in the following two sections. The instructions for cropping to an aspect ratio follow these sections.
Displaying Images in a Digital Photo Frame
If you display your images in a digital photo frame, the frame may have a different aspect ratio from your camera's aspect ratio. If the aspect ratios don't match, your digital photo frame might compensate in ways that might not be visually pleasing. The digital photo frame may crop your image automatically, thereby cutting off vital parts of the picture. It may stretch your image to fit the frame, thus distorting your image or it may have a black line down two sides of your image.
Check the Photo Size before Printing
The aspect ratio of an image produced by a camera doesn't match the aspect ratio of most photo paper. This absolute silliness was the case in the film camera days and is still the case today. In simple terms, the image produced by your camera has a different width-to-height ratio than most photo paper.
If you are printing an image, it makes sense to crop your image to the same aspect ratio as the paper the photo is printed on. If you don't crop or resize your image, the image is usually cropped automatically in the printing process. This might not be a pleasant surprise. An Australian friend of ours worked on her European holiday images in a digital editor. To her horror, when the images were printed, important parts of many images were cropped out in the printing process. She did not know why this had happened and was very upset. No one had told her to check the paper sizes in use at the printing shop.
![]() Tip When printing your images, set your resolution to 300 ppi. See Chapter 3 for more details.
Tip When printing your images, set your resolution to 300 ppi. See Chapter 3 for more details.
Cropping to an Aspect Ratio in GIMP
There may be times when you need to crop an image to a specific ratio. For example, a ratio of 6:4 is a common size for small printed photos.
- Select the Crop Tool in the Toolbox (see Figure 4-10). The Crop Tool is located in the Toolbox on the left of the screen if you are in single-window mode. If you can't see the Toolbox, use the keyboard shortcut Control+B to bring up the Toolbox.
- The Crop Tool has a Tool Options box that is located below the Toolbox.
- Choose Aspect ratio from the drop-down list next to the checkbox.
- In the Tool Options, select “Fixed” next to Aspect ratio.
- Type in the Aspect ratio you need. (The example in Figure 4-10 has a ratio of 6:4.)
- To start the selection process, drag the mouse diagonally across the image. (This can be an approximate selection.)
- To align the crop selection more accurately, the selected area has a square box in each corner of the selection. Drag the mouse inside any of those square borders to make your crop selection larger or smaller.
- To crop the image, press Enter. Figure 4-11 shows the result.

Figure 4-10. Selecting aspect ratio in the Crop Tool options area
Figure 4-11. Image cropped to 6:4 ratio
Cropping to a Width or Height
GIMP's cropping tool also allows cropping to a specific width or height. To crop to a specific width or height, follow the last exercise until the end of step 2. Then choose either the height or width from the drop down list next to aspect ratio. (See Figure 4-10.) Type the height or width in the box, then continue from step 6.
Changing the Size of an Image
You may need to change the size or dimensions of an image, perhaps for a web site or for printing. It is possible to scale an image smaller or larger. Scaling an image down in size usually doesn't affect the quality of the image. Making an image larger than the original can affect image quality. It is a good practice to make a copy of your image before scaling. When you have saved (or exported) your scaled image, the change is permanent.
The Scale Image option in GIMP allows you to make an image smaller or larger. You can scale your image by one of the following units:
- Pixels
- Percentage
- Inches
- Millimeters
- Points
- Pica
For the following exercises, we suggest you avoid using the scale tool in the Toolbox. This example uses the Scale Image option located in the Image menu (Image ![]() Scale Image). There is often more than one way of doing things in GIMP. We show the most useful tools, rather than every possible way to do a task.
Scale Image). There is often more than one way of doing things in GIMP. We show the most useful tools, rather than every possible way to do a task.
![]() Tip Scaling is quite different from zooming. When you zoom in or out of an image on your screen, this just affects the view you see on the screen. Zoom does not permanently change your image size. Scaling changes your image permanently to another size.
Tip Scaling is quite different from zooming. When you zoom in or out of an image on your screen, this just affects the view you see on the screen. Zoom does not permanently change your image size. Scaling changes your image permanently to another size.
Making an Image Larger
If you make an image larger (in other words, if you scale up an image), there may be some loss of quality to the image in the process. The amount of loss of quality when enlarging depends on the quality of the image and the amount of the enlarging. When enlarging an image, the interpolation tool adds extra pixels.
GIMP's Scale Image area sets the size of any image you open at 100%. To double an image in size, choose 200%. Experiment with different percentages to see what works for your image.
To make an image larger or to scale up an image, follow these steps:
- Go to Image

Figure 4-12. Choose Scale Image from the Image menu
- In the pop-up window, choose a percentage value greater than 100% to enlarge your image (see Figure 4-13). Alternatively, you can scale up your image by choosing from the drop-down list one of the following measurements: pixels, inches, millimeters, points, or pica. Then type into the Width area the size you need.
- Click the adjacent chain link (see Figure 4-13). This retains the images original proportions.
- For the method of scaling or interpolation, try Cubic or Sinc (Lanzcos3).
- Click Scale. The image will scale up 200%.
Figure 4-14 is a photo of a computer fan before scaling up in GIMP. Figure 4-15 shows the computer fan after scaling up 200%.
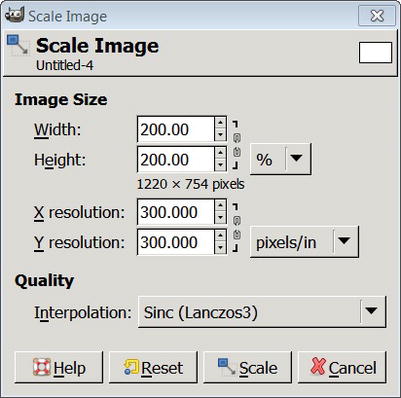
Figure 4-13. The Scale Image window showing 200% scaling. Other scaling options are located in the drop-down list next to percent.
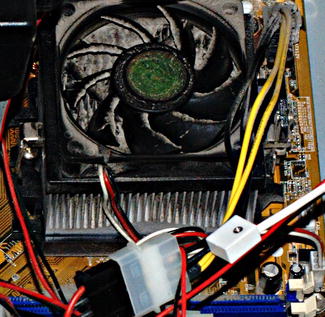
Figure 4-14. Computer fan before scaling up

Figure 4-15. Computer fan after scaling up 200%
Making an Image Smaller
GIMP's Scale Image option can also scale images down in size. Choose one of the following units to scale your image:
- Pixels
- Percentage
- Inches
- Millimeters
- Points
- Pica
There is a Scale Tool in the Toolbox. However, for these exercises, as mentioned earlier, we are using the Scale Image option located in the Image menu (Image ![]() Scale Image). The Scale Image option also has an area to change the resolution of an image.
Scale Image). The Scale Image option also has an area to change the resolution of an image.
- Go to the Scale Image option located in the Image menu, as shown in Figure 4-16.
Figure 4-16. To make an image smaller, go to Image
- In the pop-up window, choose pixel from the drop-down list near Width and Height, and type in the pixel width for your image (see Figure 4-17). Alternatively, you can scale down your image by choosing an option from the drop-down list.
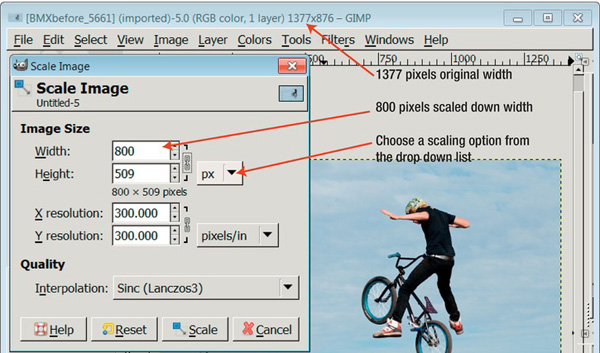
Figure 4-17. To scale down the image for a web site, pixels were chosen from the drop-down list.
- Click the chain link located next to Width and Height; this retains the correct proportions.
- For the method of scaling or interpolation, try Cubic or Sinc (Lanzcos3).
- Click Scale.
See Figures 4-18 and 4-19 for a before and after scaling example.
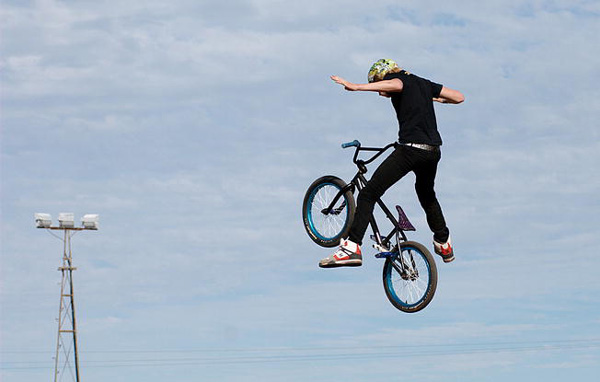
Figure 4-18. BMXer photo before scaling down for web site use

Figure 4-19. The BMXer photo scaled down to 800 pixels wide
Fixing Perspective: Leaning Buildings
GIMP has a powerful Perspective Tool. Use the Perspective Tool to correct a photo that has leaning buildings or towers or power poles etc. (see Figures 4-20 and 4-21)
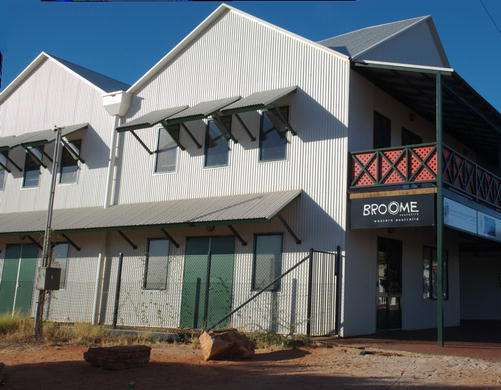
Figure 4-20. Leaning building before using GIMP's Perspective Tool
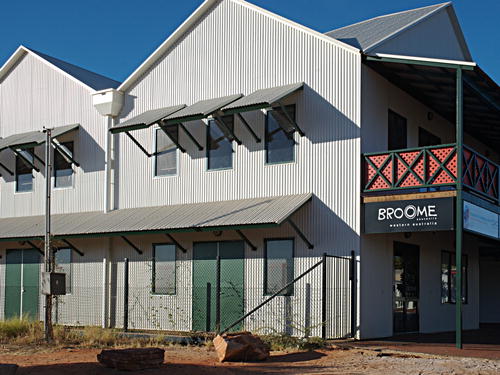
Figure 4-21. The same building after using the Perspective tool. Note that a small amount of the image has been cropped.
The following exercise shows you how to straighten an image. Once you have completed the exercise, feel free try different options in the tool.
To straighten a leaning building, follow these steps:
- Open your image in GIMP.
- Click on the Perspective Tool located in the Toolbox (see Figure 4-22).
- Below the Toolbox are the Tool Options for the Perspective Tool. Select the following Tool Options (see Figure 4-22):
- Direction: Corrective (Backward)
- Interpolation: Sinc (Lanczos3) - optional
- Clipping: Crop to result
- Preview: Image
- Guides: Number of lines, try 15

Figure 4-22. When the Perspective Tool is selected, the Tool Options for the Perspective Tool are available.
- Click on the image to activate the Perspective Tool. A grid will appear over the image and a pop-up dialog box will appear, as shown in Figure 4-22. Move the dialog box off the image so you can see what you are doing.
- Move the grid with your mouse, so that it lines up with vertical lines on your image.
- Click on Transform in the dialog box. If you're not happy with the result, you can go back a step in your Undo History or click Control+Z on your keyboard.
- Your image will have a hatched border down two sides (see Figure 4-23). This is because “Crop to result” was selected to give your image clean, straight edges.
- To remove this blank space, go to Image
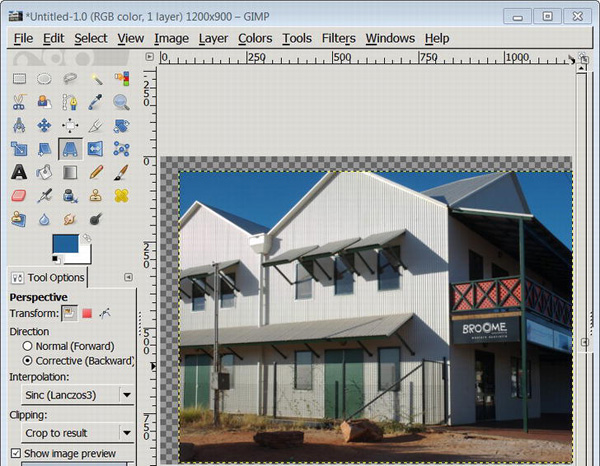
Figure 4-23. After the Transform, and with “Crop to result” selected, the image has a blank or transparent edge on two sides.
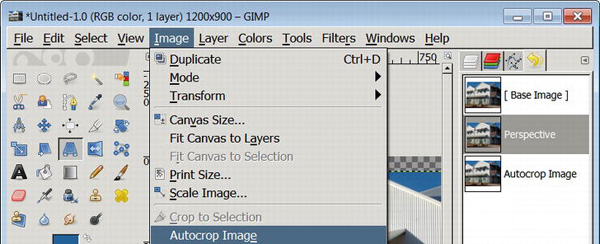
Figure 4-24. To remove the hatched border go to Image
- To save your image, go to File
Framing an Image
Adding a border to your image in GIMP is easy. Framing effects and other options are located in the Filters ![]() Decor menu. Figure 4-25 shows an example of the Border option. Figure 4-26 shows an example of the Round Corners option and the Slide border option.
Decor menu. Figure 4-25 shows an example of the Border option. Figure 4-26 shows an example of the Round Corners option and the Slide border option.
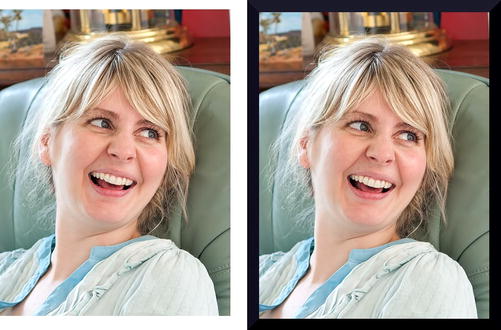
Figure 4-25. The image on the left has no border; the image on the right has a border.
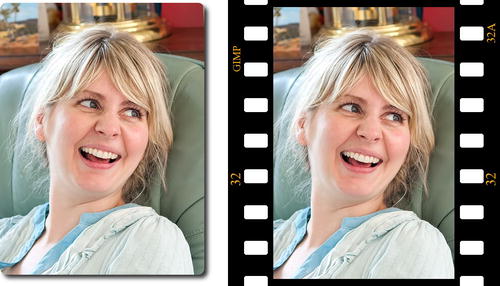
Figure 4-26. The image on left has round corners and the image on right has GIMP's Slide option.
To add a frame, follow these steps:
- Open an image in GIMP.
- Go to Filters
- To save your image, go to File
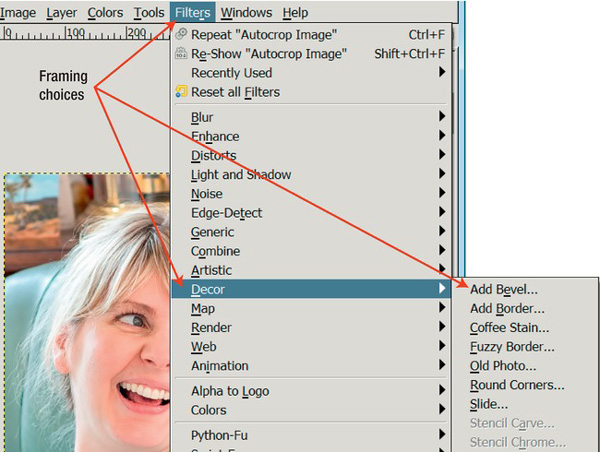
Figure 4-27. There are several framing effects available in the Filters
We will be looking at more filters throughout the book.
Summary
This chapter covers everything to do with the perimeter of your image. We showed you how to add a frame or border to your image and how to crop and resize an image. We also showed you how to straighten an image and correct perspective distortion. In the next chapter, you will learn how to fix problems in images.