
C H A P T E R 7
![]()
Setting Up a Graphics Tablet
In This Chapter
- The benefits of using a graphics tablet
- How to add a graphics tablet
- Setting up a graphics tablet
The Benefits of Using a Graphics Tablet
A graphics or digital tablet is a digital drawing tool for sketching or drawing with the aid of a computer. The tablet plugs into the computer and comes with a pen-like stylus that allows more artistic control than doing the same actions with a mouse. The stylus feels natural — not just while sketching but also while doing photo touch-ups.
When you draw on the tablet with your stylus, the drawing shows on your computer screen. The stylus is sensitive to pressure. A light stylus stroke shows on the screen as a light line and a stroke with heavier pressure shows as a darker and thicker line.
![]() Note GIMP supports all Wacom brand tablets
Note GIMP supports all Wacom brand tablets
How to Add a Graphics Tablet
There are three parts to setting up a graphics tablet in GIMP.
- Check you have the correct drivers for your tablet installed on your computer.
- Adjust access settings in the Input Device area of GIMP.
- To get pressure sensitivity working, check that Basic Dynamics in GIMP is selected.
Installing Graphic Drivers on Your Computer
If you have been using a graphics tablet on your computer for other programs, GIMP will probably automatically detect your tablet when it opens for the first time.
If you are using your tablet for the first time on your computer, here are some general tips to get your tablet operating in GIMP. Read the section that refers to your operating system.
Windows
If you have the device drivers for your graphic tablet installed, GIMP 2.8 (and later versions) automatically detects the tablet. Because every manufacturer designs and bundles driver packages for its software differently, we do not cover how to install a driver for your tablet under Windows. If you are not sure how to install your tablet driver, look online and follow the maker's instructions.
If your tablet does not work automatically, plug in your tablet before opening GIMP. Open GIMP and then follow the instructions in the ‘Setting Up Your Graphics Tablet’ section below.
Mac OS X
Install your tablet's drivers in the usual way. Plug in the tablet to your USB slot. Turn your computer on. Open GIMP and follow the instructions in the ‘Setting Up Your Graphics Tablet’ section.
Linux
The setup is automatic for most modern Linux distributions. For example, for Ubuntu, you plug the tablet into your computer's USB slot and then turn your computer on. Open GIMP and follow the instructions in the ‘Setting Up Your Graphics Tablet’ section.
For other Linux distributions, it should work automatically. If GIMP is not seeing your tablet, you may need to update the drivers.
With the drivers for your tablet installed, the next step is to add the tablet to GIMP's Input Device area.
Setting Up Your Graphics Tablet
If you have your tablet drivers installed, for most people the tablet will work automatically in GIMP.
If your tablet drivers are installed and the tablet does not work automatically:
- Plug your graphics tablet into your computer's USB slot.
- Open GIMP.
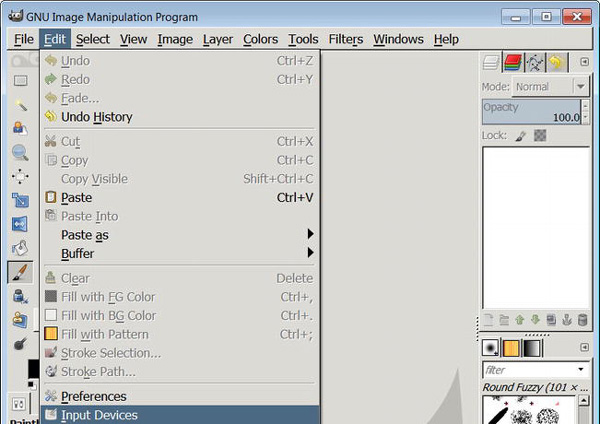
- Go to Edit
Input Devices. See Figure 7-1.
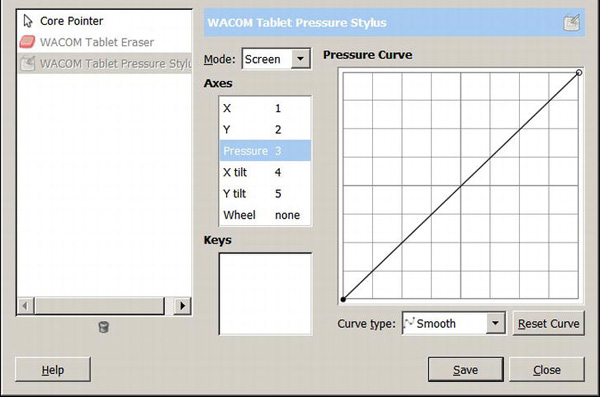
- In the Input Devices screen, your graphics tablet will appear on the left hand side of the screen. Figure 7-2 has a Wacom tablet showing as an ‘Input Device’ in GIMP.
Figure 7-2. The ‘Configure Input Devices’ area shows a Wacom tablet and a mouse (Core Pointer).
- In the Configure Input Devices area, select your graphics tablet.
- Under the ‘Mode’ drop-down list for the Pressure Curve, set the device to Screen (see Figure 7-2).
- Click Save and Close. (In the Input Devices area, you can safely ignore the Keys section. This is for mapping MIDI devices to the keyboard.)
![]() Note Other devices also work with GIMP. MIDI keyboards and shaped triggers can map to individual keys in GIMP. For example, you could change the opacity amount by pressing a key on the MIDI keyboard.
Note Other devices also work with GIMP. MIDI keyboards and shaped triggers can map to individual keys in GIMP. For example, you could change the opacity amount by pressing a key on the MIDI keyboard.
Troubleshooting Tips
If your graphics tablet doesn't show up in the ‘Configure Input Devices’ screen, try these tips:
- Check that you have GIMP 2.8 or later installed.
- Plug your tablet into the USB slot and then turn your computer on.
- Open GIMP.
Adding Pressure Sensitivity to Your Tablet
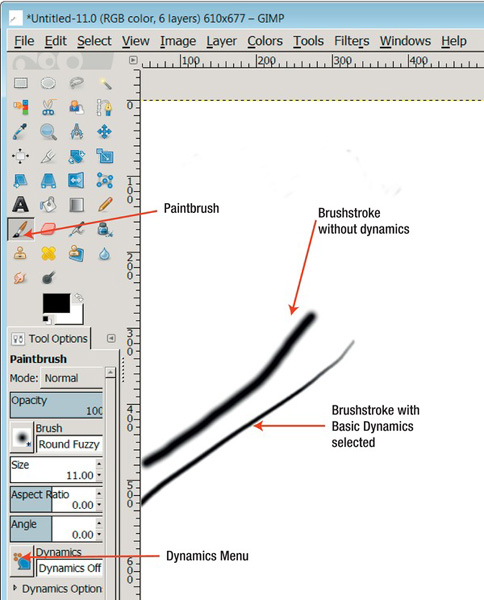
Adding pressure sensitivity to your graphical pen in GIMP helps you create natural looking strokes in paintings and drawings. In Figure 7-3, you can see a brushstroke without dynamics enabled and a stroke with dynamics enabled.
To add pressure sensitivity to your tablet's pen:
- Open a new canvas by going to File
- Go to the Toolbox and click on the Paintbrush. Try a Paintbrush stroke on your canvas (see Figure 7-3).
- Check your Paintbrush stroke against Figure 7-3. The top black brush stroke does not have pressure sensitivity enabled; the lower black brush stroke has pressure sensitivity enabled.
Figure 7-3. To enable Brush Dynamics, click on the Dynamics Menu and select Basic Dynamics.
- To add Dynamics, in the Tool Options for the Brush, click on the icon next to Dynamics Off. In the list of choices, select Basic Dynamics. Choosing Basic Dynamics will activate pressure sensitivity for your tablet's pen.
Basic Dynamics works on the Paintbrush, Pen and the Airbrush Tools located in the Toolbox. Activating Basic Dynamics in the P:aintbrush Tool Options also sets the dynamics for the Pen and Airbrush.
If this is the first time you have used your tablet, be patient. Looking at your monitor while drawing onto the tablet feels a little strange at first. Your lines might lean at one end. With practice, this will improve. The larger the tablet space, the easier drawing will be. However, larger tablets cost more.
Setting Up Your Tablet's Eraser
When the Eraser option is set up, you can turn the pen or stylus upside down and rub it on the tablet to erase unwanted parts of your work. This makes digital drawing very like using a pencil with an eraser attached to the top.
Follow these steps to set up the eraser:
- Turn your tablet's stylus upside down so the thicker end hovers over the tablet. You should see it hover on your screen.
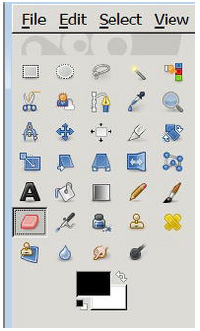
- With your stylus upside down, select the Eraser Tool in the Toolbox. The Eraser Tool is near the Brush Tool and looks like an eraser (see Figure 7-4).
Figure 7-4. The Eraser Tool is selected.
You should now have the GIMP eraser working at the thick end of your stylus. The pointy end of the stylus is available for the brush or other tools from the Toolbox.
Summary
This chapter showed how to set up a modern graphics tablet, how to enable the pressure sensitivity option for brush strokes, and how to assign GIMP's eraser function to the top of your stylus. The next chapter covers digital drawing. However, if negotiating around GIMP is new to you, it might be a good idea to look at Chapter 2, which is all about getting to know the GIMP workspace.