C H A P T E R 8
AppFabric Service Bus
In this chapter, you will learn details of the AppFabric Service Bus architecture. We will cover the concept of an Enterprise Service Bus, and introduce you to the AppFabric Service Bus. We will then cover the various ways of programming applications that use the Service Bus, both from the .NET Client API and a REST-based API. We will also look at the newest functionality addition, a new robust messaging system consisting of Queues and Topics. After reading this chapter, you should be able to use the AppFabric Service Bus in your own architectures.
![]() Note This is a large chapter. If you're already familiar with the concepts of an Enterprise Service Bus, you might want to skip ahead to “Introduction To the AppFabric Service Bus” section.
Note This is a large chapter. If you're already familiar with the concepts of an Enterprise Service Bus, you might want to skip ahead to “Introduction To the AppFabric Service Bus” section.
First, a Little Background. . .
Over the past decade, enterprises have invested heavily in upgrading their enterprise architecture by implementing several enterprise software patterns like Service Oriented Architecture and Enterprise Service Bus (ESB). These software patterns make application infrastructure loosely coupled and compatible across software boundaries. For example, Microsoft SharePoint server can integrate with Lotus Domino or EMC Documentum. You can also build custom business applications that can take advantage of these loosely coupled architectures. To make such integrations possible, Microsoft has defined four tenets1 as guidance:
- Services have explicit boundaries.
- Services are autonomous and deployed, versioned, and managed independently.
- Services share schema and contracts.
- Service compatibility is achieved by appropriate policy configuration.
These tenets are by no means comprehensive, but they give a good high-level framework for service-oriented enterprise architectures.
______________________________
1 John Evdemon. The Four Tenets of Service Orientation. Business Architectures and Standards, Microsoft Architecture Strategy Team, Thursday, May 19, 2005.
The ESB pattern is designed to offer service-oriented brokered communications of enterprise objects across enterprise applications. The design and implementations of ESBs varies in different organizations because by definition, ESB is a pattern and not a product. For example, I consulted with an enterprise where the ESB had an FTP interface. You could configure and schedule the ESB on the kind of data the subscriber systems needed from a publisher system. The ESB then queried the publisher system and provided an FTP endpoint to the subscriber systems. The architecture worked like a charm because the contract at the data level was defined in a set of enterprise schema, and the data communication medium was FTP, a well-known public protocol.
Even though these architectures work well in an enterprise environment, they can't easily cross enterprise boundaries and aren't designed for Internet scale. As applications move into the cloud, they still need to decouple themselves to keep the architectural tenets of the enterprise intact and make applications seamlessly accessible not only in the cloud but also on-premises.
Microsoft's attempt to create an Internet-scale Service Bus is an Azure Platform Service called AppFabric Service Bus. AppFabric Service Bus runs in the cloud and seamlessly connects cloud, enterprise, and consumer applications.
Enterprise Service Bus (ESB)
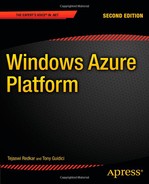
There is no generic architecture for an ESB, because it's a pattern and can be built as an add-on for already-existing Microsoft products like BizTalk Server, MSMQ, Windows Communications Foundation (WCF), and SQL Server. Every company that makes a product conforming to the ESB pattern has a different definition of ESB. I define the ESB pattern as follows: “ESB is an enterprise architecture pattern that defines the connectivity, contracts, and communication of business objects across enterprise applications.”
The definition is depicted in Figure 8-1.
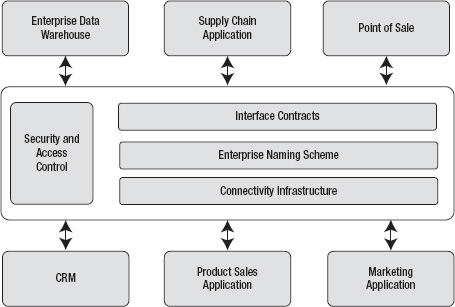
Figure 8-1. Enterprise Service Bus pattern
As in my definition, an ESB offers the following four core services:
- Security and Access Control
- Connectivity Infrastructure
- Enterprise Naming Scheme
- Interface Contracts
These are discussed in the sections that follow.
Security and Access Control
The Security and Access Control service offers communication as well as message-level security for interacting with ESB endpoints. An ESB usually integrates with the enterprise identity providers but may have an integrated identity provider. All applications must pass through this layer before interacting with the ESB.
Connectivity Infrastructure
The connectivity infrastructure defines the mechanisms and endpoints of an ESB to communicate business objects across enterprise applications. These endpoints may be any public or private protocols conforming to enterprise standards. In enterprises, I have seen ESBs with a connectivity infrastructure based on protocols like FTP, HTTP, TCP-Sockets, SOAP, and even REST.
Enterprise Naming Scheme
To communicate business objects across enterprise applications, you need an enterprise standard for defining naming schemes for objects. For example, a Product object must have a single schema across the enterprise. The URI scheme for accessing these objects in an ESB should also be standardized.
ESB can define the URI scheme for accessing business objects. For example, the URI of a specific product object may be of the format /MyEnterprise/MyProducts/T-Shirts["ProductId"]. ESB can translate this schema and make it usable across any connectivity infrastructure. For example, in an HTTP-based interface, you can access the product using the URI http://mysystem/ MyEnterprise/MyProducts/T-Shirts["ProductId"], whereas in an FTP-based interface, you can access the serialized object in a file /MyEnterprise/MyProducts/T-Shirts/[“ProductId”].xml. Enterprise schemes not only define a uniformed way of accessing business object, but also offer simple business rules and filters within the scheme.
Interface Contracts
ESB acts as a broker of business objects across business applications. One business application can access the methods and objects of another business application in a loosely coupled manner. The ESB interface contracts define the standard contracts for invoking methods on the ESB as well as other business systems. For example, I have a marketing reporting application that needs access to daily sales data on a periodic basis, but sometimes I also want to know real-time sales figures by accessing real-time sales data on demand. ESB can define interface contracts that the source and destination systems can adhere to while making asynchronous and synchronous invocations.
Evolution of the Internet Service Bus (ISB)
ESB clearly has challenges in the cloud as well as in cross-organization scenarios. Current ESBs aren't designed to offer the scalability and availability required by cloud applications. In cross-organization scenarios, ESB may somehow integrate the connectivity infrastructure and interface contracts, but it faces significant challenges in integrating security and enterprise naming schemes. Porting enterprise schemes becomes difficult across enterprises, and most applications need to be rewritten to work with different enterprise schemes. To make the security service in ESB work across organizations, ESB needs to integrate with the security provider of another enterprise. ESBs aren't designed to work across security realms and thus usually aren't recommended to be used across enterprises. With the enterprise push toward cloud services, it's important to offer a Service Bus in the cloud that can be used by enterprises as well as consumer applications at an Internet scale.
Some years back, I designed an Internet Service Bus (ISB) specifically to collect data from energy devices in homes and commercial buildings. At that time, I called it Energy Bus, but essentially it was an ISB with some limitations. I deployed this ISB as part of an overall service in a data center. The service was designed for high scalability and availability with multiple clustered nodes at the infrastructure as well as database level. The business purpose of the service was to collect energy data from thousands of homes and commercial buildings and offer energy-management services to end users through utility companies. For example, you as a homeowner could control your home devices like lighting, security, HVAC, and coffee maker over the Internet. At the same time, devices in the house could call the energy service in the cloud to send energy usage logs (kWh values) and alarms (fire alarm, burglar alarm, and so on). The entire architecture was build around the concept of an Internet Service Bus with Microsoft Message Queuing (MSMQ) as its backbone communications engine. Figure 8-2 illustrates the high-level architecture of the ISB.
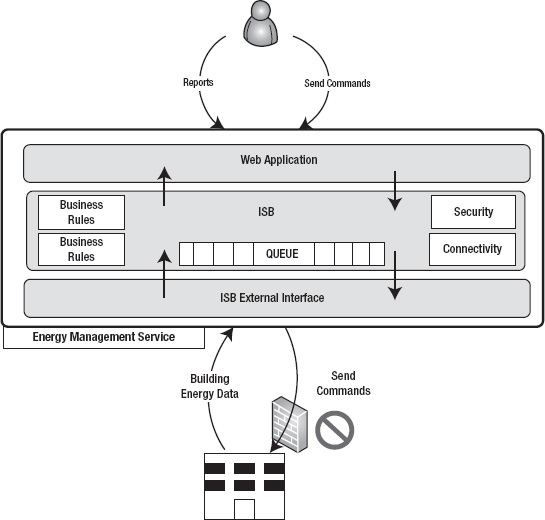
Figure 8-2. Energy management service ISB
As shown in Figure 8-2, end users could generate reports on their energy data and also get and set values of energy-consuming devices in buildings and apartments. The ISB provided the connectivity and interfaces between the devices in the buildings and cloud. Two of the biggest challenges I faced in designing the service were as follows:
- Connectivity: Because of the nature of the service, one of its core functions was providing real-time connectivity between devices and the service. Most often, devices were behind firewalls or network address translation (NAT) routers. Even though communication from the device to the service was seamless, communication from the service to the device was always challenging. Opening firewall ports to the devices wasn't an option in many cases due to customers' security policies. So, ISB communication couldn't penetrate the firewall, and communications failed. As a workaround, the developers had to tunnel communications through only the ports that were allowed through the firewall, or build a proxy server on the customer site that polled the cloud service on a periodic basis to receive commands from ISB.
- User profiles: Customers wanted their existing user profile stores to synchronize with the cloud securely, rather than creating all the user profiles from scratch. As a workaround, I ended up building a profile import and synchronization server that periodically synchronized the user profiles from the customer's Active Directory with the service database in the cloud. Because the service was deployed in the cloud and was available for multiple customers, it couldn't directly integrate with any identity providers.
If Microsoft's AppFabric Service Bus had been available at the time, both these challenges would have been non-existent because the Service Bus is designed to address these exact challenges. The AppFabric Service Bus provides access control, naming, service registry, messaging, and connectivity services at Internet scale. It enables bidirectional communications between on-premises and cloud application through relay service capabilities. The relay service runs in the cloud, and interested parties register themselves with it to communicate with each other. The Service Bus determines the best connectivity method by either using outbound bidirectional sockets connections from the service to the Service Bus when a firewall is present, or establishing a direct connection between the client and the service when there is no firewall.
Some of the applications you use today may already support bidirectional communication through NAT traversal. Internet client applications like Windows Live Messenger, Kazaa, BitTorrent, Xbox Live, and some Universal Plug and Play clients (UPnP) can traverse through firewalls using Relay Service.
Relay Service
A relay service is a central service running in the cloud that provides a rendezvous connection point between the client and the service. In networking terms, the rendezvous address is a common meeting point for two connections. Figure 8-3 shows typical relay service communications between client and service.
As shown in Figure 8-3, the relay service runs in the cloud and offers connection endpoints to the message client and service. A client opens an outbound connection to the relay service. The service opens a bidirectional outbound connection to the relay service and receives a rendezvous connection endpoint that is shared with the service. The outbound bidirectional connection from the service makes it possible for the service to receive messages on an outbound connection without opening inbound ports in the firewall or NAT routers. The client sends a message to the relay service that is routed by the rendezvous connection point to the service over the outbound connection. Thus, the relay service makes it possible for clients and services to communicate through firewalls.
With the advancements in networking APIs in frameworks like the .NET Framework, it isn't difficult to build a relay service and bidirectional sockets in your applications. The real challenge is to build a relay service at Internet scale for applications around the world. In this chapter, you see how the AppFabric Service Bus provides an Internet scale Service Bus with relay capabilities.
Introduction to the AppFabric Service Bus
Microsoft's AppFabric Service Bus is an Internet-scale Service Bus that offers scalable and highly available connection points for application communication. The AppFabric Service Bus is designed to provide connectivity, queuing, and routing capabilities not only for the cloud applications but also for on-premises applications. It also integrates with the Access Control Service (ACS) to provide secure relay and communications. Figure 8-4 illustrates the architecture of the AppFabric Service Bus.
![]() NoteTo see a Field note describing how Service Bus was used to connect an Azure application to a FAST search engine on-premises, go to
NoteTo see a Field note describing how Service Bus was used to connect an Azure application to a FAST search engine on-premises, go to http://www.microsoft.com/windowsazure/learn/real-world-guidance/field-notes/integrating-with-service-bus-and-port-bridge/.
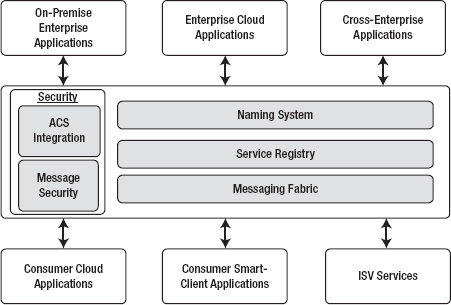
Figure 8-4. AppFabric Service Bus architecture
As shown in Figure 8-4, the AppFabric Service Bus consists of four main services that can be used by different kinds of on-premises as well as cloud services. They are as follows:
- Security
- Naming service
- Service registry
- Messaging fabric
Security
As you read in Chapter 1, one of the biggest concerns of enterprises in moving applications to the cloud is security. At Internet scale, where millions of frauds and hacks occur on a daily basis, secure communication across applications is absolutely necessary for enterprises. An on-premises environment is governed and controlled by corporate policies, and prevention is preferred to cure. In the cloud, systems, applications, and data are exposed and prone to not only external but also internal threats. To overcome this barrier, the AppFabric Service Bus offers the following two main options for securing the transport of messages from clients to services:
- Access Control Service (ACS) integration
- End-to-end security
ACS Integration (Relay Authentication)
Microsoft has integrated the AppFabric Service Bus with ACS to provide relay authentication and authorization. The message sender and message receiver have to pass security checks before connecting to the AppFabric Service Bus. Services (or receivers) must be authenticated either by ACS or an identity provider trusted by ACS before establishing a connection to the AppFabric Service Bus. By default, the clients (or senders) require relay authentication but can be optionally exempted from authentication by services. The client authentication type may be different than the service authentication type. For example, a client can authenticate using a shared secret, whereas a service can authenticate using a SAML token. Three types of authentication are currently available with ACS: shared secret, SAML token, and simple web tokens (SWTs). Figure 8-5 illustrates the Service Bus integration with ACS.
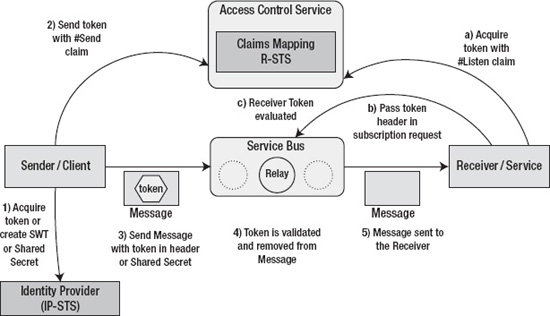
Figure 8-5. AppFabric Service Bus and ACS integration
As shown in Figure 8-5, the client and service both have must be authenticated with ACS before connecting to the Service Bus. The authentication for client and service takes place separately and isn't dependent on the other. The client authentication process is as follows:
- The client acquires a SAML token from a SAML token provider or creates an SWT token or uses a shared secret to authenticate with Service Bus.
- The client sends an authentication request to ACS and acquires a #Send claim from ACS. After it is authenticated, the client receives a token containing the #Send claim. AppFabric Service Bus is preconfigured to validate only the #Send claim from a client application.
 Note For more information about ACS, please refer to Chapter 7.
 - The token with the #Send claim is embedded into the header of the message sent to the Service Bus relay service.
- The relay service validates the token and removes it from the message header. Because AppFabric Service Bus is the relying party in this scenario, as seen in the previous chapter, ACS encrypts the token with a public key, and Service Bus decrypts the token with a private key. During solution provisioning, trust between ACS solution and Service Bus is already established by the AppFabric portal.
- The relay service sends the message (without the token) to the service.
The service also has to authenticate itself with ACS before connecting to the AppFabric Service Bus. The service authentication process is as follows:
- The service sends an authentication request to ACS and acquires the #Listen claim from ACS. Similar to the client, the service can authenticate with any identity provider trusted by ACS.
- The token with the #Listen claim is embedded in the subscription request to the AppFabric Service Bus relay service.
- The relay service validates the token and lets the service open a bidirectional outbound connection to the relay service.
Optionally, you can turn off the client authentication by specifying it in the service-binding configuration as shown in Listing 8-1.
Listing 8-1. Turning Off Client Authentication
<binding name="default">

    <security relayClientAuthenticationType="None" />

  </binding>
The RelayClientAuthenticationType.None value specifies that clients of the service aren't required to present any token issued by the ACS. Usually, you set the RelayClientAuthenticationType.None value if you want the service to authenticate and authorize the clients and the AppFabric Service Bus authentication is adding unnecessary overhead to the service without adding any value. The default value for the relayAuthenticationType attribute is RelayAccessToken.
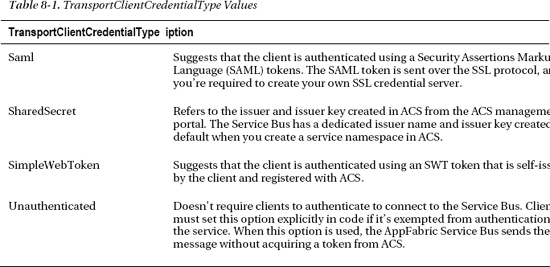
TransportClientEndpointBehavior is a class in the Microsoft.ServiceBus namespace that describes the WCF behavior of a particular endpoint registered with the Service Bus. The CredentialType property of the TransportClientEndpointBehavior class specifies the type of authentication you use for the endpoint. AppFabric Service Bus API offers TransportClientCredentialType enumeration with four different values for relay authentication, as shown in Table 8-1.
The services and clients can choose authenticate using any of the configured types. In the examples later in the chapter, I show you how to implement these options in your code.
As you read in the previous chapter on ACS, ACS creates dedicated Service Bus endpoints in your service namespace. Figure 8-6 shows the Service Bus section from the service namespace page of your account.
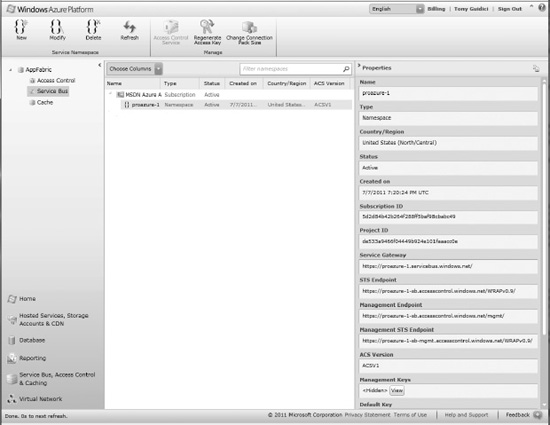
Figure 8-6. Service Bus solution in ACS
You can map incoming and outgoing claims in ACS to authenticate your clients and/or services. Thus, ACS integration provides The AppFabric Service Bus with the ability to authenticate with any identity provider and participate in a claims-based identity model for authorization.
Message Security
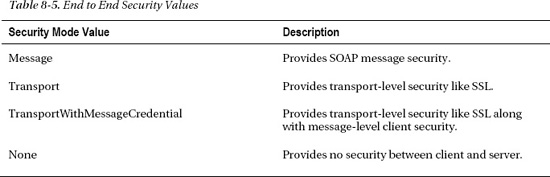
Relay authentication is geared toward authenticating clients and services to communicate with the AppFabric Service Bus. But a true enterprise solution is incomplete without security of the message that travels between the communicating parties. Message security refers to the security of the message that travels from the source through the AppFabric Service Bus to the destination. The AppFabric Service Bus offers four options for securing messages between the clients and services. The enumeration Microsoft.ServiceBus.EndToEndSecurityMode in the AppFabric Service Bus API defines four security modes, as shown in Table 8-2.
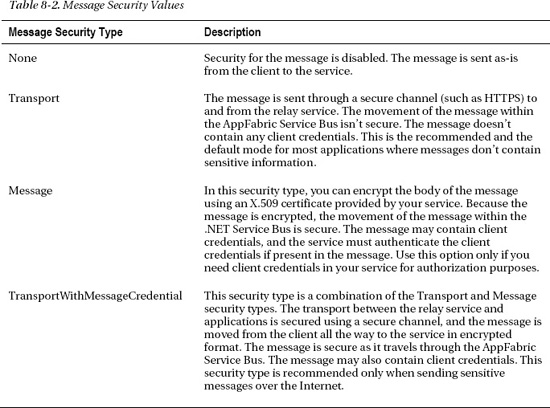
![]() Note Message security is independent of relay security. Relay security is used to connect with the AppFabric Service Bus, whereas message security refers to the security of the message that traverses through the AppFabric Service Bus.
Note Message security is independent of relay security. Relay security is used to connect with the AppFabric Service Bus, whereas message security refers to the security of the message that traverses through the AppFabric Service Bus.
Naming Service
The Naming service allows you to assign DNS-capable names to your service, which makes the service easily resolvable over the Internet. The Internet is based on the Domain Name System (DNS) where every resource on the Internet can be resolved using the DNS name and relative path. For example, in the URL www.microsoft.com, microsoft.com is the registered domain name for Microsoft's web site. HTTP is the protocol used for accessing the web site. Similarly, http://msdn.microsoft.com is the registered domain name for MSDN site. The msdn part of the URL is called a subdomain of microsoft.com, and microsoft.com itself is called a root domain. DNS follows a hierarchical structure where one root domain can consist of many subdomains to form a tree structure. For example, social.msdn.microsoft.com adds one more level (social) under msdn to the microsoft.com domain hierarchy.
The Internet DNS system was designed for reference to static resources like web pages and web sites where the application may change but the domain name remains the same. In the cloud services world, there can be multiple unique cloud services and subservices that can register and unregister themselves from the DNS depending on the cloud service requirements. Companies can use the AppFabric Service Bus on-premises as well as off-premises. In case of on-premises services, companies can register unique domain names for services; but for off-premises services, companies must invest in infrastructure and internal naming schemes for identifying these services uniquely on the Internet.
The AppFabric Service Bus offers a DNS-compatible naming system for assigning unique Internet URIs to cloud as well as on-premises services. The AppFabric Service Bus defines a root domain name that can be resolved through the Internet DNS, but offers a service namespace-based naming hierarchy below the root. For example, in the Service Bus naming system, servicebus.windows.net is the root domain of the Service Bus. If you have ten service namespaces you want to register with the Service Bus, all ten service namespaces automatically receive URIs for cloud as well as on-premises services. If you name your namespaces solution1, solution2, …, solution10, then each solution has its own URI name:
solution1.servicebus.windows.net
solution2.servicebus.windows.net
….
solution10.servicebus.windows.net
Figure 8-7 shows an example hierarchical naming tree structure in the AppFabric Service Bus.
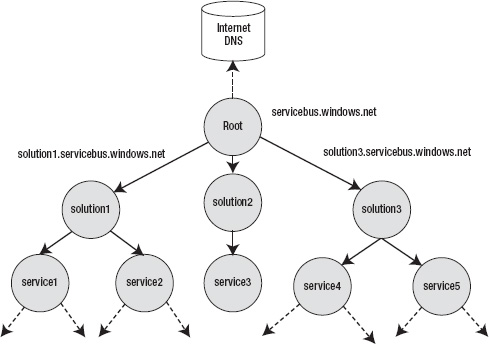
Figure 8-7. Hierarchical naming structure
You, the service namespace owner, have complete control over the naming hierarchy under the Service Bus root node. The naming scheme for the URI formation is
[scheme]://[solution-name].servicebus.windows.net/[name]/[name]/...
where [scheme] is the protocol for accessing the service. AppFabric Service Bus supports two URI schemes: http and sb. http is used for all HTTP-based communications between clients and services, whereas sb is used for all TCP-based communications between clients and services. [solution-name] is the unique solution name across the entire AppFabric Service Bus namespace. Because this name is the subdomain under the AppFabric Service Bus root domain, this needs to be unique across the entire AppFabric Service Bus namespace. You can choose any solution name while creating the account. For example, the solution I use in this chapter is the ProAzure solution. The name ProAzure is unique across the entire AppFabric Service Bus namespace. You can reference the ProAzure namespace in AppFabric Service Bus as http://proazure.servicebus.windows.net or sb://proazure.servicebus.windows.net.
[name] is the user-defined virtual name for a service or a hierarchical structure pointing to a service. You can create any hierarchical structure using the user-defined namespace. For example, if you're offering an energy management service in different cities around the world, and you have deployed different instances of you service, you can assign unique names to these service instances based on the names of the cities as follows:
http://proazure.servicebus.windows.net/sanfrancisco/energy
http://proazure.servicebus.windows.net/newyork/energy
http://proazure.servicebus.windows.net/london/energy
You can also further extend the hierarchy by offering subservices like
http://proazure.servicebus.windows.net/sanfrancisco/energy/reports
http://proazure.servicebus.windows.net/sanfrancisco/energy/realtime
http://proazure.servicebus.windows.net/sanfrancisco/energy/logs
All these URIs point to endpoints of services hosted in these cities. The physical location of these URIs is transparent not only to applications but also to each other. The http://proazure.servicebus.windows.net/sanfrancisco/energy/reports service may be hosted in a totally separate location from the http://proazure.servicebus.windows.net/sanfrancisco/energy/realtime service. The AppFabric Service Bus internally resolves the actual location of the service endpoints at runtime. Thus, the AppFabric Service Bus allows you to create an infinitely deep hierarchical naming structure referencing endpoints of cloud as well as on-premises services. It also abstracts the DNS registration and resolution for your services and applications calling these services.
Service Registry
The AppFabric Service Bus provides a registration and discovery service for service endpoints called the service registry. The service endpoints can be in the cloud or on-premises. The service registry offers an Atom feed to your solution. You can register a service endpoint into the Atom Feed using either the Atom Publishing Protocol (APP)2 or WS-Transfer3 references. APP and WS-Transfer both support publishing, listing, and removing the service endpoints. The client application can then discover your service endpoint references by simply navigating Atom 1.0 feed of your solution. The Atom 1.0 feed exposes a tree-like structure you can manually or programmatically navigate to get to the leaf node of the service endpoint. You can also programmatically register a service endpoint for public discovery by setting the DiscoveryMode property of the Microsoft.ServiceBus.ServiceRegistrySettings object to Public and associating it with the service endpoint behavior as shown in Listing 8-2. In this approach, the AppFabric Service Bus relay service automatically registers the service endpoint for you in the service registry.
Listing 8-2. Associating ServiceRegistrySettings
class Program

{

    static void Main(string[] args)

    {


        ServiceHost host = new ServiceHost(typeof(EnergyManagementService));

        ServiceRegistrySettings settings = new ServiceRegistrySettings();

        settings.DiscoveryMode = DiscoveryType.Public;

        foreach(ServiceEndpoint s in host.Description.Endpoints)

            s.Behaviors.Add(settings);

        host.Open();

        Console.WriteLine("Press [Enter] to exit");

        Console.ReadLine();

        host.Close();

    }

}
The default setting for the public discovery is set to private, so if you don't set the discovery type to public, your service won't be discoverable publicly. After you register the service endpoint, you can view the Atom feed of your Service Bus registry by navigating to the AppFabric section of the Azure management portal, and clicking the Service Bus item under AppFabric in the navigation tree. You'll see the endpoint information on the right, as shown in Figure 8-8.
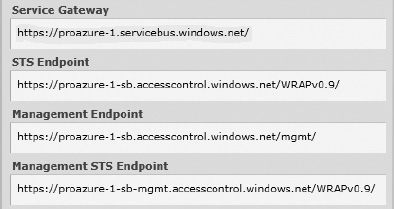
Figure 8-8. Service Bus registry link
______________________________
2 Atom Publishing Protocol Reference: www.ietf.org/rfc/rfc5023.txt.
3 WS-Transfer Specification: www.w3.org/Submission/WS-Transfer/.
Figure 8-9 shows the Atom feed for the publicly listed services in the ProAzure solution.

Figure 8-9. Service Bus registry for the ProAzure solution
The Service Bus registry shows only one registered service. I revisit the Service Bus Registry later in the examples in this chapter.
Messaging Fabric
The messaging fabric enables the relaying and communication of messages between clients and services. The messaging fabric makes it possible to expose your service endpoints into the cloud for on-premises as well as cloud deployed services. The messaging fabric also integrates with ACS to provide message level security.
The relay service is the core component of the AppFabric Service Bus messaging fabric. The relay service makes it possible for the client and services to communicate behind firewalls and NAT routers. As the name suggests, the relay service plays the role of relaying messages from clients to the services by assuming the responsibility of receiving the messages from the clients and delivering it to the services. The services can be running in the cloud or on-premise. As long as the endpoints of the services are registered in the service registry of the AppFabric Service Bus and are reachable, the relay service forwards the message. In simple terms, the relay service is like a postman who delivers the message from the client to the service. As long as the services address is valid and in the USPS registry, the postman delivers the mail. The only difference is that the postman is an asynchronous communication whereas the relay service defines a synchronous communication. This means the relay service requires the server to be available in most of the cases when the client sends a message.
The relay service supports the following types of communications between the clients and the services:
- Publish/Subscribe messaging
- Peer-to-peer communications
- Multicast messaging
- Direct connections between clients and services
Figure 8-10 illustrates the communication process that takes place between the client, the service, and the AppFabric Service Bus relay service.

Figure 8-10. AppFabric Service Bus relay service
As shown in Figure 8-10, the service opens an outbound connection with a bidirectional socket to the AppFabric Service Bus relay service. The service registry registers the listener's endpoint in its naming tree for client applications to resolve. Most the AppFabric Service Bus listener bindings require the following TCP ports opened on firewall or the NAT router for outbound communication: 808, 818, 819, 828, 80, and 443.4
Note that you don't need to open any inbound ports in your firewall or NAT router for the end-to-end communication to work when using the AppFabric Service Bus. Therefore, the listener application can be running behind a firewall, NAT router, and even with a dynamic IP address. The client application initiates an outbound connection to the relay service with the appropriate service address that can be resolved from the service registry. The AppFabric Service has a load-balanced array of nodes that provide the necessary scalability to the client and service communications. When the client sends a message to the service, the message is relayed by the relay service to the appropriate node that is holding reference to the listener's endpoint. Finally, the relay service sends the message to the service over the listener's outbound bidirectional socket.
______________________________
4 Port information available in the AppFabric SDK: http://msdn.microsoft.com/en-us/library/dd582710.aspx.
The AppFabric Service Bus URI naming scheme restricts listeners from registering more than one listener on a URI scope. For example, if you have a service with the URI /energy/california, you can't register any listener with a URI suffix of /energy/California—/energy/california/sanfrancisco, /energy/california/sanramon, and so on. You can register a service with the same URI root address, such as /energy/sanfrancisco or /energy/sanjose. The AppFabric Service Bus uses the longest-prefix match algorithm to relay messages to the services. The longest URI under URI scope is evaluated and used to relay the message. So, in your service, you can process the entire URI suffix directory for query processing or filtering.
AppFabric Service Bus Bindings
The AppFabric Service Bus SDK comes with an API for programming AppFabric Service Bus applications. The namespace for AppFabric Service Bus classes is Microsoft.ServiceBus. The AppFabric Service Bus supports bindings similar to Windows Communications Foundation (WCF) bindings. Microsoft architected the AppFabric Service Bus with the vision of supporting the existing WCF programming model so that WCF developers can design and develop services for AppFabric Service Bus with their existing skill sets. The fundamental difference between AppFabric Service Bus bindings and WCF bindings is at the transport level, which is completely opaque to the programming model. The AppFabric Service Bus API provides binding classes that can be used in your WCF applications for binding to the AppFabric Service Bus relay service.
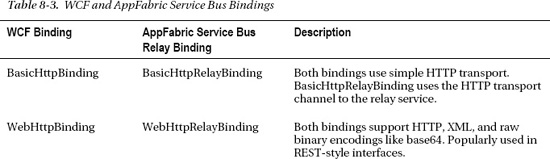
In traditional WCF applications, the service runs with specified bindings on local or remote servers, and client applications connect to the services directly. In traditional WCF, the notion of a relay service doesn't exist. Most of the standard WCF bindings have a direct match in the AppFabric Service Bus bindings. Table 8-3 lists the WCF bindings and the AppFabric Service Bus bindings side by side.
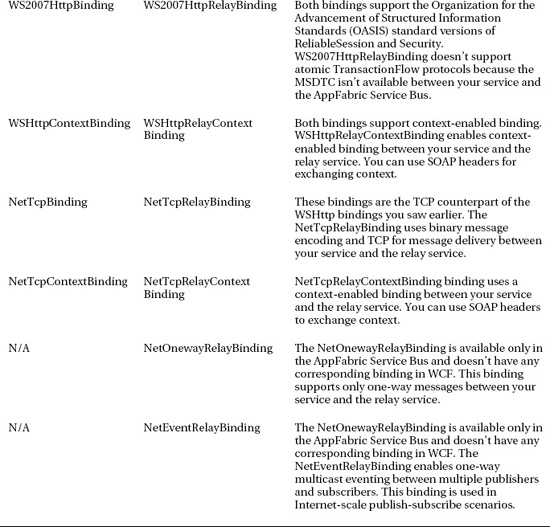
The AppFabric Service Bus Relay bindings offer you a complete spectrum of choices when you're selecting a high-performance binding like the NetTcpRelayBinding or a more interoperable and flexible binding like the WSHttpRelayBinding. All the bindings depend on the relay service to decide the message communication path between the clients and the services.
Message Buffer
The AppFabric Service Bus bindings for the WCF-style communications are designed for synchronous communications between the sender and the receiver. This means the receiver must be running to receive the message sent by the sender; otherwise, the message will get lost. The relay service doesn't contain a message store for storing and forwarding messages sent by senders to receivers. At Internet scale, the existence of the senders and receivers 100% of the time is an unrealistic expectation because senders and receivers depend on external and internal dependencies like server availability, on-premises network resources, network availability, bandwidth, and so on, that pose a significant availability risk for synchronous communications.
The AppFabric Service Bus offers a message buffer service for storing messages in a temporary cache for asynchronous communication between clients and servers. The AppFabric Service Bus buffers expose the REST API for applications to create a message buffer, send messages to the message buffer, and retrieve messages from the message buffer. The messages stored in a message buffer on the server don't survive server reboots. The message buffers themselves are replicated across multiple servers to provide redundancy, but messages stored in message buffer are stored in the server memory and are lost when the server reboots or crashes. When you design your application to use a message buffer, you have to design redundancy into the application. If you need redundancy for your messages in the server, you should consider using either Windows Azure Queue storage or SQL Azure. The message buffer also uses ACS authentication to authenticate client applications.
Queues and Topics
Released with AppFabric SDK 1.5 are two new features called Queues and Topics. Queues provide a durable messaging mechanism, and Topics builds upon the queuing structure by adding the ability to create topics for which consumers can create rules by which to filter messages. This provides a robust pattern for delivering messages to multiple subscribers with a publish-subscribe pattern. These will be discussed in-depth below in the section “AppFabric Messaging Queues and Topics.”
![]() Note Queues and Topics are replacing Message Buffers, which will be deprecated in future releases.
Note Queues and Topics are replacing Message Buffers, which will be deprecated in future releases.
Programming with the AppFabric Service Bus
This section dives into programming applications with the AppFabric Service Bus. The AppFabric Service Bus API provides WCF-like bindings for senders to send messages to receivers via the relay service. The job of the relay service is to receive messages from the sender(s) and relay those messages to the appropriate receiver(s). The AppFabric Service Bus bindings you saw in the previous sections consist of all the communication logic to communicate with the relay service. From a programmer's perspective, you must understand the limitations of and differences between WCF bindings and AppFabric Service Bus bindings in order to program AppFabric Service Bus applications. The WCF-like programming model reduces the barriers to entry for .NET developers and also enables easy porting of existing WCF applications to the AppFabric Service Bus.
The steps to create an AppFabric Service Bus application are as follows:
- Create an AppFabric Service Bus namespace by doing the following:
- Navigate to http://windows.azure.com in your browser, and log in using your LiveId.
- Choose Service Bus, Access Control, & Caching from the lower left hand pane.
- If not already expanded, expand the AppFabric tree node by clicking the Arrow/triangle next to it.
- Select the Service Bus node by clicking on it.
- Click the New button on the upper left to create a new namespace. To modify an existing namespace, select it in the middle pane, and then click Modify. You should see the dialog shown in Figure 8-11.
- Provide a name for your namespace, a region/Country (i.e., data center) in which it will be located and, if desired, a Connection Pack size. Connection packs provide discounts if you are willing to subscribe to a certain number of connections every month. Be sure you need then because you will be charged for them every month whether they are used or not.
- Design AppFabric contracts between the servers and the clients.
- Implement the service contracts.
- Design a bindings plan between the servers and clients for complex services using multiple bindings. This plan lists the AppFabric Service Bus bindings used for every message communication.
- Create a security plan for relay- and message-level security between the clients and the servers. Some of the popularly used security scenarios include the following:
- X.509 certificates for message security
- ACS integration with a third-party identity provider (Windows Identity Foundation, ADFS v2.0, LiveID, and so on)
- ACS integration with a client generated SWT token
- ACS integration with a shared issuer key
- Custom message security
- Design endpoints for the service.
- Design service hosting. This design includes whether the service will be hosted on-premises or in the cloud.
- Design the scalability and availability for the service.
- Design client applications for the service contract.
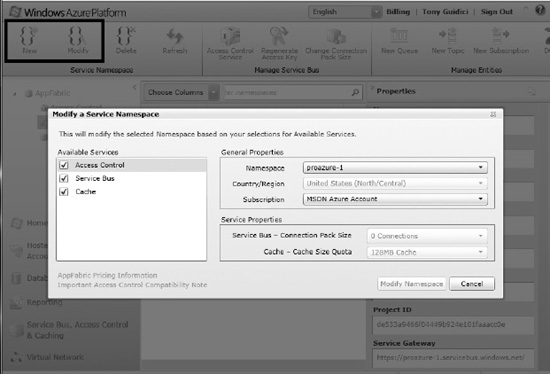
Figure 8-11. Modifying an existing Service Bus namespace.
The relay bindings are the core concepts for programming AppFabric Service Bus applications. This section covers relay bindings, queues, and routers. For the purpose of demonstration, I use a simple energy-management service that puts the AppFabric Service Bus's capabilities in a business context.
ProAzure Energy Service Example
ProAzure Energy is a sample service I use in most of the demonstrations in this chapter. The ProAzure Energy service offers utility companies energy-related data from consumer and commercial buildings. For the purpose of this demo, assume that the ProAzure Energy service offers the following three services to the utility companies:
- Energy meter monitoring: A control gateway device monitors the energy meters in buildings and sends energy meter values to the ProAzure Energy head-end software periodically. The utility companies can then access these values through a subscription service.
- Lighting monitoring and control: A control gateway device in buildings monitors the light switches using a control network protocol. The gateway device accepts ON/OFF commands from the ProAzure head-end software to turn the lights on and off, respectively. The gateway device also send real-time light-switch values to the head-end software when an ON or OFF switch event takes place on the switch either manually or programmatically.
Note Assume that the control gateway device is control-network-protocol agnostic. That means it supports all control network protocols over power lines to communicate with the energy devices. The gateway has Internet connectivity on one side and control network connectivity on another.
- Heating Ventilation Air Conditioning (HVAC) monitoring and control: A control gateway device in buildings monitors the HVAC devices using a control network protocol. The gateway device accepts the following HVAC commands:
- SETPOINT: Changes the set point of the HVAC to the specified value in degrees Fahrenheit (°F).
- HEAT: Sets the HVAC value to heating mode.
- COOL: Sets the HVAC value to the cooling mode.
- OFF: Sets the HVAC value to the OFF mode.
- The control gateway device also sends the set-point value, temperature, and heat/cool HVAC value to the ProAzure head-end software when it changes locally or on a periodic basic.
Figure 8-12 illustrates the high-level architecture of the ProAzure Energy service.
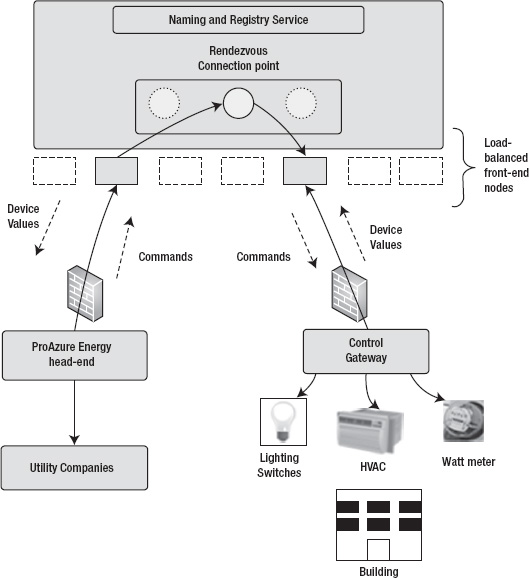
Figure 8-12. ProAzure Energy service architecture
Some of the important characteristics of the ProAzure Energy Service are as follows:
- The service monitors thousands of control gateways, which in turn manage energy devices in buildings.
- The control gateways communicate with the AppFabric Service Bus relay service to send and receive messages.
- The control gateways are clients of the head-end server as well as servers to receive commands from the head-end server.
- The control gateways may be behind firewalls.
- The ProAzure head-end server can be hosted either in the cloud in Windows Azure or on-premises at the ProAzure Energy service data center.
- The ProAzure Energy service head-send server uses the AppFabric Service Bus relay service to send and receive messages.
In addition to the device commands, the control gateway also supports the following commands for its own configuration and monitoring:
- ONLINE: Periodically, the control gateway sends an online message to let the head-end know of its continued availability.
- UPLOAD_SOFTWARE: This command is used to upload the software on the control gateway.
In the following sections, you learn how to leverage different AppFabric Service Bus bindings, queues, and routers to implement the ProAzure Energy service.
NetOnewayRelayBinding
NetOnewayRelayBinding supports one-way messages from client to the server. The method signatures for one-way methods in the service contract must not return any values. One-way methods are optimized for one-way TCP communications between the senders to the relay service and then to the receivers. The default size of the message is set to 65,536 bytes. The receiver using the NetOnewayRelayBinding opens a bidirectional TCP connection on outbound TCP port 828 for an SSL connection and TCP port 808 for a non-SSL connection. If the TCP outbound ports are unavailable due to environmental policies or port conflicts, you can configure the AppFabric Service Bus to use the HTTP protocol instead. The HTTP protocol polls the relay service through outbound ports 443 for SSL and 80 for non-SSL communications.
Figure 8-13 illustrates the workings of NetOnewayRelayBinding.
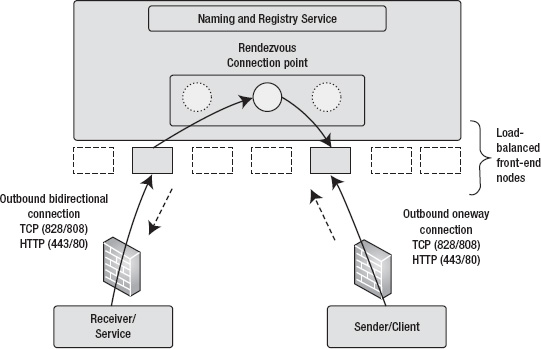
Figure 8-13. NetOnewayRelayBinding
For the purpose of demonstrating NetOnewayRelayBinding, in this section you design part of the ProAzure Energy sample service. Based on the requirements discussed in the previous section, you use the following communications from the control gateway to the head-end server to use the NetOnewayRelayBinding:
Sending energy meter value (kWh) to the head-end server periodically
- Sending light switch value (ON/OFF) to the head-end server when the state of the switch changes.
- Sending the HVAC set-point value to the head-end server when the set point changes.
- Sending the HVAC mode value (OFF/COOL/HEAT) to the head-end server when the HVAC mode changes.
The service project for this example is NetOnewayRelayServer, and the client project is NetOnewayRelayClient.
AppFabric Contract
The service contract represents the interface contract between the client and the server. The contract abstracts the interface of the server from its implementation. For the four communication requirements defined in the previous section, you design four methods in a service contract interface named IOnewayEnergyServiceOperations, as shown in Listing 8-3.
Listing 8-3. Service Contract IOnewayEnergyServiceOperations
[ServiceContract(Name = "IOnewayEnergyServiceOperations.",

Namespace = "http://proazure/ServiceBus/energyservice/headend")]

    public interface IOnewayEnergyServiceOperations

    {

        [OperationContract(IsOneWay=true)]

        void SendKwhValue(string gatewayId, string meterId,

double kwhValue, DateTime utcTime);

        [OperationContract(IsOneWay = true)]

        void SendLightingValue(string gatewayId, string switchId,

int lightingValue, DateTime utcTime);

        [OperationContract(IsOneWay = true)]

        void SendHVACSetPoint(string gatewayId, string hvacId,

int setPointValue, DateTime utcTime);

        [OperationContract(IsOneWay = true)]

        void SendHVACMode(string gatewayId, string hvacId,

int mode, DateTime utcTime);

    }


    public interface IOnewayEnergyServiceChannel : IOnewayEnergyServiceOperations, IClientChannel { }
The IOnewayEnergyServiceOperations define four operations you implement in the head-end server for the control gateway to call to send the values. Note the IsOneWay=true property of the OperationContract attribute, and also note that none of the one-way methods return any values. This is a requirement for all one-way methods in the AppFabric Service Bus.
![]() Tip Always explicitly define the name and namespace for the service contract as a best practice. Doing so ensures a unique namespace for your contract and avoids any conflicts with default values.
Tip Always explicitly define the name and namespace for the service contract as a best practice. Doing so ensures a unique namespace for your contract and avoids any conflicts with default values.
The IOnewayEnergyServiceChannel defines a channel for client communications that inherits from the IOnewayEnergyServiceOperations and IClientChannel interfaces.
![]() Note All the code for the interfaces is available in the EnergyServiceContract project in the Ch8Solution.sln Visual Studio solution. Before opening the solution, download the latest Windows Azure AppFabric SDK, also known as the AppFabric SDK.
Note All the code for the interfaces is available in the EnergyServiceContract project in the Ch8Solution.sln Visual Studio solution. Before opening the solution, download the latest Windows Azure AppFabric SDK, also known as the AppFabric SDK.
Service Implementation
After the contract is designed, the next step is to implement the contract in the head-end server. In the interest of keeping the book conceptual, you create a simple implementation of the contract that prints out the received messages to the console. Listing 8-4 shows the implementation of the IOnewayEnergyServiceOperations interface.
Listing 8-4. IOnewayEnergyServiceOperations Implementation
[ServiceBehavior(Name = "OnewayEnergyServiceOperations",

Namespace = "http://proazure/ServiceBus/energyservice/headend")]

   public class OnewayEnergyServiceOperations : EnergyServiceContract.IOnewayEnergyServiceOperations

    {

     public void SendKwhValue(string gatewayId, string meterId,

double kwhValue, DateTime utcTime)

     {

         Console.WriteLine(String.Format

("{0}>Energy Meter {1} value:{2:0.00} kWh @ {3}",

gatewayId, meterId, kwhValue, utcTime.ToString("s")));

     }

     public void SendLightingValue(string gatewayId, string switchId,

int lightingValue, DateTime utcTime)

     {

         Console.WriteLine(String.Format

("{0}>Changed lightbulb state of switch {1} to {2}",

gatewayId, switchId, ((lightingValue == 1) ? "ON" : "OFF")));

     }

     public void SendHVACSetPoint(string gatewayId, string hvacId,

int setPointValue, DateTime utcTime)

     {

         Console.WriteLine(String.Format

("{0}>HVAC {1} has SETPOINT value:{2:0} F @ {3}",

gatewayId, hvacId, setPointValue, utcTime.ToString("s")));

     }

     public void SendHVACMode(string gatewayId, string hvacId,

int mode, DateTime utcTime)

     {

         Console.WriteLine(String.Format

("{0}>HVAC {1} MODE is set to {2} @ {3}", gatewayId,

hvacId, GetHVACModeString(mode), utcTime.ToString("s")));

     }
Note that all the concepts applied until now are the same as any WCF service implementation.
Service Binding
Bindings define the transport, encoding, and protocol required by the WCF services and clients to communicate with each other. A binding configuration is applied to the endpoint to represent the transport, encoding, and protocol used for communication between client and services. NetOnewayRelayBinding is an AppFabric Service Bus binding that defines one-way communication between the client, relay server, and service. Listing 8-5 shows the binding configuration in App.config for the OnewayEnergyServiceOperations service implementation.
Listing 8-5. Service Binding for OnewayEnergyServiceOperations
<bindings>

      <netOnewayRelayBinding>

        <binding name="default" />

      </netOnewayRelayBinding>

</bindings>
The bindings section defines the netOnewayRelayBinding. You can define multiple bindings in the bindings section and then later apply one to the service endpoint. The netOnewayRelayBinding makes a TCP outbound connection on port 828 by default, which is on a secure connection. For a non-secure TCP connection, it uses port 808. In most enterprises, no outbound connections other than HTTP on port 80 or SSL on port 443 are allowed due to corporate security policies. In such scenarios, you can configure netOnewayRelayBinding to establish an HTTP connection with the relay service over port 80 or 443. The AppFabric Service Bus environment supports a ConnectivityMode property you can set to one of these enum values: AutoDetect, TCP, or HTTP, as listed in Table 8-4.

You can set the ConnectivityMode of the netOnewayRelayBinding using
ServiceBusEnvironment.SystemConnectivity.Mode = ConnectivityMode.AutoDetect;
SystemConnectivity.Mode sets the value of ConnectivitySettings that represents the AppFabric Service Bus connectivity. The default connectivity mode between the AppFabric Service Bus and the service is TCP. If you're running your service behind a firewall, you can use the HTTP binding. If you aren't sure about the network constraints, use AutoDetect mode, where the Service Bus selects TCP by default but automatically switches to HTTP if TCP connectivity isn't available.
You can configure end-to-end security between the client and the server as shown in Listing 8-6.
Listing 8-6. Binding Security for netOnewayRelayBinding
<netOnewayRelayBinding>

<binding name="default" >

<security mode="Transport" relayClientAuthenticationType="None" />

</binding>

</netOnewayRelayBinding>
The mode attribute supports four values, as listed in Table 8-5.
Relay Security
The AppFabric Service Bus integrates with ACS to provide the authentication and authorization required for accessing and creating service endpoints in the AppFabric Service Bus. Even though ACS can be configured to use an external identity provider like ADFS v2.0 or Windows Live ID, this example uses a shared secret to authenticate with ACS for both the service and the client. Listing 8-7 shows the code to pass an issuer name and issuer key as credentials to authenticate with the AppFabric Service Bus.
Listing 8-7. Shared Secret Authentication
TransportClientEndpointBehavior sharedSecretServiceBusCredential =

new TransportClientEndpointBehavior();

            sharedSecretServiceBusCredential.CredentialType = TransportClientCredentialType.SharedSecret;

            sharedSecretServiceBusCredential.Credentials.SharedSecret.IssuerName =

issuerName;

            sharedSecretServiceBusCredential.Credentials.SharedSecret.IssuerSecret =

issuerKey;

ServiceHost Host = new ServiceHost(serviceType);

Host.Description.Endpoints[0].Behaviors.Add(behavior);
In Listing 8-7, you create a TransportClientEndpointBehavior object and select the credential type SharedSecret to use the issuer and issuer key as the authenticating credentials.
Figure 8-14 shows the service namespace page with Service Bus credentials. You can use the default issuer name and default issuer key in the shared secret values while connecting to the Service Bus.
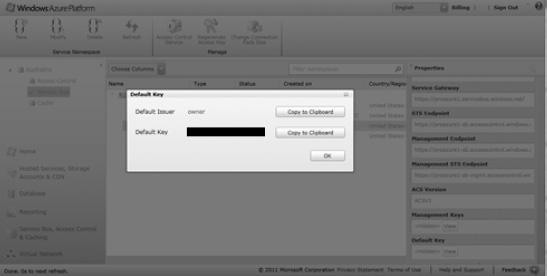
Figure 8-14. Credentials Management page
You can also define the shared secret in app.config, as shown in Listing 8-8. If you define credentials as your service behavior and assign it to the service endpoint, then you don't need to initialize transport client credentials in the code.
Listing 8-8. SharedSecret Declaration
<?xml version="1.0" encoding="utf-8" ?>

<configuration>

  <system.serviceModel>

  <behaviors>

      <endpointBehaviors>

        <behavior name="sharedSecretClientCredentials">


          <transportClientEndpointBehavior credentialType="SharedSecret">

            <clientCredentials>

              <sharedSecret issuerName="owner" issuerSecret="wJBJaobUmarWn6kqv7QpaaRh3ttNVr3w1OjiotVEOL4=" />

            </clientCredentials>

          </transportClientEndpointBehavior>


        </behavior>
      </endpointBehaviors>

    </behaviors>

    <bindings>

      <!-- Application Binding -->

      <netOnewayRelayBinding>

        <binding name="default" />

      </netOnewayRelayBinding>

    </bindings>

    <services>

      <service name="EnergyServiceContract.OnewayEnergyServiceOperations">

        <endpoint address="sb://proazure-1.servicebus.windows.net/OnewayEnergyServiceOperations/"

                  binding="netOnewayRelayBinding"


                  behaviorConfiguration="sharedSecretClientCredentials"


                  bindingConfiguration="default"

                  name="RelayEndpoint"

                  contract="EnergyServiceContract.IOnewayEnergyServiceOperations" />

      </service>

    </services>

  </system.serviceModel>

</configuration>
In Listing 8-8, the transport client behavior is defined under the sharedSecretClientCredentials element, which is assigned as the behaviorConfiguration of the service endpoint.
Message Security
Message security refers to the security of the message as it travels from client to service via the AppFabric Service Bus. As discussed earlier, the AppFabric Service Bus API offers four options for message security in the enumeration Microsoft.ServiceBus.EndToEndSecurityMode: None, Transport, Message, and TransportWithMessageCredentials. netOnewayRelayBinding doesn't support TransportWithMessageCredentials. If you want to use a certificate in the client, you have to explicitly configure the service certificate in the client; in a one-way message, there is no direct connection between the client and service. When the client sends a message, the service may not be available, and so the client can't negotiate the certificate with the service.5
The netOnewayRelayBinding example provides configuration files for default (AppBasic.config), Transport (AppTransport.config), Message without client credentials (AppMsgSecNoClientCreds.config), and Message with username credentials (AppMsgSecUsernameClientCreds.config). Figure 8-15 shows the client (NetOnewayRelayClient) and service (NetOnewayRelayServer) projects.
______________________________
5 Juval Lowy. Securing The .NET Service Bus. MSDN. http://msdn.microsoft.com/enus/magazine/dd942847.aspx.
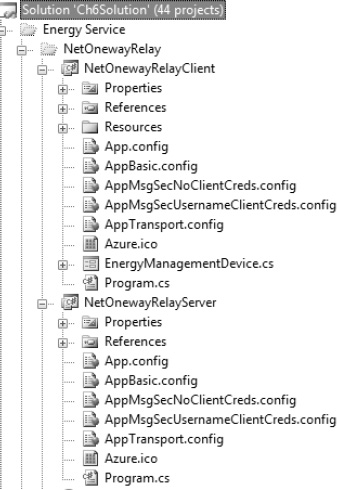
Figure 8-15. NetOnewayRelayBinding example
To use any particular message security, copy and paste the contents of the appropriate configuration file into App.config for the project in both client and service, and recompile the project. The examples use the TempCA.cer X.509 certificate for the service identity, which you can find in the code directory of Ch8Solution. Listing 8-9 shows the contents of AppMsgSecNoClientCreds.config for the service, and Listing 8-10 shows the contents of AppMsgSecNoClientCreds.config for the client.
Listing 8-9. AppMsgSecNoClientCreds.config for the Service
<?xml version="1.0" encoding="utf-8" ?>

<configuration>

  <system.serviceModel>

<behaviors>

      <serviceBehaviors>

        <!--Configure certificate for service identity-->


        <behavior name = "CertificateProtection">

          <serviceCredentials>
            <serviceCertificate

               findValue     = "TempCA"

               storeLocation = "LocalMachine"

               storeName     = "My"

               x509FindType  = "FindBySubjectName"

                  />

          </serviceCredentials>

        </behavior>

      </serviceBehaviors>

      <endpointBehaviors>

        <behavior name="sharedSecretEndpointBehavior">

          <transportClientEndpointBehavior credentialType="SharedSecret">

            <clientCredentials>

              <sharedSecret issuerName="ISSUER_NAME" issuerSecret="ISSUER_SECRET" />

</clientCredentials>

          </transportClientEndpointBehavior>

        </behavior>

      </endpointBehaviors>

    </behaviors>

    <bindings>

      <!-- Application Binding -->

      <netOnewayRelayBinding>

        <binding name = "OnewayMessageSecurity">

          <security mode = "Message">

            <message clientCredentialType = "None"/>

          </security>

        </binding>

      </netOnewayRelayBinding>

     </bindings>

    <!--Configure certificate for message security-->


    <services>

      <service name="EnergyServiceContract.OnewayEnergyServiceOperations"

               behaviorConfiguration = "CertificateProtection">

        <endpoint address=

"sb://proazure.servicebus.windows.net/OnewayEnergyServiceOperations/"

           binding="netOnewayRelayBinding"

           bindingConfiguration="OnewayMessageSecurity"

           name="RelayEndpoint"

           contract="EnergyServiceContract.IOnewayEnergyServiceOperations"

behaviorConfiguration="sharedSecretEndpointBehavior" />

      </service>

    </services>

  </system.serviceModel>

</configuration>
Listing 8-10. AppMsgSecNoClientCreds.config for the Client
<?xml version="1.0" encoding="utf-8" ?>

<configuration>

  <system.serviceModel>

    <bindings>
      <netOnewayRelayBinding>

        <binding name = "OnewayMessageSecurity">

          <security mode = "Message">

            <message clientCredentialType = "None"/>

          </security>

        </binding>

      </netOnewayRelayBinding>

    </bindings>

<behaviors>

      <endpointBehaviors>

        <behavior name = "ServiceCertificate">

          <transportClientEndpointBehavior credentialType="SharedSecret">

            <clientCredentials>

              <sharedSecret issuerName="ISSUER_NAME" issuerSecret="ISSUER_SECRET" />

            </clientCredentials>

          </transportClientEndpointBehavior>

          <clientCredentials>

            <serviceCertificate>

              <scopedCertificates>

                <add targetUri = "sb://{your service namespace}.servicebus.windows.net/OnewayEnergyServiceOperations/"

                   findValue     = "TempCA"

                   storeLocation = "LocalMachine"

                   storeName     = "My"

                   x509FindType  = "FindBySubjectName"

                        />

              </scopedCertificates>

            </serviceCertificate>

          </clientCredentials>

        </behavior>

      </endpointBehaviors>

    </behaviors>

    <client>

      <!-- Service Endpoint -->

      <endpoint name="RelayEndpoint"

                contract="EnergyServiceContract.IOnewayEnergyServiceOperations"

                binding="netOnewayRelayBinding"

                bindingConfiguration="OnewayMessageSecurity"

                address=

"sb://proazure.servicebus.windows.net/OnewayEnergyServiceOperations/"

                behaviorConfiguration = "ServiceCertificate"

                >

        <identity>

          <dns value = "TempCA"/>

        </identity>

      </endpoint>

    </client>

  </system.serviceModel>

</configuration>
The TempCA X.509 certificate is configured in the service as well as the client in the behavior section of the configuration file. In production applications, you have to use a production certificate issued by a certificate authority. Note that the behavior elements in both the client and server configuration include the transport client endpoint behavior set to shared secret. You can also initialize the TransportClientEndpointBehavior class in the client and server code. In production applications, you should encrypt the issuer credentials wherever they're stored. The X.509 certificate is used.
Service Endpoints
A WCF service endpoint defines how a client can communicate with the WCF service. The endpoint consists of four main attributes: the address of the endpoint, a binding that defines what protocol a client can use to communicate with the endpoint, a service contract that defines the operations available for the client to call, and a set of behaviors defining the local behavior of the endpoint. AppFabric Service Bus endpoints are similar to WCF endpoints. The only difference is the specific bindings used to communicate with the relay service.
Endpoints can be configured in application configuration files or programmatically. For the netOnewayRelayBinding example, Listing 8-11 shows the service endpoint definition from the App.config file.
Listing 8-11. netOnewayRelayBinding Endpoint
<!-- Service Endpoint -->

<endpoint

                address="sb://{your service namespace}

.servicebus.windows.net/OnewayEnergyServiceOperations/"

                  behaviorConfiguration="sharedSecretClientCredentials"

                  binding="netOnewayRelayBinding"

                  bindingConfiguration="default"

                  name="RelayEndpoint"

                  contract="EnergyServiceContract.IOnewayEnergyServiceOperations" />
In Listing 8-11, the binding is set to netOnewayRelayBinding, and the bindingConfiguration and behaviorConfiguration are pointers to the sections within the same configuration file. The address refers to the URI of the service endpoint. You can also create the URI of the service using the static method call
ServiceBusEnvironment.CreateServiceUri("sb", serviceNameSpace, servicePath);
where servicePath is the part of the URI after sb://proazure.servicebus.windows.net. In this example, it's OnewayEnergyServiceOperations. The “sb” represents the scheme used to communicate with the AppFabric Service Bus. The scheme can be either “http” or “sb” depending on the binding you're using. For netOnewayRelayBinding, you must use the “sb” scheme.
Service Hosting
After you've defined the service contract, service implementation, bindings, and endpoints, you can create a host for the service, as shown in Listing 8-12.
Listing 8-12. Hosting the AppFabric Service Bus Service
TransportClientEndpointBehavior behavior =

ServiceBusHelper.GetUsernamePasswordBehavior(issuerName, issuerKey);

Host = new ServiceHost(typeof(OnewayEnergyServiceOperations));

Host.Description.Endpoints[0].Behaviors.Add(behavior);

Host.Open();
As shown in Listing 8-12, the System.ServiceModel.ServiceHost is used to host the service. The TransportClientEndpointBehavior object is created from the issuer name/issuer key and passed to the defined endpoint. Finally, the Host.Open() method opens the service for communication. If you define the issuer name and issuer key in the configuration file, then you don't have to initialize it programmatically. In this example, you define the transport client endpoint behavior in the configuration file.
Client Design
You can find the client application in the NetOnewayRelayClient Visual Studio project. From the business requirements perspective, the client application is the control gateway application that connects to the head-end server to send messages. Figure 8-16 illustrates the user interface for the NetOnewayRelayClient client application.
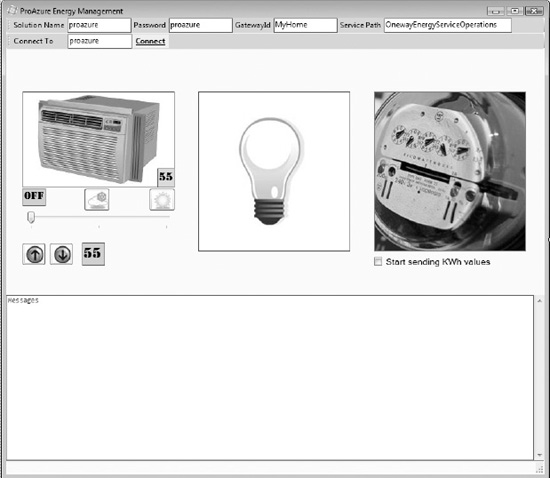
Figure 8-16. NetOnewayRelayClient application Design View
The client user interface has four main sections: configuration, HVAC operations, light switch operations, and meter reading, as discussed in the original requirements of the application. In the configuration section at the top of the form, you should enter your solution name and solution password. The Connect button establishes a connection to the AppFabric Service Bus. Any change to the HVAC set point or mode is sent to the head-end server by calling the SendHVACSetPoint() and SendHVACMode() methods on the server. Clicking the light bulb button turns the light switch on and off. Any change to the state of the light switch is sent to the server by calling the SendLightingValue() method on the head-end server. If you click on the energy meter button, a random kWh value is sent to the server by calling the SendKwhValue() method on the head-end server. If you check the “Start sending kWh values” check box, a random kWh value is sent to the head-end server every 10 seconds.
Listing 8-13 shows the code to initialize the channel to communicate with the server. The credentials are defined in the app.config file so they don't need to be initialized in the code.
Listing 8-13. Client Communication Initialization
Uri address = ServiceBusEnvironment.CreateServiceUri

("sb", serviceNamespaceDomain, "OnewayEnergyServiceOperations");


ChannelFactory<IOnewayEnergyServiceChannel> netOnewayChannelFactory = new ChannelFactory<IOnewayEnergyServiceChannel>("RelayEndpoint", new EndpointAddress(address));


IOnewayEnergyServiceChannel netOnewayChannel = channelFactory.CreateChannel();


channel.Open();
After the channel is opened successfully, you can call the methods on the service as follows:
netOnewayChannel.SendLightingValue(gatewayId, switchId, lightingValue, DateTime.UtcNow);

         netOnewayChannel.SendKwhValue(gatewayId, meterId, kWhValue, DateTime.UtcNow);
![]() Note In a real-world application, the control gateway polls the actual energy meter and sends kWh values to the head-end server. This example uses random numbers to simulate a real-world environment.
Note In a real-world application, the control gateway polls the actual energy meter and sends kWh values to the head-end server. This example uses random numbers to simulate a real-world environment.
Running the Application
The steps required to run the end-to-end application are as follows:
- Open App.config for the server and client, and configure them to represent your service namespace and issuer credentials.
- Open a command prompt as Administrator, and navigate to the binDebug directory of the NetOnewayRelayServer project.
- Run NetOnewayRelayServer.exe.
- Enter the service namespace to start the service.
- Open Windows Explorer and navigate to the binDebug directory of the NetOnewayRelayClient project.
Note Make sure the configuration for the server and the client match in terms of address and security.
- Double-click NetOnewayRelayClient.exe to start the client application.
- Click the Connect button to connect to the relay service. If the connection is successful, the text box displays success messages.
- You can interact with the application by changing the state of HVAC, Light switch or the meter reading button. The client application calls the appropriate methods on the head-end server, and as a result the NetOnewayRelayServer.exe command prompt displays the received method calls.
Figure 8-17 illustrates a running instance of the client application, and Figure 8-18 illustrates the messages received on the server command prompt.
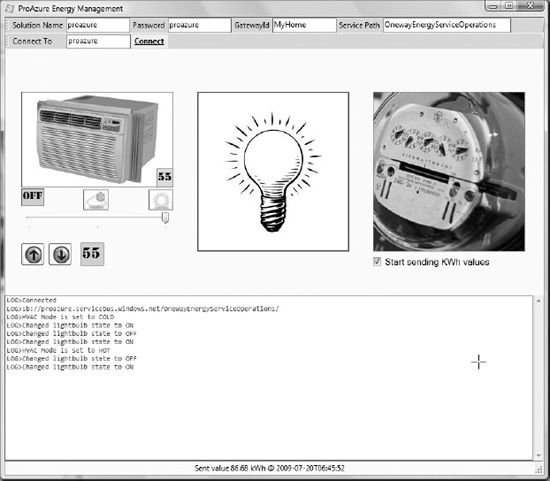
Figure 8-17. NetOnewayRelayClient application
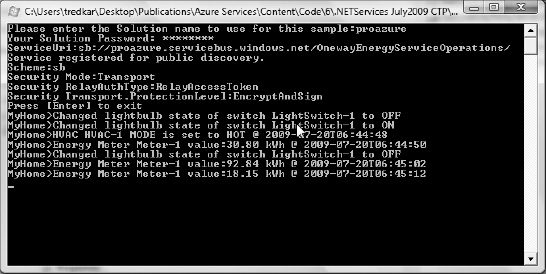
Figure 8-18. NetOnewayRelayServer application
![]() Tip If you want to observe the ports open or trace messages sent back and forth between the client and the service, you can use Microsoft's Network Monitor (netmon.exe), available at
Tip If you want to observe the ports open or trace messages sent back and forth between the client and the service, you can use Microsoft's Network Monitor (netmon.exe), available at www.microsoft.com/downloads/details.aspx?displaylang=en&FamilyID=983b941d-06cb-4658-b7f6-3088333d062f.
Figure 8-19 illustrates the Microsoft Network Monitor conversation tree of the interaction between NetOnewayRelayClient.exe and NetOnewayRelayServer.exe. Note the TCP outgoing port 828 and SSL connection in the conversation tree.
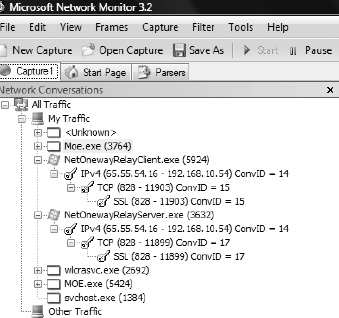
Figure 8-19. Microsoft Network Monitor capture
netEventRelayBinding
netEventRelayBinding extends the netOnewayRelayBinding by providing multicast messaging between multiple subscribers and publishers listening on the same rendezvous service endpoint. The netEventRelayBinding class inherits from netOnewayRelayBinding. This is the only binding that supports multiple receivers on the same service URI. Figure 8-20 illustrates the architecture of netEventRelayBinding.
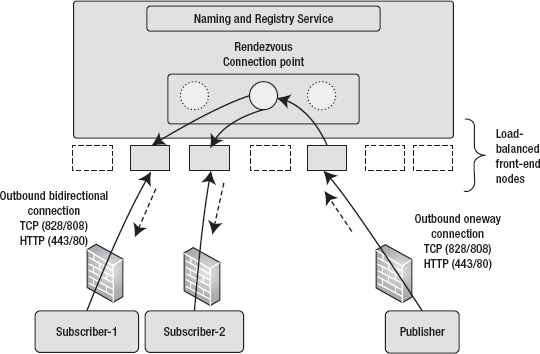
Figure 8-20. netEventRelayBinding architecture
In Figure 8-20, one publisher publishes messages on a defined endpoint URI, and two subscribers (Subscriber-1 and Subscriber-2) listen on the same endpoint URI. When the publisher sends a message to the endpoint URI, both receivers receive the message. The AppFabric Service Bus multicasts the message to all the subscribers of the URI. Internally, both the subscribers may be running on different front-end nodes. From the publisher and subscriber perspective, routing of the message to two subscribers is opaque and completely handled by the combination of netEventRelayBinding and the AppFabric Service Bus. Because netEventRelayBinding inherits from netOnewayRelayBinding, it supports the same connectivity modes and security features, as discussed for netOnewayRelayBinding.
You should use this binding if you require a publish-subscribe messaging system where a message needs to be sent to multiple receivers at the same time. netEventRelayBinding uses a multicast connection mode, whereas netOnewayRelayBinding uses a unicast connection mode.
In the ProAzure Energy service example, the control gateway needs to communicate with the head-end server about its availability and when it comes online and goes offline. This offers the head-end server better understanding of a gateway's online/offline pattern and can send scheduled commands to the control gateway only when it's online. The head-end server is a collection of small servers with dedicated specific roles. For example, there is a server instance that only sends scheduled commands to the control gateway when it's online. Another service checks for the required software upgrade on the control gateway and can upgrade the software on the control gateway when it's online. So, this example uses the netEventRelayBinding to send ONLINE/OFFLINE messages between the control gateway and the head-end server. When a control gateway is online, it periodically sends an ONLINE message to the head-end server. A control gateway also sends an OFFLINE message if it's shutting down gracefully. The service project for this example is NetEventRelayServer, and the client project is NetEventRelayGateway in the Ch8Solution. The NetEventRelayGateway project consists of netOnewayRelayBinding as well as netEventRelayBinding examples. The same application is used to send one-way as well as publish/subscribe messages.
AppFabric Contract
The AppFabric contract for the netEventRelayBinding example consists of two operations: Online() and GoingOffline(), as shown in Listing 8-14.
Listing 8-14. netEventRelayBinding Service Contract
[ServiceContract(Name = "IMulticastGatewayOperations.", Namespace = "http://proazure/ServiceBus/energyservice/gateway")]

    public interface IMulticastGatewayOperations

    {

        [OperationContract(IsOneWay = true)]

        void Online(string gatewayId, string serviceUri, DateTime utcTime);

        [OperationContract(IsOneWay = true)]

        void GoingOffline(string gatewayId, string serviceUri, DateTime utcTime);

    }

    public interface IMulticastGatewayChannel : IMulticastGatewayOperations,

IClientChannel

    {

    }
The IMulticastGatewayOperations interface has two methods: Online() and GoingOffline(). Similar to the netOnewayRelayBinding, both methods must have the IsOneWay=true attribute and must not return any values. The gatewayID refers to the unique identifier of a gateway, and the serviceUri refers to the URI of the gateway service. I cover the URI of the gateway when I discuss netTcpRelayBinding.
Service Implementation
The implementation of the IMulticastGatewayOperations interface is shown in Listing 8-15.
Listing 8-15. Implementation of the IMulticastGatewayOperations Interface
[ServiceBehavior(Name = "MulticastGatewayOperations", Namespace = "http://proazure/ServiceBus/energyservice/")]

 public class MulticastGatewayOperations :

EnergyServiceContract.IMulticastGatewayOperations

 {

  public void Online(string gatewayId, string serviceUri, DateTime utcTime)

  {

   Console.WriteLine(String.Format("{0}>ONLINE Uri:{1} @ {2}",

gatewayId, serviceUri, utcTime.ToString("s")));

  }

  public void GoingOffline(string gatewayId, string serviceUri, DateTime utcTime)

  {

      Console.WriteLine(String.Format("{0}>OFFLINE Uri:{1} @ {2}",

gatewayId, serviceUri, utcTime.ToString("s")));

  }
The implementation prints the name, URI, and the time values to the console.
Service Binding
The service binding for netEventRelayBinding is shown in Listing 8-16.
Listing 8-16. netEventRelayBinding
<netEventRelayBinding>

        <binding name = "OnewayMessageSecurity">


        </binding>

</netEventRelayBinding>
Relay Security
In the netOnewayRelayBinding example, you saw how to use shared-secret authentication with your ACS solution. This example explores the use of an SWT. Listing 8-17 shows the code segment required to authenticate using an SWT.
Listing 8-17. SWT Authentication
Uri address = ServiceBusEnvironment.CreateServiceUri("sb", serviceNamespaceDomain,

"Gateway/MulticastService");


TransportClientEndpointBehavior behavior = new TransportClientEndpointBehavior();

behavior.CredentialType = TransportClientCredentialType.SimpleWebToken;

behavior.Credentials.SimpleWebToken.SimpleWebToken = SharedSecretCredential.ComputeSimpleWebTokenString(issuerName, issuerSecret);


ServiceHost host = new ServiceHost(typeof(MulticastGatewayOperations), address);

host.Description.Endpoints[0].Behaviors.Add(behavior);
The code creates an SWT from the issuer name and issuer secret key by calling the method SharedSecretCredential.ComputeSimpleWebTokenString (string issuerName, string issuerSecret) method from Microsoft.ServiceBus.dll.
Message Security
Similar to the netOnewayRelayBinding example, you can create specific configuration files for particular message security scenarios and then switch back and forth between these configuration files depending on the scenario you're executing. When you execute a particular security configuration, make sure you're switching the client security configuration consistently with the service configuration.
Service Endpoints
The service endpoint configuration of netEventRelayBinding in this example doesn't define the ACS authentication in the configuration file like netOnewayRelayBinding. The ACS authentication is handled in the code. Listing 8-18 shows the service configuration in of the NetEventRelayServer.
Listing 8-18. Service Endpoint Configuration
<services>

<service name="EnergyServiceContract.MulticastGatewayOperations">

        <endpoint address=""

                    binding="netEventRelayBinding"

                    bindingConfiguration="default"

                      name="RelayMulticastEndpoint"

                    contract="EnergyServiceContract.IMulticastGatewayOperations"

           />

        </service>

</services>
The relay authentication is handled in the code and therefore isn't visible in the configuration file.
Service Hosting
The netEventRelayBinding example uses SWT tokens for relay authentication instead of issuer name and issuer key as in the netOnewayRelayBinding example. So, the service host has to create an SWT from the issuer name and issuer key. The code for the service host is shown in Listing 8-19.
Listing 8-19. Service Hosting for netEventRelayBinding
string serviceNamespaceDomain = “{your service namespace}”

    string issuerName = "{ISSUER NAME}";

    string issuerSecret = "{ISSUER KEY}";

    ServiceBusEnvironment.SystemConnectivity.Mode = ConnectivityMode.AutoDetect;

    TransportClientEndpointBehavior relayCredentials = new TransportClientEndpointBehavior();

    relayCredentials.CredentialType = TransportClientCredentialType.SharedSecret;

    relayCredentials.Credentials.SharedSecret.IssuerName = issuerName;

    relayCredentials.Credentials.SharedSecret.IssuerSecret = issuerSecret;

    Uri serviceAddress = ServiceBusEnvironment.CreateServiceUri("sb", serviceNamespaceDomain,

               "Gateway/MulticastService/");

    ServiceHost host = new ServiceHost(typeof(MulticastGatewayOperations), serviceAddress);

    host.Description.Endpoints[0].Behaviors.Add(relayCredentials);
host.Open();One the service hosts are started, they listen on the endpoint URI
sb://{your service namespace}.servicebus.windows.net/Gateway/MulticastService/
Client Design
In this example, the client application performs both the netOnewayRelayBinding and the netEventRelayBinding operations. When a control gateway comes online, it sends online messages every 10 seconds by calling the Online() method on the head-end server's multicast URI:
sb://proazure.servicebus.windows.net/Gateway/MulticastService/
When you close the client application, it sends an offline message by calling the GoingOffline() method on the head-end server's multicast URI:
sb://proazure.servicebus.windows.net/Gateway/MulticastService/
Figure 8-21 illustrates the design view of the NetEventRelayGateway client application.
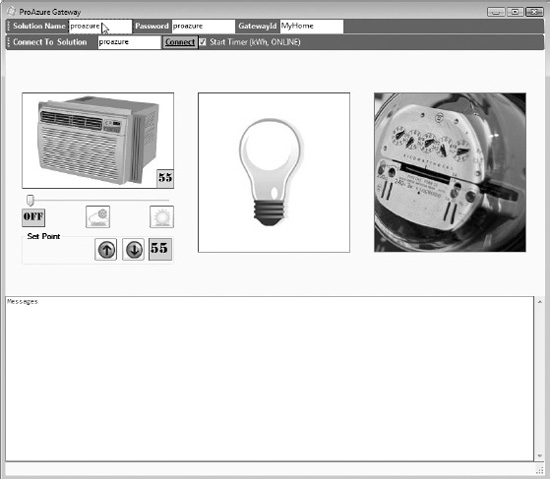
Figure 8-21. NetEventRelayGateway design view
The Start Time check box starts the timer to send an online message every 10 seconds.
![]() Note I've combined the configuration of the netOnewayRelayBinding example and the netEventRelayBinding example in one project, NetEventRelayGateway.
Note I've combined the configuration of the netOnewayRelayBinding example and the netEventRelayBinding example in one project, NetEventRelayGateway.
Running the Application
The steps required to run the end-to-end application are as follows:
- Open App.config for the NetEventRelayGateway and NetEventRelayServer and configure it to represent your service namespace and issuer credentials.
- Open three command prompts as Administrator, and navigate two prompts to the binDebug directory of the NetEventRelayServer project and the third prompt to the binDebug directory of the NetOnewayRelayServer project. You do this because the client application also supports the netOnewayRelayBinding methods from the previous example.
- Run NetEventRelayServer.exe in two prompts and NetOnewayRelayServer.exe in the third prompt.
- Enter the solution name and solution password to start the service when prompted.
- Open Windows Explorer, and navigate to the binDebug directory of the NetEventRelayGateway project.
Note Make sure the configuration for the server and the client match in terms of address and security.
- Double-click NetEventRelayGateway.exe to start the client application.
- Click the Connect button to connect to the relay service. If the connection is successful, the text box displays success messages to connect to two endpoints.
- Check the Start Time check box if it isn't already checked.
- If the configurations are correct, then you should see ONLINE messages in the two command windows of NetEventRelayServer.exe.
Thus you can build an Internet-scale publish/subscribe messaging service using netEventRelayBinding.
Figure 8-22 shows a running instance of the client application, and Figure 8-23 shows the messages received on the server command prompts.
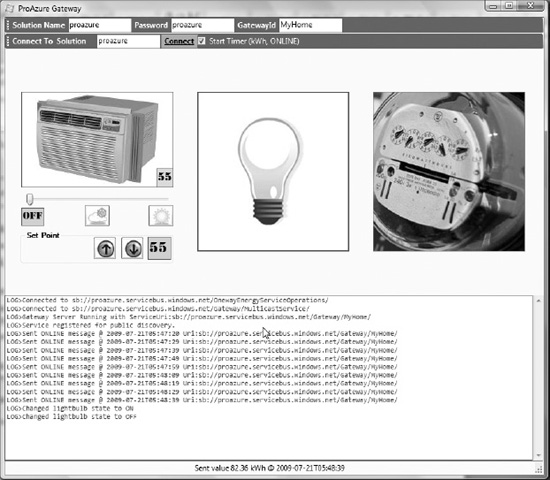
Figure 8-22. NetEventRelayGateway application
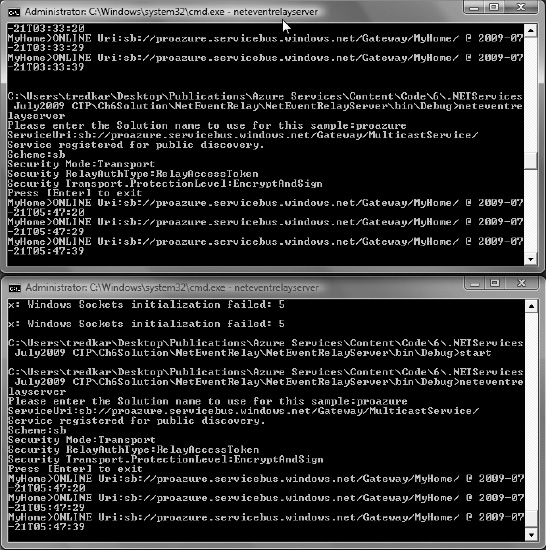
Figure 8-23. NetEventRelayServer application
NetTcpRelayBinding
netTcpRelayBinding is the recommended and most frequently used AppFabric Service Bus binding. It uses TCP as the relay transport and is based on the WCF netTcpBinding. It performs better than the HTTP bindings, because it uses TCP for message delivery and the messages are encoded in binary format. NetTcpRelayBinding supports WS-ReliableMessaging, which is turned off by default. You can turn it on by setting reliableSessionEnabled to true. In WCF, you typically use netTcpBinding to create service endpoints reachable within the intranet, but with netTcpRelayBinding you can create service endpoints reachable over the Internet. This makes communication over the Internet faster than with HTTP bindings. Similar to netOnewayRelayBinding, netTcpRelayBinding establishes an SSL-protected control channel using outbound TCP port 828 and a non-SSL data channel using outbound TCP port 818.
![]() Note netTcpRelayBinding is the only AppFabric Service Bus binding that supports WCF-style duplex callbacks through the relay service.
Note netTcpRelayBinding is the only AppFabric Service Bus binding that supports WCF-style duplex callbacks through the relay service.
netTcpRelayBinding supports three different connection modes, as listed in Table 8-6 and defined in the AppFabric Service Bus API as the Microsoft.ServiceBus.TcpRelayConnectionMode enumeration.
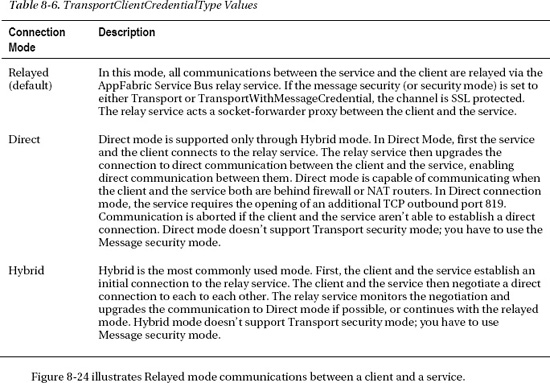
Figure 8-24 illustrates Relayed mode communications between a client and a service.
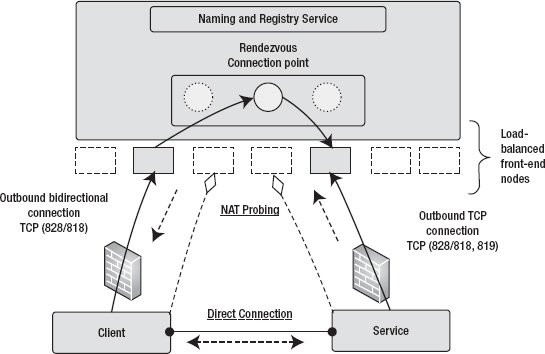
Figure 8-24 shows the following:
- The client and the service first communicate through the relay service.
- Communications begin in Relayed mode.
- Direct connection negotiation between client and service succeeds.
- The relay service keeps on probing for mutual port of communication between the client and the service.
- The probing succeeds, and the relay service provides the communication information to the client and the service to communicate with each other directly.
- The connection is upgraded to a Direct connection without any data loss.
- Future communications continue in Direct mode.
- If the probing of mutual ports fails or times out, the communication continues in Relayed mode.
In the ProAzure Energy Service example, the control gateway itself is a server that accepts commands from the head-end server. An end user can schedule a command to be executed on the gateway at a particular time or execute a real-time command on the control gateway, such as turning off all the lights in the building. The control gateway accepts the command and in turn sends the command to the lighting system on the control network. The control gateway also supports real-time retrieval of device values. For example, an end user can retrieve the current state of the HVAC set point or the lighting system in real time.
AppFabric Contract
The control gateway supports get and set operations on the back-end devices it supports. In the ProAzure Energy service example, it supports get and set operations on the lighting and HVAC systems but only get operation on the energy meter. Listing 8-20 shows the service contract for the control gateway service.
Listing 8-20. Control Gateway Service Contract
[ServiceContract(Name = "IEnergyServiceGatewayOperations",

Namespace = "http://proazure/ServiceBus/energyservice/gateway")]

    public interface IEnergyServiceGatewayOperations

    {

        [OperationContract]

        bool UpdateSoftware(string softwareUrl);


        [OperationContract]

        bool SetLightingValue(string gatewayId, string deviceId,

short switchValue);


        [OperationContract]

        short GetLightingValue(string gatewayId, string deviceId);


        [OperationContract]

        bool SetHVACMode(string gatewayId, string deviceId,

int hvMode);

        [OperationContract]

        int GetHVACMode(string gatewayId, string deviceId);


        [OperationContract]

        bool SetHVACSetpoint(string gatewayId, string deviceId,

int spValue);

        [OperationContract]

        int GetHVACSetpoint(string gatewayId, string deviceId);


        [OperationContract]

        int GetCurrentTemp(string gatewayId, string deviceId);


        [OperationContract]

        double GetKWhValue(string gatewayId, string deviceId);


    }


    public interface IEnergyServiceGatewayOperationsChannel :

IEnergyServiceGatewayOperations, IClientChannel


{
}
As shown in Listing 8-20, the IEnergyServiceGatewayOperations support nine methods that the head-end server can call. Most of the operations are get/set methods, so the method signatures are self explanatory.
Service Implementation
The control gateway itself is the server, so the interface IEnergyServiceGatewayOperations is implemented in the control gateway application. The implementation of the IEnergyServiceGatewayOperations interface is shown in Listing 8-21.
Listing 8-21. IEnergyServiceGatewayOperations Iimplementation
public bool UpdateSoftware(string softwareUrl)

        {

         AddLog("UpdateSoftware:" + softwareUrl);

         return true;

        }


        public bool SetLightingValue(string gatewayId, string deviceId,

short switchValue)

        {

         ChangeLightBulbState(false, switchValue);

         AddLog("SetLightingValue:" + switchValue);

         return true;

        }


        public bool SetHVACMode(string gatewayId, string deviceId, int hvMode)

        {

         hvacMode = hvMode;

         trackBar1.Value = hvacMode;

         ChangeHVACMode();

         AddLog("SetHVACMode:" + hvMode);

         return true;

        }


        public bool SetHVACSetpoint(string gatewayId, string deviceId, int spValue)

        {

         ChangeSetPointValue();

         AddLog("SetHVACSetpoint:" + spValue);


         return true;

        }


        public short GetLightingValue(string gatewayId, string deviceId)

        {

         AddLog("GetLightingValue:" + lightBulbState);


         return lightBulbState;
        }


        public int GetHVACMode(string gatewayId, string deviceId)

        {

         AddLog("GetHVACMode:" + hvacMode);


         return hvacMode;

        }


        public int GetHVACSetpoint(string gatewayId, string deviceId)

        {

         AddLog("GetHVACSetpoint:" + txtSetPoint.Text);

         return int.Parse(txtSetPoint.Text);

        }


        public int GetCurrentTemp(string gatewayId, string deviceId)

        {

         AddLog("GetCurrentTemp:" + txtCurrentTemperature.Text);

            return int.Parse(txtCurrentTemperature.Text);

        }


        public double GetKWhValue(string gatewayId, string deviceId)

        {

         AddLog("GetKWhValue:" + kwh);


            return kwh;

        }
All the method invocations are logged to the Messages text box on the control gateway application.
Service Binding
The service binding for netTcpRelayBinding is shown in Listing 8-22.
Listing 8-22. netTcpRelayBinding
<netTcpRelayBinding>

<binding name="default" connectionMode="Hybrid">

<security mode="None" />

</binding>

</netTcpRelayBinding>
Note that the connectionMode specified is Hybrid. You can specify the value as Hybrid or Relayed.
Relay Security
In the previous examples, you saw how to use different types of relay authentication. This example uses the ACS shared secret credentials to authenticate both the client and the service. Listing 8-23 shows the code from the NetEventRelayGateway project for setting the issuer and password for relay authentication.
Listing 8-23. Shared Secret Relay Authentication
TransportClientEndpointBehavior behavior = new TransportClientEndpointBehavior();

behavior.CredentialType = TransportClientCredentialType.SharedSecret;

behavior.Credentials.SharedSecret.IssuerName = issuerName;

behavior.Credentials.SharedSecret.IssuerSecret = issuerKey;

ServiceHost Host = new ServiceHost(serviceType);

Host.Description.Endpoints[0].Behaviors.Add(behavior);![]() Note The NetEventRelayGateway project implements the service contract because the control gateway itself is the server now and the head-end server is the client. Because the server instance implements the interface, you have to set the instance context mode to single, as shown here:
Note The NetEventRelayGateway project implements the service contract because the control gateway itself is the server now and the head-end server is the client. Because the server instance implements the interface, you have to set the instance context mode to single, as shown here:
[ServiceBehavior(Name = "EnergyServiceGatewayOperations",

     Namespace = "http://proazure/ServiceBus/energyservice/gateway",

     InstanceContextMode=InstanceContextMode.Single)]

 public partial class EnergyManagementDevice : Form, IEnergyServiceGatewayOperations
Message Security
The netTcpRelayBinding uses Transport as its default message security if you don't explicitly configure it in App.config. This example doesn't use message security, to keep the example simple. Listing 8-24 shows the configuration of netTcpRelayBinding in the App.config file of the server in the NetEventRelayGateway project.
Listing 8-24. Message Security in netTcpRelayBinding
<netTcpRelayBinding>

<binding name="default" connectionMode="Hybrid">

<security mode="None" />

</binding>

</netTcpRelayBinding>
Service Endpoints
The service endpoint configuration is shown in Listing 8-25.
Listing 8-25. Service Endpoint Configuration
<services>

<service name="NetEventRelayGateway.EnergyManagementDevice">

<endpoint name="RelayTcpEndpoint"

contract="EnergyServiceContract.IEnergyServiceGatewayOperations"

binding="netTcpRelayBinding"

bindingConfiguration="default"

address="" />

</service>
Note that in the endpoint configuration, the address field is empty: the address is generated at runtime so you can run multiple instances of the same application representing difference control gateways. Each control gateway has its own service endpoint, which the head-end server accesses to call methods on each control device.
Service Hosting
The service is hosted in the control gateway, so NetEventRelayGateway contains the code to host the service. Listing 8-26 shows the code that hosts the service within the NetEventRelayGateway application.
Listing 8-26. Service Hosting
Uri address = ServiceBusEnvironment.CreateServiceUri("sb", solutionName, servicePath);

ServiceUri = address.ToString();

TransportClientEndpointBehavior behavior = new TransportClientEndpointBehavior();

behavior.CredentialType = TransportClientCredentialType.SharedSecret;

behavior.Credentials.SharedSecret.IssuerName = issuerName;

behavior.Credentials.SharedSecret.IssuerSecret = issuerKey;Host = new ServiceHost(serviceType, address);

Host.Description.Endpoints[0].Behaviors.Add(behavior);

Host.Open();
In Listing 8-26, the URI for the service is generated dynamically by calling the ServiceBusEnvironment.CreateServiceUri() method. The servicePath contains the gatewayID, which makes the URI unique within the network of all the control gateways. The head-end server uses this URI to call methods on the control gateway.
Client Design
The head-end server acts as a client for all the control gateways. The client in this example is a simple console application that accepts a gateway ID, then creates the endpoint URI programmatically, and finally invokes multiple methods to turn off all the devices attached to the control gateway. The source code for the client application is in the NetTcpRelayBinding project. Listing 8-27 shows the code for the method (without exception handling) that turns off all the devices attached to the control gateway.
Listing 8-27. TurnEverythingOff Source Code
static void TurnEverythingOff(string solutionName, string password,

 string gatewayId)

  {

      ChannelFactory<IEnergyServiceGatewayOperationsChannel>

netTcpRelayChannelFactory = null;

      IEnergyServiceGatewayOperationsChannel

netTcpRelayChannel = null;


          Uri serviceUri = ServiceBusEnvironment.CreateServiceUri("sb",

solutionName, ServiceBusHelper.GetGatewayServicePath(gatewayId));

          netTcpRelayChannelFactory = new ChannelFactory<IEnergyServiceGatewayOperationsChannel>

("RelayTcpEndpoint", new EndpointAddress(serviceUri));


          netTcpRelayChannel = netTcpRelayChannelFactory.CreateChannel();

          netTcpRelayChannel.Open();

          netTcpRelayChannel.SetLightingValue(gatewayId, "Lighting-1", 0);


          netTcpRelayChannel.SetHVACMode(gatewayId, "HVAC-1", 0);

          netTcpRelayChannel.SetHVACSetpoint(gatewayId, "HVAC-1", 78);


              netTcpRelayChannel.Close();

              netTcpRelayChannelFactory.Close();

  }
In Listing 8-27, a channel is created with the endpoint URI based on the gateway identifier. Then, the SetLightingValue(), SetHVACMode(), and SetHVACSetpoint() methods are called on the control gateway to turn off the devices attached to the control gateway. Because the URI is generated dynamically from the gateway identified, you can invoke these methods on any gateway that has an endpoint URI registered with the AppFabric Service Bus. The ACS shared secret is defined in App.config, and therefore you don't need to redefine it in the code. Listing 8-28 shows the definition of the shared secret in App.config of the client project NetTcpRelayBinding.
Listing 8-28. Shared Secret Definition in the Client
<behaviors>

      <endpointBehaviors>

        <behavior name="sharedSecretClientCredentials">

          <transportClientEndpointBehavior credentialType="SharedSecret">

            <clientCredentials>

              <sharedSecret issuerName="ISSUER_NAME" issuerSecret="ISSUER_KEY" />

            </clientCredentials>

          </transportClientEndpointBehavior>

        </behavior>

      </endpointBehaviors>

    </behaviors>
Running the Application
The steps required to run the end-to-end application are as follows:
- Open Windows Explorer, and navigate to the binDebug directory of the NetEventRelayGateway project.
- Double-click NetEventRelayGateway.exe two times to start two instances of the NetEventRelayGateway application.
- Change the service namespace name, issuer name, and issuer key to your own values.
- In the GatewayId field of the first application, enter MyOffice. Leave the default MyHome in the second application.
- Click the Connect button on both the instances of NetEventRelayGateway to connect to the relay service. If the connections are successful, the text boxes display success messages with the URIs of the service endpoints. Note how the URIs are created based on the gateway identifier to make them unique.
- Turn the light switch on, and turn the HVAC mode to HEAT or COOL.
- Open a command prompt window with Administrator privileges, and navigate to the binDebug directory of the NetTcpRelayBinding project.
- Start the NetTcpRelayBinding.exe console application.
- Enter the service namespace name when prompted.
- When prompted, enter the gateway ID MyHome.
- Observe in the NetEventRelayGateway application that the light switch and the HVAC mode are turned off.
- Perform the same operation on the gateway ID MyOffice to see similar results
Thus, you can dynamically register thousands of control gateway endpoints with the AppFabric Service Bus and execute methods on these control gateways at Internet scale
Figure 8-25 illustrates the two running instances of NetEventRelayGateway.exe, and Figure 8-26 illustrates the NetTcpRelayBinding.exe command prompt.
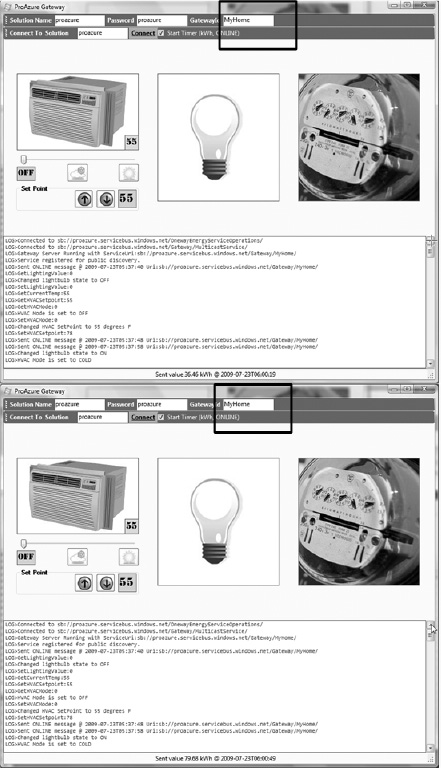
Figure 8-25. NetEventRelayGateway application
Figure 8-26. NetTcpRelayBinding application
You can catch the connection upgrade event when a Relayed connection is upgraded to a Direct connection by implementing the ConnectionStateChanged event on the IHybridConnectionStatus interface, as shown in Listing 8-29.
Listing 8-29. Connection Upgrade Event
IHybridConnectionStatus hybridConnectionStatus = channel.GetProperty<IHybridConnectionStatus>();

       if (hybridConnectionStatus != null)

            {

                hybridConnectionStatus.ConnectionStateChanged += (o, e) =>

                {

                   //Do work

                };

            }
HTTP Relay Bindings
As discussed in Table 8-3, the AppFabric Service Bus supports the following HTTP relay bindings:
- BasicHttpRelayBinding
- WebHttpRelayBinding
- WSHttpRelayBinding
- WS2007HttpRelayBinding
This section covers only WS2007HttpRelayBinding and WebHttpRelayBinding because the concepts for using all these bindings are similar. When you use HTTP bindings, the AppFabric Service Bus uses HTTP as the communication protocol instead of TCP as you saw earlier in the netOnewayRelayBinding and netTcpRelayBinding sections. HTTP bindings exchange plain XML, SOAP, WS-*, or raw text and binary messages, so they're preferred in non-WCF client environments.
At a higher level, all the HTTP bindings follow the same sequence of steps to communicate via the relay service, as shown in Figure 8-27.
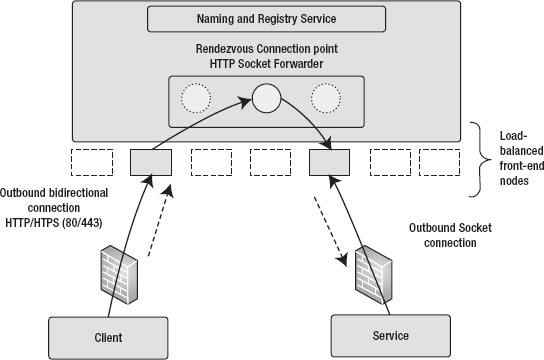
Figure 8-27. HTTP bindings
As shown in Figure 8-27, in an HTTP binding scenario, the service authenticates and registers its endpoint with the relay service. Then, a client authenticates and connects to the relay service to call a method on the service. The relay service routes the HTTP (REST), SOAP 1.1, and SOAP 1.2 calls to the service. Your business logic in the code doesn't change depending on the binding you use. As you saw earlier, you can configure bindings in the configuration file.
WS2007HttpRelayBinding
WS2007HttpRelayBinding supports SOAP 1.2 messaging with the latest OASIS standards for reliable message exchange and security. It's used to create SOAP over HTTP interfaces for your service. To demonstrate WS2007HttpRelayBinding, you use the same control gateway applications as the service, and the head-end server as the client application as you saw for netTcpRelayBinding. By modifying a few lines of code, you can easily convert netTcpRelayBinding to ws2007HttpRelayBinding.
The binding and service configuration for WS2007HttpRelayBinding is shown in Listing 8-30.
Listing 8-30. WS2007HttpRelay Configuration
<!–Define the binding -->

<ws2007HttpRelayBinding>

<binding name="default">

<security mode="None" relayClientAuthenticationType="None" />

</binding>

</ws2007HttpRelayBinding>


<!—Define end point -->

<endpoint name="RelayTcpEndpoint"

            contract="EnergyServiceContract.IEnergyServiceGatewayOperations"

            binding="ws2007HttpRelayBinding"

            bindingConfiguration="default"

            address="" />
The only difference between netTcpRelayConfiguration and ws2007HttpRelayConfiguration is the definition of the binding and replacing netTcpRelayBinding with ws2007HttpRelayBinding. Similarly, in the client application, you can make replacements as shown in Listing 8-31.
Listing 8-31. WS2007HttpRelayBinding Configuration
<!–Define the binding -->

<bindings>

 <ws2007HttpRelayBinding>

  <binding name="default">

   <security mode="None"/>

  </binding>

 </ws2007HttpRelayBinding>

</bindings>

<!–Define end point -->

<client>

<endpoint

name="RelayTcpEndpoint"

contract="EnergyServiceContract.IEnergyServiceGatewayOperations"

binding="ws2007HttpRelayBinding "

bindingConfiguration="default"

behaviorConfiguration="sharedSecretClientCredentials"

address="http://AddressToBeReplacedInCode/" />

</client>
The WS2007HttpRelayBinding client application authenticates itself with the AppFabric Service Bus using the ACS shared-secret authentication method. In the code, when you generate the URI in both client and the server, you must replace the “sb” protocol from netTcpRelayBinding to “http” for ws2007HttpRelayBinding:
Uri serviceUri = ServiceBusEnvironment.CreateServiceUri("http", serviceNamespace,

ServiceBusHelper.GetGatewayServicePath(gatewayId));
The steps required to run the end-to-end application are the same as running the netTcpRelayBinding example in the previous section.
Figure 8-28 shows the client and service applications using WS2007HttpRelayBinding.
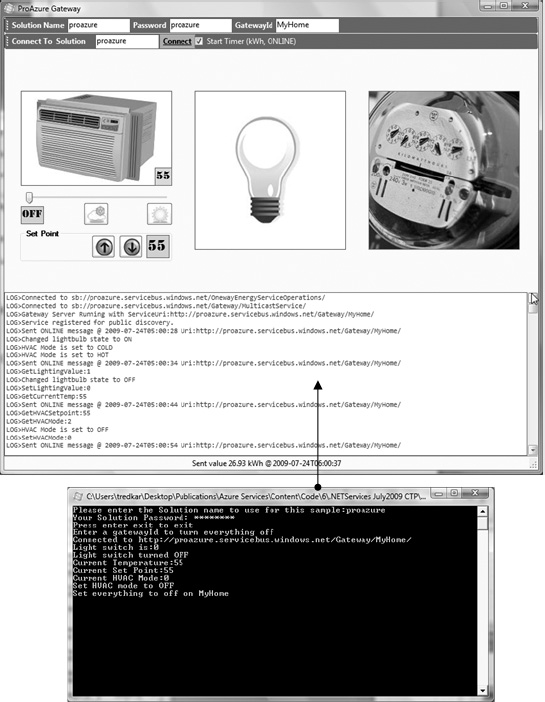
Figure 8-28. WS2007HttpRelayBinding client and service applications
While running the application, note the delay when using the WS2007HttpRelayBinding as compared to the netTcpRelayBinding. WS2007HttpRelayBinding polls the relay service for the message.
WebHttpRelayBinding
In the past few years, REST-style programming has becomes popular because it uses existing HTTP constructs to communicate messages and remote method invocations. As compared to SOAP, the REST interface is easier to use in manual and scripting interfaces. In the Windows Azure Storage chapters, you learned to use the REST interface exposed by the storage service to interact with storage objects like blobs, queues, and tables. WebHttpRelayBinding is used to create HTTP, XML, and REST-style interfaces for your service.
To demonstrate WebHttpRelayBinding, you create a simple service contract that represents a REST-style interface over the control gateway service. You can find the example for WebHttpRelayBinding in the project RESTGatewayServer in Ch8Solution.
Listing 8-32 shows the code representing two contracts: one for the lighting service (IRESTLightswitch) and the other (IRESTEnergyMeter) for the energy meter service.
Listing 8-32. Lighting Service and Energy Meter Contracts
namespace EnergyServiceContract

{


    [ServiceContract(Name = "IRESTLightswitch.",

Namespace = "http://proazure/ServiceBus/energyservice/gateway")]

    public interface IRESTLightswitch

    {

        [OperationContract(Action = "GET", ReplyAction = "GETRESPONSE")]

        Message GetLightswitchState();

    }

    public interface IRESTLightswitchChannel : IRESTLightswitch, IClientChannel

    {

    }


    [ServiceContract(Name = "IRESTEnergyMeter.",

Namespace = "http://proazure/ServiceBus/energyservice/gateway")]

    public interface IRESTEnergyMeter

    {

        [OperationContract(Action = "GET", ReplyAction = "GETRESPONSE")]

        Message GetKWhValue();

    }

}
You can combine both interfaces into one, but this example ties the simple HTTP GET operation to each method. The OperationContract.Action attribute property represents the HTTP action used to call this operation. This name must be unique within an interface. The System.ServiceModel.Channels.Message return type is a generic type of object to communicate information between the client and the service.
Listing 8-33 contains the implementation of both the service contracts.
Listing 8-33. Service Implementation
public class GatewayService : IRESTLightswitch, IRESTEnergyMeter

    {

         const string ON_FILE = "on.jpg";

         const string OFF_FILE = "off.jpg";

         Image on, off;

         static int LIGHT_BULB_STATE = 0;

        public GatewayService()

        {

            on = Image.FromFile(ON_FILE);

            off = Image.FromFile(OFF_FILE);

        }

        public Message GetLightswitchState()

        {

            Message m = Message.CreateMessage

(OperationContext.Current.IncomingMessageVersion, "GETRESPONSE", "ON");

            return m;

        }

        System.ServiceModel.Channels.Message IRESTLightswitch.GetLightswitchState()

        {

            Message response = StreamMessageHelper.CreateMessage

(OperationContext.Current.IncomingMessageVersion,

"GETRESPONSE", this.WriteImageToStream);

            HttpResponseMessageProperty responseProperty =

new HttpResponseMessageProperty();

            responseProperty.Headers.Add("Content-Type", "image/jpeg");

            response.Properties.Add(HttpResponseMessageProperty.Name,

responseProperty);

            return response;

        }

        public void WriteImageToStream(System.IO.Stream stream)

        {

            Image i = (LIGHT_BULB_STATE == 0) ? off : on;

            i.Save(stream, ImageFormat.Jpeg);

            if (LIGHT_BULB_STATE == 0)

            {

                LIGHT_BULB_STATE = 1;

            }

            else

            {

                LIGHT_BULB_STATE = 0;

            }

        }

        System.ServiceModel.Channels.Message IRESTEnergyMeter.GetKWhValue()

        {

            Random r = new Random();

            double kwhValue = double.Parse

(String.Format("{0:0.00}", (r.NextDouble() * 100)));

            System.ServiceModel.Channels.Message m =Message.CreateMessage

(OperationContext.Current.IncomingMessageVersion, "GETRESPONSE",
String.Format("{0:00}", kwhValue));

            return m;

        }

    }
In Listing 8-33, the GatewayService class implements the IRESTLightswitch and IRESTEnergyMeter interfaces. The implementation of the methods is very simple because they're only simulating the call and not making any real calls to the devices. The GetLightswitchState() method returns an image representing the state of the lighting service. The GetKWhValue() method returns a text value representing a randomly generated kWh value. Note the use of the System.ServiceModel.Channels.Message object to transfer an image as well as a text value.
Because you can access the REST interface manually from the browser, you don't implement a client for the service. Listing 8-34 shows the configuration for the service.
Listing 8-34. Service Configuration
<?xml version="1.0" encoding="utf-8" ?>

<configuration>

  <system.serviceModel>

    <bindings>

      <!-- Application Binding -->

      <webHttpRelayBinding>

                  <binding name="default" >


                           <security

relayClientAuthenticationType="None" />


                  </binding>

      </webHttpRelayBinding>

    </bindings>


    <services>

      <!-- Application Service -->

      <service name="RESTGatewayServer.GatewayService"

               behaviorConfiguration="default">

        <endpoint name="LighswitchEndpoint"

                  contract="EnergyServiceContract.IRESTLightswitch"

                  binding="webHttpRelayBinding"

                  bindingConfiguration="default"

                  behaviorConfiguration="cardSpaceClientCredentials"

                  address=

"https://{your service namespace}.servicebus.windows.net/Gateway/MyHome/Lightswitch" />

                  <endpoint name="EnergyMeterEndpoint"

                  contract="EnergyServiceContract.IRESTEnergyMeter"

                  binding="webHttpRelayBinding"

                  bindingConfiguration="default"

                  behaviorConfiguration="cardSpaceClientCredentials"

                  address=

"https://{your service namespace}.servicebus.windows.net/Gateway/MyHome/Meter" />

      </service>

    </services>

<behaviors>
      <endpointBehaviors>

        <behavior name="sharedSecretClientCredentials">

          <transportClientEndpointBehavior credentialType="SharedSecret">

            <clientCredentials>

              <sharedSecret issuerName="owner" issuerSecret="wJBJaobUmarWn6kqv7QpaaRh3ttNVr3w1OjiotVEOL4=" />

            </clientCredentials>

          </transportClientEndpointBehavior>

        </behavior>

      </endpointBehaviors>

      <serviceBehaviors>

        <behavior name="default">

          <serviceDebug httpHelpPageEnabled="false" httpsHelpPageEnabled="false" />

        </behavior>

      </serviceBehaviors>

    </behaviors>  </system.serviceModel>

</configuration>
In Listing 8-34, the service is configured to use a shared secret to authenticate with the AppFabric Service Bus. The relayAuthenticationType=None value disables the user authentication so that users can access the service without authenticating themselves. You can start the service, and users should be able to access it through the browser.
The steps to run the RESTGatewayServer application are as follows:
- Configure the service with your service namespace and shared secret information.
- Open a command prompt as Administrator, and navigate to the binDebug folder of the RESTGatewayServer project.
- Run RESTGatewayServer.exe.
- When the service starts, it displays URIs for the Lightswitch and EnergyMeter endpoints. Write down the URI access points of Lightswitch and EnergyMeter, as shown in Figure 8-29.
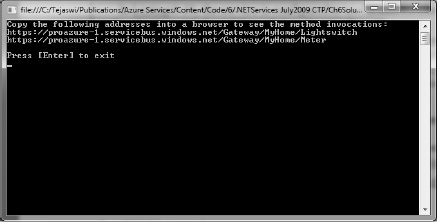
Figure 8-29. Access URLs
- Open a browser, and navigate to each endpoint. The method is automatically invoked, and the result is displayed in the browser as shown in Figures 8-30 and 8-31. Figure 8-30 illustrates the light switch state, and Figure 8-31 illustrates the energy meter value.
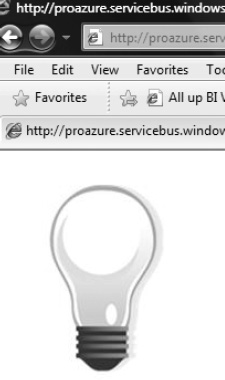
Figure 8-30. Light switch state

Figure 8-31. Energy meter value
- You can also go to the AtomPub feed of the service to invoke methods. Navigate to the solution feed page
http://[solution name].servicebus.windows.net/, as shown in Figure 8-32.
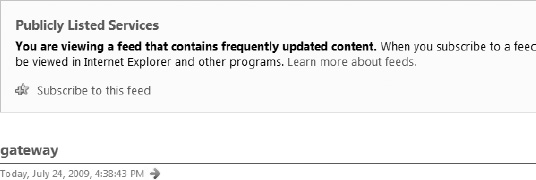
Figure 8-32. Solution feed
- Click the gateway to go to the list of registered gateways feeds, as shown in Figure 8-33.
Figure 8-33. Registered gateways
- Click the gateway (myhome) to go to the gateway operations feed page, as shown in Figure 8-34.

- Click any of the listed operations to invoke the remote method and see the response in the browser.
Message Buffer
A message buffer is a temporary cache you can create in the AppFabric Service Bus. I call it a temporary cache because the data in the cache isn't persistent and can't survive server reboots. Therefore, I recommend that you store only temporary data in message buffers and assume data loss while programming your applications.
![]() Note At the time of writing, AppFabric Service Bus version 2 had just been released. Therefore, we will cover both Message Buffers and the version 2 replacement, Queues and Topics. Bear in mind that Message Buffers are intended to be deprecated in future releases, and are only supported for backward compatibility going forward.
Note At the time of writing, AppFabric Service Bus version 2 had just been released. Therefore, we will cover both Message Buffers and the version 2 replacement, Queues and Topics. Bear in mind that Message Buffers are intended to be deprecated in future releases, and are only supported for backward compatibility going forward.
A message buffer exposes operations through a REST API that you can use to create message buffers and execute CRUD operations on messages. The message buffer REST API integrates with ACS, and therefore you can share the authentication you use for other Service Bus application with the message buffer. Figure 8-35 illustrates the high-level architecture of the message buffer.
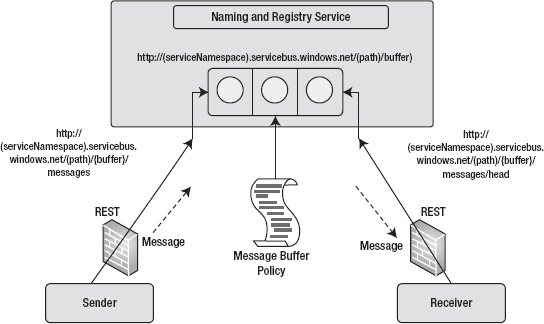
Figure 8-35. Message buffer architecture
As illustrated in Figure 8-35, the message buffer has three main components: a message buffer, a message buffer policy, and the message. The message buffer represents the actual buffer you use to store messages. The message buffer policy represents certain attributes of the message buffer such as the buffer lifetime, maximum message count, and message overflow policy. The message represents the message you send and receive from a message buffer.
The typical developer workflow in a message buffer application is as follows:
- Create a message buffer policy.
- Create a message buffer.
- Send messages to the message buffer.
- Receive or peek messages from the message buffer.
- Delete messages.
- Delete the message buffer.
The Service Bus SDK also provides a MessageBufferClient class in the Microsoft.ServiceBus.dll assembly for interacting with the message buffer. Figure 8-36 shows the class diagram of the MessageBufferClient and MessageBufferPolicy classes.

Figure 8-36. MessageBufferClient and MessageBufferPolicy class diagrams
As shown in Figure 8-35, the MessageBufferClient class includes all the basic operations like CreateMessageBuffer(), DeleteMessageBuffer(), Retrieve(), Send(), and PeekLock() for interacting with the message buffer. The MessageBufferClient class abstracts the REST interface. You can call the MessageBufferClient methods from your code directly; the MessageBufferClient class translates the method invocations into REST API calls to the message buffer.
![]() Note To learn more about the message buffer REST API methods, visit the AppFabric SDK at
Note To learn more about the message buffer REST API methods, visit the AppFabric SDK at http://msdn.microsoft.com/en-us/library/ee794877.aspx.
Programming Message Buffer Applications
Because of the REST API, a message buffer is available to any programming language, cross platform. You can write message buffer applications in any programming language that can make remote HTTP calls. This section goes over the typical developer operations on the message buffer using the MessageBufferClient class in the C# language.
Creating a Message Buffer Policy
A message buffer policy represents the runtime attributes of a message buffer. The policy is applied to a message buffer during its creation time. A message buffer policy is represented by the MessageBufferPolicy class, which is passed to the MessageBufferClient.CreateMessageBuffer() method. Listing 8-35 shows the code to create an instance of the MessageBufferPolicy class.
Listing 8-35. Initialize MessageBufferPolicy
private static MessageBufferPolicy GetMessagBufferPolicy(double bufferExpirationTime,

int maxMessageCount)

 {

            MessageBufferPolicy policy = new MessageBufferPolicy

            {

                ExpiresAfter = TimeSpan.FromMinutes(bufferExpirationTime),

                MaxMessageCount = maxMessageCount,

                OverflowPolicy = OverflowPolicy.RejectIncomingMessage,

                Authorization = AuthorizationPolicy.NotRequired,

                Discoverability = DiscoverabilityPolicy.Public,

                TransportProtection = TransportProtectionPolicy.AllPaths


            };

            return policy;

 }
In Listing 8-35, ExpiresAfter sets the lifetime of the message buffer. The lifetime of the message buffer is automatically renewed when you send a message to the buffer. MaxMessageCount represents the message capacity of the message buffer. OverflowPolicy represents the policy to be applied if there is a message overflow beyond the capacity of the message buffer. As of the September 2011 release of the Service Bus API, the only overflow policy available was OverflowPolicy.RejectIncomingMessage. AuthorizationPolicy represents the authorization policy required to access the message buffer. The default policy is AuthorizationPolicy.Required, which means that authorization is required to send as well as receiving messages. Discoverability determines whether the message buffer is accessible from the AppFabric Atom Feed. If Discoverability isn't set to Public, then applications must know the explicit URI of the message buffer. The default Discoverability value is Managers, which means only the application that created the message buffer has access to it. TransportProtection represents the end-to-end security of the message that traverses from sender to the receiver.
Creating and Deleting a Message Buffer
When you've created the message buffer policy, you can create the message buffer by calling the MessageBufferClient.CreateMessageBuffer() method, as shown in Listing 8-36.
Listing 8-36. Create Message Buffer
private MessageBufferClient CreateMessageBuffer(

string serviceNamespace, string messageBufferName, TransportClientEndpointBehavior behavior,

MessageBufferPolicy policy)

{

MessageVersion messageVersion = MessageVersion.Default;

Uri messageBufferUri = ServiceBusEnvironment.CreateServiceUri

("https", serviceNamespace, messageBufferName);

return MessageBufferClient.CreateMessageBuffer(behavior, messageBufferUri, policy, messageVersion);

}
Before you create a message buffer, you have to create an URI for the message buffer endpoint. You can create only one message buffer per endpoint, and when the endpoint is reserved for the message buffer, you can't register any other service on that endpoint. After the message buffer is created, you can get a reference to a message buffer (MessageBufferClient object) by calling the method
MessageBufferClient client = MessageBufferClient.GetMessageBuffer(TransportClientEndpointBehavior behavior, Uri messageBufferUri)
You can delete a message buffer by calling the method MessageBufferClient. DeleteMessageBuffer().
Sending Messages to a Message Buffer
To send messages to the message buffer, you can call the Send() method on the message buffer Client object that was returned either when the message buffer was created or when you called the GetMessageBuffer() method. Listing 8-37 shows the method call to send messages to a message buffer.
Listing 8-37. Sending Messages to a Message Buffer
private void SendMessage(string message, MessageBufferClient client)

{

        System.ServiceModel.Channels.Message msg = System.ServiceModel.Channels.Message.CreateMessage(

                MessageVersion.Default,

                string.Empty,

                message);

            client.Send(msg, TimeSpan.FromSeconds(30));

            msg.Close();

}
The Send() method accepts a System.ServiceModel.Channels.Message object and optionally accepts a method execution timeout value. This is the time the method call should wait before timing out.
Retrieving Message from a Message Buffer
The message buffer client API provides two main methods for retrieving a message from the message buffer: PeekLock() and Retrieve(). The PeekLock() method is used to peek at the first message in the message buffer by locking the message before the buffer is instructed to release or delete the message. The PeekLock() method also provides overloads for specifying the method timeout to wait on message and the duration for which the message remains locked. You can lock a message for a duration between 10 seconds and 5 minutes, the default being 2 minutes. You can call the DeleteLockedMessage() or ReleaseLock() method to release a lock on the message.
The Retrieve() method retrieves the message from the message buffer and deletes the message from the message buffer. This kind of read is also called a destructive read and is the recommended method for high-performance applications to avoid round trips to the server. Listing 8-38 shows the code for retrieving messages from the message buffer.
Listing 8-38. Retrieving Messages from a Message Buffer
private string RetrieveMessage(MessageBufferClient client)

{

            System.ServiceModel.Channels.Message retrievedMessage;


            retrievedMessage = client.Retrieve();

            retrievedMessage.Close();


            return retrievedMessage.GetBody<string>();


}


private string PeekMessage(MessageBufferClient client)

{


            System.ServiceModel.Channels.Message lockedMessage = client.PeekLock();

            client.DeleteLockedMessage(lockedMessage);

            lockedMessage.Close();


            return lockedMessage.GetBody<string>();

}
Message Buffer Sample Application
I've created a message buffer sample application in the source code solution for this chapter. The MessageBuffer project in the chapter solution is a Windows application that creates a message buffer, sends messages to the message buffer, retrieves messages from the message buffer, and finally deletes the message buffer. Figure 8-37 shows the application in action.
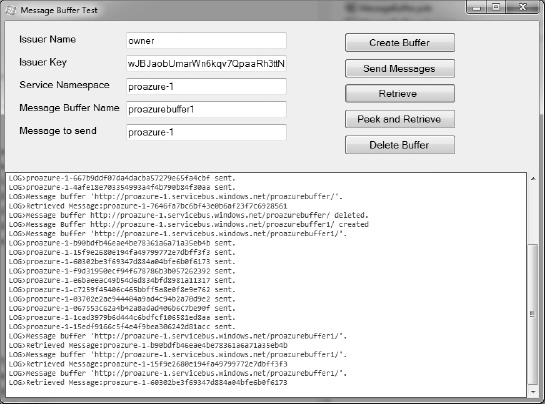
Figure 8-37. Message buffer sample application
In the sample application, you can enter your own issuer credentials and service namespace and start interacting with the message buffer. From the application, you can create a message buffer, send messages, retrieve messages, peek and retrieve messages, and finally delete the message buffer. In this case, the message sender and the message receiver are the same application; but you can separate the message sender and message receiver functionality into different applications because the message buffer API is stateless and so the same instance of the message buffer is accessible to all authenticated applications.
AppFabric Messaging: Queues and Topics
While the AppFabric Service Bus provided a viable ESB solution, there were some limitations. Most notably, the Message Buffer is only a temporary cache, and cannot survive server reboots. Some application architects worked around this by using Windows Azure Storage Queues. However, this did not permit the extra functionality provided by the Service Bus, such as event notification patterns, multicasting, and support for protocols other than HTTP/S.
Version 2 of the Service Bus provides the best of both worlds. The focus of this release is to enable rich messaging scenarios, such as publish/subscribe, temporal decoupling, and load balancing scenarios at Internet scale.6 AppFabric Service Bus Queues provides a persistent store for messages, and Topics enable the ability to distribute messages to multiple consumers using simple rules and a publish/subscribe pattern.
_______________
6MSDN documentation: http://msdn.microsoft.com/en-us/library/hh201962.aspx
![]() Note Another great source of information on this topic can be found at
Note Another great source of information on this topic can be found at http://blogs.msdn.com/b/windowsazure/archive/2011/11/11/new-article-managing-and-testing-topics-queues-and-relay-services-with-the-service-bus-explorer-tool.aspx. This blog post covers the Service Bus Explorer Tool, which allows you to administer your messaging entities, but also has links to many other background subjects as well.
AppFabric Service Bus Queues
In building a queuing mechanism, the team set out to incorporate the same features as Microsoft Messaging Queue (MSMQ). To that end, the new features were built by the same team that owns the MSMQ technology. However, in this case they were provided with an Internet-scale technology foundation, as well as the naming and discovery services provided by Service Bus. The result is a cloud cloud-based, message-oriented-middleware technologies to Service Bus that provide reliable message queuing and durable publish/subscribe messaging both over a simple and broadly interoperable REST-style HTTPS protocol with long-polling support and a throughput-optimized, connection-oriented, duplex TCP protocol.7 Figure 8-38 shows the AppFabric Service Bus Queues architecture.
Some of the functionality provided by AppFabric Queues includes:
- Peek-Lock delivery pattern for reliable delivery
- NET API and REST API
- Detection of duplicate inbound messages
- Dead-letter queue for messages that expire or fail
- Scheduled delivery of messages
_______________
7Clemens Vasters' blog: http://vasters.com/clemensv/2011/05/16/Introducing+The+Windows+Azure+AppFabric+Service+Bus+May+2011+CTP.aspx
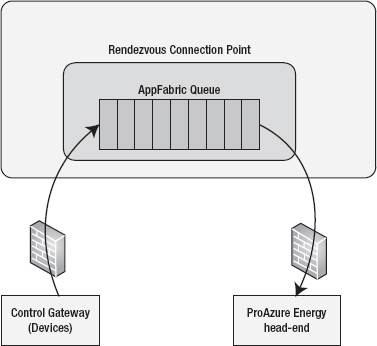
Figure 8-38. AppFabric Service Bus Queues
![]() Note To view all Service Bus Messaging quotas, go to
Note To view all Service Bus Messaging quotas, go to http://msdn.microsoft.com/en-us/library/ee732538.aspx.
AppFabric Service Bus Queues vs. Azure Storage Queues
Both mechanisms provide a queuing mechanism. So, what are the differences, and when should each be used? AppFabric Queues provide a richer messaging environment in that it supports protocols other than HTTP/S, in addition to enabling advanced messaging features:
- WCF binding
- Poison message handling
- Dead-lettering
- Transactions
- Groups
- Sessions
- duplicate detectionMessage Deferral/Scheduled Delivery
- Authentication via ACS
Also, both services support REST over HTTP, but if you require a higher level of performance, you can use bi-directional TCP with the AppFabric Queue.
Another key difference is that AppFabric Queues support the use of sessions. With this, you gain the ability to guarantee First-In First-Out ordering, as well as the ability to support Exactly-Once delivery.
If any of the mentioned capabilities are required, you will need to use AppFabric Queues. If you simply want to use a queue to support cross-service communication, such as inter-role communication at scale, then AppFabric Queues could be overkill. In this case, Azure Storage Queues should be sufficient.
AppFabric Service Bus Topics
Topics build on top of the queue mechanism to provide a way to distribute messages to multiple consumers through the service bus using simple rules via a publish/subscribe pattern. This can enable messaging scenarios where there is one central distribution point for messages, and multiple loosely connected receiver applications that can subscribe to the topic, and add rules to their subscription, so that only certain messages are received from the topic.
A topic allows for concurrent, durable subscriptions. Each subscription contains a set of filtering rules that use expressions to specify which messages should be delivered from the topic when the subscription is accessed.
Continuing with our energy example, let's say that ProAzure Energy decides they need to distribute their workload such that one system specifically handles data or commands specific to heating and cooling (HVAC), and another system handles all commands and data sent from lighting devices. This would normally be very complicated, because it would usually require an update to the devices to enable them to send to different locations. However, in this case Topics save the day. The servers simply create different subscriptions in order to pull different messages. The devices—they still send to the same topic as always, which saves a significant amount of re-work and device updating. See Figure 8-39.
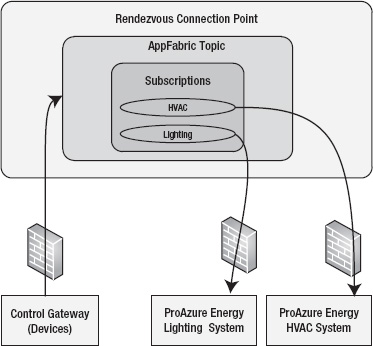
Figure 8-39. AppFabric Service Bus Topics
Subscription Rules
A particular subscription can contain one or more rules that specify what messages the subscription is expecting to find within the topic. When creating rules for a subscription, you have the options discussed in the following sections.
SQLFilterExpression
A SQLFilterExpression is an expression created in SQL 92 syntax. If the expression evaluates to true, then the message is a match, and will be delivered to the receiver through the subscription.
CorrelationFilterExpression
When using a CorrelationFilterExpression, you provide a GUID-based Correlation Id. This CorrelationId represents the header X_MS_CORRELATION_ID in the message. All messages with a matching Correlation Id will be delivered to the receiver through the subscription. When attempting to correlate messages, you would set this header when the message is sent to the Topic.
Programming Service Bus Queues and Topics
There are two avenues for programming solutions that use Queues and Topics: a .NET Client API and a REST-based API. We will explore both in the following sections.
.NET Client API
The .NET client API for this new functionality is located in two namespaces: Microsoft.ServiceBus and Microsoft.ServiceBus.Messaging. In your project, you will need to reference the Microsoft.ServiceBus.dll assembly.
Microsoft.ServiceBus Namespace
There are two key classes in this namespace related to Queues and Topics: NamespaceManager and NamespaceManagerSettings. These classes are using in conjunction with the classes in the Microsoft.ServiceBus.Messaging namespace to manage your Queues and Topics.
NamespaceManagerSettings
The NamespaceManagerSettings class provides the settings that drive NamespaceManager behavior. It contains two properties:
- Operation Timeout: Timeout period for all namespace management operations, which will be covered in the NamespaceManager section later in this chapter.
- TokenProvider: Allows you to define a TokenProvider the NamespaceManger object will use for authentication purposes.
NamespaceManager
The NamespaceManager class provides the ability to manage queues, topics, rules and subscriptions. You can use NamespaceManager to create or delete any of these entities, as well as view the metadata properties of each entity. In order to create a NamespaceManager object, we will need to provide the constructor with the URI of the namespace being managed, as well as either a TokenProvider object or a NamespaceManagerSettings object to define the behavior of the NamespaceManager.
Creating a Queue/Topic
You can create a NamespaceManager object and use it to create the entities you need. An example of creating a queue and a topic is shown in Listing 8-39. The create method for all entities provides overloaded parameters that support either passing in a string representing the path of the entity, or a Description object (QueueDescription, TopicDescription, RuleDescription, SubscriptionDescription), which contains the metadata needed to define the behavior of the entity. An example of using a QueueDescription to enable session state, dead-lettering, and duplicate detection is shown in Listing 8-40.
Listing 8-39. Creating a queue using NamespaceManager
var baseAddress = RoleEnvironment.GetConfigurationSettingValue("namespaceAddress");

var issuerName = RoleEnvironment.GetConfigurationSettingValue("issuerName");

var issuerKey = RoleEnvironment.GetConfigurationSettingValue("issuerKey");


Uri namespaceAddress = ServiceBusEnvironment.CreateServiceUri("sb", baseAddress, string.Empty);


NameSpaceManager namespaceManager = new NamespaceManager(namespaceAddress, TokenProvider.CreateSharedSecretTokenProvider(issuerName, issuerKey));

// CreateQueue returns a QueueDescription object, which contains all queue metadata

var queueDescription = namespaceManager.CreateQueue("energyqueue");


// create a topic, returns the TopicDescription

var topicDescription = namespaceManager.CreateTopic(“energytopic”);


// add subscriptions to topic

var hvacSubscription = this.namespaceManager.CreateSubscription(topicDescription.Path, "HVACSubscription", new SqlFilter("messageType='hvac'"));


var lightingSubscription = this.namespaceManager.CreateSubscription(topicDescription.Path, "LightingSubscription", new SqlFilter("messageType='lighting'"));
Adding Session State to a Queue
Session state enables many possibilities such as FIFO or Exactly Once delivery. In order to set up a queue that requires session state, you need to pass in a QueueDescription object from the Microsoft.ServiceBus.Messaging namespace. An example of this is shown in Listing 8-40.
Listing 8-40. Creating a Queue with Session State
QueueDescription queueDescription = new QueueDescription {

        RequiresSession = true,

        RequiresDuplicateDetection = true,

        EnableDeadLetteringOnMessageExpiration = true };

this.namespaceManager.CreateQueue(queueDescription);
![]() Note For more information about the all methods and properties available in the NamespaceManager class, go to http://msdn.microsoft.com/en-us/library/hh293164.aspx
Note For more information about the all methods and properties available in the NamespaceManager class, go to http://msdn.microsoft.com/en-us/library/hh293164.aspx
Microsoft.ServiceBus.Messaging Namespace
There are many new classes in the API that facilitate the new messaging functionality:

Foundational Message Components
No matter whether you are communicating with a Queue or a Topic, you will be sending or receiving a BrokeredMessage object. This object contains the message itself, plus all the properties that define the message metadata, such as CorrelationId, time the message expires, send to address, reply to address, and more.
The MessagingFactory is an object that represents the Service Bus Messaging namespace itself, and is responsible for creating messaging clients specific to the messaging pattern (Queue, Topic, Subscription) The messaging client object (QueueClient, TopicClient, SubscriptionClient) creates the objects that actually send or receive messages. Listing 8-41 shows how to create the components that will establish the means to implement a messaging infrastructure.
Listing 8-41. Creating Foundational Components Used for Either Sending or Receiving
// Create MessagingFactory for this namespace

MessagingFactory factory = MessagingFactory.Create(

                ServiceBusEnvironment.CreateServiceUri("sb", ServiceNamespace, string.Empty),

                credentials);


// Create Queue Client with PeekLock receive mode

QueueClient queueClient = factory.CreateQueueClient("energyqueue", ReceiveMode.PeekLock);


// Create Topic Client

TopicClient topicClient = factory.CreateTopicClient("energytopic");
Creating and Sending Messages
Once we have created the base components, we can create a message and send it to the messaging bus. In order to do so, we will first need to create messages to send. Then we will send some to the Queue, and some to the Topic to be picked up by separate subscriptions. The BrokeredMessage.CreateMessage() static method is used to create the message. This message serializes your object into the body of the message. You have the option of defining your own XmlObjectSerializer, or passing in a Stream object as well. See Table 8-8.
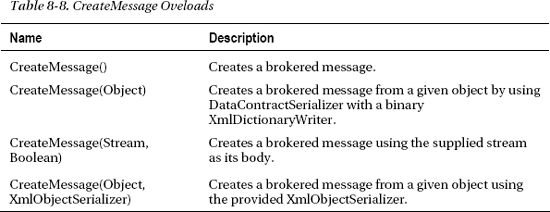
Create and Send to Queue
Because Queues are less complicated than Topics and don't have any subscriptions or filtering rules, sending messages is simply a matter of creating the message and sending to the Queue.
Listing 8-42. Creating a Message and Sending to AppFabric Queue
// Create message

BrokeredMessage message = new BrokeredMessage(“Test message”);


// send to queue

queueClient.Send(message);
Retrieve from Queue
To retrieve from a queue, we create a MessageReceiver object, set the RecieveMode (Peek-Lock in this case), and check the queue. We set the waitTime to 5 seconds, meaning that if the queue is empty, the receiver will wait five seconds in case any messages come in. If there are messages, it will return immediately.
Listing 8-43. Retrieve from Queue Using Peek-Lock
QueueClient queueClient = this.messagingFactory.CreateQueueClient(queueName, ReceiveMode.PeekLock);

// check for a message, wait 5 seconds if queue is empty

BrokeredMessage receivedMessage = queueClient.Receive(new TimeSpan(0, 0, 5));
Create and Send to Topic
When we send to a topic, we expect subscriptions to apply filtering rules. Hence, we need knowledge of the type of message being sent, so we can apply FilterExpressions. Typically, we would be able to refer to the properties of the serialized object. In this case, though, we are going to explicitly set the properties of the message. The Properties Dictionary object allows us to set application-specific properties, which is perfect for our purposes, because our message is a simple string object. We will set a property called messageType, which will contain either hvac or lighting as its value. In Listing 8-44, two messages are for HVAC, one is for lighting.
Listing 8-44. Creating and Sending Topic Messages
private static void CreateTopicMessage(string messageContents, string messageType)

        {

            BrokeredMessage message = new BrokeredMessage(messageContents);

            message.Properties["messageType"] = messageType;

topicClient.Send(message);

        }
Retrieve Messages Using Subscriptions
Now that the messages are waiting for us in the topic, we can retrieve them using our subscription. For illustrative purposes, we are using the Peek-Lock mode to receive messages for HVAC messages, and using Receive and Delete for the lighting messages. Note that in the Peek-Lock pattern, we have to use message.Complete() to remove the message from the queue once we are done processing. Running the code in Listing 8-45 should result in the HVAC subscription receiving two messages, and the lighting subscription receiving one.
Listing 8-45. Retrieving Messages Through Subscriptions
// HVAC subscription – PeekLock mode
SubscriptionClient hvacSubscriptionClient = factory.CreateSubscriptionClient("EnergyTopic", "HVACSubscription, ReceiveMode.PeekLock");


// Lighitng subscription - receive and delete

SubscriptionClient lightingSubscriptionClient = factory.CreateSubscriptionClient("EnergyTopic", "LightingSubscription", ReceiveMode.ReceiveAndDelete);


// get HVAC messages from topic

BrokeredMessage receivedHvacMessage = hvacSubscriptionClient.Receive(new TimeSpan(0, 0, 5));

string messageBody = message.GetBody<string>();

// Process the message here

message.Complete(); // remove the PeekLock, can ONLY be called when using PeekLock


// get lighting messages using receive and delete

BrokeredMessage receivedLightingMessage = lightingSubscriptionClient.Receive(new TimeSpan(0, 0, 5));

string messageBody = message.GetBody<string>();

// no need to complete, it was removed from queue
Handling Problem Messages and Abandonment
It's inevitable that errors will occur in message processing. Common scenarios include invalid or poison messages, or an issue that occurred with the server processing the message. Let's look at both scenarios.
Invalid/Poison Messages
In this case, the main concern is that we don't want to return these messages to the processing queue, as it will just cause issues for the next server that processes the messages. In addition, the poison messages will accumulate, and exponentially degrade performance. So it's not a good idea to abandon this message, nor to let the lock expire, as either will return the message to the queue. The best practice is to transfer it somewhere else where it can be handled as an exception. AppFabric Service bus provides the dead letter queue for exactly this purpose.
This is accomplished using the DeadLetter() method of the BrokeredMessage object. This moves it to a queue named $DeadLetterQueue. Once it arrives in this queue, you can decide how you want to handle the message. One approach would be to retrieve the messages using the ReceiveAndDelete pattern, and log them for later analysis. See Listing 8-46.
Listing 8-46. Retrieving Messages from $DeadLetterQueue and Log Information
// Log the dead-lettered messages that could not be processed:

using (MessageReceiver deadLetterReceiver = queueClient.CreateReceiver("$DeadLetterQueue", ReceiveMode.ReceiveAndDelete))

{

     BrokeredMessage receivedDeadLetterMessage;

      while (deadLetterReceiver.TryReceive(TimeSpan.FromSeconds(10), out receivedDeadLetterMessage))

     {

        LogOrder(receivedDeadLetterMessage);

     }

}

QueueClient deadLetterClient = factory.CreateQueueClient("$DeadLetterQueue ", ReceiveMode.ReceiveAndDelete);

BrokeredMessage deadLetterMessage = deadLetterClient.Receive(new TimeSpan(0, 0, 5));

//Process dead lettered message
Server Error During Message Processing
Another common scenario involves errors that occur on the server, while there is nothing wrong with the message, and it will need to be re-processed. In this scenario, we want to return the message to the queue so that another server can process it. The mechanisms for this depend on the ReceiveMode.
For Peek-Lock, we could simply let the TimeToLive expire, in which case the AppFabric Service Bus would return the message to the queue. However, if we want to be more proactive, we should use the Abandon() method of the BrokeredMessage object.
If you're using ReceiveAndDelete, then the message was deleted from the queue at the time it was received. Neither Abandon() or relying on TimeToLive will work. You'll have to explicitly send the message back into the queue.
REST API
If you don't want to use the .NET client, then the REST API exposes functionality that can be used to interact with queues. I've broken these out into several categories: Message commands and Management commands. Message commands simply send/receive/delete messages to and from existing queues and topics, while the management commands provide the ability to manage the queues or topics themselves.
![]() Note When using the REST API, the sb:// is replaced by https://.Also, unless otherwise noted, all requests require HTTP/1.1 version. Additionally, set request Header Content-type to
Note When using the REST API, the sb:// is replaced by https://.Also, unless otherwise noted, all requests require HTTP/1.1 version. Additionally, set request Header Content-type to application/atom+xml;type=entry;charset=utf-8.
Securing REST API Requests with Access Control Service
You can secure your REST API requests using WRAPv0.9.7.2 SWT tokens obtained from the Access Control Service. See Chapter 6 for more information about obtaining tokens from ACS. A string such as this will be returned from ACS:
wrap_access_token=net.windows.servicebus.action%3dListen%252cManage%252cSend%26http%253a%252f%252fschemas.microsoft.com%252faccesscontrolservice%252f2010%252f07%252fclaims%252fidentityprovider%3dhttps%253a%252f%252fBVTsn1002-sbususer-0-9-sb.accesscontrol.aadint.windows-int.net%252f%26Audience%3dhttp%253a%252f%252fBVTsn1002-sbususer-0-9.Windows-bvt.net%26ExpiresOn%3d1304710330%26Issuer%3dhttps%253a%252f%252fbvtsn1002-sbususer-0-9-sb.accesscontrol.aadint.windows-int.net%252f%26HMACSHA256%3d3mytM7yEZ4ZDHyO5rDBeReJien%252f%252bIrsmJJVezsUPqbU%253d&wrap_access_token_expires_in=1199
You'll need to extract the token and URL-decode. Also, MSDN documentation notes the following important points8:
- The received string is URI-decoded (%26 => &) and is in double quotes. Put this into the HttpAuthorizationHeader.
- The ExpiresOn time in the middle of the string is specified as a Unix File Time (that is, the number of seconds since 01/01/1970 at 12:00am). You should scrub the identity provider, audience, issuer and hmacsha fields.
- The domain used when requesting a token uses the HTTP scheme, even though calls to the service are always issued over HTTPS.
- Make sure that the content type in the HTTP header is of type:
application/x-www-form-urlencoded.
Once completed, it should look something like
WRAP_access_token="net.windows.servicebus.action=Listen%2cManage%2cSend&http%3a%2f%2fschemas.microsoft.com%2faccesscontrolservice%2f2010%2f07%2fclaims%2fidentityprovider=https%3a%2f%2fBVTsn1002-sbususer-0-9-sb.accesscontrol.aadint.windows-int.net%2f&Audience=http%3a%2f%2fBVTsn1002-sbususer-0-9.Windows-bvt.net&ExpiresOn=1304710330&Issuer=https%3a%2f%2fbvtsn1002-sbususer-0-9-sb.accesscontrol.aadint.windows-int.net%2f&HMACSHA256=3mytM7yEZ4ZDHyO5rDBeReJien%2f%2bIrsmJJVezsUPqbU%3d"
Once this token is fully extracted, you can add theAuthorization Request Header, and set to WRAP access_token=”{swt}”, where {swt} is the token you obtained.
Queues: Message Commands
Message commands are commands that facilitate the sending, receiving, and deleting of messages from a queue. Next we will cover how to perform each of these tasks.
_______________
8Appfabric Service Bus REST API Reference: Clemens Vasters' blog: http://msdn.microsoft.com/enus/library/gg278338.aspx#RESTAPI_1
![]() Note The REST API contains only a subset of functionality provided by the .NET Client API. Missing are features to group receivers, enrich messages, set custom filter destinations, and perform batching.
Note The REST API contains only a subset of functionality provided by the .NET Client API. Missing are features to group receivers, enrich messages, set custom filter destinations, and perform batching.
Send to Queue
In order to send a request to a Queue via the REST API, create a PUT request:
PUT https://{servicenamespace.Windows.net[:{port}]/{path} HTTP/1.1
{path} can be any depth you wish, but has a maximum length of 290 characters. For example, you could specify a path of /US, /US/CA, or /US/CA/SanRamon. It is just the path to your queue, you can name it logically.
In the body of the request, pass your message in an Atom entry:
<entry xmlns='http://www.w3.org/2005/Atom'>

  <content type='application/xml'>

    {description}

  </content>

</entry>
If the operation fails, you'll receive a response code indicating the reason for failure. Otherwise, you'll receive a 200 code with the following response:
<?xml version="1.0" encoding="utf-8" ?>

<entry xmlns='http://www.w3.org/2005/Atom'>

  <id>https://{serviceNamespace}.servicebus.windows.net/{path}</id>

  <published>{createdTime}</published>

  <updated>{lastUpdatedTime}</updated>

  <link rel='self'>https://{serviceNamespace}.servicebus.windows.net/{path} </link>
  <content type='application/xml'>

    {description}

  </content>

</entry>
Receive from Queue
The receive operation is represented by a GET operation, following the same pattern as the PUT used to send a message to the Queue:
https://{servicenamespace.Windows.net[:{port}]/{path}
If the operation fails, you'll receive a response code indicating the reason for failure. Otherwise, you'll receive a 200 code with the following response:
<?xml version="1.0" encoding="utf-8" ?>

<entry xmlns='http://www.w3.org/2005/Atom'>

  <id>https://{serviceNamespace}.Windows.net/{path}</id>

  <published>{createdTime}</published>

  <updated>{lastUpdatedTime}</updated>

  <link rel='self'>https://{serviceNamespace}.Windows.net/{path} </link>
  <content type='application/xml'>

    {description}

  </content>

</entry>
Delete from Queue
The receive operation is represented by a GET operation, following the same pattern as the PUT used to send a message to the Queue:
https://{servicenamespace.Windows.net[:{port}]/{path}
If the operation fails, you'll receive a response code indicating the reason for failure. Otherwise, you'll receive a 200 code with nothing in the response body.
Queue: Management Commands
Management commands are commands that involve creating or deleting a queue, or getting information about the queue itself. In the following we cover the commands that are available in the REST interface.
QueueDescription
It's important to cover the queue description first. This is an AtomPub document that defines the properties for a queue. It is used in REST API request and responses, sent when creating a queue, or received when requesting the properties of a queue. The QueueDescription properties are shown in Table 8-9.
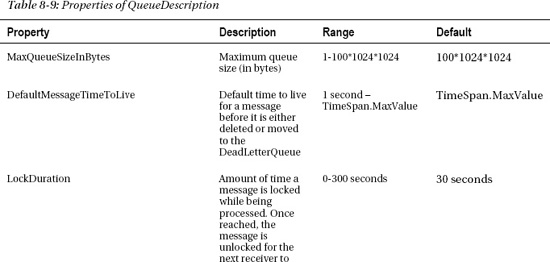
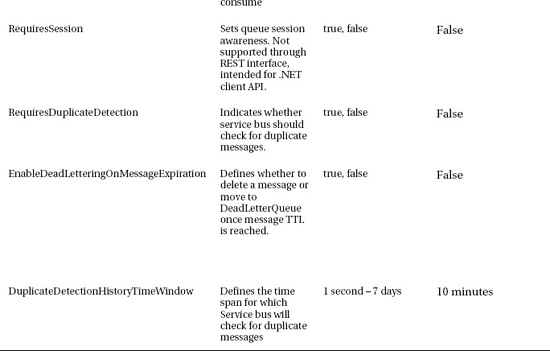
Create Queue
To create a new queue, execute the following REST command:
PUT https://{serviceNamespace}.windows.net/{Queue Path} HTTP/1.1
The payload for this command is a queue description as defined, which sets the properties and behaviors for the queue. Once you have created a queue, you cannot change its properties; you will have to delete and re-create with a new queue description. See Listing 8-47.
Listing 8-47. Creating an AppFabric Service Bus Queue
PUT /MyQueues/Queue1 HTTP/1.1

Host: proazure-1.servicebus.windows.net

Content-Type: application/atom+xml

Accept: application/atom+xml

Authorization: …

Content-Length: nnn


<entry xmlns='http://www.w3.org/2005/Atom'>

<content type='application/xml'>
<QueueDescription xmlns:i="http://www.w3.org/2001/XMLSchema-instance" xmlns="http://schemas.microsoft.com/netservices/2010/10/servicebus/connect">

  <LockDuration>PT30S</LockDuration>

  <MaxQueueSizeInBytes>104857600</MaxQueueSizeInBytes>

  <RequiresDuplicateDetection>false</RequiresDuplicateDetection>

  <RequiresSession>false</RequiresSession>

  <DefaultMessageTimeToLive>P10675199DT2H48M5.4775807S</DefaultMessageTimeToLive>

  <DeadLetteringOnMessageExpiration>false</DeadLetteringOnMessageExpiration>

  <DuplicateDetectionHistoryTimeWindow>PT10M</DuplicateDetectionHistoryTimeWindow>

</QueueDescription>

</content>

</entry>
Delete Queue
To delete a queue, execute the following REST command:
DELETE https://{serviceNamespace}.windows.net/{Queue Path} HTTP/1.1
Keep in mind that this deletes all the messages in the queue as well. If you are trying to re-create a queue with new properties, or migrating to a new queue, you will want to make sure you get all messages off the queue before you delete it. See Listing 8-48.
Listing 8-48. Deleting an AppFabric Service Bus Queue
DELETE /MyQueues/Queue1 HTTP/1.1

Host: proazure-1.servicebus.windows.net

Content-Type: application/atom+xml

Accept: application/atom+xml

Authorization: …

Content-Length: nnn
Get Queue
This command gets the queue and all its associated state. Of course, this means it must remove all messages from the queue to return the state information. So, you might use this command in the migration of messages from one queue to another, or in the deleting and re-creating a queue with new properties (see Listing 8-49). Execute the following REST Command:
GET https://{serviceNamespace}.windows.net/{Queue Path} HTTP/1.1
Listing 8-49. Deleting an AppFabric Service Bus Queue
DELETE /MyQueues/Queue1 HTTP/1.1

Host: proazure-1.servicebus.windows.net

Content-Type: application/atom+xml

Accept: application/atom+xml

Authorization: …

Content-Length: nnn
List Queues
Lists all queues that exist in the service namespace.
GET https://{serviceNamespace}.windows.net/$Resources/Queues HTTP/1.1
Topics and Subscriptions: Message Commands
Message commands are commands that facilitate the sending, receiving, and deleting of messages from a topic. In the following sections we will cover how to perform each of these tasks.
Send to Topic
To enqueue a message into a topic, execute the following REST command:
POST http{s}://{serviceNamespace}.Windows.net/{topic path}/messages HTTP/1.1
The request body contains the message payload. When the topic is created, the maximum number of messages may be set in the topic description. If the topic is already at its maximum number of messages allowed, a quota exceeded error will be returned.
Read Message from Subscription with Non-Destructive Peek-Lock
Use this technique when At-Least-Once delivery is required. When you use this command, the message is read from the queue but is locked, thus preventing other receivers from being able to process the message. If the lock expires, then the message will be available for other receivers to process.
It's important to note that when using this pattern, the receiver is responsible for deleting the message with the lock ID received from this operation once processing is complete. If the receiver does not delete the message, then the lock will eventually expire, and it will be processed by another receiver, resulting in duplicate processing. If processing must be abandoned, the receiver should issue an unlock command so that other receivers are free to process the message.
To use Peek-Lock reading of messages:
POST https://{serviceNamespace}.Windows.net/{topic path}/subscriptions/{subscription Name}/messages/head?timeout={timeout} HTTP/1.1
Note the URI parameter timeout. This represents the amount of time the server will wait for messages if there are no existing messages. Acceptable values are 0-120 seconds, and 0 is the default.
There are several important headers returned in the response. All of the information returned is requied to delete or unlock the message once processing is complete or abandoned. See Table 8-10.
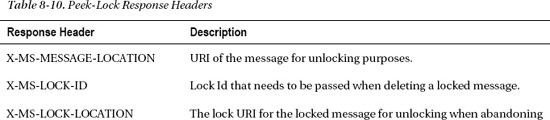
Read and Delete Message from Subscription (Destructive read)
This command should be used in scenarios where At-Least-Once delivery is not required, and some loss of messages is acceptable. The reason you would want to use this instead of the Peek-Lock is that the read and delete executes as an atomic operation. No locks are held, and the receiver is not required to return to the topoic to delete the message. Reducing that extra processing required to support Peek-Lock will increase performance.
To execute this command:
DELETE http{s}://{serviceNamespace}.windows.net/{topic path}/subscriptions/{subscription Name}/messages/head?timeout={timeout} HTTP/1.1
There is only one URI Parameter for this command: timeout. This parameter this represents the amount of time the server will wait for messages if there are no existing messages. Acceptable values are 0-120 seconds, and 0 is the default.
Unlock Message from Subscription
If you have abandoned processing and want to make the message available for other receivers to process, you will need to remove the lock object. Execute this command:
DELETE http{s}://{serviceNamespace}.servicebus.windows.net/{buffer}/messages/{message-id}/{lock-id} HTTP/1.1
Note the URI parameters in this request. Message-id is the Id of the message to be unlocked. You got this in the X-MS-MESSAGE-LOCATION response header when you retrieved the message using the PeekLock command. Lock-id is the X-MS-LOCK-ID response header that was also returned in the same response.
Delete Message from Subscription
Once your receiver has completed processing in a Peek-Lock scenario, it will need to delete the message from the subscription to prevent duplicate processing. To execute this command:
DELETE http{s}://{serviceNamespace}.Windows.net/{topic path}/subscriptions/{subscription Name}/messages/{message-id}?lockid={lock-id} HTTP/1.1
Once again, the same URI parameters are required as when unlocking a message. Message-id is the ID of the message to be unlocked. You got this in the X-MS-MESSAGE-LOCATION response header when you retrieved the message using the PeekLock command. Lock-id is the X-MS-LOCK-ID response header that was also returned in the same response.
Topics: Management Commands
Management commands are commands that involve creating or deleting a topic, or getting information about the topic itself. Later we cover the commands that are available in the REST interface.
TopicDescription
As with queues, topic descriptions are used to define the properties for a topic. This is an AtomPub document that defines the properties for a queue. It is used in REST API request and responses, sent when creating a topic, or received when requesting the properties of a topic. The properties of the TopicDescription object are shown in Table 8-11.
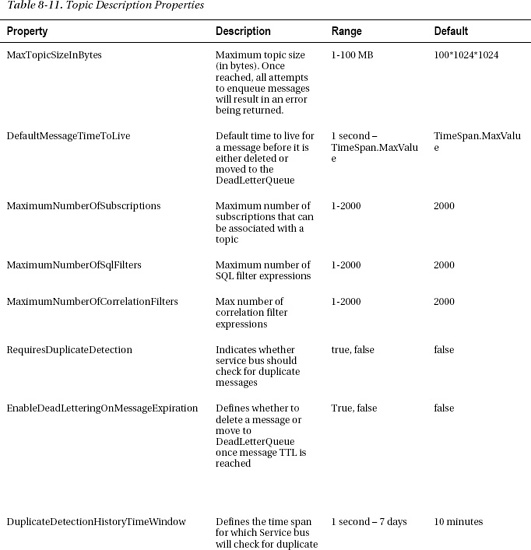
![]() Note Multiple copies of a message that exist in multiple subscriptions are counted as single message, and thus having a message on multiple subscriptions does not count against the size quota.
Note Multiple copies of a message that exist in multiple subscriptions are counted as single message, and thus having a message on multiple subscriptions does not count against the size quota.
Create Topic
To create a new topic, execute the following REST command:
PUT https://{serviceNamespace}.windows.net/{topic Path} HTTP/1.1
The payload for this command is a topic description as defined earlier, which sets the properties and behaviors for the topic. Once you have created a topic, you cannot change its properties, you will have to delete and re-create with a new topic description. See Listing 8-50.
Listing 8-50. Creating an AppFabric Service Bus Topic
PUT /MyTopics/Topic1 HTTP/1.1

Host: proazure-1.servicebus.windows.net

Content-Type: application/atom+xml

Accept: application/atom+xml

Authorization: …

Content-Length: nnn


<entry xmlns='http://www.w3.org/2005/Atom'>

<content type='application/xml'>

<TopicDescription xmlns:i="http://www.w3.org/2001/XMLSchema-instance" xmlns="http://schemas.microsoft.com/netservices/2010/10/servicebus/connect">

   <DefaultMessageTimeToLive>P10675199DT2H48M5.4775807S</DefaultMessageTimeToLive>

   <MaxTopicSizeInBytes>104857600</MaxTopicSizeInBytes>

   <RequiresDuplicateDetection>false</RequiresDuplicateDetection>

   <DuplicateDetectionHistoryTimeWindow>P7D</DuplicateDetectionHistoryTimeWindow>

   <MaxSubscriptionsPerTopic>2000</MaxSubscriptionsPerTopic>

   <MaxSqlFiltersPerTopic>1000</MaxSqlFiltersPerTopic>

   <MaxCorrelationFiltersPerTopic>2000</MaxCorrelationFiltersPerTopic>

   <DeadLetteringOnMessageExpiration>false</DeadLetteringOnMessageExpiration>

   <DeadLetteringOnFilterEvaluationExceptions>true</DeadLetteringOnFilterEvaluationExceptions>

</TopicDescription>

</content>

</entry>
Delete Topic
To delete a topic, execute the following REST command:
DELETE https://{serviceNamespace}.windows.net/{Topic Path} HTTP/1.1
Keep in mind that this deletes all the subscriptions and messages in the topic as well. If you are trying to re-create a topic with new properties, or migrating to a new topic, you will want to make sure you get all subscriptions and messages off the topic before you delete it.
Get Topic
Thie command simply retrieves the topic description for the topic.
GET https://{serviceNamespace}.windows.net/{Topic Path} HTTP/1.1.
List Topics
Lists all topics that exist in the service namespace.
GET https://{serviceNamespace}.windows.net/$Resources/Topics HTTP/1.1
Subscriptions: Management Commands
Management commands are commands that involve creating or deleting a subscription, or getting information about the subscription itself. Later we cover the commands that are available in the REST interface.
SubscriptionDescription
Continuing the theme of setting and retrieving properties vai description objects, the Subscription description is an AtomPub document that defines the properties for a subscription. It is used in REST API request and responses, sent when creating a subscription, or received when requesting the properties of a subscription. The properties of the SubscriptionDescription object are shown in Table 8-12.
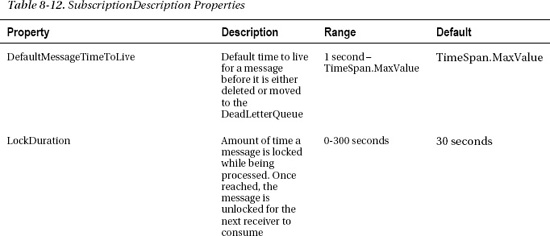
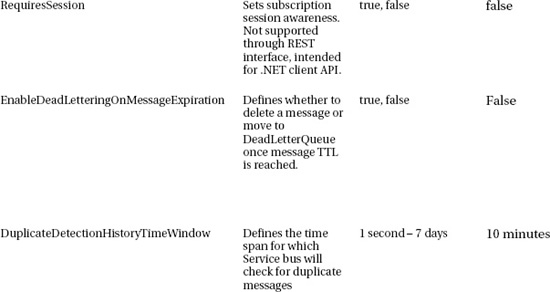
Create Subscription
To create a new subscription, execute the following REST command:
PUT https://{serviceNamespace}.servicebus.windows.net/{topic path}/subscriptions/{subscription name HTTP/1.1
The payload for this command is a subscription description as defined previously, which sets the properties and behaviors for the subscription. Once you have created a subscription, you cannot change its properties, you will have to delete and re-create with a new subscription description. See Listing 8-51.
Listing 8-51. Creating a Subscription
PUT /MyTopics/Topic1/Subscriptions/FirstSubscription HTTP/1.1

Host: proazure-1.Windows.net

Content-Type: application/atom+xml

Accept: application/atom+xml

Authorization: …

Content-Length: nnn


<entry xmlns="http://www.w3.org/2005/Atom">

  <title type="text">MySubscription</title>

  <link rel="alternate" href="https://contoso.Windows.net/MyTopic/subscriptions/MySubscription"/>

  <link rel="self" href="https://Contoso.Windows.net/Resources/Topics(‘MyTopic')/ Subscriptions(‘MySubscription')"/>


  <content type="application/xml" xmlns="http://schemas.microsoft.com/netservices/201?/??/servicebus/connect">
    <SubscriptionDescription>

      <MaxSubscriptionSizeInBytes>100000000</MaxSubscriptionSizeInBytes>

      <LockDuration>P30S</LockDuration>

      <RequiresMessageGrouping>False</RequiresMessageGrouping>

      <DefaultRule>True</DefaultRule>

    </SubscriptionDescription>

  </content>

</entry>

<entry xmlns='http://www.w3.org/2005/Atom'>

<content type='application/xml'>

<SubscriptionDescription xmlns:i="http://www.w3.org/2001/XMLSchema-instance" xmlns="http://schemas.microsoft.com/netservices/2010/10/servicebus/connect">

   <LockDuration>PT5M</LockDuration>

   <RequiresSession>false</RequiresSession>

   <DefaultMessageTimeToLive>P10675199DT2H48M5.4775807S</DefaultMessageTimeToLive>

   <DeadLetteringOnMessageExpiration>false</DeadLetteringOnMessageExpiration>   <DeadLetteringOnFilterEvaluationExceptions>true</DeadLetteringOnFilterEvaluationExceptions>

</SubscriptionDescription>

</content>

</entry>
Delete Subscription
To delete a subscription, execute the following REST command:
DELETE https://{serviceNamespace}.servicebus.windows.net/{topic path}/subscriptions/{subscription name}

 HTTP/1.1
Keep in mind that this deletes all the messages in the subscription as well. If you are trying to re-create a subscription with new properties, or migrating to a new subscription, you will want to make sure you get all messages off the subscription before you delete it.
Get Subscription
Thie command simply retrieves the topic description for the topic.
GET https://{serviceNamespace}.windows.net/{topic path}/subscriptions/{Subscription Name} HTTP/1.1.
List Subscriptions
Lists all subscriptions that exist in the specified topic.
GET https://{serviceNamespace}.windows.net/{topic path}/subscriptions/

 HTTP/1.1
Rules: Mangement Commands
Management commands are commands that involve creating or deleting a rule, or getting information about the rule itself. In the following we cover the commands that are available in the REST interface.
Rule Description
Rule Description is an AtomPub document that defines the properties for a Rule. It is used in REST API request and responses, sent when creating a rule, or received when requesting the properties of a rule. The properties of the RuleDDescription object are shown in Table 8-13.
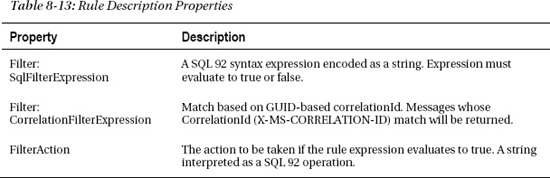
Create Rule
To create a new Rule, execute the following REST command:
PUT https://{serviceNamespace}.windows.net/{topic path}/subscriptions/{subscription name}/rules/{rule name} HTTP/1.1
The payload for this command is a rule description as defined earlier, which sets the properties and behaviors for the rule. Once you have created a rule, you cannot change its properties, you will have to delete and re-create with a new rule description. See Listing 8-52.
Listing 8-52. Creating a Rule
PUT /MyTopics/Topic1/Subscriptions/FirstSubscription/Rules/FirstRule HTTP/1.1

Host: proazure-1.servicebus.windows.net

Content-Type: application/atom+xml

Accept: application/atom+xml

Authorization: …

Content-Length: nnn


<entry xmlns='http://www.w3.org/2005/Atom'>

<content type='application/xml'>

<RuleDescription xmlns:i="http://www.w3.org/2001/XMLSchema-instance" xmlns="http://schemas.microsoft.com/netservices/2010/10/servicebus/connect">
 <Filter i:type="SqlFilterExpression">

  <SqlExpression>MyProperty='XYZ'</SqlExpression>

 </Filter>

 <Action i:type="SqlFilterAction">

  <SqlExpression>set MyProperty2 = 'ABC'</SqlExpression>

 </Action>

</RuleDescription>

</content>

</entry>
Delete Rule
To delete a rule, execute the following REST command:
DELETE https://{serviceNamespace}.windows.net/{topic path}/subscriptions/{subscription name}/rules/{rule name} HTTP/1.1
Get Rule
This command simply retrieves the rule description for the rule.
GET https://{serviceNamespace}.windows.net/{topic path}/subscriptions/{subscription name}/rules/{rule name} HTTP/1.1.
List Rules
Lists all rules that exist in the specified topic.
GET https://{serviceNamespace}.windows.net/{topic path}/rules/

 HTTP/1.1
Summary
Microsoft has built the AppFabric Service Bus as a foundation for cross-platform and cross-enterprise application integration. Services across the same or different enterprises can communicate with each other, even if they're behind firewalls. Its integration with ACS and the security at the transport-level makes it secure to send encrypted messages over the Internet. The programming model is very similar to WCF, and you can utilize your existing WCF skills to build AppFabric Service Bus applications.
Message buffers are a different concept than WCF programming, but they're similar to the Windows Azure queues that you read about earlier in the book. You can use message buffers in nonreliable asynchronous store-and-forward scenarios.
In this chapter, you learned the concepts behind the AppFabric Service Bus that can help you built integration applications at Internet-scale. Early releases of the AppFabric Service Bus included another component called Workflow Services that is planned for a future release.
The next chapter covers Microsoft's database for the cloud: SQL Azure.
Bibliography
Lowy, J. (n.d.). Securing The .NET Service Bus. Retrieved from MSDN: http://msdn.microsoft.com/en-us/magazine/dd942847.aspx.
Microsoft Corporation. (2009). Windows Azure platform AppFabric November 2009 CTP. Retrieved from MSDN: http://msdn.microsoft.com/en-us/library/ee173584.aspx.
Microsoft Corporation. (n.d.). Windows Azure SDK. Retrieved from MSDN: http://msdn.microsoft.com/en-us/library/dd179367.aspx.
OASIS Standards. (n.d.). OASIS Standards. Retrieved from OASIS Standards: www.oasis-open.org/home/index.php.
Vasters, C. (n.d.). Azure: Microsoft .NET Service Bus. Retrieved from Clemens Vasters, Bldg 42: http://blogs.msdn.com/clemensv/archive/2008/10/27/azure-microsoft-net-service-bus.aspx.
Microsoft Corporation (2011) Service Bus API REST Interface. Retrieved from MSDN: http://msdn.microsoft.com/en-us/library/hh367521.aspx
Microsoft Corporation (2011) Windows Azure AppFabric Class Library. Retrieved from MSDN: http://msdn.microsoft.com/en-us/library/hh394905.aspx