
Chapter 3
Understanding Lion Application Menus and Shortcuts
In this chapter, we will cover the menus and shortcuts included in a few of the more useful applications that ship with your Lion operating system: the Finder, Safari, and iTunes. Lion ships with many applications, but these three are the ones you'll use most often to enhance your overall desktop experience.
General Application Menus
Nearly all apps for your Mac—and that includes those that ship with Lion—include a menu system that allows you to navigate through their various features. Menu categories commonly included with most apps include File, Edit, View, Go, Window, and Help. To illustrate how you can use menus to get more out of the Lion OS, we'll begin by taking a look at the menu system of the Finder (see Figure 3–1).
The Finder
The Finder's menus exhibit a lot of the traits you will see in just about every other program you will use on the Lion OS. Notice that the application's name—Finder—is shown in the leftmost menu category. All Lion applications follow this convention. All Lion applications also employ a common menu placement for some menu options. For example, the first few items that appear under the menu that contains the application's name generally provide similar functionality. Specifically, they provide information about the app; they let you tailor the program to suit your needs and preferences; or they let you adjust certain aspects of the program to improve its performance and functionality, based on the type of Mac that you have. In the case of the Finder, the first item listed under the Finder menu is About Finder; selecting this option reveals important information about the Finder.
NOTE: Remember that we are using the Finder because it nicely illustrates how to use menus in Lion. And while it does show many common features you should expect to see in other applications, the Finder may show more or fewer options than you'll see in those other applications. Let's take a look at some of the menu features commonly found in the leftmost menu that contains the application name (use Figure 3–1 as a guide for this section).
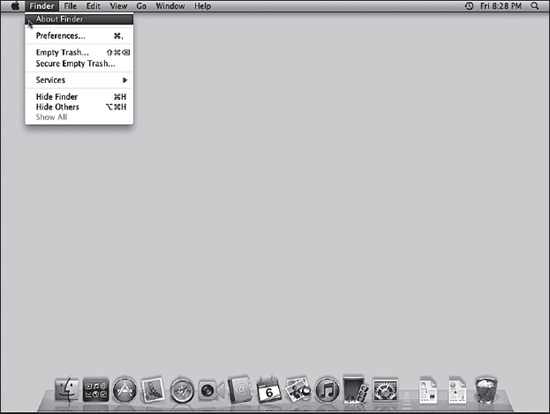
Figure 3–1. The Finder app's Finder menu options
You can see that there are several options available under the Finder menu (see Table 3–1 for a detailed explanation of each menu option).
Reviewing the File Menu
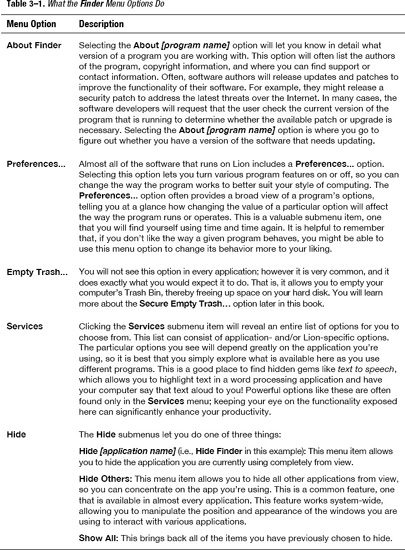
Most applications that run on Lion also include a File menu; the Finder app is no exception. This menu allows you to perform many basic actions, such as save files, open new files, and perform various other actions related to file maintenance (see Figure 3–2). The options in this menu will vary greatly from application to application; however, you will also see many similarities between the items listed here in most applications.
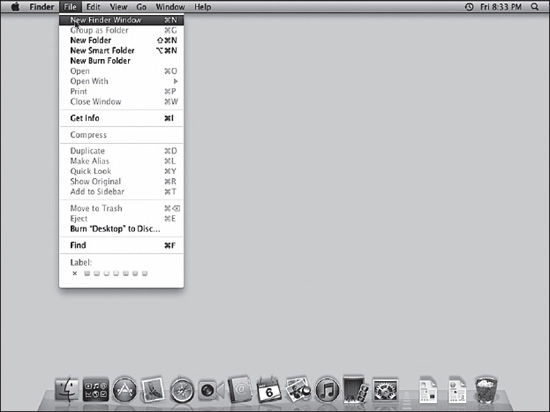
Figure 3–2. The Finder's File menu options
As is commonly the case, the Finder includes a wealth of items under its File menu. I recommend that you take the time to review an app's File menu before you begin to use the app in earnest; this will ensure that you know your options for manipulating an app's files from the outset.
Drilling Down on the Edit Menu
An app's Edit menu allows you to perform system actions such as Cut, Copy, and Paste (see Figure 3–3). Most applications allow you to do some type of copying and pasting, either within the application itself or between that application and other applications you might have open. This extremely useful feature can significantly increase your productivity because it allows you to share information between various, often unrelated applications. For example, assume you want to copy text from a Microsoft Word document to an Adobe Photoshop document. The Copy and Paste features exposed by the Edit menus in those apps enable you to accomplish that task.
Figure 3–3. The Finder's Edit menu options
Exploring the View Menu
An application's View menu enables you to manipulate that app's visual options. For example, the Finder's View menu lets you arrange the icons and file items you see in the Finder in various ways (see Figure 3–4). We covered a few of these options in Chapter 2: “Getting Around in Lion”; however, the View menu gives you an additional way of accessing the Finder's visual options. The number and scope of the options you see in this menu can differ dramatically from application to application. For example, Microsoft Word's View menu lets you select between different page-layout views, such as Outline and Print Layout.
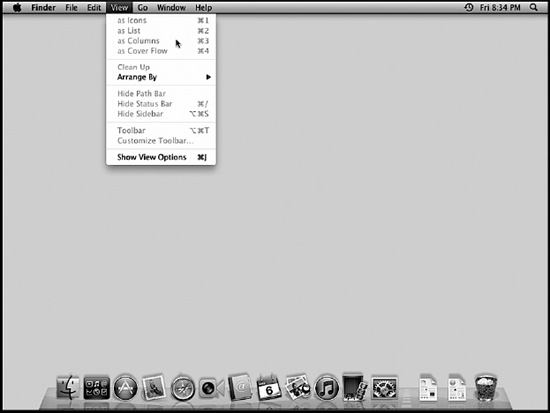
Figure 3–4. The Finder's View menu options
Zipping Around the Finder's Go Menu
The Finder's Go menu provides the ultimate list of shortcuts. Note that the Go menu is only visible when you have the Finder application selected. This menu allows you to jump to many sections of your Mac quickly, reducing the time it takes to navigate from one part of your system to another. The options you see listed in this menu also serve as a great introduction to the idea of application shortcuts.
NOTE: Shortcuts give you a fast, interactive way of navigating the Lion OS, letting you use your keyboard to access items and places on your system. This is a much faster way of navigating your system than relying solely on your mouse. For example, shortcuts let you jump from Point A to Point B instantly, whether Points A and B are applications or file areas on your computer.
There are thousands of available shortcuts; however, we will ease into the subject by concentrating on only a few, so you aren't overwhelmed by the sheer number of them available on Lion. Let's start with the shortcuts available from the Finder's Go menu (see Figure 3–5).
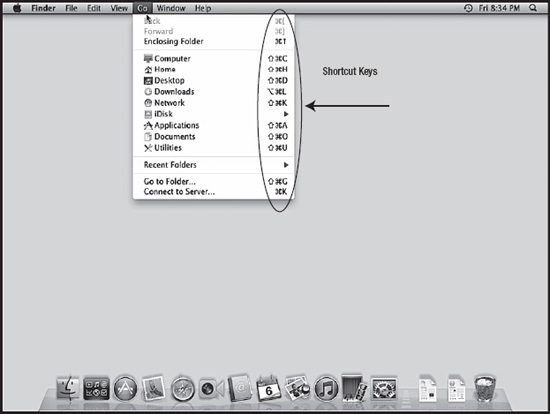
Figure 3–5. The Finder app's Go menu options
If you look closely at the circled area in Figure 3–6, you will notice that there are various symbols shown to the right of most menu options.
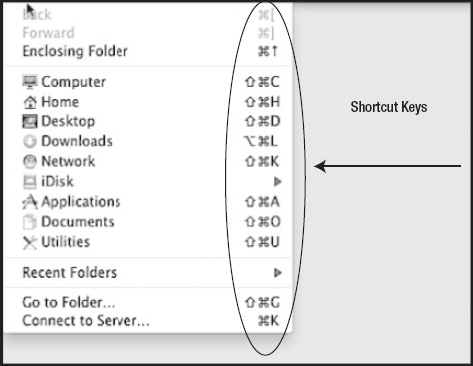
Figure 3–6. The Go menu's shortcut key combinations
The symbols shown in this figure indicate various key combinations you can press to execute the menu options. Of course, before you can use these shortcuts, you must first learn what each symbol represents and how it corresponds to the keys on your keyboard. Table 3–2 describes what each symbol is and how it maps to your keyboard.
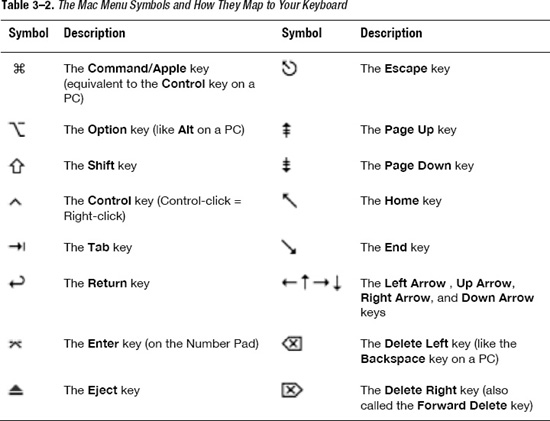
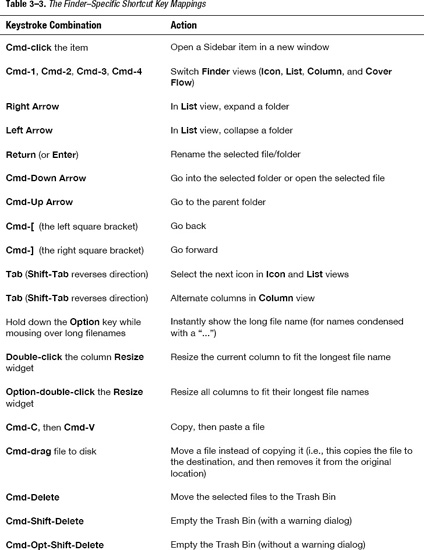
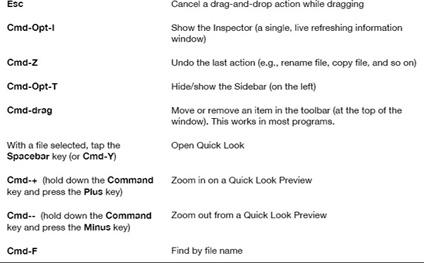
Using these keys in combination with the appropriate letters will yield some pretty interesting results. There are many other key shortcuts available; however, you will find yourself using the ones associated with the Finder application more often than those of any other application. For this reason, I am providing you with the complete list of Finder shortcuts available for Lion (see Table 3–3 for a list of these shortcuts).
As you can see, there are a lot of options for getting around in the Finder. And believe it or not, there are even more general options, which we will touch on later in the chapter. For now, let's move onto the menu options in another important application: Safari.
Safari
You will find yourself using the Safari web browser constantly. For example, you will use Safari in conjunction with other applications to reference information or gather resources. Safari is Lion's primary web browser; and though there are others, such as Firefox and Google Chrome, you will find that Safari has the tightest integration with the Lion operating system. What does this mean? In practical terms, it means that many of the shortcuts and menu items you use in Lion will also be available to you in Safari. These shortcuts provide you with time-saving ways to get around in the application, simplifying the act of web browsing. We will explore Safari in depth in Chapter 8: “It's a Jungle in Here: Safari and the Internet”; for now, let's take a look at some Safari basics, like its primary menu (see Figure 3–7).
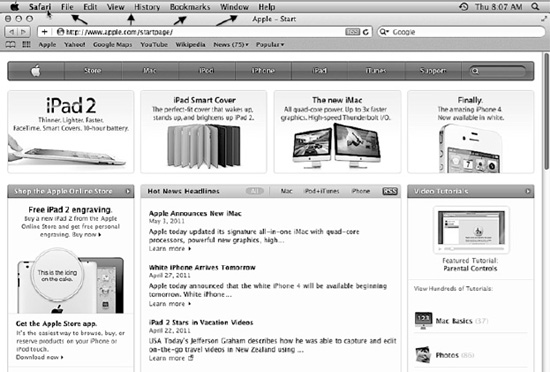
Figure 3–7. Safari's primary menu options
As you can see, many of Safari's menu categories are identical to those of the Finder; however, you can also see a couple new menu categories (see Table 3–4).
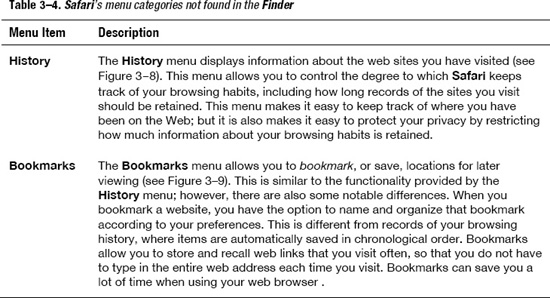
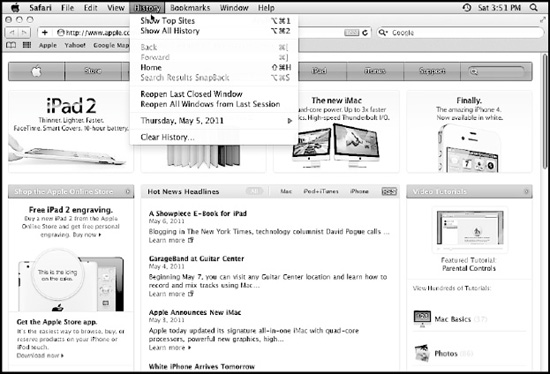
Figure 3–8. Safari's History menu
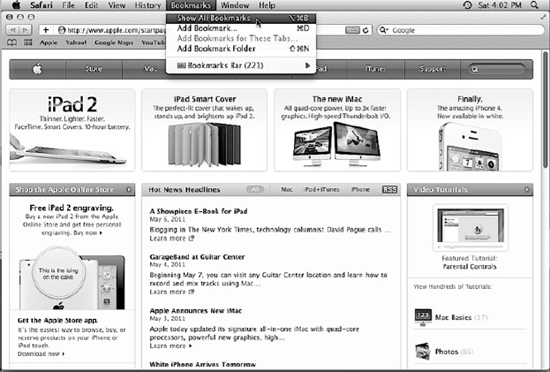
Figure 3–9. Safari's Bookmarks menu
Tables 3–5 through 3–7 list some shortcuts you may find useful when surfing the Web.
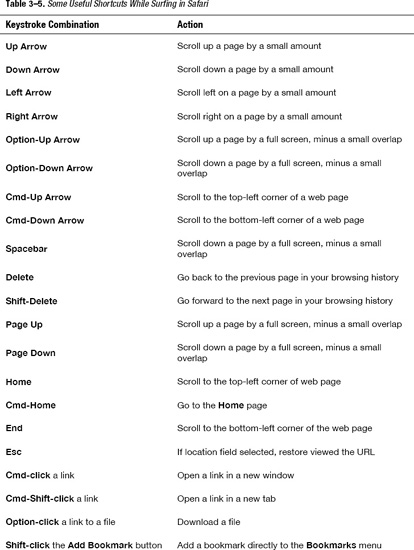
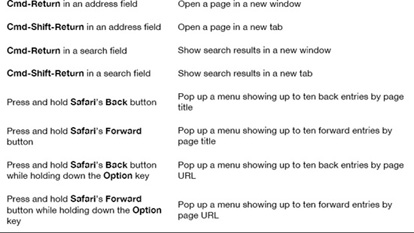
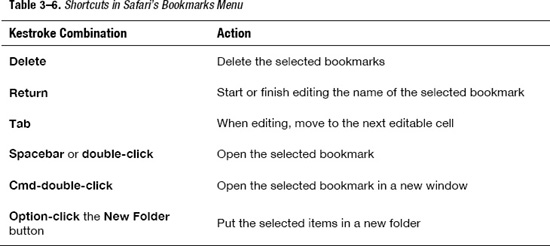
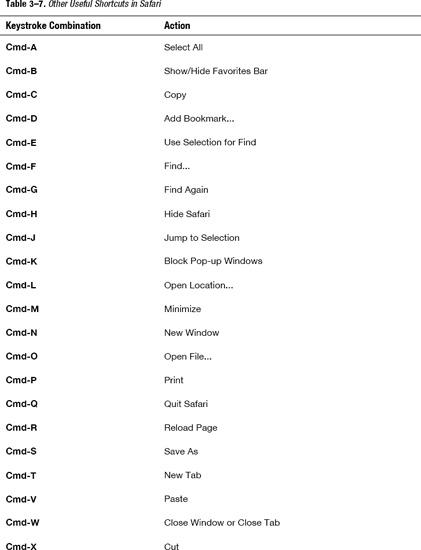
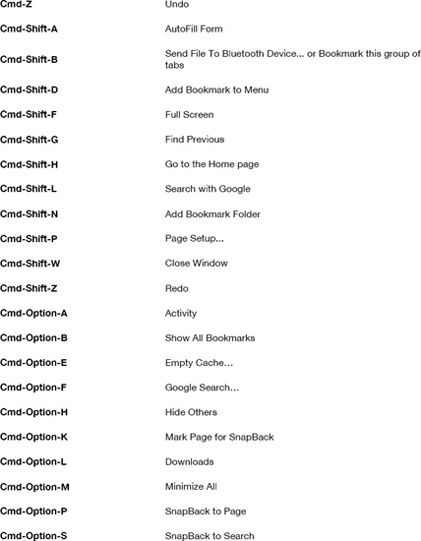
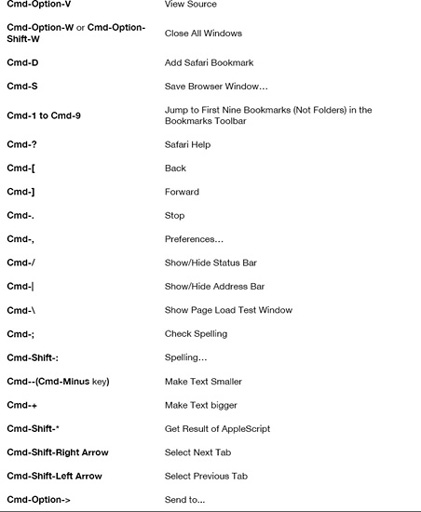
As the preceding tables illustrate, Safari includes an almost endless number of shortcut options to enhance your browsing experience. It is not necessary to try to commit all of the shortcuts shown to memory. Instead, I advise you to begin by finding the shortcuts that you feel would benefit you the most in your day-to-day use of Safari. Once you feel proficient with the shortcuts that you have decided are most important to you, you can gradually pick up other shortcuts over time. One of the hallmarks of the Lion operating system is its flexibility, its ability to adapt to your computing style. The more you use the seemingly endless array of shortcut options in Safari and the Finder, the easier you will find it to do things like surf the web and navigate the your files on your system.
iTunes
iTunes will likely be your media application of choice. This application integrates nicely with the Lion OS, letting you shop for digital media, listen to music, and watch videos, among many other actions. Like Safari and the Finder, iTunes is easy to use, not least because its built-in shortcuts improve the user experience significantly. For example, you can iTunes' shortcuts to switch quickly from song to song or to begin watching a movie instantly. In this section, we'll take an in-depth look at the menus for iTunes and how they help make the already easy-to-use app even easier and more enjoyable to use (see Figure 3–10 for a detailed view of the contextual File menu for iTunes).
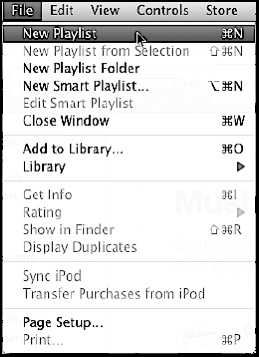
Figure 3–10. iTunes' File menu options
NOTE: iTunes' Edit and View menus contain exactly the options you'd expect, based on this chapter's earlier discussion of the Finder app's Edit and View menus. For this reason, I do not include them in my discussion of iTunes' menus.
Exploring iTunes' File Menu
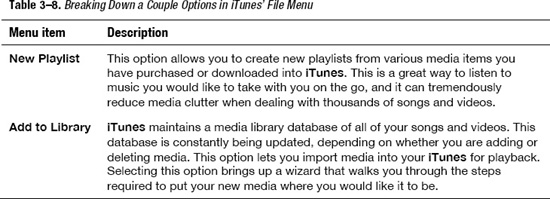
iTunes' File menu includes several options for manipulating your playlists and media libraries. As mentioned previously, each Lion application has its own set of items listed under general menus like File and Edit. For example, comparing Figures 3–2 and 3–10 reveals that the options listed under the File menu for the Finder and iTunes differ significantly. iTunes' menus are very self-explanatory, but Table 3–8 provides some additional details for two of the most important items listed under iTunes' File menu.
Using the Controls Menu
iTunes' Controls menu also includes some interesting options (see Figure 3–11).
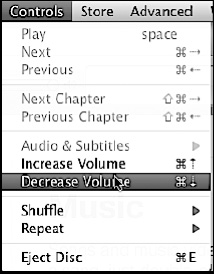
Figure 3–11. iTunes' Controls menu options
The Controls menu provides several options (with associated shortcuts) for manipulating and navigating the media you play with iTunes. For example, it includes options to increase or lower the volume, as well as to skip back and forth between the chapters of your videos and movies.
Accessing the iTunes Store via the Store Menu
As you might guess, the Store menu gives you access to the iTunes store (see Figure 3–12). The iTunes store is similar in spirit to the Mac App Store; however, the iTunes store only sells media like music and videos, not applications. You might visit the iTunes store to find your favorite song, rent or buy your favorite movie, watch an episode of your favorite television show, or view the various podcasts that you have subscribed to. In this section, we'll break down the most important option on the Store menu: Authorize This Computer.
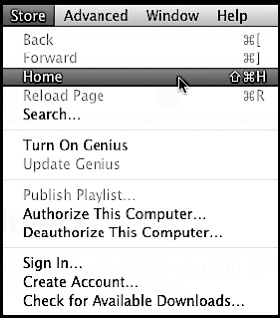
Figure 3–12. iTunes' Store menu options
The Authorize This Computer option enables your specific computer to download and play music and videos that you purchase from the iTunes store. The iTunes service allows you to authorize up to five other iTunes–compatible devices that you can use as playback devices for the media you have purchased. Authorizing a computer device indicates that you permit that device to use personal information like your credit card and iTunes user information. For this reason, you should be cautious when authorizing devices for friends or family, doing so only when trust is not an issue.
Manipulating Resources with the Advanced Menu
Finally, let's look at iTunes' Advanced Menu, which allows you to perform several tasks related to streaming and sharing resources with iTunes (see Figure 3–13).

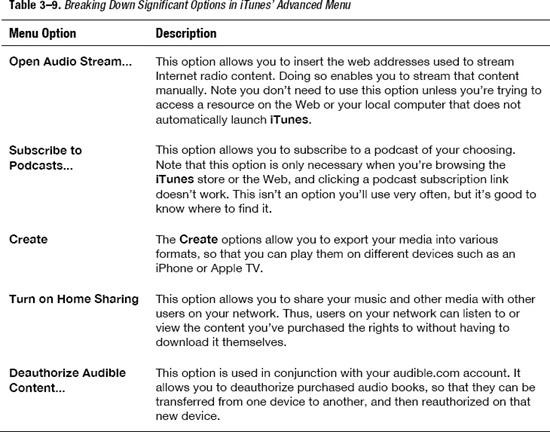
Figure 3–13. iTunes' Advanced menu options
Table 3–9 lists some of the more significant options in iTunes' Advanced menu and what they do.
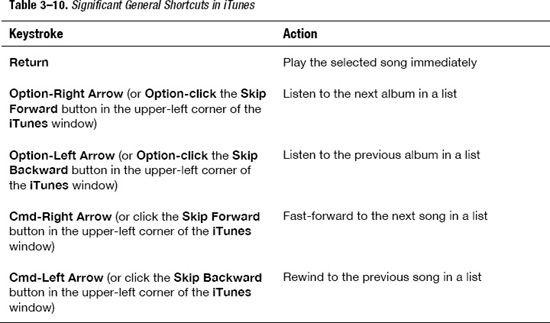
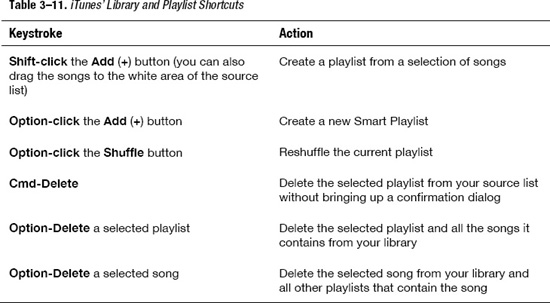
Like the Finder and Safari, iTunes comes with many useful shortcut commands that can significantly improve the overall app experience. Table 3–10 lists some general shortcuts for iTunes, while Table 3–11 lists some shortcuts that are useful for manipulating your libraries and playlists.
Summary
In this chapter, we covered how to use the menus and keyboard shortcuts built into most apps to get the most out of the Lion OS. We also looked at how to zip around your Lion OS by leveraging the shortcuts built into the Finder. This chapter looked specifically at the menu options and shortcuts available in three apps that ship with Lion: the Finder, Safari, and iTunes. However, the lessons learned are applicable to just about any Lion application you might use. There are literally thousands of shortcuts available for Lion, and these can be combined in an infinite number of ways to make using Lion both easier and more satisfying. I strongly recommend that you practice using the keyboard shortcuts described in this chapter; doing so will make you a much more productive user, not just when using the Lion OS and the apps that come with it, but when using any of the applications installed on your computing system.