Chapter 1
UDK Overview
This chapter covers the basic background information needed to get started with Unreal 3D games development for iOS and for the hands-on examples that follow in subsequent chapters. To start, we take a quick tour of the Unreal Development Kit (UDK) and familiarize those new to Unreal with the development environment. We cover the Unreal Editor, which is where levels are built and assets within the UDK are imported and managed. Some examples of UDK assets are textures, materials, static meshes, skeletal meshes, and sound cues. These are all covered in this chapter. Finally, information specific to game development on the iOS platform using the UDK is also covered. Readers who already use Unreal might want to jump ahead to this section.
Getting Started
The first thing you need to do is go to the UDK’s website, located at http://udk.com, download the June 2011 Beta version of the UDK (approximately 1.5 GB) that is used in this book, and install it on your computer. The code examples in this book work correctly with the version of the UDK presented in this book at the time of the writing. The UDK is currently still in the Beta phase and new versions of the UDK are being released about every month. After downloading the executable, run the program to install the UDK. At least Microsoft Net Framework 3.1 is required and will be installed on your system if not detected. You can also download UDK Remote at http://itunes.apple.com/us/app/udk-remote, which helps with testing your iOS games.
Unreal Editor Overview
Once you have the UDK installed, go to the Start bar and navigate to where you installed the UDK and run the UDK Editor. Once the Unreal Editor is loaded, you should see something similar to Figure 1–1. The Editor is where you build your game levels, as well as manage and manipulate the game assets used in the level. You can run your game on the iOS mobile previewer from the Unreal Editor, as well as set the specific game type to be played.
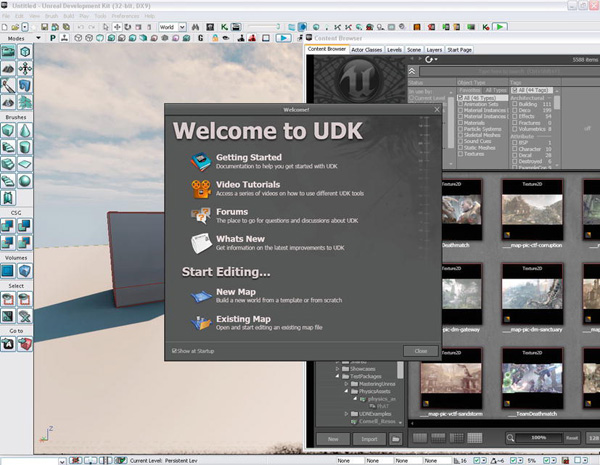
Figure 1–1. UDK Startup Screen
Click the Close button inside the Welcome to UDK box to get started. On the right hand side there is a window with many different tabs.
The Generic Browser
I won’t go over all the buttons and toolbars in the Unreal Editor UI. We’ll discuss all that in context as we work through the book. It is important to take a look at the Generic Browser, however, especially the Content Browser, covered in detail later in this section, and the Actor Classes tab.
As you can see in Figure 1–1, there are six tabs:
- Content Browser. The Content Browser tab is the main interface by which users import, select, and manipulate UDK assets. This tab is discussed in greater detail later in this chapter.
- Actor Classes. The Actor Classes tab contains a list of the UnrealScript classes in the UDK and is subsequently discussed, since it has several elements that will be important early in the book.
- Levels. The Levels tab manages the levels in your world that can consist of one level or many levels that are streamed.
- Scene. The Scene tab displays objects in the current level in table form where you can click on the name of an object and bring up its properties in a side panel.
- Layers. The Layers tab allows you to organize the actors in your level so you can view certain groups of actors and hide others.
- Start Page. The Start Page tab contains internet content related to the UDK, such as documentation, news, community forums, etc.
Now let’s take a look at the Actor Classes tab in a bit more detail before moving on to the Content Browser.
Actor Classes Tab
The Actor Classes tab, shown in Figure 1–2, displays the Unreal Script classes currently available. This is where new classes you create appear after you integrate them into the UDK system, as well as classes that are part of the UDK code base.
The term Actor generally refers to an object created from the Actor class or an object created from a class derived from the Actor class. The Actor class is important, because it implements many items needed for gameplay, including code needed for:
- Displaying an object
- Animating an object
- Performing physics and world interaction
- Making sounds
- Creating and destroying the Actor
- Broadcasting messages

There are three checkbox options in this tab:
- Use ‘Actor’ as Parent. Check “Use Actor as Parent” to view only classes that use Actor as a base class. In other words, only classes built from the Actor class. If you uncheck this box, then all classes in the UDK system will be displayed. The class Object will be displayed as the root of the new tree, since Object is the base class of all other classes.
- Placeable Classes Only. If you check the “Placeable Classes Only” checkbox, then only classes that you can place in a game level using the Unreal Editor will be displayed. If you uncheck this box, then both placeable and not placeable classes will be displayed.
- Show Categories. Checking the “Show Categories” checkbox will group and display the classes in different categories like Physics and Navigation.
There is also a search function in which you can search the tree by class name. We use this tab and discuss its features in more detail later in the book.
Now let’s turn to the Content Browser.
The Content Browser and UDK Assets
The Content Browser tab is the starting point for importing and manipulating game content in the UDK system. Game content can be sounds, textures, and 3d computer images used in your game. Click the Content Browser tab to change focus to the Content Browser (see Figure 1–3).

Figure 1–3. UDK Content Browser
Importing New Content
You can import new content into the UDK system by clicking the Import button in the lower left hand corner of the Content Browser Tab and can preview that content in the section of the browser where you see the previous images. Clicking the Import button brings up a window in which you can navigate to where your asset is, select it, and then load it into the UDK system. Examples of assets that can be imported from outside the UDK and placed into the UDK system are:
- Sound files in .wav format
- Texture files in .bmp, .pcx, .png, and .tga formats
- Static and Skeletal mesh files in .fbx format
- Movies in .bik format
- Shockwave movies in .swf and .gfx formats
Searching for UDK Assets
You can also filter the objects displayed by name, as well as type. In the upper right side of the Content Browser there is a search box in which you can type the game asset name to search for that is located next to a pair of arrows (see Figure 1–4). There is a section below that with the heading Object Type that contains two subsections named “Favorites” and “All Types.” Currently, all of the assets in the game, regardless of type, are displayed, since the “All” checkbox is checked.
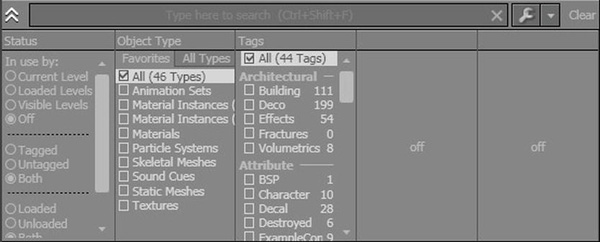
Figure 1–4. Asset Search Filtering Section of the Content Browser
Let’s search for textures that have “blockwall” as part of their name. Click the Textures checkbox under the Favorites subsection. Next, type in the word “block” to search for textures that contain the word “block” in their name. Finally, under the Packages section of the Content Browser located in the lower left hand corner, select the UDKGame package. Your Content Browser should look something like Figure 1–5.

Figure 1–5. Searching for Textures Using the “Block” Keyword
You can double click these texture assets, and a texture’s properties window will pop up, giving you more information about each texture asset. For example, click the texture called “T_BlockWall_02_D,” and the Texture Properties window shown in Figure 1–6 opens.

Figure 1–6. Texture Properties
UDK Texture Assets
Textures for iOS platforms need to be square. That is, the length in pixels must equal the width in pixels for the texture, such as 512×512 pixels. Textures are generally created outside the UDK system in a paint program like Adobe PhotoShop or PaintShop Pro and saved in a graphics file format, such as windows bitmap (.bmp), that the UDK system can understand and import in. Once inside the UDK system, textures can serve as the building blocks for UDK materials.
Uncheck the Textures checkbox and check the Materials checkbox. Find the material called “M_BlockWall_02_D” and double click it. This will bring up the Unreal Material Editor, and you should see something similar to Figure 1–7.
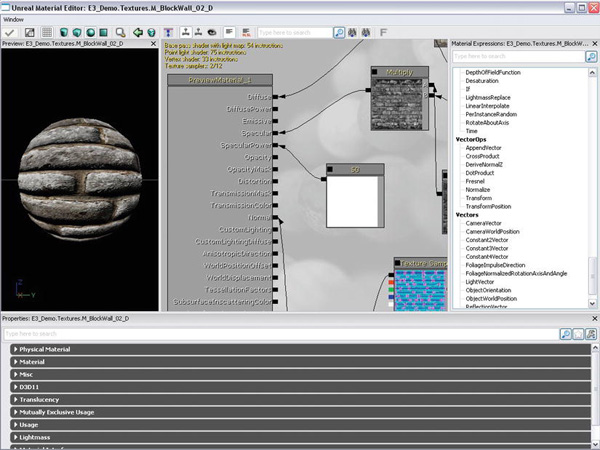
UDK Material Assets
The Material Editor is used to create new materials using textures. In the leftmost part of the Material Editor, there is a 3d sphere with a texture applied to it. You can rotate the sphere by clicking it, pressing the left mouse button, and moving the mouse. You can move the sphere forward and backward by clicking it, pressing down the right mouse button, and moving the mouse forward and backward. The texture used for the sphere is the same texture just viewed, which is T_BlockWall_02_D. Verify this is the case by scrolling through the bottom portion of the Material Editor until you come to the Mobile property section. Click the Mobile property if the subproperties are not already displayed (see Figure 1–8).
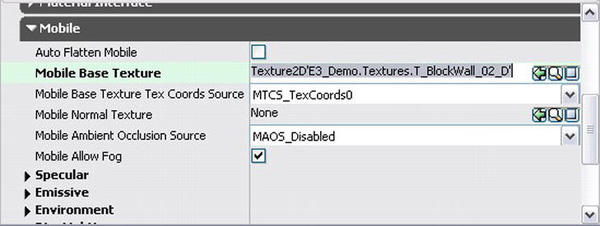
Figure 1–8. Setting Textures in the Material Editor
On the right hand side of the Mobile Base Texture property is a set of buttons. These buttons are also used in many other fields throughout the UDK:
- Arrow. The arrow button allows you to select a texture in the content browser, and then click this icon to place the name of that texture here so it can be used as the Mobile Base Texture.
- Magnifying Glass. The magnifying glass button allows you to find the object currently in the field by clicking the icon. When you do this, it should take you to the Content Browser and highlight the texture “T_BlockWall_02_D”.
- Clear Screen. The clear screen button clears the Mobile Base Texture property field.
UDK Mesh Assets
A UDK material can be used to provide the surface covering for a mesh, either a static mesh or a skeletal mesh. A mesh is the actual 3d object consisting of a collection of vertices that can be placed in a game level. A skeletal mesh also includes moving parts, called bones, which are generally used to animate a 3d character. The material is what gives the surface of a mesh color and texture.
Now, let’s look at an example.
- Go back to the Object Type
 Favorites subsection, check Static Meshes, and make sure to uncheck all the other boxes.
 - Type “Cube” into the search box to only display static meshes that have “Cube” as part of their name.
- Finally, go to the Packages section and click the Engine package. You should see a static mesh called “Cube” in the browser. Double click this item to bring up the Unreal Static Mesh Editor (see Figure 1–9).

- You can rotate the cube by first selecting the left hand side of the Mesh Editor that contains the cube. Hold down the right mouse button and move the mouse around to rotate the cube.
- Hold down the left mouse button and move the mouse back and forth to move the cube view back and forth. Static meshes are meshes without any moving parts.
- You can view the material this cube is using by going to the LODInfo property section on the right hand side of the viewer, locating the material property, and then clicking the magnifying glass button (see Figure 1–10). This will take you to the Content Browser, and the material used on this mesh will be highlighted.
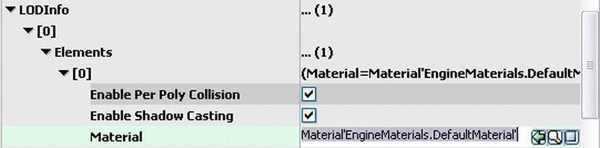
- As before, double click the material in the content browser to bring up this material in the Unreal Material Editor.
Now, let’s search for skeletal meshes in the UDK. Check the Skeletal Meshes box under the Object Type ![]() Favorites, making sure all the other checkboxes are unchecked. Type “Jazz” in the search box and change the Package to search in to UDKGame. You should see a skeletal mesh called “SK_Jazz” in the content browser. Double click this skeletal mesh to bring it up in the Unreal AnimSet Editor (see Figure 1–11).
Favorites, making sure all the other checkboxes are unchecked. Type “Jazz” in the search box and change the Package to search in to UDKGame. You should see a skeletal mesh called “SK_Jazz” in the content browser. Double click this skeletal mesh to bring it up in the Unreal AnimSet Editor (see Figure 1–11).
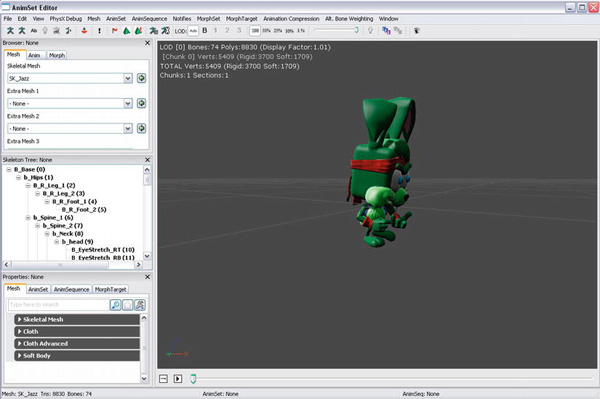
Figure 1–11. The AnimSet Editor
You can also set the material for this skeletal mesh. In the lower left hand corner of the AnimSet Editor, under the Mesh tab, you can set the Material property for this skeletal mesh under the Skeletal Mesh category (see Figure 1–12).

Figure 1–12. Setting Materials in the AnimSet Editor
You can also use the magnifying glass button to find the current material in the Content Browser, as well as set a new material from the Content Browser using the Arrow button.
In summary, textures are created in paint programs outside the UDK system and are imported into the UDK system via the Content Browser. These textures can be used to create materials inside the Unreal Material Editor. These materials can then be applied to static meshes via the Static Mesh Editor and skeletal meshes via the AnimSet Editor.
In addition to textures, materials, static meshes, and skeletal meshes, there are two other important game assets within the Content Browser, Particle Systems and Sound Cues.
UDK Particle System Assets
Particle Systems consist of an emitter and the particles that they emit. These are useful for such things as explosions and trails that projectiles leave when fired.
Let’s take a look at one.
- In the Object Type subsection, select Particle Systems as your object type, making sure all the other options are unchecked.
- Type “fire” as the search filter term, making sure the UDKGame package is highlighted in the Packages section of the Content Browser.
- Double click the fire particle system displayed to bring up Unreal Cascade, as shown in Figure 1–13.
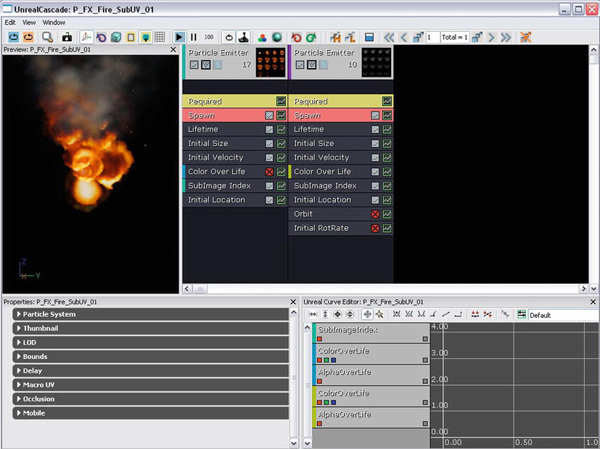
Unreal Cascade has many options for creating your own custom emitters. Such things, including particle type, particle speed, and particle direction, can be customized. For now, let’s not get into the details, but just know that custom emitters can be easily created from within the UDK system.
UDK Sound Cue Assets
Now, let’s search for sound cues. Select Sound Cues as the Object Type you will search for by checking its box. You can double click a sound cue to hear it. You can also edit the sound cue in the Sound Cue Editor by right clicking the Sound Cue you want to edit and selecting the “Edit Using Sound Cue Editor” option (see Figure 1–14). This should bring up the Sound Cue Editor shown in Figure 1–15.
NOTE: You can also access the editor for other game assets like static meshes, materials, etc. by right clicking that asset and selecting “Edit Using EditorType”. The EditorType will depend on the asset, such as “Edit Using Material Editor” if the asset selected is a material.
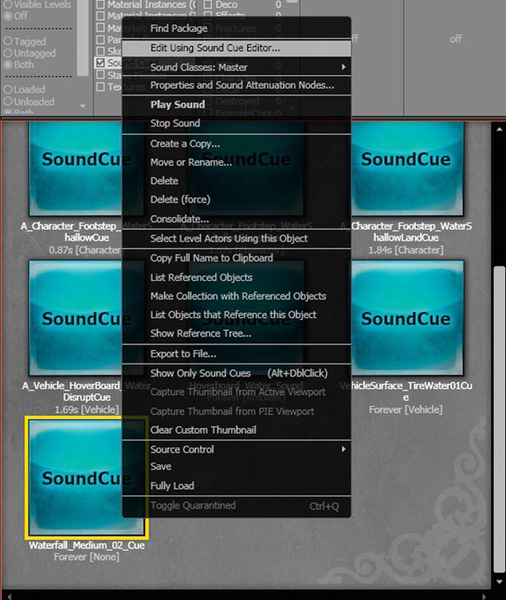
Figure 1–14. Selecting the Sound Cue Editor
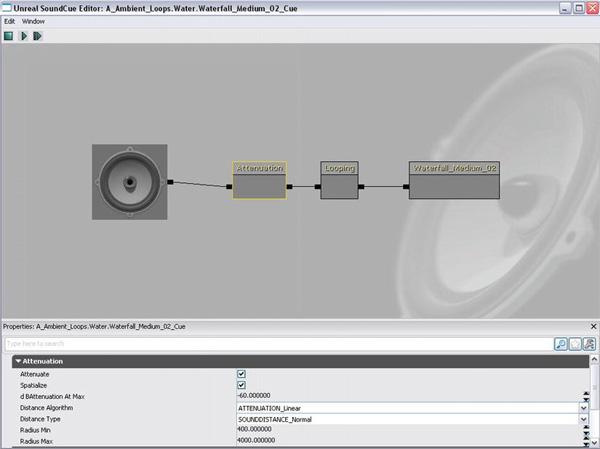
The Sound Cue Editor allows you to mix different sound samples into a single sound cue. For example, the sound editor has options for looping a sound and generating a random sound from a group of sounds.
IOS Specific UDK Information
There are certain differences to keep in mind when developing game for the iOS platform. The major differences involve saving data, preparing textures for an iOS device, and the types of player controls available to the user. We will return to the information discussed in this section later in the book and use it in the numerous hands-on examples.
Saving Data on an iOS Device
Some ways of saving data through the UDK system work on the PC-based game and even on a game on the Mobile Previewer but not on an actual iOS device. For example, using config files to save data will work on a PC-based game and even on an iOS-based game using the Mobile Previewer but will not work on the actual device. The best way to solve this problem is to use the basic save game object feature of the UDK. This method works on both the PC side and the iOS platform.
The idea of the basic save object is to put all the information you need to save into a class. Create a new object of this class and save the needed information into variables in this class object. You then save this object to a file. Once a file is created, then you can load this information back into this class variable.
Create a new class that will hold the variables you want to save to a file. For example, create a new file called PlayerInfo.uc and type the following into it.
class PlayerInfo extends Actor;
This declares a new class, called PlayerInfo, which is derived from Actor. Type in the following variables that will be the information saved to the new file.
var int PlayerLevel;

var float PlayerAgility;

var string PlayerName;

var bool PlayerInfected;
Save this file and open the class file that needs to use this information. Declare a class reference variable that uses the PlayerInfo class.
var PlayerInfo PlayerRecord;
Next, create a new object of this class using the Spawn command and set PlayerRecord to point to it.
PlayerRecord = Spawn(class’PlayerInfo'),
In the same file that you declared the PlayerRecord variable, add the following two functions that will be used to save and load the data in PlayerRecord to a file. The filename that it is saved in is PlayerData.bin.
function SavePlayerRecord()

{

    class'Engine'.static.BasicSaveObject(PlayerRecord, "PlayerData.bin", true, 1);

}

function LoadPlayerRecord()

{

    class'Engine'.static.BasicLoadObject(PlayerRecord, “PlayerData.bin", true, 1);

}
Textures on an iOS Device
Textures on the iOS platform must be square. The length of the texture must be equal to the width of the texture in pixels. For example, texture sizes of 512×512 and 1012×1012 are both square textures.
Player Input Controls on an iOS Device
The UDK supports three types of input: built in virtual joysticks, touch input, and motion input The MobilePlayerInput class and the MobileInputZone class handle player input for the iOS device and are located in the DevelopmentSrcGameFrameworkClasses under your main UDK installation directory, which is by default UDKUDK-2011–06. The easiest way to handle touch input is through setting and processing different input zones in your game through the MobileInputZone class. If you need a greater degree of control, then use the MobilePlayerInput class. However, for most uses, MobileInputZones will be adequate. In each of the hands-on examples in this book, we guide you on how to configure the mobile input controls for that specific example. So don’t worry if you don’t understand everything in this section. We guide you on exactly how to set up your mobile input controls when the time comes.
Setting Up Virtual Joysticks
To use virtual joysticks, the first thing you need to do is configure the input zones for your virtual joysticks. To do this, open the Mobile-UDKGame.ini file located in the UDKUDK-2011–06UDKGameConfig directory of your UDK installation using a plain text word processor like Windows Notepad.
Type the following in the file. This defines joystick input zones for the first hands-on example we cover at the end of Chapter 2. The first line indicates that this configuration will belong to Example1Game type game located in the Example1 directory. For each new game type that uses joysticks, you must create a similar set of configurations.
[Example1.Example1Game]
The following sets up a GroupName defined as an “UberGroup” and two input zones, called “UberStickMoveZone” and “UberStickLookZone”.The order in which you define the zones is important, since input captured by the first zone in the list is not passed along to subsequent zones. This might be a problem if you have overlapping zones.
RequiredMobileInputConfigs=(GroupName="UberGroup",RequireZoneNames=("UberStickMoveZone",

"UberStickLookZone"))
Next, we need to define the zones. The following line defines the block of configurations to follow as data for the UberStickMoveZone.
[UberStickMoveZone MobileInputZone]
Some of the more important configurations are subsequently discussed.
The InputKey defines the name of the inputkey to send to the input subsystem for input in the vertical direction. In this case, pushing this stick up or down will move the player forward or backward.
InputKey=MOBILE_Aforward
The HorizontalInputKey defines the name of the inputkey to send to the input subsystem for input in the horizontal direction. For this stick, this means that movements right or left will move the player right or left in a side to side manner suitable for strafing an enemy while facing it.
HorizontalInputKey=MOBILE_Astrafe
The Type indicates the kind of zone this is. This zone type is set to be a virtual joystick:
Type=ZoneType_Joystick

bRelativeX=true

bRelativeY=true

bRelativeSizeX=true

bRelativeSizeY=true

X=0.05

Y=-0.4

SizeX=0.1965

SizeY=1.0

bSizeYFromSizeX=true

VertMultiplier=-1.0

HorizMultiplier=1.0

bScalePawnMovement=true

RenderColor=(R=255,G=255,B=255,A=255)

InactiveAlpha=0.25

bUseGentleTransitions=true

ResetCenterAfterInactivityTime=3.0

ActivateTime=0.6

DeactivateTime=0.2

TapDistanceConstraint=5
Next, you need to configure the Joystick for turning the player left and right and moving the view up and down. Add the following definition for the UberStickLookZone. For vertical movements, an inputkey of value MOBILE_AlookUp is sent to the input system, indicating that the player should look up or down. For the HorizontalInputKey that tracks horizontal movements, the MOBILE_Aturn value is sent to the input system, which indicates the player should turn left or right.
[UberStickLookZone MobileInputZone]

InputKey=MOBILE_ALookUp

HorizontalInputKey=MOBILE_ATurn

Type=ZoneType_Joystick

bRelativeX=true

bRelativeY=true

bRelativeSizeX=true

bRelativeSizeY=true

VertMultiplier=-0.5

HorizMultiplier=0.35

X=-0.2465

Y=-0.4

SizeX=0.1965

SizeY=1.0

bSizeYFromSizeX=true

RenderColor=(R=255,G=255,B=255,A=255)

InactiveAlpha=0.25

bUseGentleTransitions=true

ResetCenterAfterInactivityTime=3.0

ActivateTime=0.6

DeactivateTime=0.2

TapDistanceConstraint=5
After you finish entering the previous information, make sure to save the file. Also it would be good practice to write protect it, as well to prevent the UDK system from overwriting your changes.
The virtual joysticks themselves should look like the transparent round circles shown in Figure 1–16.
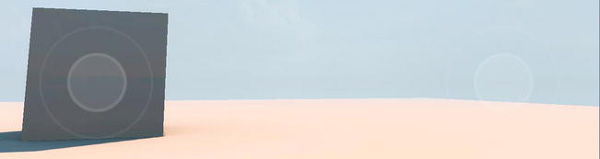
Figure 1–16. Virtual Joysticks
Setting Up Touch Input
Now let’s add in touch input for things like swipes and taps. To do this, we need to add in some more configurations to the Mobile-UDKGame.ini file that we added our joystick configuration info in earlier. First, add in "UberLookZone" to the zone names in the RequiredMobileInputConfigs section. Make sure you put the new zone at the end of the zone list. This new zone will take up the entire screen. Remember that input goes sequentially from the first listed input zone to the last. If you list the UberLookZone first, then all input will be processed by that zone and none will get to the zones that follow. This would make the virtual sticks unusable.
[Example1.Example1Game]

RequiredMobileInputConfigs=(GroupName="UberGroup",RequireZoneNames=("UberStickMoveZone","UberStickLookZone",

"UberLookZone"))
Next, add in the zone definition for the UberLookZone as follows. As with the joysticks, the InputKey refers to the up and down movements and the HorizontalInputKey refers to the left and right movements. Note that the Type is ZoneType_Trackball. Also note that the X and Y values are set to 0, which indicates the zone starts at the top left hand corner. The bRelativeSizeX and bRelativeSizeY values are set to true, and the SizeX and SizeY are set to 1, which means the size of the zone is full screen.
[UberLookZone MobileInputZone]

InputKey=MouseY

HorizontalInputKey=MouseX

TapInputKey=MOBILE_Fire

Type=ZoneType_Trackball

bRelativeSizeX=true

bRelativeSizeY=true

X=0

Y=0

SizeX=1.0

SizeY=1.0

VertMultiplier=-0.0007

HorizMultiplier=0.001

Acceleration=12.0

Smoothing=1.0

EscapeVelocityStrength=0.85

bIsInvisible=1

TapDistanceConstraint=32
Once you setup the touch input zone, you will need to set up the callback function that will process the touch input for your zone. First, you need to create a new player controller that derives from SimplePC.
class Example1PC extends SimplePC;
In this new player controller, you need to create the callback function that has the same format as the subsequent SwipeZoneCallback in terms of parameters and a Boolean return value. The EventType is ZoneEvent_Touch when the user first touches the screen. As the user moves his or her finger across the screen, the EventTypes become ZoneEvent_Update to indicate these touches are an update to a touch still in progress. Finally, the ZoneEvent_UnTouch EventType that indicates that the user has lifted his or her finger off the screen is received and the current touch is finished.
Functionbool SwipeZoneCallback(MobileInputZone Zone,

                               float DeltaTime,

                               int Handle,

                               EZoneTouchEvent EventType,

                               Vector2D TouchLocation)

{

    local     bool     retval;


    if (EventType == ZoneEvent_Touch)

    {

    }

    else

    if(EventType == ZoneEvent_Update)

    {

    }

    else

    if (EventType == ZoneEvent_UnTouch)

    {

    }

    return retval;

}
Next, you need to actually set the delegate OnProcessInputDelegate that controls touch input. Create a SetupZone function like the subsequent example that sets the touch input delegate to your custom callback function.
function SetupZones()

{

    Super.SetupZones();

    // If we have a valid player input and game class, configure the zones

    if (MPI != None && WorldInfo.GRI.GameClass != none)

    {

        LocalPlayer(Player).ViewportClient.GetViewportSize(ViewportSize);

        if (FreeLookZone != none)

        {

            FreeLookZone.OnProcessInputDelegate = SwipeZoneCallback;

        }

    }

}
Motion Input
For motion input, you need to use the delegate:
delegate OnMobileMotion(PlayerInput PlayerInput,

                        vector CurrentAttitude,

                        vector CurrentRotationRate,

                        vector CurrentGravity,

                        vector CurrentAcceleration);
located in the MobilePlayerInput class. As before, you need to set up a callback function to handle the player input.
function MobileMotionCallback(PlayerInput PlayerInputMobile,

                              vector CurrentAttitude,

                              vector CurrentRotationRate,

                              vector CurrentGravity,

                              vector CurrentAcceleration)

{

    // Code to handle Motion Input

}
Next, you need to set the delegate to point to your custom callback function. Depending on your iOS device, some motion input values will be unavailable or unreliable. For example, yaw measurement, acceleration, and gravity are only valid if the iOS device has a gyroscope.
MPI.OnMobileMotion = MobileMotionCallback;
PC to iOS Setup
In this section, we will give you a quick rundown of how to set up your completed UDK game to run on an iOS device. In addition to the overview in this section, you should reference the extensive resources provided by Epic Games which are listed in the “Other Resources” section in this book’s Introduction.
iOS Requirements
Games developed using the UDK can run on the following types of iOS devices:
- iPhone 4
- iPhone 4s
- iPhone 3GS
- iPad
- iPad2
- iPod touch 4th generation
- iPod touch 3rd generation (except for 8 GB 3rd generation devices.)
These devices must be running iOS 3.2 or later.
Apple Developer’s License
In order to run games on an actual iOS device, you need to register as an Apple developer. Apple charges $99 per year for this. You can register at the following URL:
http://developer.apple.com/programs/ios/
Participating in the Apple Developer program also entitles you to a variety of resources and enables you to distribute applications via the App Store.
Provisioning
Provisioning refers to the generations of keys, certificates, and mobile profiles needed to run a UDK game on an actual iOS device. We won’t go into detail about provisioning here, but Epic Games provides detailed instructions at the following site:
http://udn.epicgames.com/Three/AppleiOSProvisioningSetup.html
Running the UDK Game on the iOS Device
In order to play a game developed in the UDK on an actual iOS device, you need to package the game and then deploy it to the iOS device. After obtaining an Apple developer’s license and doing the required provisioning, follow these steps to run your game on an iOS device.
NOTE: This is the process for running default UDK game types. If you create a game with a custom type, as we’ll do in this book, see the following section for some additional preparatory steps.
- Connect your iOS device to your PC that is running the UDK.
- Bring up the Unreal Frontend (see Figure 1–17).

- Change the deployment platform setup from the default PC platform to the iOS platform. To do this, first press the Configuration button shown in Figure 1–18. This brings up a window shown in Figure 1–19.

Figure 1–18. The Configuration button
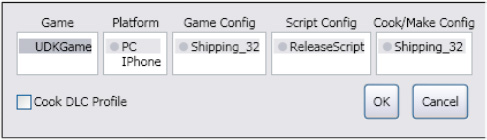
Figure 1–19. The Default PC Deployment Setup
- Change the settings to those shown in Figure 1–20.
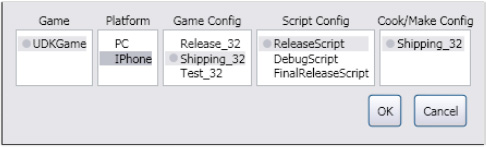
Figure 1–20. The iOS Deployment Setup
- Click the OK button. The Mobile section should become visible below the Configuration button.
- In the Mobile section, change the Packaging Mode to Default as shown in Figure 1–21.
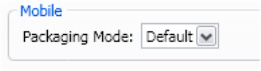
Figure 1–21. Packaging Mode
- Next you need to add the UDK level maps that you want to cook and place in the package that you deploy to your iOS device. Figure 1–22 shows the Maps to Cook section.
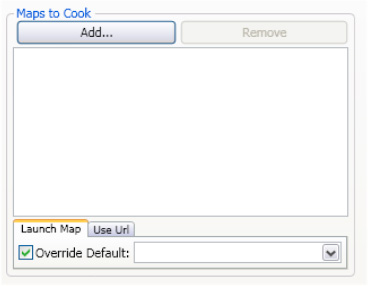
Figure 1–22. Adding Maps to Cook
- Click the Add button to bring up a list of the maps available on your computer (see Figure 1–23). You select the maps you want add from this list.

- Select the UDK level map or maps that you want to include, and then click Add Selected Maps to add the map(s). The added map(s) should show up as in Figure 1–24.
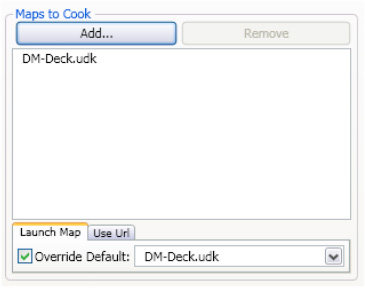
Figure 1–24. After Adding a Map
- Make sure that Override Default is checked. Then, from the drop-down box, select the map that you want to bring up by default when the game is first started.
- The final thing to do is to make sure the entire build pipeline is active (which means that none of the pictures representing the Script, Cook, Package and Deploy processes have “Skip” written over them) and then click on the Start button (see Figure 1–25). If one of the processes is disabled, you can enable it by clicking on it and selecting Step Enabled from the drop-down box.
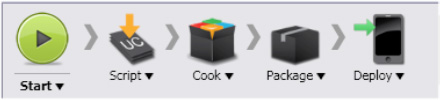
Figure 1–25. Starting the Deployment Pipeline from Frontend
This will compile, cook, package, and deploy your game to the iOS device where you can run it like any other iOS application. At this point the icon representing your UDK game should appear on your iOS device ready to run.
NOTE: Epic Games provides more information on cooking content at http://udn.epicgames.com/Three/ContentCooking.html
Configuring Custom Game Types
In the hands-on examples in this book, we will first create, compile, and then run the UnrealScript program in the Mobile Previewer. You will also create the level in the Unreal Editor that uses this script. After making sure that the example works on the Mobile Previewer, you are ready to follow the steps in the preceding section to deploy it to an actual iOS device. Since we use custom game types in our examples, however, you will need to perform a few additional steps before completing the steps from the preceding section.
TIP: In terms of compiling your script, it does not matter if the Frontend is set for iOS or PC deployment. You can have your Frontend set for the PC and still compile and run your UnrealScript program in the Mobile Previewer.
First, you need to set the game type that will be played in the deployed version of the example. In order to do this, you need to change the Mobile-UDKGame.ini and the DefaultGame.ini configuration files located in
C:UDKUDK-2011–06UDKGameConfig
and set the specific default game that is used in the hands-on example. (If you are using a different version of the UDK your default directory will be different.) For example, change the DefaultGame and DefaultServerGame configurations to the following to play the game type for the hands-on example in Chapter 2:
[Engine.GameInfo]

DefaultGame=ExampleCh2.ExampleCh2Game

DefaultServerGame=ExampleCh2.ExampleCh2Game
Next, we need to add the package that contains the code for this new game type to the list of packages that are cooked and deployed to the iOS device.
In the UDKEngine.ini configuration file add the following entries under the existing headings:
[Engine.PackagesToAlwaysCook]

Package=ExampleCh2


[Engine.StartupPackages]

Package=ExampleCh2
Next, in the DefaultEngine.ini configuration file, add the following entries under the existing headings:
[Engine.PackagesToAlwaysCook]

+Package=ExampleCh2


[Engine.StartupPackages]

+Package=ExampleCh2
Now you are ready to perform the steps from the preceding section.
NOTE: Be sure to return to this chapter when you are ready to deploy any of the examples from this book to your iOS device, and complete the steps in this section and then those from the preceding section.
Summary
In summation, we took a brief look at the key features of the UDK system. We took a look at the Unreal Editor and the associated subprograms and UDK assets, such as textures, materials, static meshes, and skeletal meshes. We then discussed important UDK development aspects that differ from the iOS platform and the Windows PC platform. We discussed how saving data and using textures differ on the PC platform and the iOS platform for the UDK. We also covered the different types of player input specific to developing games on the iOS platform. Finally, we went through the basics of the PC to iOS setup for your game.