Chapter 9
Physics Game Framework
In this chapter we will build a basic game framework for a physics-based game. A physics game uses realistic models for such things as collisions, forces applied to game objects, behavior of game objects, and gravity. The goal is usually to destroy key objects and perhaps avoid destroying other key objects.
Probably the most famous physics game for the iOS platform, or any mobile platform for that matter, is Angry Birds. In Angry Birds the player throws birds at targets at a user defined angle. The level is complete when all the targets are destroyed. We develop a similar game in this chapter with the added benefit that the game is in 3D instead of 2D as in Angry Birds.
The basic physics game framework that will be presented in this chapter involves:
- Creating a collision object that is to be thrown
- Setting the angle that the object will be launched
- Launching the object and having it collide with other objects in a realistic manner
- Providing sound effects where appropriate
- Implementing a custom HUD (Heads Up Display) to keep track of vital game statistics
- Providing a mechanism to restart a new game or level
Physics Game Framework Overview
In this section we will give a general and specific overview of the physics game framework presented here in this chapter. The general overview explains in non-technical terms the framework and how you could extend the framework to meet your own needs. The specific overview outlines in detail the major elements of the framework and how to extend it.
General Overview
In a general sense this chapter provides you with a basic model and starting point for creating your own physics game.
This chapter provides the core information and techniques for creating a collision object. You are shown how to apply a force to this object at a user defined angle. You are also shown how to create other collision objects that will serve as the targets. These targets will be destroyed if enough force is applied to them.
This framework can be extended in many ways. For example, currently the force used to launch the object at the targets is fixed. The framework can be modified so that the user is able to set the force applied to the launch object. Also, the current game objective in the framework is to destroy all the target objects. This objective can be modified to include avoiding destroying other types of objects and deducting points or applying other penalties if these objects are destroyed.
Other kinds of physics-based games could be developed using this framework as a starting point. One way to do this is to change how the player launches the collision object. Instead of clicking on an object to launch it the player can throw it by touching it and moving the object with his finger and then releasing it. To implement this you would use the RB_Handle class which has built in functions to grab, release and move a KActor or KAsset type object. You can also change the player input so that the collision object is launched like an arrow. For example the player would pull the object back a certain distance then let go to launch it like an arrow.
Specific Overview
In a specific sense this chapter provides you with the detailed code you need to start implementing the ideas you have for your own physics game.
In the framework we create a custom class called GameBall which extends the KActorSpawnable class. This will be used as the player's launch object. This class can be created or spawned dynamically from within the game and can be used for realistic rigid body collisions with other objects. The key benefit here is that the Unreal physics engine takes care of all the difficult and time consuming calculations for you. You can extend this concept to the creation of dynamic collision objects that are skeletal meshes of the KAssetSpawnable class. Skeletal meshes are generally used for characters that have moveable parts. See Chapter 4 for more background information on KActors and KAssets.
The angle to launch the object can be set within a range of 0 to 90 degrees using the right controller. Move the right controller upward to increase the launch angle and downward to decrease the launch angle. You could extend this concept further by also allowing the user to set the amount of force applied to the launch object.
Currently the value is set to a constant in the variable ImpulseMag. ImpulseMag is set to 500 in the SwipeZoneCallback() function. The ApplyForceRigidBody() function is then called to actually apply the force.
The blocks that are destroyed by the player's ball are created from classes derived from the KActor class. Remember that the KActor and KAsset classes are the two types of collision objects that can be used in realistic rigid body collisions.
In terms of the target blocks you can extend the game's objectives to including penalties for destroying certain types of blocks. Currently the function AllBlocksDestroyed() checks to see if all of the target blocks of class RigidBodyCube have been destroyed using the built in AllActors() iterator and returns a true value when they have all been eliminated. A similar function based on this code could be used to determine if any blocks of another class were destroyed and impose penalties if they were.
A customized HUD has been created that displays the player's score, the time since the game has started and the launch angle of the player's ball. This HUD can be extended by adding other statistics that you find important. For example, you could add a variable that would track the total number of blocks destroyed and display that number on the HUD. A new variable of type HUDInfo called HUDTotalBlocksDestroyed could be created to hold the HUD related placement information. This variable would be initialized in the PostBeginPlay() function. The call to actually draw the new information onscreen will be called form the DrawHUD() function. For more background information on the HUD see Chapter 6.
Hands-on Example: A Basic Physics Game
In this hands-on example we will create a basic physics game that can serve as a basic framework for creating your own physics game. First we create code for a new game type, a new player controller, a game ball which the player kicks into a group of blocks, a new HUD, and a new class of block used to create the target blocks. We then set up the game to compile and run on the mobile previewer. After compiling the new code we build the level using the new RigidBodyCubeEx class that we created then run the game on the mobile previewer.
Creating the Game Type
The first thing we need to do is create a new directory for the code for this project. Create the ExampleCh9 directory under your default UDK installation directory at C:UDKUDK-2011-06DevelopmentSrc.
NOTE: As a reminder, we are using the June 2011 UDK. If you are using a different version of the UDK, then your default path will be different.
Create a directory called Classes under the new directory you just created and put all your source code files in this directory.
Create the following class and save it under the filename “ExampleCh9Game.uc”. Again as with all previous examples in this book the filenames must match the classnames and the file extension must be “.uc”. See Listing 9–1, and note that the PlayerControllerClass and HUDType variables are set to our new custom classes. Also note that the variable Score which keeps track of the player's score in this game type.
Listing 9–1. Game Type
class ExampleCh9Game extends FrameworkGame;


var int Score;


event OnEngineHasLoaded()

{

    WorldInfo.Game.Broadcast(self,"ExampleCh9Game Type Active - Engine Has Loaded !!!!");

}


function bool PreventDeath(Pawn KilledPawn, Controller Killer, class<DamageType> DamageType, vector HitLocation)

{

    return true;

}


static event class<GameInfo> SetGameType(string MapName, string Options, string Portal)

{

    return super.SetGameType(MapName, Options, Portal);

}


defaultproperties

{

    PlayerControllerClass=class'ExampleCh9.ExampleCh9PC'

    DefaultPawnClass=class'UDKBase.SimplePawn'

    HUDType=class'KickBallHUD'


    bRestartLevel=false

    bWaitingToStartMatch=true

    bDelayedStart=false

}
FRAMEWORK NOTE: Here you can set your customized classes for the player controller, player's pawn, and player's HUD. You do this by setting the PlayerControllerClass, DefaultPawnClass, and HUDType variables to your new class.
Creating the Player Controller
Next, we need to create our player controller class. For a full version of the code in this section, without the explanations, please see the source code available for this book. Code that is new and not used in previous chapters is highlighted in bold print.
The first part of the controller code, shown in Listing 9–2, changes the behavior of the right virtual joystick controller so that pushing the virtual joystick up increases the kick angle and pushing it downward decreases the kick angle.
Key things to notice in the listing include:
- A function
InputDelayTimer()is used to delay the update of theKickAnglevariable. For example, originally theKickAnglevariable would update too quickly and the rate of update needed to be slowed down. - The
ProcessLookUpInput()function updates theKickAnglebased on the user's input. A call to theSetTimer()function initiates the call toInputDelayTimer()at a certain delay interval. During this delay interval theKickAngleis not updated. TheKickAngleis also clamped to the range 0 to 90 degrees using the built inClamp()function. - The
UpdateRotation()function is overridden by our custom function. The only difference here from the default function in the UDK base code is that the line
DeltaRot.Pitch = PlayerInput.aLookUp;is commented out so that the player's up/down view is not changed and the function
ProcessLookUpInput()is called to change theKickAngleinstead of updating the player's up/down view.
Listing 9–2. Customizing the Controls
class ExampleCh9PC extends SimplePC;


var float PickDistance;

var int KickAngle;

var int BallCreationDist;

var float GameTime;

var bool bGameOver;

var Actor Ball;

var bool bInitDone;

var bool bInputDelayFinished;

var int GameTimeDelta;

var SoundCue BallHitSound;

var SoundCue BallSpawnSound;

function InputDelayTimer()

{

    bInputDelayFinished = true;

}

function ProcessLookUpInput()

{
    local float TimerDelta;


    if (!bInputDelayFinished)

    return;

    if (PlayerInput.aLookUp > 0)

    {

        KickAngle++;

    }

    else

    if (PlayerInput.aLookUp < 0)

    {

        KickAngle--;

    }

    KickAngle = Clamp(KickAngle,0,90);

    TimerDelta = 0.05;

    bInputDelayFinished = false;

    SetTimer(TimerDelta, false, 'InputDelayTimer'),

}

function UpdateRotation( float DeltaTime )

{

    local Rotator DeltaRot, newRotation, ViewRotation;


    ViewRotation = Rotation;

    if (Pawn!=none)

    {

        Pawn.SetDesiredRotation(ViewRotation);

    }


    // Calculate Delta to be applied on ViewRotation

    DeltaRot.Yaw = PlayerInput.aTurn;


    //DeltaRot.Pitch = PlayerInput.aLookUp;

    ProcessLookUpInput();


    ProcessViewRotation( DeltaTime, ViewRotation, DeltaRot );

    SetRotation(ViewRotation);


    ViewShake( deltaTime );


    NewRotation = ViewRotation;

    NewRotation.Roll = Rotation.Roll;


    if ( Pawn != None )

        Pawn.FaceRotation(NewRotation, deltatime);

}
The next piece of the code, shown in Listing 9–3, creates and initializes the game timer. The GameTimer() function updates the amount of time that has passed since the level has started. The PostBeginPlay() function sets a looping timer which continuously calls the GameTimer() function to update the GameTime variable.
function GameTimer()

{

    if (bGameOVer)

    {

        return;

    }

    GameTime = GameTime + GameTimeDelta;

}

simulated function PostBeginPlay()

{

    Super.PostBeginPlay();

    SetTimer(GameTimeDelta, true, 'GameTimer'),

}
The next section of code, shown in Listing 9–4, should be familiar to you from Chapter 4, in which we covered UDK collisions. The ApplyForceRigidBody() function applies a force to a KActor or a KAsset object.
Listing 9–4. Applying Force to a Rigid Body
function ApplyForceRigidBody(Actor SelectedActor, Vector ImpulseDir,float ImpulseMag, Vector HitLocation)

{

    if (SelectedActor.IsA('KActor'))

    {

        WorldInfo.Game.Broadcast(self,"*** Thrown object " @ SelectedActor @

                                 ", ImpulseDir = " @ ImpulseDir @

                                 ", ImpulseMag = " @ ImpulseMag @

                                 ", HitLocation = " @ HitLocation);

        KActor(SelectedActor).ApplyImpulse(ImpulseDir,ImpulseMag, HitLocation);

    }

    else

    if (SelectedActor.IsA('KAsset'))

    {

        WorldInfo.Game.Broadcast(self,"*** Thrown object " @ SelectedActor @

                                 ", ImpulseDir = " @ ImpulseDir @

                                 ", ImpulseMag = " @ ImpulseMag @

                                 ", HitLocation = " @ HitLocation);

        KAsset(SelectedActor).SkeletalMeshComponent.AddImpulse(ImpulseDir* ImpulseMag, ,'Bone06'),

    }

    else

    {

        WorldInfo.Game.Broadcast(self,"!!!ERROR Selected Actor " @ SelectedActor @

                                 "is not a KActor or KAsset, you can not apply

                                  an impulse to this object!!!");

    }

}
The next section of code, shown in Listing 9–5, also should be familiar to you from Chapter 4. The PickActor() function determines if the user has touched an actor and returns a reference to this actor.
function Actor PickActor(Vector2D PickLocation, out Vector HitLocation, out TraceHitInfo HitInfo)

{

    local Vector TouchOrigin, TouchDir;

    local Vector HitNormal;

    local Actor  PickedActor;

    local vector Extent;


    //Transform absolute screen coordinates to relative coordinates

    PickLocation.X = PickLocation.X / ViewportSize.X;

    PickLocation.Y = PickLocation.Y / ViewportSize.Y;


    //Transform to world coordinates to get pick ray

    LocalPlayer(Player).Deproject(PickLocation, TouchOrigin, TouchDir);


    //Perform trace to find touched actor

    Extent = vect(0,0,0);

    PickedActor = Trace(HitLocation,

                        HitNormal,

                        TouchOrigin + (TouchDir * PickDistance),

                        TouchOrigin,

                        True,

                        Extent,

                        HitInfo);

    //Return the touched actor for good measure

    return PickedActor;

}
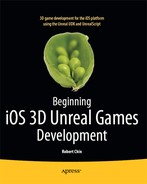
The next piece of code, shown in Listing 9–6, is called to create the player's ball that will be used to destroy blocks in the level. Figure 9–1 shows the result of this code.
The CreateNewGameBall() function creates a new GameBall class object and applies a small force downward to activate the object's rigid body physics simulation. A sound is also played.
Listing 9–6. Creating the Game Ball
function CreateNewGameBall()

{

    local vector FrontVec;

    local vector BallLocation;


    local Vector HitLocation;

    local Vector ImpulseDir;

    local float ImpulseMag;


    FrontVec = Normal(Vector(Pawn.Rotation));

    BallLocation = Pawn.Location + (FrontVec * BallCreationDist);


    Ball = Spawn(class'GameBall',,,BallLocation);

    PlaySound(BallSpawnSound);


    ImpulseDir = Vect(0,0,1);

    ImpulseMag = 5;

    HitLocation = Vect(0,0,0);
    ApplyForceRigidBody(Ball, ImpulseDir, ImpulseMag, HitLocation);

}
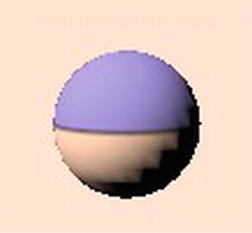
Figure 9–1. The Game Ball
The next piece of code, shown in Listing 9–7, involves code related to player input through touching the screen. Key parts of the listing include:
- The
LoadLevel(string LevelName)function loads in the level with the inputLevelNamestring parameter. - The
ResetGame()function restarts the game by loading in the original level. In the UDK environment whenever a level is loaded, the game is restarted and all variables such asScoreandGameTimeare reset. - In the
SwipeZoneCallback()function, code has been added to create a new ball when the screen is touched and to reset the game if the current game is over. A sound is also played when the ball is kicked. - The SetupZones() function initializes the input zones and this function should be familiar to you from the hands-on example in Chapter 2.
Listing 9–7. Player Input
function LoadLevel(string LevelName)

{

    local string Command;


    Command = "open " @ LevelName;

    ConsoleCommand(Command);

}


function ResetGame()

{

    LoadLevel("ExampleCh9Map");

}

function bool SwipeZoneCallback(MobileInputZone Zone,

                                float DeltaTime,

                                int Handle,

                                EZoneTouchEvent EventType,

                                Vector2D TouchLocation)

{
    local bool retval;


    local Actor PickedActor;

    local Vector HitLocation;

    local TraceHitInfo HitInfo;


    // Variables for physics

    local Vector ImpulseDir;

    local float ImpulseMag;

    local float RadKickAngle;


    retval = true;


    if (EventType == ZoneEvent_Touch)

    {

        // If screen touched then pick actor

        PickedActor = PickActor(TouchLocation,HitLocation,HitInfo);


        // Reset Game

        if (bGameOver)

        {

            ResetGame();

            return retval;

        }

        if (PickedActor.IsA('GameBall'))

        {

            RadKickAngle = KickAngle * DegToRad;


            ImpulseDir = (Normal(Vector(Pawn.Rotation)) * cos(RadKickAngle)) + (vect(0,0,1) * sin(RadKickAngle));

            ImpulseMag = 500;


            ApplyForceRigidBody(PickedActor,ImpulseDir,ImpulseMag,HitLocation);

            PlaySound(BallHitSound);

        }

        else

        {

            CreateNewGameBall();

        }

    }

    else

    if(EventType == ZoneEvent_Update)

    {

    }

    else

    if (EventType == ZoneEvent_UnTouch)

    {

    }

    return retval;

}

function SetupZones()

{

    Super.SetupZones();


    // If we have a game class, configure the zones

    if (MPI != None && WorldInfo.GRI.GameClass != none)

    {

        LocalPlayer(Player).ViewportClient.GetViewportSize(ViewportSize);
        if (FreeLookZone != none)

        {

            FreeLookZone.OnProcessInputDelegate = SwipeZoneCallback;

        }

    }

}
The next code section, shown in Listing 9–8, contains the main loop of code that is executed continuously in the function PlayerTick(). Notice the following things:
- The
AllBlocksDestroyed()function returns true if all the target blocks have been destroyed by the player and false otherwise. - The
InitKickBallGame()function is called in the beginning to do any initialization after the player is first created and afterPlayerTick()is first called. - In the main
PlayerTick()loop the functionAllBlocksDestroyed()is continually called to check to see if all the target blocks in the level have been destroyed. If they have, thenbGameOveris set to true.
Listing 9–8. Main Loop
function bool AllBlocksDestroyed()

{

    local RigidBodyCube TempBlock;

    local bool bAllBlocksDestroyed;


    bAllBlocksDestroyed = true;

    foreach AllActors(class'RigidBodyCube', TempBlock)

    {

        if (!TempBlock.bDestroyed)

        {

            bAllBlocksDestroyed = false;

        }

    }

    return bAllBlocksDestroyed;

}

function InitKickBallGame()

{

    bInitDone = true;

}

function PlayerTick(float DeltaTime)

{

    Super.PlayerTick(DeltaTime);


    if (!bInitDone)

    {

        InitKickBallGame();

    }

    if (AllBlocksDestroyed())

    {

        bGameOver = true;

    }
    if (bGameOver)

    {

        Pawn.SetHidden(true);

        Pawn.Velocity = vect(0,0,0);

    }

}
Listing 9–9 contains the final piece of the controller code, which defines the default values for some of the variables in this class.
Listing 9–9. Default Properties
defaultproperties

{

    PickDistance = 10000

    KickAngle = 45

    bInitDone = false;

    bInputDelayFinished = true

    BallCreationDist = 500

    GameTime=0

    GameTimeDelta = 1

    bGameOver = false;

    BallHitSound = SoundCue'A_Weapon_BioRifle.Weapon.A_BioRifle_FireImpactFizzle_Cue'

    BallSpawnSound = SoundCue'A_Pickups.Generic.Cue.A_Pickups_Generic_ItemRespawn_Cue'

}
FRAMEWORK NOTE: Any changes on how the player interacts with the game should be implemented in this class.
Creating the Game Ball
Next, we need to create the GameBall class that will represent the player's ball that will be used to destroy the target blocks (see Listing 9–10). The important things to note in this code are
- The
RigidBodyCollision()function plays a sound if the ball makes an impact with another object with a minimum force defined by theMinimumForceForSoundvariable. - The
Touch()function is called if another object touches this ball. Currently this function does nothing useful but is a placeholder in case you need this function in a future derived version of this class for your own game. - The
defaultpropertiesblock defines the 3d mesh used for this ball as well as defining some default values such as the sound cue to use for the impact sound.
Listing 9–10. The Player's Ball
class GameBall extends KActorSpawnable;


var SoundCue BallImpact;

var float MinimumForceForSound;


event RigidBodyCollision(PrimitiveComponent HitComponent,

                         PrimitiveComponent OtherComponent,

                         const out CollisionImpactData RigidCollisionData,

                         int ContactIndex)

{

    local float CollisionForce;


    CollisionForce = VSize(RigidCollisionData.TotalNormalForceVector);

    if (CollisionForce >= MinimumForceForSound)

    {

        PlaySound(BallImpact);

    }

}


event Touch(Actor Other, PrimitiveComponent OtherComp, vector HitLocation, vector HitNormal)

{

    WorldInfo.Game.Broadcast(self,"GameBall Has Been Touched");

}


defaultproperties

{

    Begin Object Class=StaticMeshComponent Name=GameBallMesh

        StaticMesh=StaticMesh'EngineMeshes.Sphere'

        Translation=(X=0.000000,Y=0.000000,Z=0.000000)

        Scale3D=(X=0.10000,Y=0.10000,Z=0.1000)


        CollideActors=true

        BlockActors=true

        BlockRigidBody=true

        bNotifyRigidBodyCollision=true

        ScriptRigidBodyCollisionThreshold=0.001

        RBChannel=RBCC_GameplayPhysics


RBCollideWithChannels=(Default=TRUE,BlockingVolume=TRUE,GameplayPhysics=TRUE,EffectPhysics=TRUE)

    End Object

    Components.Add(GameBallMesh)

    CollisionComponent = GameBallMesh


    BallImpact = SoundCue'A_Character_BodyImpacts.BodyImpacts.A_Character_RobotImpact_GibLarge_Cue'

    MinimumForceForSound = 50;

}
Creating the HUD
Next, we need to create the custom HUD class that will display the player's score, game time, and the KickAngle that defines the angle that a force will act on the ball (see Listing 9–11). The structure of this HUD class is similar to the one discussed previously in Chapter 6. The key differences are highlighted in bold print.
The following items are the key points to notice in the listing:
- The variables that hold the key information that is displayed on screen are
HUDKickAngle,HUDGameTime,HUDScore. - As before, the
PostBeginPlay()function sets up the values of the HUD related variables. - The
DrawHUDItem()function draws the key statistics to the screen. - The
DrawHUD()function is overridden allowing us to add our own custom drawing routines to the HUD's normal drawing routines.
Listing 9–11. Custom HUD
class KickBallHUD extends UDKHud;


struct HUDInfo

{

    var string Label;

    var Vector2D TextLocation;

    var Color TextColor;

    var Vector2D Scale;

};

// HUD

var HUDInfo HUDKickAngle;

var HUDInfo HUDGameTime;

var HUDInfo HUDGameOver;

var HUDInfo HUDScore;

simulated function PostBeginPlay()

{

    Super.PostBeginPlay();


    HUDKickAngle.Label = "KickAngle:";

    HUDKickAngle.TextLocation.x = 1000;

    HUDKickAngle.TextLocation.y = 50;

    HUDKickAngle.TextColor.R = 0;

    HUDKickAngle.TextColor.G = 0;

    HUDKickAngle.TextColor.B = 255;

    HUDKickAngle.Scale.X = 2;

    HUDKickAngle.Scale.Y = 4;


    HUDGameTime.Label = "Time:";

    HUDGameTime.TextLocation.x = 600;

    HUDGameTime.TextLocation.y = 50;

    HUDGameTime.TextColor.R = 255;

    HUDGameTime.TextColor.G = 255;
    HUDGameTime.TextColor.B = 0;

    HUDGameTime.Scale.X = 2;

    HUDGameTime.Scale.Y = 4;


    HUDGameOver.Label = "Level Complete";

    HUDGameOver.TextLocation.x = 250;

    HUDGameOver.TextLocation.y = 300;

    HUDGameOver.TextColor.R = 255;

    HUDGameOver.TextColor.G = 0;

    HUDGameOver.TextColor.B = 255;

    HUDGameOver.Scale.X = 7;

    HUDGameOver.Scale.Y = 7;


    HUDScore.Label = "Score:";

    HUDScore.TextLocation.x = 0;

    HUDScore.TextLocation.y = 50;

    HUDScore.TextColor.R = 255;

    HUDScore.TextColor.G = 0;

    HUDScore.TextColor.B = 0;

    HUDScore.Scale.X = 2;

    HUDScore.Scale.Y = 4;

}

function DrawHUDItem(HUDInfo Info, coerce string Value)

{

    local Vector2D TextSize;


    Canvas.SetDrawColor(Info.TextColor.R, Info.TextColor.G, Info.TextColor.B);

    Canvas.SetPos(Info.TextLocation.X, Info.TextLocation.Y);

    Canvas.DrawText(Info.Label, ,Info.Scale.X,Info.Scale.Y);

    Canvas.TextSize(Info.Label, TextSize.X, TextSize.Y);

    Canvas.SetPos(Info.TextLocation.X + (TextSize.X * Info.Scale.X), Info.TextLocation.Y);

    Canvas.DrawText(Value, , Info.Scale.X, Info.Scale.Y);

}

function DrawHUD()

{

    local int Time;


    super.DrawHUD();


    Canvas.Font = class'Engine'.static.GetLargeFont();

    // Score

    DrawHUDItem(HUDScore, ExampleCh9Game(WorldInfo.Game).Score);


    // Time

    Time = ExampleCh9PC(PlayerOwner).GameTime;

    DrawHUDItem(HUDGameTime, Time);


    // Kick Angle

    DrawHUDItem(HUDKickAngle,ExampleCh9PC(PlayerOwner).KickAngle);


    // Game Over

    if (ExampleCh9PC(PlayerOwner).bGameOVer)

    {

         DrawHUDItem(HUDGameOver, "");

    }
}

defaultProperties

{

}
FRAMEWORK NOTE: Modify this class in order to add in more key statistics or change the key statistics that will be displayed in your game.
Creating the RigidBodyCubeEx Object
Next, we need to create the new RigidBodyCubeEx class that extends from our previously defined RigidBodyCube class from the Chapter 4.
Notice in Listing 9–12 that the RigidBodyCollision() function overrides the parent function in RigidBodyCube. It calls the parent function and also adds to the player's score the value of the cube and plays an explosion sound if the cube is destroyed.
Listing 9–12. RigidBodyCubeEx class
class RigidBodyCubeEx extends RigidBodyCube;


var SoundCue ExplosionSound;

var() float ItemValue;


event RigidBodyCollision(PrimitiveComponent HitComponent,

                         PrimitiveComponent OtherComponent,

                         const out CollisionImpactData RigidCollisionData,

                         int ContactIndex)

{

    super.RigidBodyCollision(HitComponent, OtherComponent, RigidCollisionData, ContactIndex);


    if (bDestroyed)

    {

        PlaySound(ExplosionSound);

        ExampleCh9Game(WorldInfo.Game).Score += ItemValue;

    }

}


defaultproperties

{

    ExplosionSound = SoundCue'A_Weapon_ShockRifle.Cue.A_Weapon_SR_ComboExplosionCue'

    ItemValue = 10;

}
FRAMEWORK NOTE: You can derive or extend a new class from this class to create a new type of target object for your own game.
Configuring the Game Type
Next, we need to set up this new example for compilation and for playing on the mobile previewer. In the configuration directory located at
C:UDKUDK-2011-06UDKGameConfig
Change the UDKEngine.ini and Mobile-UDKGame.ini configuration files to the following.
UDKEngine.ini

[UnrealEd.EditorEngine]

ModEditPackages=ExampleCh9

Mobile-UDKGame.ini

[ExampleCh9.ExampleCh9Game]

RequiredMobileInputConfigs=(GroupName="UberGroup",RequireZoneNames=("UberStickMoveZone","UberStickLookZone","UberLookZone"))
Save the configuration files. You may need to write protect them to preserve the contents since the UDK sometimes overwrites them. Generally, this does not happen. However, if you are working on a project over a period of many months, then you probably should take this extra step. If you use this framework or the other frameworks in this book to build your own games, then I would advise you to write protect the configuration files.
Bring up the Unreal Frontend and compile the scripts.
Creating the Level
Next, we need to create the level. Follow these steps:
- Bring up the Unreal Editor.
- Type in vendorcrate into the search box in the Content Browser and the static mesh of a vendor crate should show up.
- Click on the vendor crate static mesh and then drag and drop the crate into the default level (see Figure 9–2).
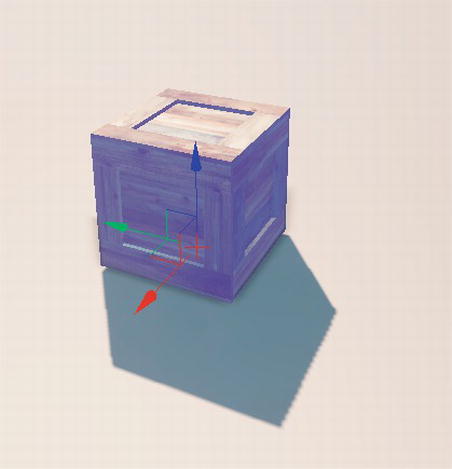
- Create stacks of crates of various heights. An easy way to do this is to select multiple crates at once by holding down the Ctrl key and clicking on a stack of crates. After the crates are selected, release the Ctrl key, hold down the Alt key, and click on the transformation widget and move it to another location to create a copy of that stack of crates (see Figure 9–3).
Figure 9–3. Duplicating Crates
- Click on the Actor Classes tab and search for
RigidbodyCubeEx. Click on that class. Right-click on an empty area in the level and select the Add RigidBodyCubeEx Here option. - The Cube will be too big so double-click on it and set the Draw Scale under the Display category to 0.20 (see Figure 9–4).
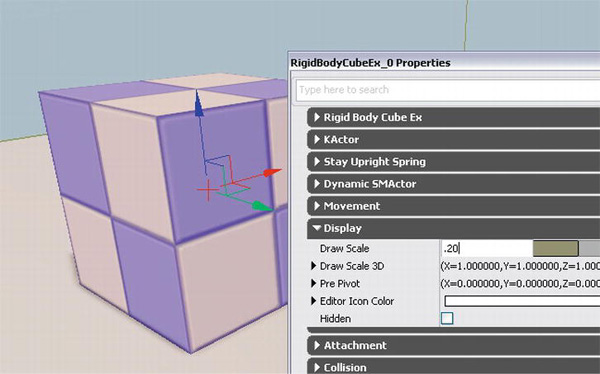
Figure 9–4. Resizing the Cube
- Make copies of this cube and put them at the tops of the vendor crates you just created (see Figure 9–5).
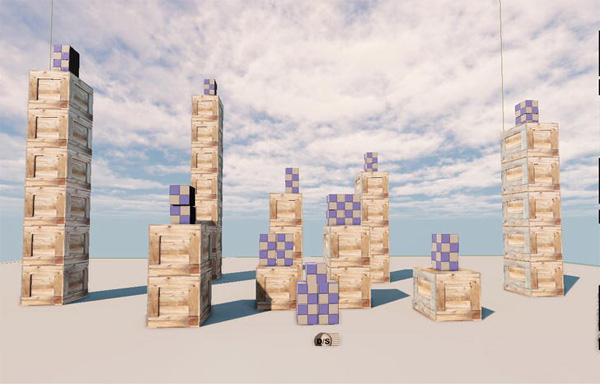
Figure 9–5. The Finished Level
Running the Game
Now, we are ready to run our game. Follow these steps:
- Select View
 World Properties from the Unreal Editor main menu. This would bring up the World Properties window.
 - In the World Properties window set the Default Game Type under the Game Type category to ExampleCh9Game.
- Select the Play On Mobile Previewer option to run the game on the mobile previewer form the Editor.
Click somewhere on the screen to create a new ball. Click on this ball to kick it toward the checkered cubes. Use the left virtual joystick to move forward/backward and left/right. Use the right virtual joystick to turn left/right and raise and lower the KickAngle. You should see something like in Figure 9–6.

Figure 9–6. Final Physics Game in Action
Summary
In this chapter we created a basic framework for a physics game. Various custom collision objects were created such as the player's ball and the target cube that is to be destroyed. Sound effects were added in where appropriate. A level consisting of stacks of different heights of crates topped with target cubes was created. The final product was a basic playable physics game that the reader can use as a base to build his own physics games from. The last few chapters of this book will concentrate on creating basic game frameworks such as this one.