Chapter 7
Sample Game and GamePlay
In this chapter we will discuss gameplay including the main categories that affect the quality of gameplay, which are game difficulty and game balance. Elements that make up game difficulty include such things as the characteristics of the enemies, the player, the weapons, and the projectiles used in the weapons. Game balance refers to finding the right combination of the above elements in order to create a fun game that the player will continue to come back to and play over and over again.
Finally, we cover an actual gameplay example where we create a small working game that involves an enemy Bot following the player around the level and firing a weapon at the player.
Gameplay Overview
In this section we will cover game difficulty and game balance, both of which are essential in producing gameplay that is both fun and challenging. We cover the different elements of gameplay that contribute to a game’s difficulty level. We then discuss how balancing these different elements is also important to creating a fun game that the player will enjoy playing over and over again.
Game Difficulty
Game difficulty is an important part of creating good gameplay and making a game fun and entertaining. A game that is too difficult for the average user will frustrate him. A game that is too easy will lack any meaningful challenge and also make him lose interest in the game. The objective is to make a game easy enough for the average player but hard enough to keep him challenged.
Elements of gameplay that affect game difficulty are:
- Enemies: The number of enemies, the capabilities of the enemies (including their armor, weapons, health, and healing abilities), and other special abilities such as magic abilities are elements to consider concerning game difficulty.
- The Player: The fundamental characteristics of the player such as number of lives, health, healing ability, armor, weapons, and other special abilities are factors that are related to game difficulty.
- Power Ups: The nature, number, and location of power ups available inside the game world that would enhance the abilities of objects and characters, such as health bonus, weapon damage powerups, and extra lives, are also factors that would affect game difficulty.
- Level Design: The way the level is designed also affects the game difficulty level in terms of where the enemies are placed and the amount and types of cover available to the player and enemies. For example, do the player’s enemies shoot at him from high ground in a fortified area? If so how much cover from hostile fire is there in the game arena?
- Game Play Rules: The rules of the game including how victory is achieved would also determine how difficult the game is. For example, if the objective of the game is to just survive for a certain amount of time, then hiding out in an easily defensible area with lots of cover from enemy fire would be desirable. However, once the player is able to find such an area in the game level, then the game would become very easy and perhaps not as fun and challenging.
Game Balance
Game Balance is also an important element in good gameplay and in creating a fun game. Game balance refers to finding the best combinations of the different levels of difficulty in each of the elements of gameplay listed in the Game Difficulty section previously.
For example, let’s take the situation from the previous section where the goal of the game is to survive for a set time and the player has found a location in the game where he is well protected from enemy fire and can just sit and wait for the game to end. A way to change this game so that it is more balanced might be to:
- Change the Game Play Rules so that the objective would be to not only survive a set amount of time but to achieve other objectives such as destroying a certain target or killing a certain number of enemies.
- Change the Level Design so that any areas that are completely protected or mostly protected from enemy fire and attack are removed.
- Increase the number of enemies around these heavily protected areas so that they are difficult to get to without the player taking heavy damage.
Basic GamePlay
In this section you will learn how to create a small working game with a working Heads Up Display, sound effects and the locked gate from the Kismet/Matinee section from the previous chapter. The knowledge used to create this game will be drawn from previous sections in this chapter and from previous chapters. A hands-on example will be presented to show you in detail how to create this basic game.
Hands-On Example: Creating a Basic Game Framework.
In this example we will create a small working game incorporating the code created in the Sound Cues, and HUD sections in this chapter. The final game will have a working HUD displaying the score, player’s health, and number of lives left in the game. An enemy bot is created on a custom spawn pad and then follows the player and fires its weapon at the player. The objective of the game would be to kill the enemy bot and gain the highest score before all your lives have been used up.
Creating the Level
In this example we will extend the level that you created for the Kismet and Matinee controlled gate example in the previous chapter.
- Bring up the Unreal Editor and load in the level you saved that contains the locked gate example using Kismet and Matinee.
- Copy and paste the cube all across the level. Right-click on an empty area near the center of the level and select Add Actor
 Add Pylon to add a Pylon for the navigation mesh used to control the enemy Bot. Rebuild the navigation mesh by selecting Build AI Paths from the main Unreal Editor menu. The resulting level should look similar to Figure 7–1.
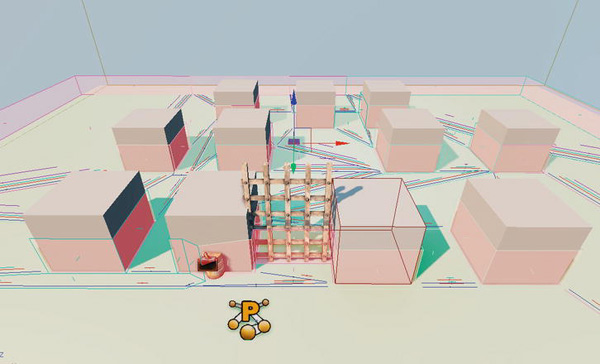
Figure 7–1. Creating a simple game level
The level is complete except for the Spawn Pad for the Bot which will be added later after code for the Spawn Pad has been created.
- Save the level.
Creating the Game Type
Next, we need to create a new game type class for this example (See Listing 7–1). Create this new class in the following directory:
C:UDKUDK-2011-06DevelopmentSrcExampleCh7Classes
You should have already created this directory to store code for the Sound Cue section and the HUD section that we created earlier in Chapter 6.
Listing 7–1. Game Type
class ExampleCh7Game extends FrameworkGame;


event OnEngineHasLoaded()

{

    WorldInfo.Game.Broadcast(self,"ExampleCh7Game Type Active - Engine Has Loaded

!!!!");

}

function bool PreventDeath(Pawn KilledPawn, Controller Killer, class<DamageType>

DamageType, vector HitLocation)

{

    return true;

}

static event class<GameInfo> SetGameType(string MapName, string Options, string Portal)

{
    return super.SetGameType(MapName, Options, Portal);

}

defaultproperties

{

    PlayerControllerClass=class'ExampleCh7.ExampleCh7PC'

    DefaultPawnClass=class'ExampleCh7.Jazz3Pawn'

    HUDType=class'ExampleCh7.ExtendedHUD'

    bRestartLevel=false

    bWaitingToStartMatch=true

    bDelayedStart=false

}
Note that we have specified a custom player controller, pawn class, and HUD for this game type. Remember that we have already created the custom HUD class in Chapter 6 so nothing more needs to be done with the HUD class.
Creating the Player’s Code
Next, we need to create the UnrealScript code for the Player. This code consists of a custom pawn, controller, weapon, and weapon projectile
Pawn
The player’s pawn is shown in Listing 7–2. The important modifications from previous code are shown in bold print.
The main addition here is the TakeDamage() function. This function processes damage to the player and if the player’s health is equal to or less than zero and the player has more lives then reset the player’s health and move the player to his starting location.
Listing 7–2. Player’s Pawn
class Jazz3Pawn extends SimplePawn;


var float CamOffsetDistance;

var int CamAngle;


var Inventory MainGun;

var vector InitialLocation;


var SoundCue PawnHitSound;

var int Lives;


event TakeDamage(int Damage, Controller InstigatedBy, vector HitLocation, vector

Momentum, class<DamageType> DamageType, optional TraceHitInfo HitInfo, optional Actor

DamageCauser)

{

    PlaySound(PawnHitSound);

    Health = Health - Damage;

    WorldInfo.Game.Broadcast(self,self @ " Has Taken Damage IN TAKEDAMAGE, HEALTH = " @

Health);


    // If Died

    if (Health <= 0)
    {

        // Reduce number of lives left if above 0

        if (Lives > 0)

        {

            Lives--;

        }


        // If player has more lives left then use them

        if (Lives > 0)

        {

             SetLocation(InitialLocation);

             SetPhysics(PHYS_Falling);

             Health = 100;

        }

    }

}

simulated singular event Rotator GetBaseAimRotation()

{

    local rotator TempRot;

    TempRot = Rotation;

    TempRot.Pitch = 0;

    SetRotation(TempRot);

    returnTempRot;

}

function AddGunToSocket(Name SocketName)

{

    local Vector SocketLocation;

    local Rotator SocketRotation;


    if (Mesh != None)

    {

        if (Mesh.GetSocketByName(SocketName) != None)

        {

            Mesh.GetSocketWorldLocationAndRotation(SocketName, SocketLocation,

SocketRotation);


            MainGun.SetRotation(SocketRotation);

            MainGun.SetBase(Self,, Mesh, SocketName);

        }

        else

        {

            WorldInfo.Game.Broadcast(self,"!!!!!!SOCKET NAME NOT FOUND!!!!!");

        }

    }

    else

    {

        WorldInfo.Game.Broadcast(self,"!!!!!!MESH NOT FOUND!!!!!");

    }

}

function AddDefaultInventory()

{

    MainGun = InvManager.CreateInventory(class'JazzWeaponSound'),

    MainGun.SetHidden(false);

    AddGunToSocket('Weapon_R'),

    Weapon(MainGun).FireOffset = vect(0,0,-70);

}
///////////////////////////////// Third Person View /////////////////////////////////

simulated function boolCalcCamera( float fDeltaTime, out vector out_CamLoc, out rotator

out_CamRot, out float out_FOV )

{

    local vector BackVector;

    local vector UpVector;

    local float  CamDistanceHorizontal;

    local float  CamDistanceVertical;


    // Set Camera Location

    CamDistanceHorizontal = CamOffsetDistance * cos(CamAngle * UnrRotToRad);

    CamDistanceVertical   = CamOffsetDistance * sin(CamAngle * UnrRotToRad);


    BackVector = -Normal(Vector(Rotation)) * CamDistanceHorizontal;

    UpVector=  vect(0,0,1) * CamDistanceVertical;


    out_CamLoc = Location + BackVector + UpVector;


    // Set Camera Rotation

    out_CamRot.pitch = -CamAngle;

    out_CamRot.yaw   = Rotation.yaw;

    out_CamRot.roll  = Rotation.roll;


    return true;

}

defaultproperties

{

    Begin Object Class=SkeletalMeshComponent Name=JazzMesh

        SkeletalMesh=SkeletalMesh'KismetGame_Assets.Anims.SK_Jazz'

        AnimSets(0)=AnimSet'KismetGame_Assets.Anims.SK_Jazz_Anims'

        AnimTreeTemplate=AnimTree'KismetGame_Assets.Anims.Jazz_AnimTree'

        BlockRigidBody=true

        CollideActors=true

    End Object

    Mesh = JazzMesh; // Set The mesh for this object

    Components.Add(JazzMesh); // Attach this mesh to this Actor


    CamAngle=3000;

    CamOffsetDistance= 484.0


    InventoryManagerClass=class'WeaponsIM1'


    PawnHitSound =

SoundCue'A_Character_CorruptEnigma_Cue.Mean_Efforts.A_Effort_EnigmaMean_Death_Cue'

}
For this pawn we added a Lives variable to indicate the number of lives this pawn has left. We also added code to the TakeDamage() function to only reset the player to the starting level position if he has more lives left.
NOTE: The number of player lives, and the player’s health are key elements of gameplay that were discussed in the game overview section. In order to have a good game balance with a reasonable game difficulty level you can change the number of starting lives and the player’s starting health accordingly to help get the desired game balance and difficulty you desire.
Controller
Next, we need to create our custom player controller. See Listing 7–3.
In this player controller we create the enemy bot on the bot spawn pad when the player is first created (PlayerTick() is first called). We also initialize the number of player’s lives. In the main control loop for player which is the PlayerTick() function we continually check to see if the game is over, that is the number of player lives remaining is 0. The player’s score is also kept in the variable Score. As in previous examples the function SwipeZoneCallback() handles touch input.
In this class we added the FindSpawnPadLocation() function to support spawning an enemy

Bot on a pad that can be placed in the level using the Unreal Editor.
The ResetGame() function helps reset the player’s score, lives, health, and so on after the player dies and the game is restarted.
Listing 7–3. Player Controller
class ExampleCh7PC extends SimplePC;


var Controller FollowBot;

Var Pawn FollowPawn;

var bool BotSpawned;


var bool GameOver;

var int Score;


function vector FindSpawnPadLocation()

{

    local SpawnPad TempSpawnPad;

    local vector TempLocation;

    foreach AllActors (class 'SpawnPad', TempSpawnPad )

    {

         TempLocation = TempSpawnPad.Location;

    }

    return TempLocation;

}

function SpawnBot(Vector SpawnLocation)

{

    SpawnLocation.z = SpawnLocation.z + 500;

    WorldInfo.Game.Broadcast(self,"SPAWNING A BOT AT LOCATION " @ Spawnlocation);

    FollowBot = Spawn(class'BotControllerAttack',,,SpawnLocation);

    FollowPawn = Spawn(class'BotPawn2',,,SpawnLocation);

    FollowBot.Possess(FollowPawn,false);

    BotControllerAttack(FollowBot).CurrentGoal = Pawn;
    Botpawn2(FollowPawn).AddDefaultInventory();

    BotPawn2(Followpawn).InitialLocation = SpawnLocation;

    FollowPawn.SetPhysics(PHYS_Falling);

    BotSpawned = true;

}

function ResetGame()

{

    GameoVer = false;

    Jazz3Pawn(Pawn).Lives = 3;

    Score = 0;

    Pawn.Health = 100;

    Pawn.SetHidden(false);

    Pawn.Weapon.SetHidden(false);

    Pawn.SetLocation(Jazz3Pawn(Pawn).InitialLocation);

}

function bool SwipeZoneCallback(MobileInputZone Zone,

                                float DeltaTime,
                                int Handle,

                                EZoneTouchEvent EventType,

                                Vector2D TouchLocation)

{

    local bool retval;

    retval = true;

    if (EventType == ZoneEvent_Touch)

    {

        WorldInfo.Game.Broadcast(self,"You touched the screen at = "

                                      @ TouchLocation.x @ " , "

                                      @ TouchLocation.y @ ", Zone Touched = "

                                      @ Zone);


        // Reset Game

        if (GameOver)

        {

            ResetGame();

        }

        else

        {

            // Start Firing pawn's weapon

            StartFire(0);

        }

    }

    else

    if(EventType == ZoneEvent_Update)

    {

    }

    else

    if (EventType == ZoneEvent_UnTouch)

    {

        // Stop Firing Pawn's weapon

        StopFire(0);

    }

    return retval;

}

function SetupZones()

{

    Super.SetupZones();
    // If we have a game class, configure the zones

    if (MPI != None && WorldInfo.GRI.GameClass != none)

    {

        LocalPlayer(Player).ViewportClient.GetViewportSize(ViewportSize);


        if (FreeLookZone != none)

        {

            FreeLookZone.OnProcessInputDelegate = SwipeZoneCallback;

        }

    }

}

function PlayerTick(float DeltaTime)

{

    Super.PlayerTick(DeltaTime);

    if (!BotSpawned)

    {

        SpawnBot(FindSpawnPadLocation());

        BotSpawned = true;


        Jazz3Pawn(Pawn).InitialLocation = Pawn.Location;

        Jazz3Pawn(Pawn).Lives = 3;

    }

    If (Jazz3Pawn(Pawn).Lives <= 0)

    {

        GameoVer = true;

    }

    if (GameOver)

    {

        Pawn.SetHidden(true);

        Pawn.Weapon.SetHidden(true);

        Pawn.Velocity = vect(0,0,0);

    }

}

defaultproperties

{

    GameOver = false;

BotSpawned = false;

}
NOTE: The number of enemy bots in a level is one of the key gameplay elements. In this class you can modify the code so that additional enemy bots could be added to your level if needed to help you get the right game difficulty and game balance.
Weapon
The player’s weapon has already been created in the Sound Cues section. See Listing 6-1 in the preceding chapter that covers the JazzWeaponSound class.
NOTE: In terms of good gameplay the characteristics of the weapons used and projectiles used are extremely important. The most important property in the Weapon class in relation to game difficulty is the FireInterval variable that controls the delay between shots in seconds. Set this variable to make the player’s weapon fire at a faster or slower rate.
Weapon Projectile
The player’s weapon projectile class JazzBulletSound was created previously in the Sound Cues sections. See Listing 6-2.
NOTE: In terms of the weapon’s projectile the most important properties related to good gameplay are the projectile’s speed and the amount of damage it does to the object it hits. Slower projectiles might be avoided especially if fired from a long distance. Projectiles that do small amounts of damage might not be effective against enemies that can heal themselves quickly for example.
Creating the Enemy Bot’s Code
Next, we need to create the code for the enemy bot which involves the bot’s pawn, controller, weapon, weapon projectile, and spawn pad.
Pawn
The code for the bot’s pawn is in Listing 7–4. The pawn for the enemy bot is similar in structure to previous pawns.
The TakeDamage() function processes damage done to the enemy bot. The AddDefaultInventory() function creates the enemy bot’s weapons, adds it into the bot’s inventory and initialized it. The AddGunToSocket() function then physically attaches the bot’s weapon’s 3d mesh to the actual bot pawn so that it appears the enemy bot is holding the weapon.
Listing 7–4. Enemy Bot’s Pawn
class BotPawn2 extends SimplePawn;


var Inventory MainGun;

var SoundCue JazzHitSound;

var vector InitialLocation;


var int KillValue;


event TakeDamage(int Damage, Controller InstigatedBy, vector HitLocation, vector

Momentum, class<DamageType> DamageType, optional TraceHitInfo HitInfo, optional Actor

DamageCauser)
{

    PlaySound(JazzHitSound);

    Health = Health - Damage;

    WorldInfo.Game.Broadcast(self,self @ " Has Taken Damage IN TAKEDAMAGE, HEALTH = " @

Health);


    if (Health <= 0)

    {

        SetLocation(InitialLocation);

        SetPhysics(PHYS_Falling);

        Health = 100;


        // Process Kill

        if (PlayerController(InstigatedBy) != None)

        {

            // Add kill to Player's Score

            ExampleCh7PC(InstigatedBy).Score += KillValue;

        }

    }

}

function AddGunToSocket(Name SocketName)

{

    local Vector SocketLocation;

    local Rotator SocketRotation;


    if (Mesh != None)

    {

        if (Mesh.GetSocketByName(SocketName) != None)

        {

            Mesh.GetSocketWorldLocationAndRotation(SocketName, SocketLocation,

SocketRotation);

            MainGun.SetRotation(SocketRotation);

            MainGun.SetBase(Self,, Mesh, SocketName);

        }

        else

        {

            WorldInfo.Game.Broadcast(self,"!!!!!!SOCKET NAME NOT FOUND!!!!!");

        }

    }

    else

    {

        WorldInfo.Game.Broadcast(self,"!!!!!!MESH NOT FOUND!!!!!");

    }

}

function AddDefaultInventory()

{

    MainGun = InvManager.CreateInventory(class'JazzWeapon2Damage'),

    MainGun.SetHidden(false);

    AddGunToSocket('Weapon_R'),

    Weapon(MainGun).FireOffset = vect(0,13,-70);

}


defaultproperties

{

    // Jazz Mesh Object

    Begin Object Class=SkeletalMeshComponent Name=JazzMesh

        SkeletalMesh=SkeletalMesh'KismetGame_Assets.Anims.SK_Jazz'
        AnimSets(0)=AnimSet'KismetGame_Assets.Anims.SK_Jazz_Anims'

        AnimTreeTemplate=AnimTree'KismetGame_Assets.Anims.Jazz_AnimTree'

        BlockRigidBody=true

        CollideActors=true

    End Object

    Mesh = JazzMesh;

    Components.Add(JazzMesh);


    // Collision Component for This actor

    Begin Object Class=CylinderComponent NAME=CollisionCylinder2

        CollideActors=true

        CollisionRadius=+25.000000

        CollisionHeight=+60.000000 //Nav Mesh

    End Object

    CollisionComponent=CollisionCylinder2

    CylinderComponent=CollisionCylinder2

    Components.Add(CollisionCylinder2)


    JazzHitSound = SoundCue'KismetGame_Assets.Sounds.Jazz_Death_Cue'

    InventoryManagerClass=class'WeaponsIM1'


    KillValue = 50;

}
The KillValue is the value that is added to the player’s score when the pawn is killed. The TakeDamage() function adds the KillValue to the player’s score if the pawn’s health is zero or less.
NOTE: The value of various enemies is another factor in creating good gameplay. Enemies that are harder to kill should be worth more points than enemies that are easier to kill. Enemies that are key to achieving some critical game objective should also be worth more points than enemies that are not related to any major objective.
Controller
Next, we need to create a new class for the bot’s controller which is called BotControllerAttack. See Listing 7–5. The controller for our enemy bot is built upon the code for the bot that followed the player in Chapter 5.
The ExecuteWhatToDoNext() function is the main entry point for the enemy bot’s AI decision making. The bot starts out in the Initial state and transitions to the FollowTarget state where the bot follows the player then to the Firing state where the enemy bot fires its weapon at the player. While in the FollowTarget state the bot uses the navigation mesh method of path finding to determine a path to the player. The GeneratePathTo() function generates the actual path using the navigation mesh and stores it in the NavigationHandle variable.
Listing 7–5. Enemy Bot Controller
classBotControllerAttack extends UDKBot;


var Actor CurrentGoal;

var Vector TempDest;

var float FollowDistance;

var Actor TempGoal;


event bool GeneratePathTo(Actor Goal, optional float WithinDistance, optional bool

bAllowPartialPath)

{

    if( NavigationHandle == None )

    return FALSE;


    // Clear cache and constraints (ignore recycling for the moment)

    NavigationHandle.PathConstraintList = none;

    NavigationHandle.PathGoalList = none;


    class'NavMeshPath_Toward'.static.TowardGoal( NavigationHandle, Goal );

    class'NavMeshGoal_At'.static.AtActor( NavigationHandle, Goal, WithinDistance,

bAllowPartialPath );


    return NavigationHandle.FindPath();

}

state FollowTarget

{

    Begin:

    WorldInfo.Game.Broadcast(self,"BotController-USING NAVMESH FOR FOLLOWTARGET STATE");

    // Move Bot to Target

    if (CurrentGoal != None)

    {

        if(GeneratePathTo(CurrentGoal))

        {

            NavigationHandle.SetFinalDestination(CurrentGoal.Location);


            if( NavigationHandle.ActorReachable(CurrentGoal) )

            {

                // then move directly to the actor

                MoveTo(CurrentGoal.Location, CurrentGoal,FollowDistance);

                GotoState('Firing', 'Begin'),

            }

            else

            {

                // move to the first node on the path

                if( NavigationHandle.GetNextMoveLocation(TempDest,

Pawn.GetCollisionRadius()) )

                {

                    // suggest move preparation will return TRUE when the edge's

                    // logic is getting the bot to the edge point

                    // FALSE if we should run there ourselves

                    if (!NavigationHandle.SuggestMovePreparation(TempDest,self))

                    {

                        MoveTo(TempDest);

                    }

                }

            }

        }
        else

        {

            //give up because the nav mesh failed to find a path

            `warn("FindNavMeshPath failed to find a path!");

            WorldInfo.Game.Broadcast(self,"FindNavMeshPath failed to find a path!,

CurrentGoal = " @ CurrentGoal);

            MoveTo(Pawn.Location);

        }

    }

    LatentWhatToDoNext();

}

state Firing

{

    Begin:

    WorldInfo.Game.Broadcast(self,"BotController-IN Firing State");

    Sleep(3);

    Pawn.StartFire(0);

    Sleep(0.5);

    LatentWhatToDoNext();

}

auto state Initial

{

    Begin:

    LatentWhatToDoNext();

}

event WhatToDoNext()

{

    DecisionComponent.bTriggered = true;

}

protected event ExecuteWhatToDoNext()

{

    if (IsInState('Initial'))

    {

        GotoState('FollowTarget', 'Begin'),

    }

    else

    if (IsInState('Firing'))

    {

        Pawn.StopFire(0);

        GotoState('FollowTarget', 'Begin'),

    }

    else

    {

        GotoState('FollowTarget', 'Begin'),

    }

}

defaultproperties

{

    CurrentGoal = None;

    FollowDistance = 700;

}
The key difference between this class and the Bot controller class from the chapter on UDK bots is the addition of the Firing state. The bot’s pawn is given the command to start firing its weapon in this state. In the previous chapter the bot just followed the player around the level.
Now, the bot’s behavior is to:
- Move toward the player.
- Stop and wait 3 seconds by suspending the state execution using the Sleep() function.
- Fire the weapon at the player for a half a second
- Go to step 1.
NOTE: In terms of good gameplay the exact behavior of the bot concerning such things as how frequently it fires it weapon, does it seek cover from player fire, does it try to get a health powerup when its health is low, and other behaviors will affect the game difficulty and game balance. You can change these behaviors in this class by modifying the existing code framework.
Weapon
The weapon for the enemy bot is the JazzWeapon2Damage class which is already defined from Chapter 5. See Listing 5-13.
NOTE: The issues regarding the bot’s weapon characteristics and weapon projectile characteristics with respect to gameplay are similar to those of the player’s weapon and weapon projectile discussed previously.
Weapon Projectile
The enemy bot’s weapon’s projectile is the JazzBullet2Damage class which we created previously in Chapter 5. See Listing 5-14.
SpawnPad
Next, we need to create the class that represents the enemy bot’s spawn pad where new enemy bots are created and placed. See Listing 7–6.
NOTE: The number and location of enemy bot spawn pads are also a factor in gameplay. You can expand on the existing game framework presented in this chapter by for example creating more spawn pads in different locations and modifying existing code to create many enemy bots attacking the player instead of just one enemy bot.
Listing 7–6. Spawn Pad for the enemy Bot
class SpawnPad extends Actor

placeable;


event Touch(Actor Other, PrimitiveComponent OtherComp, vector HitLocation, vector

HitNormal)

{

    WorldInfo.Game.Broadcast(self,"SpawnPad Has Been Touched");

}

defaultproperties

{

    Begin Object Class=StaticMeshComponent Name=StaticMeshComponent0

        StaticMesh=StaticMesh'HU_Deco.SM.Mesh.S_HU_Deco_SM_Metalbase01'

        Scale3D=(X=0.250000,Y=0.250000,Z=0.25000)

    End Object

    Components.Add(StaticMeshComponent0)


    Begin Object Class=CylinderComponent NAME=CollisionCylinder

        CollideActors=true

        CollisionRadius=+0040.000000

        CollisionHeight=+0040.000000

    End Object

    CollisionComponent=CollisionCylinder

    Components.Add(CollisionCylinder)


    bCollideActors=true

}
Creating the HUD Display
The custom HUD display was created in the HUD section in Chapter 6 as the ExtendedHUD class. You can use this same class for our example. See Listing 6-3.
Configuring the Game Type
Next, you need to configure your Unreal Script for compilation and the new game type to run on the mobile previewer. In your configuration files located at C:UDKUDK-2011-06UDKGameConfig change the following configuration files.
For the UDKEngine.ini file make the following changes:
[UnrealEd.EditorEngine]

ModEditPackages=ExampleCh7
For the Mobile-UDKGame.ini file make the following changes:
[ExampleCh7.ExampleCh7Game]

RequiredMobileInputConfigs=(GroupName="UberGroup",RequireZoneNames=("UberStickMoveZone",

"UberStickLookZone","UberLookZone"))
Bring up the Unreal Frontend and compile your scripts.
NOTE: This sets up the dual virtual joysticks and the ability to process touch input for the rest of the screen. In terms of gameplay the final game should be play tested on an actual iOS device not just the mobile previewer. The reason is that the iOS device can handle multiple touches at one time where you can control both the movement and rotation of your pawn at the same time. In the mobile previewer you are limited to one touch at a time through the mouse. The differing user interfaces would affect the gameplay.
Setting up the Spawn Pad
Now, you need to place the spawn pad in your level.
- Start up the Unreal Editor.
- Load in the level you saved at the beginning of this exercise. A good place to put it would be behind the gates in an open area.
- Go to the Actor Classes tab and search for Spawnpad. This should bring up that class in the viewing pane. Click on the class.
- Right-click on the level where you wish to place the pad and select Add SpawnPad here. Save the level (see Figure 7–2).
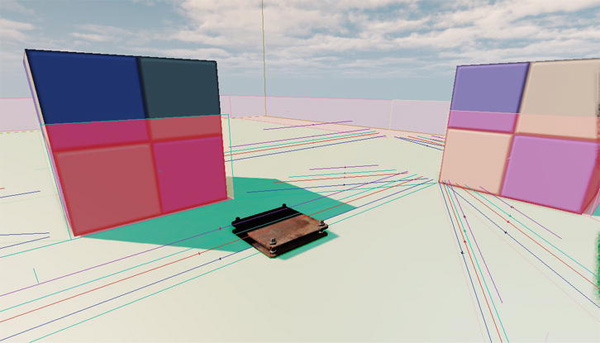
Figure 7–2. Creating the enemy bot’s spawnpad
Running the Game
Finally, it’s time to run this new game on the Mobile Previewer.
- Bring up the World Properties window by selecting View World Properties from the Unreal Editor menu.
- Change the Default Game Type property under the Game Type category to ExampleCh7Game.
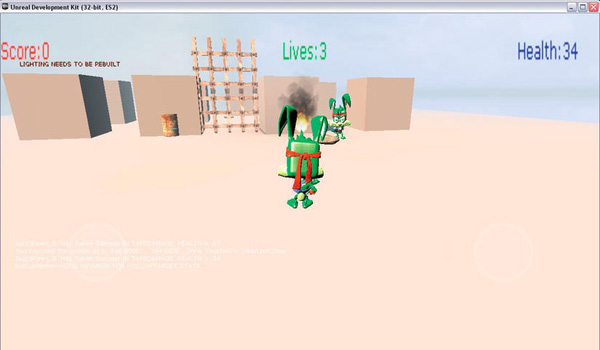
- Run the game on the Mobile Previewer by selecting Play On Mobile Previewer from the main Unreal Editor menu. You should see something similar to Figures 7–3 and 7–4.
A quick rundown of some gameplay elements shown in this example are:
- Enemy bot behavior (Artificial Intelligence)
- Enemy bot weapon and projectiles
- Player weapon and projectiles
- Level design
As you test your game, you can adjust these elements until you get the right user experience.
For example, note the behavior of the enemy bot. The general behavior of the enemy bot is move toward the player so that the player is directly reachable to the enemy bot (no obstructions), wait for a time period, and then fire at the player. This cycle then repeats. Let’s see how this appears in the game itself.
When the game first comes up in the mobile previewer, wait until the enemy bot comes around the corner of the block and stops. See Figure 7–3.
After three seconds, the enemy bot starts firing at the player. In terms of gameplay, here you can change the delay time between the enemy bot stopping and starting to fire to change the game difficulty as well as the game balance.
Next, try moving farther into the area with the large blocks. Move in between the blocks so that they obstruct the path directly to the enemy bot. The bot should follow you and move around these obstacles in order to get a clear shot at you. Once the enemy bot moves into a position where it gets a clear shot at you it stops again. (See Figure 7–4.) It then waits for three seconds and then fires its weapon at you. Here level design can affect gameplay by affecting game difficulty. Basically the player is exposed to enemy fire at the corners of each of the blocks where the enemy bot can get a clear shot at the player. If the blocks were longer or wider, for example, it would take more time for the bot to move into a good position to shoot at the player thus affecting game difficulty and gameplay generally since the enemy cannot jump over the blocks to get at the player.
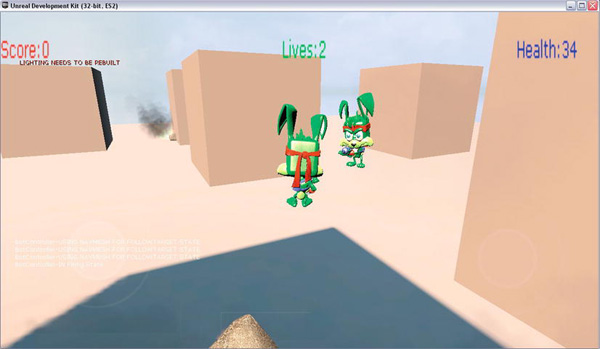
Figure 7–4. Inside the Compound
Summary
In this chapter we covered the elements of gameplay. First we gave background information on the elements that affect the quality of gameplay which are game difficulty and game balance. Then, we presented a hands-on example where we created a small game that incorporated Sound Cues, a custom HUD, a moving locked gate, and a custom enemy bot that follows and attacks the player. In the hands-on example important gameplay elements are highlighted and suggestions are given on how you could adjust the game difficulty and game balance of these elements in order to create superior gameplay.