Chapter 2
UnrealScript Overview
In this chapter we will cover the UnrealScript programming language that is used to develop games for the UDK. We will cover key information concerning the UnrealScript programming language as well as Kismet which is the graphical version of that language. Such topics as data types, functions, classes, and operators are briefly discussed to give you a quick working understanding of the UnrealScript language. You will also learn how to create and compile your UnrealScript using the Unreal Frontend. There are also many hands-on examples that apply UnrealScript throughout the book and an appendix with additional UnrealScript language information. If you are already familiar with UnrealScript feel free to skip over the language review in this chapter directly to the Hands-on Example at the end of this chapter.
Finally, we’ll work through a hands-on example in which you’ll create your first iOS objects that you can select and receive information about using the UDK Mobile Previewer.
Kismet or UnrealScript?
Kismet is a more limited and less flexible graphical version of UnrealScript. There may also be memory and performance issues with using Kismet on older iOS devices. At least one poster on the iOS development forum on the official UDK message board complained that older iOS devices would only run his game if most of the Kismet was stripped out. The game would crash otherwise. He concluded that either it was a memory issue related to Kismet or a performance issue where a Kismet sequence was causing the game to crash. In the end he decided to only release his game for newer iOS devices and was looking for an UnrealScript programmer to convert all of his Kismet code to UnrealScript.
Kismet is more limited than UnrealScript in that it:
- Does not allow direct access to the UDK’s base code with direct access to classes such as Object, Actor and so on.
- Does not allow the creation of certain variable types such as structures.
- Does not allow the creation of new classes that are derived from the UDK’s base classes.
- Does not allow loading and saving Kismet sequences to separate files for merging together Kismet code from different programmers on a large project.
UnrealScript is able to do all of the above listed items.
However, for smaller games, demos, or prototypes that use little Kismet like the Jazz Jackrabbit game demo that ships with the UDK, Kismet can work well. Another area where Kismet works well is in simple level and location specific items like moving platforms, doors, gates including doors and gates that require the player to push a button to activate or unlock. Kismet will be discussed further in Chapter 6 as it relates to opening doors and locked gates.
To access the Kismet Editor first bring up the Unreal Editor. Once the editor is up and running, click the button that contains a “K” in it that is located in the Unreal Editor at the top middle portion in the first row of buttons (see Figure 2–1).
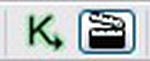
Figure 2–1. Unreal Kismet Editor button and Matinee button
After clicking on the “K” button, the Unreal Kismet Editor shown in Figure 2–2 should start.
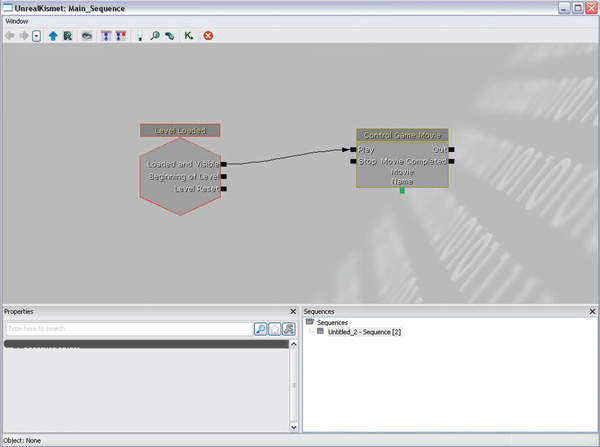
Figure 2–2. Unreal Kismet Editor
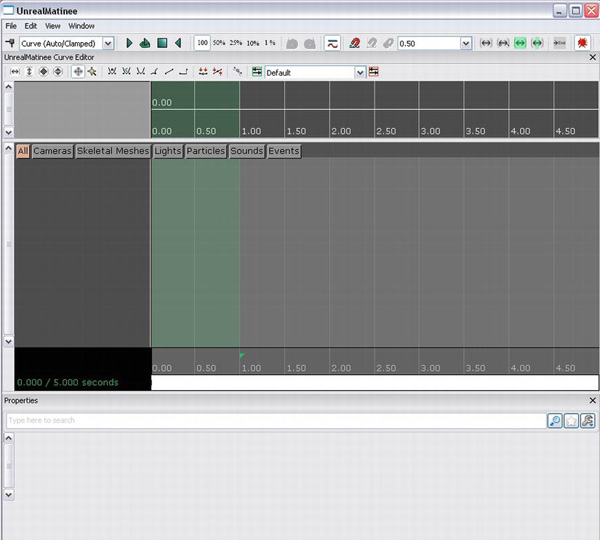
You may be wondering why we included the Unreal Matinee button with the Kismet button. The reason is that in order for Kismet to work in moving the doors, platforms, and gates we need to specify the specific locations where you want the object to move to. In order to do that we need to use Unreal Matinee. If you click on the Matinee button it will list all the Matinee sequences for the level. If there are Matinee sequences in the level you can click on one to bring up Matinee and load that sequence in. Another way to access Matinee is to bring up Kismet and right-click with your mouse and select “New Matinee” to create a new Matinee node. Then double-click on the Matinee graphic node to bring up the Matinee sequence associated with that node. See Figure 2–3.
Kismet is good for rapid prototyping of small games or demos, and certain things like the control of gates and doors when used with Matinee. Kismet is very limited in its access to underlying UDK base code and lacks the ability to create new classes that are derived from UDK base classes as well as being unsuited for large projects with many different programmers and large amounts of code. UnrealScript is suitable for large and small projects and gives you the flexibility and expandability you want in your UDK game.
Overview of UnrealScript
UnrealScriptUnrealScript was designed to combine features from C/C++ and Java and to add in new features such as States to create a programming language that was specifically designed for creating games.
Key features of UnrealScriptUnrealScript are:
- Single inheritance—All class objects derive directly or indirectly from a single class, which is Object. Actor is a class that derives from Object. Most important game classes like Pawn and Controller are derived from Actor. Multiple inheritance is not supported
- Support for States—An object can execute different code based on what current state it is in. UnrealScript basically implements a finite state machine as part of its built-in language features.
- No crashes when accessing “None” references - UnrealScriptUnrealScript handles accessing a None object reference (which is similar to NULL in C/C++) by logging the error should a crash occur. This alone saves much time in game development.
- Automatic garbage collection—Objects that are not used (unreferenced) are eventually deleted by UnrealScript’s built-in garbage collector. This automatically regains memory that would otherwise be lost.
- Latent Functions—These are functions that require game time to execute and must finish executing before returning. Some examples are Sleep() which allows the Actor to suspend all code execution for a certain amount of game time or game ticks before continuing and MoveTo() which moves the actor to a target destination. Latent functions may only be called from within a State block and not within a function even if the function is located inside a State block.
- UnrealScript objects execute script independently—Each object in the game is updated simultaneously. For example, a game object may be executing a latent function such as a MoveTo() command but another object can access a function in this game object at the same time.
NOTE: UnrealScript is about 20 times slower than C/C++ in execution speed. So the key to creating an efficient UnrealScriptUnrealScript program is to only use UnrealScript to handle key events that you want to customize such as when two Actors collide with one another for example.
The Unreal Engine is basically a virtual machine. UnrealScript runs on this virtual machine and thus there is an extra layer of overhead required to convert UnrealScript code into code that is understood by the CPU processor running the Unreal Engine. This is one reason why UnrealScript is much slower than C/C++ which are compiled into machine language and optimized to run on a certain CPU such as Intel. The benefit of this is that UnrealScript is platform independent which means that you can take your UnrealScript code and create games on other platforms besides the PC.
UnrealScript is an object-oriented language similar to C++. This book assumes that you have a basic understanding of object-oriented programming (OOP).
NOTE: If you need a refresher or introduction to OOP with C++, a good reference book is Programming: Principles and Practice Using C++ by Bjarne Stroustrup (Addison-Wesley, 2008). Stroustrup is the original designer and implementer of the C++ programming language. Another good book on C++ is by Ray Lischner called Exploring C++: The Programmer's Introduction to C++ (Apress, 2008). For those newer to programming, an alternative would be Sams Teach Yourself C++ in 24 Hours by Jesse Liberty (Sams, 2011).
The following sections give you a brief working look into the UnrealScript language itself in terms of basic variables, functions, classes, and data types. Certain aspects of UnrealScript, such as its object-oriented nature and inheritance, will not be discussed in depth because you are expected to have knowledge of this already. It is not a complete reference to the UnrealScript language. We will also be going more deeply into the language as the book progresses.
NOTE: For a full official reference on UnrealScript please check out:
UnrealScript Comments
There are two kinds of comments styles in UnrealScript: the single line comments starting with “//” and the multi-line comments enclosed by “/* */”.
- //—Single line comments begin with double slashes. The following is an example of a single line comment:
// This is an example of a single line comment - /* */—Multi line comments begin with a slash followed by an asterisk and end with an asterisk followed by a slash. The following is an example of this multi-line comment:
/* This is an

example of

a multi line

comment */
UnrealScript Variables
Data in a class is held in variables. In the UnrealScript language variables can be of many different types such as integer, floating point, Boolean, string, as well as references to class objects.
Scope Modifiers
All variables in UnrealScript must specify a scope which is either var or local.
var—The specifier var indicates this variable is global to the class it is declared in.local—The specifier local indicates that this variable is declared within a function.
Variable Types
There are many different variable types in the UnrealScript language including types like int and float that hold numbers. Strings can hold characters. Boolean variables can hold the values true or false. An Object reference can hold a reference to a class object. Structures can comprise any of the above mentioned types.
int—The int type holds an integer value. The following declares a local function variable of type int.local int dist2goal; // Declares a local variable of type intfloat—The float type holds a floating point value. The following declares a local function variable of type float.Local float MinimumForce; // Declares a local variable of type floatbool—The bool type holds a boolean value of true or false. The following declares a global class variable of type bool.Var bool bdestroyed; // Declares a global boolean variablestring—The string type holds a group of characters. The following declares a local function variable of type string.Local string Player1Name; // Declares a local variable of type stringenum—The enum type declares an enumerated type. The following declares and enumeration called eColors that can contain the values of Purple, Violet, or Red. The variable ColorGroup1 is declared as a variable of eColors type.enum eColors
{
Purple,
Violet,
Red
};
var eColors ColorGroup1; // Declares a global enurmerated variablestruct—The struct type declares a structure type that can hold any combination of the other variable types. The following declares a structure of called sPlayerInfo that contains two variables, one int variable called PlayerHeartRate and one bool variable called PlayerInfected. A variable called Player1Info is declared as a global class variable of type sPlayerInfo structure.Struct sPlayerInfo
{
var int PlayerHeartRate;
var bool PlayerInfected;
};
var sPlayerInfo Player1Info; // Declares a global variable of type sPlayerInfo- Static Arrays—Static arrays can hold collections of objects. The length of this type of array is set at compile time and cannot be changed during program execution. Static arrays in UnrealScript are restricted to one dimension. Any variable type can be put into a static array except boolean. The following declares a global variable of type static array that holds 5 elements of objects references to an Actor.
Var Actor SquadMembers[5]; - Dynamic Arrays—Dynamic arrays can hold a collection of objects. The length of the array can change during script execution. Dynamic arrays have many functions that can manipulate items in the array. The following declares a dynamic array of type reference to an Actor.
Var array<Actor> SquadMembers;The following code adds a new member to the
SquadMembersarray assuming thatTempBotis an object reference variable to an Actor.var Actor TempBot;
SquadMembers.AddItem(TempBot);The following code finds the number of members in the array or in this case the number of members in our squad.
numbersquadmembers = SquadMembers.length;The following code loops through the members of the dynamic array
SquadMembersand returns a reference to each member through the variableTempSquadMember. In the loop each squad member can be processed one at a time.Local Actor TempSquadMember;
foreach SquadMembers(TempSquadMember)
{
// Process TempSquadMember
} - Object Reference – The object reference type holds a reference to an object of type Class Object. The following declares an object reference variable to an Actor called TempActor. A new object of class Actor is created by the
Spawncommand and assigned to the TempActor reference.Var Actor TempActor;// Declares a global reference variable to an Actor
TempActor = Spawn(class'Actor'),You can cast an object reference variable to a specific class to test if it refers to an object of that type. If it returns a
Nonereference then it does not refer to an object of that class or any subclass of that class. If the returned result is notNonethen the returned reference will be to an object of the type of the cast.In the following code the variable
TempActoris tested to see if it is of classPawnthough a cast. The result is put into the variableTempPawn. If the conversion was successful (holding a value besidesNone) thenTempActorwas indeed aPawnor a subclass ofPawn. If the value inTempPawnisNonethen the object inTempActoris not aPawnor a subclass ofPawn.Var Actor TempActor;
Var Pawn TempPawn;
TempPawn = Pawn(TempActor);
If (TempPawn != None)
{
// TempPawn contains a reference to a Pawn
}
else
{
// TempPawn contain a None value and does not
// contain a reference to a Pawn
}NOTE: For object reference variables like TempActor above you need to make sure to either assign a valid reference to TempActor before you use it or you need to create a new object using the Spawn function built into the base UDK code. Example: TempActor = Spawn(class'Actor'),
- Class Reference—A class reference variable holds a reference to a class. The format is in
class<BaseClass> VariableName;The class reference
VariableNamecan hold a class of typeBaseClassor a subclass ofBaseClass. A subclass ofBaseClasswould be any class that is derived fromBaseClass. Remember that UnrealScript only supports single inheritance from the base class called Object. Multiple inheritances from more than one class is not permitted so determining if a class is a subclass of another is very straightforward.The following code holds a reference to the player controller class used to spawn players. The
PlayerControllerClassvariable is then set to a custom player controller class that we will create later in this chapter.var class<PlayerController> PlayerControllerClass;
PlayerControllerClass=class'ExampleCh2.ExampleCh2PC'
Operators
In order to perform mathematical calculations UnrealScript has the standard arithmetic operators available for you to use. UnrealScript also has many different conditional operators to test expressions for such things as equality, inequality, and so on. Each of the operators takes two expressions. Expressions can consist of a single variable or many variables and operators.
Artithmetic Operators
UnrealScript provides you with add, subtract, multiply, and divide operators that allow you to make math calculations. You can use parenthesis to group these operators together if needed.
- +, - , * , /—The standard add, subtract, multiply and divide operators
Conditional Operators
Conditional operators return a value of true or false depending on what type of conditional operator is involved and the value that the expressions evaluate to. Conditional operators are mostly used in combination with flow control statements such as if, while, and for.
- (expression1) || (expression2)—Evaluates to true if expression1 or expression2 are true. False otherwise.
- (expression1) && (expression2)—Evaluated to true if expression1 and expression2 are true. False otherwise.
- (expression1) == (expression2)—Evaluates to true if expression1 is equal to expression2. False otherwise.
- (expression1) != (expression2)—Evaluates to true if expression1 is not equal to expression2. False otherwise.
- (expression1) > (expression2)—Evaluates to true if expression1 is greater than expression2. False otherwise.
- (expression1) < (expression2)—Evaluates to true if expression1 is less than expression2. False otherwise.
- (expression1) >= (expression2)—Evaluates to true if expression1 is greater than or equal to expression2. False otherwise.
- (expression1) <= (expression2)—Evaluates to true if expression1 is less than or equal to expression2. False otherwise.
Code Execution Flow Control Statements
UnrealScript code, just like C/C++ code, executes sequentially one line after another. However, UnrealScript also has statements to control the execution of code so that it does not have to always execute sequentially.
- If Statement—If expression1 evaluates to true then the code in Section 1 will execute. If expression1 evaluates to false then the expresion2 is evaluated and if it evaluates to true then Section 2 code is executed.
if (expression1)

{

    // Section 1 Code

}

else if (expression2)

{

    // Section 2 Code

}
In the following example if
PlayerHealthis less than 0 then the code within the braces is executed.if (PlayerHealth < 0)
{
// Execute code for Player’s Death
} - While Statement—The code within the While block is executed as long as expression1 evaluates to true.
While (expression1)

{

}
In the following example the code block is executed if PlayerHealth is less than 20 and keeps executing as long as that condition evaluates to true.
While (PlayerHealth < 20)

{

    // While PlayerHealth is less than 20 then execute this loop

} - For Statement—The
forstatement is composed of three sections. The first section is the variable initialization section where the initial value of the counter variable is set and optionally declared. The second section contains the expression to be evaluated. This expression is evaluated at the beginning of theforloop and if it evaluates to true then the code block is executed. At the end of the code block the counter variable is incremented/decremented. The expression is tested again and if it evaluates to true then the code block is executed. This continues until the expression evaluates to false then the for loop is exited.for (counter variable initialization;
(expression1);
countervariable increment/decrement)
{
}In the following example, the
forloop counter variable is initialized to 0. If iis less than 10 then the code block is executed. The counter variable is incremented by 1 at the end of the loop.For (int i = 0; i < 10; i++)
{
// Execute this block of code while i < 10, increase i by 1 after every loop
} - Switch/Case Statement—The switch statement is a more elegant and organized alternative to the if then else statement. Instead of many else if statements with many braces you have a neat case break pair. The expression in the switch statement is evaluated. Execution will jump to the case break block that matches the value in the case statement or will jump to the default block if there are no matches.
Switch (expression1)

{

    case value1:

    break;


    case value2:

    break;


    default:

    break;

}
In the following example, the value of ColorGroup1 is determined then that value is matched with the values Purple, Violet, or Red to determine which case break block to jump to.
Class Declarations
UnrealScript supports object oriented classes and class inheritance. In order to have one class derive from a parent class use the extends keyword. A class consists of the class heading which declares the classname followed by “the” extends keyword and the class it derives from. This is followed by the global class variables if any. Then the class functions are declared. UnrealScript classes can have many different options associated with them and these are discussed in a subsequent chapter later in this book.
The following code declares a new class of type Soldier that derives from the Actor class. Two global class variables are also declared. Each class must be put in a separate plain text file created with a program like Notepad and named after the class. This class’s filename would be Soldier.uc.
class Soldier extends Actor;

var bool bIsSick;

var bool bHasOpenSores;
Functions
Functions in UnrealScript help you divide a big task into smaller more manageable pieces much like other programming languages like C and C++. UnrealScript functions have many different options and function specifiers. These will be discussed in detail in a subsequent chapter.
The following declares a basic function called TestSoldierInfected(). It takes an input parameter of type Soldier and returns a boolean value depending on weather this soldier is infected or not.
function bool TestSoldierInfected(Soldier TestActor )

{

    local bool bInfected;

    if (TestActor.bIsSick && TestActor.bHasOpenSores)

    {

        bInfected = true;

    }

    else

    {

        bInfected = false;

    }

    return bInfected;

}
States
UnrealScript has built-in support for a finite state machine. A finite state machine (or FSM) used in this book refers to a computer model that describes the behavior of computer controlled bots. An FSM can only be in one state at a time and can move to other states depending on a trigger such as a change of conditions in the game.
For example, a bot using an FSM can initially be put into an idle state then when an enemy is within a certain distance change to an attacking state and move toward the enemy and fire its weapon at it.
The following is the general format for a state. The items in brackets are optional.
[Auto] State[()] StateName

{

[ignores FunctionName1, FunctionName2, …]

    event BeginState( Name PreviousStateName )

    {

        // Code for BeginState Goes Here

    }

    event EndState( Name NextStateName )

    {

        // Code for EndState Goes Here

    }

    function StateSpecificFunction()

    {

        // Code StateSpecificFunction Goes Here

    }

    Begin:

    // Begin State Code

    // Put calls to Latent Functions here.

}
The Auto specifier for the state indicates that this state is the initial state that the actor is placed in when it is created.
The ignores keyword is optional and causes the functions specified after ignores to not be executed while the object is in this state.
The parenthesis () after the State keyword means that this state can be edited in the Unreal Editor.
The BeginState and EndState functions are part of the built in UnrealScript State system and are optional. The BeginState function is executed once when the state is first entered. The input parameter PreviousStateName holds the Name of the previous state the object was in before transitioning to the current state. The EndState function is executed once when leaving the state but before entering the new state. The input parameter NextStateName is the name of the state that is to be transitioned to after the EndState function is executed. A state does not need to declare a BeginState, or EndState but it is good to have the framework in place just in case you need to add code that has to be executed every time when a state is entered or exited. Within a state you can define functions that only will be executed when the object is in that specific state.
The beginning of the actual state code starts at the Begin: label.
Debug Messages
One helpful way to debug your program is to have messages displayed on your screen via the Broadcast() function. UnrealScript is very flexible and will automatically convert boolean, int, float, and even class objects into a displayable format using the code below.
WorldInfo.Game.Broadcast(self, "Soldier Object = " @ TestActor @

                               "Soldier's Sick Status = " @ TestActor.bIsSick @

                               ", Soldiers's Open Sore Status = " @

                               TestActor.bHasOpenSores);
Creating and Compiling UnrealScript
UnrealScript can be created by any plain text word processing program such as Notepad. Notepad comes with the Windows operating system at no additional cost. In order to compile UnrealScript you need to start up the Unreal Frontend program. The Frontend is located in the Tool directory of your UDK installation and is labeled “Unreal Frontend”. Select this program from the Start Menu bar and click on it. The Frontend window shown in Figure 2–4 opens.
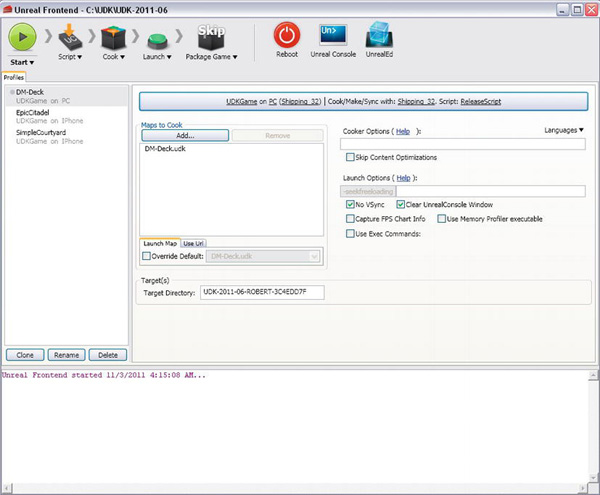
In order to start the actual compiling click the Script button on the top left-hand side of the toolbar, which will highlight options for compilation (see Figure 2–5).

Figure 2–5. Starting the actual compile
The “Compile scripts” option only compiles scripts that have been changed since the last compile. The “Full recompile” option compiles all the scripts in the UDK system regardless if they have changed since the last compile or not. Once the scripts have been successfully compiled then any new classes are automatically added to the Actor Classes tab in the Unreal Editor where they can be used in building game levels.
Hands-On Example: Selecting an Object with Touch
In this tutorial you will learn how to use the iOS touch input system to pick out an actor. The first thing we need to do is create a new level for this example and put some objects in it.
- Start up the Unreal Editor.
- Change the object type filter in the Content Browser to search for static meshes.
- Put static meshes of your choice into the blank level that is the default level that is loaded when the Unreal Editor comes up. One way you can do this is you can click on the static mesh you want to put into the level then drag it to where you want to place it into the level. Another way is to click on the static mesh then go to the place in the level where want to place it then right-click and select the add StaticMesh option (see Figure 2–6).
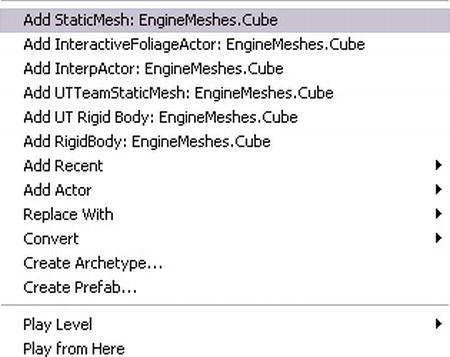
Figure 2–6. Adding a Static Mesh to a level
- Make sure your static mesh also has a collision model associated with it or else it will not be detected by the user’s touch.
NOTE: We will discuss collision models in Chapter 4 on UDK collisions. Some examples of static meshes with collision models are SM_GEN_Foliage01_LargeTree01_Opt, SM_GEN_Ruins_512Block01, and SM_VendorCrate_01_E. The collision models are already incorporated within each of the static meshes so you don’t need to set any specific collision model for the meshes since they are already part of the static mesh. You can search for these models using the search function of the Content Browser and place them in the level.
- The next thing to do is to save the level. To do this, click “File” menu item and choose the “Save As” option which brings up the Save As file dialog box. Enter the filename as “ExampleCh2Map” and click the Save button.
Creating the Game Type
Now that we have created our map for this example we need to create the code to handle touches and code to pick an actor.
- Create a new directory called ExampleCh2 under the DevelopmentSrc directory of the UDK installation which by default is UDKUDK-2011-06 on the drive you installed the UDK on.
- Under that directory create another directory called Classes. This is where the source code from this example will be placed in.
- Create a new file called ExampleCh2Game.uc in the Classes directory. This new class will hold information for the type of game to be played and is a subclass of the GameInfo class.
- Add the following line to the file, which declares the new ExampleCh2Game class as deriving from FrameworkGame.
class ExampleCh2Game extends FrameworkGame; - Add the
OnEngineHasLoaded()function to the file. This function is called when the Unreal engine has finished loading and prints out a message that our custom game type is now active.event OnEngineHasLoaded()
{
WorldInfo.Game.Broadcast(self,"ExampleCh2Game Type Active - Engine Has Loaded
!!!!");} - Add the
PreventDeath()function to the file. ThePreventDeathfunction returns true to stop our player from dying in the game. - Add the
SetGameType()function to the file. TheSetGameTypefunction can be used to allow only certain mapnames to be used with our gametype. For now just let all maps use our gametype.static event class<GameInfo> SetGameType(string MapName, string Options, string Portal)
{
return super.SetGameType(MapName, Options, Portal);
} - Add the
defaultpropertiesblock to the file. The important thing to take note of is that custom player controllers, custom pawns and custom HUD classes can be specified here. ThePlayerControllerClassvariable is set to our custom player controller that we will create next which is ExampleCh2PC.defaultproperties
{
PlayerControllerClass=class'ExampleCh2.ExampleCh2PC'
DefaultPawnClass=class'UDKBase.SimplePawn'
HUDType=class'UDKBase.UDKHUD'
bRestartLevel=false
bWaitingToStartMatch=true
bDelayedStart=false
} - Save the ExampleCh2Game.uc file that you just added the above lines into.
Creating the Player Controller
Now let’s create the player controller.
- Create a new file called ExampleCh2PC.uc and save it in the same directory as the other file. Add in the following line to declare this new player controller class as a subclass of SimplePC.
class ExampleCh2PC extends SimplePC; - Add the following line to the file. PickDistance is the maximum distance that the picked item can be from the player.
var float PickDistance; - Add the
PickActor()function to the file. ThePickActorfunction actually does the work of finding the actor based on an input 2d touch location and maps this into the 3d world and then returns the actor touched by the player if there is one.function Actor PickActor(Vector2D PickLocation, out Vector HitLocation, out TraceHitInfo
HitInfo)
{
local Vector TouchOrigin, TouchDir;
local Vector HitNormal;
local Actor PickedActor;
local vector Extent;
//Transform absolute screen coordinates to relative coordinates
PickLocation.X = PickLocation.X / ViewportSize.X;
PickLocation.Y = PickLocation.Y / ViewportSize.Y;
//Transform to world coordinates to get pick ray
LocalPlayer(Player).Deproject(PickLocation, TouchOrigin, TouchDir);
//Perform trace to find touched actor
Extent = vect(0,0,0);
PickedActor = Trace(HitLocation,
HitNormal,
TouchOrigin + (TouchDir * PickDistance),
TouchOrigin,
True,
Extent,
HitInfo);
//Return the touched actor for good measure
return PickedActor;
} - Add the
SwipeZoneCallback()function to the file. The following is the touch input callback function that calls the PickActor function and displays the result. If the user picks an actor then that actor’s name is printed out, followed by the hit location where the user touches the object in the 3d world, and the zone that the touch occurred in.function bool SwipeZoneCallback(MobileInputZone Zone,
float DeltaTime,
int Handle,
EZoneTouchEvent EventType,
Vector2D TouchLocation)
{
local bool retval;
local Actor PickedActor;
local Vector HitLocation;
local TraceHitInfo HitInfo;
retval = true;
if (EventType == ZoneEvent_Touch)
{
// If screen touched then pick actor
PickedActor = PickActor(TouchLocation,HitLocation,HitInfo);
WorldInfo.Game.Broadcast(self,"PICKED ACTOR ="
@ PickedActor @ ", HitLocation = "
@ HitLocation @ ", Zone Touched = "
@ Zone);
}
elseif(EventType == ZoneEvent_Update)
{
}
else
if (EventType == ZoneEvent_UnTouch)
{
}
return retval;
} - Add the
SetupZones()function to the file. TheSetupZonesfunction sets theSwipeZoneCallbackas the function that handles touch input processing.function SetupZones()
{
Super.SetupZones();
// If we have a game class, configure the zones
if (MPI != None && WorldInfo.GRI.GameClass != none)
{
LocalPlayer(Player).ViewportClient.GetViewportSize(ViewportSize);
if (FreeLookZone != none)
{
FreeLookZone.OnProcessInputDelegate = SwipeZoneCallback;
}
}
} - Add the
defaultpropertiesblock to the file. Here thePickDistancevariable is set by default to 10000.defaultproperties
{
PickDistance = 10000;
} - Save this file.
Settting up the Game Type Configuration
Now we need to set up the configuration to compile and run our game. First you need to modify the UDKEngine.ini file located in the UDKGameConfig under your UDK installation.
- Under the
UnrealEd.EditorEnginesection add in the following line to allow our new code to be added to the compile listUDKEngine.ini
[UnrealEd.EditorEngine]
ModEditPackages=ExampleCh2 - Next we need to set up the mobile virtual joystick controls and touch screen input. In the same configuration directory add the following line to your Mobile-UDKGame.ini file.
Mobile-UDKGame.ini

[ExampleCh2.ExampleCh2Game]


RequiredMobileInputConfigs=(GroupName="UberGroup",RequireZoneNames=("UberStickMoveZone",

"UberStickLookZone","UberLookZone"));
NOTE: You can set up a general set of configurations here for the rest of the chapters by making new entries for other chapters if you wish. However, some chapters will contain multiple examples and will require a configuration entry for each example. We will show you the details on how to set up these configurations in the hands-on examples in the rest of the book.
Next, we need to compile our script. Bring up the Unreal Frontend and select Compile scripts to compile our code. After the code successfully compiles then we are ready to start up the Unreal Editor.
Running the Game Type
Starting in the June version of the UDK you can select and save the game type you want associated with a level and play this level in the Mobile Previewer from the Editor.
- Start up the Unreal Editor.
- Select the World Properties menu item under the View Menu. This should bring up the WorldInfo Properties window shown in Figure 2–7.
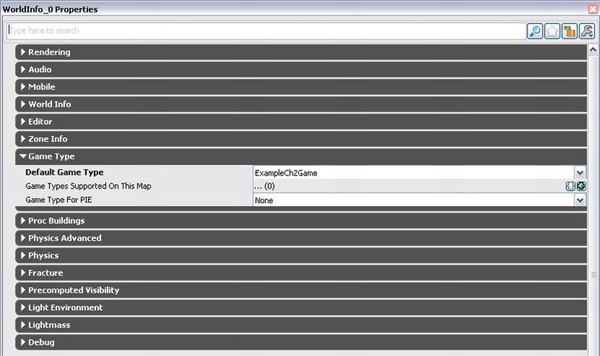
Figure 2–7. Setting the Game Type in the Unreal Editor
- Under the Game Type property set the Default Game Type to ExampleCh2Game from the drop-down list box.
- Close the WorldInfo Properties window.
- Under the Play menu select On Mobile Previewer. This should start up the Mobile Previewer with your level using the new game type ExampleCh2Game (see Figure 2–8).
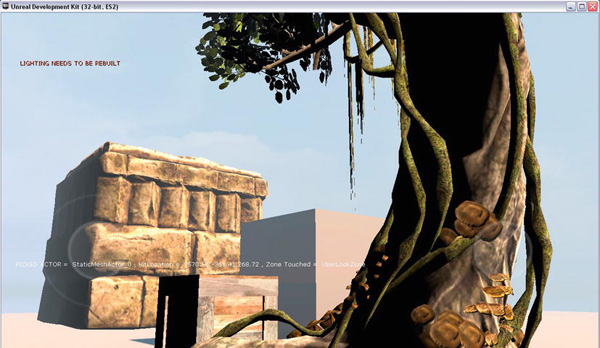
Figure 2–8. ExampleCh2Game for our first hands-on example
Both the joysticks should be working. The right stick should turn the player left and right and move the view up and down. The left stick should move the player forward and back and side to side. You should be able to use your mouse to click on various static meshes and the Actor name, hitlocation, and zone should be printed out on the screen. An Actor name of None means that no Actor was selected. For now, ignore the message about the lighting needing to be rebuilt since this does not affect the gameplay.
Summary
In this chapter we took a brief tour of the UnrealScript language giving readers a basic working knowledge of it and saving the details for later chapters. We also took a look at Kismet and Matinee again saving the details for later chapters. Finally, a detailed hands-on tutorial was provided that pulled all this information and concepts together in an applied manner in the form of a working UDK Mobile based application where the user can pick actors by clicking on them through the Mobile Previewer.