Chapter 12
Top-Down Shooter/RPG Game Framework
In this chapter we will create a game framework suitable for a top-down shooter/role playing type game.
Of course, role playing games do not need to be from the top-down perspective. However, the old roleplaying games such as the original Ultima series featured a 2D top-down view of the playfield and used 2D icons for characters. This is the sort of feel we want to create here in this game framework although everything will be in 3D. Elements in the framework presented in this chapter that specifically relate to role playing games are:
- The ability to display and save individual character statistics such as hit points, experience, and so forth.
- The ability to direct members of the player's group to perform actions such as attacking an enemy and moving to a new location.
First we give a general overview of the framework and then code-specific details of the implementation. Next, we create the actual framework. We create new code for the game, modify an existing game level we created in Chapter 11, and adapt it to our new game framework. We also configure this new game type to run on the mobile previewer and then demonstrate the completed framework.
The game framework in this chapter specifically consists of:
- A top-down view of gameplay
- The ability of selecting player- or bot-specific information and displaying it on the HUD by clicking on the character.
- An ability of commanding a bot to move to another area of the level or to attack an enemy bot.
- The ability to save and load character information by having the player's pawn touch a statue.
Game Framework Overview
In this section we will discuss the game framework in general and specific terms. First we give you a general overview of the game framework by listing its main features. Next, we give you a more code-specific overview of the framework as to how exactly the general features are implemented in code.
General Framework Overview
This framework provides for a top-down view of the playfield and player's pawn. You can adjust the distance the camera is from the ground and set whether the camera rotates with the player or has a fixed rotation. Another feature of this framework is a custom Heads Up Display or HUD that allows the player to display the statistics specific to the player or a member of the player's group by clicking on that Actor. You can extend this HUD by adding or deleting entries including those specific to the type of pawn being selected.
In a shooter type game you might extend the HUD by adding the amount of ammo or other physical items that the player is carrying. In an RPG you might add intangible items like character traits such as strength, agility, dexterity, endurance, and negotiating skills.
This framework also provides for a bot under player command that the player can direct to move from one location to another in the game world and can direct to attack an enemy. You can build on this by adding other bots to the player's squad or modifying the code to change the exact behavior of the bot. For example, you can add in new code to make your bot repair damaged structures. For a role playing game you might add in the ability to use magic to attack enemies and to heal members of your party.
Additionally, the framework includes a method to load and save character statistics for the player and the player's ally bot. You can extend this method by adding in more data for the characters that will be saved and loaded or by changing the exact method that character data will be saved. Currently, character data is saved or loaded when the player's pawn touches a statue in the game world. You can change this by using some kind of menu system to load and save character data. You can also customize this method by loading and saving other data besides character data, including the game state such as the player's location. For a shooter type game you could save the character's physical possessions, and for a role playing game you could also save the character's intangible traits like magic ability, spell casting experience, combat experience, and so on.
Specific Framework Overview
The top-down view is implemented in the player's pawn class which is the PlayerPawnCh12 class. The function CalcCamera() is the function that actually changes the camera's view from the default first-person view to the new top-down third-person viewpoint. A top-down third-person viewpoint means that the player's viewpoint is above the player's pawn and is looking straight down at the player's pawn and the game playfield. This viewpoint should remind players of the older 2d role-playing style games such as the original Ultima series for the Commodore 64 and Apple II. More recent examples of top-down style role playing games are Across Age, Dungeon Hunter, Inotia 2: A Wanderer of Luone, Rough Touch, Sword of Fargoal, and Zenonia. All of these games are available for the iPhone.
The custom HUD for this class is implemented in the Ch12HUD class.This class depends on the HUDPawn variable located in the ExampleCh12PC class to determine which Pawn's information should be displayed on the HUD.
The SaveMarker class implements the 3d mesh graphic that the player's pawn needs to touch in order to save his own as well as his team member's character info. The SaveMarker class calls the SaveSquadInfo() function located in ExampleCh12PC class that implements the actual saving of the character data.
The LoadMarker class implements the 3d mesh graphic that the player's pawn needs to touch in order to load in his own as well as his team member's character info. The LoadMarker class calls the LoadSquadInfo() function located in ExampleCh12PC class that implements the actual loading of the character data.
Hands-On Example: Creating a Top-Down Shooter / Role-Playing Game Framework
In this hands-on example we will create a game framework suitable for a top-down shooter or a role-playing game. We add to the functionality of the game framework presented in Chapter 11 for a third-person shooter game. For this framework you again control a bot that you can move to different locations and command to attack an enemy bot but you do it from a top-down perspective. In addition, you can click on the bot or player and bring up character specific statistics such as hitpoints (which is health) and experience and display these on the HUD. Also, you can load and save the character data of the player and the ally bot by having the player's pawn touch two different 3d mesh graphics that represent the load and save markers.
In a role-playing game, saving your progress through the game world is essential. One reason it is essential is that one characteristic of a role-playing game is building up the character's attributes, such as experience points, strength, magical ability, and so forth, in order to defeat more powerful enemies and progress through the game. Since it is unlikely you will be able to do this in one play session, you need a method to save your character's status. We have chosen the marker method; however, you can extend this framework if you wish and develop some kind of menu system to load and save character data based on what you have learned from this book.
First we need create some new code such as a new game type, player controller, player pawn, ally bot pawn, enemy bot pawn, character information class, save marker, load marker, and HUD.
Creating the Game Type
The first thing we need to do is create a new directory for the code for this project. Create the ExampleCh12 directory under your default UDK installation directory at C:UDKUDK-2011-06DevelopmentSrc. If you are using a different version of the UDK other than the June 2011 UDK then this default directory will be different. Create a directory called Classes under the new directory you just created and put all your source code files in this directory.
Then create the following class (see Listing 12–1) and save it under the filename “ExampleCh12Game.uc”. Again as with all previous examples in this book the filenames must match the classnames and the file extension must be “.uc”.
Listing 12–1. Game type
class ExampleCh12Game extends FrameworkGame;


event OnEngineHasLoaded()

{

    WorldInfo.Game.Broadcast(self,"ExampleCh12Game Type Active - Engine Has Loaded !!!!");

}

function bool PreventDeath(Pawn KilledPawn, Controller Killer, class<DamageType> DamageType, vector HitLocation)

{

    return true;

}

static event class<GameInfo> SetGameType(string MapName, string Options, string Portal)

{

    return super.SetGameType(MapName, Options, Portal);

}

defaultproperties

{

    PlayerControllerClass=class'ExampleCh12.ExampleCh12PC'

    DefaultPawnClass=class'PlayerPawnCh12'

    HUDType=class'Ch12HUD'

    bRestartLevel=false

    bWaitingToStartMatch=true

    bDelayedStart=false

}
The key code is highlighted in bold. Note that the PlayerControllerClass, DefaultpawnClass, and HUDType are set to new classes created for the game framework in this chapter.
Creating the Player Controller
Next, we need to create the player controller for this game framework. This player controller builds upon the one in Chapter 11. The new code is shown below. In the interest of saving space, we have abbreviated this code so that only key important changes from the controller in Chapter 11 are shown. Each function listed below is complete with the changes or additions highlighted in bold. However, there are functions that have been eliminated from this listing but are in the full source code for this book.
The important functions employed in this framework and their roles include the following:
- The key functions that involve saving character data are the
SaveSquadInfo()andSaveCharacterInfo()functions. - The key functions that involve loading character data are the
LoadSquadInfo()andLoadCharacterInfo()functions. - The key function involving changing the player controls so that moving the player forward moves the player up the screen and moving the player side to side in a strafing manner moves the player left and right across the screen is the
PlayerMove()function located in thePlayerWalkingstate.
Listing 12–2 contains the first segment of controller code and deals with class variables and the functions that load and save character data to a file on the iOS device.
Listing 12–2. Loading and Saving
class ExampleCh12PC extends SimplePC;

var Pawn HUDPawn;

var CharacterInfo CharacterFile;

function SaveCharacterInfo()

{

    class'Engine'.static.BasicSaveObject(CharacterFile, "CharacterInfo.bin", true, 1);

}

function LoadCharacterInfo()

{

    class'Engine'.static.BasicLoadObject(CharacterFile, "CharacterInfo.bin", true, 1);

}

function SaveSquadInfo()

{

    CharacterFile.PlayerHitPoints = PlayerPawnCh12(Pawn).Health;

    CharacterFile.PlayerExperience = PlayerPawnCh12(Pawn).Experience;

    CharacterFile.AllyHitPoints = BotPawnCh12(AllyPawn).Health;

    CharacterFile.AllyExperience = BotPawnCh12(AllyPawn).Experience;

    SaveCharacterInfo();

}

function LoadSquadInfo()

{

    LoadCharacterInfo();

    // Put data back into variables

    PlayerPawnCh12(Pawn).Health = CharacterFile.PlayerHitPoints;

    PlayerPawnCh12(Pawn).Experience = CharacterFile.PlayerExperience;

    BotPawnCh12(AllyPawn).Health = CharacterFile.AllyHitPoints;

    BotPawnCh12(AllyPawn).Experience = CharacterFile.AllyExperience;

}

simulated function PostBeginPlay()

{

    Super.PostBeginPlay();
    CharacterFile = Spawn(class'CharacterInfo'),

}
The important things to notice in the preceding listing are
- The
HUDPawnvariable holds a reference to the pawn that will have its statistics displayed on the HUD. - The
CharacterFilevariable will hold the character data for the player and the ally bot that will be written to a file. - The
SaveCharacterInfo()function uses theBasicSaveObjectto save the character data for the player and the ally bot located in the variableCharacterFileinto the file “CharacterInfo.bin”. - The
LoadCharacterInfo()function uses theBasicLoadObjectto load in the data from the file “CharacterInfo.bin” into the variableCharacterFile. - The
SaveSquadInfo()function sets theCharacterFilevariable with the player and the ally bot's statistics and saves them into a file by calling theSaveCharacterInfo()function. - The
LoadSquadInfo()function loads in the player and ally bot's data and puts them back into the correct player and bot ally variables.TheLoadCharacterInfo()function actually loads in the character data from a file and is called first. - The
PostBeginPlay()function was added so that a newCharacterFilevariable will be created when gameplay starts.This variable will hold the data for the characters.
The next piece of code, shown in Listing 12–3, involves the PlayerWalking State and changes made within that state to the PlayerMove() function. The additions are in bold print.
Here the PlayerMove() function is overridden in the PlayerWalking state. It is in the PlayerMove() function that the player's controls are remapped so that moving forward is moving up the screen and moving side to side or strafing is remapped to moving the player left and right on the screen in the top-down view.
Listing 12–3. PlayerWalking State
state PlayerWalking

{

ignores SeePlayer, HearNoise, Bump;


    function PlayerMove( float DeltaTime )

    {

        local vector X,Y,Z, NewAccel;

        local eDoubleClickDir DoubleClickMove;

        local rotator OldRotation;

        local bool bSaveJump;


        if( Pawn == None )
        {

            GotoState('Dead'),

        }

        else

        {

            GetAxes(Pawn.Rotation,X,Y,Z);


            // New Custom Code

            NewAccel.y = PlayerInput.aStrafe;

            NewAccel.x = PlayerInput.aForward;

            NewAccel.Z = 0;

            NewAccel = Pawn.AccelRate * Normal(NewAccel);


            if (IsLocalPlayerController())

            {

                AdjustPlayerWalkingMoveAccel(NewAccel);

            }


            DoubleClickMove = PlayerInput.CheckForDoubleClickMove( DeltaTime/WorldInfo.TimeDilation );


            // Update rotation.

            OldRotation = Rotation;

            UpdateRotation( DeltaTime );

            bDoubleJump = false;


            if( bPressedJump && Pawn.CannotJumpNow() )

            {

                bSaveJump = true;

                bPressedJump = false;

            }

            else

            {

                bSaveJump = false;

            }


            if( Role < ROLE_Authority ) // then save this move and replicate it

            {

                ReplicateMove(DeltaTime, NewAccel, DoubleClickMove, OldRotation - Rotation);

            }

            else

            {

                ProcessMove(DeltaTime, NewAccel, DoubleClickMove, OldRotation - Rotation);

            }

            bPressedJump = bSaveJump;

         }

    }

}
Listing 12–4 includes the functions that spawn bots. In the SpawnGuardBot() function the enemy bot has a new body which is in the form of the GuardPawn2 class. In the SpawnAllyBot() function the player's ally bot has a new body in the form of the BotPawnCh12 class.
function SpawnGuardBot(Vector SpawnLocation,optional Vector Offset)

{

    SpawnLocation = SpawnLocation + Offset;

    GuardBot = Spawn(class'BotControllerGuard',,,SpawnLocation);

    GuardPawn = Spawn(class'GuardPawn2',,,SpawnLocation);

    GuardBot.Possess(GuardPawn,false);

    GuardPawn2(GuardPawn).AddDefaultInventory();

    GuardPawn2(GuardPawn).InitialLocation = SpawnLocation;

    GuardPawn.SetPhysics(PHYS_Falling);

}

function SpawnAllyBot(Vector SpawnLocation, optional Vector Offset)

{

    SpawnLocation = SpawnLocation + Offset;

    AllyBot = Spawn(class'BotAllyController',,,SpawnLocation);

    AllyPawn = Spawn(class'BotPawnCh12',,,SpawnLocation);

    AllyBot.Possess(AllyPawn,false);

    BotAllyController(AllyBot).SetCommand(Follow, Pawn);

    BotAllyController(AllyBot).BotOwner = Pawn;

    BotPawnCh12(AllyPawn).AddDefaultInventory();

    BotPawnCh12(AllyPawn).InitialLocation = SpawnLocation;

    AllyPawn.SetPhysics(PHYS_Falling);

}
Listing 12–5 involves the SetHUDPawn function and its use in the SwipeZoneCallback() function:
- The
SetHUDPawn()function sets the Pawn which is set inHUDPawnthat will have its statistics displayed on the HUD. - In the function
SwipeZoneCallback()the functionSetHUDPawn()is called every time the user touches the screen in order to determine the pawn that will have its statistics displayed on the HUD. Either the pawn will be the player's pawn or the ally bot's pawn.
Listing 12–5. SetHUDPawn
function SetHUDPawn(Actor TouchedActor)

{

    if (IsActorAllyBot(TouchedActor))

    {

        HUDPawn = Pawn(TouchedActor);

    }

    else

    {

        // Set Default to Player Pawn

        HUDPawn = Pawn;

    }

}

function bool SwipeZoneCallback(MobileInputZone Zone,

                                float DeltaTime,

                                int Handle,

                                EZoneTouchEvent EventType,

                                Vector2D TouchLocation)

{
    local bool retval;

    local Actor TempActor;

    local Vector HitLocation;

    local TraceHitInfo HitInfo;


    retval = true;

    if (EventType == ZoneEvent_Touch)

    {

        // Code for Setting Bot WayPoint

        TempActor = PickActor(TouchLocation, HitLocation, HitInfo);

        ProcessTouch(TempActor, HitLocation);

        SetHUDPawn(TempActor);

    }

    else

    if(EventType == ZoneEvent_Update)

    {

    }

    else

    if (EventType == ZoneEvent_UnTouch)

    {

        // Stop Firing Pawn's weapon

        StopFire(0);

    }

    return retval;

}
FRAMEWORK NOTE: You can easily expand this class to load and save additional character data for your own game by modifying the functions SaveSquadInfo() and LoadSquadInfo().
Creating the Player Pawn
Next, we need to create the player's body or pawn (see Listing 12–6). The key things to notice in this listing are
- Player statistics are added here in the form of the variables
CharacterNameandExperience. - The function
CalcCamera()does the actual work of changing the camera view to a top-down view withCamOffsetDistancedistance the height of the camera from the ground. The pitch which is the up/down movement of the camera is set to –90 degrees which points downward. - If the
bFollowPlayerRotationis true then the camera turns (yaw changes, left or right) to track the player when the player turns. - The function
GetBaseAimRotation()sets the aim rotation for weapons firing to straight ahead, which means the pitch is 0.
class PlayerPawnCh12 extends JazzPawnDamage;


var bool bFollowPlayerRotation;

var string CharacterName;

var int Experience;


////////// Top Down View ///////

simulated function bool CalcCamera( float fDeltaTime, out vector out_CamLoc, out rotator out_CamRot, out float out_FOV )

{

    out_CamLoc = Location;

    out_CamLoc.Z += CamOffsetDistance;

    if(!bFollowPlayerRotation)

    {

        out_CamRot.Pitch = -16384;

        out_CamRot.Yaw = 0;

        out_CamRot.Roll = 0;

    }

    else

    {

        out_CamRot.Pitch = -16384;

        out_CamRot.Yaw = Rotation.Yaw;

        out_CamRot.Roll = 0;

    }

    return true;

}

simulated singular event Rotator GetBaseAimRotation()

{

    local rotator   POVRot, tempRot;


    tempRot = Rotation;

    tempRot.Pitch = 0;

    SetRotation(tempRot);

    POVRot = Rotation;

    POVRot.Pitch = 0;

    return POVRot;

}

defaultproperties

{

    bFollowPlayerRotation = false

    CamOffsetDistance= 1500.0

    CharacterName = "Player"

    Experience = 0

}
FRAMEWORK NOTE: You can expand on this class by adding additional statistics to your player in this class.
Creating the Ally Bot Pawn
Next, we need to create the pawn for the player's ally bot (see Listing 12–7). The Ally bot's statistics are added here in the form of the variables CharacterName and Experience. The TakeDamage() function processes damage for the ally bot and resets the experience points.
Listing 12–7. Ally Bot's Pawn
class BotPawnCh12 extends BotPawn;

var string CharacterName;

var int Experience;


event TakeDamage(int Damage, Controller InstigatedBy, vector HitLocation, vector Momentum, class<DamageType> DamageType, optional TraceHitInfo HitInfo, optional Actor DamageCauser)

{

    PlaySound(JazzHitSound);

    Health = Health - Damage;

    if (Health <= 0)

    {

        SetLocation(InitialLocation);

        SetPhysics(PHYS_Falling);

        Health = 100;

        Experience = 0;

    }

}

defaultproperties

{

    CharacterName = "TeamMember1"

    Experience = 0;

}
FRAMEWORK NOTE: You can add in more statistics specific for this type of pawn here.For example, if this type of pawn is planned to have magic abilities you might add properties such as SpellCastingLevel to your list of character statistics. Although we have not discussed magic before, the general idea is that the character will have some power such as healing, or the ability to cause damage to enemies using some supernatural ability not based on a physical device or weapon. In terms of the property SpellCastingLevel, this variable would denote the ability of this character to use magic with a higher number indicating a greater ability.For example, a higher number would perhaps make special types of spells available.
Creating the Enemy Bot Pawn
Now, we create the pawn for the enemy guard bot (see Listing 12–8). The ExperienceValue variable is the value that is added to the experience statistic of the character that kills this pawn. The character must be either the player or the player's ally bot. The TakeDamage() function is where the experience points are actually added to the character that has successfully killed a pawn of this class.
Listing 12–8. Guard Pawn
class GuardPawn2 extends BotPawnCh10;


var int ExperienceValue;


event TakeDamage(int Damage, Controller InstigatedBy, vector HitLocation, vector Momentum, class<DamageType> DamageType, optional TraceHitInfo HitInfo, optional Actor DamageCauser)

{

    PlaySound(HurtSound);

    Health = Health - Damage;

    if (Health <= 0)

    {

        PlaySound(DeathSound);

        /*Add experience points to player or member of player's group

          if this pawn is killed by one of them*/

        if (InstigatedBy.IsA('ExampleCh12PC'))

        {

            PlayerPawnCh12(InstigatedBy.Pawn).Experience += ExperienceValue;

        }

        else

        if (InstigatedBy.IsA('BotAllyController'))

        {

            BotPawnCh12(InstigatedBy.Pawn).Experience += ExperienceValue;

        }

        //destroy();

        SetLocation(InitialLocation);

        SetPhysics(PHYS_Falling);

        Health = 100;

    }

    BotControllerGuard(Controller).Threat = InstigatedBy.Pawn;

}

defaultproperties

{

    ExperienceValue = 100;

}
Creating the Character Information Class
Next, we need to create the class that actually holds the character information for the player's squad that will be saved to the character file. See Listing 12–9.
Listing 12–9. Squad Information Class
class CharacterInfo extends Actor;


var int PlayerHitPoints;

var int PlayerExperience;

var int AllyHitPoints;

var int AllyExperience;
FRAMEWORK NOTE: You can expand on this class by adding in characteristics for additional squad members and/or adding in additional statistics for existing squad members.
Creating the Save Marker
Next, we need to create the 3d mesh graphic that represents the save marker and is used to save the player's squad data (see Listing 12–10). The 3d mesh for this marker is set in the StaticMesh variable and is scaled up 3 times the normal size using the Scale3D variable. The Touch() function implements the save marker's key behavior.If the actor that touches this marker is the player's pawn then a sound is played and the character information for the player's squad is saved to a file on the iOS device.
Listing 12–10. SaveMarker Class
class SaveMarker extends Actor

placeable;


var SoundCue SaveSound;


event Touch(Actor Other, PrimitiveComponent OtherComp, vector HitLocation, vector HitNormal)

{

    if (!Other.IsA('PlayerPawnCh12'))

    {

        return;

    }

    PlaySound(SaveSound);

    ExampleCh12PC(Pawn(Other).Controller).SaveSquadInfo();

}

defaultproperties

{

    Begin Object Class=StaticMeshComponent Name=StaticMeshComponent0

        StaticMesh=StaticMesh'FoliageDemo2.Mesh.S_Statue_01'

        Scale3D=(X=3.0000,Y=3.0000,Z=3.000)

    End Object

    Components.Add(StaticMeshComponent0)


    Begin Object Class=CylinderComponent NAME=CollisionCylinder

        CollideActors=true

        BlockActors=false

        CollisionRadius=+0140.000000

        CollisionHeight=+0240.000000

    End Object

    Components.Add(CollisionCylinder)

    CollisionComponent = CollisionCylinder

    bCollideActors=true

    bBlockActors = false

    SaveSound = SoundCue'A_Interface.menu.UT3MenuAcceptCue'

}
Creating the Load Marker
Next, we need to create the Load Marker class. See Listing 12–11. The key points to note are
- The
LoadMarkerclass contains a 3d graphic mesh that represents the object the player's pawn needs to touch in order to load in previously saved squad character data. - The 3d mesh for this marker is set in the
StaticMeshvariable and is scaled up 2 times the normal size using theScale3Dvariable. - In the
Touch()function if the actor that touches this marker is the player's pawn then the player's previously saved squad character information is loaded in from the iOS device.
Listing 12–11. LoadMarker Class
class LoadMarker extends Actor

placeable;


var SoundCue SaveSound;


event Touch(Actor Other, PrimitiveComponent OtherComp, vector HitLocation, vector HitNormal)

{

    if (!Other.IsA('PlayerPawnCh12'))

    {

        return;

    }

    PlaySound(SaveSound);

    ExampleCh12PC(Pawn(Other).Controller).LoadSquadInfo();

}

defaultproperties

{

    Begin Object Class=StaticMeshComponent Name=StaticMeshComponent0

        StaticMesh=StaticMesh'HU_Deco_Statues.SM.Mesh.S_HU_Deco_Statues_SM_Statue03_01'

        Scale3D=(X=2.0000,Y=2.0000,Z=2.000)

    End Object

    Components.Add(StaticMeshComponent0)


    Begin Object Class=CylinderComponent NAME=CollisionCylinder

        CollideActors=true

        BlockActors=false

        CollisionRadius=+0140.000000

        CollisionHeight=+0240.000000

    End Object

    Components.Add(CollisionCylinder)

    CollisionComponent = CollisionCylinder

    bCollideActors=true

    bBlockActors = false

    SaveSound = SoundCue'A_Interface.menu.UT3MenuAcceptCue'

}
Creating the HUD
Next, we need to create the new class for the Heads Up Display (see Listing 12–12). The key changes from previous versions of the HUD class are highlighted in bold print.
Depending on the type of pawn in the HUDPawn variable in the player controller which is an ExampleCh12PC class then either the HUD is drawn using the DrawPlayerHUD() function to draw the HUD for the player or the DrawAllyHUD() function to draw the HUD for the ally bot.
Listing 12–12. Heads Up Display
class Ch12HUD extends UDKHud;


struct HUDInfo

{

    var string Label;

    var Vector2D TextLocation;

    var Color TextColor;

    var Vector2D Scale;

};


// HUD

var HUDInfo HUDHealth;

var HUDInfo HUDName;

var HUDInfo HUDExperience;

var HUDInfo HUDGameOver;

simulated function PostBeginPlay()

{

    Super.PostBeginPlay();


    HUDHealth.Label = "HitPoints:";

    HUDHealth.TextLocation.x = 1100;

    HUDHealth.TextLocation.y = 50;

    HUDHealth.TextColor.R = 0;

    HUDHealth.TextColor.G = 0;

    HUDHealth.TextColor.B = 255;

    HUDHealth.Scale.X = 2;

    HUDHealth.Scale.Y = 4;


    HUDName.Label = "Name:";

    HUDName.TextLocation.x = 600;

    HUDName.TextLocation.y = 50;

    HUDName.TextColor.R = 0;

    HUDName.TextColor.G = 255;

    HUDName.TextColor.B = 0;

    HUDName.Scale.X = 2;

    HUDName.Scale.Y = 4;


    HUDGameOver.Label = "Objective Killed";

    HUDGameOver.TextLocation.x = 300;

    HUDGameOver.TextLocation.y = 300;

    HUDGameOver.TextColor.R = 255;

    HUDGameOver.TextColor.G = 0;

    HUDGameOver.TextColor.B = 255;
    HUDGameOver.Scale.X = 7;

    HUDGameOver.Scale.Y = 7;


    HUDExperience.Label = "Experience:";

    HUDExperience.TextLocation.x = 0;

    HUDExperience.TextLocation.y = 50;

    HUDExperience.TextColor.R = 255;

    HUDExperience.TextColor.G = 0;

    HUDExperience.TextColor.B = 0;

    HUDExperience.Scale.X = 2;

    HUDExperience.Scale.Y = 4;

}

function DrawHUDItem(HUDInfo Info, coerce string Value)

{

    local Vector2D TextSize;


    Canvas.SetDrawColor(Info.TextColor.R, Info.TextColor.G, Info.TextColor.B);

    Canvas.SetPos(Info.TextLocation.X, Info.TextLocation.Y);

    Canvas.DrawText(Info.Label, ,Info.Scale.X,Info.Scale.Y);

    Canvas.TextSize(Info.Label, TextSize.X, TextSize.Y);

    Canvas.SetPos(Info.TextLocation.X + (TextSize.X * Info.Scale.X), Info.TextLocation.Y);

    Canvas.DrawText(Value, , Info.Scale.X, Info.Scale.Y);

}

function DrawPlayerHUD(Pawn HUDPawn)

{

    local string CharacterName;

    local int Experience;

    local int HitPoints;


    CharacterName = PlayerPawnCh12(HUDPawn).CharacterName;

    Experience = PlayerPawnCh12(HUDPawn).Experience;

    HitPoints = HUDPawn.Health;


    DrawHUDItem(HUDExperience, Experience);

    DrawHUDItem(HUDName, CharacterName);

    DrawHUDItem(HUDHealth, HitPoints);

}

function DrawAllyHUD(Pawn HUDPawn)

{

    local string CharacterName;

    local int Experience;

    local int HitPoints;


    CharacterName = BotPawnCh12(HUDPawn).CharacterName;

    Experience = BotPawnCh12(HUDPawn).Experience;

    HitPoints = HUDPawn.Health;

    DrawHUDItem(HUDExperience, Experience);

    DrawHUDItem(HUDName, CharacterName);

    DrawHUDItem(HUDHealth, HitPoints);

}

function DrawHUD()

{

    local Pawn HUDPawn;
    super.DrawHUD();

    Canvas.Font = class'Engine'.static.GetLargeFont();


    HUDPawn = ExampleCh12PC(PlayerOwner).HUDPawn;

    if (HUDPawn.IsA('PlayerPawnCh12'))

    {

       DrawPlayerHUD(HUDPawn);

    }

    else

    if (HUDPawn.IsA('BotPawnCh12'))

    {

       DrawAllyHUD(HUDPawn);

    }


    // Game Over

    if (ExampleCh12PC(PlayerOwner).bGameOVer)

    {

         DrawHUDItem(HUDGameOver, "");

    }

}

defaultProperties

{

}
Configuring the Game Type
Next, we need to set up this new example for compilation and for playing on the mobile previewer.In the configuration directory located at
C:UDKUDK-2011-06UDKGameConfig
(it will be different if you are using a different UDK version), change the UDKEngine.ini and Mobile-UDKGame.ini configuration files to the following:
UDKEngine.ini

[UnrealEd.EditorEngine]

ModEditPackages=ExampleCh12

Mobile-UDKGame.ini

[ExampleCh12.ExampleCh12Game]

RequiredMobileInputConfigs=(GroupName="UberGroup",RequireZoneNames=("UberStickMoveZone","UberStickLookZone","UberLookZone"))
Save the configuration files. You may need to write protect them to preserve the contents since the UDK sometimes overwrites them (see the section “Configuring the Game Type" in Chapter 9).
Bring up the Unreal Frontend and compile the scripts.
Creating the Level
To create the level for this example, complete the following steps:
- Bring up the Unreal Editor.
- Load in the level you created for the game framework in Chapter 11 (see the section “Creating the Level”). (You also can find the level—
ExampleCh11Map.zip—with the source code for this book.) - Save a copy of this level by selecting File
 Save As to bring up the windows save dialog and typing in a new name for this new level then saving it.
 - Next, select the Actor Class tab from the generic browser and search for savemarker in the search box. Select the SaveMarker class when it comes up.
- Right click on an empty area in the level and select Add SaveMarker Here to add the marker to the level (see Figure 12–1).
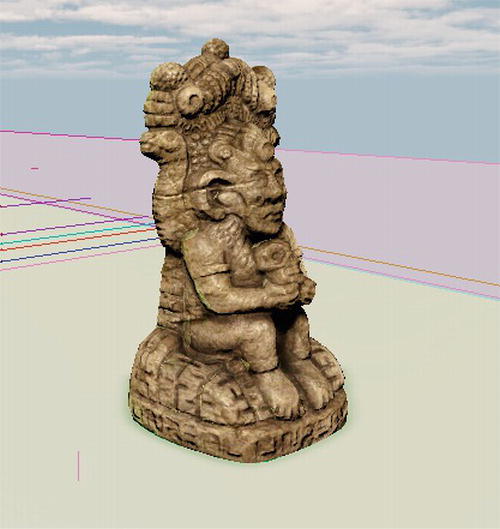
Figure 12–1. Adding the Save Marker to the Level
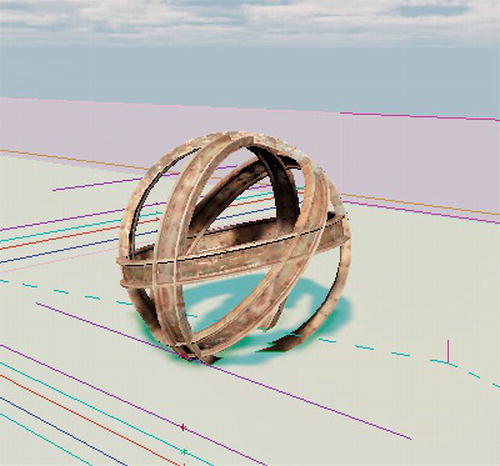
- Next search for loadmarker in the search box in the Actor Classes tab. Select the LoadMarker class when it comes up.
- Right click on an empty area in the level and select Add LoadMarker Here to add the marker to the level (see Figure 12–2).
- Save the level.
Running the Game
Now, we are ready to run our game.
- Select View World Properties from the Unreal Editor main menu. This would bring up the World Properties window.
- In the World Properties window set the Default Game Type under the Game Type category to ExampleCh12Game.
- Select the Play On Mobile Previewer option to run the game on the mobile previewer from the Editor.
- Select your bot ally by clicking on it.The Name in the HUD should be TeamMember1, as shown in Figure 12–3.

- Next, build up your ally bot's experience points by clicking on the enemy guard bot to attack it. Repeat this process of clicking on your bot and then on the enemy guard several times to attack it. When the enemy guard is dead it will respawn.
- Save your squad's character statistics by having the player's pawn touch the SaveMarker statue in the level which is the rectangular statue. The round statue is the LoadMarker statue. See Figure 12–4.
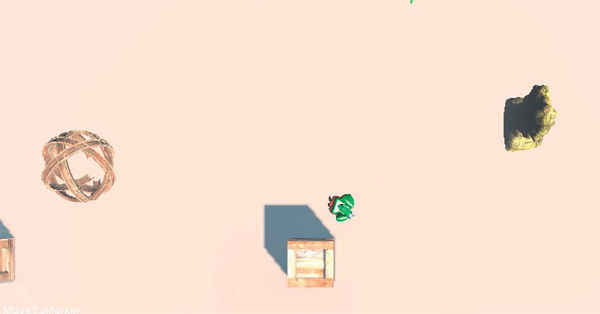
Figure 12–4. LoadMarker on Left and SaveMarker on Right
- Exit the mobile previewer then restart it.
- Load in the previously saved character data by having your player's pawn touch the LoadMarker. Click on your ally bot to bring up its statistics. Note that the Experience points are the same as when you saved it previously. You should see something like Figure 12–5.

Figure 12–5. After loading in the character data
Summary
In this chapter we created a new game framework suitable for a top-down shooter and or a role playing game. We discussed the framework's features and then discussed how these features were implemented in terms of code. We then created the actual game framework. New code was created, a new level was created from an existing level that was made in a previous framework, the game type was then set up to run on the mobile previewer and finally we gave the reader a demonstration of the game.