Chapter 11
Third-Person Shooter/Adventure Game Framework
In this chapter we will cover a third-person shooter / adventure game framework. A third-person shooter is distinct from a first-person shooter in that the player's pawn is visible. The great advantage of this is that it adds a movie like quality to the game. The player can see the in-game representation of himself perform various actions such as running, jumping, reloading, and firing weapons. An adventure game has the distinction of the player commanding other members of his party or squad to perform certain actions. This framework adds that feature whereby the player can command a computer-controlled character.
First a game framework overview is given. In this overview we give a general overview of the features of the framework, and then we give more code specific details on how these features are implemented. Next, we create the actual framework.
The general framework presented in this chapter consists of:
- A controllable player ally bot that can move to a location designated by the player, attack enemies selected by the player, and follows the playerby default.
- An enemy bot that guards an asset and responds to attacks on that asset by attacking the player or bot responsible.
- An enemy asset that has a link to an enemy bot that guards it.
- A custom HUD that displays the player's health, the health of the player's bot ally, and the health of the objective (the enemy asset that is guarded) that the player must destroy.
- Framework code that tracks the health of the guarded enemy asset and displays a message when that enemy asset has been destroyed.
Game Framework Overview
In this section we give you an overview of the game framework from a general standpoint and a specific standpoint. The general overview will give you in general non-code specific terms the key features of this framework. The specific overview will give you a more detailed code specific overview of the game framework.
General Overview
This framework provides the basis for games you can define and create. It consists of various models, such as bots, meshes, and a HUD, that you can use or build on to produce the kind of game experience you want.
In this framework we build a player-controlled bot. This bot is issued commands by the player and then executes these commands. You can extend this framework by adding in new commands and the new states that will be needed to implement these commands. For a shooter type game a modification might be to modify the attack command so that your bot will attack certain target types with certain weapons that the player can specify. For an adventure style game a modification might be to add in a new set of commands specific to the needs of your adventure game. For example, you can expand the command set to include a command to have your bot negotiate with enemy forces.
In a general sense we have shown how to link the behaviors of objects of two different classes:
- We have created a computer-controlled bot that can respond to a threat to another Actor that it is guarding by attacking the threat and discontinuing that attack if certain conditions are true. Currently, that attack is broken off if the bot moves to a location that is too far away from the item it is guarding. You can expand on this framework by changing what specific type of Actor the bot is guarding, how the bot responds to a threat, and what conditions are needed for the bot to stop its attack on the threat.
- A new placeable class is created that includes a 3d mesh and is linked to another Actor that protects it. You can expand on this framework by changing the type of 3d mesh or the type of Actor that is associated with this class. For example, associate this object with the enemy that is assigned to destroy it.
This basic idea can be expanded to include any situation when you need to link events that occur to one type of object to behavior that needs to occur to another type of object.
A new HUD class that displays critical game statistics is presented. You can expand on this framework by adding or subtracting statistics that you want to add or delete from the HUD display using existing statistics as examples of how to do this.
Specific Overview
The artificial intelligence for the player's bot ally is implemented in the BotAllyController class. The player issues commands to the bot through the player controller class which is ExampleCh11PC. The ally bot is controlled by the player by issuing the commands:
- Follow, to have the bot follow the player around the level
- Move, to have the bot move to a specific location in the game world, and
- Attack, to have the bot start its attack on the enemy bot that is guarding the objective.
The enemy bot's artificial intelligence is implemented in the BotControllerGuard class and the bot's physical body is implemented in the GuardPawn class.
The player's objective which is the power generator is implemented in the Generator class. This objective is guarded by an enemy bot that is referenced by the Guard variable that is of the Pawn class.
The custom Heads Up Display is implemented in the Ch11HUD class and displays the player's health, the player's bot's health, and the objective's health as well as displays the mission accomplished message when the enemy asset is destroyed.
Hands-on Example: Third-Person Shooter/Adventure Game Framework
In this section we will build a framework suitable for a third-person shooter, third-person adventure game or a perhaps a combination. You will be able to control an ally bot and move it around the game world and order it to attack the enemy bot guarding the power generator. Your objective would be to destroy this generator. We create new classes for a game type, player controller, enemy guard controller, enemy guard pawn, player bot ally controller, generator, HUD, and a custom bot marker that indicates toward what the player's ally bot is to move.
Creating the Game Type
The first thing we need to do is create a new directory for the code for this project. Create the ExampleCh11 directory under your default UDK installation directory at C:UDKUDK-2011-06DevelopmentSrc. If you are using a different version of the UDK other than the June 2011 UDK then this default directory will be different. Create a directory called Classes under the new directory you just created and put all your source code files in this directory.
Create the following class, shown in Listing 11–1, and save it under the filename “ExampleCh11Game.uc”. Again, as with all previous examples in this book, the filenames must match the classnames and the file extension must be “.uc”.
The code in bold represents new or modified code from what was presented in previous chapters as well as important code that the reader should pay special attention to.
Listing 11–1. Game type
class ExampleCh11Game extends FrameworkGame;


event OnEngineHasLoaded()

{

    WorldInfo.Game.Broadcast(self,"ExampleCh11Game Type Active - Engine Has Loaded !!!!");

}

function bool PreventDeath(Pawn KilledPawn, Controller Killer, class<DamageType> DamageType, vector HitLocation)

{

    return true;

}

static event class<GameInfo> SetGameType(string MapName, string Options, string Portal)

{

    return super.SetGameType(MapName, Options, Portal);

}

defaultproperties

{

    PlayerControllerClass=class'ExampleCh11.ExampleCh11PC'

    DefaultPawnClass=class'JazzPawnDamage'

    HUDType=class'Ch11HUD'

    bRestartLevel=false

    bWaitingToStartMatch=true

    bDelayedStart=false

}
The PlayerControllerClass variable points to our custom player controller class ExampleCh11PC. The HUDType variable points to our custom HUD for this framework which is Ch11HUD.
Creating the Player Controller
Next, we need to create our custom player controller class. This class is similar to the player controller class in Chapter 5 covering bots in that the player can click on an area in the game world and have the bot move to that area. However, much has been changed and added. Now, the player must first select the ally bot and then direct the ally bot to an area to move to or an enemy bot to attack.
When the player is first initialized, the function SpawnAllyBot() is called to create the player's ally bot and the function CreateNewGuardBot() is called to create the enemy guard bot that guards the player's objective. In the PlayerTick() function that is continuously called, the FindObjectiveHealth() function is called to determine the damage done to the enemy structure and sets the bGameOver variable to true if this is true.
When the user touches the screen the function ProcessTouch() is called to process this user generated touch. It is this function that determines if the player is commanding the ally bot to move to a new location, to attack an enemy or is just firing the player's own weapon.
The listings in this section detail the controller class with explanations. You can find the complete source code listing without comments with the source code for the book.
The first section of code for this class is in Listing 11–2 and covers the class variables and the function that determines the objective's (which is the enemy power generator) health.
Listing 11–2. Class Variables and FindObjectiveHealth
class ExampleCh11PC extends SimplePC;

var Controller AllyBot;

Var Pawn AllyPawn;

var Controller GuardBot;

Var Pawn GuardPawn;

var bool BotSpawned;

var Actor BotTarget;

var float PickDistance;

var bool bBotCommandStateActive;

var int ObjectiveHealth;

var bool bGameOver;

function FindObjectiveHealth()

{

    local Generator TempGenerator;


    foreach AllActors(class'Generator', TempGenerator)

    {

        ObjectiveHealth = TempGenerator.Health;

    }

}
Key things to note in this listing are:
- The
AllyBotandAllyPawnvariables hold references to the controller for the player-controlled bot ally and the pawn for that ally. - The
GuardBotandGuardPawnvariables are used to create the controller and pawn for the enemy guard that protects the enemy asset and is the player's goal to destroy. - The
bBotCommandStateActivevariable is true if the player's bot ally is currently selected (last object touched). The next touch will be the enemy bot to attack or the place in the game world to move to. - The
ObjectiveHealthholds the health of enemy asset that the player needs to destroy in order to win the game. - The
bGameOveris true if the player has destroyed the generator, false otherwise. - The
FindObjectiveHealth()function searches all the actors in the level and retrieves the health of the player's objective which is the power generator that needs to be destroyed.
The next piece of code is in Listing 11–3 and deals with picking an Actor. The PickActor() function determines if the user has touched and Actor on the screen and is the same function as in the hands-on example in Chapter 2.
Listing 11–3. PickActor
function Actor PickActor(Vector2D PickLocation, out Vector HitLocation, out TraceHitInfo HitInfo)

{

    local Vector TouchOrigin, TouchDir;

    local Vector HitNormal;

    local Actor  PickedActor;

    local vector Extent;


    //Transform absolute screen coordinates to relative coordinates

    PickLocation.X = PickLocation.X / ViewportSize.X;

    PickLocation.Y = PickLocation.Y / ViewportSize.Y;


    //Transform to world coordinates to get pick ray

    LocalPlayer(Player).Deproject(PickLocation, TouchOrigin, TouchDir);


    //Perform trace to find touched actor

    Extent = vect(0,0,0);

    PickedActor = Trace(HitLocation,

                        HitNormal,

                        TouchOrigin + (TouchDir * PickDistance),

                        TouchOrigin,

                        True,

                        Extent,

                        HitInfo);


    //Return the touched actor for good measure

    return PickedActor;

}
The next code segment, shown in Listing 11–4, includes functions related to commanding the player's ally bot. The key ones to notice:
- The
SetBotMarkerGraphic()function creates a new botmarker if one does not currently exist and sets the position of it based on theLocinput parameter modified by theoffsetinput vector. - The
ExecuteBotMoveCommand()function sets the bot graphic marker to the inputHitLocationposition and sends aMovecommand to the player-controlled bot to move the bot to the location of the bot marker. - The
ExecuteBotAttackCommand()function sets the bot marker graphic to a location above the attack target with the arrow pointing downward. The player-controlled bot is also given theAttackcommand directed against theTarget. - The
SelectBotAllyGraphic()function sets the location of the bot marker when selecting the player-controlled ally bot. The location of the bot marker is offset so that it is just above the ally bot.
Listing 11–4. Bot Command Related Functions
function SetBotMarkerGraphic(vector Loc, optional vector offset)

{

    Loc = Loc + offset;

    If (BotTarget == None)

    {

        WorldInfo.Game.Broadcast(None,"Creating New Move Marker!!!!!!!!");

        BotTarget = Spawn(class'BotMarker2',,,Loc);

    }

    else

    {

        BotTarget.SetLocation(Loc);

    }

}

reliable server function ExecuteBotMoveCommand(Vector HitLocation)

{

    // 1. Set Marker

    Hitlocation.z += 50; // Add offset to help bot navigate to point

    SetBotMarkerGraphic(Hitlocation);

    // 2. Send Move Command to bot along with target location

    BotAllyController(AllyBot).SetCommand(Move, BotTarget);

}

function ExecuteBotAttackCommand(Actor Target)

{

    // 1. Set Marker

    SetBotMarkerGraphic(Target.Location, vect(0,0,200));

    // 2. Send Attack Command to bot along with target location

    BotAllyController(AllyBot).SetCommand(Attack, Target);

}

function SelectBotAllyGraphic(vector Loc)

{

    Loc.z += 200; // Add offset to help bot navigate to point

    SetBotMarkerGraphic(Loc);

}
The code segment in Listing 11–5 involves the creation of the enemy bot that guards the power generator. Note the following functions included in this listing:
- The FindSpawnPad() function is the same as the one in the Chapter 10 framework.
- The
SpawnGuardBot()function creates a new enemy guard bot that will seek out a generator that is unguarded and will guard it. The bot uses theBotControllerGuardcontroller class and theGuardPawnpawn class and is created atSpawnLocationlocation offset by theOffsetvector. - The
CreateNewGuardBot()function finds the spawn pad in the level and creates the enemy guard bot on that spawn pad.
Listing 11–5.Enemy Guard Bot Creation
function Actor FindSpawnPad(int PadNumber)

{

    local BotSpawnPad TempSpawnPad;

    local Actor ReturnSpawnPad;

    ReturnSpawnPad = None;

    foreach AllActors(class'BotSpawnPad', TempSpawnPad)

    {

        if(TempSpawnPad.PadNumber == PadNumber)

        {

            ReturnSpawnPad = TempSpawnPad;

        }

    }

    return ReturnSpawnPad;

}


function SpawnGuardBot(Vector SpawnLocation,optional Vector Offset)

{

    SpawnLocation = SpawnLocation + Offset;

    GuardBot = Spawn(class'BotControllerGuard',,,SpawnLocation);

    GuardPawn = Spawn(class'GuardPawn',,,SpawnLocation);

    GuardBot.Possess(GuardPawn,false);

    GuardPawn(GuardPawn).AddDefaultInventory();

    GuardPawn(GuardPawn).InitialLocation = SpawnLocation;

    GuardPawn.SetPhysics(PHYS_Falling);

}

function CreateNewGuardBot()

{

    local Actor TempPad;

    TempPad = FindSpawnPad(0);

    if (TempPad != None)

    {

        SpawnGuardBot(TempPad.Location);

    }

}
In Listing 11–6, the Player's ally bot is created. The SpawnAllyBot() function creates a new player-controlled ally bot using the BotAllyController class for the controller and the BotPawn class for the pawn. The bot is created at SpawnLocation location offset by the Offset vector.
Listing 11–6. Creating the Player's Ally Bot
function SpawnAllyBot(Vector SpawnLocation, optional Vector Offset)

{

    SpawnLocation = SpawnLocation + Offset;

    AllyBot = Spawn(class'BotAllyController',,,SpawnLocation);

    AllyPawn = Spawn(class'BotPawn',,,SpawnLocation);

    AllyBot.Possess(AllyPawn,false);

    BotAllyController(AllyBot).SetCommand(Follow, Pawn);

    BotAllyController(AllyBot).BotOwner = Pawn;

    BotPawn(AllyPawn).AddDefaultInventory();

    BotPawn(AllyPawn).InitialLocation = SpawnLocation;

    AllyPawn.SetPhysics(PHYS_Falling);

}
The next piece of code involves functions that test whether the actor that is touched by the player is an ally bot or an enemy bot (see Listing 11–7):
- The
IsActorAllyBot()function returns true if the touched Actor input in theTestBotparameter is of the type of pawn used by the bot ally. - The
IsActorGuardBot()function returns true if the tested Actor is of a pawn type used by the enemy guard bot.
Listing 11–7. Ally or Enemy Bot Test Functions
function bool IsActorAllyBot(Actor TestBot)

{

    local bool bretval;

    bretval = TestBot.IsA('BotPawn'),

    return bretval;

}


function bool IsActorGuardBot(Actor TestBot)

{

    local bool bretval;

    bretval = TestBot.IsA('GuardPawn'),

    return bretval;

}
The next code segment, shown in Listing 11–8, processes the player's touch input.
The ProcessTouch() function is the main processing function for user generated touches. If the bBotCommandStateActive is true that is the ally bot has been selected then if the touched actor is an enemy bot then execute the command to attack it. Otherwise if it is another location in the game world and not the ally bot's position then execute the command to move the ally bot to that location.
If the bBotCommandStateActive is false then if the touched actor is the ally bot then set the bBotCommandStateActive to true so that the next touch can execute a bot command either moving to a new location or attacking an enemy bot. Otherwise, start firing the player's weapon.
Listing 11–8. Processing the Player's Touch Input
function ProcessTouch(Actor TouchedActor, vector HitLocation)

{

    if (bBotCommandStateActive)

    {

        if (IsActorGuardBot(TouchedActor))

        {

            ExecuteBotAttackCommand(TouchedActor);

            bBotCommandStateActive = false;

        }

        else

        if (!IsActorAllyBot(TouchedActor))

        {

            ExecuteBotMoveCommand(HitLocation);

            bBotCommandStateActive = false;

        }
    }

    else

    {

        if (IsActorAllyBot(TouchedActor))

        {

            SelectBotAllyGraphic(TouchedActor.Location);

            bBotCommandStateActive = true;

        }

        else

        {

            // Start Firing pawn's weapon

            StartFire(0);

        }

    }

}
The SwipeZoneCallback() function in Listing 11–9 is modified from previous versions used in previous chapters, in that the ProcessTouch() function is now called to process the user's touch input. The original function was defined in the hands-on example in Chapter 2.
Listing 11–9. SwipeZoneCallback
function bool SwipeZoneCallback(MobileInputZone Zone,

                                float DeltaTime,

                                int Handle,

                                EZoneTouchEvent EventType,

                                Vector2D TouchLocation)

{

    local bool retval;

    local Actor TempActor;

    local Vector HitLocation;

    local TraceHitInfo HitInfo;


    retval = true;

    if (EventType == ZoneEvent_Touch)

    {

        // Code for Setting Bot WayPoint

        TempActor = PickActor(TouchLocation, HitLocation, HitInfo);

        ProcessTouch(TempActor, HitLocation);

    }

    else

    if(EventType == ZoneEvent_Update)

    {

    }

    else

    if (EventType == ZoneEvent_UnTouch)

    {

        // Stop Firing Pawn's weapon

        StopFire(0);

    }

    return retval;

}

function SetupZones()

{

    Super.SetupZones();
    // If we have a game class, configure the zones

    if (MPI != None && WorldInfo.GRI.GameClass != none)

    {

        LocalPlayer(Player).ViewportClient.GetViewportSize(ViewportSize);

        if (FreeLookZone != none)

        {

            FreeLookZone.OnProcessInputDelegate = SwipeZoneCallback;

        }

    }

}
The last chunk of code for this class is shown in Listing 11–10. It covers the PlayerTick() function and default properties. The function has been modified to create the enemy bot and player's ally bot when the controller is first ticked. Also, the health of the player's objective is monitored and the game over status is set to true if the power generator's health is equal to or less than 0.
Listing 11–10.PlayerTick
function PlayerTick(float DeltaTime)

{

    local vector AllyBotPos;

    Super.PlayerTick(DeltaTime);

    if (!BotSpawned)

    {

        AllyBotPos = Pawn.Location + Normal(Vector(Pawn.Rotation)) * 100;

        SpawnAllyBot(AllyBotPos,vect(0,0,500));

        BotSpawned = true;

        JazzPawnDamage(Pawn).InitialLocation = Pawn.Location;

        CreateNewGuardBot();

    }

    FindObjectiveHealth();

    if (ObjectiveHealth <= 0)

    {

        bGameOver = true;

    }

}

defaultproperties

{

    BotSpawned=false

    PickDistance = 10000

    bBotCommandStateActive = false

    bGameOver = false

}
FRAMEWORK NOTE: This class can be modified in many ways such as to allow the player to control more bots or to change the way the player actually selects and gives the ally bot or bots their orders.
Creating the Bot Ally Controller
Next, we need to create the code for the controller for the player's ally bot.
The artificial intelligence for the player's bot ally is implemented in this class with the function ExecuteWhatToDoNext() being the main entry point for programmer defined custom behavior. The bot starts in the Initial state and goes to the FollowingTarget state. The bot is given the default command to follow the player when it is first created. Each of the available bot commands maps to a state within the BotAllyController class that implements that command.
The Follow command maps to the FollowingTarget state. The Move command maps to the MovingToMarker state. The Attack command maps to the AttackingEnemy state.
The first piece of code for this class, shown in Listing 11–11, involves bot commands. Key items in this listing are that:
- The
FollowTargetholds a reference to the player's pawn that the ally bot will follow. - The
MoveToTargetholds a reference to the bot marker that the ally bot will move to. - The
AttackTargetholds a reference to the enemy bot's pawn that the ally bot will attack. - The
Commandvariable holds a player specified order for the ally bot. The orders are toFollowthe player,Moveto the location of the bot marker, or toAttackthe enemy bot that is guarding the power generator. - The
SetCommand()function sets the command that the ally bot will follow as well as does some initializations that are command specific.
Listing 11–11.Bot Commands
class BotAllyController extends UDKBot;


var Vector TempDest;

var float FollowDistanceTarget;

var float FollowDistanceMarker;

var Actor TempGoal;

var float AttackOffsetDist;

var bool bAttackDone;

var int AttackDuration;

var Pawn BotOwner;

var Actor FollowTarget;

var Actor MoveToTarget;

var Actor AttackTarget;


enum BotCommand

{

    Follow,

    Move,
    Attack

};

var BotCommand Command;

function SetCommand(BotCommand Order, Actor Target)

{

    Command = Order;

    if (Command == Follow)

    {

       FollowTarget = Target;

    }

    else

    if (Command == Move)

    {

        MoveToTarget = Target;

    }

    else

    if (Command == Attack)

    {

        AttackTarget = Target;

        bAttackDone = false;

    }

}
The next piece of code is the GeneratePathTo() function from Chapter 5 that does the actual pathfinding using a navigation mesh (see Listing 11–12).
Listing 11–12. GeneratePathTo
event bool GeneratePathTo(Actor Goal, optional float WithinDistance, optional bool bAllowPartialPath)

{

    if( NavigationHandle == None )

    return FALSE;

    // Clear cache and constraints (ignore recycling for the moment)

    NavigationHandle.PathConstraintList = none;

    NavigationHandle.PathGoalList = none;

    class'NavMeshPath_Toward'.static.TowardGoal( NavigationHandle, Goal );

    class'NavMeshGoal_At'.static.AtActor( NavigationHandle, Goal, WithinDistance, bAllowPartialPath );

    return NavigationHandle.FindPath();

}
The FollowingTarget state, shown in Listing 11–13, makes this bot follow the player around the level. When the actor is directly reachable, the bot stops when it is within FollowDistanceTarget Unreal units of distance from the player.
NOTE: In the BeginState and EndState functions, the “Put Code Here” comments in the code refer to new code you can add to extend this framework for you own customized game.
Listing 11–13. FollowingTarget State
state FollowingTarget

{

    event BeginState( Name PreviousStateName )

    {

        // Put code here that is to only be executed when the state is first entered

    }

    event EndState( Name NextStateName )

    {

        // Put code here that is to be executed only when exiting this state

    }

    Begin:

    WorldInfo.Game.Broadcast(self,"************** IN State FollowTarget ");

    // Move Bot to Target

    if (FollowTarget != None)

    {

        if(GeneratePathTo(FollowTarget))

        {

            NavigationHandle.SetFinalDestination(FollowTarget.Location);


            if( NavigationHandle.ActorReachable(FollowTarget) )

            {

                // then move directly to the actor

                MoveTo(FollowTarget.Location, ,FollowDistanceTarget);

            }

            else

            {

                // move to the first node on the path

                if( NavigationHandle.GetNextMoveLocation(TempDest, Pawn.GetCollisionRadius()) )

                {

                    if (!NavigationHandle.SuggestMovePreparation(TempDest,self))

                    {

                        MoveTo(TempDest);

                    }

                }

            }

        }

        else

        {

            //give up because the nav mesh failed to find a path

            `warn("FindNavMeshPath failed to find a path!");

            WorldInfo.Game.Broadcast(self,"FindNavMeshPath failed to find a path!, FollowTarget= " @ FollowTarget);

            MoveTo(Pawn.Location);

        }

    }

    LatentWhatToDoNext();

}
Listing 11–14 shows the MovingToMarker state. This state makes the bot move toward the bot marker, and when the bot marker is directly reachable, it stops the bot when it is within FollowDistanceMarker using Unreal units of distance of the marker.
Listing 11–14. MovingToMarker State
state MovingToMarker

{

    event BeginState( Name PreviousStateName )

    {

        // Put code here that is to only be executed when the state is first entered

    }

    event EndState( Name NextStateName )

    {

        // Put code here that is to be executed only when exiting this state


    }

    Begin:

    WorldInfo.Game.Broadcast(self,"************** IN State MoveToMarker ");

    // Move Bot to Target

    if (MoveToTarget != None)

    {

        if(GeneratePathTo(MoveToTarget))

        {

            NavigationHandle.SetFinalDestination(MoveToTarget.Location);


            if( NavigationHandle.ActorReachable(MoveToTarget) )

            {

                // then move directly to the actor

                MoveTo(MoveToTarget.Location, ,FollowDistanceMarker);

            }

            else

            {

                // move to the first node on the path

                if( NavigationHandle.GetNextMoveLocation(TempDest, Pawn.GetCollisionRadius()) )

                {

                    if (!NavigationHandle.SuggestMovePreparation(TempDest,self))

                    {

                        MoveTo(TempDest);

                    }

                }

            }

        }

        else

        {

            //give up because the nav mesh failed to find a path

            `warn("FindNavMeshPath failed to find a path!");

            WorldInfo.Game.Broadcast(self,"FindNavMeshPath failed to find a path!, MoveToTarget= " @ MoveToTarget);

            MoveTo(Pawn.Location);

        }

    }

    LatentWhatToDoNext();

}
The AttackingEnemy state shown in Listing 11–15 makes this bot move toward the enemy pawn and attack it. When the enemy bot is directly reachable, it stops the bot when it is within AttackOffsetDist Unreal units of distance of the enemy.
Listing 11–15. AttackingEnemy State
state AttackingEnemy

{

    event BeginState( Name PreviousStateName )

    {

        // Put code here that is to only be executed when the state is first entered

        Pawn.StartFire(0);

        bAttackDone = false;

    }

    event EndState( Name NextStateName )

    {

        // Put code here that is to be executed only when exiting this state

        Pawn.StopFire(0);

    }


    Begin:

    WorldInfo.Game.Broadcast(self,"############# In State AttackingEnemy");


    if (AttackTarget != None)

    {

        if(GeneratePathTo(AttackTarget))

        {

            NavigationHandle.SetFinalDestination(AttackTarget.Location);


            if( NavigationHandle.ActorReachable(AttackTarget) )

            {

                // then move directly to the actor

                MoveTo(AttackTarget.Location, AttackTarget, AttackOffsetDist);

                Sleep(AttackDuration);

                bAttackDone = true;

            }

            else

            {

                // move to the first node on the path

                if( NavigationHandle.GetNextMoveLocation(TempDest, Pawn.GetCollisionRadius()) )

                {

                    if (!NavigationHandle.SuggestMovePreparation(TempDest,self))

                    {

                        MoveTo(TempDest, AttackTarget);

                    }

                }

            }

        }

        else

        {

            //give up because the nav mesh failed to find a path

            WorldInfo.Game.Broadcast(self,"FindNavMeshPath failed to find a path!,AttackTarget = " @ AttackTarget);
            MoveTo(Pawn.Location);

        }

    }


    LatentWhatToDoNext();

}
Next is the code in Listing 11–16 that provides support to the bot's AI and originally appeared in Chapter 5.
Listing 11–16. AI Support Code
auto state Initial

{

    Begin:


    LatentWhatToDoNext();

}

event WhatToDoNext()

{

    DecisionComponent.bTriggered = true;

}
The final piece of code for this class is shown in Listing 11–17 and contains the ExecuteWhatToDoNext() function and default properties. The ExecuteWhatToDoNext() function processes the player's commands and executes them through state transitions.
Listing 11–17. ExecuteWhatToDoNext
protected event ExecuteWhatToDoNext()

{

    if (IsInState('Initial'))

    {

        GotoState('FollowingTarget', 'Begin'),

    }

    else

    if (Command == Follow)

    {

        GotoState('FollowingTarget', 'Begin'),

    }

    else

    if (Command == Move)

    {

        GotoState('MovingToMarker', 'Begin'),

    }

    else

    if (Command == Attack)

    {

        if (!bAttackDone)

        {

            GotoState('AttackingEnemy', 'Begin'),

        }

        else

        {

            Command = Follow;

            GotoState('FollowingTarget', 'Begin'),
        }

    }

}

defaultproperties

{

    FollowDistanceTarget = 250

    FollowDistanceMarker = 75

    AttackOffsetDist = 500

    bAttackDone = false

    AttackDuration = 2;

}
FRAMEWORK NOTE: This bot controller class can be easily modified by adding in additional types of commands and processing them in the ExecuteWhatToDoNext() function. For example, you can add in the command Heal to the list of enumerations in BotCommand. You would add in a new state called HealingTarget that would move the bot to the target Actor you wanted to heal and then perform the healing. The new command would be tested for in the ExecuteWhatToDoNext() function and if true the bot's state would go to the HealingTarget state.
Creating the BotMarker
Next, we create the class for the bot marker that denotes the location the player wants the bot to move to in the game world (see Listing 11–18). The Tick() function rotates the marker continuously. The StaticMesh variable defines the actual 3d mesh graphic used for the bot marker. The Scale3D variable resizes the marker to twice its normal size.
Listing 11–18. BotMarker class
class BotMarker2 extends Actor;


event Touch(Actor Other, PrimitiveComponent OtherComp, vector HitLocation, vector HitNormal)

{

    //WorldInfo.Game.Broadcast(self,"BotMarker Has Been Touched");

}

function Tick(FLOAT DeltaTime)

{

    local Rotator TempRot;

    TempRot = Rotation;

    TempRot.yaw = Rotation.yaw + (15000 * DeltaTime);

    SetRotation(TempRot);

}

defaultproperties

{

    Begin Object Class=StaticMeshComponent Name=StaticMeshComponent0

        StaticMesh=StaticMesh'CastleEffects.TouchToMoveArrow'

        Scale3D=(X=2.0000,Y=2.0000,Z=2.000)

    End Object

    Components.Add(StaticMeshComponent0)

}
Creating the Enemy Guard Bot Controller
Next, we need to create the controller class for the enemy bot that guards the power generator.
After the guard bot is created it automatically tries to find an unguarded generator to guard. If an unguarded power generator is found then the bot goes into the Guarding state and guards the structure. While guarding the power generator if a threat occurs, the bot goes to the Attacking state and attacks the threat to the power generator. The bot will move toward the threat and attack it but if the bot is out of its patrol range then it will go back to the generator and go back into the Guarding state. The ExecuteWhatToDoNext() function is the key entry point to this AI behavior.
The first piece of code for this class is in Listing 11–19 and covers the class variables and navigation mesh pathfinding. Key things to notice:
- GuardedStructure references the asset that this enemy guard is protecting.
Threatholds a reference to an Actor that has attacked the power generator this bot is guarding.- The GeneratePathTo() function does the actual navigation mesh pathfinding and is the same function as in the hands-on examples presented in Chapter 5.
Listing 11–19. Mesh Navigation
class BotControllerGuard extends UDKBot;


var Actor CurrentGoal;

var Vector TempDest;

var Actor TempGoal;

var float GuardDistance;

var float AttackDistance;

var float GuardRadius;

var Actor GuardedStructure;

var Pawn Threat;


///////////////// Navigation Mesh Related Functions  /////////////////

event bool GeneratePathTo(Actor Goal, optional float WithinDistance, optional bool bAllowPartialPath)

{

    if( NavigationHandle == None )

    return FALSE;


    // Clear cache and constraints (ignore recycling for the moment)

    NavigationHandle.PathConstraintList = none;

    NavigationHandle.PathGoalList = none;

    class'NavMeshPath_Toward'.static.TowardGoal( NavigationHandle, Goal );

    class'NavMeshGoal_At'.static.AtActor( NavigationHandle, Goal, WithinDistance, bAllowPartialPath );

    return NavigationHandle.FindPath();

}
Next consider Listing 11–20, which involves functions related to guarding the power generator:
- The
FindUnguardedGenerator()function finds a generator that has no enemy bot guarding it and returns a reference to it if one is found. - The
Guardingstate moves the bot to the structure that it is going to guard against attack. - The
IsInPatrolRange()function returns true if the distance the bot is from the guarded structure is equal to or less than theGuardRadius. Otherwise a value of false is returned.
Listing 11–20. Guarding Related Functions
function Actor FindUnguardedGenerator()

{

    local Generator TempGenerator;

    local Actor ReturnGenerator;

    ReturnGenerator = None;

    foreach AllActors(class'Generator', TempGenerator)

    {

        if(TempGenerator.Guard == None)

        {

            ReturnGenerator = TempGenerator;

        }

    }

    return ReturnGenerator;

}

state Guarding

{

    event BeginState( Name PreviousStateName )

    {

        // Put code here that is to only be executed when the state is first entered

        CurrentGoal = GuardedStructure;

        Threat = None;

    }

    event EndState( Name NextStateName )

    {

        // Put code here that is to be executed only when exiting this state

    }


    Begin:

    // Move Bot to Target

    if (CurrentGoal != None)

    {

        if(GeneratePathTo(CurrentGoal))

        {

            NavigationHandle.SetFinalDestination(CurrentGoal.Location);


            if( NavigationHandle.ActorReachable(CurrentGoal) )

            {

                // then move directly to the actor

                MoveTo(CurrentGoal.Location,CurrentGoal,GuardDistance);
            }

            else

            {

                // move to the first node on the path

                if( NavigationHandle.GetNextMoveLocation(TempDest, Pawn.GetCollisionRadius()) )

                {

                    if (!NavigationHandle.SuggestMovePreparation(TempDest,self))

                    {

                        MoveTo(TempDest);


                    }

                }

            }

        }

        else

        {

            //give up because the nav mesh failed to find a path

            `warn("FindNavMeshPath failed to find a path!");

            WorldInfo.Game.Broadcast(self,"GUARDING - FindNavMeshPath failed to find a path!, CurrentGoal = " @ CurrentGoal);

            MoveTo(Pawn.Location);

        }

    }

    LatentWhatToDoNext();

}

function bool IsInPatrolRange()

{

    local bool retval;

    local float Distance;

    Distance = VSize(Pawn.Location - GuardedStructure.Location);

    if (Distance <= GuardRadius)

    {

        retval = true;

    }

    else

    {

        retval = false;

    }

    return retval;

}
Now, Listing 11–21 shows the Attacking state, in which the bot moves toward the Threat and begins firing its weapon. If the bot is out of the patrol range, that is IsInPatrolRange() returns false, then the attack is finished and the bot returns to the Guarding state.
Listing 11–21. Attacking State
state Attacking

{

   event BeginState( Name PreviousStateName )

    {

        // Put code here that is to only be executed when the state is first entered

        CurrentGoal = Threat;

        Pawn.StartFire(0);

    }

    event EndState( Name NextStateName )

    {

        // Put code here that is to be executed only when exiting this state

        Pawn.StopFire(0);

    }

    Begin:

    // Move Bot to Target

    if (CurrentGoal != None)

    {

        if(GeneratePathTo(CurrentGoal))

        {

            NavigationHandle.SetFinalDestination(CurrentGoal.Location);


            if( NavigationHandle.ActorReachable(CurrentGoal) )

            {

                // then move directly to the actor

                MoveTo(CurrentGoal.Location,CurrentGoal,

                       AttackDistance);

            }

            else

            {

                // move to the first node on the path

                if( NavigationHandle.GetNextMoveLocation(TempDest, Pawn.GetCollisionRadius()) )

                {

                    if (!NavigationHandle.SuggestMovePreparation(TempDest,self))

                    {

                        MoveTo(TempDest);


                    }

                }

            }

        }

        else

        {

            //give up because the nav mesh failed to find a path

            `warn("FindNavMeshPath failed to find a path!");

            WorldInfo.Game.Broadcast(self,"GUARDING - FindNavMeshPath failed to find a path!, CurrentGoal = " @ CurrentGoal);

            MoveTo(Pawn.Location);

        }

    }

    if (!IsInPatrolRange())

    {

         GotoState('Guarding', 'Begin'),
    }


    LatentWhatToDoNext();

}
Listing 11–22 involves functions that support the AI of the bot and were previously shown in Chapter 5.
Listing 11–22. AI Support Functions
auto state Initial

{

    Begin:

    LatentWhatToDoNext();

}

event WhatToDoNext()

{

    DecisionComponent.bTriggered = true;

}
Next is the ExecuteWhatToDoNext() function (see Listing 11–23), which is the main entry point for user defined AI and is a good place for testing to see if the bot needs to transition to a new state. The default properties for this class are also shown.
Listing 11–23. The ExecuteWhatToDoNext() function
protected event ExecuteWhatToDoNext()

{

    local Actor TempGenerator;

    if (IsInState('Initial'))

    {

        TempGenerator = FindUnguardedGenerator();

        if (TempGenerator != None)

        {

            Generator(TempGenerator).Guard = Pawn;

            GuardedStructure = TempGenerator;

            GotoState('Guarding', 'Begin'),

        }

        else

        {

            GotoState('Inital', 'Begin'),

        }

    }

    else

    if (IsInState('Guarding'))

    {

        if (Threat != None)

        {

            GotoState('Attacking', 'Begin'),

        }

        else

        {

            GotoState('Guarding', 'Begin'),

        }

    }

    else
    if (IsInState('Attacking'))

    {

       GotoState('Attacking', 'Begin'),

    }

}

defaultproperties

{

    CurrentGoal = None

    GuardDistance = 300

    AttackDistance = 500

    Threat = None

    GuardRadius = 1000;

}
Creating Enemy Guard Bot Pawn
Next, we need to create the pawn class for the enemy guard. Listing 11–24 shows the code.
Listing 11–24. GuardPawn class
class GuardPawn extends BotPawnCh10;


event TakeDamage(int Damage, Controller InstigatedBy, vector HitLocation, vector Momentum, class<DamageType> DamageType, optional TraceHitInfo HitInfo, optional Actor DamageCauser)

{

    PlaySound(HurtSound);

    Health = Health - Damage;

    if (Health <= 0)

    {

        PlaySound(DeathSound);

        destroy();

    }

    BotControllerGuard(Controller).Threat = InstigatedBy.Pawn;

}

defaultproperties

{

    Health = 500;

}
The most important feature in this new pawn class is that the guard's Threat variable located in the bot's controller class will be set to the pawn that causes the guard damage.
Creating the Heads Up Display
Next, we need to create the class for our custom Heads Up Display, shown in Listing 11–25. This HUD will display the power generator's health, the player-controlled ally bot's health and the player's health. Key changes to the code from previous versions of the HUD in other chapters are highlighted in bold print.
Key things to notice in the following code listing:
- The
HUDInfostructure holds the data for a text label that will be displayed on the screen. - The
DrawHUDItem()function actually draws the information to the screen for an individual HUD item. - The
DrawHUD()function is the hook where we can draw extra information to the HUD in addition to the standard graphics which include things like the virtual joysticks.DrawHUDItem()is called from this function.
Listing 11–25. Custom HUD
class Ch11HUD extends UDKHud;


struct HUDInfo

{

    var string Label;

    var Vector2D TextLocation;

    var Color TextColor;

    var Vector2D Scale;

};

// HUD

var HUDInfo HUDHealth;

var HUDInfo HUDAllyHealth;

var HUDInfo HUDObjectiveHealth;

var HUDInfo HUDGameOver;


simulated function PostBeginPlay()

{

    Super.PostBeginPlay();

    HUDHealth.Label = "Health:";

    HUDHealth.TextLocation.x = 1100;

    HUDHealth.TextLocation.y = 50;

    HUDHealth.TextColor.R = 0;

    HUDHealth.TextColor.G = 0;

    HUDHealth.TextColor.B = 255;

    HUDHealth.Scale.X = 2;

    HUDHealth.Scale.Y = 4;


    HUDAllyHealth.Label = "AllyHealth:";

    HUDAllyHealth.TextLocation.x = 600;

    HUDAllyHealth.TextLocation.y = 50;

    HUDAllyHealth.TextColor.R = 0;

    HUDAllyHealth.TextColor.G = 255;

    HUDAllyHealth.TextColor.B = 0;

    HUDAllyHealth.Scale.X = 2;

    HUDAllyHealth.Scale.Y = 4;


    HUDGameOver.Label = "Objective Killed";

    HUDGameOver.TextLocation.x = 300;

    HUDGameOver.TextLocation.y = 300;

    HUDGameOver.TextColor.R = 255;

    HUDGameOver.TextColor.G = 0;
    HUDGameOver.TextColor.B = 255;

    HUDGameOver.Scale.X = 7;

    HUDGameOver.Scale.Y = 7;


    HUDObjectiveHealth.Label = "ObjectiveHealth:";

    HUDObjectiveHealth.TextLocation.x = 0;

    HUDObjectiveHealth.TextLocation.y = 50;

    HUDObjectiveHealth.TextColor.R = 255;

    HUDObjectiveHealth.TextColor.G = 0;

    HUDObjectiveHealth.TextColor.B = 0;

    HUDObjectiveHealth.Scale.X = 2;

    HUDObjectiveHealth.Scale.Y = 4;

}

function DrawHUDItem(HUDInfo Info, coerce string Value)

{

    local Vector2D TextSize;

    Canvas.SetDrawColor(Info.TextColor.R, Info.TextColor.G, Info.TextColor.B);

    Canvas.SetPos(Info.TextLocation.X, Info.TextLocation.Y);

    Canvas.DrawText(Info.Label, ,Info.Scale.X,Info.Scale.Y);

    Canvas.TextSize(Info.Label, TextSize.X, TextSize.Y);

    Canvas.SetPos(Info.TextLocation.X + (TextSize.X * Info.Scale.X), Info.TextLocation.Y);

    Canvas.DrawText(Value, , Info.Scale.X, Info.Scale.Y);

}

function DrawHUD()

{

    local int Health;

    super.DrawHUD();

    Canvas.Font = class'Engine'.static.GetLargeFont();

    // Objective Health

DrawHUDItem(HUDObjectiveHealth,ExampleCh11PC(PlayerOwner).ObjectiveHealth);


    // Ally Bot Health

    Health = ExampleCh11PC(PlayerOwner).AllyBot.Pawn.Health;

    DrawHUDItem(HUDAllyHealth, Health);


    // Health

    DrawHUDItem(HUDHealth,PlayerOwner.Pawn.Health);


    // Game Over

    if (ExampleCh11PC(PlayerOwner).bGameOVer)

    {

         DrawHUDItem(HUDGameOver, "");

    }

}

defaultProperties

{

}
The new custom HUD is shown in Figure 11–1.

Figure 11–1. New HUD
Creating the Power Generator
Next, we need to create the class for the power generator that will be the player's objective to destroy. The key code is in the TakeDamage() class which is called by a weapon's projectile when it hits the generator. If the generator is attacked by the player or the player's ally bot then the enemy bot that is guarding the power generator will attack that pawn.
Listing 11–26. Power Generator
class Generator extends Actor

placeable;


var ParticleSystem ExplosionTemplate;

var ParticleSystemComponent Explosion;

var SoundCue HitSound;

var int Health;

var Pawn Guard;

event TakeDamage(int Damage, Controller InstigatedBy, vector HitLocation, vector Momentum, class<DamageType> DamageType, optional TraceHitInfo HitInfo, optional Actor DamageCauser)

{

    PlaySound(HitSound);

    Explosion = WorldInfo.MyEmitterPool.SpawnEmitter(ExplosionTemplate, HitLocation);

    BotControllerGuard(Guard.Controller).Threat = InstigatedBy.Pawn;

    if (InstigatedBy.IsA('ExampleCh11PC'))

    {

        Health = Health - Damage;

    }

}

event Touch(Actor Other, PrimitiveComponent OtherComp, vector HitLocation, vector HitNormal)

{

    WorldInfo.Game.Broadcast(self,"Generator Has Been Touched by " @ Other );

}

defaultproperties

{

    Begin Object Class=StaticMeshComponent Name=StaticMeshComponent0

        StaticMesh=StaticMesh'Pickups.Health_Large.Mesh.S_Pickups_Health_Large_Keg'

        Scale3D=(X=5.0000,Y=5.0000,Z=5.000)

        CollideActors=true

        BlockActors=true

    End Object

    Components.Add(StaticMeshComponent0)


    Begin Object Class=CylinderComponent NAME=CollisionCylinder

        CollideActors=true

        BlockActors=true

        CollisionRadius=+0140.000000

        CollisionHeight=+0140.000000

    End Object

    Components.Add(CollisionCylinder)

    CollisionComponent = CollisionCylinder


    bCollideActors=true

    bBlockActors = true
    HitSound = SoundCue'A_Gameplay.Gameplay.A_Gameplay_ArmorHitCue'

    ExplosionTemplate = ParticleSystem'Castle_Assets.FX.P_FX_Fire_SubUV_01'

    Guard = None;

    Health = 300;

}
The Power Generator is shown in Figure 11–2.
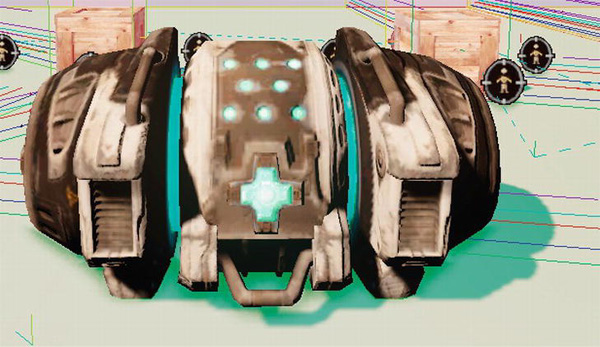
Figure 11–2.Power Generator
Configuring the Game Type
Next, we need to set up this new example for compilation and for playing on the mobile previewer. In the configuration directory located at
C:UDKUDK-2011–06UDKGameConfig
(it will be different if you are using a different UDK version), change the UDKEngine.ini and Mobile-UDKGame.ini configuration files to the following:
UDKEngine.ini

[UnrealEd.EditorEngine]

ModEditPackages=ExampleCh11

Mobile-UDKGame.ini

[ExampleCh11.ExampleCh11Game]

RequiredMobileInputConfigs=(GroupName="UberGroup",RequireZoneNames=("UberStickMoveZone","UberStickLookZone","UberLookZone"))
Save the configuration files. You may need to write protect them to preserve the contents since the UDK sometimes overwrites them.
Bring up the Unreal Frontend and compile the scripts.
Creating the Level
Next, we need to create the level for this game framework.
- Start up the Unreal Editor.
- Load the level you created for Chapter 10, the one with many vendor crates surrounded by cover nodes. (You also can find the level—
ExampleCh10Map.zip—with the source code for this book.) - Save the level as a new level by selecting File
 Save As from the main menu and entering a new filename for the map. You can use whatever filename you wish.
 - Select the Actor Classes tab in the Generic Browser.
- Search for generator in the Actor Classes tab.
- Select the generator class in the Actor Classes tab.
- Right Click on an empty area and select Add Generator Here to add a power generator to the level. Position the generator so that it is just above the ground.
- In the Actor Classes tab search for botspawnpad in the search area. Select the botspawnpad class and right click to place this item in an empty area in the level. Adjust the pad so that it is just touching the ground.The level with the generator and botspawnpad should look something like Figure 11–3.
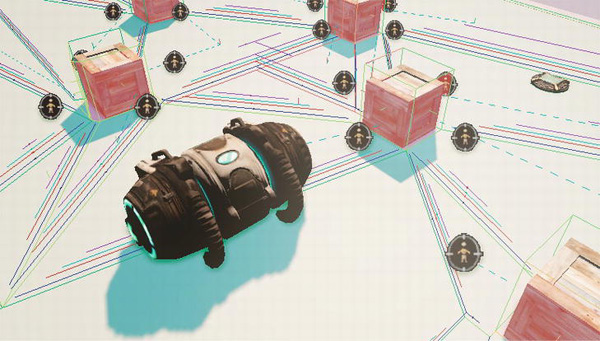
Figure 11–3. The level with generator and one botspawnpad
- Save the level.
Running the Game
Now, we are ready to run our game. Follow these steps:
- Select View World Properties from the Unreal Editor main menu. This would bring up the World Properties window.
- In the World Properties window set the Default Game Type under the Game Type category to ExampleCh11Game.
- Select the Play On Mobile Previewer option to run the game on the mobile previewer form the Editor.
- Once the game is running move your character around the level and your ally bot should follow you around.
- Click on your ally bot to select it as indicated by the orange arrow hovering over the bot and to activate the bot command mode (see Figure 11–4).
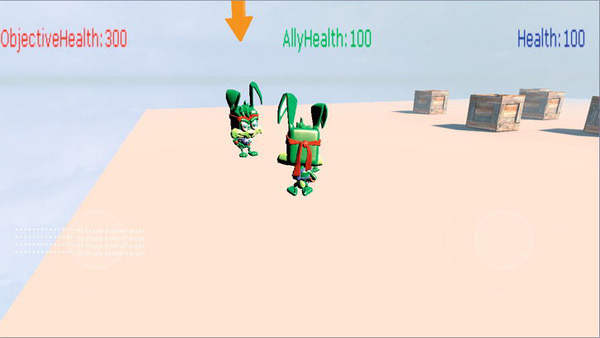
Figure 11–4. Selecting your ally bot
- Next, direct your bot to a position nearer to the enemy guard bot by clicking on an empty area closer to the generator (see Figure 11–5).

Figure 11–5. Direct your bot to move to a location nearer the enemy guard bot
- Next, click on the ally bot again to select it and then click on the enemy guard bot to have your bot attack it. After the attack is finished the ally bot should return to following you.
- Repeat this process until the guard is killed.
- Finally, destroy the power generator by firing your weapon at it until the objective killed message is displayed, as in Figure 11–6.
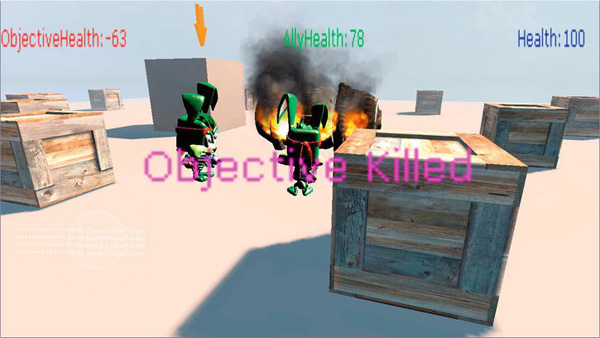
Figure 11–6. Power generator is destroyed.
Summary
In this chapter we covered a game framework that is suitable for a third-person shooter or a third-person shooter / adventure type game where you control other team members that have special abilities and you need to direct them to accomplish specific tasks. We first covered an overview of the game framework discussing features of the framework in both general and code specific terms. Then we created the actual framework. We created new code, discussed how to set up the game to run on the mobile previewer, discussed how to build the level, and finally we gave a walkthrough of this game framework that showed you how to accomplish the goal of destroying the power generator.