
C H A P T E R 4
IIS 7.5
Internet Information Services (IIS) is the web server that’s included with (and integrated into) Windows. As the application that sits between your web site and the operating system, IIS has a big impact on the performance and scalability of your site.
IIS 7 is included with Windows Server 2008 and some editions of Windows Vista. IIS 7.5 adds a few features to IIS 7 (and changes a few default settings), and is included with Windows Server 2008R2 and some editions of Windows 7. IIS Express is a lightweight, self-contained version of IIS 7.5 that supports web development. It’s included with Visual Studio 11, and is available as a free download for use with Visual Studio 2010. With the release of IIS Express, Microsoft has deprecated the previous web development server known as Cassini.
In this chapter, I’ll cover the following:
- Application pools and web gardens.
- The IIS request-processing pipeline.
- Windows System Resource Manager.
- Common HTTP issues.
- Compression.
- HTTP keep-alives.
- Reducing the length of your URLs.
- Managing traffic.
- Failed request tracing.
- Miscellaneous IIS performance tuning.
Application Pools and Web Gardens
When you configure a single web site to run under IIS with default settings, you can see the worker process running in Task Manager as w3wp.exe. However, IIS isn’t limited to running as a single worker process per web site. You can configure it to use multiple worker processes (as a web garden), with each worker process handling requests for one or more web sites. Each group of IIS processes handling requests for the same collection of web sites is called an application pool (or AppPool). A single AppPool is capable of supporting a large number of web sites.
To specify settings for an AppPool, first start IIS Manager. In Windows 7 or Server 2008 or 2008R2, you can type iis in the search box in the Start menu, and select Internet Information Services (IIS) Manager from the results—or you can run it directly with the inetmgr command. In Windows Server 2008 or 2008R2, start Server Manager and select Roles ![]() Web Server (IIS)
Web Server (IIS) ![]() Internet Information Services (IIS) Manager.
Internet Information Services (IIS) Manager.
Open the section for your computer in the Connections pane in IIS Manager, select Application Pools, then select an AppPool in the center panel, and finally click Advanced Settings in the right-hand pane. Available settings include Managed Pipeline Mode (Classic or Integrated), Maximum Worker Processes, CPU Limit, Processor Affinity, and the Windows Identity used to run the process, parameters for health monitoring, Rapid-Fail, and Recycling parameters. See Figure 4-1.
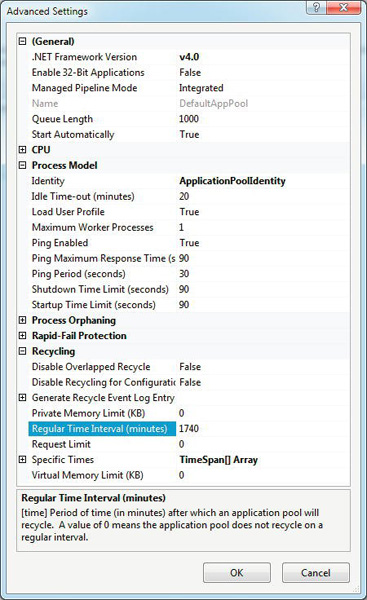
Figure 4-1. IIS application pool Advanced Settings
AppPool Recycling
By default, AppPools are set to recycle every 1,740 minutes (29 hours). When they recycle, the associated IIS worker processes are shut down and restarted in an overlapping manner, so that no HTTP requests are missed. However, all the data stored in memory that your application has modified since the AppPool started, including the cache, static variables, and InProc session state, are lost.
Recycling can help prevent outages due to memory leaks or other resource leaks or due to application bugs that might cause a thread in the AppPool to hang, or to use all available CPU, I/O or network resources. However, it also presents an additional load on your server that can affect performance and throughput.
To avoid unnecessarily disrupting your users, one approach is to schedule recycling at a specific time every day when you know the traffic on your site will be low. Although this usually works well for smaller sites, larger sites should either stagger their recycle times, or configure recycling based on the number of requests processed. In combination with the right load-balancing algorithm, such as one based on the number of connections per server (as opposed to round robin), recycling after a certain number of requests should prevent your servers from recycling at the same time.
Another possibility is to disable recycling. However, I’ve generally found that this is a bad idea, except on sites that are using active monitoring, where you can detect and act on faults in other ways. Even on very large sites, it’s surprisingly common that application bugs will occasionally cause problems that are resolved by restarting the AppPool.
Multiple AppPools
When multiple web sites are sharing a single AppPool, all of the sites are effected when one of them does something to cause a worker process in the AppPool to crash or reset.
If you have web sites (or parts of web sites) with uptime or reliability requirements that are significantly different from one another, you should consider using more than one AppPool. By segregating the applications into separate AppPools, you can help prevent bugs or outages in one web site from causing problems in the other.
For example, let’s say that one part of your site is responsible for processing customer orders and another part allows users to browse your product catalog. The former is critical to business, while the latter is not. To avoid letting outages in the catalog part of the site also bring down the order-processing part, you could separate the two applications into different AppPools.
Since switching contexts is faster between threads than between processes, there is a performance cost to using more worker processes. I generally recommend no more than one or two per CPU core to help minimize context-switch overhead. For example, a server with a single quad-core CPU should usually have no more than about four to eight worker processes.
Web Gardens
Web gardens can help mitigate the risk of a worker process failure by having more than one worker process handle requests for the same web sites. However, all application-specific memory is duplicated in each worker process, including user-mode output caches and static data. Therefore, I don’t recommend using web gardens except in those special cases where reliability is critical and your site is running from a single web server, rather than in the usual load-balanced configuration used by larger sites. With enough RAM, web gardens can provide a basic level of redundancy; if one worker process crashes, another will be available to handle requests.
Another scenario where web gardens can be useful is if you’re running on a single server but planning to move up to a multiserver load-balanced environment later. In the interim, you can use a web garden to help debug any issues that you might have with a load-balanced architecture, such as cache and state management.
You establish a web garden by setting Maximum Worker Processes in AppPool Advanced Settings to a value greater than one. The http.sys driver distributes incoming connectionsfrom one worker process to another in a round-robin fashion. When you have HTTP keep-alives enabled (which is the default), a single connection can handle multiple HTTP requests. This means, for example, that if you refresh your browser, those requests are likely to use the same connection, and therefore, the same worker process. For testing purposes, you may want to disable keep-alives in IIS temporarily. To test with keep-alives enabled, you may want to use a multi-threaded load generation tool.
Request-Processing Pipeline
IIS has two request-processing pipeline modes: Integrated and Classic. Integrated mode allows both native code and managed code to run in response to events as HTTP requests move through the pipeline. In Classic mode, only native code (C++) can process IIS events. I recommend using Integrated mode (which is the default), since it allows you to use .NET code to handle events that aren’t associated with the ASP.NET handler, such as images and other static files.
Each HTTP request that IIS receives goes through a sequence of states. In Integrated mode, managed HttpModules can register event handlers before, during, or after most state transitions. Figure 4-2 shows the sequence of events using plus signs before or after the event names to indicate where you can register pre- and post-event handlers. The Execute Handler box has rounded corners to show that it isn’t an event itself, and the plus signs show that the Framework fires events before and after it calls the handler.

Figure 4-2. IIS request-processing pipeline
![]() Note
Note HttpModules are just organized collections of event handlers for IIS state transitions. IIS invokes the event handlers in all HttpModules that have registered for a particular event before moving to the next state.
Before beginning the request pipeline, the Framework creates an instance of the HostingEnvironment class, which provides information about the application, such as the name of the folder where it’s stored. ASP.NET starts the application by creating an instance of the HttpApplication class in Global.asax. For each request, the Framework also creates instances of the HttpContext, HttpRequest, and HttpResponse classes.
After the initial conditions are established, deterministic states progress from the top of Figure 4-2 to the bottom. There are also three nondeterministic states, which can happen at various times in the pipeline. The Error state, for example, can happen at any time or may not happen at all. Headers and content can be sent early in the pipeline such as after retrieving them from cache, or later, after the End Request event.
Examples of the functions implemented by standard HttpModules include authenticating forms, authorization, profile support, role management, session state, and logging.
The request handlers called from the pipeline are responsible for retrieving the resource that’s associated with a particular URL. Handlers are mapped to specific file extensions. For example, the ASP.NET handler is associated with .aspx files.
You can have ASP.NET process additional file extensions other than .aspx by adding them to the Handler Mappings section of IIS Manager. You might want to do this when you’re migrating to ASP.NET from another technology so that you can maintain your existing search engine entries and links from other sites without redirects. For example, you could turn your static .htm pages into dynamic pages this way, including support for code-behind, ASP.NET directives, and so on. You can use the same technique to generate .css or .js files dynamically (you may also need to configure a buildProvider in web.config).
Similarly, if you wanted to support another dynamic page-generation technology such as PHP or Perl, you would do so by adding an appropriate handler and mapping it to the desired file extension.
Windows System Resource Manager
Windows System Resource Manager (WSRM) is a feature that comes standard with Windows Server 2008 that allows you to reserve a minimum amount of CPU or memory for different groups of processes. It is a server-only feature, so it’s not available for client versions of operating systems, such as Windows 7.
Let’s walk through an example. Start by creating two AppPools, one for an online catalog and another for purchase transactions. Call the first one Catalog and the second one Trans.
Under normal (unmanaged) conditions, let’s say that you’ve measured CPU use by Catalog to be 50 percent, Trans is 10 percent, and the operating system uses an additional 10 percent for things such as network processing and kernel mode caching.
You can use WSRM to protect against bugs or load spikes in one application impairing the performance of the other. In this example, I will show how to use it to ensure that Catalog gets at least 65 percent of the CPU if it needs it, Trans gets 20 percent, and everything else gets 15 percent, including the operating system.
To do that, first add the WSRM feature from Server Manager and start the WSRM service. Then start the WSRM console by selecting Start ![]() Administrative Tools
Administrative Tools ![]() Windows System Resource Manager. When the Connect to Computer dialog box comes up, select This Computer, and click Connect.
Windows System Resource Manager. When the Connect to Computer dialog box comes up, select This Computer, and click Connect.
To configure WSRM, the first step is to tell the software how to identify the processes that you want it to manage. Right-click Process Matching Criteria in the left panel, and select New Process Matching Criteria. In the dialog box that comes up, click Add. The next dialog box that opens is where you define the files or command lines that will be included in this rule. Select IIS App-Pool in the option box, and click Select. In the dialog box that comes up, select the Catalog AppPool, and click OK. See Figure 4-3.

Figure 4-3. Add Rule dialog box in Windows System Resource Manager
Click OK to dismiss the dialog box. In the New Process Matching Criteria dialog box, give the criteria a name. Let’s call it CatalogAppPool (spaces aren’t allowed). See Figure 4-4.
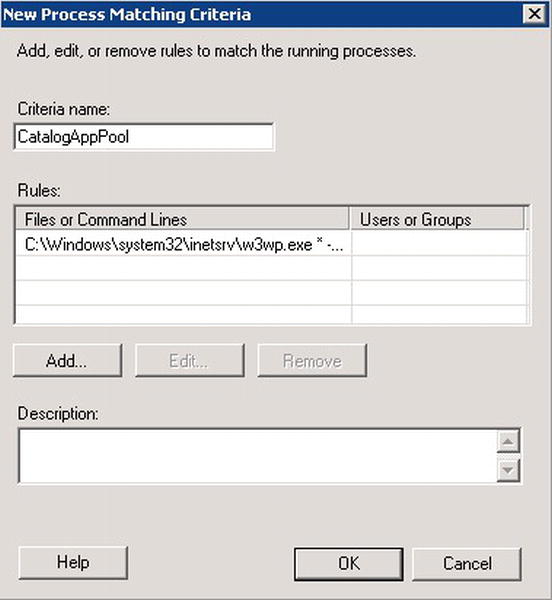
Figure 4-4. New Process Matching Criteria dialog box in Windows System Resource Manager
Click OK to dismiss the dialog box and complete the definition of the first process matching criteria.
Repeat the process for the other AppPool. Call the second criteria TransAppPool.
Next, right-click Resource Allocation Policies, and select New Resource Allocation Policy. In the dialog box that comes up, click Add. In the next dialog box, in the Process matching criteria option box, select CatalogAppPool, and set the Percentage of processor allocated for this resource to 65, as in Figure 4-5.
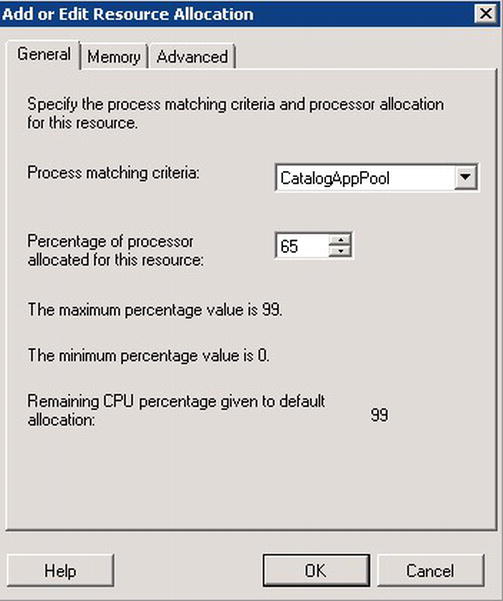
Figure 4-5. Add or Edit Resource Allocation dialog box in Windows System Resource Manager
That defines the minimum CPU time that will be available to this AppPool. Click OK to dismiss the dialog box.
Repeat the process to add TransAppPool to the policy, giving it a 20 percent allocation. Give the policy a name, such as CatalogTrans. See Figure 4-6.
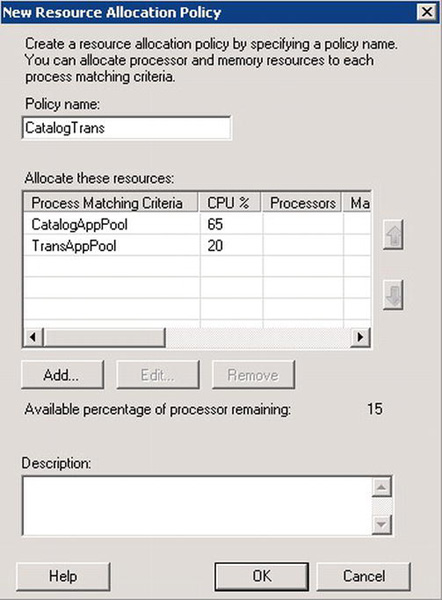
Figure 4-6. New Resource Allocation Policy dialog box in Windows System Resource Manager
Notice that Available percentage of processor remaining is 15 percent. This is the residual allocation that will be available for the OS and other processes. Click OK to dismiss the dialog box and create the policy.
To activate the policy, first right-click it in the left panel and select Set as Managing Policy. Then right-click Windows System Resource Manager (Local) at the top of the left panel and select Start Windows System Resource Manager management.
When enforcing CPU limitations, WSRM doesn’t become active until aggregate total CPU use exceeds 70 percent. Applications can use more than their allocated share of the CPU until another managed application needs its share. At that point, WSRM lowers the priority of the application that’s using more than its allocated share, which will decrease its CPU use.
For example, let’s say that Catalog needs 80 percent of the CPU (vs. 65 percent allocated), Trans needs 5 percent (vs. 20 percent allocated), and the OS needs 10 percent (vs. 15 percent allocated), which is 95 percent altogether. WSRM will not adjust CPU usage or process priorities, because none of the managed process groups is limited within its specified minimums and because free CPU cycles are still available. However, if the load on Trans increases to where it could use 15 percent, then WSRM will lower the priority of Catalog so that it uses only 75 percent.
Another way of looking at this is that available CPU cycles aren’t wasted. If one of the managed processes can use the CPU without limiting the cycles available to another managed process to something below its minimum allocation, then WSRM will allow that to happen. This allows more efficient sharing of hardware resources.
That behavior leads to a different way of using WSRM than described in the example. Instead of reserving minimum CPU use to a value somewhat above average use, you could make sure that a high-priority AppPool can always get as much of the CPU as it needs to cover loads during peak periods. Extending the earlier example, you might allocate 80 percent to Trans, 10 percent to Catalog, and 10 percent to residual. Average use as described earlier would be unimpaired. The difference is that if there were a load spike on Trans, it would be allowed to use 80 percent of the CPU, at the expense of the Catalog application.
In most environments, WSRM can reduce the need to segregate applications onto dedicated hardware so that they don’t interfere with one another. It also provides better control than using multiple virtual machines on a single physical host. Segregating business-critical applications from other apps, particularly when the other apps change frequently or are much less stable, is a sound architectural principle. However, placing them on separate machines or VMs for that reason alone often introduces another set of problems related to operations, deployment, monitoring, capacity planning, and so on.
WSRM has several other features, including the ability to manage memory use, binding processes to certain processors, matching processes by the user or group that starts them, and switching to different policies at certain times. I suggest managing by CPU use instead of memory use whenever possible, since restricting memory use can have unexpected side effects, including increased disk activity (paging). The other features tend to be most useful in environments with a large number of AppPools or ones that are running applications other than just IIS.
Common HTTP Issues
As sites grow and evolve, file and folder names change regularly. One side effect is inadvertent HTTP 404 Not Found errors. Since errors can have a negative impact on both performance and site functionality, it’s important to establish a process to identify these errors when they appear. One way is to analyze your IIS log files regularly using a tool like Log Parser.
You can download Log Parser from this location:
Here’s an example that uses Log Parser to find the 404 Not Found errors in all the logs for my primary site and to display how many times the error has happened, along with the URL:
C:>logparser "select count(*) as Times, cs-uri-stem as URL

from <1>

wheresc-status = 404

group by cs-uri-stem

order by Times desc"


Times  URL

------ ------------------------------------

157807 /pages/defaultx.aspx

42     /static/myimage.jpg
The <1> in the query tells Log Parser to find the site with an ID of 1 (usually the default site) and to locate and process all of its logs, even if they are spread among multiple files. You can find the ID for your site either in the site’s Advanced Settings dialog box in IIS Manager or in the applicationHost.config file. Log Parser also supports several other ways of selecting a site, or you can point it to a specific file that contains the log data.
Log Parser uses a SQL-like query language to specify commands that parse, summarize, or transform a wide variety of source data, including Active Directory objects, binary IIS logs, CSV files, the Windows event log, file and directory structures, the http.sys log, Netmon capture files, registry values, XML files, and others. The documentation included in the download describes the syntax in detail. In addition to text output, it can also generate bar charts as images, or insert results into other data stores, such as SQL Server. It’s a powerful and flexible tool, and I recommend it highly.
![]() Caution Be sure not to enable custom logging in IIS, since that disables kernel-mode caching (
Caution Be sure not to enable custom logging in IIS, since that disables kernel-mode caching (http.sys).
You can use Log Parser to obtain useful performance-related information from your IIS logs, including:
- How many requests are coming from search engines (based on the User-Agent string and the number of requests for
robots.txt). - The URLs referenced most often by your users or by search engines.
- The URLs responsible for consuming the most bandwidth (total size).
- How many HTTP errors are produced, and by which URLs.
- The minimum and maximum average response time.
- How much traffic you are handling from leeched content (images or other files hosted on your site, but referenced by other sites).
- The number of requests per IP address (abnormally high counts can be from masked search engines or other bots).
- The most frequent referring URLs, either from your site or from other sites.
Processing logs manually is increasingly time-consuming and prone to error on multi-server sites, since the log files have to be collected from each server. For .aspx pages and other dynamic content, you can simplify the process by logging both HTTP requests and errors in a central database, ideally using a background thread to minimize the performance impact. It is much easier to perform trend analyses and detect potential problems early using the data in SQL Server.
It is usually best to handle HTTP errors related to images and other static content by automated multiserver monitoring, rather than directly in your application. Chapter 10 will cover this approach in more detail.
HTTP Redirects
If you request a URL that refers to a folder and the URL doesn’t end in a slash, IIS will automatically issue a redirect to the same URL, with a slash added at the end.
For example, the following URL (without the trailing slash):
http://www.12titans.net/samples
will be redirected to this (with the trailing slash):
http://www.12titans.net/samples/
Here’s what the HTTP response looks like:
HTTP/1.1 302 Found

Cache-Control: private

Content-Type: text/html; charset=utf-8

Location: /samples/

X-Powered-By: ASP.NET

Server: Microsoft-IIS/7.5

X-AspNet-Version: 4.0.30319

Date: Mon, 12 Dec 2011 11:52:23 GMT


<html><head><title>Object moved</title></head>

<body><h2>Object moved to

<a href="%2fsamples%2f">here</a>.

</h2></body></html>
IIS will obtain the content for a folder-based URL from one of the configured default files. For example, with the previous URL, the content might come from this location:
http://www.12titans.net/samples/default.aspx
This means there are three equivalent URLs for default pages. In order to avoid “hidden” redirects like these, it’s important to use consistent URLs to reference default pages. The browser will also treat all three URLs as distinctly different, from a caching perspective. After experiencing a redirect on the first URL in the previous example, if a user later clicks a link that references the third version, they could end up with two copies of the page in their browser cache.
Consistently using full, explicit URLs on your site is the best solution because it helps minimize the chances of duplicate caching on clients and proxies. In addition, http.sys won’t cache “implied default” URLs like the first two shown earlier.
Notice that the redirect response in the previous example includes some HTML. The same is true for error responses such as a 404 Not Found. Even when the requested object is an image, the server will still return HTML-formatted error text. The text is there for human readability, but people rarely see redirect responses, since the browser should immediately reissue the request. People sometimes see HTTP error pages, although usually they don’t since browsers tend to display their own error pages instead.
For those reasons, it is advisable to use custom error pages and to keep the error text very short. Custom error pages that users are unlikely to see should be implemented with “plain” HTML and should not reference any images or external JavaScript or CSS files to avoid possible circular errors (such as if the image on a 404 Not Found error page also can’t be found).
Custom error pages that you use in association with the Application_Error event or with Web Events usually don’t need to be as restrictive. Although simplicity is still a good idea, you might use .aspx pages in some cases. Just be sure that your error pages can’t generate the same type of errors that you are using them for.
Since redirects require an additional server round-trip, you should avoid using them for your regular content. The most appropriate use of redirects is to manage situations where you would like to provide a way for old or archived pages to find content that you have recently moved or renamed. However, those redirects should be permanent, not temporary. Browsers can cache redirects if they’re permanent, but not if they’re temporary.
I’ll cover some additional techniques in Chapter 5 for programmatically minimizing redirects for dynamic content, using ASP.NET.
HTTP Headers
As you saw earlier in the HTTP response for redirects, IIS and ASP.NET insert a few “informational” HTTP headers that are useful mostly for third-party statistical purposes. You can easily see them with a tool like the Fiddler proxy. They have no impact on either the browser or the web server, other than to add extra traffic to every request, so it’s a good idea to remove them.
The issue with these headers is not that they are performance killers. Rather, their elimination is in keeping with the ultra-fast philosophy as explained earlier: every little bit helps, and lots of little bits in the right places add up quickly. HTTP headers, for example, can have an impact on every response generated by the server.
There is a minor side issue here relating to site security. There is a chance that a hacker might choose to target sites based on which operating system or web server the sites are using. Although there are many techniques a hacker might use to figure that out, there’s no reason you need to make it easy for them by advertising your web server type and .NET version number in every HTTP response you generate.
Removing the headers doesn’t do anything to enhance the security of your site, but it does reduce the risk that a hacker will use the headers to identify and target your site in the event that a specific IIS or .NET security vulnerability is identified. Like performance and scalability, many small security improvements add up - every little bit helps.
![]() Tip I recommend regularly looking at the HTTP responses generated by your site using a web proxy tool like Fiddler. That can help identify HTTP errors, unexpected HTTP headers, hidden redirects, and the like; it can be a very enlightening experience.
Tip I recommend regularly looking at the HTTP responses generated by your site using a web proxy tool like Fiddler. That can help identify HTTP errors, unexpected HTTP headers, hidden redirects, and the like; it can be a very enlightening experience.
Removing the X-Powered-By Header
To remove the X-Powered-By header, first double-click HTTP Response Headers in IIS Manager. Then click the header, and select Remove on the right side, as in Figure 4-7.
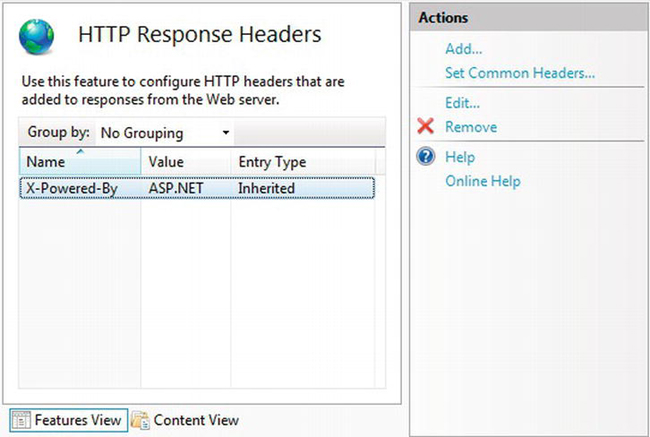
Figure 4-7. Removing informational HTTP headers using IIS Manager
Since the header type is Inherited, you can remove it either on a per-site basis (as shown in Figure 4-7) or for all web sites on your server by selecting the top-level machine node in IIS Manager before opening the HTTP Response Headers panel.
Removing the Server Header
The next informational header in the example response shown earlier is Server. Unfortunately, you can’t remove it with a configuration setting in IIS Manager. Here’s some example code for a custom HttpModule that will do the job (see App_CodeHttpHeaderCleanup.cs):
using System;

using System.Web;


namespace Samples

{

    public class HttpHeaderCleanup : IHttpModule

    {

        public void Init(HttpApplication context)

        {

            context.PreSendRequestHeaders += OnPreSendRequestHeaders;

        }


        voidOnPreSendRequestHeaders(object sender, EventArgs e)

        {
            HttpResponse response = HttpContext.Current.Response;

            response.Headers.Remove("Server");

        }


        public void Dispose()

        {

        }

    }

}
The code registers an event handler for the PreSendRequestHeaders event. When the event fires, the handler removes the Server header from the outgoing Response.
Next, register the HttpModule in web.config:
<system.webServer>

<modules>

    . . .

    <add name="HttpHeaderCleanup" type="Samples.HttpHeaderCleanup" />

</modules>

</system.webServer>
For this to work, be sure the application pool is configured in Integrated mode (which is the default). Setting it up this way will cause the HttpModule to run for both static and dynamic content.
Removing the ETag Header
IIS generates ETag headers for static content. For example, after cleaning up the headers as described earlier, the HTTP response for an image might look something like this:
HTTP/1.1 200 OK

Cache-Control: max-age=31536000, public

Content-Type: image/png

Last-Modified: Mon, 16 Jun 2008 10:17:50 GMT

Accept-Ranges: bytes

ETag: "f0f013b9acfc81:0"

Date: Tue, 17 Feb 2009 01:26:21 GMT

Content-Length: 4940
The idea behind the ETag header is that if the content expires, the browser can use an HTTP If-Modified-Since request to ask the server to send a new copy only if it has changed since it was first retrieved. For example:
If-Modified-Since: Mon, 16 Jun 2008 10:17:50 GMT

If-None-Match: "f0f013b9acfc81:0"
Although the concept sounds good in principle, with far-future expiration times, the If-Modified-Since call may never happen; the basic HTTP responses will vastly outnumber the potential If-Modified-Since calls. In addition, the round-trip to make such a call takes almost as long as retrieving small static objects, so you save very little time unless the objects are large or resource-intensive to generate on the server side. Unless you have a specific application for them, you should disable ETags, since this will reduce the size of all of your static file response headers.
Unfortunately, as with the Server header, IIS doesn’t provide a configuration setting to disable ETags. Luckily, you can handle them in the same way by adding the following code to the end of OnPreServerRequestHeaders() from the example above:
response.Headers.Remove("ETag");
Removing the X-Aspnet-Version Header
You can remove the X-Aspnet-Version header from the HTTP response for ASP.NET pages by setting the enableVersionHeader property to false in the <httpRuntime> tag in web.config:
<configuration>

    ...

<system.web>

    <httpRuntimeenableVersionHeader="false" />

    ...

</system.web>
Using HTTP 1.1 Headers
Modern browsers now universally support HTTP 1.1, so in most environments there is no longer any need to support HTTP 1.0 explicitly. The only HTTP 1.0 clients you’re likely to encounter are old bots or old proxies.
If you explicitly need to add your own headers for some reason, you should use the ones from HTTP 1.1, rather than their HTTP 1.0 equivalents. In particular, Cache-Control: max-age should be used instead of Expires, and Cache-Control: no-cache should be used instead of a “back-dated” Expires header or Pragma: no-cache. There should never be a need to use either Expires or Pragma.
Compression
Compression of text files, including HTML, CSS, and JavaScript, can often reduce file sizes by 60 percent or more. This has several advantages:
- Server network bandwidth is reduced.
- The content is received by the client more quickly (reduced latency).
- For content that the runtime doesn’t have to recompress for every request, servers can deliver more requests per second when it is compressed.
There are also a couple of disadvantages:
- It takes server CPU resources to compress the file the first time.
- Additional server disk space and RAM are required.
Note that Cassini, the development web server included with some versions of Visual Studio, does not support compression. With the release of Visual Studio 11, Microsoft has deprecated Cassini, so you should use IIS Express instead, which does support compression. Alternatively, for development on Windows 7 or Windows Server 2008, you can easily configure IIS to run your site instead of Cassini or IIS Express, and set the startup URL in Visual Studio accordingly. When you’re developing multiple web sites on the same machine, you can either use different port numbers on localhost for each site, or create several aliases for 127.0.0.1 in your hosts file.
Enabling Compression
Before enabling compression, first install the dynamic compression role service for IIS, if you haven’t already, from Server Manager on Windows Server or from Turn Windows features on or off in the Programs and Features control panel on Windows 7. Next, configure basic settings at the machine level by selecting your computer (the top-level node) in the Connections pane in IIS Manager and then double-clicking the Compression feature. See Figure 4-8.
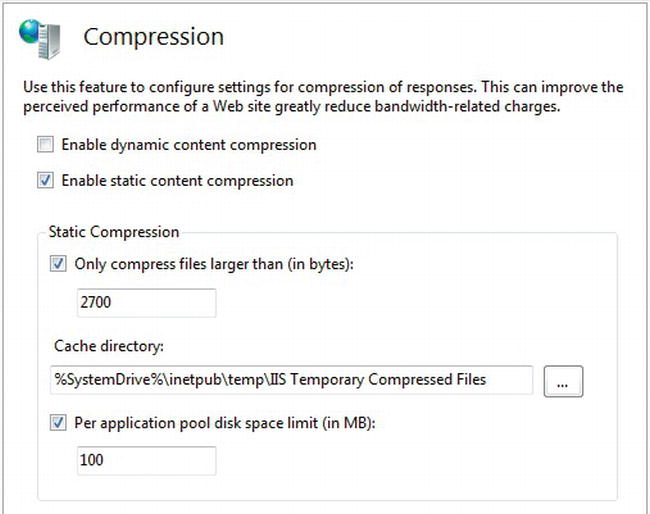
Figure 4-8. Compression configuration panel at the machine level in IIS Manager
From there, you can set the minimum size of the files before the runtime can compress them, the folder where IIS should cache the files once they are compressed, and the maximum disk space to be allocated to the cache folder. Those settings are available only at the machine level, not at the web site level or below. You can also enable static or dynamic compression for all web sites on your machine. At this stage, I suggest enabling static compression, but not dynamic compression, as in Figure 4-8.
You should consider which disk drive you will use to cache the compressed files, since it will incur additional load as IIS writes and then later reads the files, using up to the specified disk space limit.
You can override server-wide enabling or disabling of compression at the web site, folder, or file level by selecting the target in IIS Manager and double-clicking the Compression feature. See Figure 4-9.
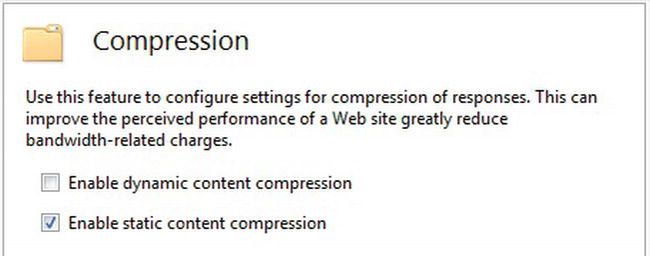
Figure 4-9. Compression configuration panel at the site, folder, or file level in IIS Manager
If you have entire folders where all of the dynamic files they contain can be compressed, you can enable that this way.
Enabling compression typically increases CPU use by roughly 3 to 5 percent for an active site. For most sites, the trade-off is generally worth it.
Setting Compression Options
Browsers generally understand two different compression algorithms: gzip and deflate. IIS enables gzip in its default configuration but not deflate, even though that algorithm is also available in the standard gzip.dll. The difference between the two is the wrapper around the compressed data, rather than the compression algorithm itself (both use the zlib algorithm). The header used with deflate is slightly smaller.
The gzip and deflate algorithms both support varying levels of compression. The higher the level, the more CPU time they spend trying to optimize and improve the degree of compression. Levels vary from zero to ten, although I’ve found that the effect is not continuous; you may need to go up or down by several numbers to see a change in the size of your output. The default is seven for both static and dynamic compression. A light level of compression for dynamic files minimizes the extra CPU load, while still providing most of the benefits. Heavy compression for static files provides maximum benefits with minimal additional cost, since the compression is done only once and the file is then served many times.
Another configuration option controls whether the runtime disables compression if CPU use reaches a certain threshold. I don’t suggest using that feature. On a heavily loaded site, where the load never drops below the default threshold of 50 percent for static content, your content might never be compressed. For dynamic content, even if your server is behaving normally, CPU use might periodically peak at 100 percent while delivering regular traffic. If IIS suddenly disabled dynamic compression when your server reached the default 90 percent point, network traffic might spike from sending uncompressed content, which could cause more problems than it solves; the number of requests per second that the server can deliver could easily decline. It’s much better to allow the system to degrade gracefully when it reaches maximum CPU use. You can turn those features off by raising the “disable” thresholds to 100 percent.
You can make the changes suggested in this section, including enabling the deflate algorithm, by modifying the <httpCompression> section in applicationHost.config as follows (control over these settings is not available from the GUI; see compress.config in the code download:
<httpCompression directory="%SystemDrive%inetpub	empIIS Temporary Compressed Files"

        staticCompressionDisableCpuUsage="100"

        dynamicCompressionDisableCpuUsage="100">

    <scheme name="gzip" dll="%Windir%system32inetsrvgzip.dll"

        staticCompressionLevel="10" dynamicCompressionLevel="3" />

    <scheme name="deflate" dll="%Windir%system32inetsrvgzip.dll"

        staticCompressionLevel="10" dynamicCompressionLevel="3" />

    <staticTypes>

        <add mimeType="text/*" enabled="true" />

        <add mimeType="message/*" enabled="true" />

        <add mimeType="application/x-javascript" enabled="true" />

        <add mimeType="*/*" enabled="false" />

    </staticTypes>

    <dynamicTypes>

        <add mimeType="text/*" enabled="true" />

        <add mimeType="message/*" enabled="true" />

        <add mimeType="application/x-javascript" enabled="true" />

        <add mimeType="*/*" enabled="false" />

    </dynamicTypes>

</httpCompression>
![]() Tip If you are serving a particular MIME type that would benefit from compression, you should make sure that it’s included in either
Tip If you are serving a particular MIME type that would benefit from compression, you should make sure that it’s included in either <staticTypes> or <dynamicTypes>, or both, as appropriate.
You can use Firefox to confirm that the deflate algorithm is working correctly. In the about:config page, enter accept-encoding as the filter criteria. Double-click network.http.accept-encoding, and change the value to deflate. After that, when you use Fiddler or Firebug to view a request made by Firefox for a page from your site that has compression enabled, you should see the HTTP Content-Encoding header set to deflate, and of course, the page should render correctly.
Using web.config to Configure Compression
For folder-specific compression-related settings, the GUI will create a small web.config file in each folder. I prefer to group settings together in the top-level web.config, which means making the entries by hand rather than using the GUI. For example:
<location path="pages">

    <system.webServer>

        <urlCompressiondoDynamicCompression="true" />

    </system.webServer>

</location>
Caching Compressed Content
When you enable both output caching and compression, IIS compresses the content before storing it in the output cache.
You can have IIS cache both compressed and uncompressed versions of your pages. You do that by setting the VaryByContentEncoding property of the OutputCache directive. For example:
<%@ OutputCache Duration="86400" VaryByParam="None" VaryByContentEncoding="gzip;deflate" %>
You can also specify that property in a cache profile in web.config:
<add name="Cache1Day" duration="86400" varyByParam="none"

    varyByContentEncoding="gzip;deflate" />
However, be aware that VaryByContentEncoding will disable http.sys caching since the runtime needs to decide which cached version to use.
Programmatically Enabling Compression
There are cases where it’s not always desirable to compress a page. For example, pages that can’t be output cached and are less than about 1KB in size, and, consequently, fit into a single TCP packet, are generally not good candidates for dynamic compression. Since the usual delay between TCP packets in the response doesn’t exist when there’s only one packet, the reduction in data size may not be worth the increase in latency caused by the compression.
In addition, if your servers are frequently running close to 100 percent CPU utilization, you might want to consider selectively disabling dynamic compression, particularly for pages that can’t be output cached.
You can programmatically enable dynamic compression by adding the following code to your Page_Load() method (see compress.aspx):
if (!String.IsNullOrEmpty(this.Request.ServerVariables["SERVER_SOFTWARE"]))

    this.Request.ServerVariables["IIS_EnableDynamicCompression"] = "1";
The check for SERVER_SOFTWARE ensures that we’re running on IIS7+ or IIS Express, since Cassini and IIS 6 don’t allow you to set ServerVariables, and Cassini doesn’t support compression.
Alternatively, you can disable dynamic compression by setting the ServerVariable to "0" (a string containing zero).
HTTP Keep-Alives
You should not disable HTTP keep-alives in IIS. If you do, browsers will revert to the HTTP 1.0 behavior of one request per TCP connection. If the browser is forced to open a new connection for every object on the page, it can have a very negative impact on performance.
The default settings for IIS are to enable keep-alives, with a 120-second timeout; if the browser hasn’t reused a connection after 120 seconds, IIS will close it. Depending on the nature of how your users interact with your site, since opening a new connection increases request latency, you might consider extending the timeout. If users tend to navigate to a page, read for a while, and then click to a new page, then a longer timeout might make sense. If they tend to click a few links and leave your site quickly, then there’s no need to change the default.
Although keeping the connection open does consume memory on the server, it’s only roughly 1KB per connection, or 1MB per 1,000 connections. It’s a small price to pay for a significant improvement in performance.
Reducing the Length of Your URLs
Since URLs appear in HTTP request headers, as well as in your HTML, it’s a good idea to avoid excessively long ones. Yahoo, for example, has a long history of using single-character paths in certain parts of its site.
As a rule of thumb, you should try to keep both file names and folder names less than about eight characters long (two to six is best), except where search engine optimization comes into play. Folder hierarchies should be flat, rather than deep. For example, the following:
http://s1.12titans.net/images/mypic.jpg
is much better than this:
http://coolstaticfiles.12titans.net/reallycoolimages/picsfromlastyear/mycoolpic.jpg
If you need to work with an existing hierarchy that uses long names or if your system needs longer names to ease some aspects of development or maintenance, then you can shorten the long URLs using virtual directories or URL rewriting.
Virtual Directories
You can use virtual directories with short names to refer to the actual folders. You may be able to bypass one or more levels of an on-disk folder hierarchy this way.
For example, if you wanted to map the long path shown earlier to a shorter one under the images folder, then right-click the folder in IIS Manager, and select Add Virtual Directory. See Figure 4-10.
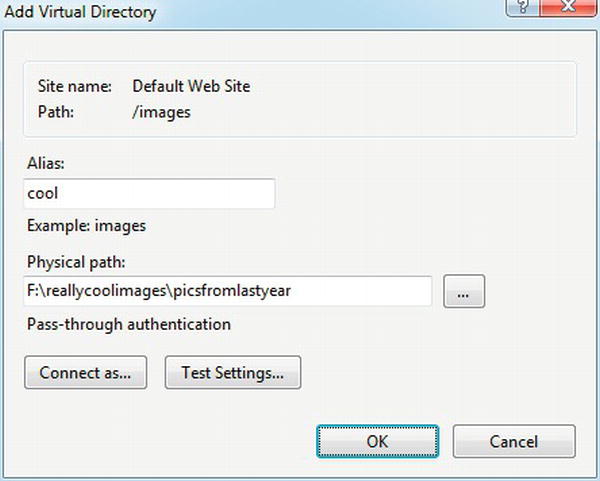
Figure 4-10. Adding a virtual directory to shorten your URLs
Type in the alias you’d like to use and the physical path that you want to map to that alias. In the example, IIS would map all files in the folder F:
eallycoolimagespicsfromlastyear to the default web site at http://s1.12titans.net/images/cool/.
URL Rewriting
Although URL rewriting is often used to make URLs search engine friendly, you can also use it to make them shorter. You might want to do this in cases where you are unable to rename the existing files or folders for some reason, or when you want to have a local file structure that is different from the externally visible one. You can also use URL rewriting to hide query strings from http.sys, which can make a page cacheable that wouldn’t be otherwise.
You can rewrite URLs in IIS using the URL Rewrite Module or in ASP.NET using page routing. The IIS approach tends to be slightly more efficient for static content, and can be configured in web.config or using the GUI in IIS Manger. See Chapter 7 for details on page routing.
To use the URL Rewrite Module with IIS, first download and install it:
http://www.iis.net/extensions/URLRewrite
As an example, let’s use it to shorten a URL. Create a folder in your web site called mylongfoldername, put an image in it called logo.png, and configure the web site in IIS.
Next, click your web site in the Connections panel in IIS Manager. Then double-click URL Rewrite in the center panel to enter the configuration area. Click Add Rules in the right-hand panel to bring up the Add rule(s) dialog box as in Figure 4-11. Select Blank rule, and click OK.
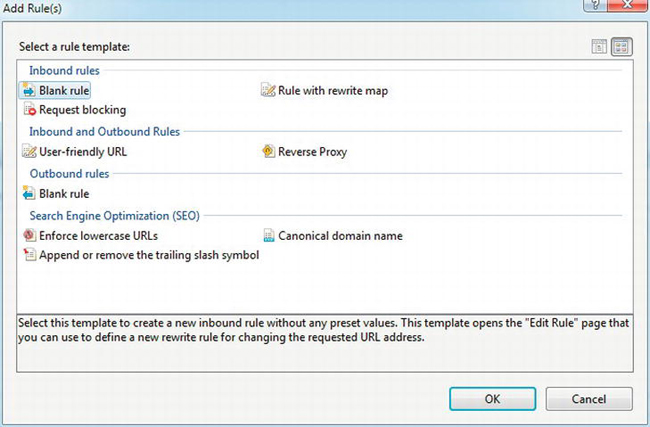
Figure 4-11. Selecting the blank URL rewriting rule template
Next, in the Edit Inbound Rule screen, enter a name in Name for the rule, and enter ^m/(.*) in Pattern. See Figure 4-12.
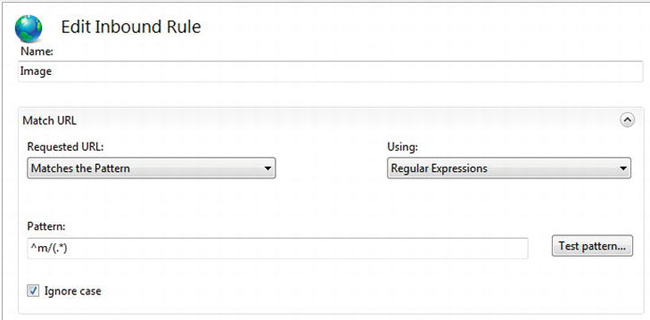
Figure 4-12. Entering a regular expression pattern for the incoming URL
The Pattern field contains a regular expression that matches the incoming URL. In this case, you’re looking for a URL that starts with the letter m, then a slash, and anything else after that. You use the parentheses to establish a capture group, which you can reference later in the rewritten URL. Capture groups are numbered from left to right, from one to N. Capture group zero is a special case that represents the entire incoming URL.
To test the regular expression, click Test pattern. Enter an example of an incoming URL that the pattern is supposed to match as the Input data to test. Click the Test button to see the results of the test, including the capture groups. See Figure 4-13.
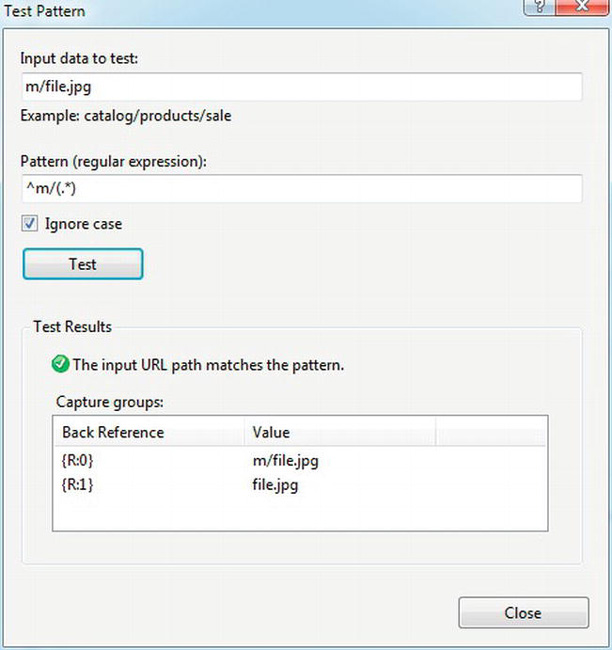
Figure 4-13. Testing the regular expression
Click Close to dismiss the Test Pattern dialog box, and enter mylongfoldername/{R:1} in Rewrite URL in the Action section of Edit Inbound Rule. This is the name of the local resource, which includes the long folder name, followed by {R:1}, which is the first capture group from the regular expression. Leave the other settings at their defaults. See Figure 4-14.
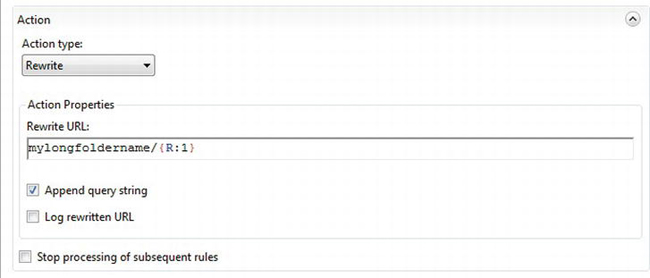
Figure 4-14. Entering the rewrite URL using a capture group from the regular expression
Click Apply at the upper right of the screen, which will activate the rewrite rule and save it in the web site’s web.config.
![]() Note Since adding a new URL rewrite rule updates
Note Since adding a new URL rewrite rule updates web.config, it will also cause your site to restart.
After applying the rule, IIS will map an incoming URL like http://localhost/m/logo.png to http://localhost/mylongfoldername/logo.png.
If you have a number of rules, you might find it easier to edit web.config directly, instead of using the GUI. For example:
<system.webServer>

    . . .

    <rewrite>

        <rules>

            <rule name="Images">

                <match url="^m/(.*)" />

                <action type="Rewrite" url="mylongfoldername/{R:1}" />

            </rule>

        </rules>

    </rewrite>

</system.webServer>
Managing Traffic and Bandwidth
For most sites, having search engines visit regularly is very desirable. However, each page or file that a search engine requests presents a load on your servers and network, and those requests compete with your regular users.
For some sites, the load from search engines and other bots can be substantial. You can help manage the load they put on your site by using robots.txt, site maps, and bandwidth throttling.
The type of content that you may want to prevent bots from accessing includes the following:
- Images, CSS, and other files that you use primarily for layout purposes.
- JavaScript files.
- Registration and logon pages.
- Search results.
- Certain file types, such as
.zip,.avi,.docx,.pptx, and so on. - Pages that require authentication.
- Lists of users who are currently online, and similar content that’s only meaningful to someone connected to your site.
It’s a good idea to partition your images into folders, based on those that would be suitable for image search and those that wouldn’t be, to make it easier to block access to the latter. For example, in an image gallery application, you might want to allow access to thumbnails but not to full-size images.
Using robots.txt
You can place a robots.txt file in the root of your site to help inform search engines and other bots about the areas of your site that you don’t want them to access. For example, you may not want bots to access the content of your images folder:
User-agent: *

Disallow: /images/
You can also provide instructions for particular bots. For example, to exclude Google image search from your entire site, use this:
User-agent: Googlebot-Image

Disallow: /
The robots.txt standard is unfortunately very limited; it only supports the User-agent and Disallow fields, and the only wildcard allowed is when you specify it by itself in User-agent, as in the previous example.
Google has introduced support for a couple of extensions to the robots.txt standard. First, you can use limited patterns in pathnames. You can also specify an Allow clause. Since those extensions are specific to Google, you should only use them with one of the Google user agents or with Googlebot, which all of its bots recognize.
For example, you can block PNG files from all Google user agents as follows:
User-agent: Googlebot

Disallow: /*.png$
The asterisk refers to matching any sequence of characters, and the dollar sign refers to matching the end of the string. Those are the only two pattern-matching characters that Google supports.
To disable all bots except for Google, use this:
To exclude pages with sort as the first element of a query string that can be followed by any other text, use this:
User-agent: Googlebot

Disallow: /*?sort
![]() Caution When you create a
Caution When you create a .txt file from Visual Studio, it is stored in UTF-8 format by default, which results in a byte order marker (BOM) that is written at the beginning of the file. Bots that don’t understand the BOM can’t parse the file. This can be an issue for Google, as well as some online syntax-check utilities. It’s easily fixed by having a blank line or a comment as the first line of the file. If you use Notepad to create the file, the default is to store it as an ANSI file, which doesn’t use a BOM.
You might consider generating robots.txt dynamically, rather than statically, which allows you to set custom performance counters and adapt to new bots or content.
Site Maps
Site maps are XML files that list all of the URLs on your site, along with when the content was last modified, an indication regarding how often it changes, and a relative priority (not to be confused with ASP.NET site maps, which have a different format and serve a different purpose). By providing a site map, you can help search engines optimize how often they revisit your site. If the content on a particular page never changes, you can let search engines know so they don’t keep reading it repeatedly.
You can find the site map specification online at http://www.sitemaps.org/. Here’s an example:
<?xml version="1.0" encoding="UTF-8"?>

<urlset xmlns="http://www.sitemaps.org/schemas/sitemap/0.9">

    <url>

        <loc>http://www.12titans.net/p/default.aspx</loc>

        <lastmod>2011-12-01</lastmod>

        <changefreq>daily</changefreq>

        <priority>0.8</priority>

    </url>

</urlset>
You list each URL in a separate <url> block. Only the <loc> tag is required; the others are optional.
Several tools are available online to help you generate site maps and submit them to search engines. If you choose to do it yourself, be sure to use correct XML syntax, including escaping entities such as ampersands.
You can advertise the availability of a site map in your robots.txt file:
Sitemap: http://www.12titans.net/sitemaps/sitemap.xml.gz
You can also submit the URL of the site map file directly to search engines. The details vary by search engine. For Google, you can use its Webmaster Tools.
Bandwidth Throttling
Although it’s most often used when serving media content, you can also use bandwidth throttling as a traffic and load management technique. For example, one way to apply this concept is to send content more slowly to bots than to real users. This can make more bandwidth and CPU cycles available to users when your site is under heavy usage, so the content will load faster for them than it would otherwise.
You can also use bandwidth throttling to make sure that you give users a chance to change their minds about whether they want to download a large file. For example, with streaming video, a user might watch the first few seconds and then decide they don’t want to download the whole thing. If you send it to them in a high-speed mode, it might be too late for them to cancel the download by the time they change their minds. Using bandwidth throttling, you can slow things down and give them time to cancel, while not interfering with their streaming experience. In addition to improving overall system performance, this can also help reduce your bandwidth costs, by reducing the total amount of data transferred and by lowering your peak transfer rate.
To use bandwidth throttling, install the IIS extension for Media Services:
http://www.iis.net/extensions/BitRateThrottling
To enable it from IIS Manager, first click your site or machine in the Connections pane. Double-click Bit Rate Throttling in the center panel, and click Enable in the Actions pane on the right side. This will enable default throttling for most media content, such as .avi and .mp3 files.
With bandwidth throttling enabled, the defaults are set so that IIS will start by sending media content in high-speed burst mode. After a little while, the throttling module will reduce the rate to the encoded bit rate, which it determines by examining the file. For example, consider an .avi file that’s encoded at 500Kbps. IIS will start by sending 20 seconds of the file at full speed and then limit the bandwidth to 100 percent of the encoded 500Kbps rate.
From a performance and scalability perspective, the real power of Bit Rate Throttling comes into play using its programmability. You can set server variables to control the maximum bandwidth used by a given response.
You might consider applying bandwidth throttling programmatically according to conditions such as the following:
- Based on the
User-Agentstring (search engines and other bots, media players, and so on). - Particular pages, folders, images, or domains.
- Time of day, day of the week, or month.
- Cookies (user, role, VIP users, banned users, and so on).
- Leeched content (images or other files used directly on other sites, determined using the HTTP referrer).
- Request rate (perhaps using cookies or session state to track the history).
- HTTP 1.0 requests (identify using
Request.ServerVariables["SERVER_PROTOCOL"]). - IP addresses (countries or states, identified using a Geo-IP database, or certain IP ranges).
- How busy the server is (using performance counters for CPU, network, disk, and so on).
As an example, let’s create an HttpModule that programmatically limits the download speed of .zip files when they aren’t accessed by clicking on a link on our web site (see App_CodeThrottle.cs):
using System;

using System.Web;


namespace Samples

{

    public class Throttle : IHttpModule

    {

        public void Init(HttpApplication context)

        {

            context.PostRequestHandlerExecute += OnPostRequestHandlerExecute;

        }


        voidOnPostRequestHandlerExecute(object source, EventArgs e)

        {

            HttpApplication application = (HttpApplication)source;

            HttpContext context = application.Context;

            HttpResponse response = context.Response;

            HttpRequest request = context.Request;

            try

            {

                if ((response.ContentType == "application/x-zip-compressed") &&

                    ((request.UrlReferrer == null) ||

                     !request.UrlReferrer.Host.Contains("12titans.net")))

                {

                    if (!String.IsNullOrEmpty(request.ServerVariables["SERVER_SOFTWARE"]))

                    {

                        request.ServerVariables["ResponseThrottler-InitialSendSize"] = "20";

                        request.ServerVariables["ResponseThrottler-Rate"] = "10";

                    }

                }

            }

            catch (Exception)

            {

                // log the error

            }

        }


        public void Dispose()

        {

        }

    }

}
In an event handler called after the request handler runs, you check the MIME type of the response to see whether it’s a .zip file. If it is, and the HTTP referrer is null or doesn’t refer to our domain name, then check if you’re running under IIS or IIS Express instead of Cassini. If so, then set two server variables. ResponseThrottler-InitialSendSize indicates that you want the first 20KB of the file to be downloaded at full network speed, and ResponseThrottler-Rate says that you want the rest of the file to be downloaded at 10Kbps (about 1.25KB/s). Malformed referrer URLs can cause an exception, so put the code in a try / catch block.
Next, register the HttpModule in web.config:
<system.webServer>

    . . .

    <modules>

        . . .

        <add name="ThrottleModule" type="Samples.Throttle, App_Code"/>

    </modules>

</system.webServer>
This configures IIS to run the code with both static and dynamic content.
Next, put a .zip file in the web site and access it from a browser. After an initial burst, you will see the download rate settle at around the target (the transfer rate displayed by IE is an average, not the current rate). See Figure 4-15.
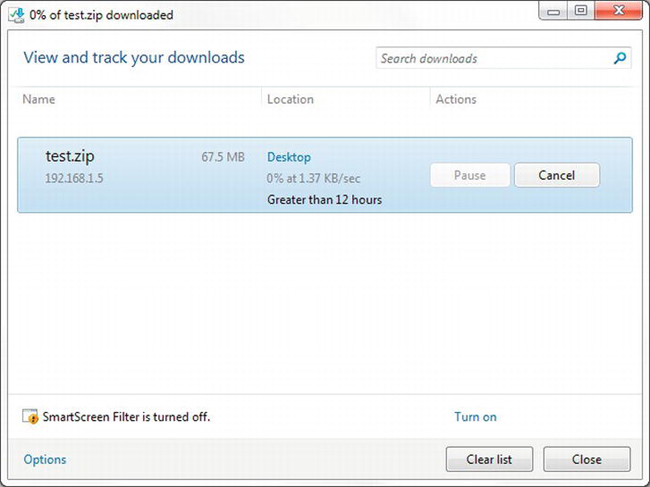
Figure 4-15. Bandwidth-limited download
![]() Note Bandwidth throttling doesn’t work when you access the site using the same machine that is running IIS (such as
Note Bandwidth throttling doesn’t work when you access the site using the same machine that is running IIS (such as localhost).
Failed Request Tracing
Don’t let the name of the IIS Failed Request Tracing (FRT) feature fool you. In addition to tracing requests that fail, you can also use it to trace successful requests. In particular, you can use it to trace requests that take too long or aren’t being processed in a way that you expect, such as with caching or compression.
As an example, let’s analyze a case where http.sys is not caching a particular image. First, you need to install the feature.
On Windows Server, from Server Manager, select Go To Roles. In the Web Server (IIS) section, under Role Services, select Add Role Services. Under Health and Diagnostics, select Tracing, and click Install.
On Windows 7, from the Programs and Features control panel, click Turn Windows features on and off, under World Wide Web Services, open Health and Diagnostics, select Tracing, and click OK.
Next, open IIS Manager, open your web site in the Connections pane, and click the folder that contains the files you’re interested in tracing. Then double-click Failed Request Tracing Rules in the center pane, and click Add in the right-hand pane. For this example, you’re interested in all PNG files in the selected folder, so in the Specify Content to Trace dialog box, select Custom and enter *.png as the filename pattern. See Figure 4-16.
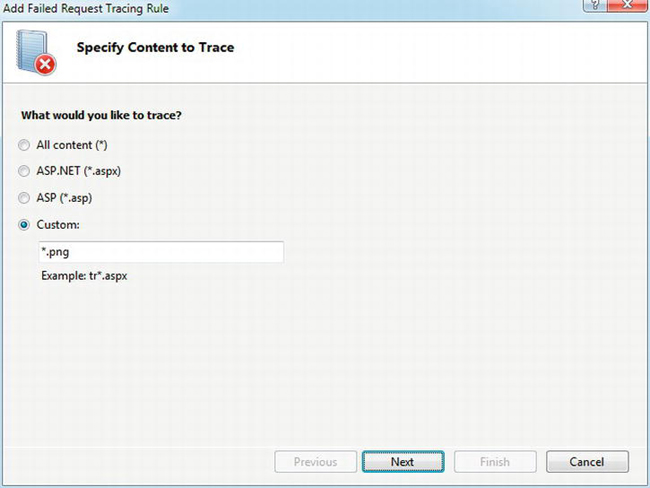
Figure 4-16. Specifying content to trace for Failed Request Tracing
Click the Next button, and specify the trace conditions. In this case, you’re interested in successful responses rather than errors or pages that take too long to execute (which are, however, very useful in their own right). Select the Status code(s) box, and enter 200, which is the HTTP response code that indicates success. See Figure 4-17.
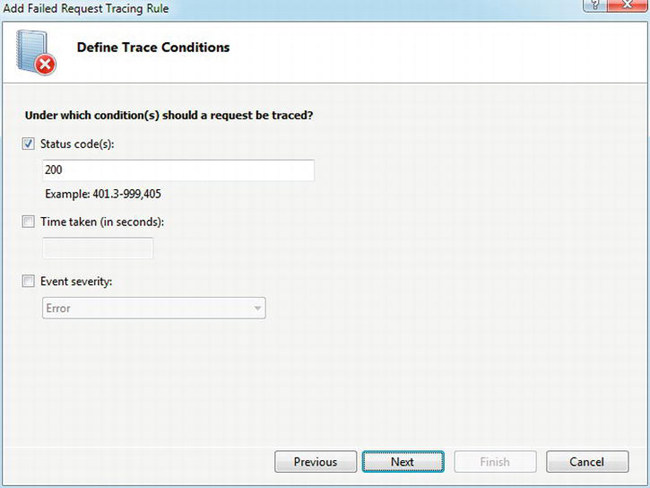
Figure 4-17. Defining trace conditions for Failed Request Tracing
Click Next to select the trace providers of interest. In this case, you’re interested only in the WWW Server provider. Uncheck the others, and select the WWW Server entry in the Providers panel on the left, which will cause the Areas available for tracing to be displayed on the right. You’re interested only in the Cache area, so uncheck the others as in Figure 4-18. Since the trace information is written to disk as an XML file, it’s a good idea to select only the information you’re interested in to limit the size of the file, particularly when using tracing on a server in production.

Figure 4-18. Selecting trace providers for Failed Request Tracing
Click Finish to complete creation of the rule.
Next, you need to enable FRT to activate the rule. Click the web site in the Connections panel. Then click Failed Request Tracing on the right-hand panel, under Manage Web Site ![]() Configure. In the dialog box that comes up, select Enable, as in Figure 4-19. Then click OK to activate FRT.
Configure. In the dialog box that comes up, select Enable, as in Figure 4-19. Then click OK to activate FRT.
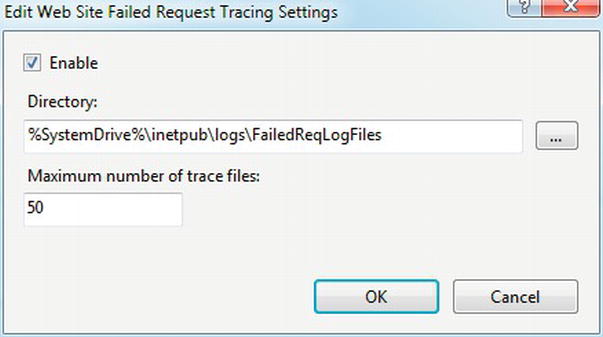
Figure 4-19. Enabling Failed Request Tracing
The directory name in this dialog box is where IIS will write the trace files. You can also specify a maximum number of trace files, which can be useful for systems in production, to avoid filling the disk with them. In many cases, you will only need a small number of trace files in order to diagnose the problem.
Before running the test for the example, open the FailedReqLogFiles folder in Windows Explorer. Next, use IE to open a URL to a PNG file from the folder in the web site being tested that you originally specified when you created the rule. Press Ctrl+Refresh to refresh the page four or five times. There should now be a folder with a name resembling W3SVC1 in the Explorer window. Open the folder, and you will see several XML files, which are the output files from the trace. Drag the most recent file into IE to open it, and click the Compact View tab at the top. The line you’re looking for is the one with HTTPSYS_CACHEABLE in the Event Name column:
HttpsysCacheable="true", Reason="OK",

CachePolicy="USER_INVALIDATES", TimeToLive="0"
This says that the file is cacheable by http.sys. If you press Ctrl+Refresh enough times in a row, you’ll notice that FRT stops creating new trace files after the file starts to be served from http.sys.
Now let’s change the URL to include a query string, which will prevent http.sys from caching it. Just adding a question mark to the end of the URL will be enough. Press Ctrl+Refresh a bunch of times in a row, as before. This time, notice that the files don’t stop appearing in the folder as they did before. Open the latest XML file in IE, and click the Compact View tab as discussed earlier. The HTTPSYS_CACHEABLE line reads similar to the following:
HttpsysCacheable="false", Reason="STATIC_REQUEST_QUERYSTRING",

CachePolicy="NO_CACHE", TimeToLive="0"
This tells you that the file is not cacheable by http.sys, and the reason is that the request includes a query string.
You can use FRT to help diagnose unexpected behavior in caching, in compression, or during many of the other steps in the IIS pipeline. It’s also useful to catch pages that are running slowly. For example, you might collect tracing on all of the requests that take longer than one second to execute to help identify bottlenecks. In production environments, I suggest enabling it on as few servers as you can and only for as long as you need it, since there is a performance cost when it’s running.
Miscellaneous IIS Performance Tuning
Here are a few miscellaneous tips for tuning IIS:
- Order the list of file types for default documents by their approximate frequency of use, and delete any file types that you don’t use. For example, if most of your default pages are
default.aspxand you have a fewindex.htm, then placedefault.aspxat the top of the list, followed byindex.htm, and remove all the other entries. Ifdefault.aspxis located at the end of the list, then IIS will look for all the other files every time users access the default page. You can make this change at both the site level and for individual folders. - Remove modules that you aren’t using. Configured modules still handle pipeline events, even if you’re not using them. This also helps from a security perspective by reducing the attack surface of the application.
- Don’t allow the use of
web.configfiles in subdirectories of your applications. You should have only a singleweb.configat the top level. With that restriction in place, you can modifyapplicationHost.configas follows so that IIS doesn’t search for config files where they won’t exist, including in odd places such asfile.htm/web.config, where IIS is checking to see whether the file name might be a folder:<system.applicationHost>
<sites>
. . .
<virtualDirectoryDefaultsallowSubDirConfig="false" />
</sites>
</system.applicationHost>
Summary
In this chapter, I covered the following:
- When you should use multiple AppPools or a web garden.
- Configuring recycling on your AppPools.
- How
HttpModules and request handlers fit into the IIS request-processing pipeline. - Using WSRM to help manage contention between AppPools.
- Using Log Parser to find HTTP errors in your log files.
- Using consistent URLs to help eliminate unnecessary HTTP redirects.
- How to remove the
X-Powered-By,Server,ETag, andX-Aspnet-VersionHTTP headers. - Enabling static and dynamic compression, and optimizing the compression configuration settings.
- Enabling caching for compressed content.
- Programmatically enabling compression.
- Why it’s important not to disable HTTP keep-alives.
- Using virtual directories and URL rewriting to reduce the length of your URLs.
- Using
robots.txtand site maps to help limit the load on your site from search engines and other bots. - Using bandwidth throttling to help manage the load from network traffic and total data transferred.
- Using Failed Request Tracing to trace requests that take too long or that aren’t being processed in a way that you expect, such as with caching or compression.
- Miscellaneous tips for tuning IIS.