
C H A P T E R 6
Using ASP.NET to Implement and Manage Optimization Techniques
You can use a number of standard ASP.NET mechanisms to implement many of the optimization techniques described in Chapters 2 and 3. Implementations that use shared or centralized code can help reduce the time and effort required to create new high-performance content or to modify existing content. Speed in those dimensions is an important part of the ultra-fast approach.
In this chapter, I will cover the following:
- How to use master pages, user controls, and themes and skins to help centralize and manage your optimized code and markup
- How to customize the output of standard user controls to generate optimized output that implements some of the strategies from Chapter 2
- How to generate JavaScript and CSS dynamically
- How to automatically retrieve your static files from multiple domains
- How to resize and recompress images from your application
Master Pages
Master pages can help improve consistency and reliability by allowing you to share a single copy of frequently referenced code and markup among multiple pages. Reusing a common implementation can also help simplify the process of performance optimizing your pages.
Improving the speed with which you can effectively respond to changing requirements from customers or from your business and being able to find and fix bugs quickly are also aspects of the ultra-fast approach that are supported by master pages. With master pages, you can make changes to a single file that will be reflected immediately through your entire site.
As an example, let’s say you’ve decided to use DOCTYPE Strict for your site. Since that’s not the default in the standard web form template used by Visual Studio and since you might want to change it in the future, you decide to create a top-level master page that contains your desired DOCTYPE setting. That way, other developers on the team can use the master page, and you don’t have to worry about them remembering to include the right DOCTYPE or a custom template. In addition, since the standard web form template includes a server <form> tag, you decide to remove that from the top-level master so that content-only pages won’t include the extra HTML for the <form> tag itself and the ViewState information that comes along with it. Here’s the markup for the master page (see MasterMaster.master):
<%@ Master Language="C#" AutoEventWireup="true" CodeFile="Master.master.cs"

    Inherits="Master" %>

<!DOCTYPE html PUBLIC "-//W3C//DTD XHTML 1.0 Strict//EN"

    "http://www.w3.org/TR/xhtml1/DTD/xhtml1-strict.dtd">

<html xmlns="http://www.w3.org/1999/xhtml">

<head runat="server">

    <title></title>

</head>

<body>

    <asp:ContentPlaceHolder id="BD" runat="server">

    </asp:ContentPlaceHolder>

</body>

</html>
The first line is the Master directive, which indicates to ASP.NET that this is a master page.
![]() Note You can’t include an
Note You can’t include an OutputCache directive in a master page.
In addition to the DOCTYPE tag and the removal of the <form> tag, notice that there is an <asp:ContentPlaceHolder> tag, which defines where content will be placed that is provided by pages that are derived from the master page. You can have as many of them as you need. Also, notice that the ID that you’ve used for that tag is very short: only two characters long. That ID string will often appear directly in the generated HTML, so it’s a good idea to keep it short.
Next, let’s create a page that uses that master page. When you create the new web form, select the Select master page checkbox. Then choose the one that you just created. Visual Studio will automatically insert an <asp:Content> control for each <asp:ContentPlaceHolder> in the master page.
After Visual Studio creates and opens the new page, add an <asp:HyperLink> tag in the <asp:Content> section.
Here’s the final markup (see page1.aspx):
<%@ Page Title="Test" Language="C#" MasterPageFile="~/Master/Master.master"

    AutoEventWireup="true" CodeFile="page1.aspx.cs" Inherits="page1" %>

<asp:Content ID="Content1" ContentPlaceHolderID="BD" Runat="Server">

<asp:HyperLink runat="server" ID="home" NavigateUrl="~/default.aspx">

Home

</asp:HyperLink>

</asp:Content>
In the Page directive, Visual Studio has specified a MasterPageFile that refers to the new master page. You have also included a title for the page, which the runtime will place in the <head> section of the generated HTML, replacing the empty <title> tag in the master page.
View this page in a browser, and then view the source of the page. Notice that the hidden field for ViewState is not present, since you don’t have a server-side <form>. Here is the <a> tag that’s generated by <asp:HyperLink>:
<a id="ctl00_BD_home" href="default.aspx">
Notice that the IDs of both the <asp:ContentPlaceHolder> and the <asp:HyperLink> are included in the generated ID of the <a> tag. You can keep that string short by using short IDs in your markup. Even better, when you don’t need to reference that object from the code-behind or from JavaScript, you can simply omit the ID tag, and it won’t be generated in the HTML.
You can disable the feature in Visual Studio that automatically adds an ID to controls when you copy and paste them. Go to Tools ![]() Options, select Text Editor
Options, select Text Editor ![]() HTML
HTML ![]() Miscellaneous in the left panel, deselect Auto ID elements on paste in Source view on the right side (as in Figure 6-1), and click OK.
Miscellaneous in the left panel, deselect Auto ID elements on paste in Source view on the right side (as in Figure 6-1), and click OK.
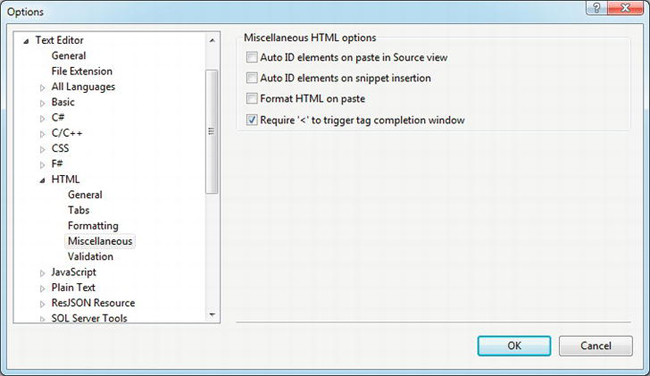
Figure 6-1. Disable “Auto ID elements on paste in Source view” in Visual Studio
Nested Master Pages
ASP.NET supports nested master pages. You create them by deriving a master page from another master page, which you can do easily by simply using the same MasterPageFile property in the Master directive as you use with Pages.
For example, here’s a nested master page that includes a server <form> tag (see MasterForm.master):
<%@ Master Language="C#" MasterPageFile="~/Master/Master.master"

    AutoEventWireup="true" CodeFile="Form.master.cs" Inherits="Master_Form" %>

<asp:Content ID="Content1" ContentPlaceHolderID="BD" Runat="Server">

 <form id="mainform" runat="server">

   <asp:ContentPlaceHolder ID="IC" runat="server">

   </asp:ContentPlaceHolder>

 </form>

</asp:Content>
Notice that you replaced the ContentPlaceHolder BD in the original master page with the <form> tag and a new ContentPlaceHolder IC, which will be the one that pages derived from this master page will replace with content (although you had the option of reusing BD in this scope).
Dynamic Master Pages
Instead of assigning a page to a particular master page using the MasterPageFile property in the Page directive, it’s also possible to make the assignment dynamically at runtime. You might want to do that as part of a personalization scheme, where you provide a way for users to select different page layouts, each of which is implemented by a different master page. Supporting mobile devices is another potential application for dynamic master pages.
For this to work, you must make the assignment from Page_PreInit() in your code-behind, which is called before Page_Init() and Page_Load() in the page-processing pipeline.
Here’s an example:
protected void Page_PreInit(object sender, EventArgs e)

{

    this.MasterPageFile = "~/Master/Master.master";

}
When you use dynamic master pages with content pages that you would like to be compatible with output caching, you should use VaryByCustom to tell the runtime to cache different versions of the page for each available master page.
Referencing the Master Page
From the perspective of a web forms page, a master page behaves largely like a child control for things like lifecycle event order and so on. One difference is that you can’t set properties on a master page declaratively as you can with a control.
To get around this limitation, you can use the MasterType directive on your page to declare the type name of the master page. After that, you can reference properties and methods in the master page without the need to cast this.Master first.
For example (see MasterContent.master and page2.aspx):
<h1><%= this.Header %></h1>
In the master page, you use the Header property to set the header text for the page.
<%@ Page Title="My Content" Language="C#" MasterPageFile="~/Master/Content.master"

    AutoEventWireup="true" CodeFile="page2.aspx.cs" Inherits="page2" %>

<%@ MasterType TypeName="Content" %>

<asp:Content ID="CC" ContentPlaceHolderID="BD" Runat="Server">

Here's the content

</asp:Content>
In the markup for the page, you specify the MasterPageFile, along with the MasterType.
this.Master.Header = "My Header";
In the code behind for the page, you can access the Header property directly, without casting this.Master to the correct type first.
User Controls
Like with pages, user controls in ASP.NET are objects that generate text, which is usually, but not always, HTML. User controls have a life cycle that’s similar to pages, including many of the same events, and you can cache their output (fragment caching).
User controls can be a great way to centralize, encapsulate, and reuse performance-optimized code for your site. You could use them to implement a number of the performance optimization techniques that I covered earlier in the book.
You should consider moving markup and its associated code-behind into a user control under conditions similar to when you would create a subroutine. For example, you might create a control when it’s likely to be reusable in other places, when it would help to split it off for maintenance or development purposes, or when it helps improve code clarity, provides an optimized implementation, implements best practices or standardized business rules, and so on.
![]() Tip You can access most regular HTML tags from the code-behind by adding
Tip You can access most regular HTML tags from the code-behind by adding runat="server" and an ID; you don’t have to convert them to custom or <asp>-type user controls to do so.
As with the example in the previous section on master pages, when you’re using ASP.NET controls, be aware that they often output all or part of the strings you choose as object IDs in the HTML. Therefore, unlike conventional software wisdom that correctly advocates descriptive and potentially long names, you should try to use short IDs whenever you can. In addition, although IDs are generally recommended, they are not required unless you need to reference the object from code-behind, from another declarative statement, or from JavaScript. It’s therefore reasonable to simply leave them off unless they are explicitly used somewhere.
Example: Image Handling
I briefly discussed user controls in Chapter 3, in the section on page fragment output caching. Here’s another example that implements a couple of the recommendations from Chapter 2:
- URLs used in
<img>tags should use consistent case throughout your application so that the browser downloads an image only once when there are multiple references to it. Ideally, the URLs should be in lowercase to maximize compressibility.- You should always include a
heightandwidthwith<img>tags to speed up the browser’s rendering of the page to the screen.
Control Output Caching
Here’s the markup for the control (see Controlsimage.ascx):
<%@ Control Language="C#" AutoEventWireup="true" CodeFile="image.ascx.cs"

    Inherits="Controls_image" %>

<%@ OutputCache Duration="86400" VaryByControl="src" Shared="true" %>

<img src="<%= src %>" height="<%= height %>" width="<%= width %>"
alt="<%= alt %>" />
Since the control might have to do some work to determine the size of the image, you enable output caching to cache the results. Setting VaryByControl to src tells the runtime to cache a different version of the control for each different value of the src property. Setting Shared to true allows multiple pages to share a single instance of the cached control.
The way control caching works is that the runtime constructs a key that it uses to store and retrieve information about the control in the cache, along with its rendered contents. The key includes the fully qualified ID of the control, so if you have three instances of the control on one page, the runtime will cache them separately. Similarly, if you have multiple instances that you reference in nested controls, they will also be cached separately, since their fully qualified path IDs will be different, even if the local or immediate IDs are the same. If Shared is set to false (the default), then the runtime also includes the page class name in the cache key, so you will have different versions of the control cached for each page, even when their fully qualified path names are the same.
From a practical perspective, this means that you should be sure to use the same ID from one page to another for controls that should use cached output. If you use different IDs, it might appear to work, but you will in fact have multiple copies of the control in the cache, even when Shared is true. Conversely, if you set Shared to true and use the same IDs from one page to another, don’t let it surprise you when the page uses a version that may have been created and cached on a different page.
If your control varies based on more than one input property, you can include them in VaryByControl by separating them with semicolons. In that case, the runtime will include all listed property values in the cache key, so you will have different versions for each combination.
You can also specify a list of fully qualified control IDs in VaryByControl using a dollar sign as the path separator, such as MyControl$OtherControl$MyTextBox. In that case, the runtime includes the hash code of the control (from GetHashCode()) as a component of the cache key. Unfortunately, the fully qualified path name approach can be somewhat fragile, particularly when you’re using master pages.
The properties on the <img> tag are set from properties of the same name in the control to make it easy to modify existing HTML to use it.
Here’s the code-behind for the control (see Controlsimage.ascx.cs):
[PartialCaching(86400, null, "src", null, true)]

public partial class Controls_image : UserControl

{

    private string _src;


    protected void Page_Load(object sender, EventArgs e)

    {

        if (this.height <= 0 || this.width <= 0)

        {

            string path = Server.MapPath(this.src);

            using (Stream stream = new FileStream(path, FileMode.Open))

            {

                using (System.Drawing.Image image =

                       System.Drawing.Image.FromStream(stream))

                {

                    width = image.Width;

                    height = image.Height;

                }

            }

        }

    }
    public string src

    {

        get

        {

            return this._src;

        }

        set

        {

            this._src = ResolveUrl(value).ToLowerInvariant();

        }

    }

    public int height { get; set; }

    public int width { get; set; }

    public string alt { get; set; }

}
The PartialCaching attribute is an optional alternative to the OutputCache directive that specifies the same information (so you need only one or the other, not both as in the example). Although it’s useful in some projects, most of the time I prefer the OutputCache directive, since using the same pattern as pages is usually easier to understand and maintain.
The code defines public properties for src, height, width, and alt. For src, it uses ResolveUrl() to determine an absolute path to the image and converts the result to lowercase. That allows developers to use references starting with a tilde to indicate a path relative to the home directory.
If the size properties aren’t set, the Page_Load() method reads the image from disk and determines its size. Note that production code should probably use asynchronous I/O.
Registering and Using the Control
To use the control, first you register it on the page with the following directive after the Page directive (see image1.aspx):
<%@ Register Src="~/Controls/image.ascx" TagPrefix="ctl" TagName="image" %>
Then you invoke the control at the desired location on the page:
<ctl:image runat="server" src="~/CSG.png" alt="Test Image" />
When you run the page and view the HTML source, here’s the text generated by the control:
<img src="/web/csg.png" height="343" width="56" alt="Test Image" />
Notice that the URL for the image has been determined and is in lowercase and that the height and width properties are filled in, even though you didn’t provide them originally.
Placing Controls in an Assembly
It’possible to place controls in a DLL. Once there, although you can continue to use a version of the Register directive if you prefer, I find it’s easier and less error prone to do the registration in web.config. Let’s say that your controls are in an assembly called Sample, in a namespace called MyControls. You could register the controls in web.config as follows:
<system.web>

  . . .

  <pages . . .>

    <controls>

      <add tagPrefix="ctl" assembly="Sample" namespace="MyControls" />

      . . .

    </controls>

  </pages>

</system.web>
With that configuration change in place, you can reference controls in that assembly directly from your pages, without the need for a Register directive. Visual Studio will also provide IntelliSense for available control names.
Templated Controls
If you want your user control to wrap other controls at the point where you use it, a standard control won’t work. Instead, you need a templated control.
As an example, start with the markup for the control (see ControlsFrame.ascx):
<%@ Control Language="C#" AutoEventWireup="false" CodeFile="Frame.ascx.cs"

    Inherits="Controls_Frame" %>

<asp:Panel runat="server" ID="header">

</asp:Panel>

<asp:Panel runat="server" ID="center">

</asp:Panel>
It looks like a standard control so far, with two <asp:Panel> controls.
Next, add the code behind (see ControlsFrame.ascx.cs):
using System;

using System.Web.UI;


public partial class Controls_Frame : UserControl

{

    public string HeaderText { get; set; }

    private FrameContainer Container { get; set; }


    [TemplateContainer(typeof(FrameContainer))]

    [PersistenceMode(PersistenceMode.InnerProperty)]

    public ITemplate HeaderTemplate { get; set; }


    [TemplateInstance(TemplateInstance.Single)]

    [PersistenceMode(PersistenceMode.InnerProperty)]

    public ITemplate BodyTemplate { get; set; }
The class extends UserControl. Add the HeaderText property, a FrameContainer, and two ITemplate objects. The TemplateContainer attribute specifies the name of an associated INamingContainer, which the control needs to support data binding. The PersistenceMode.InnerProperty attribute specifies that the associated property persists in the control as a nested tag. The TemplateInstance.Single attribute says that there will only be one instance of the associated template in the control. That allows the compiler to make instances of child controls directly accessible by the page, without using FindControl.
The compiler (and Visual Studio) takes the names of the two templates directly from the property names.
    protected override void OnInit(EventArgs e)

    {

        if (this.HeaderTemplate != null)

        {

            this.Container = new FrameContainer();

            this.HeaderTemplate.InstantiateIn(this.Container);

            this.header.Controls.Add(this.Container);

        }

        if (this.BodyTemplate != null)

        {

            this.BodyTemplate.InstantiateIn(this.center);

        }

    }
In the OnInit event, if a HeaderTemplate exists, create the FrameContainer, instantiate HeaderTemplate (which includes the controls and other markup specified when the Frame control is used) in the container, then Add the container (with its controls) as a child of the header control (from the markup). For BodyTemplate, you don’t need data binding, so just instantiate it (and the controls carried with it) into the center control (from the markup).
    protected override void OnPreRender(EventArgs e)

    {

        base.OnPreRender(e);

        this.Container.HeaderText = this.HeaderText;

        this.Container.DataBind();

    }

}


public class FrameContainer : Control, INamingContainer

{

    public string HeaderText { get; set; }

}
In the OnPreRender event, set the HeaderText property of the FrameContainer to the HeaderText property of the control, and call DataBind() to process <%# %> type markup that may be in the HeaderTemplate.
Declare the FrameContainer class to inherit from Control and implement the INamingContainer interface. It only has one property, HeaderText.
Make the control visible to your pages by declaring it in web.config:
<system.web>

  . . .

  <pages>

    <controls>

      <add tagPrefix="ct" tagName="Frame" src="~/Controls/Frame.ascx"/>

    </controls>

  </pages>

</system.web>
To use the control (see frame1.aspx):
<ct:Frame runat="server" ID="Content" HeaderText="Header">

    <HeaderTemplate>

        <h1><%# Container.HeaderText %></h1>

    </HeaderTemplate>

    <BodyTemplate>

        <asp:Label ID="BodyLabel" runat="server" Text="Body" />

    </BodyTemplate>

</ct:Frame>
You set the value of the HeaderText property in the <ct:Frame> tag (or programmatically), and use it in HeaderTemplate via Container.HeaderText in a data binding marker.
You can override the Text property for the Label control from the code behind for the page, by referencing the control’s ID directly (see frame1.aspx.cs):
this.BodyLabel.Text = "from page load";
When you run the page, the control generates the following markup:
<div id="Content_header">

    <h1>Header</h1>

</div>

<div id="Content_center">

    <span id="Content_BodyLabel">from page load</span>

</div>
Themes
As with master pages and user controls, themes are helpful from an ultra-fast perspective because they allow you to factor out common code and put it in a central, easily managed location. Using a single central copy makes it easier and faster for you to change, debug, or performance tune. Avoiding code duplication also helps save time during development and debugging.
Static Files
Themes provide a way to group static files such as images, CSS, and JavaScript and to dynamically switch between those groups. When you apply a theme to a page, references to the CSS and script files it contains are automatically included in the <head> section of the generated HTML.
You can use themes as one aspect of implementing roles. You might assign regular users to one theme and administrators to another, with each having different CSS and JavaScript files. You can also use themes as part of a version migration (and fallback) strategy.
Unfortunately, themes in their current form suffer from some significant drawbacks, so they aren’t suitable for all projects. For example, you can’t specify the order in which CSS files will appear on a page (they are always included in lexicographic order) or which CSS files will be included (it’s always all of them). One of the biggest issues for me is that the runtime does not allow you to use any dynamic page generation technologies for theme files, so you can’t use an .aspx file to generate script or CSS in a theme.
Skins
Skins are collections of default property values for user controls. They are associated with a particular theme and are contained in one or more .skin files. Each set of default property values can be either unnamed or associated with a particular SkinId.
![]() Note You can’t specify certain control properties, such as
Note You can’t specify certain control properties, such as EnableViewState, in a skin.
You might think of skins as a very restricted variant of user controls, where you can only specify certain property values, with no code or nesting.
Setting Themes Dynamically
There are two different kinds of themes. Properties from a StyleSheetTheme are applied to controls first. Then properties at the Page level are applied. Finally, properties from a regular Theme are applied. In other words, in your Page you can override properties that are set in a StyleSheetTheme, and properties set in a regular Theme override the properties you set on the Page.
To set a regular Theme dynamically from a page, you must do so in the PreInit event. Here’s an example (see theme1.aspx.cs):
protected void Page_PreInit(object sender, EventArgs e)

{

    this.Theme = "mkt";

}
You can’t set the StyleSheetTheme property directly from a Page. You must instead override the property (see theme2.aspx.cs):
public override string StyleSheetTheme { get { return "mkt"; } }
You can also set site-wide defaults in web.config for both types of themes:
<system.web>

    . . .

    <pages styleSheetTheme="mkt">

        . . .

    </pages>

</system.web>
If you need to set a site-wide default programmatically instead of declaratively in web.config, you can do so from the PreRequestHandlerExecute event in an HttpModule. In that case, you can set either theme property directly.
Here’s an example:
public void Init(HttpApplication context)

{

    context.PostRequestHandlerExecute += this.Sample_PostRequestHandlerExecute;

}

private void Sample_PreRequestHandlerExecute(Object source, EventArgs e)
{

    HttpApplication application = (HttpApplication)source;

    HttpContext context = application.Context;

    Page page = context.Handler as Page;

    if (page != null)

    {

        page.StyleSheetTheme = "mkt";

    }

}
Normally, you would set a default theme programmatically or in web.config and then override the default declaratively or programmatically required.
Themable Properties
When you’re writing custom user controls, by default all public properties are themable. If there’s a public property that you don’t want to be settable from a skin, you should mark it with the [Themeable(false)] attribute.
For example, let’s say that you don’t want the alt property in the earlier user control example to be settable from a skin:
[Themeable(false)]

public string alt { get; set; }
You can disable theming for an entire control either by setting its EnableTheming property to false in the PreInit event handler or by overriding the EnableTheming property in a custom control.
Example: Theme and Skin
Images that you reference with a relative path from a skin or a CSS file in a theme will be contained in the theme.
Let’s say you have an image that you normally reference with an <asp:Image> tag that you want to be able to change from one theme to another. Right-click your web site in Solution Explorer, and select Add ASP.NET Folder and then Theme. That will create a folder called App_Themes at the top level of your site, along with an empty folder inside it. Rename the empty folder to mkt, which will be the name of the theme. Then create another folder called images in the mkt folder, which is where you will place the image files. Now you’re ready to create the .skin file. Call it mkt.skin, and place it in the mkt folder. The first part of the name of the .skin file is just for organizing or grouping; the runtime will collect all files in the theme that end in .skin and use them together. After including a few images and a CSS file, the resulting folder structure will look like Figure 6-2.
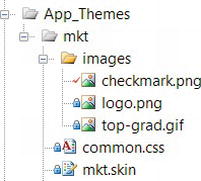
Figure 6-2. Folder structure for an ASP.NET theme
In the .skin file, add an <asp:Image> tag that references your image with a relative path, along with a SkinId that you will use later:
<asp:Image runat="server" SkinId="logo" ImageUrl="images/logo.png" />
As mentioned, the key here is that relative paths from a .skin file are resolved with respect to the skin, rather than with respect to the page. CSS files work the same way.
![]() Tip To specify custom controls in a
Tip To specify custom controls in a .skin file, either include a Register directive at the top of the .skin file, as with an .aspx page, or register the control or its assembly in web.config.
To use this image, first you need to specify the theme either at runtime, declaratively in the page itself, or in web.config. In this case, let’s put it in the page (see default.aspx):
<%@ Page Theme="mkt" Language="C#" AutoEventWireup="true"

    CodeFile="default.aspx.cs" Inherits="_default" %>
Finally, to reference the image, simply specify its SkinId in an <asp:Image> tag:
<asp:Image runat="server" SkinId="logo" />
The runtime will get the ImageUrl property from the .skin file. If the name of the image file changes, you can update it in the .skin file, and all references to it will automatically be changed. You might use this approach to help manage name changes for static files when you version them, as I discussed in Chapter 2. Instead of changing many .aspx pages that reference your static files, you can change just one or a few .skin files and then easily test the changes or fall back to the old version if you need to do so.
This approach is also useful to help consistently associate particular properties with an image, such as a CSS class or height and width.
In addition to images, you can apply skins to most controls. For some of the same reasons that it’s a good idea to move style-related information such as colors and fonts into CSS files, it’s also a good idea to move similar types of information into skins when it’s applied to controls in the form of properties.
Precaching Themed Images
An issue may come up when you’re implementing image precaching from JavaScript, as I discussed in Chapter 2, when you’re also using themes. A fixed path name won’t work correctly, since the path name changes when the theme changes. Paths can also be different in Cassini than in IIS. The solution is to use ResolveUrl and the current theme name to generate the required path:
<body onload="OnPageLoad">

. . .

<script type="text/javascript">

function OnPageLoad(evt) {

    var cim = new Image();

    cim.src = '<%= ResolveUrl("~/app_themes/" + this.StyleSheetTheme +

              "/images/logo.png") %>';

}

</script>

</body>
You could extend this technique to force lowercase URLs and to support multiple static domains for your images, along the lines shown later in this chapter.
Bundling and Minification
To help minimize round trips between browsers and your web server, the runtime can bundle multiple CSS or JavaScript files into a single file. In the process, it can also “minify” the files, by removing extra whitespace and so on.
To enable default bundling and minification processing, add the following code to Application_Start (see App_CodeGlobal.cs):
System.Web.Optimization.BundleTable.Bundles.EnableDefaultBundles();
If your JavaScript files are in the scripts folder, you would use the following markup to tell the runtime to bundle the *.js files in that folder into a single file, and minify the results (see bundle1.aspx):
<script src="scripts/js" type="text/javascript"></script>
The /js suffix is the trigger for the bundling and minification process. The runtime will determine the order of the script files within the bundle by sorting the file names, grouping the results by libraries, such as jQuery or Dojo, and placing the library files first. For example, jquery-1.7.1.min.js would come before aaa.js in the bundle. You should prefer preminified versions of libraries to dynamic minification when possible, such as in this example for jQuery.
The process is similar for CSS files. For example, if your *.css files are in the styles folder:
<link href="styles/css" rel="stylesheet" />
As before, the files in the bundle are ordered alphabetically by file name, except in this case, reset.css and normalize.css come first.
You can specify the path and which minifier to use (see App_CodeGlobal.cs):
Bundle bundle = new Bundle("~/jsf", typeof(JsMinify));

bundle.AddDirectory("~/scripts", "*.js", false);

BundleTable.Bundles.Add(bundle);
This would allow you to use the following markup:
<script src="/jsf" type="text/javascript"></script>
You can customize the order of the files within the bundle using the Orderer property of the Bundle class.
Caching Browser-Specific Pages
Pages that generate browser-specific markup or script on the server require extra care in order to be correctly output cached. You should vary the cache by specifying an appropriate value for VaryByCustom in the OutputCache directive, along with providing the corresponding logic in the GetVaryByCustomString method in global.asax.
The brute-force approach is to set VaryByCustom to "browser". That will cause the runtime to cache different versions of the page based on the browser’s type and major version number. This approach doesn’t require a custom GetVaryByCustomString method. However, if your only variations are for IE, Mozilla, and all others, the brute-force solution will result in caching many more versions of the page than you actually need. Instead, an optimized GetVaryByCustomString methodwould be better.
Here’s an example (see Global.cs):
public override string GetVaryByCustomString(HttpContext context, string custom)

{

    switch (custom.ToLower())

    {

        case "iemozilla":

            switch (context.Request.Browser.Browser.ToLower())

            {

                case "ie":

                case "blazer 3.0":

                    return "ie";

                case "mozilla":

                case "firebird":

                case "firefox":

                case "applemac-safari":

                    return "mozilla";

                default:

                    return "default";

            }

        default:

            return base.GetVaryByCustomString(context, custom);

    }

}
The runtime will cache different versions of the page for each different string that this method returns; the exact value of the strings doesn’t matter. In this case, we have up to three versions of each iemozilla page: ie, mozilla, and default (plus the base method, which handles the case where custom is "browser").
![]() Caution This approach relies on the
Caution This approach relies on the Request.Browser object, which ultimately uses the HTTP User-Agent string to try to deduce information about the browser. Unfortunately, as the variety of different devices, browsers, and spiders has increased, this technique has become unreliable, except in a very broad sense.
Then to configure output caching (see browser1.aspx):
<%@ OutputCache Duration="60" VaryByParam="None" VaryByCustom="ieMozilla" %>
The runtime passes the ieMozilla string assigned to VaryByCustom to the GetVaryByCustomString method.
Control Adapters
Part of the life cycle of a user control includes the Render phase, during which the control generates its output. It’s possible to use a control adapter to alter the output that a control generates.
Control adapters are useful for several things related to performance. For example, you might want to change a control to use a tableless layout or to shorten the markup. You can also use control adapters to modify some of the control’s properties before it’s rendered. You can use these features to implement some of the HTML optimization techniques from Chapter 2.
Example: Enforcing Lowercase URLs for Images
In the earlier example of a user control, one of the things that you did was to convert the image URL to lowercase. Let’s build a control adapter to do that automatically for all <asp:Image> controls (see App_CodeImageControlAdapter.cs):
using System;

using System.Web.UI.WebControls;

using System.Web.UI.WebControls.Adapters;


namespace Samples

{

    public class ImageControlAdapter : WebControlAdapter

    {

        public ImageControlAdapter()

        {

        }
Since the Image control derives from WebControl, derive the control adapter from WebControlAdapter.
        protected override void BeginRender(System.Web.UI.HtmlTextWriter writer)

        {

            Image image = Control as Image;

            if ((image != null) && !String.IsNullOrEmpty(image.ImageUrl))

            {

                if (!image.ImageUrl.StartsWith("http"))

                {

                    image.ImageUrl = this.Page.ResolveUrl(image.ImageUrl).ToLower();

                }

            }

            base.BeginRender(writer);

        }

    }

}
You need to override only one method in this case. The runtime will call BeginRender at the start of the rendering process for controls that are attached to this adapter. If the attached control is Image, and if its ImageUrl property is present and doesn’t refer to an external site (where URL case might matter), then replace it with a lowercase version that includes the full path. After that, just call base.BeginRender which will render the control as usual.
Next, to attach the control adapter to the Image control, create a file called adapter.browser in your App_Browser folder:
<browsers>

  <browser refID="Default">

    <controlAdapters>

      <adapter controlType="System.Web.UI.WebControls.Image"

               adapterType="Samples.ImageControlAdapter" />

    </controlAdapters>

  </browser>

</browsers>
You specify the ID of the browsers that you want this control adapter to be used for in the refID property. Since you want it to be used for all browsers in this case, specify Default. Specify the full type name of the Image control in the controlType property and the type of the new control adapter in the adapterType property.
To test the adapter, create a new web form and add an <asp:Image> control with an uppercase ImageUrl property. When you view the page in a browser and examine the source, you should see the URL in lowercase.
Example: Removing IDs from Panel, Hyperlink and Label Controls
You only need the HTML IDs that the runtime adds to controls, if you reference them from script. To reduce the size of your HTML slightly, you can use a control adapter to remove the ID strings when you don’t need them.
Begin by creating a page base class. The control adapter won’t affect pages unless they inherit from this class (see App_CodePageBase.cs):
using System;

using System.Web;

using System.Web.UI;


public class PageBase : Page

{

    protected override void OnInit(EventArgs e)

    {

        base.OnInit(e);

        this.RemoveIds = true;

    }


    public bool RemoveIds { get; set; }

}
The class adds a RemoveIds property, and sets it to true by default in the OnInit event handler. A page will be able to disable the new behavior by setting RemoveIds to false.
Here’s the code for the control adapter (see App_CodeNoIdControlAdapter.cs):
using System;

using System.IO;

using System.Web.UI;

using System.Web.UI.WebControls;

using System.Web.UI.WebControls.Adapters;


namespace Samples

{

    public class NoIdControlAdapter : WebControlAdapter

    {

        protected override void Render(HtmlTextWriter writer)

        {

            PageBase page = this.Page as PageBase;

            if ((page != null) && page.RemoveIds &&

                (this.Control.ClientIDMode != ClientIDMode.Static))

            {

                HtmlTextWriter noIdwriter = new NoIdHtmlWriter(writer);

                base.RenderBeginTag(noIdwriter);

                base.RenderContents(writer);
                base.RenderEndTag(noIdwriter);

            }

            else

            {

                base.Render(writer);

            }

        }

    }
In the Render method, first check to see if the page inherits from the new PageBase class, and if so, whether it has the RemoveIds flag set to true, and if the attached control does not have its ClientIDMode set to ClientIDMode.Static (which you could do if you wanted to reference the control from JavaScript). If the conditions are met, then you create an instance of the (new) NoIdHtmlWriter class, and use it to render the begin tag and end tag for the control, while rendering the contents of the control with the original HtmlTextWriter.
    public class NoIdHtmlWriter : HtmlTextWriter

    {

        public NoIdHtmlWriter(TextWriter writer)

            : base(writer)

        {

        }


        public override void AddAttribute(HtmlTextWriterAttribute key, string value)

        {

            if (key != HtmlTextWriterAttribute.Id)

                base.AddAttribute(key, value);

        }

    }

}
Declare the new NoIdHtmlWriter class to inherit from the standard HtmlTextWriter. Override the AddAttribute method, where you call the AddAttribute method of the base class for all attributes except ID, since you don’t want that one to appear in your final HTML.
Configure the runtime to use the control adapter by adding it to a .browser file in the App_Browsers folder (see App_Browsersadapter.browser):
<browsers>

  <browser refID="Default">

    <controlAdapters>

      <adapter controlType="System.Web.UI.WebControls.Panel"

               adapterType="Samples.NoIdControlAdapter" />

      <adapter controlType="System.Web.UI.WebControls.Label"

               adapterType="Samples.NoIdControlAdapter" />

      <adapter controlType="System.Web.UI.WebControls.HyperLink"

               adapterType="Samples.NoIdControlAdapter" />

    </controlAdapters>

  </browser>

</browsers>
You specify Default as the refID in the top–level <browser> element so that the runtime will apply the adapter for all browsers. You include one <adapter> element for each control that you want to attach to the new adapter: Panel, Label and HyperLink.
To use the adapter, create a new page based on the Form.master master page, and set the CodeFileBaseClass to PageBase (see noid1.aspx):
<%@ Page Title="" Language="C#" MasterPageFile="~/Master/Form.master" AutoEventWireup="true"

    CodeFile="noid1.aspx.cs" Inherits="noid1" CodeFileBaseClass="PageBase" %>

<asp:Content ID="Content1" ContentPlaceHolderID="IC" Runat="Server">

<asp:HyperLink runat="server" ID="MyHyperLink"

    NavigateUrl="~/noid1.aspx">Link</asp:HyperLink>

<asp:Panel runat="server" ID="MyPanel">Panel</asp:Panel>

<asp:Label runat="server" ID="MyLabel" Text="Label text"></asp:Label>

</asp:Content>
Here’s the code behind (see noid1.aspx.cs):
public partial class noid1 : PageBase

{

    protected void Page_Load(object sender, EventArgs e)

    {

        this.RemoveIds = false;

    }

}
Run the page the first time with RemoveIds set to false. The page generates the following HTML for the three controls:
<a id="ctl00_ctl00_BD_IC_MyHyperLink" href="noid1.aspx">Link</a>

<div id="ctl00_ctl00_BD_IC_MyPanel">Panel</div>

<span id="ctl00_ctl00_BD_IC_MyLabel">Label text</span>
Notice the long ID strings.
Next, set RemoveIds to true (or remove the code and rely on the default), and load the page again to see the modified HTML:
<a href="noid1.aspx">Link</a>

<div>Panel</div>

<span>Label text</span>
The ID strings are no longer present.
Browser Providers
.NET 4 introduced a feature called HttpCapabilitiesProviders, which allows you to determine the browser type and related capabilities programmatically, completely bypassing the default semi static mechanisms.
One advantage of this technique from a performance perspective is that it allows you to look at more than just the User-Agent string. You might use this approach to identify search engines and other bots, for example, by looking at cookies or access patterns.
As an example, create a file called BrowserProvider.cs in your App_Code folder:
using System;

using System.Collections;

using System.Web;

using System.Web.Caching;

using System.Web.Configuration;
namespace Samples

{

    public class BrowserProvider : HttpCapabilitiesProvider

    {

        public BrowserProvider()

        {

        }
The class inherits from HttpCapabilitiesProvider. You need to override only one method:
public override HttpBrowserCapabilities GetBrowserCapabilities(HttpRequest request)

{

    string key = "bw-" + request.UserAgent;

    Cache cache = HttpContext.Current.Cache;

    HttpBrowserCapabilities caps = cache[key] as HttpBrowserCapabilities;

    if (caps == null)

    {

        //

        // Determine browser type here...

        //

        caps = new HttpBrowserCapabilities();

        caps.AddBrowser("test");

        Hashtable capDict = new Hashtable(StringComparer.OrdinalIgnoreCase);

        capDict["browser"] = "Default";

        capDict["cookies"] = "true";

        capDict["ecmascriptversion"] = "0.0";

        capDict["tables"] = "true";

        capDict["w3cdomversion"] = "0.0";

        caps.Capabilities = capDict;

        cache.Insert(key, caps, null, Cache.NoAbsoluteExpiration,

            TimeSpan.FromMinutes(60.0));

    }

    return caps;

}
First, construct a key to use with the cache to see whether you have previously determined the HttpBrowserCapabilities object for the current User-Agent. The results are cached because this method can be called multiple times during a single request and because the lookup process might be time-consuming. To generate the cache key, prepend a fixed string to the User-Agent string to avoid potential collisions with other pages or applications.
If the cache lookup fails, then determine the browser type (not shown in the example), construct an HttpBrowserCapabilities object with an associated Hashtable of properties, and insert it into the cache.
The properties added in the example are the minimum set needed to display a very simple web page.
To enable the provider, make the following change to Global.cs:
using System.Web.Configuration;


void Application_Start(object sender, EventArgs e)

{

    HttpCapabilitiesBase.BrowserCapabilitiesProvider =

        new Samples.BrowserProvider();

}
To test the provider, create a page that displays Request.Browser.Id and Request.Browser.Browser. Notice that the results are different after enabling the provider.
Dynamically Generating JavaScript and CSS
JavaScript plays a critical role in all modern web sites. Unfortunately, though, the ugly reality is that JavaScript is not a type-safe language, and it’s interpreted rather than compiled. As a result, it tends to be a rich source of bugs, even on some of the world’s largest and busiest sites.
I’ve worked with development teams that seem to spend more time chasing bugs in JavaScript than they do in server-side code, even though the script is a small fraction of the size. Fortunately, widely used libraries such as jQuery have been a big step forward in that regard.
In addition to using standard libraries, you can minimize these types of problems in two other ways. The first, as I described earlier, is to replace script with Silverlight on the client when possible. The second is to minimize the size and complexity of your script by generating it dynamically on the server.
There is a similar story for CSS. I’ve seen extremely inventive yet terribly convoluted and hard to maintain code that handles browser differences in CSS. You can make your life much easier by dynamically generating the correct CSS on the server.
When thinking about how to make dynamic JavaScript and CSS work, consider for a moment what .aspx pages (and user controls) really are: a fancy way to generate text in response to an HTTP request. In the usual case, that text happens to be HTML, but it doesn’t have to be.
Example: Dynamic JavaScript
For example, create a new web form called script1.aspx, and replace the markup with the following:
<%@ Page EnableTheming="false" StylesheetTheme="" EnableViewState="false"

    AutoEventWireup="true" Language="C#" CodeFile="script1.aspx.cs"

    Inherits="script1" %>

alert('<%= "User Agent = " + Request.UserAgent %>'),
If you’re planning to use themes on your site, it’s important to set EnableTheming to false and StyleSheetTheme to an empty string. Otherwise, the runtime will generate an error saying that you need to include a <head runat="true"> tag. Unfortunately, setting those values in a central location such as an HttpModule won’t work.
Notice that the argument to alert includes text that will be dynamically generated when the file is requested.
In the code-behind:
protected void Page_Load(object sender, EventArgs e)

{

    this.Response.ContentType = "text/javascript";

}
This sets the MIME type of the response, which tells the browser what type of data it contains. If you want to generate CSS instead, the MIME type would be text/css.
Next, create a web form called script-test1.aspx, and insert the following at the top of the <body>:
<script type="text/javascript" src="script1.aspx">

</script>
Now view script-test1.aspx in a browser, and you should see an alert displayed from script1.aspx.
It’s possible to configure ASP.NET to process .js or .css files as though they were .aspx files. However, there are issues that prevent that from working right if you’re using themes. In particular, as I mentioned earlier, the runtime doesn’t allow dynamic files in the App_Themes folder, presumably to prevent accidental recursion.
Using JavaScript to Access Markup Generated by Controls
You can easily use JavaScript to access the markup generated by your user controls. Although the default IDs generated by the runtime in the final HTML are sometimes predictable, often they are not. The use of master pages, for example, will result in IDs that are different from the ones you specify for your controls.
To demonstrate, let’s say you have an <asp:Label> control on a page that uses a master page and you want to modify the content of the control on the client using jQuery (see script2.aspx):
<%@ Page MasterPageFile="~/master/Main.master" Language="C#" AutoEventWireup="true"

    CodeFile="script2.aspx.cs" Inherits="script2" %>

<asp:Content runat="server" ID="NW" ContentPlaceHolderID="LG">

<asp:Label runat="server" ID="myInfo" Text="Initial text" />

<script type="text/javascript" src="scripts/jquery-1.7.1.min.js"></script>

<script type="text/javascript">

    $('#<%= myInfo.ClientID %>').text('Replacement text'),

</script>

</asp:Content>
You call myInfo.ClientID to get the HTML ID for the control.
The runtime generates the following HTML for the <asp:Label> control:
<span id="ctl00_LG_myInfo">Initial text</span>
The generated JavaScript looks like this:
<script type="text/javascript">

    $('#ctl00_LG_myInfo').text('Replacement text'),

</script>
You can use the ClientIDMode property on controls to change the way the runtime generates HTML IDs. The most useful alternative to the default setting is Static, which sets the HTML ID to be the same as the ASP.NET control ID. For example:
<asp:Label runat="server" ID="myInfo" Text="Initial text" ClientIDMode="Static" />
The generated HTML is:
<span id="myInfo">Initial text</span>
This can simplify your JavaScript in cases where you don’t use the same control on your page more than once, by not requiring the use of ClientID to discover the HTML ID.
Multiple Domains for Static Files
One of the suggestions I made in Chapter 2 was to distribute your image files among multiple subdomains, which can allow the browser to do more downloading in parallel. To maximize cacheability on the client and in proxies, you shouldn’t make that assignment randomly; you should do it in a deterministic way so that the same image is always mapped to the same subdomain.
One approach you could take for images is to extend the <ctl:image> user control that I described earlier in the “User Controls” section. Since you are already manipulating the URL of the image there, it would be straightforward to add support for multiple subdomains.
Here’s an example (see Controlsimagesub.ascx.cs):
private string _src;

private static string[] subdomains = {

    "http://s1.12titans.net",

    "http://s2.12titans.net",

    "http://s3.12titans.net"

};


public string src

{

    get

    {

        HttpContext ctx = HttpContext.Current;

        if (ctx.Request.Url.Host != "localhost")

        {

            if (!String.IsNullOrEmpty(this._src) && !this._src.StartsWith("http") &&

                !this._src.StartsWith("data:"))

            {

                int n = Math.Abs(this._src.GetHashCode()) % subdomains.Length;

                return subdomains[n] + this._src;

            }

        }

        return this._src;

    }

    set

    {

        this._src = ResolveUrl(value).ToLowerInvariant();

    }

}


public int height { get; set; }

public int width { get; set; }

public string alt { get; set; }
The example code does not change the URL when it’s running on your local machine, when the image comes from another site or when it’s a data URL.
You could apply this same technique in a control adapter for the <asp:Image> control, in addition to making the URL lowercase as in the earlier example.
![]() Note The standard
Note The standard GetHashCode() function does not return the same result in the x86 version of the .NET Framework as it does in the x64 version. If you’re doing development or testing in one environment and deploying in another, you may want to provide your own version of a hashing function to ensure consistent results.
In a production version of this code, you might want to add logic to minimize the effects of adding new domains or removing old ones. This would also be a good place to automatically apply similar mappings for a content distribution network.
Image Resizing
As I mentioned in Chapter 2, images often represent a significant fraction of both the data required by the browser to render a page fully and a site’s bandwidth use. For those reasons, it’s important to make sure that you don’t send large images to the client when smaller ones will work just as well. If your images are too big or have a much higher quality than your users need, you might of course choose to resize or recompress them statically: figure out all the right sizes and compression factors, run them through a tool of some kind, and you’re done. However, if you have tens of thousands, or perhaps tens of millions of images like some sites do, that can be more than a little tedious.
An alternative is to resize and recompress your images dynamically and cache the results as you go. You might create a user control to do that, for example, or for a large library of images, you might do it in a background thread. Since the number and size of the images could be large and since IIS has an efficient method for caching static files, you should generally store the resized images as files rather than in memory.
Here’s an example of a routine that can resize JPEG and GIF images. For JPEGs, you can specify a level of compression between 0 and 100, with 0 being maximum compression and minimum size and with 100 being minimum compression and maximum size. You specify the size of the resized image as the length of the longest dimension. You might use this to create thumbnails, for example, that all fit in a 100 × 100 pixel area.
See App_CodeImageResizer.cs:
using System;

using System.Drawing;

using System.Drawing.Imaging;

using System.Drawing.Drawing2D;

using System.IO;

using System.Threading.Tasks;


namespace Samples

{

    public class ImageResizer

    {

        private static ImageCodecInfo jpgEncoder;


        public async static void ResizeImage(string inFile, string outFile,

            double maxDimension, long level)

        {

            byte[] buffer;

            using (Stream stream = new FileStream(inFile, FileMode.Open))

            {

                buffer = new byte[stream.Length];

                await Task<int>.Factory.FromAsync(stream.BeginRead, stream.EndRead,

                    buffer, 0, buffer.Length, null);

            }

            using (MemoryStream memStream = new MemoryStream(buffer))

            {

                using (Image inImage = Image.FromStream(memStream))

                {
Mark the method with the async keyword to indicate that it contains a Task-based asynchronous operation using the await keyword.
Read the image file with a FileStream into a byte array. By wrapping the BeginRead and EndRead calls with the FromSync() method, you create an await-able Task<int>, which allows you to use asynchronous I/O without building a separate continuation method. After the read completes, you wrap the byte array with a MemoryStream, and use it to build an Image object.
                    double width;

                    double height;


                    if (inImage.Height < inImage.Width)

                    {

                        width = maxDimension;

                        height = (maxDimension / (double)inImage.Width) * inImage.Height;

                    }

                    else

                    {

                        height = maxDimension;

                        width = (maxDimension / (double)inImage.Height) * inImage.Width;

                    }

                    using (Bitmap bitmap = new Bitmap((int)width, (int)height))

                    {

                        using (Graphics graphics = Graphics.FromImage(bitmap))

                        {
After calculating the dimensions of the new image based on the given parameters and the dimensions of the original image, create an empty Bitmap object that will contain the resized image and a Graphics object that you can use to draw into the Bitmap.
                            graphics.SmoothingMode = SmoothingMode.HighQuality;

                            graphics.InterpolationMode =

                                InterpolationMode.HighQualityBicubic;

                            graphics.DrawImage(inImage, 0, 0, bitmap.Width, bitmap.Height);
Copy the original image into the Bitmap using the Graphics object, resizing it as you go according to the parameters specified for SmoothingMode and InterpolationMode.
                            if (inImage.RawFormat.Guid == ImageFormat.Jpeg.Guid)

                            {

                                if (jpgEncoder == null)

                                {

                                    ImageCodecInfo[] ici =

                                        ImageCodecInfo.GetImageDecoders();

                                    foreach (ImageCodecInfo info in ici)

                                    {

                                        if (info.FormatID == ImageFormat.Jpeg.Guid)

                                        {

                                            jpgEncoder = info;

                                            break;

                                        }

                                    }

                                }
If the original image is in the JPEG format and you haven’t previously found the corresponding ImageCodecInfo object, then look it up now.
                                if (jpgEncoder != null)

                                {

                                    EncoderParameters ep = new EncoderParameters(1);

                                    ep.Param[0] = new EncoderParameter(Encoder.Quality,

                                        level);

                                    bitmap.Save(outFile, jpgEncoder, ep);

                                }

                                else

                                    bitmap.Save(outFile, inImage.RawFormat);

                            }

                            else

                            {

                                //

                                // Fill with white for transparent GIFs

                                //

                                graphics.FillRectangle(Brushes.White, 0, 0, bitmap.Width,

                                    bitmap.Height);

                                bitmap.Save(outFile, inImage.RawFormat);

                            }
If the original image was a JPEG, then set the compression level of the output image based on the specified input parameter, and encode the image. Otherwise, encode the output image in the same format as the original image.
                        }

                    }

                }

            }

        }

    }

}
To use the method during a page request, first set the Async property for the page to true (see resize1.aspx):
<%@ Page Language="C#" AutoEventWireup="true" CodeFile="resize1.aspx.cs"

    Inherits="resize1" Async="true" %>
Then call the method (see resize1.aspx.cs):
ImageResizer.ResizeImage(this.Server.MapPath("~/launch.jpg"),

                         this.Server.MapPath("~/launch_th.jpg"), 150.0, 60);
Summary
In this chapter, I covered the following:
- Using master pages, user controls, and themes and skins to encapsulate high-performance implementations to improve code reuse and to reduce the time it takes you to make changes to your site
- Using bundling and minification to reduce the size of your JavaScript and CSS files, and the number of round trips it takes to retrieve them
- Applying output caching to user controls and browser-specific pages
- Using control adapters to modify the output of user controls to produce optimized HTML and to implement some of the optimization techniques from Chapter 2
- Using
HttpCapabilitiesProviderto determine browser type and related capabilities programmatically- Generating JavaScript and CSS dynamically using the same mechanisms you use to generate HTML
- Accessing HTML generated by ASP.NET controls from JavaScript
- Generating consistent domains for static files, as suggested in Chapter 2
- Dynamically resizing images, with asynchronous I/O and optimized compression for JPEGs