
C H A P T E R 5
ASP.NET Threads and Sessions
For many ASP.NET-based web sites, an effective way to improve site performance and scalability is by thoroughly addressing issues related to threads and sessions.
In this chapter, I’ll cover the following:
- The very negative impact of using synchronous pages when you make out-of-process or off-server calls
- Improving the scalability of your site by using asynchronous pages and background worker threads
- A brief overview of locking as it applies to asynchronous programming
- The scalability impact of the default session state provider, why it’s best to avoid session state if you can, and what the alternatives are
- An approach to building a customized and highly scalable session state provider
Threads Affect Scalability
I’ve noticed that many large sites end up spending a lot of effort optimizing their systems in the wrong places.
As an example, let’s say that you’re building a one-page site that should support 1,200 simultaneous users, with a response time of one second or less, and you have plans to scale-up later on to 120,000 users.
During load testing, you reach your maximum acceptable response time after reaching 120 simulated users on a single CPU, and the CPU is 24% busy. As you increase the load, you find that CPU use stays the same, but response time increases. By the time you reach 1,200 users, response time is ten seconds—ten times what it was at 120 users.
At this stage, you will need ten CPU cores (best case, assuming linear scaling) to support your target user load and performance goals in the short term, and 1,000 cores in the long term.
To determine to what extent you can to optimize this scenario, you measure the time it takes to process each phase of a single request on an unloaded machine. The results are in Figure 5-1.
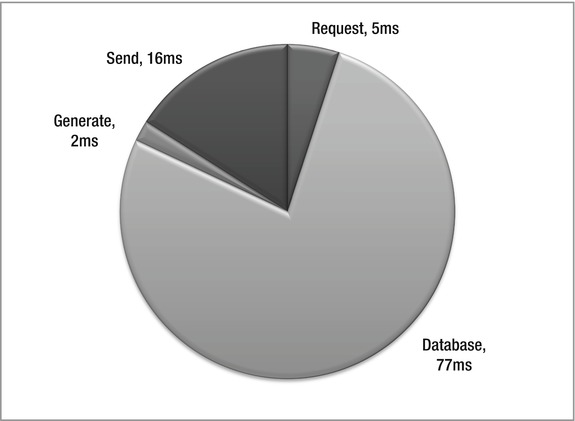
Figure 5-1. Time to process a hypothetical web page request
You find that receiving 0.5KB at 128Kbps takes 5ms, obtaining the needed data from the database takes 77ms, generating the response HTML takes 2ms, and sending the 5KB response at 384Kbps takes 16ms.
When faced with data like this, the first place many developers would look for improvements is the slowest part of the process, which in this case is the database access. In some environments, the database is a black box, so you can’t tune it. When you can, the usual approach is to put a lot of emphasis on query optimization. Although that certainly can be helpful, it often doesn’t completely solve the problem. In later chapters, I’ll show some reasons why that’s the case and what you can do about it. For this example, let’s assume the queries are already fully tuned.
The next largest chunks of time are spent receiving the request and sending the response. A typical initial reaction of developers is that “you can’t do anything about the client’s data transmission rates, so forget about the request and response times.” As I’ve shown in Chapter 2, that clearly is not the whole story.
That leaves the time to generate the HTML, which in this case is only 2 percent of the total request-processing time. Because that part of the application appears to developers to be most readily under their control, optimizing the time spent there is often where they end up spending their performance improvement efforts. However, even if you improve that time by 50 percent, down to 1ms, the overall end-to-end improvement seen by end users may only be 1 percent. In this example, CPU use would decline to 12 percent, but you would still need the same total number of CPUs; it doesn’t improve scalability.
I would like to suggest looking at this problem in a much different way. In a correctly designed architecture, the CPU time spent to process a request at the web tier should not be a primary factor in overall site performance or scalability. In the previous example, an extra 2ms one way or the other won’t be noticeable by an end user.
In this example, and often in the real world as well, reducing the CPU time spent by the web tier in generating the pages reduces the CPU load on each machine, but it doesn’t improve throughput or reduce the number of machines you need.
What’s happening in the example is that the site’s throughput is limited by the IIS and ASP.NET thread pools. By default, there are 12 worker threads per CPU. Each worker processes one request at a time, which means 12 requests at a time per CPU. If clients present new requests when all of the worker threads are busy, they are queued.
Since each request takes 100ms to process from end to end, one thread can process ten requests per second. With 12 requests at a time, that becomes 120 requests per second. With 2ms of CPU time per request, 120 * 0.002 = 0.24 or 24% CPU use.
The solution to scalability in this case is to optimize thread use, rather than minimizing CPU use. You can do that by allowing each worker thread to process more than one request at a time, using asynchronous database requests. Using async requests should allow you either to reach close to 100% CPU use, or to push your scalability issues to another tier, such as the database. At 100% CPU use, you would only need one quarter of the CPUs you did at the start.
Adding more worker threads can help in some cases. However, since each thread has costs associated with it (startup time, memory, pool management, context switch overhead), that’s only effective up to a point.
In this example, caching helps if you can use it to eliminate the database request. Threads come into play when you can’t. When CPU use per server averages 70 to 80+ percent under peak load, then it tends to become a determining factor for how many CPUs you need. At that stage, it makes sense to put effort into optimizing the CPU time used by the application—but to minimize the number of servers you need, not to improve performance from the user’s perspective.
Of course, there are cases where CPU use is the dominant factor that you should address first, but once a site is in production, those cases tend to be the exception and not the rule. Developers and testers tend to catch those cases early. Unfortunately, threading issues often don’t appear until a site goes into production and is under heavy load.
Low CPU use per server is one reason some sites have found that using virtual machines (VMs) or IIS web gardens can improve their overall throughput. Unfortunately, VMs add overhead and can complicate operations, deployment, and maintenance. You should weigh those options against the effort to modify your applications to improve thread use through async requests and related optimizations covered in this chapter.
ASP.NET Page Life Cycle
As I discussed in Chapter 4, HTTP requests processed by IIS go through a series of states on the way to generating a response. Similarly, ASP.NET pages also go through a series of states. As with IIS, the runtime generates events at each state that you can register a handler for and take action on. See Figure 5-2 for a diagram of the standard synchronous page life cycle and associated events.
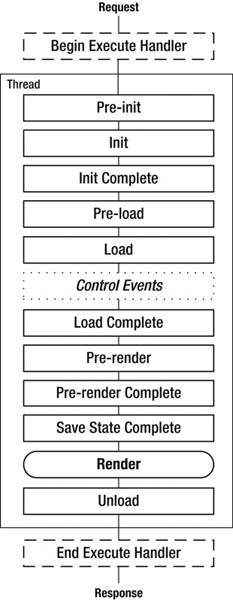
Figure 5-2. ASP.NET page processing life cycle and events
The HTTP request enters the page-processing pipeline at the top of the figure, when IIS starts to execute the Page Handler (see also Figure 4-2). As the processing progresses, the runtime moves from one state to another, calling all registered event handlers as it goes. In the synchronous case, a single thread from the ASP.NET thread pool does all the processing for the page.
![]() Note The
Note The Render phase is not an event. All pages and controls have a Render() method that’s responsible for generating the output that will be sent to the client.
For Init and Unload, the runtime fires the events for child controls before the parent (bottom–up), so the Page events fire last. For Load and PreRender, the runtime fires events in the parent followed by child events (top–down), so Page events fire first. The other events in the figure above, except for Control Events, only exist at the Page level, not in controls. The runtime treats master pages as child controls of the Page.
DataBind is an optional event that happens after PreRender either when you set a DataSourceID declaratively, or when you call DataBind().
If you have code blocks in your markup (using <%= %>), the runtime executes that code during the Render phase. That’s why you can’t set control properties using code blocks; controls are instantiated, including setting their initial properties, at the beginning of the page life cycle, whereas Render happens at the end.
Instead of the usual serial and synchronous approach, it’s possible to configure a page to run asynchronously. For asynchronous pages, ASP.NET inserts a special “async point” into the page life cycle, after the PreRender event. One thread executes the part of the life cycle before the async point and starts the async requests. Then the same thread, or possibly a different one from the thread pool, executes the rest of the life cycle after the async point. See Figure 5-2.
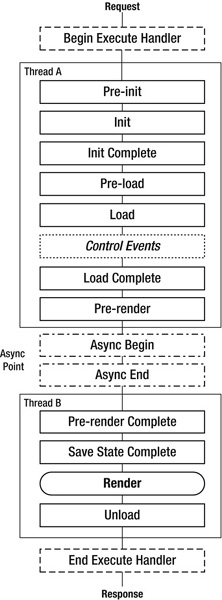
Figure 5-3. Asynchronous page processing life cycle and events
Application Thread Pool
Let’s put together a test case to demonstrate how the application thread pool processes both sync and async pages.
Synchronous Page
Add a new web form in Visual Studio, and call it sql-sync.aspx. Keep the default markup, and use the following code-behind:
using System;

using System.Data.SqlClient;

using System.Web.UI;


public partial class sql_sync : Page

{

    public const string ConnString = "Data Source=.;Integrated Security=True";


    protected void Page_Load(object sender, EventArgs e)

    {

        using (SqlConnection conn = new SqlConnection(ConnString))

        {

            conn.Open();

            using (SqlCommand cmd = new SqlCommand("WAITFOR DELAY '00:00:01'", conn))

            {

                cmd.ExecuteNonQuery();

            }

        }

    }

}
The code connects to SQL Server on the local machine and issues a WAITFOR DELAY command that waits for one second.
![]() Note I’m using a connection string that’s compatible with a local default instance of a “full” edition of SQL Server, such as Developer, Enterprise or Standard. If you’re using SQL Server Express, which works with most (but not all) of the examples in the book, the
Note I’m using a connection string that’s compatible with a local default instance of a “full” edition of SQL Server, such as Developer, Enterprise or Standard. If you’re using SQL Server Express, which works with most (but not all) of the examples in the book, the Data Source field should be .SQLEXPRESS. In both cases, the dot is shorthand for localhost or your local machine name. I’m showing connection strings in-line for clarity. In a production application, you should usually store them in web.config or a related configuration file.
You don’t need to specify which database to connect to, since you aren’t accessing any tables or other securables.
Asynchronous Page Using the Asynchronous Programming Model
Next, create another page called sql-async.aspx. Change the Page directive in the markup file to include Async="true":
<%@ Page Language="C#" Async="true" AutoEventWireup="true"

    CodeFile="sql-async.aspx.cs" Inherits="sql_async" %>
That tells the runtime that this page will be asynchronous, so it will create the async point as in Figure 5-3.
Next, create the code-behind as follows, using the asynchronous programming model (APM):
using System;

using System.Data.SqlClient;

using System.Web;

using System.Web.UI;


public partial class sql_async : Page

{

    public const string ConnString = "Data Source=.;Integrated Security=True;Async=True";
Here you are including Async=True in the connection string to inform SQL Server that you will be issuing asynchronous queries. Using async queries requires a little extra overhead, so it’s not the default.
    protected void Page_Load(object sender, EventArgs e)

    {

        PageAsyncTask pat = new PageAsyncTask(BeginAsync, EndAsync, null, null, true);

        this.RegisterAsyncTask(pat);

    }
In the Page_Load() method, you create a PageAsyncTask object that refers to the BeginAsync() method that the runtime should call to start the request and the EndAsync() method that it should call when the request completes. Then you call RegisterAsyncTask() to register the task. The runtime will then call BeginAsync() before the PreRenderComplete event, which is fired before the markup for the page is generated.
    private IAsyncResult BeginAsync(object sender, EventArgs e,


        AsyncCallback cb, object state)

    {

        SqlConnection conn = new SqlConnection(ConnString);

        conn.Open();

        SqlCommand cmd = new SqlCommand ("WAITFOR DELAY '00:00:01'", conn);

        IAsyncResult ar = cmd.BeginExecuteNonQuery(cb, cmd);

        return ar;

    }
The BeginAsync() method opens a connection to SQL Server and starts the WAITFOR DELAY command by calling BeginExecuteNonQuery(). This is the same database command that was used in the synchronous page, but BeginExecuteNonQuery() ddoesn’t wait for the response from the database like ExecuteNonQuery() does.
    private void EndAsync(IAsyncResult ar)

    {

        using (SqlCommand cmd = (SqlCommand)ar.AsyncState)

        {

            using (cmd.Connection)

            {

                int rows = cmd.EndExecuteNonQuery(ar);

            }

        }

    }

}
The runtime will call EndAsync() when the async database call completes. EndAsync() calls EndExecuteNonQuery() to complete the command. You have two using statements that ensure Dispose() is called on the SqlConnection and SqlCommand objects.
Keep in mind when writing async pages that it doesn’t help to perform CPU–intensive operations asynchronously. The goal is to give up the thread when it would otherwise be idle waiting for an operation to completeso that it can do other things. If the thread is busy with CPU–intensive operations and does not go idle, then using an async task just introduces extra overhead that you should avoid.
Asynchronous Page Using the Task–Based Asynchronous Pattern
Starting in .NET 4.5, you have the option of implementing async pages using the task–based asynchronous pattern (TAP), which results in code that’s easier to read, write, and maintain (see sql-async2.aspx.cs):
using System;

using System.Data.SqlClient;

using System.Threading.Tasks;

using System.Web.UI;


public partial class sql_async2 : Page

{

    public const string ConnString = "Data Source=.;Integrated Security=True;Async=True";


    protected async void Page_PreRender(object sender, EventArgs e)

    {

        using (SqlConnection conn = new SqlConnection(ConnString))

        {

            conn.Open();

            using (SqlCommand cmd = new SqlCommand("WAITFOR DELAY '00:00:01'", conn))

            {

                await Task.Factory.FromAsync<int>(cmd.BeginExecuteNonQuery,

                                                  cmd.EndExecuteNonQuery, null);

            }

        }

    }

}
The connection string and the Page directive still require Async=True. Instead of using the async Begin and End methods directly, you add the async keyword to the Page_PreRender event handler, and structure the database calls nearly as you would for the synchronous case. However, instead of using ExecuteNonQuery(), you call Task.Factory.FromAsync() with the names of the Begin and End methods, and prefix the call with the await keyword. That will start the async operation and create a hidden, in–place continuation that the runtime will call when it completes.
With this approach, note that the thread returns to the thread pool right after starting the request, so the runtime won’t execute any code after the line with the await keyword until after the async request completes.
One difference between using TAP and APM for async pages is that TAP starts the async operation right away, whereas by default APM queues the async request and doesn’t start it until the async point, right after the PreRender event.
Asynchronous vs. Synchronous Load Tests
For the tests below to work as I describe, use Windows Server 2008 or 2008 R2. Threading behaves differently with IIS on Vista or Windows 7, which support only either three or ten simultaneous requests, depending on the edition you’re using.
Add the new pages to a web site that’s running under IIS (not IIS Express or Cassini), and check to make sure they’re working.
Let’s use the same load test tool as in Chapter 3, WCAT. Create the configuration file as follows in the WCAT Controller folder, and call it c2.cfg:
Warmuptime 5s

Duration 30s

CooldownTime 0s

NumClientMachines 1

NumClientThreads 100
The test will warm up for 5 seconds and run for 30 seconds, using a single client process with 100 threads.
Let’s test the synchronous case first. Create the test script in the same folder, and call it s2.cfg:
SET Server = "localhost"

SET Port = 80

SET Verb = "GET"

SET KeepAlive = true


NEW TRANSACTION

classId = 1

Weight = 100

NEW REQUEST HTTP

URL = "/sql-sync.aspx"
You can of course adjust the server name or port number if needed.
Load Test Results
You are now ready to run the first test. Open one window with the WCAT Controller and another with the WCAT Client. In the controller window, start the controller as follows:
wcctl-a localhost -c c2.cfg -s s2.cfg
In the client window, start the client:
wcclient localhost
I used a virtual machine for the test, configured as a single CPU socket with four cores, running Windows Server 2008 R2 x64 and IIS 7.5 with .NET 4.5. I ran WCAT from the host, with Windows 7 Ultimate x64. I started the test right after restarting the AppPool. Here are the results, as shown in the client window at the 10, 20, and 30-second points:
Total 200 OK                :            133      (   13/Sec)

Avg. Response Time (Last)   :           8270 MS


Total 200 OK                :            370      (23/Sec)

Avg. Response Time (Last)   :           6002 MS


Total 200 OK                :            701      (23/Sec)

Avg. Response Time (Last)   :           4680 MS
Even though the only thing the page does is to sleep for one second, the server is able to deliver just 13 to 23 requests per second, and the average response time ranges from 8.3 to 4.7 seconds.
Next, change the URL in s2.cfg to refer to one of the async pages, recycle the AppPool, and repeat the test. Here are the results:
Total 200 OK                :           1000      (100/Sec)

Avg. Response Time (Last)   :           1001 MS


Total 200 OK                :           2000      (100/Sec)

Avg. Response Time (Last)   :           1001 MS


Total 200 OK                :           3000      (100/Sec)

Avg. Response Time (Last)   :           1002 MS
The number of requests per second has increased by a factor of four, to 100 per second, and the response time has decreased to one second—which is what you would expect with 100 request threads each running a task that sleeps for one second.
![]() Note If you increase
Note If you increase NumClientThreads above 100 for the async test case, you will find that the load test slows down again. This happens because the SQL Server client API by default supports a maximum of 100 simultaneous connections per unique connection string. Beyond that, connection requests to the database are queued. You can increase the maximum by setting Max Pool Size in the connection string.
Why is the synchronous case so much slower?
In the synchronous test case, one thread can handle only one request at a time. Since there were 13 requests per second at the 10-second mark, and since each request ties up a thread the whole time it runs, you can tell that there were 13 threads, or roughly two three per CPU core. By 20 seconds, there were 23 requests per second, which means 23 threads, or roughly six per core. The runtime added more threads when it detected requests that were being queued.
Since creating new threads is a relatively expensive operation, the runtime adds them slowly, at a maximum rate of about two per second. This can cause accentuated performance problems on web sites with relatively bursty traffic, since the thread pool may not grow quickly enough to eliminate request queuing.
In the async case, after a thread starts the async operation, the thread returns to the pool, where it can go on to process other requests. That means it takes far fewer threads to process even more requests.
Tuning the IIS Application Thread Pool
You can tune the thread pool in IIS 7 and 7.5 by editing the Aspnet.config file, which is located in C:WindowsMicrosoft.NETFrameworkv4.0.30319. Here’s an example:
<configuration>

    . . .

    <system.web>

        <applicationPool maxConcurrentRequestsPerCPU="5000"

                         maxConcurrentThreadsPerCPU="0"

                         requestQueueLimit="5000" />

    </system.web>

</configuration>
The parameters in the example are the same as the defaults for .NET 4.5. After updating the file, you will need to restart IIS in order for the changes to take effect. If you rerun the previous tests, you should see that they both produce the same results.
You can also get or set two of these parameters programmatically, typically from Application_Start in global.asax:
using System.Web.Hosting;


HostingEnvironment.MaxConcurrentRequestsPerCPU = 5000;

HostingEnvironment.MaxConcurrentThreadsPerCPU = 0;
You can adjust the limits on the number of concurrent requests per CPU with the maxConcurrentRequestsPerCPU parameter, and the threads per CPU with the maxConcurrentThreadsPerCPU parameter. A value of 0 means that there is no hard limit. One parameter or the other can be set to 0, but not both. Both can also have nonzero values. Enforcing thread limits is slightly more expensive than enforcing request limits.
The number of concurrent requests and concurrent threads can only be different when you’re using async pages. If your pages are all synchronous, each request will tie up a thread for the duration of the request.
![]() Note In addition to the concurrent request limits that IIS imposes, the
Note In addition to the concurrent request limits that IIS imposes, the http.sys driver has a separately configured limit, which is set to 1,000 connections by default. If you reach that limit, http.sys will return a 503 Service Unavailable error code to clients. If you see those errors in your IIS logs (or if they are reported by users), consider increasing the Queue Length parameter in AppPool Advanced Settings.
For most applications, the defaults in .NET 4.5 work fine. However, in some applications, serializing requests to some degree at the web tier by reducing maxConcurrentRequestsPerCPU or by using maxConcurrentThreadsPerCPU instead can be desirable in order to avoid overloading local or remote resources. For example, this can be the case when you make heavy use of web services or when the number of threads in the thread pool becomes excessive. In mixed–use scenarios, you may find that it’s better to implement programmatic limits on resource use, rather than trying to rely entirely on the runtime.
In sites whose primary off-box calls are to SQL Server, it’s usually better to allow many simultaneous requests at the web tier, and let the database handle queuing and serializing the requests. SQL Server can complete some requests quickly, and in a large-scale environment, there might be multiple partitioned database servers. In those cases, the web tier just doesn’t have enough information for a policy of substantially limiting the number of simultaneous requests to be an effective performance-enhancing mechanism.
Improving the Scalability of Existing Synchronous Pages
Since increasing the maximum number of concurrent requests or threads won’t help the sync test case, if you have a large site with all-sync requests, you might be wondering whether there’s anything you can do to improve throughput while you’re working on converting to async. If your application functions correctly in a load-balanced arrangement and you have enough RAM on your web servers, then one option is to configure your AppPools to run multiple worker processes as a web garden.
In the previous sync test case, if you configure the AppPool to run two worker processes, throughput will double. One price you pay for multiple workers is increased memory use; another is increased context switch overhead. Data that can be shared or cached will need to be loaded multiple times in a web garden scenario, just as it would if you were running additional web servers.
Executing Multiple Async Tasks from a Single Page
While developing async pages, you will often run into cases where you need to execute multiple tasks on a single page, such as several database commands. Some of the tasks may not depend on one another and so can run in parallel. Others may generate output that is then consumed by subsequent steps. From a performance perspective, it’s usually best to do data combining in the database tier when you can. However, there are also times where that’s not desirable or even possible.
Executing Tasks in Parallel Using APM
The first solution to this issue works when you know in advance what all the steps will be and the details of which steps depend on which other steps. The fifth (last) argument to the PageAsyncTask constructor is the executeInParallel flag. You can register multiple PageAsyncTask objects with the page. When you do, the runtime will start them in the order they were registered. Tasks that have executeInParallel set to true will be run at the same time. When the flag is set to false, those tasks will run one at a time, in a serialized fashion.
For example, let’s say that you have three tasks, the first two of which can run at the same time, but the third one uses the output of the first two, so it shouldn’t run until they are complete (see async-parallel.aspx):
protected void Page_Load(object sender, EventArgs e)

{

    PageAsyncTask pat = new PageAsyncTask(BeginAsync1, EndAsync1, null, null, true);

    this.RegisterAsyncTask(pat);

    pat = new PageAsyncTask(BeginAsync2, EndAsync2, null, null, true);

    this.RegisterAsyncTask(pat);

    pat = new PageAsyncTask(BeginAsync3, EndAsync3, null, null, false);
    this.RegisterAsyncTask(pat);

}
The executeInParallel flag is set to true for the first two tasks, so they run simultaneously. It’s set to false for the third task, so the runtime doesn’t start it until the first two complete.
The fourth argument to the PageAsyncTask constructor is a state object. If you provide a reference to one, it will be passed to your BeginEventHandler. This option can be helpful if the BeginEventHandler is in a different class than your page, such as in your data access layer (DAL).
Executing Async Tasks After the PreRender Event
The other approach to this issue relies on the fact that the runtime won’t advance to the next state in the page-processing pipeline until all async tasks are complete. That’s true even if you register those tasks during the processing of other async tasks. However, in that case, you need to take one extra step after registering the task, which is to start it explicitly.
The following builds on the previous sql-async.aspx example (see async-seq.aspx):
private void EndAsync(IAsyncResult ar)

{

    using (SqlCommand cmd = (SqlCommand)ar.AsyncState)

    {

        using (cmd.Connection)

        {

            int rows = cmd.EndExecuteNonQuery(ar);

        }

    }

    PageAsyncTask pat = new PageAsyncTask(BeginAsync2, EndAsync2, null, null, true);

    this.RegisterAsyncTask(pat);

    this.ExecuteRegisteredAsyncTasks();

}
The call to ExecuteRegisteredAsyncTasks() will start any tasks that have not already been started. It’s not required for tasks that you’ve registered before the end of PreRender event processing. This approach also allows the tasks to be conditional or to overlap in more complex ways than the executeInParallel flag allows.
You can also call ExecuteRegisteredAsyncTasks() earlier in the page life cycle, which will cause the runtime to execute all registered tasks at that time, rather than at the async point. Tasks are called only once, regardless of how many times you call ExecuteRegisteredAsyncTasks().
Executing Tasks in Parallel Using TAP
You can also use TAP to execute tasks in parallel (see async-parallel2.aspx.cs):
using System;

using System.Data.SqlClient;

using System.Threading.Tasks;

using System.Web.UI;


public partial class async_parallel2 : Page

{

    public const string ConnString = "Data Source=.;Integrated Security=True;Async=True";
    protected void Page_PreRender(object sender, EventArgs e)

    {

        Task1();

        Task2();

    }


    private async void Task1()

    {

        using (SqlConnection conn = new SqlConnection(ConnString))

        {

            conn.Open();

            using (SqlCommand cmd = new SqlCommand("WAITFOR DELAY '00:00:01'", conn))

            {

                await Task.Factory.FromAsync<int>(cmd.BeginExecuteNonQuery,

                                                  cmd.EndExecuteNonQuery, null);

            }

            using (SqlCommand cmd = new SqlCommand("WAITFOR DELAY '00:00:02'", conn))

            {

                await Task.Factory.FromAsync<int>(cmd.BeginExecuteNonQuery,

                                                  cmd.EndExecuteNonQuery, null);

            }

        }

    }


    private async void Task2()

    {

        using (SqlConnection conn = new SqlConnection(ConnString))

        {

            conn.Open();

            using (SqlCommand cmd = new SqlCommand("WAITFOR DELAY '00:00:03'", conn))

            {

                await Task.Factory.FromAsync<int>(cmd.BeginExecuteNonQuery,

                                                  cmd.EndExecuteNonQuery, null);

            }

        }

    }

}
Task1() will start the first SQL command and then return, and Task2() will then start the second command in parallel. After the first command in Task1() completes, the second one will be called. By using slightly different parameters for each WAITFOR DELAY command, you can easily follow the sequence of events with SQL Profiler.
Handling Timeouts
As the third parameter in the PageAsyncTask constructor, you can pass a delegate that the runtime will call if the async request takes too long to execute:
PageAsyncTask pat = new PageAsyncTask(BeginAsync, EndAsync, TimeoutAsync, null, true);
You can set the length of the timeout in the Page directive in your markup file:
<%@ Page AsyncTimeout="30" . . . %>
The value of the AsyncTimeout property sets the length of the timeout in seconds. However, you can’t set a separate timeout value for each task; you can set only a single value that applies to all of them.
You can set a default value for the async timeout in web.config:
<system.web>

    <pages asyncTimeout="30" . . . />

    . . .

</system.web>
You can also set the value programmatically:
protected void Page_Load(object sender, EventArgs e)

{

    this.AsyncTimeout = TimeSpan.FromSeconds(30);

    . . .

}
Here’s an example that forces a timeout (see async-timeout.aspx):
using System;

using System.Data.SqlClient;

using System.Web.UI;


public partial class async_timeout : Page

{

    public const string ConnString = "Data Source=.;Integrated Security=True;Async=True";


    protected void Page_Load(object sender, EventArgs e)

    {

        this.AsyncTimeout = TimeSpan.FromSeconds(5);

        PageAsyncTask pat = new PageAsyncTask(BeginAsync, EndAsync,

            TimeoutAsync, null, true);

        RegisterAsyncTask(pat);

    }
You set the timeout to five seconds and then create and register the task.
    private IAsyncResult BeginAsync(object sender, EventArgs e,

        AsyncCallback cb, object state)

    {

        SqlConnection conn = new SqlConnection(ConnString);

        conn.Open();

        SqlCommand cmd = new SqlCommand("WAITFOR DELAY '00:01:00'", conn);

        IAsyncResult ar = cmd.BeginExecuteNonQuery(cb, cmd);

        return ar;

    }
The WAITFOR command waits for one minute, which is longer than the five-second timeout, so the page will display the error message when it runs.
    private void EndAsync(IAsyncResult ar)

    {

        using (SqlCommand cmd = (SqlCommand)ar.AsyncState)

        {

            using (cmd.Connection)

            {

                int rows = cmd.EndExecuteNonQuery(ar);

            }

        }

    }


    private void TimeoutAsync(IAsyncResult ar)

    {

        errorLabel.Text = "Database timeout error.";

        SqlCommand cmd = (SqlCommand)ar.AsyncState;

        cmd.Connection.Dispose();

        cmd.Dispose();

    }

}
The runtime doesn’t call the end event handler if a timeout happens. Therefore, in the timeout event handler, you clean up the SqlCommand and SqlConnection objects that were created in the begin handler. Since you don’t have any code that’s using those objects here like you do in the end handler, you explicitly call their Dispose() methods instead of relying on using statements.
Asynchronous Web Services
Another type of long-running task that’s a good candidate to run asynchronously is calls to web services. As an example, let’s build a page that uses Microsoft’s TerraServer system to get the latitude and longitude for a given city in the United States. First, right-click your web site in Visual Studio, select Add Service Reference, and enter the URL for the WSDL:
http://terraserverusa.com/TerraService2.asmx?WSDL
Click the Go button to display the available services. See Figure 5-3.
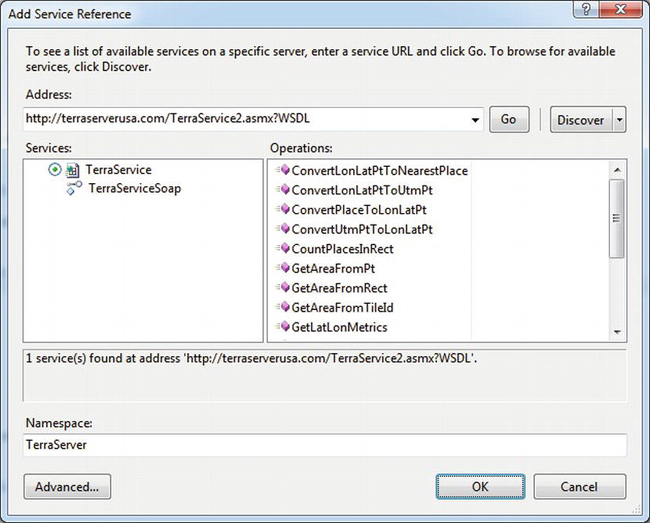
Figure 5-4. Adding a service reference for TerraService
Set the Namespace to TerraServer and click OK to finish adding it.
Next, add a web form called terra1.aspx.
Set Async="True" in the Page directive, and add two <asp:Label> tags to hold the eventual results:
<%@ Page Async="true" Language="C#" AutoEventWireup="true"

    CodeFile="terra1.aspx.cs" Inherits="terra1" %>

<!DOCTYPE html PUBLIC "-//W3C//DTD XHTML 1.0 Transitional//EN"

"http://www.w3.org/TR/xhtml1/DTD/xhtml1-transitional.dtd">

<html xmlns="http://www.w3.org/1999/xhtml">

<head runat="server">

  <title></title>

</head>

<body>

  <form id="form1" runat="server">

    <div>

      <asp:Label runat="server" ID="LA" />

      <br />

      <asp:Label runat="server" ID="LO" />

    </div>

</form>

</body>

</html>
Here’s the code-behind (see terra1.aspx.cs):
using System;

using System.Web.UI;

using TerraServer;


public partial class terra1 : Page

{

    protected async void Page_Load(object sender, EventArgs e)

    {

        var terra = new TerraServiceSoapClient();

        Place place = new Place()

        {

            City = "Seattle",

            State = "WA",

            Country = "US"

        };

        var result = await terra.GetPlaceFactsAsync(place);

        PlaceFacts facts = result.Body.GetPlaceFactsResult;

        this.LA.Text = String.Format("Latitude: {0:0.##}", facts.Center.Lat);

        this.LO.Text = String.Format("Longitude: {0:0.##}", facts.Center.Lon);

    }

}
Services use the TAP model for async operations, so start by adding the async keyword to the declaration for Page_Load(). Create an instance of the TerraServerSoapClient service proxy object that Visual Studio created for you, along with a Place object that contains the City, State and Country you want to lookup.
Invoke the web service asynchronously by calling GetPlaceFactsAsync() with the Place object as an argument, and await the response. When the call returns, get the PlaceFacts object from the results and use it to obtain the latitude and longitude of the specified Place.
Asynchronous File I/O
For an asynchronous file I/O example using APM, create a new web form called file1.aspx. Set Async=True in the Page directive and add the same two Labels to the markup as you did for the web service example earlier.
Here’s the code-behind (see file1.aspx.cs):
using System;

using System.IO;

using System.Web;

using System.Web.UI;


public partial class file1 : Page

{

    private byte[] Data { get; set; }


    protected void Page_Load(object sender, EventArgs e)

    {

        PageAsyncTask pat = new PageAsyncTask(BeginAsync, EndAsync, null, null, true);

        RegisterAsyncTask(pat);
}
As before, you create and register the async task. You’re not using a timeout handler here since local file access shouldn’t need it.
    private IAsyncResult BeginAsync(object sender, EventArgs e,

        AsyncCallback cb, object state)

    {

        FileStream fs = new FileStream(this.Server.MapPath("csg.png"),

            FileMode.Open, FileAccess.Read, FileShare.Read, 4096,

            FileOptions.Asynchronous | FileOptions.SequentialScan);

        this.Data = new byte[64 * 1024];

        IAsyncResult ar = fs.BeginRead(this.Data, 0, this.Data.Length, cb, fs);

        return ar;

    }
To use a FileStream for asynchronous file I/O, be sure to either set the useAsync parameter to true or include the FileOptions.Asynchronous bit in the FileOptions flag. For best performance, you should use a buffer size of 1KB or more; I’ve used 4KB in the example. For larger files, you may see a slight performance improvement with buffers up to about 64KB in size. If you know the access pattern for your file (random vs. sequential), it’s a good idea to include the corresponding flag when you create the FileStream, as a hint that the OS can use to optimize the underlying cache. I’ve specified FileOptions.SequentialScan to indicate that I will probably read the file sequentially.
To use TAP instead of APM, you can call FileStream.ReadAsync() to start the read operation and return an awaitable Task object:
int size = await fs.ReadAsync(this.Data, 0, this.Data.Length);
![]() Tip When you’re reading just a few bytes, async file I/O can be considerably more expensive than synchronous I/O. The threshold varies somewhat, but I suggest a 1KB file size as a reasonable minimum: for files less than 1KB in size, you should prefer synchronous I/O.
Tip When you’re reading just a few bytes, async file I/O can be considerably more expensive than synchronous I/O. The threshold varies somewhat, but I suggest a 1KB file size as a reasonable minimum: for files less than 1KB in size, you should prefer synchronous I/O.
    private void EndAsync(IAsyncResult ar)

    {

        using (FileStream fs = (FileStream)ar.AsyncState)

        {

            int size = fs.EndRead(ar);

            this.LA.Text = "Size: " + size;

        }

    }

}
When the I/O is done, you call EndRead() to get the number of bytes that were read and then write that value in one of the labels on the page.
The process for async writes is similar. However, in many cases even when you request an async write, the operating system will handle it synchronously. The usual reason is that the OS forces all requests that extend files to happen synchronously. If you create or truncate a file and then write it sequentially, all writes will be extending the file and will therefore be handled synchronously. If the file already exists, you can get around that by opening it for writing and, rather than truncating it, use FileStream.SetLength() to set the length of the file as early as you can. That way, if the old file is as long as or longer than the new one, all writes will be asynchronous. Even if the file doesn’t already exist, calling FileStream.SetLength() as early as you can is still a good idea, since it can allow the operating system to do certain optimizations, such as allocating the file contiguously on disk.
In addition, reads and writes to compressed filesystems (not individual compressed files) and to files that are encrypted with NTFS encryption are forced by the OS to be synchronous.
![]() Tip During development, it’s a good practice to double-check that the OS is really executing your calls asynchronously. With APM, you can do that by checking the
Tip During development, it’s a good practice to double-check that the OS is really executing your calls asynchronously. With APM, you can do that by checking the IAsyncResult.CompletedSynchronously flag after you issue the Begin request.
Asynchronous Web Requests
Following what by now I hope is a familiar pattern, let’s walk through an example of how to execute a web request asynchronously using TAP. First, create a new web form called webreq1.aspx. Make the same changes to the markup file that you did for the previous examples: set the Async flag in the Page directive, and add the <asp:Label> controls.
Here’s the code-behind (see webreq1.aspx.cs):
using System;

using System.Net;

using System.Text;

using System.Web.UI;


public partial class webreq1 : Page

{

    protected async void Page_Load(object sender, EventArgs e)

    {

        WebRequest request = WebRequest.Create("http://www.apress.com/");

        WebResponse response = await request.GetResponseAsync();

        StringBuilder sb = new StringBuilder();

        foreach (string header in response.Headers.Keys)

        {

            sb.Append(header);

            sb.Append(": ");

            sb.Append(response.Headers[header]);

            sb.Append("<br/>");

        }

        this.LO.Text = sb.ToString();

    }

}
Add the async keyword to the Page_Load() method. Create a WebRequest object, and await a call to its GetResponseAsync() method. After the call returns, collect the response header keys and values into a StringBuilder, along with a <br/> between lines, and display the resulting string in one of the labels on the page.
The WebRequest and WebResponse objects don’t implement IDisposable, so you don’t need to call Dispose() as you did in the other examples.
Background Worker Threads
Another approach to offloading ASP.NET worker threads is to defer activities that might take a long time. One way to do that is with a background worker thread. Rather than performing the task in-line with the current page request, you can place the task in a local queue, which a background worker thread then processes.
Background worker threads are particularly useful for tasks where you don’t require confirmation that they’ve executed on the current page before returning to the user and where a small probability that the task won’t be executed is acceptable, such as if the web server were to crash after the request was queued but before the task was executed. For example, logging can fall in this category. Service Broker is useful for longer tasks that you can’t afford to skip or miss, such as sending an e-mail or recomputing bulk data of some kind. I will cover Service Broker in Chapter 8.
ASP.NET does provide ThreadPool.QueueUserWorkItem() for executing work items in the background. However, I don’t recommend using it in web applications for two reasons. First, it uses threads from the same thread pool that your pages use and is therefore competing for that relatively scarce resource. Second, multiple threads can execute work items. One of the things that I like to use a background thread for is to serialize certain requests. Since the standard ThreadPool is a shared object whose configuration shouldn’t be adjusted to extremes, task serialization isn’t possible with QueueUserWorkItem()without using locks, which would cause multiple threads to be blocked.
Similarly, the .NET Framework provides a way to asynchronously execute delegates, using BeginInvoke(). However, as earlier, the threads used in this case also come from the ASP.NET thread pool, so you should avoid using that approach too.
There is a fundamental difference between native asynchronous I/O and processing I/O requests synchronously in background threads (so they appear asynchronous). With native async, a single thread can process many I/O requests at the same time. Doing the same thing with background threads requires one thread for each request. Threads are relatively expensive to create. Native async, as you’ve been using in the examples, is therefore much more efficient in addition to not putting an extra la load on the worker thread pool, which is a limited resource.
C# USING AND LOCK STATEMENTS
Background Thread for Logging
Here’s a detailed example of using a background thread, which demonstrates a number of key principles for async programming, such as locks (monitors), semaphores, queues, and signaling between threads. The goal of the code is to allow multiple foreground threads (incoming web requests) to queue requests to write logging information to the database in a background worker thread.
The code supports submitting logging requests to the worker thread in batches, rather than one at a time, for reasons that will become clear later in the book.
See App_CodeRequestInfo.cs:
namespace Samples

{

    public class RequestInfo

    {

        public string Page { get; private set; }


        public RequestInfo()

        {

            this.Page = HttpContext.Current.Request.Url.ToString();

        }
    }

}
The RequestInfo object encapsulates the information that you will want to write to the database later. In this case, it’s just the URL of the current page.
See App_CodeWorkItem.cs:
namespace Samples

{

    public enum ActionType

    {

        None = 0,

        Add = 1

    }
The ActionType eenum defines the various actions that the background worker thread will perform. I use None as a placeholder for an unassigned value; it is not valid for a queued work item.
public class WorkItem

{

    private static Queue<WorkItem> queue = new Queue<WorkItem>();

    private static Semaphore maxQueueSemaphore =

        new Semaphore(MaxQueueLength, MaxQueueLength);

    private static Object workItemLockObject = new Object();

    private static WorkItem currentWorkItem;

    private static Thread worker;

    public delegate void Worker();
The WorkItem class manages a collection of requests for work to be done, along with a static Queue of WorkItems.
You use a Semaphore to limit how many WorkItem objects can be queued. When a thread tries to queue a WorkItem, if the queue is full, the thread will block until the number of items in the queue drops below MaxQueueLength. You apply a lock to workItemLockObject to serialize access to currentWorkItem, in order to allow multiple threads to enqueue requests before you submit the WorkItem to the background worker thread.
    public ActionType Action { get; set; }

    public ICollection<RequestInfo> RequestInfoList { get; private set; }


    public static int MaxQueueLength

    {

        get { return 100; }

    }


    public int Count

    {

        get { return this.RequestInfoList.Count; }

    }


    public static int QueueCount

    {

        get { return queue.Count; }

    }
    public WorkItem(ActionType action)

    {

        this.Action = action;

        this.RequestInfoList = new List<RequestInfo>();

    }
The constructor stores the specified ActionType and creates a List to hold RequestInfo objects. Using a List maintains the order of the requests.
    private void Add(RequestInfo info)

    {

        this.RequestInfoList.Add(info);

    }
The Add() method adds a RequestInfo object to the end of RequestInfoList.
    private void Enqueue()

    {

        if (maxQueueSemaphore.WaitOne(1000))

        {

            lock (queue)

            {

                queue.Enqueue(this);

                Monitor.Pulse(queue);

            }

        }

        else

        {

            EventLog.WriteEntry("Application",

                "Timed-out enqueueing a WorkItem.  Queue size = " + QueueCount +

                ", Action = " + this.Action, EventLogEntryType.Error, 101);

        }

    }
The Enqueue() method adds the current WorkItem to the end of the Queue and signals the worker thread. You write an error to the Windows event log if the access to the Semaphore times out.
This method waits up to 1,000ms to enter the semaphore. If successful, the semaphore’s count is decremented. If the count reaches zero, then future calls to WaitOne()will block until the count is incremented by calling Release() from Dequeue().
After entering the semaphore, obtain a lock on the queue object since Queue.Enqueue() is not thread safe. Next, save the current WorkItem in the queue. Then call Monitor.Pulse() to signal the worker thread that new work is available in the queue.
    public static void QueuePageView(RequestInfo info, int batchSize)

    {

        lock (workItemLockObject)

        {

            if (currentWorkItem == null)

            {

                currentWorkItem = new WorkItem(ActionType.Add);

            }

            currentWorkItem.Add(info);

            if (currentWorkItem.Count >= batchSize)

            {
                currentWorkItem.Enqueue();

                currentWorkItem = null;

            }

        }

    }
The QueuePageView() method starts by getting a lock on workItemLockObject to serialize access to currentWorkItem. If currentWorkItem is null, then create a new WorkItem with a type of ActionType.Add. After adding the given RequestInfo object to the List held by the WorkItem, if the number of objects in that List is equal to the specified batchSize, then the WorkItem is enqueued to the worker thread.
    public static WorkItem Dequeue()

    {

        lock (queue)

        {

            for (;;)

            {

                if (queue.Count > 0)

                {

                    WorkItem workItem = queue.Dequeue();

                    maxQueueSemaphore.Release();

                    return workItem;

                }

                Monitor.Wait(queue);

            }

        }

    }
The worker thread uses the Dequeue() method to obtain the next WorkItem from the Queue. First, lock queue to serialize access. If the queue has anything in it, then Dequeue() the next item, Release() the semaphore, and return the WorkItem. Releasing the semaphore will increment its count. If another thread was blocked with the count at zero, it will be signaled and unblocked.
If the queue is empty, then the code uses Monitor.Wait() to release the lock and block the thread until the Enqueue() method is called from another thread, which puts a WorkItem in the queue and calls Monitor.Pulse(). After returning from the Wait, the code enters the loop again at the top.
    public static void Init(Worker work)

    {

        lock (workItemLockObject)

        {

            if (worker == null)

                worker = new Thread(new ThreadStart(work));

            if (!worker.IsAlive)

                worker.Start();

        }

    }

}
The Init() method obtains a lock on the workItemLockObject to serialize the thread startup code, ensuring that only one worker thread is created. Create the worker thread with the entry point set to the provided Worker delegate and then start the thread.
public static void Work()

{
    try

    {

        for (;;)

        {

            WorkItem workItem = WorkItem.Dequeue();

            switch (workItem.Action)

            {

                case ActionType.Add:
The code that’s executed by the worker thread starts with a loop that calls Dequeue() to retrieve the next WorkItem. Dequeue() will block if the queue is empty. After retrieving a work item, the switch statement determines what to do with it, based on the ActionType. In this case, there is only one valid ActionType, which is Add.
                    string sql = "[Traffic].[AddPageView]";

                    using (SqlConnection conn = new SqlConnection(ConnString))

                    {

                        foreach (RequestInfo info in workItem.RequestInfoList)

                        {

                            using (SqlCommand cmd = new SqlCommand(sql))

                            {

                                cmd.CommandType = CommandType.StoredProcedure;

                                SqlParameterCollection p = cmd.Parameters;

                                p.Add("pageurl", SqlDbType.VarChar, 256).Value

                                    = (object)info.Page ?? DBNull.Value;

                                try

                                {

                                    conn.Open();

                                    cmd.ExecuteNonQuery();

                                }

                                catch (SqlException e)

                                {

                                    EventLog.WriteEntry("Application",

                                        "Error in WritePageView: " +

                                        e.Message + "
",

                                        EventLogEntryType.Error, 104);

                                }

                            }

                        }

                    }

                    break;

            }

        }

    }

    catch (ThreadAbortException)

    {

        return;

    }

    catch (Exception e)

    {

        EventLog.WriteEntry("Application",

            "Error in MarketModule worker thread: " + e.Message,

            EventLogEntryType.Error, 105);
        throw;

    }

  }

}
The remainder of the method uses ADO.NET to call a stored procedure synchronously to store the URL of the page. The stored procedure has a single argument, and you call it once for each RequestInfo object that was stored with the WorkItem. I will cover several techniques for optimizing this code later in the book.
The ThreadAbortException is caught and handled as a special case, since it indicates that the thread should exit. The code also catches and logs generic Exceptions. Even though it’s not a good practice in most places, Exceptions that are thrown from a detached thread like this would be difficult to trace otherwise.
Using the worker thread is easy. First, start the thread:
WorkItem.Init(Work);
You can do that from the Init() method of an HttpModule, or perhaps from Application_Start() in Global.asax.
After that, just create a RequestInfo object and pass it to QueuePageView() along with the batch size:
WorkItem.QueuePageView(new RequestInfo(), 10);
Task Serialization
You can also use background threads as a way of executing certain types of tasks one at a time, as an alternative to locking for objects that experience heavy contention. The advantage over locking is that the ASP.NET worker thread doesn’t have to block for the full duration of the task; you could write the request to a queue in a BeginAsyncHandler method, and the thread would continue rather than block. Later, when the task completes, the background thread could signal an associated custom IAsyncResult, which would cause the EndAsyncHandler method to execute.
However, because of the significant additional overhead, this makes sense only when threads are frequently blocking for relatively long periods.
If your code accesses different areas of disk at the same time, the disk heads will have to seek from one area to another. Those seeks can cause throughput to drop by a factor of 20 to 50 or more, even if the files are contiguous. That’s an example of where you might consider using task serialization with a background thread. By accessing the disk from only one thread, you can limit seeks by not forcing the operating system to interleave requests for data from one part of the disk with requests for data from another part.
Locking Guidelines and Using ReaderWriterLockSlim
Whenever you have multiple threads, you should use locks to prevent race conditions and related problems. Locking can be a complex topic, and there’s a lot of great material that’s been written about it, so I won’t go into too much detail here. However, for developers who are new to asynchronous programming, I’ve found that it’s often helpful to establish a couple of basic guidelines:
- Use a lock to protect access to all writable data that multiple threads can access at the same time. Access to static data, in particular, should usually be covered with a lock.
- Avoid using a lock within another lock. If absolutely required, ensure that the order of the locks is always consistent to avoid deadlocks.
- Lock the minimum amount of code necessary (keep locks short).
- When deciding what code to lock, keep in mind that interrupts can happen between any two nonatomic operations and that the value of shared variables can change during those interrupts.
The standard C# lock statement serializes access to the code that it surrounds. In other words, the runtime allows only one thread at a time to execute the code; all other threads are blocked. For cases where you mostly read and only infrequently write the static data, there is a useful optimization you can make. The .NET Framework provides a class called ReaderWriterLockSlim that allows many readers, but only one writer, to access the locked code at the same time. The standard lock doesn’t differentiate between readers and writers, so all accesses of any type are serialized.
For example, here are two shared variables, whose values need to be read or written at the same time in order for them to be consistent:
public static double Balance;

public static double LastAmount;
Here’s the declaration of the lock:
public static ReaderWriterLockSlim rwLock = new ReaderWriterLockSlim();
Here’s the code to read the shared data:
rwLock.EnterReadLock();

double previousBalance = Balance + LastAmount;

rwLock.ExitReadLock();
If there is any chance of the locked code throwing an exception or otherwise altering the flow of control, you should wrap it in a try/finally block to ensure that ExitReadLock() is always called.
Here’s the code to write the shared data:
rwLock.EnterWriteLock();

LastAmount = currentAmount;

Balance -= LastAmount;

rwLock.ExitWriteLock();
When you use the default constructor, the resulting object doesn’t support recursive (nested) locks. To allow recursive locks:
public static ReaderWriterLockSlim rwLockRecurse =

    new ReaderWriterLockSlim(LockRecursionPolicy.SupportsRecursion);
If you enter this type of f lock again after you’ve already acquired it once, the runtime will increment an internal counter. Exiting the lock will decrement the counter until it reaches zero, when the lock will actually be released.
Session State
Web applications often have a requirement for managing information that is carried over from one HTTP request to another. For example, this information could include a logged-on user’s name, their role, authorization details, shopping cart contents, and so on.
In a load-balanced environment, each HTTP request from a given client might be routed to a different web server, so storing that state information on the web tier won’t work. The HTTP protocol itself is stateless; each connection carries no history with it about anything that has happened before other than what the browser presents in each request.
Session state is “historical” or state information that is useful only for the duration of a session. A session is the period that a client is “active,” which might be the time that they are logged on or perhaps the time that the browser is open.
The management of session state, or more often its mismanagement, is a significant issue that sites often encounter as they grow. Because it’s easy to use and yet presents a significant load to your back-end data store, it can become a significant barrier to scalability. From a scalability perspective, the best solution to avoiding session state problems is not to use it; most sites can get along fine with just cookies. Having said that, there are times when it’s useful and desirable.
ASP.NET includes a comprehensive set of mechanisms for managing session state. While the built-in system can work great for small to medium sites, it’s not sufficiently scalable as-is for large sites, although the system does have several hooks that will allow you to improve its scalability substantially.
Here’s an example of how to set session state from a web page:
this.Session["info"] = "this is my info";
You can then read the information in a subsequent request for the same page or a different one:
string myinfo = (string)this.Session["info"];

if (myinfo != null)

{

    // myinfo will be set to "this is my info"

}
The Session object is a specialized dictionary that associates a key with a value. The semantics are similar to those of the ViewState object, as described in Chapter 3.
Session IDs
Session state works in part by associating some client-specific data called the session ID with a record that’s stored somewhere on the server side. The usual approach is to provide a unique session ID to each client as a cookie.
An alternative approach is to use cookieless session IDs, where the session ID is encoded in the URL. In many applications, providing ready access to session IDs, such as is possible when they are encoded in a URL, is a potential security risk. As I mentioned in Chapter 1, modern public-facing web sites will encounter very few real clients (as opposed to spiders) that don’t support cookies. For those reasons, I recommend using only the cookie-based approach.
The default implementation of session ID cookies by ASP.NET doesn’t assign an explicit expiration time to them. That causes the browser to consider them temporary, so it can delete the cookies on its own only when the browser’s window is closed. Temporary cookies never timeout; they are active as long as the window is open. When you provide an expiration time, the browser writes the cookies to disk, and they become (semi) permanent. The browser deletes them after they expire.
Both types of cookies have a role in implementing session state or alternatives, depending on the requirements for your site. You might want users to stay logged in for a while, even if they close the browser. You might also want the user’s session to timeout if they walk away from their computer for a while without closing the browser. In most cases, I prefer cookies to be permanent, with specific expiration times. If your application requires the session to end when a user closes the browser, then you might consider a custom provider with both a temporary cookie and a permanent one. Together, you will have all the information you need to take the correct action on the server. From a code complexity perspective, I prefer that approach to using temporary cookies with timeout information encoded into them.
InProc Mode
The default configuration is to store session state information in the memory of the IIS worker process using InProc mode. The advantage of this approach is that it’s very fast, since session objects are just stored in (hidden) slots in the in-memory Cache object. The stored objects aren’t serialized and don’t have to be marked as serializable.
Since one worker process doesn’t have access to the memory in another, the default configuration won’t work for a load-balanced site, including web gardens. Another issue is that if the web server crashes or reboots or if the IIS worker process recycles, all current state information will be lost. For those reasons, I don’t recommend using InProc mode, even for small sites.
One approach that some web sites take to address the problems with InProc mode is to configure their load balancer to use sticky connections to the web servers. That way, the load balancer will assign all connections from a particular client to a particular web server, often based on something like a hash code of the client’s IP address. Although that solution partly addresses the scalability issue, the data is still stored in RAM only and will therefore still be lost in the event of a server failure or a worker process recycle.
In addition, using sticky connections introduces a host of additional problems. Since the load balancer is no longer free to assign incoming connections in an optimized way (such as to the server with the least number of active connections), some servers can experience significant and unpredictable load spikes, resulting in an inconsistent user experience. Those load spikes might result not just in purchasing more hardware than you would otherwise need, but they can also interfere with your ability to do accurate capacity planning and load trend forecasting.
Using StateServer
Another option for storing session state is to use StateServer, which is included as a standard component of ASP.NET. Unlike InProc mode, StateServer serializes objects before storing them.
StateServer has the advantage of running outside of IIS, and potentially on a machine of its own, so your site will function correctly without sticky connections when it’s load balanced or a web garden.
However, as with the InProc mode, StateServer stores state information only in memory, so if you stop the process or if the machine reboots, all session data is lost. With StateServer, you are effectively introducing a single point of failure. For those reasons, I don’t recommend using StateServer.
Using SQL Server
Storing session state in a database addresses the reliability issues for both InProc and StateServer. If the database crashes or reboots, session state is preserved.
To enable use of the built-in SQL Server session provider, execute the following command from C:WindowsMicrosoft.NETFramework64v4.0.30319:
aspnet_regsql -E -S localhost -ssadd -sstype p
The -E flag says to use a trusted connection (Windows authentication). The -S flag specifies which database server instance to use; for SQL Server Express, you should specify .SQLEXPRESS, as you would with a connection string. -ssadd says to add support for SQL Server session state. -sstype p says to store both session state and the associated stored procedures in the newly created ASPState database.
If you have trouble getting aspnet_regsql to work correctly in your environment, the /? flag will display a list of options.
If you’re curious, you can look in the InstallPersistSqlState.sql file in that same folder for an idea of what the previous command will do. However, you shouldn’t execute that script directly since it’s parameterized; use aspnet_regsql as shown earlier.
After you run aspnet_regsql, if you take a look at SQL Server using SSMS, you’ll notice a new database called ASPState, which has two tables and a bunch of stored procedures. You might need to configure the database to allow access from the identity that your web site’s AppPool uses, depending on the details of your security setup.
A SQL Agent job is also created, which runs once a minute to delete old sessions. You should enable SQL Agent so that the job can run.
![]() Caution If you don’t enable SQL Agent so that it can run the job that periodically deletes expired sessions, you will find that sessions never expire. The standard session provider never checks the session’s expiration time.
Caution If you don’t enable SQL Agent so that it can run the job that periodically deletes expired sessions, you will find that sessions never expire. The standard session provider never checks the session’s expiration time.
Configuring the Application
Enable SQL Server session state storage by making the following change to web.config:
<system.web>

  <sessionState mode="SQLServer"

      sqlConnectionString="Data Source=.;Integrated Security=True"

      timeout="20"

      cookieName="SS" />

  . . .

</system.web>
The timeout property specifies how long a session can be idle before it expires, in minutes.
The sqlConnectionString property specifies the server to use. The database name of ASPState is implied; the runtime won’t allow you to specify it explicitly unless you also set the allowCustomSqlDatabase property to true. As an alternative to including a full connection string, you can also use the name of one from the connectionStrings section of your web.config.
Using the cookieName property, I’ve specified a short two-character name for the name of the session ID cookie instead of the default, which is ASP.NET_SessionId.
If you’re interested in exploring how sessions work in more details, after running a small test page, along the lines of the earlier Session example, you can query the tables in the ASPState database to see that they are in fact being used. You can also take a look at the HTTP headers using Fiddler to see how the session ID cookie is handled and view the session-related database queries with SQL Profiler.
Compressing Session State
In some cases, you can improve the performance of your session state by compressing the serialized session dictionary before sending it to SQL Server. You enable automatic compression with GZipStream by setting the compressionEnabled property of the sessionState element in web.config.
Extending the earlier example:
<system.web>

  <sessionState mode="SQLServer"

      sqlConnectionString="Data Source=.;Integrated Security=True"

      timeout="20"

      cookieName="SS"

      compressionEnabled="true" />

  . . .

</system.web>
This can improve performance by reducing the load on the network and the database, at the expense of additional CPU time on the web server.
Selectively Enabling Session State and Using ReadOnly Mode
In spite of its positive aspects, database storage of session state does have some drawbacks. The biggest is that the standard implementation doesn’t adequately address scalability.
Having many web servers that talk to a single session database can easily introduce a bottleneck. One database round-trip is required at the beginning of a web request to read the session state, obtain an exclusive lock, and update the session’s expiration time, and a second round-trip is required at the end of the request to update the database with the modified state and release the lock. The runtime also needs to deserialize and reserialize the state information, which introduces even more overhead.
One side effect of the exclusive locks is that when multiple requests arrive from the same user at once, the runtime will only be able to execute them one at a time.
Writes to the database are particularly expensive from a scalability perspective. One thing you can do to help minimize scalability issues is to heavily optimize the database or file group where the session state is stored for write performance, as described in later chapters.
Something that can have even more impact is to limit which pages use session state and to indicate whether it’s only read and not written. You can disable session state for a particular page by setting the EnableSessionState property to false in the Page directive:
<%@ Page EnableSessionState="false" . . . @>
If you try to access the Session object from a page that has session state disabled, the runtime will throw an exception.
With session state disabled, even if you don’t access the Session object, if the client has a session ID cookie set, the session provider still accesses the database in order to update the session timeout. This helps keep the session alive, but it also presents additional load on the database.
You can use the same property to indicate that the session data used by the page is read-only:
<%@ Page EnableSessionState="ReadOnly" . . . @>
The provider still updates the database with a new session expiration time, even in ReadOnly mode, but it’s done by the same stored procedure that reads the session data, so it doesn’t require a second round–trip.
In addition to eliminating a second round–trip, setting read-only mode helps performance by causing the session provider to use a read lock on the database record, rather than an exclusive lock. The read lock allows other read-only pages from the same client to access the session data at the same time. That can help improve parallelism and is particularly important when a single client can issue many requests for dynamic content at the same time, such as with some Ajax-oriented applications, with sites that use frames, or where users are likely to issue requests from more than one browser tab at a time.
You can set the default for the EnableSessionState property in web.config:
<configuration>

    <system.web>

        <pages enableSessionState="false">

                . . .

        </pages>

        . . .

  </system.web>

</configuration>
In most environments, I suggest setting the default to false and then explicitly enabling session state on the pages that need it, or setting it to ReadOnly on pages that only need read access. That way, you avoid accidentally enabling it on pages that don’t need it.
It’s also a good idea to split functions that need session data only in read-only form onto separate pages from those that need read/write access to minimize further the write load on the database.
Scaling Session State Support
As I mentioned earlier, the standard support for session state using SQL Server unfortunately isn’t scalable for large sites. However, if it’s an important part of your architecture, the framework does provide a couple of hooks that make it possible to modify several key aspects of the implementation, which you can use to make it scalable.
Although the cost of serializing session state data can be significant, it normally has an impact mostly on the performance side, rather than on scalability. Since it’s a CPU-intensive activity, if your site is scalable, you should be able to add more servers to offset the serialization cost, if you need to do so. The time it takes to write the session data to the database is where scalability becomes an issue.
It is possible to use distributed caching technology, such as Microsoft’s Velocity, as a session state store. See the “Distributed Caching” section in Chapter 3 for a discussion of that option.
Scaling Up
If the data you need is already in RAM, SQL Server can act like a large cache, so that read queries execute very quickly, with no access to disk. However, all INSERT, UPDATE, and DELETE operations must wait for the database to write the changes to disk. I’ll cover database performance in more detail in later chapters. For now, the main point is that database scalability is often driven more by writes than reads.
To increase database write performance, the first step is to maximize the performance of your database hardware. Database write performance is largely driven by the speed with which SQL Server can write to the database log. Here are a few high-impact things you can do:
- Place the session database log file on its own disks, separate from your data.
- Use RAID-10 and avoid RAID-5 for the log disks.
- Add spindles to increase log write performance.
I’ll discuss those optimizations in more detail in later chapters.
Scaling Out
Once you reach the limit of an individual server, the next step is to scale out. Your goal should be to distribute session state storage onto several different servers in such a way that you can figure out which server has the state for a particular request without requiring yet another round-trip. See Figure 5-4.
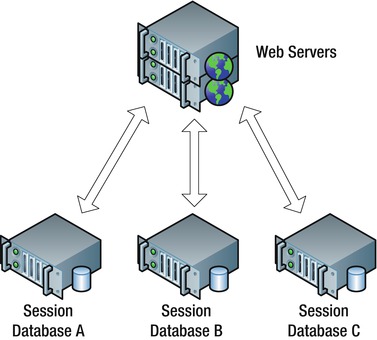
Figure 5-5. Scaled-out databases for session state storage
Custom Session ID Manager
The default session ID is a reasonably random 24-character string. A simple approach you might use for partitioning is to convert part of that string to integer, take its modulo, and use that to determine which database server to use. If you had three servers, you would take the ID modulo three.
What complicates the issue for large sites is the possibility that you might want to change the number of session state servers at some point. The design shouldn’t force any existing sessions to be lost when you make such a change. Unfortunately, algorithms such as a simple modulo function that are based entirely on a set of random inputs aren’t ideal in that sense, since without accessing the database you don’t have any history to tell you what the server assignment used to be before a new server was added.
A better approach is to encode the identity of the session server directly into the session ID, using a custom session ID generator. Here’s an example (see App_CodeScalableSessionIDManager.cs):
using System;

using System.Web;

using System.Web.SessionState;


namespace Samples

{

    public class ScalableSessionIDManager : SessionIDManager

    {
Here you are going to extend the default SessionIDManager class. You only need to override two methods to implement custom session IDs. If you also wanted to modify the way the session cookies are handled, you would implement the ISessionIDManager interface instead.
public static string[] Machines = { "A", "B", "C" };

private static Object randomLock = new Object();

private static Random random = new Random();


public override string CreateSessionID(HttpContext context)

{

    int index;

    lock (randomLock)

    {

        index = random.Next(Machines.Length);

    }

    string id = Machines[index] + "." + base.CreateSessionID(context);

    return id;

}
Pick a random number between zero and the length of the Machines array. This index determines which database server you’ll use to store the session state.
If the hardware you’re using for each of your session servers is not identical, you could apply weighting to the random assignments to allow for the difference in performance from one server to another.
Since creating the Random class involves some overhead, use a single instance of it to generate the random numbers. Since its instance methods are not thread safe, get a lock first before calling Random.Next(). In keeping with best practices for locking, create a separate object for that purpose.
Finally, you create the session ID by concatenating the machine ID with a separator character and the ID provided by the base class. This approach will allow you to add new session servers later if needed, without disturbing the existing ones, since the session server assignment is encoded in the session ID.
public static string[] GetMachine(string id)

{

    if (String.IsNullOrEmpty(id))

        return null;

    string[] values = id.Split('.'),

    if (values.Length != 2)

        return null;

    for (int i = 0; i < Machines.Length; i++)

    {

        if (Machines[i] == values[0])

            return values;

    }

    return null;

}


public override bool Validate(string id)

{

    string[] values = GetMachine(id);

    return (values != null) && base.Validate(values[1]);

}
The static GetMachine() method parses your new session IDs and makes sure that they contain a valid session server ID. The overridden Validate() method first calls GetMachine() to parse the session ID and then passes the part of it that originally came from the base class to the Validate() method in the base class.
Partition Resolver
To map your new session IDs into appropriate database connection strings, you use a partition resolver. See App_CodeScalablePartitions.cs:
using System.Web;


namespace Samples

{

    public class ScalablePartitions : IPartitionResolver

    {
Implement the IPartitionResolver interface, which contains only two methods: Initialize() and ResolvePartition().
private string[] sessionServers = {

    "Data Source=ServerA;Initial Catalog=session;Integrated Security=True",

    "Data Source=ServerB;Initial Catalog=session;Integrated Security=True",

    "Data Source=ServerC;Initial Catalog=session;Integrated Security=True"

};
Specify the connection strings for the different servers. During testing, you might configure this either with different database instances or with different databases in a single instance.
public void Initialize()

{

}


public string ResolvePartition(object key)

{

    string id = (string)key;

    string[] values = ScalableSessionIDManager.GetMachine(id);

    string cs = null;

    if (values != null)

    {

        for (int i = 0; i < ScalableSessionIDManager.Machines.Length; i++)

        {

            if (values[0] == ScalableSessionIDManager.Machines[i])

            {

                cs = sessionServers[i];

                break;

            }

        }

    }

    return cs;

}
Initialize() is called once per instance of the class. This implementation doesn’t require any instance-specific initialization, so that method is empty.
ResolvePartition() receives the session ID as its argument. Pass the ID to the static GetMachine() shown earlier, which will parse the ID and return a two-element array if it’s properly formatted. The first element in the array is the key that determines which session server to use. After finding that key in ScalableSessionIDManager.Machines, use its index to determine which connection string to return.
Configuring the Custom Session ID Manager and Partition Resolver
To tell the runtime to use the new code, make the following change to web.config:
<system.web>

  <sessionState sessionIDManagerType="Samples.ScalableSessionIDManager"

      partitionResolverType="Samples.ScalablePartitions"

      mode="SQLServer" timeout="20" cookieName="SS"

      allowCustomSqlDatabase="true" />

  . . .

</system.web>
The sessionIDManagerType property specifies the class name for the custom session ID manager. The partitionResolverType property specifies the class name for the partition resolver. Setting mode to SQLServer causes the SQL Server session provider to be used. The cookieName property gives a nice short name for the session state cookie.
Setting allowCustomSqlDatabase to true allows you to include the name of a database in the connection strings returned by the partition resolver. That’s particularly useful during development, when you might want to use several different databases on the same server. The default setting of false prevents that, which forces use of the default ASPState database.
The database connection string that you may have previously included in the <sessionState> section is no longer needed, since the partition resolver will now provide them.
Testing the New Code
To test the code, create a new web form called session1.aspx. Enable session state in the Page directive:
<%@ Page EnableSessionState="True" Language="C#" AutoEventWireup="true"

    CodeFile="session1.aspx.cs" Inherits="session1" %>
Next, replace the code-behind with the following:
using System;

using System.Web.UI;


public partial class session1 : Page

{

    protected void Page_Load(object sender, EventArgs e)

    {

        this.Session["test"] = "my data";

    }

}
Unless you store something in the Session object, the runtime won’t set the session cookie.
Start the Fiddler web debugger and load the page. The response should include a Set-Cookie header, something like the following:
Set-Cookie: SS=C.ssmg3x3t1myudf3osq3whdf4; path=/; HttpOnly
Notice the use of the cookie name that you configured, along with the session server key at the beginning of the session ID.
ASP.NET also displays the session ID on the page when you enable tracing:
<%@ Page Trace="True" . . . %>
You can verify the use of the correct database by issuing an appropriate query from SSMS. For example:
SELECT *

    FROM ASPStateTempSessions

    WHERE SessionID LIKE 'C.ssmg3x3t1myudf3osq3whdf4%'
You need the LIKE clause since the session provider creates the database key by appending an application ID to the value in the session ID cookie. The provider generates the application ID by computing a hash of the application name, which you can get from HostingEnvironment.ApplicationID. That allows a single ASPState database to support more than one application. See the TempGetAppID stored procedure for details.
Fine-Tuning
You should address several additional issues in your support for performance-optimized session state. Notice that the standard session provider doesn’t set an expiration date on the session ID cookie, which results in a browser session cookie. That means if the user closes the browser’s window, the cookie may be dropped. If the user never closes the browser, the cookie will never be dropped. Notice too that the path is set to /, so the cookie will be included with all requests for the given domain. That introduces undesirable overhead, as I discussed in Chapters 2 and 3. Unfortunately, the default implementation doesn’t provide a way to override the path.
The default session IDs aren’t self-validating. The server needs to issue queries to the database to make sure that the session hasn’t expired and to update its expiration date. Also, as I mentioned earlier, even when sessions have been disabled on a page, once a user activates a session, a database round-trip is still made in order to update the session’s expiration time. In keeping with the core principles as outlined in Chapter 1, it would be nice to eliminate those round-trips.
One approach would be to encode the session expiration time in the session cookie (or perhaps a second cookie), along with a hash code that you could use to validate the session ID and the expiration time together. You could implement that as a custom ISessionIDManager.
Full-Custom Session State
To get full control over the way session state is managed, you will need to replace the default session HttpModule. Such a solution would involve implementing handlers for the AcquireRequestState and ReleaseRequestState events to first retrieve the session data from the database and then to store it back at the end of the request. You will need to handle a number of corner cases, and there are some good opportunities for performance optimization. Here is a partial list of the actions your custom session HttpModule might perform:
- Recognize pages or other
HttpHandlers that have indicated they don’t need access to session state or that only need read-only access- Implement your preferred semantics for updating the session expiration time
- Call your
ISessionIDManagercode to create session IDs and to set and retrieve the session ID cookie- Call your
IPartitionResolvercode to determine which database connection string to use- Serialize and deserialize the
Sessionobject- Implement asynchronous database queries and async
HttpModuleevents- Implement your desired locking semantics (optimistic writes vs. locks, and so on)
- Handle creating new sessions, deleting old or abandoned sessions, and updating existing sessions
- Ensure that your code will work in a load-balanced configuration (no local state)
- Store and retrieve the
Sessionobject to and fromHttpContext, and raiseSessionStartandSessionEndevents (perhaps using theSessionStateUtilityclass)
There are also details on the database side, such as whether to use the default schema and stored procedures or ones that you’ve optimized for your application.
You might also consider transparently storing all or part of the Session object in cookies, rather than in the database. That might eliminate the database round-trips in some cases.
Session Serialization
The standard session state provider uses a serialization mechanism that efficiently handles basic .NET types, such as integers, bytes, chars, doubles, and so on, as well as DateTime and TimeSpan. Other types are serialized with BinaryFormatter, which, unfortunately, can be slow. You can reduce the time it takes to serialize your session state by using the basic types as much as possible, rather than creating new serializable container classes.
If you do use serializable classes, you should consider implementing the ISerializable interface and including code that efficiently serializes and deserializes your objects. Alternatively, you can mark your classes with the [Serializable] attribute and then mark instance variables that shouldn’t be serialized with the [NonSerialized] attribute.
Something to be particularly cautious about when you’re using custom objects is to avoid accidentally including more objects than you really need. BinaryFormatter will serialize an entire object tree. If the object you want to include in session state references an object that references a bunch of other objects, they will all be serialized.
![]() Tip It’s a good idea to take a look at the records that you’re writing to the session table to make sure that their sizes seem reasonable.
Tip It’s a good idea to take a look at the records that you’re writing to the session table to make sure that their sizes seem reasonable.
With a custom session HttpModule, you might also want to check the size of the serialized session and increment a performance counter or write a warning message to the log if it exceeds a certain threshold.
Alternatives to Session State
For cases where you only need the data on the client, Silverlight and web storage can provide good alternatives to session state. That way you can use the data locally on the client, without requiring the browser to send it back to the server. If the server does need it, you can send it under program control, rather than with every request as would happen with cookies. Instead of using the Session-based API, your web application would simply pass state information to your Silverlight app or JavaScript as part of the way it communicates for other tasks, such as with web services.
Cookies are another alternative. As with Silverlight and web storage, the easy solution here involves using cookies directly and avoiding the Session-based API.
However, if your site already makes heavy use of the Session object, it is also possible to write a custom session provider that would save some state information to cookies. You could save data that is too big for cookies or that might not be safe to send to clients even in encrypted form in a database. For sites that need session state with the highest possible performance, that’s the solution I recommend.
Cookies have the disadvantage of being limited to relatively short strings and of potentially being included with many HTTP requests where the server doesn’t need the data. They are also somewhat exposed in the sense that they can be easily sniffed on the network unless you take precautions. In general, you should therefore encrypt potentially sensitive data (such as personal information) before storing it in a cookie. In Chapter 2, I’ve provided an example for encrypting and encoding data for use in a cookie.
When using cookies as an alternative to session state, you should set their expiration times in a sliding window so that as long as a user stays active, the session stays alive. For example, with a 20-minute sliding expiration time, when the user accesses the site with 10 minutes or less to go before the cookies expire, then the server should send the session-related cookies to the client again with a new 20-minute expiration time. If users wait more than 20 minutes between requests, then the session times out and the cookies expire.
The other guidelines that I described for cookies in Chapter 2 also apply here, including things such as managing cookie size and using the httpOnly, path, and domain properties.
Summary
In this chapter, I covered the following:
- How synchronous I/O can present a significant barrier to system scalability
- How you should use asynchronous I/O on web pages whenever possible for database accesses, filesystem I/O, and network I/O such as web requests and web services
- Using background worker threads to offload the processing of long-running tasks
- Why you should avoid using session state if you can, and why cookies, web storage, or Silverlight isolated storage are preferable
- In the event your application requires session state, how you can improve its scalability by strategically limiting the way it’s used, and by using custom session IDs, a partition resolver, and a custom session management
HttpModule