The Game, Part 1: Core Game Code
So far, I have covered quite a bit of ground: from the basics of graphics and audio to file operations, from the Storyboard API to the Transition API. You are rapidly building up your repertoire for working with Corona and in the process Astro Rescue is coming together. You’ve looked at the title scene, menu scene, and settings scene, all very important elements to the complete project.
However, it’s not the game itself, and that’s the meat and potatoes you’re here to see, I know! Well, it’s time to go there now—time to start looking at the core of Astro Rescue and see what makes it tick. There is a lot of ground to cover in this chapter, but by the time you’re finished you will have gained a significant portion of the knowledge you’ll need to write virtually any game you want with Corona.
The Game Scene Kicks It All Off
When the user selects New Game or Continue Game from the menu, the gameScene is launched. As you know, the contract with the Storyboard API says this should be—most of the time, anyway—in a file named gameScene.lua, and in this case it is. That file begins with:
gc = require("gameCore");
As you’ll see, the gameScene is really a pretty sparse object and serves the purpose of an interface between the real game code and the Storyboard API. It’s kind of a shim between the two, so to speak. I prefer this decoupling because if I ever want to move away from the Storyboard API for some reason ,then there is no (or, at least, little) impact on my actual game code. Frankly, the gameCore object is what most of this chapter is about, so I’ll get to that.
It is, however, important to note that the variable gc is a reference to the gameCore object and is used throughout the code. Remember that, as it’ll make the rest of the code make a heck of a lot more sense!
Thinking further along the line of decoupling things as much as possible results in the next three imports:
require("gameCoreInputEvents");
require("gameCoreCollisionEvents");
require("gameCoreMainLoop");
Each of these Lua source files contains code that is added to the gameCore object—mixed in, if you will. That implies that the import of gameCore must be first, and that is true. Generally, it’s good to avoid such dependence on import ordering, but because of the architecture I’ve chosen it comes into play.
The gameCoreInputEvents.lua file is responsible for adding methods to gameCore for handling all user input events. The gameCoreCollisionEvents.lua file adds code for dealing with collisions between game objects, which, because of what Astro Rescue is, turns out to be where a lot of the action really is in terms of the code. The final import, gameCoreMainLoop.lua, adds in the main loop of the game, which is responsible for handling movement of objects and determining if it’s time for the game to end (in conjunction with the code in gameCoreCollisionEvents.lua).
All of those files will be explored in detail in later chapters, but for now you have one final piece of business:
local scene = storyboard.newScene();
With a scene object in place the Storyboard API can deal with this scene properly. All that’s left is adding the life-cycle handlers for it, and that’s coming up shortly, but first you have one little detour to make: physics.
The World of the Real: Physics
Okay, nice, something new to talk about! The next two lines of code in gameScene.lua, before the scene life-cycle event handlers get added, are:
physics = require("physics");
shapeDefs = require("shapeDefs").physicsData(1.0);
In the old days of writing games, the motion of objects was usually pretty linear and nearly always deterministic, in the sense that you specifically wrote the code defining its motion. If you had an airplane flying across the screen, you generally wrote the code to keep decrementing its horizontal position over time, or something along those lines.
That motion isn’t particularly natural, though. Although you certainly hope a plane always flies in a straight line, especially if you’re a passenger, the fact is that it is constantly falling towards the Earth due to gravity! It’s only because the forces of lift and thrust combine to keep it in the air that we don’t wind up with a lot more visits to mysterious islands with smoke monsters and polar bears on them!
Note This is of course a reference to the television show Lost. I would bet most readers don’t need to be told this, but it’s entirely possible you never saw the show, so just to be safe, I’m telling you!
To simulate the real world, however, what if you wanted that plane to be affected by gravity? On your own, you likely would do something like reduce its vertical position over time, balanced against its level of thrust and lift, taking into account air viscosity and other factors. But what if you then wanted that plane to fly across the surface of Mars? That’s different gravity, so you’d need to change your calculations.
Sounds to me like a whole lot of work and complicated math!
Most games didn’t bother with this level of complexity years ago because it was too computationally expensive, even if the developer was up to the task. Really, there’s a great many games you can write that don’t require simulating physics in the first place, and that’s still very much true today.
But, what if you want to write the next Angry Birds clone? Well, physics is actually the key to such a game! The way the birds fly off the launcher, arc toward the pigs and their defenses—that’s all governed by physics. Not just gravity, but the weight of the bird (which varies by type), the strength the player uses to fling them, and of course the materials they ultimately crash into. Further, how that material reacts is governed by physics, too: whether the objects are made of glass, metal, or wood; how elastic they are (how they bounce, in other words), and other factors.
Having to write the math for all of that would be an exercise in futility for me, I can tell you that much! Fortunately, I don’t have to brush off my paltry calculus skills to do so because Corona provides the Physics API for exactly this purpose, and that’s of course what that require() is for. It brings in the code necessary to work all of that physics magic and presents us with a physics reference through which you can access it.
What about that shapeDefs object? That’s related to physics, too and brings us to the core concept of the Physics API: physics bodies.
You’ve Got a Great Body There
The great thing about the Physics API is you can bolt it on after the fact. Any graphical element, any DisplayObject basically, can be turned into a physics body, which means it will react to gravity and other physical interaction parameters. To be more precise, the physics body is really an extension of a DisplayObject, with some extra information it carries related to physics.
Let’s say for the sake of argument you have a cannonball graphic:
local cannonball = display.newImage("cannonball.png");
If you put that on the screen after importing physics, well, nothing will actually happen, because the physics simulation hasn’t been activated yet. To do so you only have to call:
physics.start();
Now, if you put the cannonball on the screen . . . well, still nothing will happen! That’s because even though you’ve turned physics on, and Corona is in fact simulating gravity and everything else involved in a physics simulation, it doesn’t yet know that this object should be affected by gravity and so won’t simulate its motion as part of its physics simulation.
To do that you need to create a physics body and add it to your cannonball, like so:
physics.addBody(cannonball, { density = 2.5, friction = .2, bounce = .1 });
Now, if you put the cannonball on the screen, you will see that it immediately begins to fall down toward the bottom of the screen. It will gradually gain speed as it does so, exactly as an object falling from the sky does. That’s gravity of course, and that’s the physics engine at work!
Tip Although it’s not typically something you have to be all that concerned with, Corona uses the popular Box2D physics engine for its physics simulator. In fact, the only time this information tends to come up is if you can’t get your physics to act like you want. In that case, knowing that you should research Box2D is helpful, since you’ll be able to find plenty of help online, and most of it will apply to Corona just like it does to using Box2D directly. You’ll probably need to adjust things a little bit, but generally what applies to Box2D will apply to Corona’s Physics API just as well.
The parameters inside the configuration object passed to physics.addBody() defines the physical characteristics of the body. The density attribute is used to determine the object’s mass, which determines how much of an effect gravity has on it. In simplest terms: The larger the number, the heavier the object, and the more it’ll be affected by gravity (it’ll accelerate and fall faster). The friction attribute is how much resistance to the forces exerted on the object there is. This is a value from 0 on up, 0 being no friction. The bounce attribute determines “restitution,” which means how much velocity is returned after the object impacts another physics body. This is a value from 0 to 1, where 0 is no bounce and 1 will make the object bounce forever. You rarely want a value greater than .3 unless you are modeling something like rubber because values above .3 result in objects that bounce a lot.
The Curves of Your Body
A cannonball tends to be circular; I’d say that’s a reasonable statement! However, by default, a physics body is rectangular. Therefore, the physics body incorporates the circular cannonball, as shown in Figure 5-1.
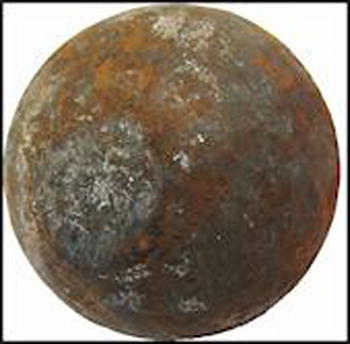
Figure 5-1 . The cannonball and its containing physics body
The white area around the cannonball inside the square would be transparent. This has an undesired effect: collisions between bodies will not always be precise. For example, Figure 5-2 shows a potential collision between two cannonballs.
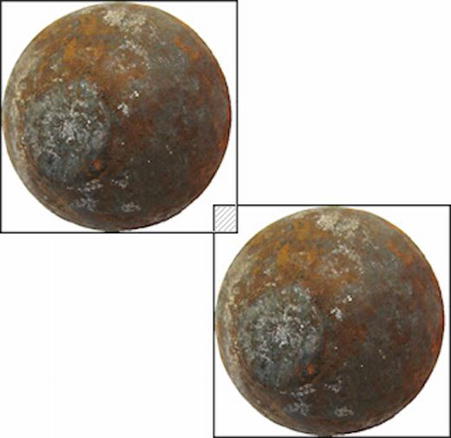
Figure 5-2 . The striped square in the middle is where they collide
Now, if these cannonballs were defined as being very bouncy, they would bounce away from each other at this point, and unless they were moving very fast the user would see it as them bouncing away from each other without actually touching! For rectangular objects, this works fine. Imagine a crate, for example: the default body would match the physical object perfectly and there would never be such a problem. For a circle, or other irregular shapes though, it’s a potential problem.
If the action is moving fast enough, then you can often get away with this sort of imperfect collision because the player won’t be able to see where it doesn’t quite match up anyway. This in fact is the case in Astro Rescue except in one specific instance, and that’s where shapeDefs comes into play.
While physics bodies are rectangular by default, you can do something more complex by manually defining the body. For starters, you can pass a radius attribute as part of the configuration object passed to physics.addBody() to define a circular body, perfect for our cannonball.
The other option is to define a polygon body. To do so, pass an array of x/y coordinates to physics.addBody():
local triangle = display.newImage("triangle.png");
local polyBody = { 0,-19, 19,19, -19,19 };
physics.addBody(triangle,
  { density = 2, friction = 4, bounce = 1, shape = polyBody }
);
Assume the triangle.png is a 39×39 pixel image with a triangle drawn in it edge-to-edge and centered. To define a physics body for it that matches its sides, you need to define them clockwise around the shape, as that’s what the Physics API requires, and it also must wind up being be a convex shape with no more than eight sides. Therefore, you start with the top vertex of the triangle (which vertex you start at is up to you, as long as you always move clockwise relative to the last coordinate pair provided). The Physics AP requires that the center point of the body is considered point 0,0, so you define the coordinates as you would relative to the origin on an inverted Cartesian graph, meaning positive numbers are movements right and down from the origin and negative movements are left and up. Therefore, to get the coordinates of that top vertex point you’d have to move up 19 pixels on the y axis, or –19 from the center point, with no change on the X axis, so the coordinate is 0,–19. The next point moving clockwise is the bottom right vertex, and that’s 19 pixels to the right of the origin and 19 pixels down so that’s where 19,19 comes from. The final vertex, the one to the bottom left of the center point, is 19 pixels left on the x axis and 19 pixels down, so –19,19.
For a triangle, defining that body isn’t so tough. However, for a larger shape, like, say, the mothership at the top of the screen, with its little landing struts jutting out, it would be quite a burden. Such a definition is precisely what you’ll find in that shapeDefs.lua file. In fact, if you have a look in there you’ll see that it’s a fair bit more complex than that, and includes a number of other body-related configurations, but at its core, that’s what it’s doing.
Why am I not showing that code and going over it in detail here? The answer is that I didn’t write it! I used a tool called PhysicsEditor (http://physicseditor.de) to generate it. This is an extremely handy tool that lets you import a graphic file, the mothership in this case, and then automatically trace the edges of the graphic to come up with the physics body coordinates! It also allows you to edit the other characteristics of a physics body such as density, friction, and bounce. It can then export the code for Corona, among other SDKs, as was done for this file. If you’re going to be working with complex bodies like this, I can’t recommend using this tool (or another like it) enough!
Note I worked on a project last year where I had a number of very complex bodies and I was defining them by hand. Yes, it works, but man, is it a pain! I wouldn’t do that again for all the tea in China. Well, okay, maybe for that, because I could turn around and sell it for a lot of money. (Maybe—does China even have a lot of tea?! It’s research time!)
So, since I didn’t write that code, going over it seems a bit superfluous to me. Think of it as you do Corona: it is code you didn’t have to write to accomplish a goal, so unless there’s something wrong in it you probably don’t care much about it. Really, though, the important point is that it’s what defines the complex body for the mothership. Later on in the section “Stuff Is Still Better When It Moves: Sprites Part 2”, you’ll see where it’s actually used to do just that, and you’ll see more of the Physics API as well over the next three chapters, but you’ve got the basic ideas behind it at this point.
Honestly, there’s not a heck of a lot more in gameScene.lua, but I’ll walk you through it nonetheless, beginning with createScene():
function scene:createScene(inEvent)

  utils:log("gameScene", "createScene()");

  gc:init(self.view);

end
As stated earlier, the game code itself is decoupled from the scene object, but there is a similar set of events that need to occur for that game code, beginning with basic one-time initialization tasks. The gc:init() method of the gameCore object, referenced by the variable gc, does just that. The DisplayGroup for the scene, self.view, is what all the graphics must be drawn in if you want the scene transitions to affect them, so it is passed along to gc:init().
The enterScene() method has a similar call into gameCore:
function scene:enterScene(inEvent)

  utils:log("gameScene", "enterScene()");

  gc:start();

end
The gc:start() method takes care of tasks that need to be done in the game code that should happen each time the scene is shown. Don’t worry, I will of course get into those details soon.
Correspondingly, when you leave the scene you need to stop the game, and there is a gc:stop() method just for that:
function scene:exitScene(inEvent)

  utils:log("gameScene", "exitScene()");

  gc:stop();

end;
Last, you have the same need when the scene is destroyed as with any scene: to clean up resources that were created when the scene was created. This time, I thought gc:destroy() would a perfectly appropriate name, rather than changing enterScene to start and exitScene to stop:
function scene:destroyScene(inEvent)

  utils:log("gameScene", "destroyScene()");

  gc:destroy();

end
There’s also the willEnterScene() and didExitScene() methods, but they have no corresponding method in the gameCore object, so they are just empty methods.
As with all scenes, there’s the final little bit of boilerplate work to do:
utils:log("gameScene", "Beginning execution");

scene:addEventListener("createScene", scene);
scene:addEventListener("willEnterScene", scene);
scene:addEventListener("enterScene", scene);
scene:addEventListener("exitScene", scene);
scene:addEventListener("didExitScene", scene);
scene:addEventListener("destroyScene", scene);

return scene;
Now you’re ready to look at the gameCore object where the real work is done.
Getting to the Heart of the Matter: The gameCore Object
The gameCore object starts innocently enough:
local gameCore = {

  levelData = require("levelData"),
The levelData.lua file is where the information describing the levels of the game is found. However, it makes much more sense to explain this in the context of drawing a level, which you’ll be getting to soon, so you can move on to:
gameDG = nil,
This variable, and all the rest to come, are members of the gameCore object, not global scope. The gameDG variable is really an alias for the view’s DisplayGroup. This is done because outside of the gameScene object you wouldn’t have access to self.view, and while there’s other ways to make it accessible (e.g., global variable, accessing it through the gameScene object itself), doing it this way makes the code a bit more self-contained within the gameCore object.
levelDG = nil,
The levelDG variable is another DisplayGroup that will itself become a child of gameDG. The difference is that every object put into levelDG is something that will need to be created and destroyed for each level (whereas gameDG contains not only that, but elements that you don’t want to be destroying and creating all the time).
topYAdjust = 34,
The topYAdjust variable effectively defines the height of the black bar at the top of the screen where the fuel gauge and other readouts are. Elements drawn on the screen are adjusted downward by this amount to account for that space.
PHASE_FLYING = 1,
PHASE_DEAD = 2,
PHASE_IN_BAY = 3,
PHASE_LANDED = 4,
phase = nil,
When the game is running it can be in a number of phases. The most common case, when the player is actually playing, is the phase defined by the value of PHASE_FLYING. When the player has crashed and the popup is shown asking if he wants to try again, the phase is PHASE_DEAD. When he’s entered the landing bay and the level completion popup is shown, the phase is PHASE_IN_BAY. Last, when he’s landed and is, presumably, waiting for a colonist to enter, the phase is PHASE_LANDED. The current phase of the game is stored in the phase variable. You’ll see where the current phase comes into play later, but suffice it to say that action needs to be paused, or a different action must take place, depending on the current phase.
Caution Lua does not have the notion of a constant. However, since it would make sense for the phases here to be constants, I’ve made them all uppercase, which is the typical convention across most languages for constants. It’s a reminder to myself that I intend these not to change. However, it’s always important to keep in mind that you can change them. Neither Lua nor Corona will or can do anything to force them to be unchangeable.
popup = nil,
The popup variable stores a reference to one of the popups, either when the player dies or he enters the landing bay and the level is complete.
scoreText = nil,
The scoreText variable is a reference to the text seen on the top of the screen for the player’s current score.
Note Don’t get too hung up on these variables just yet. My goal at this point is just to give you the general lay of the land. You’ll see how these are used throughout the code, and it’s not important that you memorize what each of them is right now; just that you have a clear 10,000-foot view of things.
Stuff Is Better When It Moves: Sprites, Part 1
The next bit of code in gameCore.lua takes us into another new Corona topic: sprites.
ship = {
  sequenceData = {
    { name = "noThrust", start = 1, count = 4, time = 250 },
    { name = "thrustUp", start = 5, count = 4, time = 250 },
    { name = "thrustRight", start = 9, count = 4, time = 250 },
    { name = "thrustLeft", start = 13, count = 4, time = 250 },
    { name = "thrustUpRight", start = 17, count = 4, time = 250 },
    { name = "thrustUpLeft", start = 21, count = 4, time = 250 }
  },
  sprite = nil,
  thrustVertical = nil,
  thrustLeft = nil,
  thrustRight = nil,
  colonistsOnboard = nil,
  fuel = nil,
  maxFuel = nil
},
Now, not everything you see here in the ship object is actually related to sprites, so I’ll discuss those first. The thrustVertical, thrustLeft, and thrustRight attributes are simple Boolean flags that tell you in which direction(s), if any, the ship is currently thrusting (which results from the player touching the screen or tilting their device, depending on which control scheme they use). The colonistsOnboard attribute tells you how many colonists the ship currently has onboard. The fuel variable is, naturally enough, how much fuel the ship currently has. Last, maxFuel is how much fuel the ship can have onboard. There’s a little more to that one than it would seem at first, and it has to do with properly drawing the fuel gauge. While that discussion is on the horizon, it’s not quite here yet so let’s talk about sprites instead, which is where the sprite (of course!) and sequenceData attributes come into play.
So, what’s this sprite thing anyway? In simplest terms, it’s a DisplayObject with some extra goodness related to animation added in. In more technical terms, a sprite is conceptually a combination of a couple of things: an image sheet (or sprite sheet; the terms are interchangeable), one or more animation sequences constructed based on the image sheet, and the sprite object itself.
Let’s talk about image sheets first. These are nothing but plain old images that happen to contain multiple images in them, such as Figure 5-3, which is the alien from Astro Rescue (who I’ve affectionately taken to calling Evil Otto, in remembrance of the great ColecoVision game Venture, even though the monsters in that game were actually called Hallmonsters and not Evil Otto, but I always think of Evil Otto from Berzerk when I see them so I just go ahead and save a few memory slots in my brain and call them all Evil Otto- but I digress!).
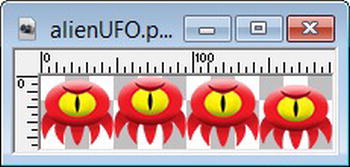
Figure 5-3 . Evil Otto . . . err, Astro Rescue’s alien antagonist, in image sheet form
In this case, it’s pretty easy to understand and you can probably guess what’s going on here: it’s a plain old PNG file that contains four frames of animation to make the alien bob up and down as it moves across the screen. However, the important point is that this single image sheet can be a much more complicated structure. It can contain multiple animation sequences for this game element, and it can even contain sequences for a number of different game elements.
It could, for example, contain the animation sequences for the ship, of which there are a lot more than for the alien, as you can see in Figure 5-4.
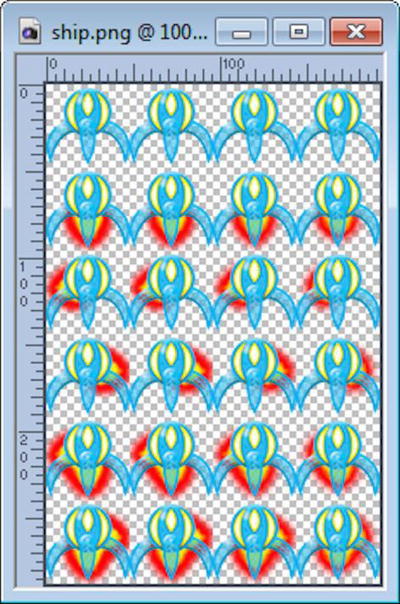
Figure 5-4 . Image sheet of the ship
I’ve tossed around this term animation sequence a number of times, but what does that mean? Well, it’s nothing more than a collection of individual frames of animation—a sequence of animation frames, in other words.
In this ship image sheet, for example, there are six different animation sequences, arranged in rows, four frames of animation each. The first such row is for when the ship is not thrusting at all (it’s either falling due to gravity or has landed). The next sequence, row two, is when it is thrusting vertically only. The third is thrusting left only, while the fourth is thrusting right only. The fifth and sixth are the other two possible thrust cases: thrusting vertically and left or vertically and right, respectively.
The question you have to answer for yourself as you develop your games is how to combine graphics. It’s quite possible to have only a single PNG file in your whole project that contains every game element and every animation sequence. There are some benefits to doing this, mainly that the graphic can be highly compressed due to a lot of redundancy in the color palette and pixel patterns. However, in many ways it leads to more complex code and makes maintaining your images a fair bit more difficult (and also makes it easier to run out of texture memory on a real device, since you’re loading all your graphics at one time rather than progressively loading things as they’re needed). The choice is entirely up to you, though. You could also put each individual animation sequence for each game element in its own file (so, e.g., six different PNGs for the ship). This may be a bit easier to maintain but will require more code. For my own work, and how I’ve done Astro Rescue, is to put each discrete game element in its own file that contains all its animation sequences. This is a nice, logical delineation, isn’t too difficult to work with, and makes dealing with memory relatively easy.
Okay, so we know what an image sheet is, but how do we turn that into a sprite? It’s actually very easy:
local mySprite = display.newSprite(
  graphics.newImageSheet("imageSheet.png",
    { width = 50, height = 450, numFrames = 8 }
  ),
  {
    { name = "seq1", start = 1, count = 8, time = 250 }
  }
);
The display.newSprite() method is the key and gives you back a SpriteObject, which is a subclass of DisplayObject. This takes two arguments: an ImageSheet object and an array of objects where each object defines an animation sequence. The ImageSheet object is obtained by a call to display.newImageSheet() and you have to give it the graphic file that contains the sheet as well as an object that tells Corona about that sheet. Specifically, you tell it what the dimensions of an individual frame of animation are, as well as how many total frames there are. Notice, though, that you don’t need to tell it the overall size of the sheet. This means that Corona will handle sheets of any size and you can organize them horizontally or vertically (e.g., if you wanted 10 frames of 50×50 animation, you could draw them in your sheet straight down so you’d wind up with a sheet that’s 50×500).
Note Corona also has the ability to handle image sheets where individual frames aren’t all the same dimensions. This is a more advanced topic, however, and not something that is used in Astro Rescue. It’s also not, in my experience, all that common in a lot of Corona projects. Therefore, that capability isn’t discussed in this book. The Corona documentation can provide the information you require for this if you have the need. Rest assured, in typical Corona fashion, it’s quite easy to do if it’s something you need.
The definition of the animation sequences is the other piece of the puzzle. You can define as many sequences as you like; simply add an object to the array passed in. Each sequence needs to define a name (the name attribute) for the sequence that you’ll refer to later. It also needs to include what frame in the sheet the sequence starts on (the start attribute) and how many frames make up the sequence (the count attribute). Last, it must tell Corona how fast it should switch between frames (the time attribute, which is the time between frame transitions, in other words). The time attribute is actually optional and, if not supplied, it will be based on the frame rate of your application. Most times, you’ll probably want to define this yourself so your animations will be consistent regardless of frame rate. You can also optionally define how many times you want the sequence to play by specifying the loopCount attribute. A value of 0, the default, will cause the sequence to loop until you explicitly stop it. Any other value will run through that many of times and then stop until you explicitly start it again. Last, the loopDirection attribute allows you to play the sequence either forward (with a value of "forward", the default) or as a bounce (with a value of "bounce"), which will play it forward, then backward (and it may repeat that or not, based on loopCount).
Once you have your sprite, you can activate a given animation sequence easily:
mySprite:setSequence("seq1");
mySprite:play();
That’s it! Your sprite will then cycle through the seq1 animation sequence (which, in real code, you’ll usually want to give a descriptive name; e.g., "walking" if this was a character in the game).
As mentioned earlier, a SpriteObject is a subclass of DisplayObject, so of course you can do all the usual DisplayObject stuff with it. As for what else you can do with sprites specifically, there’s not a heck of a lot! In any case, you’ll see a few more things as we progress through the code.
Let’s not forget about that sequenceData attribute in the ship object that started this whole sprite discussion. Now you know exactly what it’s all about: it’s the collection of animation sequences the ship has. The names match up with the sequences described in the ship image sheet. That was pretty simple, wasn’t it?
Moving Right Along
A lot of what comes next will be obvious now that you have an understanding of sprites, beginning with the colonist object:
colonist = {
  sequenceData = {
    { name = "materializing", start = 1, count = 10, time = 1000,
      loopCount = 1
    },
    { name = "standing", start = 11, count = 4, time = 1000 },
    { name = "indicator_onboardShip", start = 21, count = 1 },
    { name = "indicator_pendingRescue", start = 31, count = 1 },
    { name = "walking_left", start = 41, count = 6 },
    { name = "walking_right", start = 51, count = 6 }
  },
  sprite = nil,
  appearCounter = 0,
  FRAMES_BETWEEN_APPEARANCES = 60,
  indicators = { },
  lastAppearancePoint = nil
},
Again, we have a collection of animation sequences, as shown in Figure 5-5. This sheet is an interesting case in that some of the sequences have a different number of animation frames than the others, so you wind up with some empty space. This is actually by choice; there would be no problem if these all ran together, either in one straight line (so you’d wind up with an image that’s 832×32 pixels: 832 is the width of a frame, 32, times the number of frames, 26). Or it could be arranged in another way, maybe in 4×4 squares of frames. Any arrangement you like will work; as long as the frames are all the same size, Corona will be able to work with it. However, to help visualize the different sequences as a learning exercise, I prefer this layout. That being said, it’s important to realize that this does uses more texture memory, and usually that’s something you want to avoid. For a relatively small image like this, in a relatively small game like Astro Rescue, you can get away with it, but in a larger game, you would be better served by condensing it and having no wasted space.
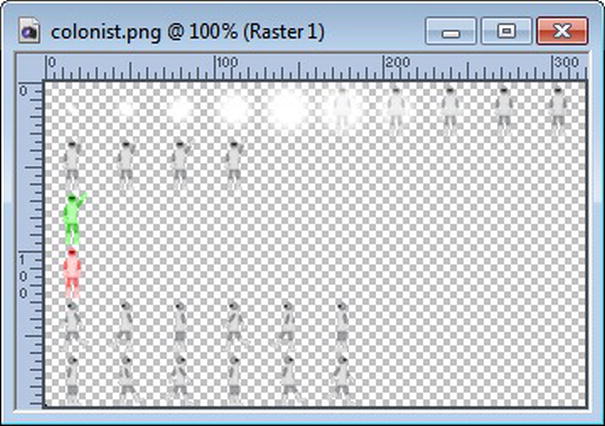
Figure 5-5 . Image sheet of the colonist
The "materializing" sequence is for when the colonist first appears on the screen. The "standing" sequence is of course when he’s just standing there waiting for you. The "walking_right" and "walking_left" sequences are just that: for when he is walking toward the ship, and which one is used depends on which way he’s walking. The "indicator_onboardShip" and "indicator_pendingRescue" are two special cases in that they aren’t animations per se. Instead, they are versions of the colonist graphic used to show the indicators in the upper-right corner. This is a good example of how you can use sprites even if you don’t need animation; if you simply need to have a couple different versions of a basic static image, you can do it with sprites and only have to maintain one physical graphic file. Whatever suits your needs, Corona will provide it for you!
Note The other attributes of the colonist object start with the sprite attribute. This attribute is of course is a reference to a SpriteObject. The way the game works, there’s only ever one colonist on the screen at any given time, so a single sprite is all that will ever be needed. The appearCount attribute is used to determine when it’s time for a new colonist to appear. The FRAMES_BETWEEN_APPEARANCES, a pseudo-constant, is used to ensure at least 2 seconds pass between colonist appearances. Remember, the game runs at 30 fps, so 2 seconds is 60 fps. If we check every frame to see if it’s time for a colonist appear, we can compare to this constant to tell. The indicators attribute is an array where each element corresponds to one of the colonist indicators in the corner. This array gets filled in as the player rescues colonists. Last, the lastAppearancePoint attribute is used to remember where a colonist last appeared on the screen so that we can avoid a colonist appearing at the same place twice in a row and making it too easy on the player!
You may be wondering why I’m creating an object for each of these game entities rather than using expando attributes on some plain old DisplayObjects. That’s certainly a valid way to go. However, just from a clarity-of-code perspective I like having everything encapsulated in an object for the ship, colonist, and everything else. That also ensures I don’t accidentally break anything by creating an expando that happens to overwrite or conflict with something Corona expects. As usual, it’s up to you whether you like this style or not; it’ll work either way.
explosion = {
  sequenceData = {
    name = "exploding", start = 1, count = 5, time = 500, loopCount = 1
  },
  sprite = nil,
  callback = nil
},
The explosion object is much like the ship and colonist objects: it has a sequenceData attribute and sprite attribute to deal with the animation, and in addition has a callback attribute that, as you’ll see in a chapter 8, is used to execute some code when an explosion finishes doing its boom thing.
Next, we have the on-screen controls:
controls = {
  left = nil,
  right = nil,
  vertical = nil
},
Each of its attributes is simply a reference to a DisplayObject, which all get created a little later on in the code.
fuelPod = {
  sprite = nil,
  rotate = function()
    transition.to(gc.fuelPod.sprite, {
      time = 1000, delta = true, rotation = 360,
      onComplete = function()
        gc.fuelPod.rotate();
      end
    });
  end,
  appearanceRangeFrames = { min = 150, max = 600 },
  framesSinceLastAppearance = nil
},
The fuelPod object is for when fuel appears for the player to pick up. Here we have a sprite attribute, but notice there’s no sequenceData. In point of fact, the sprite attribute doesn’t reference a SpriteObject but instead references a plain old DisplayObject. I just kept the attribute name to make it consistent across all these objects. Sprite animation isn’t used for the fuel pod; rather, plain old Transition API functions are called and that’s what the rotate attribute references. The function that is its value performs a transition on the sprite’s rotation attribute. Again, to me, encapsulating this function inside the fuelPod object makes for a much cleaner style of coding. The appearanceRangeFrames attribute contains two values, which are used to determine when a fuel pod should appear. There will always be at least 5 seconds between appearances but no more than 10 (these values are numbers of frames). Last, the framesSinceLastAppearance attribute is what is changed with each frame and is compared to appearanceRangeFrames to know when it’s time to show a fuel pod.
Like the controls object, the fuelGauge object is simple:
fuelGauge = {
  shell = nil,
  fill = nil
},
The shell and fill attributes reference the components of the fuel gauge, namely the outline of it (its “shell”) and the portion that fills in (and empties) as fuel is used.
The warningSign object is next:
warningSign = {
  sprite = nil,
  tween = nil,
  fadingIn = true,
  flash = function()
    local aVar = 0;
    if gc.warningSign.fadingIn == true then
      aVar = 1;
    end
    gc.warningSign.tween = transition.to(gc.warningSign.sprite, {
      time = 250, alpha = aVar,
      onComplete = function()
        gc.warningSign.fadingIn = not gc.warningSign.fadingIn;
        gc.warningSign.flash();
      end
    });
  end,
},
Once again, we have a sprite attribute, but not an actual SpriteObject and no sequenceData attribute. Like the fuelPod, the warningSign won’t be using sprite animation. It again uses a transition, and when the transition is applied we store a reference to it in tween so that it can be stopped later (in contrast to fuelPod, whose animation simply runs all the time).
Tip In general, you should always stop transitions and sprite animations when the object isn’t actually on the screen. This will help keep your frame rate up and also reduce battery usage. However, as this is a learning experience I wanted to be sure to show both situations.
The fadingIn attribute tells us whether the warning sign is fading into or out of view, which is used within the logic of the flash() function. This function is used just like rotate() in fuelPod. The value of aVar is 1 when fading in, or 0 when not fading in, and the alpha attribute of the DisplayObject is animated toward that value. At the end of the transition, the value of fadingIn is inverted and the process is begun again. The result is a pulsating warning sign that fades in and out of view quickly and serves to get the player’s attention.
Next up we have our alien:
Note Originally, the enemy in the game was to have been a spaceship, a UFO if you will. However, when my talented artist buddy Anthony Volpe did his thing with my temporary graphics, he decided that an alien squid-type thing was better, and I agree
alienUFO = {
   sequenceData = {
     { name = "default", start = 1, count = 4, time = 200 }
   },
   sprite = nil,
   appearanceRangeFrames = { min = 300, max = 750 },
   frameSinceLastAppearance = 0,
   exitPoint = nil,
   tween = nil,
 },
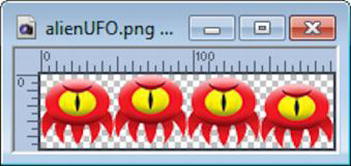
Figure 5-6 . Image sheet of the alien
Figure 5-6 shows the image sheet. Most of the code is well-known to you by now, so I’ll just talk about the new attribute, exitPoint (which goes hand-in-hand with tween). When an alien is shown, it starts from some point on the screen (just off the edge of the screen actually). At that time, the game code calculates where it will leave the screen. The motion of the alien is accomplished via a transition of its x/y coordinates from its starting point toward its ending point, which is stored in exitPoint. The animation itself is referenced by tween.
The plasmaBall object, whose image sheet is shown in Figure 5-7, is very similar to the alienUFO object:
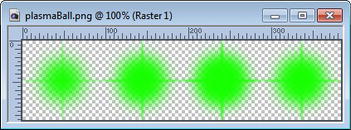
Figure 5-7 . Image sheet of the plasma ball
  plasmaBall = {
    sequenceData = {
      { name = "default", start = 1, count = 4, time = 200 }
    },
    sprite = nil,
    tween = nil
  },
Since a plasma ball is only seen when an alien appears, we don’t need most of the attributes the objects have had. We just need the sequenceData, since this time it’s an actual SpriteObject, referenced by the sprite attribute, and we’ll be using the Transition API again to move the plasma ball from the alien to the player’s ship, so a reference to the tween is stored in the tween attribute once more.
  sfx = {
    scream = nil,
    screamChannel = nil,
    fuelPodPickup = nil,
    fuelPodPickupChannel = nil,
    sos = nil,
    sosChannel = nil,
    explosion = nil,
    explosionChannel = nil,
    thrusters = nil,
    thrustersChannel = nil
  }

};
The final attribute of the gameCore object encountered when walking through the code is sfx, which is a collection of references to audio resources. Once again, this organizational structure is a choice. I like having a single object storing all my audio resources so it’s easy to remember where they are. It also helps avoid naming conflicts later as I build the code up.
Where It All Starts: Initializing the Game
The first method found in the gameCore object was the one you saw earlier called from createScene() in the gameScene object, init():
function gameCore:init(inDisplayGroup)

  utils:log("gameCore", "init()");

  gc.gameDG = inDisplayGroup;

  physics.start(true);
  physics.setDrawMode("normal");
  physics.setGravity(0, 1);
As you can see, this is where that gameDG attribute gets populated and is a reference to the DisplayGroup passed in. Referring back to gameScene, you see that’s self.view, the DisplayGroup the Storyboard API automatically creates for the gameScene.
Following that, we have some physics setup to perform. Just loading the Physics API doesn’t actually do anything on its own, we have to tell the API to start simulating physics first, hence the call to physics.start(). The Boolean passed in tells the physics engine whether physics bodies can “sleep,” which means when they come to rest and are not involved in collisions, their motion will no longer be simulated. The value true tells Box2D that bodies cannot sleep, while the default value false means bodies can sleep (that’s a little backwards to most people’s thinking, but it is what it is). This is generally a good thing as it reduces the overhead the engine requires; however, there are instances where the simulation will be imperfect and collisions will not work as expected as a result. This was the case in Astro Rescue, as sometimes objects would not register collisions correctly, hence passing true, which tells the engine that bodies should never sleep.
The call to physics.setDrawMode() is actually not necessary as written because "normal" is the default, but since during development it is handy to be able to switch to "debug" or "hybrid" mode, I left that line in. The "debug" mode shows collision engine outlines only (collision detection is something we’ll see a lot of in Chapter 8). The "hybrid" mode shows the objects normally with the collision engine outlines superimposed on them. The "normal" mode is of course just the object itself being shown.
Tip You can also turn sleeping on or off for individual bodies, and I would suggest that be your first course of action if you encounter issues. You should only turn sleeping off if you do encounter problems, though, so that the simulation can be as efficient as possible. If you decide you need to do this, you have only to set the value of the isSleepingAllowed attribute of the body in question as appropriate.
Last, the physics.setGravity() call is responsible for describing the gravity used to simulate physics. The arguments are horizontal and vertical gravity components, respectively, measured in meters per second squared. For standard Earth gravity the values 0,9.8 would be used, but since Astro Rescue takes place on another planet with less gravity than Earth, I used 0,1. If the value were 2,1, for example, then gravity would not only pull the player’s ship down but also to the right. You can set up whatever sort of wacky world makes sense using these values.
Caution It’s important to realize that collision detection in Corona requires usage of physics. This is something that trips a lot of people up at first. However, it’s also important to realize that this does not imply your objects need to be affected by gravity, as you’ll see later on. If you really don’t want to use the Physics API you can always do “bounding box” calculations on your own to determine when two objects intersect. However, since at the present time Corona does not allow pixel-level manipulations, these calculations will always be approximate at best. Using the Physics API for collision detection allows you to be more precise.
gc.loadGraphics();
The loadGraphics() method is responsible for loading all the graphical resources used during gameplay, but that method is covered in the next section in detail, so for now I’ll move on to the audio resources:
gc.sfx.scream = audio.loadSound("scream.wav");
gc.sfx.fuelPodPickup = audio.loadSound("fuelPodPickup.wav");
gc.sfx.sos = audio.loadSound("sos.wav");
gc.sfx.explosion = audio.loadSound("explosion.wav");
gc.sfx.thrusters = audio.loadSound("thrusters.wav");
You have of course seen sounds loaded before, so this is nothing new.
gc.drawCurrentLevel();
Like loadGraphics(), drawCurrentLevel() is a method you’ll be exploring in detail in short order, but as I’m sure you can guess it’s what is responsible for drawing the screen, namely the ground, for whatever level the game is currently on.
gc.resetLevel();
The resetLevel() method is responsible for resetting state at the start of a level so the game begins properly and consistently. Say it with me: you’ll be looking at that soon!
Loading Graphic Resources
Now you’re going to start looking at the loadGraphics() method. Much of this will be old hat to you, but there’s also some new stuff to explore.
function gameCore:loadGraphics()

  local starfield = display.newImage("starfield1.png", true);
  starfield.x = display.contentCenterX;
  starfield.y = display.contentCenterY + gc.topYAdjust;
  gc.gameDG:insert(starfield);
First, we need to load the star field background, as shown in Figure 5-8. This has to be done first since you want everything else to be drawn on top of it. Note that its vertical position is determined using that topYAdjust variable you saw earlier. It is pushed down just far enough to leave the empty space you need for the status bar up top.
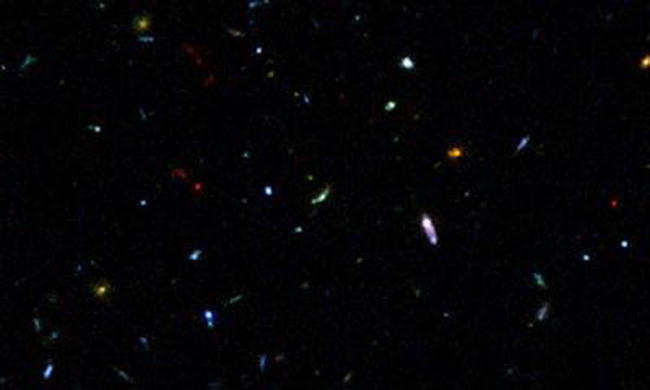
Figure 5-8 . The background star field image (starfield1.png)—thank you, Hubble!
Note The star field is actually a section of the famous Hubble Deep Field image. Yes, that’s a real picture of space, and nearly everything you see that isn’t empty space is a galaxy!
Next up, draw the text that shows the player’s current score:
gc.scoreText = display.newText("Score: ", 0, 2, native.systemFont, 28);
gc.gameDG:insert(gc.scoreText);
Once again, this is nothing you haven’t seen before. Notice there is no value after the text, though; that will be drawn later by updating the value of this text object.
Another component of the status bar, in addition to the current score, is the fuel gauge, which is actually a combination of two elements:
gc.fuelGauge.shell = display.newImage("fuelGauge.png", true);
gc.fuelGauge.shell.x = display.contentCenterX;
gc.fuelGauge.shell.y = gc.fuelGauge.shell.height / 2;
gc.gameDG:insert(gc.fuelGauge.shell);
gc.fuelGauge.fill = display.newRect(
  (gc.fuelGauge.shell.x - (gc.fuelGauge.shell.width / 2)) + 3,
  (gc.fuelGauge.shell.y - (gc.fuelGauge.shell.height / 2)) + 3,
  gc.fuelGauge.shell.width - 5,
  gc.fuelGauge.shell.height - 5
);
gc.fuelGauge.fill:setFillColor(255, 0, 0);
gc.gameDG:insert(gc.fuelGauge.fill);
gc.ship.maxFuel = gc.fuelGauge.fill.width;
The first part is the shell. This is a simple graphic file that is centered horizontally on the screen and positioned vertically based on its own height. You want it to be right at the top of the screen, but remember that its reference point is its midpoint by default. So, if we set y to 0, then it would be half cut off on the top. It needs to move down from that point by half its height, so that’s what the code does.
The next part of the fuel gauge is the fill portion inside of it. To do this, we draw a plain old rectangle. The x and y positioning is done effectively relative to the shell and taking into account the thickness of the shell itself. The width and height are similarly based on the size of the shell, minus enough to account for its thickness. The gauge is to be red, so setFillColor() is called with the RGB value for red (255,0,0).
The other task that needs to be accomplished here is to set the maxFuel attribute of the ship object. This is based on the size of the fill portion of the gauge. I did it this way so that I could adjust the size of the gauge as I developed the game, and the rest of the game code would continue to function as expected in all cases. Any time you can avoid hard-coded values in your code it’s generally a Very Good Thing™.
Stuff Is Still Better When It Moves: Sprites, Part 2
The next object that gets created is the mothership, shown in Figure 5-9.

Figure 5-9 . The mothership (mothership.png)
The mothership is drawn at the top of the screen, and the code that creates it introduces a number of new concepts in the process of doing its thing:
local mothershipSprite = display.newSprite(
  graphics.newImageSheet("mothership.png",
    { width = 800, height = 60, numFrames = 1 }
  ),
  { name = "default", start = 1, count = 1, time = 500 }
);
mothershipSprite.objName = "crash";
mothershipSprite.x = display.contentCenterX;
mothershipSprite.y = (mothershipSprite.height / 2) + gc.topYAdjust;
physics.addBody(mothershipSprite, "static", shapeDefs:get("mothership1"));
mothershipSprite.isFixedRotation = true;
mothershipSprite:setSequence("default");
mothershipSprite:play();
gc.gameDG:insert(mothershipSprite);
local mothershipMiddle = display.newImage("mothershipMiddle.png", true);
mothershipMiddle.x = display.contentCenterX;
mothershipMiddle.y = mothershipSprite.height + 32;
mothershipMiddle.objName = "bay";
physics.addBody(
  mothershipMiddle, "static", { density = 1, friction = 2, bounce = 0 }
);
gc.gameDG:insert(mothershipMiddle);
At first, it’s just like any other sprite in that you need to pass it an image sheet, which is created inline in this case, as well as the animation sequences, of which there’s just one this time around.
The first new bit is the setting of objName, which is an expando attribute. This is used later to identify what objects have collided when a collision event occurs.
The x and y locations are set so the mothership is at the top of the screen just below the status bar area.
Next, a physics body is added, as described earlier. Two interesting bits there that are new are the "static" argument and the call to shapeDefs:get(). The latter is a function provided by the code generated by PhysicsEditor that returns the description of the points that make up the outline of the body. That’s really all there is to it. As previously discussed in this chapter, that is generated code so it won’t be reviewed here (although you probably should take a moment and check it out on your own, just to have a general idea what’s going on, but understanding it in detail isn’t crucial to what you’re doing here).
The "static" argument requires some explanation, though. There are three different types of physics bodies: static, dynamic, and kinematic, and these happen to be the values you can pass to addBody() as well. Static bodies are ones that don’t move. The Corona documentation says they “don’t interact with each other” as well. While it is true that two static bodies won’t interact with each other, in that it won’t trigger a collision event, other types of bodies can interact with a static body and produce a collision event. This is demonstrated in Astro Rescue itself: the mothership is static, as is the ground (as you will see later), but the player’s ship, which in contrast to the ground and mothership is a dynamic body, can collide with the mothership as well as the ground. The third type of body, kinematic, covers objects that move, participate in collision events, and can be affected by forces (you’ll see forces, which are different from gravity, in action later) but are not affected by gravity. Things like bullets might be kinematics, and objects that the user can drag around are typically set as kinematic bodies.
Next, the isFixedRotation attribute is set to true. This keeps the ship pointing upright at all times. The default value is false, which results in the mothership tipping left and right if the player’s ship crashes into it. Usually, you want the physics simulation to be as accurate as possible, which means if contact is made with another body and the force is off center, then the bodies should tilt as expected. Imagine a teeter-totter on a playground. You remember those, right? The things with the two seats attached by a board balanced on a support in the middle? Well, whichever direction the most force is applied downward to, the side with the heavier kid generally, results in the other side moving in the opposite direction (all other forces being equal). That’s the realistic way things work and is normally how you want your physics-based games to react as well. However, if this is not done for the mothership, you will wind up with an unfortunate situation where the mothership slowly seems to fall off the screen! Go ahead and try it—set isFixedRotation to false, run the game, and crash your ship into the mothership on one side. You’ll see it slowly start to fall down the opposite way! Fun to watch, but not exactly how you’d expect it to react, and setting isFixedRotation to true deals with that problem.
Last, the default animation sequence, the only one the sprite supports, is enabled and the animation started. In point of fact, there is no actual animation on the mothership, but this leaves open the possibility of adding moving lights or something like that by adding frames later. It would just require altering the value of numFrames and count in the sequence definition.
In addition to the mothership itself, the landing bay (Figure 5-10) is created as well. The landing bay graphic is positioned such that it visually completes the mothership on the screen, hanging below the body of the ship a bit. A physics body is added to it as well so that it can register the collision when the ship enters, and the objName is set to "bay" so we can differentiate that collision event from others later on, as you’ll see.
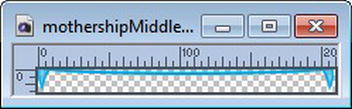
Figure 5-10 . The mothership landing bay (mothership.png)
Having the landing bay be a separate element from the mothership itself makes the coding far easier, because you can watch for a collision on each separately and act accordingly in each case. The alternative, where the mothership was one graphic, would have required looking at screen coordinates and such to know when the player’s ship hit the bay as opposed to the ship itself, or some other mental gymnastics. Better to take the easier route with two separate images.
Moving Right Along, Redux
When the player is moving too fast and their collision with another object will result in death, a flash warning sign appears. This is a pretty ordinary sprite:
gc.warningSign.sprite = display.newImage("warningSign.png", true);
gc.warningSign.sprite.x =
  gc.warningSign.sprite.width - (gc.warningSign.sprite.width / 2) + 2;
gc.warningSign.sprite.y =
  gc.warningSign.sprite.height + mothershipSprite.height + 10;
gc.warningSign.sprite.alpha = 0;
gc.gameDG:insert(gc.warningSign.sprite);
It’s alpha attribute is set to 0 so that it isn’t initially visible, since it’s only shown when needed. Its position is set up based on its width, so that it winds up close to the left edge of the screen, and on the height of the mothership, so that it’s below that.
Next, the on-screen controls must be set up, but only if the player has chosen to control the game this way via the Settings screen (and this is the default control mode as well):
if usingAccelerometer == false then
  gc.controls.vertical = display.newImage("controlVertical.png", true);
  gc.controls.vertical.x =
    (display.contentWidth - (gc.controls.vertical.width / 2)) - 20;
  gc.controls.vertical.y =
    display.contentCenterY + gc.controls.vertical.height + 40;
  gc.controls.vertical.alpha = .2;
  gc.controls.vertical.controlName = "vertical";
  gc.controls.vertical:addEventListener("touch", gc);
  gc.gameDG:insert(gc.controls.vertical);
end
That sets up the vertical control on the right and, like the warning size, uses its own dimensions as well as the dimensions of the screen to position it, so that if the graphics are resized later it should still be positioned properly. At least, it should be close; there are some “magic numbers” used here, so they might have to be tweaked, but you probably wouldn’t want to make this graphic much different size-wise anyway.
Also, note the controlName expando. This is similar conceptually to the objName set on the game elements in that when a touch event occurs, controlName will help us determine which control was touched and act accordingly. To make use of that value we need an event handler, and unlike some previous scenes, this one is set up on the control element itself. That means that touching the screen will only result in us handling the touch event if it was this control that was touched. Just touching an empty area of the screen won’t do so, in contrast to those other scenes that registered touches anywhere. Since a reference to the gameCore object, by way of the gc variable, is what’s passed to addEventHandler(), we know there is a touch() method to explore somewhere in our future!
The horizontal controls require a little bit more work to set up:
if usingAccelerometer == false then
  gc.controls.left = display.newImage("controlHorizontal.png", true);
  gc.controls.left.x = (gc.controls.left.width / 2) + 20;
  gc.controls.left.y = display.contentCenterY + gc.controls.left.height + 40;
  gc.controls.left.alpha = .2;
  gc.controls.left.controlName = "left";
  gc.controls.left:addEventListener("touch", gc);
  gc.gameDG:insert(gc.controls.left);
  gc.controls.right = display.newImage("controlHorizontal.png", true);
  gc.controls.right.x =
    (gc.controls.right.width / 2) + 40 + gc.controls.right.width;
  gc.controls.right.y =
    display.contentCenterY + gc.controls.right.height + 40;
  gc.controls.right.alpha = .2;
  gc.controls.right.controlName = "right";
  gc.controls.right:addEventListener("touch", gc);
  gc.controls.right:scale(-1, 1);
  gc.gameDG:insert(gc.controls.right);
end
It doesn’t look much different than the vertical control, until you get to the line with the call to scale(). What’s going on there? Well, to save memory it makes sense to use the same graphic for the left and right controls, since it’s the same thing, just flipped (or mirrored, as it’s sometimes described, because you’re talking about a mirror image of the original graphic). However, Corona doesn’t have a native mirroring function (I wouldn’t be surprised to see one added before too long though as it’s a very common thing, along with a vertical flip). However, the same thing is easy to accomplish with the scale() method that all DisplayObjects have. Usually, you pass a horizontal and vertical scaling factor to this, respectively, so passing 2,2 would double the size of the object in both directions for example (a value of 1 is 100%). But, Corona provides the special case of negative numbers, which not only scales but flips on the axis to which you pass the negative value. So, if you want to horizontally flip the object, you pass -1,0 (0 ensures you don’t flip it or scale it vertically). You could also do both. Say you want to scale it to 300% vertically as well as flip it, and also scale is 200% horizontally; then you’d pass 2,-3. Makes sense, right?
Tip With Lua and Corona being so flexible, it’s trivial to simply add expando methods, just like the expand attribute we’ve seen, so you could always add mirror() and flip() methods for horizontal and vertical flipping to all DisplayObjects you create. Even better, create your own createNewImage() method that calls display.newImage() first and then adds those methods, so you always have it. You can augment the Corona API like this all you like thanks to Lua’s dynamic nature.
Next, we need to create the sprite for the player’s ship:
gc.ship.sprite = display.newSprite(
    graphics.newImageSheet("ship.png",
      { width = 48, height = 48, numFrames = 24 }
    ),
    gc.ship.sequenceData
  );
  physics.addBody(
    gc.ship.sprite, "dynamic", { density = 1, friction = 1, bounce = 0 }
  );
  gc.ship.sprite.isFixedRotation = true;
  gc.ship.sprite.objName = "ship";
  gc.gameDG:insert(gc.ship.sprite);
This time it’s a dynamic body because we of course want it to react to gravity and any other forces acting upon it, and just like the mothership you don’t want it to rotate when it impacts things, or when things impact upon it. The control scheme in the game isn’t sophisticated enough for the user to be able to correct the ship when it lists the way it would if isFixedRotation were false, so that possibility is removed entirely by setting it to true so it never lists.
The next game element to set up is the colonist that appears to be rescued:
gc.colonist.sprite = display.newSprite(
  graphics.newImageSheet("colonist.png",
    { width = 32, height = 32, numFrames = 60 }
  ),
  gc.colonist.sequenceData
);
gc.colonist.sprite.objName = "colonist";
physics.addBody(
  gc.colonist.sprite, "static", { isSensor = true }
);
gc.colonist.sprite:addEventListener("sprite",
  function(inEvent)
    if inEvent.target.sequence == "materializing" and
      inEvent.phase == "ended"
    then
      gc.colonist.sprite:setSequence("standing");
      gc.colonist.sprite:play();
    end
  end
);
gc.gameDG:insert(gc.colonist.sprite);
Recall that the colonist has quite a few different animation sequences as defined in gc.colonist.sequenceData; that’s why there’s so many frames in the image sheet in comparison to most of the other game elements.
Here you encounter something new in physics: the isSensor attribute. A sensor is an object that registers when collisions occur but does not produce reactive force. In other words, if the player’s ship collides with the colonist standing there, that’s bad news for the colonist and you want to know about it in the code. However, you do not want the ship to react physically to the collision; our code will effectively handle that. Setting isSensor to true does this: you’ll get your collision events, as will be discussed in Chapter 7, but they’ll have no effect on the ship.
The other part of the equation here is the event listener attached. When the colonist is appearing, which is termed "materializing" within the context of the game, you want to know when that animation sequence completes so that it can switch to the sequence that shows the colonist standing there waving their arms. This event handler deals with that. The "sprite" event type receives notice of a number of different event phases, including "began" for when a sequence begins, "bounce" for when a sequence bounces from forward to backwards while playing, "loop" for when the sequence loops around to play again, and "next" for when a new frame in a sequence is played that doesn’t otherwise result in one of the other phases. The other phase, "ended", is for when a sequence ends, and that’s what you need to know about about here. Remember though, this event phase will be triggered when any sequence ends, so we also need to check what sequence is playing and ensure the handler only does its thing when it’s the "materializing" sequence.
After the colonist sprite comes the explosion sprite (Figure 5-11), seen when the player’s ship meets its untimely demise:
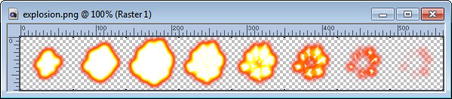
Figure 5-11 . The explosion image sheet (explosion.png)
gc.explosion.sprite = display.newSprite(
  graphics.newImageSheet("explosion.png",
    { width = 70, height = 70, numFrames = 5 }
  ),
  gc.explosion.sequenceData
);
gc.explosion.sprite.isVisible = false;
gc.gameDG:insert(gc.explosion.sprite);
There is nothing new there, although note that the explosion is initially hidden, which is only logical.
Tip While it’s quite possible to create this sprite at the time you need it, and destroy it when its animation sequence concludes, it’ll generally be more efficient in terms of performance to create all your graphics ahead of time. For small graphics like the explosion, the memory overhead isn’t any big deal. For larger graphics, you have to make a trade-off between performance and memory usage, and there is no simple right-or-wrong answer—it’s whatever you determine makes sense at a given point in your code.
The fuel pod that appears periodically to help the player is next:
  gc.fuelPod.sprite = display.newImage("fuelPod.png", true);
  gc.fuelPod.sprite.objName = "fuelPod";
  gc.fuelPod.sprite.isVisible = false;
  gc.fuelPod.sprite.x = -1000;
  gc.fuelPod.sprite.y = -1000;
  physics.addBody(gc.fuelPod.sprite, "static", { isSensor = true });
  gc.gameDG:insert(gc.fuelPod.sprite);
It’s a static body type because we don’t want it to fall down under the effects of gravity, and like the explosion it gets hidden until it’s time to show it.
You’re probably wondering why the x and y coordinates are set to values that put the fuel pod off screen, since setting isVisible to false does about the same thing. The answer is physics! If you don’t do this, then the player’s ship can still collide with the fuel pod. Although it’s static and set up as a sensor and so won’t physically effect the ship, it’ll still register collision events. Yes, even when not visible, bodies can affect each other! If you suspect this might lead to some interesting-to-debug situations, you’re right! This problem (which in some cases isn’t a problem, but in this case, it is) can be dealt with later by checking the value of isVisible and simply skipping the logic that occurs in that case if it’s false, but another way to achieve that goal is to move the object off screen entirely so a collision simply can’t occur. Which way is better is up to you, but I wanted to show you the alternative approach either way.
You’re almost done with our graphics setup now. Only two game elements remain, the first of which is the alien:
gc.alienUFO.sprite = display.newSprite(
  graphics.newImageSheet("alienUFO.png",
    { width = 48, height = 48, numFrames = 4 }
  ),
  gc.alienUFO.sequenceData
);
physics.addBody(gc.alienUFO.sprite, "static", { isSensor = true });
gc.alienUFO.sprite.x = -1000;
gc.alienUFO.sprite.y = -1000;
gc.alienUFO.sprite.isVisible = false;
gc.alienUFO.sprite.objName = "crash";
gc.alienUFO.sprite:setSequence("default");
gc.alienUFO.sprite:play();
gc.gameDG:insert(gc.alienUFO.sprite);
A situation similar to that of the fuel pod, with respect to collisions when it’s not visible, applies to the alien, so it is put off screen initially as well. Note the objName value "crash", which is used generically on all elements that the ship can crash into.
Last, you have the plasma ball that the alien shoots at the player’s ship:
  gc.plasmaBall.sprite = display.newSprite(
    graphics.newImageSheet("plasmaBall.png",
      { width = 24, height = 24, numFrames = 4 }
    ),
    gc.plasmaBall.sequenceData
  );
  physics.addBody(gc.plasmaBall.sprite, "static", { isSensor = true });
  gc.plasmaBall.sprite.x = -1000;
  gc.plasmaBall.sprite.y = -1000;
  gc.plasmaBall.sprite.isVisible = false;
  gc.plasmaBall.sprite.objName = "crash";
  gc.plasmaBall.sprite:setSequence("default");
  gc.plasmaBall.sprite:play();
  gc.gameDG:insert(gc.plasmaBall.sprite);

end
At this point, that code is well known to you. One thing I will point out, however, is that you’ll notice the animation sequences on the plasma ball and the alien are started immediately, even though they are not initially visible. For maximum performance, you wouldn’t want to start those until those elements were actually visible. However, being a relatively simple game, Astro Rescue doesn’t have much concern about performance anyway; even doing things as inefficiently as possible leads to perfectly acceptable performance. Such is the power of Corona! That’s probably the battle cry of some little-known Marvel superhero come to think of it, but I digress.
Got to Begin Again: Resetting for a New Level
Every time a new level begins, or the current level is retried, resetLevel() is called to get the state of the game back in the proper condition. Mostly it’s a lot of variable resets and fairly mundane bits, but you still need to take a look at it to have the overall picture complete.
function gameCore:resetLevel()

  utils:log("gameCore", "resetLevel()");

  gc.phase = gc.PHASE_FLYING;
  gc.popup = nil;
The initial state of the game is always PHASE_FLYING, so the action begins immediately when the level is shown. Setting gc.popup to nil ensures code later properly recognizes that there is no popup currently showing (the meaning of popup is discussed in the next two chapters—there is more to it than you might imagine!)
gc.ship.thrustVertical = false;
gc.ship.thrustLeft = false;
gc.ship.thrustRight = false;
gc.ship.colonistsOnboard = 0;
gc.ship.fuel = gc.ship.maxFuel;
gc:updateFuelGauge();
gc.ship.sprite:setSequence("noThrust");
gc.ship.sprite:play();
gc.ship.sprite.isVisible = true;
gc.ship.sprite.x = display.contentCenterX;
gc.ship.sprite.y = 70 + (gc.ship.sprite.height / 2) + gc.topYAdjust;
gc.ship.sprite:setLinearVelocity(0, 0);
gc.ship.sprite.isBodyActive = true;
Resetting the ship is the next chore. This includes ensuring the flags describing the direction of thrust are all false so the ship doesn’t start flying around on its own, resetting the count of colonists onboard so the ship starts empty, resetting the fuel gauge to its initial full condition (and redrawing it via a call to the gc:updateFuelGauge() method), resetting the ship sprite’s animation sequence so there’s no thrust flames coming out, and putting the ship at its starting location.
There’s a little bit of new physics here too, namely the setLinearVelocity() call and the setting of isBodyActive. The linear velocity of a physics body is how fast, if at all, it’s moving either horizontally or vertically. This value changes over time based on the effects of gravity, collisions, and forces you can apply to the body yourself. To begin with, you don’t want the ship to be moving, hence you reset both values to 0. Gravity will begin having an effect immediately, however, and the ship will almost instantly begin moving downward. Setting isBodyActive to true ensures that the ship is simulated as part of the Box2D physics simulation (as I’m sure you can guess, it’ll be set to false later on in the code, otherwise this would be pretty pointless!)
gc.colonist.appearCounter = 0;
gc.colonist.lastAppearancePoint = nil;
gc.colonist.sprite.isVisible = false;
The colonist has to be reset too, including resetting appearCounter so the code begins starting to count toward a colonist appearing. We also clear out the record of the last place on the screen they appeared so all points are available the first time they appear. Of course, the colonist has to be hidden initially too, so that is done.
gc.explosion.callback = nil;
As you’ll see later, when an explosion occurs and its animation sequence completes, a function is called. This is referred to as a callback function and a reference to it is stored in gc.explosion.callback. Initially though, there is none, so that must be nilled out.
gc.fuelPod.framesSinceLastAppearance = 0;
gc.fuelPod.sprite.isVisible = false;
gc.fuelPod.sprite.x = -1000;
gc.fuelPod.sprite.y = -1000;
The fuel pod, as with the colonist, needs to be hidden and the counter reset to start counting toward an appearance. As previously discussed, it is also moved far off screen so as to not interact with the player’s ship.
if gc.warningSign.tween ∼= nil then
  transition.cancel(gc.warningSign.tween);
end
gc.warningSign.tween = nil;
gc.warningSign.sprite.alpha = 0;
gc.warningSign.fadingIn = true;
gc.warningSign.sprite.isVisible = false;
gc.warningSign.flash();
The warning sign similarly must be hidden, and this is accomplished by setting its alpha attribute to zero. The trick here, though, is that if the ship had just crashed then the flashing animation would still be occurring, and you need to stop that as well. That’s easily accomplished by calling transition.cancel() on the reference to the transition stored in gc.warningSign.tween. The variables associated with the warning sign fading into view are also reset, and the flash() method is called to begin its (at this point, invisible) animation again.
The alien is reset next:
if gc.alienUFO.tween ∼= nil then
  transition.cancel(gc.alienUFO.tween);
end
gc.alienUFO.framesSinceLastAppearance = 0;
gc.alienUFO.sprite.isVisible = false;
gc.alienUFO.sprite.x = -1000;
gc.alienUFO.sprite.y = -1000;
gc.alienUFO.tween = nil;
Since the alien moves across the screen via a transition, you need to stop that movement if it is occurring, just as with the warning sign. The rest of the resetting is, I think, self-explanatory.
if gc.plasmaBall.tween ∼= nil then
  transition.cancel(gc.plasmaBall.tween);
end
gc.plasmaBall.sprite.isVisible = false;
gc.plasmaBall.sprite.x = -1000;
gc.plasmaBall.sprite.y = -1000;
gc.plasmaBall.tween = nil;
The plasma ball is handled very much like the warning sign and alien as well.
Next up are the colonist indicators in the upper-right corner, and these are reset a bit differently. The first step is to get rid of any that are there now:
for i = 1, #gc.colonist.indicators, 1 do
  gc.colonist.indicators[i]:removeSelf();
  gc.colonist.indicators[i] = nil;
end
Unlike most of the other graphics in the game, these actually are created on the fly, so you have to destroy them at some point so as to not leak memory. Iterating over the gc.colonist.indicators() array allows you to call removeSelf() on them to destroy the graphics resources and then set the reference to nil to avoid the leak.
Once any existing indicators are cleaned up, you then need to create new indicators for the current level:
local indNum = 1;
gc.colonist.indicators = { };
for i = gc.levelData[gameData.level][16].colonistsToRescue, 1, -1 do
  gc.colonist.indicators[indNum] = display.newSprite(
    graphics.newImageSheet("colonist.png",
      { width = 32, height = 32, numFrames = 60 }
    ),
    gc.colonist.sequenceData
  );
  gc.colonist.indicators[indNum]:setSequence("indicator_pendingRescue");
  gc.colonist.indicators[indNum]:play();
  gc.colonist.indicators[indNum].x = display.contentWidth - (
    ((i - 1) * gc.colonist.indicators[indNum].width) +
      gc.colonist.indicators[indNum].width / 2
  );
  gc.colonist.indicators[indNum].y =
  gc.colonist.indicators[indNum].height / 2;
  gc.gameDG:insert(gc.colonist.indicators[indNum]);
  indNum = indNum + 1;
end
First, the number of indicators is determined by looking at gc.levelData, which is a data structure that you’ll be looking at in just a bit. The data it contains describe a level including its visual structure (the ground and landing pads and such) as well as meta-information, like how many colonists there are to rescue and the coordinates at which an alien or a fuel pod can appear. The colonistsToRescue attribute is what is of interest here.
Now, to build up the gc.colonist.indicators array you have to play a little game: because of the math involved in drawing the indicators, you want the colonist all the way to the right to be the first to appear and then fill them in going left. However, the first element in the array should correspond to that rightmost indicator. In other words, its position on the screen is the exact opposite of its position in the array. This will make working with it later a lot easier, but it means you have to loop backwards here to get the right x/y coordinate calculations for each indicator.
The actual creation of each sprite is straightforward and no different from what you have been seeing all along. The calculation of the x coordinate looks a bit hairy, but it really just boils down to what I was talking about: the first element winds up furthest to the right on the screen. The indNum variable is incremented as that is used to insert the sprites into the array in the usual forward order, counter to the array, and the end result is things are set up as we want them to be on the screen as well as in the array.
Next, we have to deal with some z index issues:
if usingAccelerometer == false then
  gc.controls.left:toFront();
  gc.controls.right:toFront();
  gc.controls.vertical:toFront();
end
gc.ship.sprite:toFront();
gc.colonist.sprite:toFront();
gc.warningSign.sprite:toFront();
gc.fuelPod.sprite:toFront();
gc.alienUFO.sprite:toFront();
gc.plasmaBall.sprite:toFront();
Calling toFront(), a method of DisplayObject, on all our graphics objects ensures they are in front of the level that will have been drawn right before resetLevel() was called. If this wasn’t done, then these graphics would be at least partially obscured by the ground.
Last, the score text has to be reset:
gc.scoreText:setReferencePoint(display.CenterReferencePoint);
gc.scoreText.text = "Score: " .. gameData.score;
gc.scoreText:setReferencePoint(display.TopLeftReferencePoint);
gc.scoreText.x = 0;
gc.scoreText.y = 2;
As mentioned earlier, the actual score is now appended to the static label and the value of gc.scoreText.text is updated. There is a bit of a trick in order to get the text to be properly left-aligned. Basically, you need to change the default top-left reference point to center, change the text, change the reference point back, and then reset the x/y location. If you don’t do all this in exactly this order, then what happens is the text winds up hanging off the left side of the screen a bit. It moves from where it’s initially placed in the init() method after the text is changed. This “hack” gets around that that problem.
Note If you need to use scaling then you should set the x and y scaling both to 1 before changing the text, then set it to display.contentScaleX and display.contentScaleY afterward. Doing so will allow you to have left-aligning at the same time as using scaling.
Kick It Off: Starting the Game
When the enterScene event occurs on the gameScene object, it calls the start() method of gameCore. It is a fairly straightforward method:
function gameCore:start()

  utils:log("gameCore", "start()");

  if usingAccelerometer == false then
    system.activate("multitouch")
  end
The system.activate() method is used to turn on system-level functions. At present, the only supported option is "multitouch". This means that more than one touch event can be handled simultaneously. Astro Rescue requires this to be true, otherwise the on-screen controls won’t work right. For example, without activating this feature, the game won’t properly handle presses on the vertical and horizontal thrust buttons and the player won’t be able to control the ship properly. You’ll learn how touch events are handled in Chapter 7, but this call makes it all work as expected.
Next, we need to set up event handlers for enterFrame so that the core game logic, a.k.a. the main game loop, can run:
Runtime:addEventListener("enterFrame", gc);
Runtime:addEventListener("collision", gc);
Chapter 6 is where we’ll dive into that main loop. In addition, the game wouldn’t do much if it didn’t have collision events occurring, so an event handler is set up for that. Both of these reference the gameCore object itself by way of the variable gc, so you know from this that there will be an enterFrame() and collision() method floating around somewhere.
  if usingAccelerometer == true then
    Runtime:addEventListener("touch", gc);
    Runtime:addEventListener("accelerometer", gc);
  end

end
Last, if the player has decided to use accelerometer controls, then not only do you need to register to listen for accelerometer events, but you also need to set up a touch listener on the entire screen (as opposed to just the thrust control graphics, as was done earlier when setting up those graphics and when not using accelerometer control). That way, he can use the entire screen as their vertical thrust and control the left and right thrust by tilting their device.
Okay, That’ll Do: Stopping the Game
Like two sides of a coin, starting the game has a corresponding stop event as implemented in the aptly named stop() method:
function gameCore:stop()

  utils:log("gameCore", "stop()");

  if usingAccelerometer == false then
    system.deactivate("multitouch")
  end
First, multitouch events are disabled using the system.deactivate() method, the opposite of the previously seen system.activate() method. This has to be done because multitouch events on something like the menu screen could cause issues: what happens if the user presses two options at once, holds his finger down, and releases at the same time? Since the menu items are triggered during the "ended" phase of the touch event, you’d wind up with two of them firing at roughly the same time. That would lead to all manner of Very Bad Things™ happening.
Next, the physics simulation needs to be stopped:
physics.stop();
This needs to be done if for no other reason than efficiency: when leaving the game there’s no physics involved, so it would be silly and wasteful of CPU power (and therefore the battery!) to keep it running.
Next, the two event handlers attached to the Runtime object that were set up in start() need to be removed:
Runtime:removeEventListener("enterFrame", gc);
Runtime:removeEventListener("collision", gc);
Especially for event handlers attached to Runtime, you need to be careful to clean these up by removing them when not needed. Imagine if you forgot to do this—it would mean that when you went back to the menu scene, you’d wind up triggering gc.enterFrame() as well as whatever the menu scene might be doing with each frame. That definitely wouldn’t wind up being good for anyone!
  if usingAccelerometer == true then
    Runtime:removeEventListener("touch", gc);
    Runtime:removeEventListener("accelerometer", gc);
  end

end
Similarly, the handlers for the touch and accelerometer events need to be removed, lest you wind up with events occurring on other screens that aren’t intended to happen.
Destruction: Cleaning Up After Ourselves
When transitioning from the gameScene back to the menuScene after the game ends, it’s important to clean up graphic resources and audio resources, and otherwise remove references to anything that Corona and Lua will clean up automatically. To accomplish this, the destroy() method is called:
function gameCore:destroy()

  utils:log("gameCore", "destroy()");

  if gc.sfx.screamChannel ∼= nil then
    audio.stop(gc.sfx.screamChannel);
  end
  audio.dispose(gc.sfx.scream);
  gc.sfx.screamChannel = nil;
  gc.sfx.scream = nil;
  if gc.sfx.fuelPodPickupChannel ∼= nil then
    audio.stop(gc.sfx.fuelPodPickupChannel);
  end
  audio.dispose(gc.sfx.fuelPodPickup);
  gc.sfx.fuelPodPickup = nil;
  gc.sfx.fuelPodPickupChannel = nil;
  if gc.sfx.sosChannel ∼= nil then
    audio.stop(gc.sfx.sosChannel);
  end
  audio.dispose(gc.sfx.sos);
  gc.sfx.sos = nil;
  gc.sfx.sosChannel = nil;
  if gc.sfx.explosionChannel ∼= nil then
    audio.stop(gc.sfx.explosionChannel);
  end
  audio.dispose(gc.sfx.explosion);
  gc.sfx.explosion = nil;
  gc.sfx.explosionChannel = nil;
  if gc.sfx.thrustersChannel ∼= nil then
    audio.stop(gc.sfx.thrustersChannel);
  end
  audio.dispose(gc.sfx.thrusters);
  gc.sfx.thrusters = nil;
  gc.sfx.thrustersChannel = nil;
First to be cleaned up are all the audio resources. This comes down to the same sequence of events for all. First, if the sound is still playing, call stop() on it. Then, call audio.dispose() to let Corona remove the resource. Last, set both the reference to the channel on which the sound was playing, as well as the reference to the audio resource itself, to nil.
Note In truth, nilling out the reference to the channel shouldn’t be necessary, but it does no harm. It’s always good to be overly concerned with cleaning up resources when you’re dealing with resource-constrained mobile devices. Of course, resource-constrained doesn’t have the same meaning it did just a few short years ago, but you still don’t want your game to crash because it causes the system to run out of memory.
With the audio resources cleaned up, it’s time to handle the graphics:
gc.scoreText:removeSelf();
gc.scoreText = nil;
gc.ship.sprite:removeSelf();
gc.ship.sprite = nil;
gc.colonist.sprite:removeSelf();
gc.colonist.sprite = nil;
gc.explosion.sprite:removeSelf();
gc.explosion.sprite = nil;
if usingAccelerometer == false then
  gc.controls.left:removeSelf();
  gc.controls.left = nil;
  gc.controls.right:removeSelf();
  gc.controls.right = nil;
  gc.controls.vertical:removeSelf();
  gc.controls.vertical = nil;
end
gc.fuelPod.sprite:removeSelf();
gc.fuelPod.sprite = nil;
gc.fuelGauge.shell:removeSelf();
gc.fuelGauge.shell = nil;
  gc.fuelGauge.fill:removeSelf();
  gc.fuelGauge.fill = nil;
  gc.warningSign.sprite:removeSelf();
  gc.warningSign.sprite = nil;
  gc.alienUFO.sprite:removeSelf();
  gc.alienUFO.sprite = nil;
  gc.plasmaBall.sprite:removeSelf();
  gc.plasmaBall.sprite = nil;
  for i = 1, #gc.colonist.indicators, 1 do
    gc.colonist.indicators[i]:removeSelf();
    gc.colonist.indicators[i] = nil;
  end
For all of them, do a call to removeSelf()and then set the reference to nil. These are the canonical steps to properly clean up graphics in Corona.
Note, however, that the graphics added to levelDG, things like the ground, aren’t cleaned up here. They are actually done next:
  gc.levelDG:removeSelf();
  gc.levelDG = nil;
  gc.gameDG = nil;

end
What’s interesting here is that although levelDG at this point would contain a whole bunch of DisplayObjects (as a result of the very next method to be explored), there’s no need to remove each of them individually. As it happens, calling removeSelf() on a DisplayGroup automatically calls it on all of its children, so there’s no need to do that manually.
Last, note the setting of gc.gameDG to nil. While it is true that Corona will clean up the scene’s DisplayGroup automatically, the code in gameCore would wind up stopping that from happening due to this reference, which would cause Corona and Lua to determine it is not eligible for garbage collection. Setting it to nil stops that from happening and ensures garbage collection occurs as you want.
We Need a Playfield: Drawing the Current Level
One of the bigger tasks the code in gameCore.lua has to accomplish is to draw the level, meaning the ground. The drawCurrentLevel() is the method specifically responsible for doing that:
function gameCore:drawCurrentLevel()

  utils:log("gameCore", "drawCurrentLevel()");

  if gc.levelDG ∼= nil then
    gc.levelDG:removeSelf();
  end
The first thing to do is to see if there is a level in memory already, as would be the case if this wasn’t the first level played this session. When that is true, gc.levelDG is a reference to a DisplayGroup, so in that case a call to removeSelf() cleans up all those resources.
Either way, you need a DisplayGroup into which to put all the graphics, so create one now:
gc.levelDG = display.newGroup();
That’s actually the first time (and the only one, as it happens!) you’ve seen a DisplayGroup being created manually. Before now, you’ve only ever seen the one created by the Storyboard API automatically. There’s no problem creating your own, and you can in fact create as many as you like. You can even nest them because a DisplayGroup has DisplayObjects as its children, and a DisplayGroup happens to extend DisplayObject. Any time you want to group graphics together, usually to manipulate many at one time, you can create a DisplayGroup, add other objects to it, and then manipulate it. It’s an extremely handy thing to be able to do, as this method demonstrates: you’ll use it to handle all the ground graphics as one, with no need ever to deal with the individual graphics.
Speaking of individual graphics, that is in fact how the ground is drawn—it’s just a series of 32×32 tiles that are used to draw over a 15×25 grid of tiles. The width of a tile (32 pixels) multiplied by the number of tiles across the screen (25) yields a total pixel area of 800, which happens to be exactly the width of the virtual screen to which Astro Rescue is designed. Likewise, the height of a tile (32 pixels) multiplied by the number of tiles down the screen (15) yields a total pixel area of 480, the height of the virtual screen.
Figure 5-12 shows the grid arrangement and should help you visualize what was just described. Each of the squares is a single tile element as defined in the level data discussed in the next section.
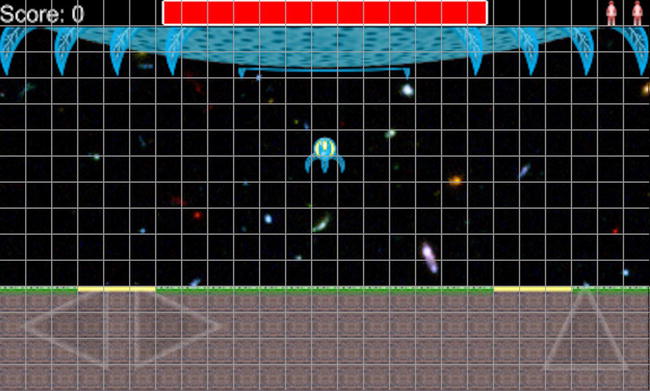
Figure 5-12 . The tile grid for drawing a level visualized
That 25×15 grid size is where the loop variables here come from:
for y = 1, 15, 1 do
  for x = 1, 25, 1 do
    local pX = 32 * (x - 1);
    local pY = 32 * (y - 1);
    local tileType = gc.levelData[gameData.level][y][x];
The x and y location of the next tile to draw is calculated based on the tile’s width and height (32) and the row (y) and column (x) being drawn. The type of tile is determined by looking into the gc.levelData structure.
Defining a Level
Let’s step out of the flow of examining drawCurrentLevel() a bit and examine this levelData structure. It’s an array that looks like this:
local levelData = {

  {
    { " "," "," "," "," "," "," "," "," "," "," "," "," "," "," "," "," "," "," "," "," "," "," "," "," " },
    { " "," "," "," "," "," "," "," "," "," "," "," "," "," "," "," "," "," "," "," "," "," "," "," "," " },
    { " "," "," "," "," "," "," "," "," "," "," "," "," "," "," "," "," "," "," "," "," "," "," "," "," " },
    { " "," "," "," "," "," "," "," "," "," "," "," "," "," "," "," "," "," "," "," "," "," "," "," "," " },
    { " "," "," "," "," "," "," "," "," "," "," "," "," "," "," "," "," "," "," "," "," "," "," "," "," " },
    { " "," "," "," "," "," "," "," "," "," "," "," "," "," "," "," "," "," "," "," "," "," "," "," "," " },
    { " "," "," "," "," "," "," "," "," "," "," "," "," "," "," "," "," "," "," "," "," "," "," "," "," " },
    { " "," "," "," "," "," "," "," "," "," "," "," "," "," "," "," "," "," "," "," "," "," "," "," "," " },
    { " "," "," "," "," "," "," "," "," "," "," "," "," "," "," "," "," "," "," "," "," "," "," "," "," " },
    { " "," "," "," "," "," "," "," "," "," "," "," "," "," "," "," "," "," "," "," "," "," "," "," "," " },
    { " "," "," "," "," "," "," "," "," "," "," "," "," "," "," "," "," "," "," "," "," "," "," "," "," " },
    { "2","2","2","3","3","3","2","2","2","2","2","2","2","2","2","2","2","2","2","3","3","3","2","2","2" },
    { "1","1","1","1","1","1","1","1","1","1","1","1","1","1","1","1","1","1","1","1","1","1","1","1","1" },
    { "1","1","1","1","1","1","1","1","1","1","1","1","1","1","1","1","1","1","1","1","1","1","1","1","1" },
    { "1","1","1","1","1","1","1","1","1","1","1","1","1","1","1","1","1","1","1","1","1","1","1","1","1" },
    { colonistsToRescue = 2 },
    { { x = 2, y = 12 }, { x = 24, y = 12 } },
    { { x = 3, y = 9 }, { x = 11, y = 8 }, { x = 20, y = 7 } },
    { { x = 25, y = 7 }, { x = 1, y = 5 }, { x = 1, y = 6 } }
  },
  . . .
};
Each row in the topmost array defines a level. Within that, the first 15 rows are the actual data for what tiles make up the ground. Any that are spaces are where no tile is drawn. This means that we could have ground coming up all the way to the top, but in practice that doesn’t make a lot of sense from a game-play perspective, so most of the no-space tiles are near the bottom.
The numbers 1, 2, and 3 for tile values correspond to tiles for dirt, the top layer of dirt with the green outline, and dirt with a landing pad, respectively. For the levels with metal ground, the values are 4, 5, and 7 for a filled metal tile, a top-layer metal tile, and a metal tile with a landing pad on it.
Rows 16 through 19 define “meta-data” for the level. Row 16 tells us how many colonists there are to rescue on this level. Row 17 provides a list of objects, each with an x and y coordinate, where each object gives a tile location where a colonist can appear. These coordinates place them right next to the landing pads. The colonists actually get drawn directly above that location, but the coordinates are one of the top-layer tiles next to a landing pad.
Row 18 is like the colonists’ points but tells the code where a fuel pod can appear. I chose only two per level, but there’s no limitation on how many there can be. They all should be in empty space, however, otherwise the player won’t be able to get to them.
Row 19 is similar in that it defines the points from which an alien can come onto the screen. The alien moves in a straight line, so you have to be careful that whatever starting point you choose has a clear flight path all the way across the screen (technically, the alien could fly on top of the ground or even the mothership, but it just doesn’t look very good).
Finishing Up Level Drawing
Getting back to drawing the level, you left off right at the point where you determined what type of tile is next to be drawn. This information is used to branch accordingly:
if tileType ∼= " " then
  local material = "Dirt";
  if tileType == "4" or tileType == "5" or tileType == "6" then
    material = "Metal";
  end
There’s nothing to do when you encounter a tile type of a space character, but for other cases, first assume the material of the tile is dirt, and override with metal for the 4, 5, and 6 tile type codes.
Next, we create the appropriate tile:
local tile;
if tileType == "1" or tileType == "4" then
  tile = display.newImage("tile" .. material .. "Fill.png", true);
  tile.objName = "crash";
end
if tileType == "2" or tileType == "5" then
  tile = display.newImage("tile" .. material .. "Top.png", true);
  tile.objName = "crash";
elseif tileType == "3" or tileType == "6" then
  tile = display.newImage("tile" .. material .. "Pad.png", true);
  tile.objName = "pad";
end
physics.addBody(
  tile, "static", { density = 1, friction = 2, bounce = 0 }
);
With the material already determined, you just need to determine whether it’s a fill tile, a top tile, or a landing pad tile. For each, there needs to be a physics body attached. Giving the top and fill tiles an objName of "crash" gives you a value to key off of later when we handle collisions to indicate the ship has crashed. Likewise, for the landing pad tile, a value of "pad" is used so the code can differentiate that situation.
      tile:setReferencePoint(display.TopLeftReferencePoint);
      tile.x = pX;
      tile.y = pY;
      gc.levelDG:insert(tile);
    end
  end
end
For all tile types, set the reference point to the top left corner to make positioning it a little more straightforward. The tile is then inserted into gc.levelDG.
One final step remains:
  gc.gameDG:insert(gc.levelDG);

end
The entire DisplayGroup that now contains all the tile graphics for this level is inserted into the main DisplayGroup for the scene, and you’re off to the races with this level!
Communication Is Key: Showing a Quick Message
As you play the game, you’ll see situations when a quick message is flashed on the screen, expands toward you, and gradually fades away. Specifically, this happens when you get a fuel pod or pick up a colonist. The method that accomplishes this is showMessage(), and while the effect is, I think, fairly nice and effective as a transient messaging mechanism, the code behind it is surprisingly sparse.
function gameCore:showMessage(inMsg)

  utils:log("gameCore", "showMessage(): inMsg = " .. inMsg);

  local msgText = display.newText(inMsg, 0, 0, nil, 20);
  msgText:setTextColor(255, 255, 0);
  msgText.x = display.contentCenterX;
  msgText.y = display.contentCenterY;
  msgText.alpha = 1;
  msgText.xScale = 1.0;
  msgText.yScale = 1.0;
A new text DisplayObject is created using the message passed into the method. Its color is set and it is centered on the screen by using the display.contentCenterX and display.contentCenterY values. These are a nice convenience to use rather than having to divide the screen’s width and height by 2 yourself.
The alpha attribute is also set so the text is fully opaque, and the scale is set to 1 in both directions. These steps are actually not necessary, but for the sake of coding clarity, I think it’s not a bad idea to do them anyway.
Next, a transition is started on this text:
  transition.to(msgText,
    { time = 1000, alpha = 0, xScale = 30.0, yScale = 30.0,
      onComplete = function(inTarget)
        inTarget:removeSelf();
        inTarget = nil;
      end
    }
  );

end
The transition takes care of everything in one step: the alpha attribute is reduced over time down to 0 and the text is expanded in both directions. The target values for the scaling are large enough that by the time the alpha value reaches 0, the text has grown way beyond the bounds of the screen.
Last, when the transition completes, the program destroys the text DisplayObject, which conveniently is passed into the onComplete event handler. Setting the reference to nil isn’t necessary, but for the sake of consistency with all the other cleanup code, I prefer to have it. Again, being overly concerned with resource management is rarely a bad thing when working with Corona and Lua.
Cut It Out Right Now, You Kids: Stopping Game Activity
The last method in the gameCore.lua file is one used from a couple of places in the game, and its job is to stop any activity currently happening on the screen. This means shutting down transitions, stopping audio, and hiding a few select elements.
function gameCore:stopAllActivity()

  if gc.warningSign.tween ∼= nil then
    transition.cancel(gc.warningSign.tween);
  end
  if gc.alienUFO.tween ∼= nil then
    transition.cancel(gc.alienUFO.tween);
  end
  if gc.plasmaBall.tween ∼= nil then
    transition.cancel(gc.plasmaBall.tween);
  end
The warning sign, alien, and plasma ball all use transitions to move, as you saw earlier, so if those transitions are occurring they are stopped.
Next, the alien, plasma ball, and the player’s ship are hidden from view:
gc.alienUFO.sprite.isVisible = false;
gc.plasmaBall.sprite.isVisible = false;
gc.ship.sprite.isVisible = false;
Next, you need to deactivate the physics body associated with the player’s ship, but there’s a little bit of a problem here:
timer.performWithDelay(10,
  function()
    gc.ship.sprite.isBodyActive = false;
  end
);
The problem is that this method, in at least one situation, will be called from inside an event handler. This is a problem because you are not allowed to manipulate the active state of a physics body from an event handler. So, to be able to accomplish this goal, you need to use the timer.performWithDelay() function. This simply accepts a millisecond value and a reference to a function, which can be inline as it is here if you want. Ten milliseconds is enough for the event handler to complete, so at the end of that interval the isBodyActive attribute will be set to false. The delay is small enough that the user won’t notice, and also small enough that, from the standpoint of our code, it happens at virtually the same time as if it were done directly in the destroy() method.
Note There are other attributes that cannot be changed in an event handler, such as bodyType. If you ever encounter a situation where an attribute change in an event handler doesn’t seem to be working as expected, check the Corona documentation to see if it’s explicitly stated that you can’t do that, or simply try the change using timer.performWithDelay().
if gc.sfx.thrustersChannel ∼= nil then
  audio.stop(gc.sfx.thrustersChannel);
end
The thruster sound is actually the only sound resource that needs to be stopped, since all others are temporary sounds anyway, but the thrust sound continues as long as the ship is moving under player control.
Summary
Whew, that was quite a long chapter, wasn’t it? Nevertheless, long as it may have been, I think you’ll agree it was well worth it!
In this chapter, you covered a lot of ground, including sprites, the beginnings of physics, native UI, and a number of assorted Corona functions. In addition, you got the chance to see more things that have been discussed being used, including the display API, storyboard, transitions, and audio.
All of this was put to good use to start building the core of Astro Rescue, including the basic lifecycle events that are needed, some utility functions, and all the resource management involved.
In Chapter 6, you’ll continue exploring the core game code, specifically the main game loop, where most of the real frame-to-frame action takes place. As always, you’ll get a chance at some hands-on experience with new elements of Corona, as well as more experience with the things you’re becoming familiar with now. Astro Rescue will continue to be built out as a result, and in short order you’ll have a full, playable game!