
Patterns emerge in software engineering in which we realize that one solution to a recurring problem is implemented more often than any other. This is as true in game programming as it is in any other area of programming.
One such pattern is the main game loop pattern. While not every game uses this approach, most—even the vast majority—do. It is so common, in fact, that it usually isn’t even talked about as a specific pattern; it’s simply the way games are done, 9 times out of 10.
At its core, it is a simple enough concept: you typically have a single function that executes frequently—once per frame being a very common interval—which is responsible for making the core logic of the game happen. This function moves on-screen elements, implements AI, and generally performs any other regularly occurring task needed for the game to run.
Astro Rescue is in no way atypical in this regard, as it does indeed have a main game loop, as implemented in the aptly-named gameCoreMainLoop.lua file, and that is what this chapter is all about.
enterFrame
The specific function to be dealt with here is enterFrame(). In Chapter 5, you saw how a listener was attached to the Runtime object for the "enterFrame" event in the start() method. That results in enterFrame() being called every time Coronal is about to draw a new frame to the screen. You can do whatever you wish in this method, be it simple or complex.
As it happens, the version in Astro Rescue is quite simple. First, we need to deal with three special cases:
function gc:enterFrame(inEvent)

  if gc.phase == gc.EXPLODING then
    return;
  end
First, you want all game activity to cease when the player’s ship is exploding, which you can determine because there is a specific game phase for that. In that case, all you do is terminate the function with a return.
if gc.phase == gc.PHASE_DEAD then
  gc.showDeadPopup();
  return;
end
Similarly, if the player is now dead, which is the state the game ends up in when the explosion animation finishes, then the function needs to terminate early as well. However, in that case, the game needs to show the popup message asking if the player wants to try again or quit, and that is accomplished by showDeadPopup(), as you’ll see shortly. Interestingly, you may be thinking that this will continue to occur while the popup is shown because the "enterFrame" event doesn’t ever cease from the time the app starts until the time it ends, and you would be correct. It will be the responsibility of showDeadPopup() to not show the popup if it’s already on the screen.
if gc.phase == gc.PHASE_IN_BAY then
  gc.showEnteredBayPopup();
  return;
end
As with the case of the player being dead, when she enters the bay there is a popup message that appears as well, so that case gets handled the same as the dead case by calling a method to show the popup and then exiting the enterFrame() function.
With the three special cases dealt with, all that’s left to do is the core logic of the game and movement of the on-screen objects:
gc.processShip(inEvent);
gc.processColonist(inEvent);
gc.processFuelPod(inEvent);
gc.processAlienUFO(inEvent);
You could of course choose to write everything inside the enterFrame() method, and in a simple game like Astro Rescue that might not be so bad, but in anything larger it will quickly become unwieldy. Instead, calling a number of smaller functions for specific tasks is a better pattern to follow.
The first thing that is dealt with is the movement of the player’s ship. You’ll be looking at that method next, but the executive summary is that there are flags, which you saw earlier, that tell you whether the ship is moving as a result of player interaction, and in what direction. On their own those flags do nothing; it’s only the processShip() method interrogating them and actually updating the location of the ship that does anything.
The processColonist() method will take care of showing a colonist to be rescued, if it’s time to do so, or moving the current colonist toward the player’s ship, if it has landed.
The processFuelPod() method takes care of showing a fuel pod when it’s time and, similarly, the processAlienUFO() method takes care of our marauding alien craft.
Although the process isn’t complex, sometimes a picture is worth more than all the words of the world combined. So, to ensure it’s clear to you what’s going on at a high level, Figure 6-1 should solidify it in your mind, I suspect.
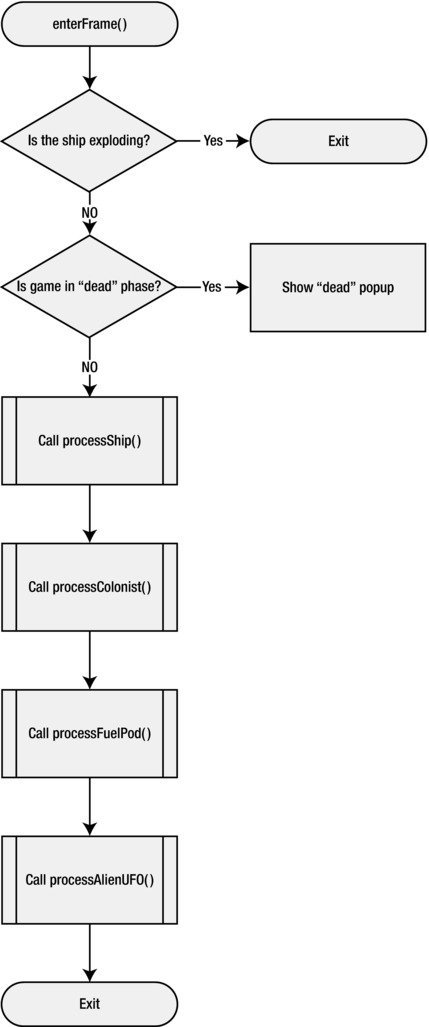
Figure 6-1 . Overall flow of the enterFrame() method
processShip
The next method that is also called from enterFrame() is processShip() and is what’s responsible for actually moving the player’s ship.
It may seem a little counterintuitive at first glance to move the ship here rather than directly in response to an input event, so let me explain this from a high level before I get into the details of the code.
Let’s say you want to move the ship 1 pixel for every screen tap, so you decide to do that in the event handler you set up to handle taps. It isn’t hard to imagine that you may get a different number of tap events per frame drawn if the player is tapping madly. What happens if one time they tap the screen three times in between frames, and another time they tap it 10 times in between frames?
The result will be, to the player, a ship that doesn’t move at a constant velocity and sometimes “jumps around.” Now, that may in fact be what you want on occasion, depending on the type of game you’re making, but more often than not you really want a constant rate of movement (ignoring acceleration for the moment).
The way this is accomplished is that the position of the ship is only updated inside the main loop. All that happens in this scenario in the tap event handler is that flags are set to say whether the ship is moving or not. Doing this means that you know, based on the frame rate, how many times per second the ship’s position will be updated, and it will be constant.
THERE’S MORE THAN ONE WAY TO SKIN, ERR, MOVE A CAT!
The approach to moving the ship described here is referred to as frame rate-based movement, but there is another approach, called time-based movement or frame-independent movement. In that approach, you determine with each frame drawn how many pixels an object should move based on how fast the game is actually running (usually how many frames the last frame took to process). This is useful when your game may have to work on devices that can’t produce a constant frame rate, either because some are less powerful or because your game’s action sometimes changes in intensity and some frames naturally will wind up taking longer to process than others. Time-based movement avoids the problem of a game running faster on machines that are more powerful and slower on less powerful ones. However, it is a more complex approach requiring more code and can lead to animation that is less smooth because the amount of pixels that an object moves can change suddenly, causing it to appear to jump around.
Frankly, time-based movement is oftentimes simply not needed, but it very much depends on the design of your game. Astro Rescue certainly does not need it, for example—it’s simple enough that basing it on frame rate works just fine.
Also, remember that while Corona does provide a way to “lock” the frame rate, if you do too much in your main loop you can cause that frame rate to drop. So, if you go with the frame-rate-based approach you need to be cognizant of this and be careful that in no case will the code executing in your main loop take more time than the frame rate allows (33 ms in the case of Astro Rescue: 1,000 ms / 30 fps = 33 ms/frame). If you do not ensure this, then you will get dropped frames and the game will appear to slow down—not good!
With those preliminaries covered, I’ll get into what happens inside processShip():
function gc:processShip(inEvent)

  if gc.ship.thrustVertical == true and gc.ship.fuel > 0 then
    gc.ship.sprite:applyLinearImpulse(
      0, -.4, gc.ship.sprite.x, gc.ship.sprite.y
    );
  End
Whenever the player has her finger on the vertical thrust button, or on the screen generally when using accelerometer controls, the gc.ship.thrustVertical flag will be set. In that case, and if the player has some fuel left, the ship needs to be moved. The trick to this is that you want the ship to accelerate gradually over time. Certainly you could do this ourselves, but why bother? Corona’s physics engine makes this possible with far less effort on your part.
The applyLinearImpulse() method applies a single, momentary jolt of movement in a given direction to a physics body. This method accepts an x and y component as its first two arguments that tell it how strong the jolt is in each direction. A 0, as in the x component here, means no energy is applied in the horizontal direction. The y value of -.4 means apply energy to push the body upward. The actual value itself is entirely trial and error as you explore what value will result in the movement desired. Since this impulse will be applied with every frame drawn, assuming the flag is set and there is gas left, the value is low. However, it’s an additive effect, meaning the overall momentum of the ship builds over time, exactly like we want.
Note There is also an applyForce() method that is used to apply a force over time. Similarly, there is an applyTorque() method to apply a rotational force to make the body spin over time. An impulse is intended to provide a one-time kick to an object, whereas a force acts on it over time. Either approach would have worked for the ship, but using an impulse as shown provides a somewhat more realistic movement profile for the ship—it simply looks more like what you would expect a hovering spaceship to look like.
if gc.ship.thrustLeft == true and gc.ship.fuel > 0 then
  local forceAmount = .2;
  if usingAccelerometer == true then
    forceAmount = .1;
  end
  gc.ship.sprite:applyLinearImpulse(
    forceAmount, 0, gc.ship.sprite.x, gc.ship.sprite.y
  );
end
if gc.ship.thrustRight == true and gc.ship.fuel > 0 then
  local forceAmount = .2;
  if usingAccelerometer == true then
    forceAmount = .1;
  end
  gc.ship.sprite:applyLinearImpulse(
    -forceAmount, 0, gc.ship.sprite.x, gc.ship.sprite.y
  );
end
Left and right thrust is handled just like vertical thrust, with one important difference: the amount of force applied differs when using accelerometer control versus touch control. The reason is that the ship winds up moving far too fast using accelerometer control because you can’t null it out (i.e., stop the movement) as easily as with touch control, for which you’re just lifting your finger off the screen. Therefore, a smaller value is used in that case. Once the amount is determined, an impulse is applied, same as for the vertical thrust case. Negative values move the ship right in this case, since the values are relative to the object’s center of mass, so a negative value results in force applied from the left, pushing the body to the right.
if gc.ship.sprite.x < 0 or
  gc.ship.sprite.x > display.contentWidth
then
  utils:log("gameCoreMainLoop", "Ship went off screen");
  gc.phase = gc.PHASE_DEAD;
  gc.ship.sprite.isVisible = false;
end
If the ship goes off the screen in either direction, then the player is considered dead. The ship is hidden and the phase switched to gc.PHASE_DEAD, which you know from the last section results in the popup message appearing asking if they want to try again or not.
if gc.ship.thrustVertical == true or gc.ship.thrustLeft == true or
  gc.ship.thrustRight == true
then
  gc.ship.fuel = gc.ship.fuel - 2;
  if gc.ship.fuel <= 0 then
    gc.ship.sprite:setSequence("noThrust");
    gc.ship.sprite:play();
    gc.ship.thrustVertical = false;
    gc.ship.thrustLeft = false;
    gc.ship.thrustRight = false;
  end
  gc.updateFuelGauge();
end
Any time the ship is thrusting in any direction, you need to deduct some fuel. When the player runs out of fuel, the "noThrust" animation sequence is shown, since the ship at this point obviously can have no thrust flames coming out. We also ensure that the three thrust vector flags are set to false. Last, the updateFuelGauge() method is called to redraw the fuel gauge to show the current amount of fuel.
local vX, vY = gc.ship.sprite:getLinearVelocity();
if vX > 75 or vY > 75 then
  gc.warningSign.sprite.isVisible = true;
else
  gc.warningSign.sprite.isVisible = false;
end
The last step is to see if the ship is moving too fast and to show the warning sign if it is. The getLinearVelocity() method returns to us the rate at which a body is moving in pixels per second. It returns two values, the X and Y components of the body’s motion. If either value is greater than the threshold value 75, which again is just a bit of trial and error, then the warning sign is made visible—otherwise it’s hidden.
Processing the colonist is the next task accomplished in the main game loop. There is a bit more to it than processing the player’s ship.
function gc:processColonist(inEvent)

  if gc.colonist.sprite.isVisible == true and gc.phase == gc.PHASE_LANDED then
If a colonist it currently awaiting rescue, which is the case when isVisible is true, and if the ship has landed, then the colonist should run toward the ship. The first step is to determine how far away the colonist is from the ship:
local deltaX = math.abs(gc.colonist.sprite.x - gc.ship.sprite.x);
The math.abs() function gives us the absolute value of the difference between the ship and colonist’s x coordinate. Use this to move the colonist toward the ship.
First, though, you need to see if the colonist is already at the ship, which could be the case because this method, as you will see, moves the colonist toward the ship with each call.
if deltaX <= 1 then

  gc.colonist.sprite.isVisible = false;
  gc.ship.colonistsOnboard = gc.ship.colonistsOnboard + 1;
  if gc.ship.colonistsOnboard <=
    gc.levelData[gameData.level][16].colonistsToRescue
  then
    gc.colonist.indicators[gc.ship.colonistsOnboard]:setSequence(
      "indicator_onboardShip"
    );
    gc.colonist.indicators[gc.ship.colonistsOnboard]:play();
    gc.colonist.appearCounter = 0;
    gc:showMessage("Got 'em!");
  end
When there is no longer a delta between the ship and colonist’s X location, then the colonist boards the ship. When this occurs, the colonist is again hidden, and the number of colonists on board the ship is incremented. The animation sequence for the appropriate colonist indicator is switched to indicate he has been picked up. The appearCounter for the colonist is reset, making it eligible to show up again, and the “Got ‘em!” message is shown.
Now, if the colonist hasn’t reached the ship yet, then you have to move them toward it:
elseif deltaX > 1 and deltaX <= 140 then

  if gc.ship.sprite.x > gc.colonist.sprite.x then
    gc.colonist.sprite.x = gc.colonist.sprite.x + 2;
    if gc.colonist.sprite.sequence ∼= "walking_right" then
      gc.colonist.sprite:setSequence("walking_right");
      gc.colonist.sprite:play();
    end
  elseif gc.ship.sprite.x < gc.colonist.sprite.x then
    gc.colonist.sprite.x = gc.colonist.sprite.x - 2;
    if gc.colonist.sprite.sequence ∼= "walking_left" then
      gc.colonist.sprite:setSequence("walking_left");
      gc.colonist.sprite:play();
    end
  end

end
Remember that we have an absolute value for the delta between the ship and colonist’s X location, so if the ship’s X value is greater than the colonist’s X value is, then the colonist is running to the right, toward the ship. If the animation sequence hasn’t already been changed to the "walking_right" sequence, then that is done as well.
Conversely, if the ship is to the left of the colonist then the X location of the colonist is reduced, so they move toward the ship, and the "walking_left" animation sequence is switched as well.
The next task occurs when the colonist is not currently on-screen and/or moving towards the ship. The code needs to decide if it’s time for a colonist to appear for rescuing:
if gc.colonist.sprite.isVisible == false and
  gc.ship.colonistsOnboard <
    gc.levelData[gameData.level][16].colonistsToRescue and
  gc.colonist.appearCounter >= gc.colonist.FRAMES_BETWEEN_APPEARANCES
then
As long as the colonist isn’t currently showing and there are still colonists left to be rescued on this level, and if enough time has elapsed since the last colonist appeared, then the colonist can appear.
At this point, one situation that could still be true that you need to deal with is the case where the player just rescued a colonist and is still on the landing pad. In that case, you want to make it so the player has to lift off before the colonist appears; otherwise she might be able to just sit on the pad awaiting colonists all game. Well, not really, since the alien’s plasma ball will do them in before that happens, but still, it’s better to force her to fly around a bit for the challenge of it.
With this in mind, one quick check is done:
if gc.phase == gc.PHASE_LANDED then
  gc.colonist.appearCounter = 0;
  return;
end
If the ship is still on a landing pad at this point, just reset the appearCounter so that the delay between colonist appearances starts over without the colonist appearing, owing to the return here, which forces the player to have to lift off for a colonist to appear again.
Next is deciding at what tile location the colonist will appear:
local whichTile = math.random(1, #gc.levelData[gameData.level][17]);
while whichTile == gc.colonist.lastAppearancePoint do
  whichTile = math.random(1, #gc.levelData[gameData.level][17]);
end
gc.colonist.lastAppearancePoint = whichTile;
Recall that the 17th row of data in the level definition provides a list of tile coordinates where a colonist may appear. Therefore, the code randomly chooses a number between 1 and the length of the array that is the 17th row. However, you don’t want the colonist to appear at the same place as last time, so compare the chosen tile against gc.colonist.lastAppearancePoint and keep randomly choosing a tile until one is picked that’s not the same as last time. Once one is chosen, you have to record it in gc.colonist.lastAppearancePoint, of course, or this work will be all for nothing next time a colonist appears!
Note This is actually a rather inefficient way to do this; more important, it could lead to slowdowns. Imagine what would happen if the same tile kept being chosen many times in a row, which could happen since this is random. The main game loop might all of a sudden take longer than its allotted time slice to finish, and you’ll get a stutter on the screen. It’s not likely to occur in this case so it isn’t really a problem, but in general you’d be better off doing something like creating a pseudorandomized list of array indexes at application startup and running through them linearly, looping at the end, and using that to determine the next colonist tile location. It will be less “truly” random than this approach, but will be a constant time hit instead of introducing the unknown time as this code does.
local tileCoordinates = gc.levelData[gameData.level][17][whichTile];
local pX = 32 * (tileCoordinates.x - 1);
local pY = (32 * (tileCoordinates.y - 1)) - 16;
gc.colonist.sprite.x = pX;
gc.colonist.sprite.y = pY;
Once we know what tile the colonist will appear at, you need to figure out the physical x and y coordinates on the screen at which to place them. The tileCoordinates.x and tileCoordinates.y values are the x and y coordinates of the tile in the level tile grid, not an actual screen location. To translate to physical coordinate, do a bit of math that is very similar to what you did to draw the screen, and set the sprite’s x and y attributes to those calculated values.
Finally, there are just a few small matters to take care of:
  gc.colonist.sprite:setSequence("materializing");
  gc.colonist.sprite:play();
  gc.colonist.sprite.isVisible = true;

  gc.sfx.sosChannel = audio.play(gc.sfx.sos);

end
The colonist’s "materializing" animation sequence is played and, of course, the sprite is made visible. Last, the sos audio resource is played so the player doesn’t miss the fact that a colonist is now ready to be rescued.
processFuelPod
The processing related to fuel pods is very simple:
function gc:processFuelPod(inEvent)

  if gc.fuelPod.sprite.isVisible == false then

    gc.fuelPod.framesSinceLastAppearance =
      gc.fuelPod.framesSinceLastAppearance + 1;
If a fuel pod isn’t already showing, which can be determined by seeing if the isVisible property of its sprite is false, then the game can continue on. The next step is to increment the counter that lets you know how many frames have elapsed since a fuel pod was seen last.
The next step is to see if that counter exceeds our minimum. This ensures that fuel pods have a minimum amount of time between appearances (150 frames, or 5 s):
if gc.fuelPod.framesSinceLastAppearance >=
  gc.fuelPod.appearanceRangeFrames.min
then
  local num = math.random(1, 100);
  if num >= 95 or gc.fuelPod.framesSinceLastAppearance >=
    gc.fuelPod.appearanceRangeFrames.max
  then
    gc.fuelPod.framesSinceLastAppearance = 0;
    gc.showFuelPod();
  end
end
If it exceeds the minimum, then a random value between 1 and 100 is chosen. If that value is greater than 95, which means that a fuel pod will appear only 5% of the time it’s eligible to, then it will be shown. Alternatively, if you go 600 frames (20 s), which is the maximum time allowed to elapse between appearances, then a fuel pod will be shown for sure.
Once you determine it’s time to show the fuel pod, the counter is reset and showFuelPod() is called to actually show it—and that’s the next method you’ll look at, as luck would have it!
showFuelPod
When processFuelPod() decides that it is time to show a fuel pod, showFuelPod() is called.
function gc:showFuelPod()

  utils:log("gameCoreMainLoop", "showFuelPod()");
First, do a bit of logging for debugging purposes.
local whichTile = math.random(1, #gc.levelData[gameData.level][18]);
local tileCoordinates = gc.levelData[gameData.level][18][whichTile];
Next, decide where the fuel pod will appear. The 18th row of data in the level definition provides a list of tile coordinates where a fuel pod may appear. Randomly choose a number between 1 and the length of the array that is the 18th row. Once we know which tile it is, we get a reference to it in tileCoordinates. We now can easily access the x and y values through that variable.
gc.fuelPod.sprite.isVisible = true;
gc.fuelPod.sprite.alpha = 1;
gc.fuelPod.sprite.x = 32 * (tileCoordinates.x - 1);
gc.fuelPod.sprite.y = (32 * (tileCoordinates.y - 1)) - 16;
Only a single sprite is associated with the fuel pod, so it is made visible and its alpha value reset to full opacity. The physical coordinates of the fuel pod are calculated much like they were in processColonist().
gc.fuelPod.rotate();
The fuel pod begins to spin by calling its rotate() method, which you’ll recall from early chapters uses a transition to accomplish the spin.
transition.to(gc.fuelPod.sprite, {
  time = 10000, alpha = 0,
  onComplete = function(inTarget)
    inTarget.isVisible = false;
    inTarget.x = -1000;
    inTarget.y = -1000;
  end
});
Last, you need to transition the fuel pod so it gradually fades out of view over the course of 10 seconds. When it is completely faded out, the sprite is hidden and moved off screen to avoid collision events with the ship (since it is still simulated by the physics engine even when invisible).
processAlienUFO
The processAlienUFO() method should already look familiar to you because it is virtually identical to processFuelPod():
function gc:processAlienUFO(inEvent)

  if gc.alienUFO.sprite.isVisible == false then
    gc.alienUFO.framesSinceLastAppearance =
      gc.alienUFO.framesSinceLastAppearance + 1;
    if gc.alienUFO.framesSinceLastAppearance >=
      gc.alienUFO.appearanceRangeFrames.min
    then
      local num = math.random(1, 100);
      if num >= 95 or gc.alienUFO.framesSinceLastAppearance >=
        gc.alienUFO.appearanceRangeFrames.max
      then
        gc.alienUFO.framesSinceLastAppearance = 0;
        gc.showAlienUFO();
      end
    end
As you can see, the overall structure and flow is the same; the only differences, quite reasonably, are the variables used and the method called when it’s time to show a UFO, showAlienUFO().
Because it is essentially what I’ve already dissected, I’ll keep this brief and move on to the next method, which is considerably different than any other: showAlienUFO().
showAlienUFO
The showAlienUFO() method begins very much like showFuelPod() did:
function gc:showAlienUFO()

  utils:log("gameCoreMainLoop", "showAlienUFO()");

  local whichTile = math.random(1, #gc.levelData[gameData.level][19]);
  local tileCoordinates = gc.levelData[gameData.level][19][whichTile];
After a bit of logging, you then determine which tile represents the alien’s starting point. This time, Row 19 contains the list of tiles where the alien can appear, and you’ll again randomly choose one of those.
gc.alienUFO.sprite.isVisible = true;
gc.alienUFO.sprite.y = 32 * tileCoordinates.y;
Next, the alien is made visible and its physical y location set based on the selected tile’s y grid location.
But what about the x location? Why isn’t that set? The next block of code handles that:
if tileCoordinates.x == 1 then
  gc.alienUFO.sprite.x = 0 - gc.alienUFO.sprite.width;
  gc.alienUFO.exitPoint = display.contentWidth + gc.alienUFO.sprite.width;
else
  gc.alienUFO.sprite.x = display.contentWidth + gc.alienUFO.sprite.width;
  gc.alienUFO.exitPoint = 0 - gc.alienUFO.sprite.width;
end
The x location of the selected tile will be one of two values: 1 or 25, those being the bounds of the tile locations. However, you want the alien to start a little bit off screen so that it appears to fly in from one side or the other and not just immediately appear on the edge of the screen, as would happen if you used the 1 or 25 values.
Therefore, if the value is 1, the alien will appear from the left side. To get the physical value you just need to subtract the width of the alien’s sprite from 0, which puts the alien off screen to begin with. The exit point—that is, the physical location the alien will be moving toward—is then simply the width of the screen plus the width of the alien’s sprite.
When the tile x value is 25 we do the same sort of thing in reverse: this time, the alien’s starting point is off the right side of the screen and its exit point is off the left, so the calculations are the reverse of what they are for tile x value 1.
local firePoint = math.random(1, display.contentWidth);
The other thing to decide is where along the alien’s line of travel from one side of the screen to the other it will fire a plasma ball at the player’s ship. This is a simple random choice using the entire range of the alien’s movement as the bounds of the number chosen.
The next step is to make the alien move from its starting point to that chosen firing point:
gc.alienUFO.tween = transition.to(gc.alienUFO.sprite, {
  time = 3500, x = firePoint,
  onComplete = function()
    gc.plasmaBall.sprite.isVisible = true;
    gc.plasmaBall.sprite.x = gc.alienUFO.sprite.x;
    gc.plasmaBall.sprite.y = gc.alienUFO.sprite.y;
    gc.plasmaBall.tween = transition.to(
      gc.plasmaBall.sprite, {
        time = 3000, x = gc.ship.sprite.x, y = gc.ship.sprite.y,
        onComplete = function()
          gc.plasmaBall.sprite.isVisible = false;
          gc.plasmaBall.sprite.x = -1000;
          gc.plasmaBall.sprite.y = -1000;
        end
      }
    );
This transition occurs over 3.5 seconds. Once the firing point is reached, then the alien has to fire the plasma ball. Its sprite is unhidden and its starting location is the same as the alien’s. Next, transition the plasma ball toward the player’s ship over the course of 3 seconds. As you will see in Chapter 8, if the plasma ball collides with the ship then the player is dead, but if the plasma ball reaches the location of the ship without a collision then it is simply hidden and moved off screen. Note that the location to which the plasma ball is moving, which is the player’s current location, may not be the location of the ship when the plasma ball arrives, as the player can be moving all this time; that’s why a collision isn’t guaranteed.
The final step is to continue moving the alien toward its exit point:
    gc.alienUFO.tween = transition.to(gc.alienUFO.sprite, {
      time = 3500, x = gc.alienUFO.exitPoint,
      onComplete = function()
        gc.alienUFO.sprite.isVisible = false;
        gc.alienUFO.sprite.x = -1000;
        gc.alienUFO.sprite.y = -1000;
        gc.alienUFO.frameSinceLastAppearance = 0;
      end
    });
  end
});
The interesting thing about this implementation is that the movement of the alien is not a constant linear speed. It will sometimes move fast and sometimes move slowly, and oftentimes will be seen to speed up or slow down after firing its plasma ball. That’s because the location from which the plasma ball is fired can be anywhere across the width of the screen, but it will always take the alien 3.5 seconds to move to that point and then off screen from it. If the firing point chosen is 600, for example, and the alien is coming in from the right, that means it will move roughly 200 pixels in 3.5 seconds. It will then fire its plasma ball and move off screen, which means it will move roughly 600 pixels to the left, but it will do that in the same 3.5 seconds it took to get to the firing point. Therefore, it will appear to move on screen slowly, fire, and then accelerate off screen.
The way the alien moves is deliberate: it makes the alien a bit more unpredictable and harder to avoid than if it was moving at a constant speed. Since a collision with the alien is bad news for the player, this adds a little bit of challenge, and to me at least, makes the alien a little more visually interesting.
showDeadPopup
When the player dies, showDeadPopup() is responsible for showing the popup message asking if she wants to retry the level or quit the game. The method itself is very simple:
function gc:showDeadPopup()

  if gc.popup == nil then

    gc.popup = native.showAlert(
      "Oops", "You died. Tough luck!", { "Try Again", "Quit" },
      function(inEvent)
        gc.popup = nil;
        if inEvent.action == "cancelled" then
          storyboard.gotoScene("menuScene", "zoomOutIn", 500);
        else
          if inEvent.index == 1 then
            gc.resetLevel();
          else
            storyboard.gotoScene("menuScene", "zoomOutIn", 500);
          end
        end
      end
    );

  end

end
First, a check is done to ensure the popup isn’t already showing, because this method will be called with every subsequent enterFrame event, and clearly you only want to show the popup the first time through. Assuming it isn’t, the Native UI API that Corona provides then will be used to show an alert message. This API is a wrapper around a few platform-specific user interface elements. You can show an alert message, as is done in this method, as well as opening the default mail or SMS application, the application store for the platform, or a number of other UI-related functions (more details on this in the “More on Native UI” section of this chapter).
The alert message used here is a simple popup with a title, some text, and one or more buttons the user can click. The title and text are the first two arguments to native.showAlert(), and the third is an array of one or more buttons (up to five). The first button is considered the default and is colored or otherwise displayed differently to set it apart.
The fifth argument to native.showAlert() is a callback function, inlined in this case. First, it nills the gc.popup variable so that the popup can be shown again when needed. The action attribute will be the value "cancelled" or "clicked". When "cancelled", that indicates that the user closed the alert in some way other than clicking one of the buttons (e.g., clicking the X to close the window in the simulator). That case is handled as clicking Quit is: the game transitions to the menu scene.
If action wasn’t "cancelled" then it must have been "clicked", so now the code looks at the index attribute of inEvent to determine which button was clicked. If it was the first one, the Try Again button, then the level is reset and the player can try again. If it was Quit then, again, the menu scene is shown.
showEnteredBayPopup
Similar to showDeadPopup() is showEnteredBayPopup(), seen when the player’s ship comes into contact with the landing bay of the mothership. This case requires a bit more work, but not too much more.
function gc:showEnteredBayPopup()

  if gc.popup == nil then

    gameData.score = gameData.score + (gc.ship.colonistsOnboard * 100);
First, ensure the popup isn’t already showing. Assuming it’s not, add a value to the player’s score based on how many colonists are on the ship.
if gc.levelData[gameData.level + 1] == nil then

  storyboard.gotoScene("endingScene", "zoomOutIn", 500);
Next, a check is done to see if there is a next level. If there isn’t, then the game is over and the endingScene is shown. Otherwise:
else

  gameData.level = gameData.level + 1;
  saveGameData();
The current level number is incremented and the game data saved so that if the player exits the game, she will continue on the next level, not the one she just completed.
Then, it’s time to show an alert:
  gc.popup = native.showAlert(
    "Good work",
    gc.ship.colonistsOnboard .. " colonists rescued x 100 points =" ..
    gc.ship.colonistsOnboard * 100,
    { "Next Level", "Quit" },
    function(inEvent)
      gc.popup = nil;
      if inEvent.action == "cancelled" then
        storyboard.gotoScene("menuScene", "zoomOutIn", 500);
      else
        if inEvent.index == 1 then
          gc.drawCurrentLevel();
          gc.resetLevel();
        else
          storyboard.gotoScene("menuScene", "zoomOutIn", 500);
        end
      end
    end
  );

end
This works virtually the same as the showDeadPopup() alert code does. The text of the popup is a little more complex, showing the number of colonists rescued and how many points they earned, but otherwise it works the same, so no need to rehash that territory.
Instead, let’s talk a little more about what the Native UI API has to offer that wasn’t seen in Astro Rescue.
More on Native UI
As mentioned earlier, the Native UI API Corona offers a wrapper around some platform-specific UI elements, as well as some UI-related things. You saw native.showAlert() in this chapter, of course, and you’ve also seen how native.systemFont and native.systemFontBold are used to get a reference to the native font currently in use by the operating system when you’re creating text objects.
Going along, in spirit at least, with native.systemFont and native.systemFontBold is the native.getFonts() method, which returns a list of the fonts available on the system. You can use this if you want to use a specific font but aren’t sure if it’s available. If it is, you can go ahead and use it, but if it’s not available then you can, as one alternative, use native.systemFont as a fallback.
Along with the native.showAlert() method that you’ve already seen, there are a couple other methods that show a dialog of some sort to the user.
The native.showPopup() method allows you to show a dialog for a specified service. For example, if you want to allow the user to send an e-mail you can call native.showPopup("email"). On iOS devices, the popup is displayed within your app, but on Android, the app is suspended and the system’s default app for sending e-mail is displayed. You can also pass "sms" for sending text messages, "appStore" to launch the default app store for the system, or "rateApp" to open a “Write Review” dialog (but only for iOS). You can also pass in options as the second argument to native.showPopup() to further define what you want to happen (consult the Corona docs for specifics, as the options differ from service to service).
The native.showWebPopup()allows you to open a web page (be it a local HTML file or a remote site) into a popup dialog. This accepts at a minimum the URL to open, with a number of options being available such as the size and location of the popup. This is good when, for example, you want to keep the instructions for your application current, so you post them on your web server and open them via native.showWebPopup() rather than including them in the application package itself.
In addition, native.cancelAlert() and native.cancelWebPopup()allow you to programmatically close an alert dialog or web page dialog; for example, if you want it to automatically dismiss itself after 15 seconds of no interaction by the user.
In addition to dialogs, the Native UI API allows you to create a handful of native widgets.
The native.newMapView() method allows you to create a MapView component to show a map and provides a DisplayObject wrapper so you can manipulate it much like any other DisplayObject. In contrast to native.showWebPopup, which opens a web page in a popup dialog, there is also native.newWebView(), which creates a DisplayObject, like native.newMapView() does, to give you an object you can manipulate that shows a web page in it.
The native.newTextField() and native.newTextBox() methods are similar in that both create an element for the user to enter text into, again with a DisplayObject wrapper so you can manipulate it. The difference is that native.newTextField() creates a multi-line, scrollable area for the user to enter text in while native.newTextBox() creates a single-line entry area.
Note One big difference with these native objects is that unlike most other DisplayObjects, they always appear on top of other DisplayObject and can’t be placed into DisplayGroups. You can use most of the typical DisplayObject methods to manipulate them, but they do not obey the usual DisplayObject hierarchy. This is true of all native components.
Last, there are a few miscellaneous functions available to you in this namespace.
The native.requestExit() method closes the application on Android gracefully without terminating the underlying application process. In general, it is better to use this rather than os.exit(), as is done in Astro Rescue, since it’ll make application relaunch faster (and, as per my earlier admonition, will cause your app to be rejected for publication in Apple’s App Store for sure). However, if you truly intend to shut the application down, as is the case when you exit Astro Rescue, it is usually better to terminate the process entirely rather than continue to use some amount of memory, in case the user wants to use the app again.
The native.setActivityIndicator() method is used to show a platform-specific activity indicator that causes touch events to be ignored while it is visible. Calling this method with true shows it; false hides it.
Last, the native.getProperty() and native.setProperty() methods allow you to get and set platform-specific properties, which are called environment variables on desktop systems. However, at the time of this writing, only iOS supports this, and only a small set of properties are recognized.
Summary
In this chapter, you looked at the main game loop of Astro Rescue and saw how it triggers most of the core action of the game. You also got a look at a few new physics and math functions. Last, you saw the Native UI functionality Corona provides for interacting with the underlying operating system’s native user interface.
In Chapter 7, you’ll dive into the aspects of player control and see how the flags used to determine player movement in the main game loop are set when the player touches the screen and/or uses the accelerometer.