
![]()
Asynchronous UI
Ever since the first graphical user interface, there has been a need to provide users with the feeling that while the computer is crunching numbers, the UI can still respond to input. This is perfectly reasonable: how many physical devices with buttons do you have that suddenly stop responding the moment they start doing any work?
With programming environments that didn’t have threads, this was a challenge. Programmers had to build their own time slicing, do a bit of processing—oh, and now process any user input—and back to processing. Once programmers have threads the problem gets easier: simply have a thread dedicated to UI processing, and any compute task run on another thread, leaving the operating system’s scheduler to handle time slicing automatically. This all sounds very easy, and it is; the complexity only starts to creep in when you want to update the UI from a non-UI thread.
In this chapter we will take a look at the UI threading model used by all Windows and Silverlight technologies including WinRT, and how you need to develop code to ensure your interfaces remain fast and fluid.
UI Mechanics
Before we dive into asynchronous UI, it is worth discussing the mechanics of how a click on the mouse eventually ends up causing something to happen inside an application. The two main players in achieving this goal are the OS and the application. The OS takes the underlying low-level event (mouse click) and then decides which application needs to respond to it. The OS determines the application by deciding which window has the focus for the event; the application that created that window is the target. Actually it is a little bit more complex than that, as it is not the application that is the target but the thread that created the window.
The OS has now established the target for the event, but how is the event delivered? The event is placed onto a queue accessible by the thread that created the window for the event (Figure 6-1).
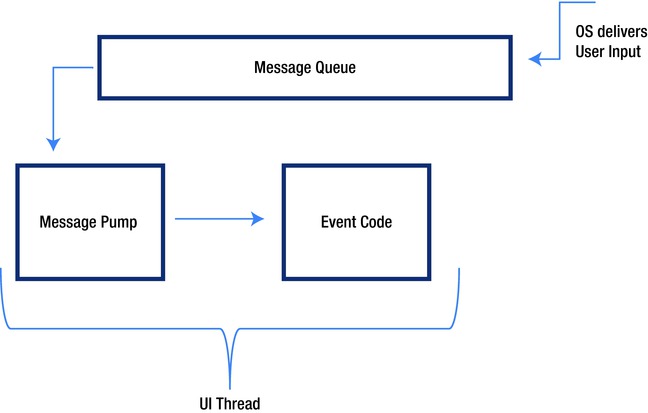
Figure 6-1. How window events are delivered to the UI thread
To process the event, the thread must remove the event from the queue, and then decide the appropriate action to handle the event and dispatch the event locally. What we have just described is the heart of nearly every UI platform—the message pump or message loop. Listing 6-1 shows an implementation of such a loop in .NET.
Listing 6-1. Example of a Windows Message Loop
MSG windowMsg;
while (User32.GetMessage(out windowMsg, IntPtr.Zero, 0, 0) != 0)
{
   User32.TranslateMessage(ref windowMsg);
   User32.DispatchMessage(ref windowMsg);
}
If the UI thread is not taking events out of the queue and dispatching them, the application can’t respond to user input. So for a UI application to be responsive, the UI thread needs to be spending most of its time sitting in this loop consuming and dispatching events. You can spot applications that don’t conform to this pattern when the OS turns the title of the window to “Not Responding.”
One common misconception I frequently see amongst developers is that an application can have only one UI thread. While this is true for a lot of applications, it does not have to be the case. Any custom thread you create can be a UI thread, and as long as it pumps those messages, life is good. Internet Explorer does this for each top-level window, thus isolating each browser window from UI lockup issues in other windows.
Imagine the following scenario: a user hits a button, and the button event handler fires and runs a piece of code that takes about 2 seconds to complete. By default this code will run on the UI thread, and while it is running the UI becomes unresponsive as it is not processing UI events. Solution: make the “long-running code” run on a separate thread.
The code in Listing 6-2 shows a button handler starting a new task. Once the task has been created, the UI thread returns to processing UI events, thus keeping the application responsive. There is just one big problem with this code: the thread that is performing the long-running calculation is not allowed to update the ResultsTextBlock control. Why is this? Because all Windows controls have what is called thread affinity, meaning that they can only have their state manipulated on the same thread that created the control. This has always been the case in Microsoft Windows–based UIs and is still the case for modern frameworks such as WPF, WinRT, and Silverlight. To keep the UI responsive, we need to offload non-UI work onto another thread, but if that work needs to update the UI, we need to be back onto the UI thread.
Listing 6-2. Asynchronous Work Initated from the UI Thread
private void ButtonClick(object sender, RoutedEventArgs e)
{
  Task.Factory.StartNew(() =>
  {
    decimal result = CalculateMeaningOfLife();
    ResultTextBlock.Text = result.ToString();
  });

}
The technique to request execution of a piece of work on another thread is known as marshaling. Marshaling requires cooperation to make it happen. In other words, the non-UI thread needs to communicate with the UI thread and ask it to execute a specific piece of code. To marshal work back onto the UI thread, you will take advantage of the same message queue the OS uses to communicate user input. The marshaling will take the form of posting a Windows message onto the UI message queue for that UI thread. The UI thread will eventually see that message requesting that the said piece of code be run on this thread.
Fortunately you won’t have to get involved at this low level, as there are a number of abstractions that simplify the process. Each of the various UI technologies has its own specific API. Having all these APIs leads to code being tightly coupled to a given UI technology, and in the world of unit testing and reusable components this is not ideal. Thankfully, in .NET 2.0 an abstraction was created called SynchronizationContext that provides a common way of marshaling onto the UI thread irrespective of UI technology.
Synchronization Context
Fundamentally, the role of SynchronizationContext is to run a delegate on a thread associated with the SynchronizationContext. Each UI technology will have its own native mechanism to marshal work back onto its UI thread, and as such each creates their own synchronization context type that derives from the SynchronizationContext base; consumers continue to use the base type (code to abstraction). When the UI framework is initialized, it creates an instance of its SynchronizationContext and then associates this instance with the current thread, by calling the method SynchronizationContext.SetSynchronizationContext. This method places the synchronization context instance into thread local storage, meaning it can only be retrieved by code executing on the same thread. To retrieve the synchronization context associated with the current thread applications, access the static property SynchronizationContext.Current.
![]() Caution Calling SynchronizationContext.Current on a thread that has not had a call to SetSynchronizationContext will result in a null value. Therefore to have access to another thread’s synchronization context, you must first read it while on that thread, and store it in a non–thread-scoped variable. SynchronizationContext does not flow across thread and task boundaries.
Caution Calling SynchronizationContext.Current on a thread that has not had a call to SetSynchronizationContext will result in a null value. Therefore to have access to another thread’s synchronization context, you must first read it while on that thread, and store it in a non–thread-scoped variable. SynchronizationContext does not flow across thread and task boundaries.
Send and Post
After capturing the synchronization context from the UI thread, you can use the captured synchronization context object on any other thread. The two key methods available to execute work are Send and Post. Send is a synchronous method that will block on the calling thread until work has been completed on the associated synchronization context thread, whereas Post executes asynchronously, allowing the calling thread to continue. Post is used most often; it is very rare to require the calling thread to block waiting for the UI to update. Listing 6-3 is a rewrite of Listing 6-2 taking advantage of synchronization context.
Listing 6-3. Using SynchronizationContext to Marshal Back onto the UI Thread
private void ButtonClick(object sender, RoutedEventArgs e)
{
   // Capture synchronization context while on the UI thread
   SynchronizationContext ctx = SynchronizationContext.Current;

   Task.Factory.StartNew(() =>
   {
     decimal result = CalculateMeaningOfLife();

     // request that the synchronization context object
     // runs ResultTextBlock.Text = result.ToString() on the UI thread asynchronsly

     ctx.Post(state => ResultTextBlock.Text = result.ToString(), null);
    });
 }
The Send and Post methods both take a SendOrPostCallbackDelegate, which itself will match any method returning void and taking a single parameter of type object. This second parameter to the Send or Post call is the value that will be passed into the delegate when it executes on the correct thread. This is seldom used, instead favoring closures to flow data into the delegate body.
Favor using Post calls when, during the life of an asynchronous operation, you wish to modify the properties on a UI control, and you don’t require the UI to remain 100 percent in step with the asynchronous operation. Use Send if it is imperative that the asynchronous processing and the UI processing be in lockstep. However, be careful when using Send as opposed to Post if the UI thread and the calling thread have shared locks, as this may result in a deadlock scenario (e.g., an asynchronous operation has lock; calls Send; UI thread attempts to acquire lock before performing the update).
Examining the code in Listing 6-2, you can see that the asynchronous operation has two parts: perform the calculation and, when done, update the UI. Rather than placing all this in a single task, we could break it into two. The first task performs the long-running calculation, and the second task updates the UI. At first glance this seems pointless; however, remember what I said in Chapter 3, that continuations are useful when you have a series of asynchronous operations that need to execute in a different context to one another. In this example, you want the first task to run on a thread pool thread, but the second task to run in a different context: on a UI thread. When a request is made to start a task it is given to a scheduler, and the default scheduler is the thread pool scheduler; hence tasks run on thread pools. The other out-of-the-box scheduler is a SynchronizationContextTaskScheduler; when this scheduler is given a task, it posts it onto the synchronization context associated with the scheduler. One of the overloads, Task.ContinueWith, takes the scheduler you would like to use. You can now rewrite Listing 6-2 to use a continuation (see Listing 6-4).
Listing 6-4. Background Thread Compute, with Continuation on UI Thread
private void ButtonClick(object sender, RoutedEventArgs e)
{
   Task.Factory
       .StartNew<decimal>(() => CalculateMeaningOfLife())
       .ContinueWith(t => ResultTextBlock.Text = t.Result.ToString(),
                     TaskScheduler.FromCurrentSynchronizationContext());
}
The UI thread creates the initial task object and sets up the continuation. Creating the continuation task on the UI thread results in having the TaskScheduler.FromCurrentSynchronizationContext return a scheduler that, when asked to start a task, will run it using the SynchronizationContext associated with this UI thread. Continuations are a convenient way to marshal asynchronous-result processing back onto the UI thread.
Event-Based Asynchronous Pattern (EAP)
In .NET 2.0, an effort was made to make the processing of asynchronous operations easier when running inside a UI environment. API developers were encouraged to provide asynchronous operations that signaled completion by firing an event using a captured synchronization context at the point when the asynchronous operation was requested. This effectively means UI developers need to care less about synchronization context; it all gets wrapped up inside the asynchronous API implementation. An example of this EAP pattern is shown in Listing 6-5. Note the event registration is only done once, not per asynchronous call, and the synchronization context is captured at the point when the asynchronous call is made. The one downside with this approach is error handling—instead of the conventional catch block, you have to resort to testing return values.
Listing 6-5. Example of EAP Pattern Client
public partial class MainWindow : Window
{
   private WebClient client = new WebClient();

   public MainWindow()
   {
     InitializeComponent();
     client.DownloadStringCompleted += ProcessResult;
   }

   private void ProcessResult(object sender, DownloadStringCompletedEventArgs e)
   {
     // event handler running on the UI thread
    if (e.Error != null)
      webPage.Text = e.Error.Message;
    else
       webPage.Text = e.Result;   }

   private void DownloadIt(object sender, RoutedEventArgs e)
   {
        // Captures Synchronization Context at this point
     client.DownloadStringAsync(new Uri("http://www.rocksolidknowledge.com/5SecondPage.aspx"));
   }
 }
An example of building your own EAP component that encapsulates synchronization context is shown in Listing 6-6. On creation of the Clock, the synchronization context is captured. If there is no synchronization context present, it simply creates an instance of the base synchronization context. This keeps our programming model simple internally (not requiring null checks) and for nonthread affinity scenarios, allowing the asynchronous operation to continue processing while updating the consumer on another thread. When you wish to inform the client of a change of state, you simply post the event-firing code onto the captured synchronization context.
Listing 6-6. Example of EAP Implementation
public class Clock
{
   public int Hour { get { return DateTime.Now.Hour; } }
   public int Minutes { get { return DateTime.Now.Minute; } }
   public int Seconds { get { return DateTime.Now.Second; } }

   public event EventHandler<EventArgs> Tick = delegate { };

   private Timer timer;
   private SynchronizationContext uiCtx;

   public Clock()
   {
      uiCtx = SynchronizationContext.Current ?? new SynchronizationContext();
      timer = new Timer(OnTick,null,1000,1000);
   }

        private void OnTick(object state)
        {
            uiCtx.Post(_ => Tick(this, EventArgs.Empty), null);
        }
 }
Background Worker
BackgroundWorker is a component that can be used in both Windows Forms and WPF that provides a solution to a common asynchronous UI scenario: user hits button; long-running activity on background thread; user wishes to receive progress, the final result, and the ability to cancel the long-running operation. Updating the user on progress of the operation and reporting a final outcome will need to be coordinated from the asynchronous operation, but almost certainly will require the ability to update UI controls. The background worker component has been developed to solve this very specific scenario.
The BackgroundWorker component follows the principles of the EAP pattern; it exposes a series of events to represent state changes during the life of the asynchronous operation. Apart from the event DoWork, all other events will fire on the UI thread. The work you wish to execute asynchronously is defined by subscribing to the DoWork event. When a call is made to RunWorkerAsync on the BackgroundWorker, it fires this event on a thread pool thread and thus starts the asynchronous operation. The code performing the asynchronous operation can then report progress and poll for cancellation (Listing 6-7).
Listing 6-7. BackgroundWorker for UI Marshaling
private BackgroundWorker backgroundWorker;

private void StartProcesing(object sender, RoutedEventArgs e)
{
   backgroundWorker = new BackgroundWorker();

   backgroundWorker.DoWork             += PerformCalculation;
   backgroundWorker.RunWorkerCompleted += CalculationDone;
   backgroundWorker.ProgressChanged    += UpdateProgress;

   // Define what behavior is supported by the background worker
   backgroundWorker.WorkerReportsProgress = true;
   backgroundWorker.WorkerSupportsCancellation = true;

  // On a background thread, fire the DoWork event
   backgroundWorker.RunWorkerAsync();
 }

private void UpdateProgress(object sender, ProgressChangedEventArgs e)
{
  this.AsyncProgressBar.Value = e.ProgressPercentage;
}

private void CalculationDone(object sender, RunWorkerCompletedEventArgs e)
{
  // If the asynchronous operation completed by throwing an exception
  if (e.Error != null)
   this.ResultTextBlock.Text = e.Error.Message;
  else if (e.Cancelled)
    this.ResultTextBlock.Text = "CANCELLED";
  else
    this.ResultTextBlock.Text = e.Result.ToString();
}

private void PerformCalculation(object sender, DoWorkEventArgs e)
{
  // Dummy Loop to represent some idea of progress in
  // calculating the value
  for (int i = 0; i < 100; i++)
  {
     Thread.Sleep(50); // Simulating work
     backgroundWorker.ReportProgress(i);

     // Check if cancellation has been requested
     if (backgroundWorker.CancellationPending)
     {
       e.Cancel = true;  //Indicate the reason for completion is due to cancellation
       return;
      }
   }
   // set the result of the asynchronous operation
   e.Result = 42;
  }

 private void CancelProcessing(object sender, RoutedEventArgs e)
 {
   // Politely ask for the background worker to cancel
   backgroundWorker.CancelAsync();
  }
BackgroundWorker is a useful component that fits a very specific brief. If you need more flexibility than for what the BackgroundWorker is intended, don’t be tempted to try and bend it—look to using more flexible techniques presented in this chapter. I have seen developers who for some reason see BackgroundWorker as the golden hammer for general purpose UI thread marshaling. This often takes the form of calling the ReportProgress method on the background thread to pass a known constant to indicate what UI update is required. The ProgressChanged event handler then typically switches on the value to decide how to update the UI. It would have been far simpler and more maintainable to have invoked the functionality directly via a post on a synchronization context from the asynchronous work.
![]() Note BackgroundWorker is not available in WinRT. The introduction of async and await keywords in the C#5 programming language means this component isn’t required.
Note BackgroundWorker is not available in WinRT. The introduction of async and await keywords in the C#5 programming language means this component isn’t required.
Data Binding
Modern smart-client UIs now rarely rely on directly updating visual controls. With the onset of architectures like MVVM (Model-View-View Model), developers use a technique called data binding to move data back and forth between application objects and visual objects. Data binding involves creating a relationship called a binding between the source (application object and Property) and the target (visual component and property), with the idea that updating the source object’s property in code will cause the bound visual property to get updated. The trigger for updating comes from the fact that the source object must implement an interface called INotifyPropertyChanged. This interface exposes a single event called PropertyChanged, and it is further the responsibility of the source object to raise this event each time one of its bound properties is changed. The event arguments for the event specify which property has changed, or if a null value is used it signifies that all bound properties of this source object need to be refreshed. The UI framework registers for this event against the source object, and on receipt of this event causes the UI to update based on the new value from the source object (Listing 6-8).
Listing 6-8. Example View Model
public class ViewModel : INotifyPropertyChanged
{
   public ViewModel()
   {
       Task.Factory.StartNew(() =>
                {
                    while (true)
                    {
                        Result = CalculateNexResult();
                    }
                });
   }

   private decimal result;
   public decimal Result
   {
      get { return result; }
      private set { result = value; OnPropertyChanged("Result"); }
   }

   public event PropertyChangedEventHandler PropertyChanged = delegate { };

    protected virtual void OnPropertyChanged(string propertyName = null)
    {
       PropertyChanged(this, new PropertyChangedEventArgs(propertyName));
    }
 }
All seems very straight forward until you ask which thread fires the event. It turns out it’s the thread that modified the source property. If the source property is modified on the UI thread, there’s no issue; but, as in Listing 6-8, what if it is modified on another thread? The answer to that question depends on what UI technology you are using. The following sections cover the specific technology differences.
Windows Forms
For data binding to work reliably in Windows Forms, all updates to source properties need to happen on the UI thread. Therefore the implementation in Listing 6-8 clearly shouldn’t work. In the case of Windows Forms, if you run it outside the debugger it almost certainly will work, but run it inside the debugger and the framework will enforce the thread affinity rule, and simply refuse to update the UI—no exception, nothing. The fact that it works without the debugger attached is due to the fact that Microsoft did not enforce the thread affinity in .NET 1.1 and as such your program would be subject to just the possibility that the update would fail. To fix this issue, we need to ensure that the event fires on the UI thread, and for that we have used synchronization context (Listing 6-9). Notice, though, we have used Send and not Post.
Listing 6-9. Cross-Thread Data Binding in Windows Forms
private SynchronizationContext uiCtx;

public ViewModel()
{
  uiCtx = SynchronizationContext.Current;
    Task.Factory.StartNew(() =>
                {
                    while (true)
                    {
                        Result = CalculateNexResult();
                    }
                });
}
. . .
protected virtual void OnPropertyChanged(string propertyName = null)
{
  uiCtx.Send(_ => PropertyChanged(this, new PropertyChangedEventArgs(propertyName)),null);
}
We have used Send to ensure the result is read fully before calculating the next result; this is, after all, a multithreaded application, and having one thread update a value while another is reading could cause strange results to be displayed. This also makes you consider whether you might need to update a dozen or so data-bound values—having to marshal multiple times and block for each one may be too prohibiting. For those scenarios you could consider issuing a single PropertyChanged event with the affected property being null (assuming all bound properties are rooted through a single source), or alternatively you could wrap up all the properties updates in a SynchronizationContext.Send or Post, resulting again in just a single marshaling operation.
Windows Presentation Foundation (WPF)
The behavior of Windows Forms always seemed kind of strange to us; after all, you would have thought that the data-binding layer could automatically perform the marshaling for you. Fortunately, WPF does (well, almost; more later), so the changes you made to your ViewModel to make it work with Windows Forms are not necessary for WPF. WPF will marshal onto the UI thread, but for high-performance environments it may be also be prudent to update a set of properties on the UI thread to reduce the number of marshaling requests.
WPF data binding therefore does a pretty good job of hiding the need to perform marshaling. However, this is only true for single-value data bindings. WPF also supports data binding to collections, for visual controls like list views. Collections that wish to act as data-bound sources must implement INotifyCollectionChanged, and raise an event to say the content of the collection has changed. There is an out-of-the-box collection that implements this interface called ObservableCollection<T>. Listing 6-10 shows a view model that is utilizing the observable collection. The problem is once the Value property is data-bound, any attempt to Add to the collection will fail if the Add does not occur on the UI thread. The ObservableCollection<T> was not written to be thread safe; thus the only way to add items is to marshal onto the UI thread.
Listing 6-10. ObservableCollection<T>
public class ViewModel
{
  public ViewModel()
  {
    Values = new ObservableCollection<int>();
    Task.Factory.StartNew(GenerateValues);
  }

  public ObservableCollection<int> Values { get; private set; }

  private void GenerateValues()
  {
     var rnd= new Random();
     while (true)
     {
       Values.Add( rnd.Next(1,100));
       Thread.Sleep(1000);
      }
  }
 }
To fix this, you can take advantage of synchronization context, and post the add operation onto the UI thread. You could wrap ObservableCollection<T> to do this for you, and if you do it may be worth supporting an AddMany method and performing a single marshaling operation for all the items you wish to add (Listing 6-11).
Listing 6-11. Updating ObservableCollection via SynchronizationContext
private SynchronizationContext uiCtx = SynchronizationContext.Current;

private void GenerateValues()
{
  var rnd = new Random();
  while (true)
  {
    uiCtx.Post( _ => Values.Add(rnd.Next(1, 100)),null);

    Thread.Sleep(1000);
  }
}
This obviously does mean introducing synchronization context back into the code, but as of .NET 4.5 you don’t need to, as it is now possible to make ObservableCollection and any other data-bound collection work with multiple threads. To make this possible, we have to assist the data-binding layer so that it can ensure that, when it is accessing the collection, no other thread is modifying the data structure. To achieve this, some form of thread synchronization is obviously required. To request that the data binding performs synchronization prior to accessing the collection, make a call to the static method BindingOperations.EnableCollectionSynchronization. The first parameter represents the IEnumerable<T> object that contains the data binding source you wish to control access for, and the second parameter is the object to be used for thread synchronization. Before accessing the collection, the data-binding layer obtains the monitor for this object, and as long as your code abides to the contract by also obtaining the monitor before accessing the collection, all is good (see Listing 6-12).
Listing 6-12. Updating ObservableCollection Using Collection-Based Locking
public class ViewModel
{
  private object valuesLock = new object();
  public ObservableCollection<int> Values { get; private set; }

  public ViewModel()
  {
    Values = new ObservableCollection<int>();
    BindingOperations.EnableCollectionSynchronization(Values, valuesLock);
     Task.Factory.StartNew(GenerateValues);
   }

   private void GenerateValues()
   {
     var rnd = new Random();
     while (true)
     {
        lock (Values)
             Values.Add(rnd.Next(1, 100));
        Thread.Sleep(1000);
     }
}
The synchronization strategy used here is mutual exclusion. If you want greater control over the locking strategy, this is also possible using an overloaded version of the BindingOperations.EnableCollectionSynchronization that takes a delegate that the data binding layer will invoke to obtain access to the collection. This allows you to use whatever synchronization method you feel appropriate. The code in Listing 6-13 shows an implementation that uses a reader-writer lock. The three parameters passed to EnableCollectionSynchronization are the collection, a user-defined context, and the delegate to be used to obtain access. The user-defined context is whatever you like and is passed into the delegate. The ControlAccessToValues method is called each time the data-binding layer wishes to access the collection. It indicates what type of access (read/write) and supplies an Action delegate that represents the code it wishes to have run while the thread synchronization is active.
Listing 6-13. Updating ObservableCollection Using ReaderWriterLockSlim
public class ViewModel
{


  ReaderWriterLockSlim valuesLock = new ReaderWriterLockSlim();
  public ViewModel()
  {
     Values = new ObservableCollection<int>();
     BindingOperations.EnableCollectionSynchronization(Values,valuesLock,ControlAccessToValues);
     Task.Factory.StartNew(GenerateValues);
  }

  public ObservableCollection<int> Values {get;private set;}

  private void ControlAccessToValues(IEnumerable collection, object context,
                                  Action accessmethod, bool writeaccess)
  {
   var collectionLock = (ReaderWriterLockSlim) context;
   Action enterLock = writeaccess  ? new Action(collectionLock.EnterWriteLock)
                                   : new Action(collectionLock.EnterReadLock);

   Action exitLock = writeaccess  ? new Action(collectionLock.ExitWriteLock)
                                  : new Action(collectionLock.ExitReadLock);

   enterLock();
   try { accessmethod(); }
   finally {exitLock();  }
 }
 private void GenerateValues()
 {
   var rnd = new Random();
   while (true)
   {
     valuesLock.EnterWriteLock();
     try{Values.Add(rnd.Next(1, 100));}
     finally{valuesLock.ExitWriteLock();}

     Thread.Sleep(1000);
    }
 }
}
So while the goal of data binding is to allow a simple, declarative way of moving data between a source and a target, you do still need to be aware of potential threading issues. WPF on the whole punishes you immediately, which results in UI threading issues being missed less often.
WinRT
WinRT has the same UI threading model for data binding as Windows Forms. When a data-bound source is updated from a thread not associated with the target, a COMException is raised. The message for this exception is as follows: “The application called an interface that was marshaled for a different thread. (Exception from HRESULT: 0x8001010E (RPC_E_WRONG_THREAD)).” Unlike Windows Forms, this exception is raised with or without debugger attachment. The same techniques used with Windows Forms to marshal back onto the UI thread apply to WinRT. While this may appear to be cumbersome—especially considering this is, after all, the latest UI technology from Microsoft—you will see in Chapter 7 that the new features in C#5 actually make it all a lot simpler, and hence the extra efforts employed by WPF are not necessary.
So far in this chapter we have tried to be agnostic of UI technology by taking advantage of synchronization context and data binding. Both these abstractions for WPF are built using the WPF Dispatcher. The WPF Dispatcher is responsible for marshaling work from a background thread to the UI thread. In addition to providing support for Send- and Post-like behavior, it also offers support for UI timers, prioritizing work for the UI thread and the ability to cancel any pending work.
Obtaining the Dispatcher
There are multiple ways to obtain the dispatcher, if your code is not running on the UI thread itself, you can fetch the dispatcher of any UI element via the Dispatcher property, or you can call Application.Current.Dispatcher. If you are on the UI thread you can call Dispatcher.Current.
Executing Work Through the Dispatcher
Similar to synchronization context, we can execute work through the dispatcher synchronously (Invoke) or asynchronously using the APM pattern (BeginInvoke). Both these methods take an optional priority, allowing work to be scheduled on the UI thread at a lower priority than handling user-initiated interactions. In the case of the invoke method it returns void, but it does take an optional timeout so you don’t end up blocking for too long. The BeginInvoke method returns a DispatcherOperation object; this object confers the ability to track and cancel the operation if it has not started. Most applications would typically use the Normal priority, which is what DispatcherSynchronizationContext uses for Post requests (Table 6-1).
Table 6-1. WPF Dispatcher Priorities
Priority |
Description |
|---|---|
Inactive |
Work items are queued but not processed. |
SystemIdle |
Work items are only dispatched to the UI thread when the system is idle. This is the lowest priority of items that are actually processed. |
ApplicationIdle |
Work items are only dispatched to the UI thread when the application itself is idle. |
ContextIdle |
Work items are only dispatched to the UI thread after higher-priority work items are processed. |
Background |
Work items are dispatched after all layout, rendering, and input items are processed. |
Input |
Work items are dispatched to the UI thread at the same priority as user input. |
Loaded |
Work items are dispatched to the UI thread after all layout and rendering are complete. |
Render |
Work items are dispatched to the UI thread at the same priority as the rendering engine. |
DataBind |
Work items are dispatched to the UI thread at the same priority as data binding. |
Normal |
Work items are dispatched to the UI thread with normal priority. This is the priority at which most application work items should be dispatched. |
Send |
Work items are dispatched to the UI thread with the highest priority. |
Listing 6-14. Marshaling onto UI thread Using WPF Dispatcher
private Dispatcher dispatcher = Dispatcher.CurrentDispatcher;

  private void GenerateValues()
  {
    var rnd = new Random();
    while (true)
    {
      int nextValue = rnd.Next(1,100);
      dispatcher.BeginInvoke(new Action(() => Values.Add(nextValue));

      Thread.Sleep(1000);
     }
   }
Favor using the dispatcher over SynchronizationContext when you wish to take fine-grained control of dispatching work onto the UI thread, or you wish to have UI-based timers (see later).
The WinRT dispatcher has a very similar API to that of WPF Dispatcher, with a couple of key differences: the way you obtain the dispatcher is slightly different, and the number of priorities is far smaller.
Obtaining the Dispatcher
There are multiple ways to obtain the dispatcher. If your code is not running on the UI thread itself, you can fetch the dispatcher of any UI element via the Dispatcher property. If you are on the UI thread, you can obtain the dispatcher via CoreWindow.GetForCurrentThread().Dispatcher; this property returns a type of CoreDispatcher. Once you have obtained the dispatcher you can share it with any other thread so, when required, they can request any UI updates to run on the UI thread.
Executing Work Through the Dispatcher
Unlike the WPF Dispatcher, the WinRT dispatcher can only execute work asynchronously. Asynchronicity is at the heart of WinRT: blocking is considered evil, and there are no means for you to block. To invoke work via the dispatcher, you can use the RunAsync method. The RunAsync allows you to pick a priority to determine when the code should run. This is similar to WPF Dispatcher, although the number of priorities is greatly reduced (Table 6-2).
Table 6-2. WinRT Dispatcher Priorities
Priority |
Description |
|---|---|
Low |
Requested work is processed when the window’s main thread is idle and there is no input pending in the queue. |
Normal |
Requested work is processed in the order it is requested. |
High |
Requested work is queued and processed before any other request type. |
Excessive use of High priority can obviously result in a UI that is unresponsive to user input. Low priority provides the best way to schedule work to run, while keeping user interaction a top priority. Normal priority is equal priority with user interactions; this would be the same as utilizing SynchronizationContext. Listing 6-15 shows a UI thread executing a task asynchronously, which in turn runs the UI update logic asynchronously back on the UI thread.
Listing 6-15. WinRT Executing Work Back onto the UI Thread with the WinRT Dispatcher
private void DoIt(object sender, RoutedEventArgs e)
{
  // Button click handler running on UI thread, capture dispatcher
  CoreDispatcher dispatcher = CoreWindow.GetForCurrentThread().Dispatcher;

   Task.Run(() =>
           {
             int answer = CalculateMeaningOfLifeUniverseAndEverything();
             dispatcher.RunAsync(CoreDispatcherPriority.Low, () =>
                 {
                    resultsTextBlock.Text = answer.ToString();
                 });
           });
        }
UI Timers
In addition to updating the UI when an object’s state changes, we can also update the UI at a given frequency. UI Timers provide a means of registering a piece of code to run a given interval. UI Timers are different from other forms of timers as they ensure that the timer fires on the UI thread. Because the timer fires on the UI thread, there is no need to consider synchronization context. It should go without saying that any UI timer executed must complete quickly in order to keep the UI responsive.
Windows Forms Timer
The Windows Forms timer takes the form of a component. Components are like controls but do not have any visual part. The System.Windows.Forms.Timer component is available on the Windows Forms Toolbox, and can be dragged and dropped onto a form just like a visual component. Once it has been dropped onto the form, it can be configured just like a control, setting properties and wiring up events. Listing 6-16 shows a form with the timer being created in the code behind. The frequency of the timer is defined via the Interval property, which takes a time period in milliseconds. The Tick event is used to identify the code you wish to run every time the timer fires. The timer by default is not started; it can be started either by setting the Enabled property to true or by calling the Start method. The Enabled property allows you to start the timer from the property sheet in the designer. The Start method provides a more code-readable form, to be used from code behind. The timer can be stopped by setting Enabled to false or calling the Stop method.
Listing 6-16. The Windows Forms Timer Updates Title of Form Every Second with Current Date and Time
 public partial class ClockForm : Form
 {
    private Timer timer = new Timer();
    public ClockForm()
    {
      InitializeComponent();

      timer.Interval = 1000; // 1000 ms == 1 second
      timer.Tick += UpdateFormTitleWithCurrentTime;

      //timer.Enabled = true; or
      timer.Start();

    }

    private void UpdateFormTitleWithCurrentTime(object sender, EventArgs e)
    {
      this.Text = DateTime.Now.ToString();
    }
 }
WinRT and WPF Dispatch Timers
Listing 6-17 shows an example a partial piece of code to update a Values collection on the UI thread every second for both WinRT and WPF.
Listing 6-17. Example Use of a Dispatcher Time
// Created on the UI thread
timer = new DispatcherTimer {Interval = TimeSpan.FromSeconds(1)};
// Event handler will fire on the UI thread, making it
// safe to update UI elements
timer.Tick += (s, e) => Values.Add(rnd.Next(1, 100));
timer.Start();
Complex UI scenes may require the building of complex shapes and bitmaps. Building such items on the UI thread obviously will cause the UI thread to become nonresponsive. Building these UI objects on a background thread therefore makes sense; the rub comes when these components are referenced by components created on the UI thread. For example, an Image created on the UI thread refers to a BitmapSource to define the pixel data for the image. Not defining the BitmapSource on the UI thread causes an exception to be thrown when the image created on the UI thread is associated with the bitmap source. To solve this issue, WPF UI components that are not themselves visual but are used to define the data used by the visual component derive from a base class called Freezable. Freezable types can be created on a non-UI thread and then have the Freeze method applied to them, allowing them to be used (without change) by visual components on the UI thread. Listing 6-18 shows a partial example of creating a Bitmap on a non-UI thread; marked as Freezable, the bitmap can be used on the UI thread.
Listing 6-18. Creating UI Components on Background Threads
Task.Factory.StartNew<BitmapSource>(CreateImage)
                .ContinueWith(src => images.Children
                                     .Add( new Image() { Width = 100,Source=src.Result}),
                TaskScheduler.FromCurrentSynchronizationContext());

 . . .

private BitmapSource CreateImage()
{
  var src = new WriteableBitmap(200,200,96,96,new PixelFormat(), BitmapPalettes.Gray256);

  // Calculate image
  src.Freeze();
  return src;
 }
Too Much of a Good Thing
One of the main reasons to spin off separate threads from the UI is so that the UI thread is left to focus on pure UI and keep the user experience fast and fluid. Throughout this chapter we have reviewed the need for the asynchronous operations to keep the UI up to date by posting work back on to the UI, but it turns out this whole approach could end up creating the very environment we are trying to avoid. Consider the code in Listing 6-19. The CalculatePi method is going to be run on a background thread, and the synchronization context has already been captured on the UI thread. It should produce a nice progress bar for you as the calculation is being performed, but unfortunately the only thing that happens is the UI freezes. Why? Well, just think about how this whole marshaling thing works: it is about posting messages onto the UI thread, the same thread that is trying to handle user interactions. At the moment you have a background thread that is creating thousands of requests per second. The user events don’t get looked into, and the UI thread spends most of its time trying to keep up and not repainting the screen. In fact, it is not uncommon for this application to run out of memory on a 32-bit machine, as the queue eats so much memory.
Listing 6-19. Windows Message Queue Overload
private SynchronizationContext uiCtx = SynchronizationContext.Current;

private void CalculatePi()
{
  const int iterations = 1000000000;
  double pi = 1;
  double multiplier = -1;
  int newProgress;

  for (int i = 3; i < iterations; i += 2)
  {
         pi += multiplier*(1.0/(double) i);
         multiplier *= -1;

         newProgress = (int) ((double) i/(double) iterations*100.0);
         uiCtx.Post(_ => progressBar.Value = newProgress, null);
      }

      uiCtx.Post(_ => this.result.Text = (pi*4.0).ToString(), null);
   }
}
The fix for this is not to marshal at this kind of rate—after all, the user can’t possibly take all that information in, and really, will he or she want to see such a small change in progress? Listing 6-20, shows the refactored code.
Listing 6-20. Less Aggressive Update to Keep UI Thread Responsive
int nBlocks = 100;
int blockSize = iterations/nBlocks;

for (int nBlock = 0; nBlock < nBlocks; nBlock++)
{
   for (int i = 3 + nBlock*blockSize; i <  nBlock*blockSize + blockSize; i += 2)
   {
     pi += multiplier*(1.0/(double) i);
     multiplier *= -1;
   }
   uiCtx.Post(_ => progressBar.Value = nBlock, null);
}
Now we are only performing 100 post-backs during the lifetime of the calculation. This not only keeps the UI responsive but also reduces the time for the calculation. In WPF, if we had used data binding as opposed to updating the controls directly, then the UI would have remained responsive, as the data-binding engine uses a feature of the dispatcher that queues update operations with a low priority and ignores duplicate update requests, thus giving greater priority to user interactions. However, the overall calculation time would still be massively increased—not what we want. It is therefore very important to understand the inner workings and build your code to take this knowledge into account. In this example, it has been relatively easy to control the amount of marshaling onto the UI thread; for other algorithms it might be trickier, because triggering the need to update might itself be random in nature. In this situation it may be simpler to use a UI timer to regularly poll the current state and update the user. Keeping the user abreast of state changes every 250ms is probably good enough, and won’t kill the UI thread. We could also solve these kinds of problems by using the dispatcher with a low priority and only reissuing the update if the previous update has completed (Listing 6-21).
Listing 6-21. Dispatcher to Update UI Thread Only When UI Thread Is Idle
DispatcherOperation updateOp = null;

for . . .
{
    if (updateOp == null || updateOp.Status == DispatcherOperationStatus.Completed)
    {
       updateOp =Dispatcher.BeginInvoke(DispatcherPriority.ApplicationIdle,
            new Action(() => progressBar.Value = (int) ((double) i/(double) iterations*100.0)));
    }

}
An alternative approach is to sample and throttle. You don’t have to build that yourself; the Reactive Framework gives you all the building blocks and is discussed in Chapter 14.
Summary
In this chapter, you have seen that Windows UI technology has thread affinity, requiring any UI updates initiated from the non-UI thread to be marshaled back onto the UI thread in order to update. You have also seen that the process of marshaling can take many forms, but they all boil down to sending a message to the UI thread. For WPF we often favor data binding to do the right thing; for the likes of Windows Forms and WinRT, you need to take control of the marshaling, and SynchronizationContext is our cross-technology preferred option. For finer-grained control in the case of WinRT and WPF, consider using its dispatcher directly. Keep in mind that the reason for performing asynchronous programming in UIs is to maintain responsiveness. Flooding the UI thread with update messages will reverse the effect, so you should consider batching updates.
While asynchronous UI processing isn’t that hard, it does force you to structure your code differently from regular sequential code. In Chapter 7, we will look at the new features of C#5 that, to a large extent, remove this need and allow you to build fast and fluid UIs while maintaining the simple sequential structure that programmers are often most comfortable with.