
![]()
Tasks
With the release of .NET 4.0, Microsoft introduced yet another API for building asynchronous applications: the Task Parallel Library (TPL). The key difference between TPL and previous APIs is that TPL attempts to unify the asynchronous programming model. It provides a single type called a Task to represent all asynchronous operations. In addition to Tasks, TPL introduces standardized cancellation and reporting of progress—traditionally something developers rolled for themselves. This chapter will examine these new constructs and how to take advantage of them to perform asynchronous operations.
A Task represents an asynchronous unit of work. This work could be, for example, to calculate a value based on some inputs, or it could represent a request to a network-based resource. It is important to recognize that this single item, called a Task, simply represents an activity that is ongoing while the main thread of execution continues. Tasks are not some new, magical way of performing asynchronous work; they are an abstraction over the underlying mechanics we discussed in Chapter 2. We can generally consider tasks to be either compute based, and thus bound to some kind of OS thread, or I/O based, and thus modeled around I/O completion ports. But as you will discover in later chapters, they really can represent anything running asynchronously.
Creating a Compute-Based Task
When learning any new language or technology, there is a style of program you just have to build as part of your journey to greater things—yes, you guessed it, asynchronous “Hello World.”
The code in Listing 3-1 is very similar to the thread examples in Chapter 2. When creating the Task object, a method is supplied that matches the signature of the Action delegate. This delegate represents the work to run asynchronously. The asynchronous operation will be deemed to have completed when the Speak method completes. You may feel that this trivial example is not worth running; however, please do so as it may not do what you expect. For best effect, run it outside the debugger with CTRL+F5.
Listing 3-1. Asynchronous Hello World
class Program
{
  static void Main(string[] args){
     Task t = new Task(Speak);
     t.Start();
  }
  private static void Speak() {
     Console.WriteLine("Hello World");
   }
}
If it is your lucky day, “Hello World” will appear on your screen. But run the code a few times and you may well get different results; for most people absolutely nothing will be displayed. We hope you have figured out the reason: compute-based tasks run on background threads and, as explained in Chapter 2, background threads do not keep the process alive. By the time the task is about to run, the main thread has already terminated and, hence, the process will terminate as well. This is an important point to remember, as when it comes to your own code, running tasks will simply be aborted if no foreground threads are executing.
So how can you bring some determinism to this chaotic example? What you need to do is to keep the main thread alive until the asynchronous work has completed. A simple Console.ReadLine(); would suffice, but a more elegant way would be to block the main thread, wait for the task to complete, and then exit (see Listing 3-2).
Listing 3-2. Asynchronous Guaranteed “Hello World”
static void Main(string[] args){
     Task t = new Task(Speak);
     t.Start();
     Console.WriteLine("Waiting for completion");
     t.Wait();
     Console.WriteLine("All Done");
  }
So far we have created and started tasks as two separate statements. It turns out this is not typical for compute-based tasks. We can actually create and start the task as a single statement, replacing
Task t = new Task(Speak);
t.Start();
with
Task t = Task.Factory.StartNew(Speak);
In .NET 4.5 it is made even simpler: if you just require a task configured using some predefined defaults, you can use Task t = Task.Run(Speak). For the remainder of this chapter we will favor the factory-style approach as it will work in .NET 4.0 and 4.5. It also provides more flexibility to configure the task’s behavior, something you will use in subsequent chapters.
As mentioned earlier, compute-based tasks run on OS threads, so where does this thread come from? There are two obvious possibilities: either a new thread is created, or you schedule the work to run on a reusable thread pool thread. As you will see in later chapters, to make your application fast and fluid and scalable, you may be creating lots of small, asynchronous units of work. It is therefore logical that, by default, compute-based tasks are assigned to thread pool threads. To confirm this, you can run the code in Listing 3-3.
Listing 3-3. Thread Pool Thread
static void Main(string[] args)
{
  Task.Factory.StartNew(WhatTypeOfThreadAmI).Wait();
}
private static void WhatTypeOfThreadAmI()
{
  Console.WriteLine("I'm a {0} thread" ,
                    Thread.CurrentThread.IsThreadPoolThread ? "Thread Pool" : "Custom");
}
So what if you want to have a long-running, asynchronous operation? As mentioned in Chapter 2, using a thread pool for this purpose would be considered an abuse of the thread pool. However, the creators of the TPL wanted to ensure that users have a uniform API irrespective of the type of asynchronous operation; you don’t want to have to resort to old-style APIs.
When you create a task, in addition to supplying the Action delegate, hints can be supplied on how to create the task. These hints are known as task creation options and are represented as the enumeration type TaskCreationOptions. Listing 3-4 shows the creation of a long-running task. Long-running tasks will run on their own, newly created, dedicated thread, which is destroyed once the task has completed.
Listing 3-4. Long-Running Task
static void Main(string[] args)
{
  Task.Factory
      .StartNew(WhatTypeOfThreadAmI, TaskCreationOptions.LongRunning)
      .Wait();
}
There are many more creation options, and the options can be combined using the | operator. We will discuss the other options as required throughout this book.
Passing Data into a Task
So far you have simply created a task and assumed the method has all the necessary information to perform its function. Just as you generalize methods by adding parameters, you will want to do the same for tasks. You have seen that the StartNew method takes an Action delegate; this delegate takes no inputs and returns void. Consider the code in Listing 3-5.
Listing 3-5. Import Method: No Inputs, No Outputs
public class DataImporter
{
  public void Import()
  {
    // Import files from which directory ?
  }
}
The Import method takes no inputs and outputs and so, from what you have read so far, it could be executed as a Task body. But what if we want to pass the directory to import? It turns out there is another delegate type that the StartNew and Run method will take to represent the task body, Action<object>. This allows you to supply a method that takes a single parameter of type object (Listing 3-6).
Listing 3-6. Task Body with a Parameter
public class DataImporter
{
   public void Import(object o)
   {
     string directory = (string) o;
     . . .
   }
}

class Program
{
  private static void Main(string[] args)
  {
    var importer = new DataImporter();
    Task.Factory.StartNew(importer.Import,@"C:data");
  }
}
This approach does seem rather restrictive and smelly, but is certainly one of the most efficient ways of passing data to a task body. Another possibility is to have the data for the Import method supplied via instance fields of the DataImporter class (Listing 3-7).
Listing 3-7. Task Inputs Supplied via Instance Fields
public class DataImporter
{
   private readonly string directory;
   public DataImporter(string directory)
   {
     this.directory = directory;
   }
   public void Import()
   {
     // Import files from this.directory
   }
 }
This would then allow use of the simple Task.Factory.StartNew(importer.Import) with an Action delegate. However, this is not always convenient, as a single DataImporter may want to allow different import sources over time. Fortunately, .NET 2.0 and later versions support closures via anonymous methods (and lambdas in .NET 3.5). This allows you to make use of the compiler to build a class that contains all the items you want to flow into the task, plus a small method that ultimately calls the asynchronous functionality (Listing 3-8).
public class DataImporter
 {
   public void Import(string directory)
   {
     // Import files from this.directory
   }
 }
 class Program
 {
   private static void Main(string[] args)
   {
     var importer = new DataImporter();
     string importDirectory = @"C:data";

     Task.Factory.StartNew(() => importer.Import(importDirectory));   }
}
CLOSURES
During compilation, the compiler builds a class that contains an instance method containing the code used as part of the lambda, and public fields to hold any data the instance method requires from the outer scope. The following is an example of what the class may look like.
public class ImportClosure
{
public string importDirectory;
public DataImporter importer;
public void ClosureMethod()
{
importer.Import(importDirectory);
}
}
This class is instantiated when the first of the local variables used in the lambda is declared. The local variables are now no longer accessed directly via the stack, but instead via a stack-based reference to an instance of this generated class. The compiler then builds a delegate that matches the Action delegate pointing to the class instance method ClosureMethod. This method will obviously have access to the instance fields, and thus have access to the outer scope variables. The following code shows an example of how the C# compiler will rewrite Main to achieve the closure.
private static void Main(string[] args)
{
var closure = new ImportClosure();
closure.importer = new DataImporter();
closure.importDirectory = @"C:data";
Task.Factory.StartNew(closure.ClosureMethod);
}
Closures make passing data into a task very simple, and they are therefore the norm for passing data into tasks. They are not as efficient as passing in a single object, but they keep the code simple and easy to understand.
Closures provide a very convenient mechanism to flow local data into delegates. When the delegate is invoked synchronously there is no great need to understand what is going on under the covers; however, the same is not true for asynchronous invocation of the delegate. If you are not aware of the mechanics of closures, please do read the previous sidebar before proceeding. Let us first examine the following piece of code in Listing 3-9.
for (int i = 0; i < 10; i++)
{
  Task.Factory.StartNew(() => Console.WriteLine(i));
}
Console.ReadLine();
The obvious intent of the code is to print out all the numbers from 0 to 9. They won’t necessarily be in order, because you are simply issuing work to the thread pool infrastructure, and thus you have no control over the order in which the tasks will run. Run the code and you will perhaps find a much more unexpected result. You will most likely have seen ten 10s on the screen. This seems very strange, as you may well have expected only to see a set of unique values from 0 to 9; but instead you see the same value printed out, and not even one of the expected values. The cause lies with the closure; the compiler will have had to capture local variable i and place it into a compiler-generated object on the heap, so that it can be referenced inside each of the lambdas. The question is, when does it create this object? As the local variable i is declared outside the loop body, the capture point is, therefore, also outside the loop body. This results in a single object being created to hold the value of i, and this single object is used to store each increment of i. Because each task will share the same closure object, by the time the first task runs the main thread will have completed the loop, and hence i is now 10. Therefore, all 10 tasks that have been created will print out the same value of i, namely 10.
To fix this problem, you need to change the point of capture. The compiler only captures the variables used inside the closure, and it delays the capture based on the scope of the variable declaration. Therefore, instead of capturing I, which is defined once for the lifetime of the loop, you need to introduce a new local variable, defined inside the loop body, and use this variable inside the closure. As a result, the variable is captured separately for iteration of the loop.
Running the code in Listing 3-10 will now produce all values from 0 to 9; as for the order, well, that’s unknown and part of the fun of asynchronous programming. As stated earlier, closures are the most natural way to flow information into a task, but just keep in mind the mechanics of how they work, as this is a common area for bugs and they are not always as obvious to spot as this example.
Listing 3-10. Working Capture
for (int i = 0; i < 10; i++)
{
   int toCaptureI = i;
   Task.Factory.StartNew(() => Console.WriteLine(toCaptureI));
}
Console.ReadLine();
This classic gotcha with asynchronous delegates has been addressed to some degree with C# 5. The piece of code defined in this sidebar when compiled using the C# 4 compiler will result most likely in all 9s. However, compiling it under C# 5 will produce all values 0 to 9, although in an unknown order. The reason for this is that in the case of foreach, the compiler team has moved the point of capture to inside the loop automatically. Personally I don’t like the fact that a foreach loop behaves differently than a for loop; also, it introduces inefficiency when we are not invoking the delegate asynchronously.
foreach( List<int> i in new List<int> {0,1,2,3,4,5,6,7,8,9} )
{
Task.Factory.StartNew(() => Console.WriteLine(i));
}
Console.ReadLine();
Returning Data from a Task
Up to now we have just examined the notion of passing data into a task, but tasks can also be used to return results. Have you ever wondered what the chances are of winning a lottery that has 49,000 possible numbers of which you have to pick the 600 that are selected on the given night? You probably already know your chances of winning are slim, but Listing 3-11 contains partial implementation of the code necessary to calculate the odds.
Listing 3-11. ACME Lottery—The Odds Are with Us
BigInteger n = 49000;
BigInteger r = 600;

BigInteger part1 = Factorial(n);e
BigInteger part2 = Factorial(n - r);
BigInteger part3 = Factorial(r);

BigInteger chances = part1/(part2*part3);
Console.WriteLine(chances);
Executing this code sequentially will only use one core; however, since the calculation of part1, part2, and part3 are all independent of one another, you could potentially speed things up if you calculated those different parts as separate tasks. When all the results are in, do the simple divide-and-multiply operation—TPL is well suited for this kind of problem. Listing 3-12 shows the refactored code that takes advantage of TPL to potentially calculate all the parts at the same time.
BigInteger n = 49000;
BigInteger r = 600;

Task<BigInteger> part1 = Task.Factory.StartNew<BigInteger>(() => Factorial(n));
Task<BigInteger> part2 = Task.Factory.StartNew<BigInteger>(() => Factorial(n-r));
Task<BigInteger> part3 = Task.Factory.StartNew<BigInteger>(() => Factorial(r));

BigInteger chances = part1.Result/(part2.Result*part3.Result);
Console.WriteLine(chances);
The code in Listing 3-12 is using a different form of StartNew. This form of StartNew has the following method signature:
public Task<TResult> StartNew<TResult>(Func<TResult> function);
The generic argument TResult identifies the type of result the task will return. For the task to be able to return a result of this type, the signature of the delegate used to represent the task body will also need an identical return type. So instead of supplying an Action delegate, now you use a Func<TResult>. Furthermore, StartNew<T> now returns not a Task but a Task<TResult>. This has an additional property called Result, which is used to obtain the result of the asynchronous operation. This property can only yield the result once the asynchronous operation has completed, so making a call to this property will block the calling thread until the asynchronous operation has completed. In Listing 3-12 three tasks will be created, each performing its part of the calculation in parallel. Meanwhile, the main thread moves forward to attempt to calculate the overall chance by combining the results from all the parts. As each part result is required by the main thread, it blocks until that result is available before evaluating the next part of the expression.
One key advantage TPL has over previous asynchronous APIs is that the asynchronous code in Listing 3-12 is not radically different in structure from the sequential code in Listing 3-11. This is in general contrast to asynchronous APIs of the past, which often required radical change to the structure of the algorithm, thus often overcomplicating the code. This was one of the key API guidelines.
FUTURES
In the very early days of the TPL Community Technology Preview (CTP), there was no Task<T>; it was called Future<T>. Personally I loved this as it added a certain elegance to your code. It allowed me to declare a variable here that would have a value at some point in the future. In the end, though, the design team rejected it in favor of general consistency.
So far we have only discussed compute-based asynchronous operations. When code executes, it clearly use CPU resources, but it often requires other resources too. These could take the form of I/O (e.g. disk); often code is written to utilize one of these resources and not proceed until the resource has completed the requested operation. Having user interface threads block for some I/O, even for just 250 milliseconds, can cause your application to feel annoyingly unresponsive. It therefore makes sense to request the resource asynchronously. Ask the resource for what you want, but don’t wait for it to complete. While the resource is completing the request, use the CPU to keep the UI responsive. Once the resource has signaled it is done, use the CPU to obtain and process the response. It’s not just in the world of UI applications where this is applicable. Consider an application wishing to make two independent web service calls; it makes sense to have it make the calls asynchronously rather than wait for the first call to complete before initiating the second. Once both results are in, then it can continue processing. In effect, you want to overlap as many requests as you can to take advantage of all resources available. Consider the code in Listing 3-13.
static void Main(string[] args)
{
  string download = DownloadWebPage("http://www.rocksolidknowledge.com/5SecondPage.aspx");
  Console.WriteLine(download);
 }

 private static string DownloadWebPage(string url)
 {
   WebRequest request = WebRequest.Create(url);
   WebResponse response = request.GetResponse();
   var reader = new StreamReader(response.GetResponseStream());
   {
     // this will return the content of the web page
     return reader.ReadToEnd();
    }
  }
Executing the code produces a flashing cursor, leaving the user wondering if this is actually doing something or just hung. The main thread is blocking on the reader.ReadToEnd() until all the data arrives from the web site. What you would rather do is keep the main thread active and doing something to keep the user happy. With what you have learned so far you could easily fix this, with the creation of a DownloadPageAsync method (see Listing 3-14).
![]() Note The convention for .NET 4.5 is that asynchronous methods are identified with the suffix Async.
Note The convention for .NET 4.5 is that asynchronous methods are identified with the suffix Async.
 private static Task<string> DownloadWebPageAsync(string url)
 {
   return Task.Factory.StartNew(() => DownloadWebPage(url));
 }
Now that you have an asynchronous version of DownloadWebPage, you can modify Main to take advantage of its asynchronous nature (Listing 3-15).
Task<string> downloadTask = DownloadWebPageAsync("http://www.rocksolidknowledge.com/5SecondPage.aspx");

while (! downloadTask.IsCompleted)
{
  Console.Write(".");
  Thread.Sleep(250);
}
Console.WriteLine(downloadTask.Result);
The IsCompleted property on the task allows you to determine if the asynchronous operation has completed. While it is still completing, the task keeps the user happy by displaying dots; once it completes, you request the result of the task. Since you know the task has now completed, the result will immediately be displayed to the user.
This all looks good until you start to analyze the cost of achieving this asynchronous operation. In effect you now have two threads running for the duration of the download: the one running inside Main and the one attempting to get the response from the web site. The thread responsible for getting the content is spending most of its time blocked on the line reader.ReadToEnd(); you have taken a thread from the thread pool, denying others the chance to use it, only for it to spend most of the time idle.
A far more efficient approach would be to create a thread to request the data from the web server, give the thread back to the thread pool, and when the data arrives, obtain a thread from the pool to process the results. To achieve this prior to .NET 4.5, the I/O methods in the library use the APM idiom seen in Chapter 2:
public virtual IAsyncResult BeginGetResponse(AsyncCallback callback, object state);
public virtual WebResponse EndGetResponse(IAsyncResult asyncResult);
You could write your download code using this API, but you would actually like to continue to keep the DownloadAsync method returning a Task<string>—remember, the general goal of TPL is to represent every asynchronous operation as a task. To enable this, there is yet another way to create a task called Task.Factory.FromAsync. This method takes an IAsyncResult to represent the lifetime of the task and a callback method to call when the asynchronous operation has completed. In the case where the task being created is a Task<T>, this method has the role of producing the result for the task, so it will return a value of type T. The code in Listing 3-16 is making more efficient use of the thread pool by only consuming a thread when data arrives back from the web site. No threads are consumed from the pool while you are waiting for a response.
private static Task<string> BetterDownloadWebPageAsync(string url)
{
   WebRequest request = WebRequest.Create(url);
   IAsyncResult ar = request.BeginGetResponse(null, null);

   Task<string> downloadTask =
       Task.Factory
       .FromAsync<string>(ar, iar =>
       {
         using (WebResponse response = request.EndGetResponse(iar))
         {
            using (var reader = new StreamReader(response.GetResponseStream()))
            {
               return reader.ReadToEnd();
            }
         }
        });

        return downloadTask;
  }
Although this approach feels far more complex than simply wrapping a piece of long-running code in a task, it is a far more efficient use of the thread pool, keeping the number of threads as small as possible for the same level of concurrency. This is advantageous because threads are not free to create and consume memory.
To simplify things further, in .NET 4.5 the I/O libraries have gotten some love and now offer asynchronous calls that return tasks, removing the need to wrap up old-style APIs with FromAsync:
public virtual Task<WebResponse> GetResponseAsync();
We will take advantage of this method later in the chapter, in the section “Chaining Tasks (Continuations)”.
So far we haven’t considered what happens if things don’t go as expected. What should happen when you execute code in the context of a task that throws an unhandled exception? Having the process continue oblivious to this unhandled exception will, we hope, leave a bad taste in your mouth; after all you don’t know what state the overall process is in (have any shared data structures been left in an inconsistent state?).
It is therefore hard to say if it is safe for the process to continue. In .NET 1.1 unhandled exceptions on a custom thread just caused the thread to die. This created a problem with regard to the finalizer thread, in that it could terminate because an objects finalizer threw an unhandled exception, resulting in no more finalization taking place, and causing a long-term memory leak. To fix this in .NET 2.0+, the behavior was changed so that an unhandled exception on any thread results in process termination. While this might initially feel bad—no one likes to see their process crash—it encourages programmers to fix the problem rather than crossing their fingers and hoping that the process limps on to better and greater things.
Regular .NET methods are synchronous calls, whereas tasks allow the calling of a method asynchronously. A method could produce a valid result or an exception, and so can be the case for a task. When a task completes, it can complete in one of the following states:
- Ran to Completion
- Canceled
- Faulted
Ran to Completion, as you would expect, means the root method of the task ended gracefully. Faulted implies that the task ended through an unhandled exception. We will discuss cancellation in the section of that name, later in this chapter.
The good news is that unlike raw threads, just because a task ends through an unhandled exception, it doesn’t mean the process is terminated—you will get the opportunity to see and handle the error. The most natural way to handle exceptions is to use try/catch. Placing the try/catch just around the task creation is obviously not going to cut it, as any exception resulting from the task body won’t happen until after the task has started. Delivering the exception on the thread that created the task at the point in time when the exception occurred is also not practical (or possible), as it would make it very hard to decide where to place the try/catch. The most logical place to deliver the exception is when another thread is waiting for the outcome of a given task—in other words, when a call is made to Task.Wait, Task.WaitAll, or Task.Result (see Listing 3-17).
Task task = Task.Factory.StartNew(() => Import(@"C:data2.xml"));

 try
 {
    task.Wait();
 }
catch (Exception e)
{
  Console.WriteLine("Error : {0}",e);
}
private static void Import(string fullName)
{
  XElement doc = XElement.Load(fullName);
  // process xml document
}
In Listing 3-17, even if the Import method fails before we hit the Wait method call, the task object will hold onto the exception and re-throw it when the call to Wait is made. This all looks nice and simple—however, there is a twist. Let us say that the 2.xml file contains invalid XML. It would therefore seem logical that the type of exception being delivered would be an XML-based one. In fact what you will get is an AggregateException. This seems a little odd at first, since AggregateException implies many exceptions, and in this situation it looks like you could only get one exception. As you will see later in this chapter, tasks can be arranged in a parent/child relationship, whereby a parent won’t be deemed completed until all its children have been. If one or many of those children complete in a faulted state, that information needs to propagated, and for that reason TPL will always wrap task-based exceptions with an AggregateException.
The role of an exception is twofold: first, to provide some error message that is normally understood by a developer; and second, to indicate the type of fault so that we construct the appropriate catch blocks to handle or recover from the error. Catching an AggregateException is probably not detailed enough to find the root cause of the error, so you need to crack open the aggregate exception and examine the underlying exceptions. The underlying exceptions are found via the InnerExceptions property on the AggregateException (Listing 3-18).
try
{
  task.Wait();
}
catch (AggregateException errors)
{
  foreach (Exception error in errors.InnerExceptions)
  {
    Console.WriteLine("{0} : {1}" , error.GetType().Name,error.Message);
  }
}
This is somewhat cumbersome, made even more so in that it is possible that a given inner exception can also be an aggregate exception requiring another level of iteration. Thankfully the AggregateException type has a Flatten method that will provide a new AggregateException that contains a single, flat set of inner exceptions (Listing 3-19).
catch (AggregateException errors)
{           {
  foreach (Exception error in errors. Flatten().InnerExceptions)
  {
     Console.WriteLine("{0} : {1}" , error.GetType().Name,error.Message);
  }
}
As explained earlier, the role of an exception handler is to look at the exception type and decide how to recover from the error. In the case of AggregateException errors, that would mean iterating through all the inner exceptions, examining each type in turn, deciding if it can be handled, and if not re-throw it and possibly any others that can’t be handled.
This would be extremely tedious. So there is a method on the AggregateException called Handle, which reduces the amount of code you would need to write, and perhaps gets closer to the traditional try/catch block. The Handle method takes a predicate style delegate that is given each exception in turn from the AggregateException. The delegate should return true if the exception has been handled and false if the exception can't be handled. At the end of processing all the exceptions, any exceptions not handled will be re-thrown again as part of a new AggregateException containing just those exceptions deemed to have been unhandled.
Listing 3-20 shows code that catches an AggregateException and then only ignores the exception if it contains XML-based exceptions. Any other type of exception contained inside the AggregateException will be re-thrown as part of a new AggregateException. In essence the developer considers XML-based errors as not fatal, and is happy for the application to continue.
catch (AggregateException errors)
{
  errors.Handle(IgnoreXmlErrors);
}
private static bool IgnoreXmlErrors(Exception arg)
{
  return (arg.GetType() == typeof (XmlException));
}
There will be many scenarios where waiting on a task is not appropriate. The main purpose of asynchronous programming, after all, is to start asynchronous operations while letting the initiating thread move onto other things. This raises the question: What if I don’t wait for a task? What if I simply want to fire and forget? For example, an application may launch a task at regular intervals to attempt to update a cache in the background. The application may not care if the task fails occasionally, as this will just result in a cache miss when a user attempts to fetch some data that failed to be loaded into the cache. So while the application developer may feel it’s okay to just ignore any failures from the cache update task, is it really safe to do so? It turns out this will depend on the completion status of the task and the version of the .NET framework it is running under.
Under .NET 4.0, if a task ends in a faulted state you have an obligation to inspect the error, known as observing the error. Failure to do so can result in your application being forced to shut down at what appears to be some random time in the future. This behavior results from the fact that the TPL team decided it was bad practice simply to ignore errors (and I would agree). After all, exceptions are not thrown just for fun—they indicate some unexpected failure. The unexpected failure could result in your application being in an invalid state, and further execution could lead to further failures and corruption. The purpose of catching exceptions is to ensure, before processing continues, that the process remains in a valid state. Therefore, simply ignoring exceptions seems a very bad idea.
The question is, how does TPL know that you have decided to ignore the error? While you have a live reference to a task object, you have a chance to observe the error. But once you no longer have such a live reference, clearly you can’t observe any error associated with the task. Once there are no more live references to the task object, it becomes a candidate for garbage collection. The task object contains a finalizer; when it is created, it is registered on the finalization queue. When the garbage collector decides to throw out the task, it sees it has a registration on the finalization queue and therefore can’t remove it from memory just yet; instead it places the task on the reachable queue. The finalization thread eventually runs the finalizer for the task and, since no attempt has been made to observe the error, the error is rethrown on the finalization thread, thus ending the process.
The fact that this behavior is based on garbage-collection triggering means that there can be a long period of time between the task ending in a faulted state and the application terminating, making it very difficult to debug and sometimes not seen until the code hits production.
This isn’t quite the full picture. There is one final opportunity available to handle the exception: by registering for the UnobservedTaskException event declared on the task scheduler class. Before a task’s finalizer re-throws the exception, it fires this event, and any subscribers get a final chance to say they have observed the exception and it is safe to keep the process alive. This is indicated by calling the SetObserved method on the event arguments. Failure to do so will result in the exception being rethrown. Listing 3-21 shows code registering for the UnobservedTaskException event.
 TaskScheduler.UnobservedTaskException += HandleTaskExceptions;
. . .
static void HandleTaskExceptions(object sender, UnobservedTaskExceptionEventArgs e)
{
   Console.WriteLine(sender is Task);
   foreach (Exception error in e.Exception.InnerExceptions)
   {
     Console.WriteLine(error.Message);
   }
   e.SetObserved();
 }
While this satisfies the need not to have to wait on a task, it still means that an error may or may not be seen until some random point in the future, or in some cases never. Additionally, in the meantime code has been executing against a possible invalid state. Exceptions are generally best handled as close to the source as possible. This event handler is really only useful for logging, and possibly for highlighting to a developer that they should be observing the task for errors.
There was a backlash in the developer community about this general “random error notification” mechanism. In response to this criticism, Microsoft thus decided to change the behavior in .NET 4.5. The fix was simple: don’t re-throw the exception on the finalization thread. Offer it to any UnobservedTaskException subscriber, but don’t ever re-throw it on the finalization thread. In other words, if the programmer doesn’t take any action to handle errors, TPL will just simply swallow the error.
Run the code in Listing 3-22 under .NET 4.5 and the application will run forever; under 4.0 it will terminate at some point (for best results run under Release, using CTRL+F5). Try changing the infinite while loop to a simple Console.ReadLine() and you will see that it probably never crashes.
Task t = Task.Factory.StartNew(() => { throw new Exception("Boom!"); });
t = null;
var objects = new object[10000];
int i=0;
while (true)
{
   objects[i++] = new object();
   i = i % objects.Length;
 }
If you have .NET 4.5 installed, you can’t run the application under 4.0. What you can do, though, is request that 4.5 use the 4.0 behavior by supplying an application configuration file that contains the following:
<configuration>
  <runtime>
    <ThrowUnobservedTaskExceptions enabled="true"/>
  </runtime>
</configuration>
When running Listing 3-22 in .NET 4.0 and 4.5, you will notice that the Boom exception is never delivered in 4.5 but is in 4.0. The question begs to be asked: is this progress? In the view of the present authors: far from it. This new approach allows the less well-informed developer to spin up tasks in blissful ignorance of the fact that some of them could be failing. At least with the .NET 4.0 approach, they would eventually be punished. My personal preference is to ensure that your application deals with the exception as soon as possible. One option is to ensure that all fire-and-forget–style tasks have a body that contains a top-level try/catch block. Any expected exceptions will be dealt with, unexpected exceptions logged, and the application safely recycled.
Designing a sequential API is pretty much the bread and butter of any seasoned .NET developer. Building an asynchronous API, however, can require a bit more thought. Let us first consider the synchronous API shown in Listing 3-23.
public interface IImport
{
   void ImportXmlFiles(string dataDirectory);
}
Listing 3-24 shows the asynchronous version of this API. The differences are highlighted in bold. The most important difference is that the method now returns a Task as opposed to void, allowing the caller to determine when the asynchronous operation has completed. The other difference is that the name of the method has changed to include the suffix Async. Obviously this has no effect other than as an indicator to the programmer that this method executes asynchronously.
public interface IImport
{
  Task ImportXmlFiles Async(string dataDirectory);
}
If the method did not originally return void but some other type, then the method would return a Task<T>, allowing the caller the opportunity to obtain the result. This all looks relatively straightforward; however, the fact that we are now invoking a method asynchronously often means that we need to add additional requirements to the method. Perhaps we want to be able to cancel the asynchronous operation if it is taking too long, or we want to get some idea of progress to determine if it is worth waiting a bit longer. Historically it was left to the developer to create their own mechanisms to deliver this functionality. As of .NET 4.0 there was a standard way to deliver cancellation, and .NET 4.5 introduced a standard way to deliver progress.
Cancellation
As mentioned, asynchronous operations may need to be stopped, either when the user gets bored waiting, or the application simply doesn’t require the result anymore. What isn’t acceptable is simply aborting the task mid-flow, as it may be in the process of transitioning some process-wide state, and aborting it at that point could leave the process in an invalid state, causing future errors. Any method of cancellation requires cooperation from the asynchronous operation itself. The operation will define points in its execution where cancelling is safe. In effect the cancellation is politely requested, and the asynchronous operation will act on it when it can. It is therefore possible that an asynchronous operation can be requested to cancel but still complete successfully. To implement such a protocol, .NET 4.0 introduced two new types: CancellationTokenSource and CancellationToken. These two types coordinate the cancellation. The cancellation token source is used by the party wishing to request the cancellation; the cancellation token is given to each asynchronous operation you wish to be able to cancel. You can now evolve your interface as shown in Listing 3-25.
public interface IImport
{
   Task ImportXmlFilesAsync(string dataDirectory);
   Task ImportXmlFilesAsync(string dataDirectory, CancellationTokenct);
}
Note you have not simply modified our original asynchronous method; you have added a new one, as not everyone will want the ability to cancel. To call the method with the cancellation token, you obviously need to have one. The cancellation token comes from a cancellation token source; as stated earlier, the cancellation token source is the object that is used by the part of the code wishing to initiate the cancellation process. Listing 3-26 shows some code taking advantage of this API, by first creating a cancellation token source, and then extracting the token from the source and passing the token to the asynchronous method—the same token can be passed to many asynchronous methods. If the user wishes to cancel all operations that have access to the token, the Cancel method on the cancellation token source is called. This simply changes the state of CancellationToken to cancelled.
public static void DataImport(IImport import)
{
   var tcs = new CancellationTokenSource();
   CancellationToken ct = tcs.Token;

   Task importTask = import.ImportXmlFilesAsync(@"C:data", ct);

   while (!importTask.IsCompleted)
   {
     Console.Write(".");
     if ( Console.KeyAvailable && Console.ReadKey(true).Key == ConsoleKey.Q)
     {
       tcs.Cancel();
     }
     Thread.Sleep(250);
   }
  }
The second part to this protocol is responding to the polite request from the cancellation token source to cancel. There are two opportunities for this: before and during execution of the asynchronous operation. Remember that creating and starting a task doesn’t mean immediate execution; it may be on the thread pool queue waiting to execute (more accurately, with a scheduler waiting to be run). Therefore, in order for the task infrastructure not to execute a task that has been requested to cancel, it also needs to have knowledge of the cancellation token. Listing 3-27 shows the cancellation token being passed to the StartNew method.
public Task ImportXmlFilesAsync(string dataDirectory, CancellationToken ct)
{
  return Task.Factory.StartNew(() =>
  {
     foreach (FileInfo file in new DirectoryInfo(dataDirectory).GetFiles("*.xml"))
     {

        // convenient point to check for cancellation

        XElement doc = XElement.Load(file.FullName);

        InternalProcessXml(doc);

      }
   }, ct);
}
Once the asynchronous operation is executing, it is the responsibility of the task to decide when it is safe to act on a cancellation request. The cancellation token object has a property called IsCancellationRequested. This is set to true if the Cancel method on its associated cancellation-token source object has been called. It would therefore seem intuitive to simply write some code as follows:
If ( ct.IsCancellationRequested) return;
This will appear to have the desired effect in that the asynchronous operation ends. The framework and ultimately the caller of the asynchronous method will care why the method ended. If it simply returns gracefully from the method, however, it will be impossible to tell if the method completed or was cancelled. We can’t just assume that because the task was asked to cancel, it indeed honored the request, since at the very moment you ask it to cancel, it could have completed. If it has completed it would be nice to have the result, irrespective if cancellation was requested. By simply returning, TPL just considers the task as having finished in a RanToCompletion state. To inform TPL that the asynchronous operation has indeed responded to cancellation, the operation must terminate by throwing an OperationCancelledException.
if (ct.IsCancellationRequested) throw new OperationCanceledException("Cancelled",ct);
![]() Note It is important that the cancellation token to which the code is responding is supplied as a parameter to the creation of the exception. Otherwise the task will have deemed to have completed in a Faulted state.
Note It is important that the cancellation token to which the code is responding is supplied as a parameter to the creation of the exception. Otherwise the task will have deemed to have completed in a Faulted state.
Fortunately there is a single method on the cancellation token that wraps this all up, called ThrowIfCancellationRequested:
ct.ThrowIfCancellationRequested();
![]() Note It is in fact essential that when a task is created, the cancellation token be supplied to TPL. Failure to do so will mean the task is never deemed to be in a cancelled state even if OperationCanceledException is thrown, and will end up in a Faulted state. This can have even greater repercussions in .NET 4, as tasks that end in a Cancelled state don’t need to be observed, whereas if we don’t observe the outcome of a task that ends in the Faulted state, the exception will be re-thrown on the finalizer thread.
Note It is in fact essential that when a task is created, the cancellation token be supplied to TPL. Failure to do so will mean the task is never deemed to be in a cancelled state even if OperationCanceledException is thrown, and will end up in a Faulted state. This can have even greater repercussions in .NET 4, as tasks that end in a Cancelled state don’t need to be observed, whereas if we don’t observe the outcome of a task that ends in the Faulted state, the exception will be re-thrown on the finalizer thread.
In addition to user-led cancellation, it is reasonable for asynchronous operations to be cancelled because they are taking too long to complete. Rather than supplying an additional time-out value, time-outs can be achieved via cancellation. When a CancellationTokenSource is created you can specify a time period after which cancellation will be trigged automatically. There is also a method, CancelAfter, that can be used on the CancellationTokenSource to set a time for when cancellation will be requested after creation. This feature is only available in .NET 4.5.
The API you have built contains two asynchronous methods, one that can provide cancellation and one that can’t. We don’t want to build two separate methods and just omit the cancellation logic; instead we can take advantage of a dummy cancellation token provided by TPL (in pattern-speak this is called the Null Pattern), which will never be signaled for cancellation. Listing 3-28 shows how we would implement a version of the asynchronous method that didn’t take a cancellation token.
public Task ImportXmlFilesAsync(string dataDirectory)
{
   return ImportXmlFilesAsync(dataDirectory, CancellationToken.None);
}
The techniques we have looked at so far work well when the code is in a position to keep polling the IsCancellationRequested flag. But what if your task is waiting on a handle, and it will not come out of the wait state until the handle is singled or a specified time out has elapsed? While it is in this wait state, you clearly can’t be checking for cancellation. Let us say that before loading a specific XML document, a named mutex must be acquired so as to ensure only one process at a time processes the document (Listing 3-29).
Mutex fileMutex = new Mutex(false,file.Name);
fileMutex.WaitOne();
The problem here is that while waiting for the mutex, you can’t handle cancellation requests. However, the cancellation token also has a wait handle, which is signaled on cancellation. So instead of just waiting on the mutex handle, you can now wait on multiple handles (Listing 3-30).
Mutex fileMutex = new Mutex(false,file.FullName);
WaitHandle.WaitAny(new WaitHandle[] {fileMutex, ct.WaitHandle});
ct.ThrowIfCancellationRequested();
WaitAny takes an array of wait handles. It will return when any of the handles are signaled, and the return value indicates which one.
Last, it is worth stating that a cancellation token source can only be used once—once signaled, it cannot be reset and used again.
The last addition to your asynchronous API is to add support for progress. Progress is typically represented by a percentage, but that isn’t always appropriate; during an install it might be nice to see what component is being installed. .NET 4.5 introduces a standard way to represent progress, via an interface IProgress<T>.
 public interface IProgress<in T>
 {
    void Report(T value);
 }
This is a very simple interface. The idea is that anyone wanting to view progress implements this interface, which then passes an instance of the object to an asynchronous method expecting an object of IProgress<T>. The asynchronous method then calls the Report method every time it wishes to report new progress. To add progress support to our asynchronous API, you could use the code in Listing 3-31.
public interface IImport
{
  Task ImportXmlFilesAsync(string dataDirectory);
  Task ImportXmlFilesAsync(string dataDirectory,CancellationToken ct);
  Task ImportXmlFilesAsync(string dataDirectory, CancellationToken ct,
                          IProgress<ImportProgress> progressObserver);
 }

 public class ImportProgress
 {
   public int OverallProgress { get; private set; }
   public string CurrentFile { get; private set; }

   public ImportProgress(int overallProgress, string currentFile)
   {
      OverallProgress = overallProgress;
      CurrentFile = currentFile;
    }
  }
The asynchronous method now looks like Listing 3-32.
public Task ImportXmlFilesAsync(string dataDirectory,
                               CancellationToken ct, IProgress<ImportProgress> progressObserver)
{
    return Task.Factory.StartNew(() =>
    {
       FileInfo[] files = new DirectoryInfo(dataDirectory).GetFiles("*.xml");
       int nFileProcessed = 0;
       foreach (FileInfo file in files)
       {
         XElement doc = XElement.Load(file.FullName);

         double progress = (double) nFileProcessed/(double) files.Length*100.0;
         progressObserver.Report(new ImportProgress((int)progress, file.FullName));

         InternalProcessXml(doc);
         nFileProcessed++;

         ct.ThrowIfCancellationRequested();
        }
      },ct);
  }
To consume progress reports you need to supply an object that implements IProgress<T>. In a UI application this could easily be implemented by the ViewModel, but this can sometimes get tedious, especially if you are simply updating a value on a progress bar. To keep things simpler, TPL provides an implementation of IProgress<T> called Progress<T>. This type is an adapter for the IProgress<T> interface allowing you to consume the progress either via a simple delegate or a traditional event subscription.
Task importTask = import.ImportXmlFilesAsync(@"C:data", ct ,
                                            new Progress<ImportProgress>(DisplayProgress));
. . .
private static void DisplayProgress(ImportProgress progress)
{
   Console.SetCursorPosition(0,0);
   Console.Write("Processing {0} {1}% Done", progress.CurrentFile,progress.OverallProgress);
}
Cancellation and Progress are by no means rocket science, but they are a welcome inclusion to TPL as they standardize this common requirement, simplifying the work of the developer, and allowing these concepts to flow into low-level APIs.
Up until now we have generally considered each task to be its own island of activity. We will now look at how we can chain tasks together and arrange them in parent-child relationships as shown in Figure 3-1.
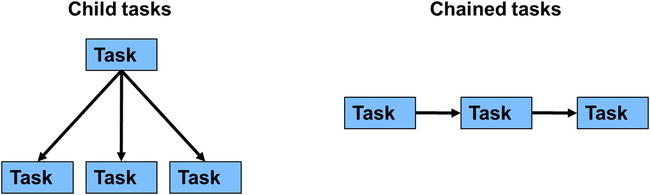
Figure 3-1. Task relationships
Chaining Tasks (Continuations)
In addition to creating tasks that are immediately ready to be run, TPL allows you to define a task that is not immediately scheduled to run, but is in a state of WaitingForActivation. The task moves into a WaitingToRun state once one or (in some cases) many antecedent tasks have completed. Listing 3-33 shows a piece of code that creates two such tasks, one with the normal StartNew method, the second with the ContinueWith method.
Listing 3-33. Simple Unconditional Continuation
Task<int> firstTask = Task.Factory
                      .StartNew<int>(() => { Console.WriteLine("First Task");return 42;});

Task secondTask = firstTask
     . ContinueWith(ft => Console.WriteLine("Second Task, First task returned {0}" , ft.Result));

secondTask.Wait();
The ContinueWith method creates the second task, which will be activated once the firstTask has completed. The delegate supplied to the ContinueWith method represents the secondTask body much in the same way as with StartNew, with one difference being that the method is passed a single parameter that represents the task from which this task is continuing. This allows results from one task to be flowed into another. The continuations defined thus far are unconditional—in other words, it doesn’t matter what state the previous task completes in; the second task will be activated. It may be the case that we only wish to run a subsequent task if the previous task ran to successful completion. Conditional continuation is achieved by specifying one of the TaskContinuationOptions (an extended list of TaskCreationOptions used with StartNew) as part of the call to ContinueWith (Listing 3-34).
Listing 3-34. Two-Conditional Continuation
Task secondTask = firstTask.ContinueWith( ProcessResult ,
                                TaskContinuationOptions.OnlyOnRanToCompletion);
Task errorHandler = firstTask.ContinueWith(st => Console.WriteLine(st.Exception),
                                TaskContinuationOptions.OnlyOnFaulted);
The code in Listing 3-34 does pose an interesting question: what if another piece of code was continuing from the secondTask or just simply waiting on whether the secondTask does actually complete all well and good? If the secondTask does not complete successfully, then the task continuing from this will never run. How TPL handles this is by making the secondTask enter a cancelled state, and thus not producing a deadlock.
One common use for OnlyOnFaulted continuations is to use them to handle any unhandled exception from the antecedent task to prevent unobserved task exceptions. Obviously you have to make sure that this task can’t throw an unhandled exception. I have seen code that just swallows the exception and so there is no risk of further exceptions. Personally I don’t like the idea of having errors swallowed; at a minimum they should be logged.
![]() Note It is not necessary to create the continuation before the antecedent task has finished. If the antecedent task has already finished, then the continuation task will simply be created in the Waiting to Run state.
Note It is not necessary to create the continuation before the antecedent task has finished. If the antecedent task has already finished, then the continuation task will simply be created in the Waiting to Run state.
Why Use Continuations?
Chaining tasks together seems rather odd at first. Why have task A run and then, when it is completed, run task B? After all, couldn’t you just combine the functionality of tasks A and B into a single task. That can certainly be true for compute-based tasks, but what if task A were an I/O-based task, and task B were a compute-based task designed to process the data returned from the I/O based task. We can’t simply combine this functionality into a single task, but what we can do is use a continuation. Listing 3-35 demonstrates this approach. It has the advantage that no thread pool thread is in use while waiting for a response from the web server, but once a response is received the continuation is now ready to run on a thread pool thread, and once running it proceeds to download the content.
Listing 3-35. Continuing from an I/O-Based Task
private static Task<string> DownloadWebPageAsync(string url)
{
   WebRequest request = WebRequest.Create(url);
   Task<WebResponse> response = request.GetResponseAsync();

   return response
        .ContinueWith<string>(grt =>
         {
           using (var reader = new StreamReader(grt.Result.GetResponseStream()))
           {
              return reader.ReadToEnd();
           }
         });
}
Earlier we alluded to the fact that continuations could be based on not just one task but many. Consider the following scenario: a large data set has an algorithm applied to it, and then once completed, a summary of the results is produced. Assuming the large data set can be broken down into isolated parts, we can create many tasks to run the algorithm against a small portion of the overall set, with a summary task defined as a continuation that will run upon completion of the all the algorithmic tasks (Listing 3-36).
Listing 3-36. Asynchronous Fork and Join
Task[] algorithmTasks = new Task[4];
for (int nTask = 0; nTask < algorithmTasks.Length; nTask++)
{
   int partToProcess = nTask;
   algorithmTasks[nTask] = Task.Factory.StartNew(() => ProcessPart(partToProcess));
}
Task.Factory.ContinueWhenAll(algorithmTasks, antecedentTasks => ProduceSummary());
Another continuation based on many tasks is ContinueWhenAny. As the name suggests, this can be used to continue when any one of the tasks in the array completes. This does sound very attractive for situations where, for example, you query three servers for a result and the first one back wins. However, this method is fraught with complexity. The continuation will fire irrespective of how a task completes, and you can’t use the OnXXXX TaskContinuation options for the ContinueWhenAll/Any calls to remedy this. This obviously means that if the first task to complete does so in a Faulted state, then later successes will go unobserved. Even if the continuation fires successfully in .NET 4.0, you may still want to handle any errors from the remaining tasks, so as not to fall afoul of unobserved task exceptions. We will look at simpler techniques to get this behavior in Chapter 7; these use async and await.
Continuations are a very powerful technique to keep the number of active threads to a minimum and, most important, to allow asynchronous operations executing in different contexts to be chained together. We will make further use of continuations in Chapter 6 when we look at tasks and user interfaces.
During the execution of a task, TPL allows for the task itself to create other tasks. These other tasks are called either nested or child tasks depending on how they are created. Nested tasks have no impact on the task that created them; the only thing of interest here is that the nested tasks will be entered onto the work-stealing queue of the thread that creates it, as opposed to the shared queue.
If you were to run just the code in Listing 3-37, there would be very little likelihood of the Nested message appearing, since the outer task will finish immediately after the nested task has been created.
Listing 3-37. Nested Task
 Task.Factory.StartNew(() =>
 {
   Task nested = Task.Factory.StartNew((() => Console.WriteLine("Nested..")));
 }).Wait();
Modifying the code slightly to make the nested task a child task will result in the parent not being seen to have completed until its child has completed, and thus will guarantee the Nested message will be displayed. To make a nested task into a child task, supply a TaskCreationOption of AttachedToParent when the task is created, as shown in Listing 3-38.
Listing 3-38. Child Task
Task.Factory.StartNew(() =>
 {
 Task child = Task.Factory.StartNew(() => Console.WriteLine("Nested.."),                                                                    TaskCreationOptions.AttachedToParent);
TaskCreationOptions.AttachedToParent);
 }).Wait();
The other effect of creating a child task as opposed to a nested task is around exception handling. Any unhandled exception originating from a child task is propagated to the parent. Any code acting on the result of the parent will see all the child-task exceptions as part of the aggregate exception.
In addition to being able to create a task as a child, it is also possible to prevent tasks from becoming children, by creating the parent task with the TaskCreationOptions of DenyChildAttach. If an attempt is made to create a child task, it is simply ignored and made a nested task. A possible use of this flag is to allow a library to expose tasks without fear that they will need to handle exceptions from code of which it has no knowledge.
![]() Caution Creating the parent task using Task.Run will prevent the child task from attaching. This is because the implementation of Task.Run creates the task using the TaskCreationOptions of DenyChildAttach.
Caution Creating the parent task using Task.Run will prevent the child task from attaching. This is because the implementation of Task.Run creates the task using the TaskCreationOptions of DenyChildAttach.
Why Use Child Tasks?
Let us revisit the asynchronous importer we presented earlier. Listing 3-39 is provided to save you skipping back.
Listing 3-39. Asynchronous XML File Importer
public Task ImportXmlFilesAsync(string dataDirectory, CancellationToken ct)
{
  return Task.Factory.StartNew(() =>
  {
     foreach (FileInfo file in new DirectoryInfo(dataDirectory).GetFiles("*.xml"))
     {
        XElement doc = XElement.Load(file.FullName);

        InternalProcessXml(doc);

      }
   },ct);
}
You could improve the performance of this piece of code by running the loading and processing as separate tasks. You don’t really want to add complexity to the ImportXmlFilesAsync method by returning many tasks. You can simply make the body of the foreach loop create a child task. The complexity of using multiple, finer-grained tasks is then hidden from the consumer, and as such will continue to see a single task to represent the overall import process. Listing 3-40 shows the refactored code now using many finer-grained tasks to process many XML files at once.
Listing 3-40. Parallel XML File Import
public Task ImportXmlFilesAsync(string dataDirectory, CancellationToken ct)
{
            return Task.Factory.StartNew(() =>
            {
                foreach (FileInfo file in new DirectoryInfo(dataDirectory).GetFiles("*.xml"))
                {
                    string fileToProcess = file.FullName;
                    Task.Factory.StartNew(_ =>
                        {
                            // convenient point to check for cancellation

                            XElement doc = XElement.Load(fileToProcess);

                            InternalProcessXml(doc,ct);
                        }, ct, TaskCreationOptions.AttachedToParent);
                }
            }, ct);
 }
Conclusion
The introduction of the TPL tasks for the first time in the .NET framework provides a consistent way to represent asynchronous activity, be it local compute, I/O, or even via third-party libraries for GPU-based computing. This drive for consistency is not limited just to tasks but also includes TPL as a whole with the creation of cancellation and progress primitives, resulting in consistent and familiar asynchronous APIs throughout the entire platform.
When designing and implementing your code from now on, consider how long each method may take to execute. Methods that use I/O-based resources should be written to be asynchronous, and all I/O operations inside the method should be asynchronous. Asynchronous methods are identified by the fact that they return a Task or Task<T> and have the suffix Async; follow this pattern to allow other developers to easily identify asynchronous methods. If possible, provide for progress and cancellation of asynchronous operations via the CancellationToken and IProgress<T> types. Leave methods that are pure compute synchronous, and allow the caller to decide to execute it asynchronously.
Last, remember that writing code that never blocks will most likely produce the most scalable solution.
It turns out creating tasks is the easiest part of asynchronous programming (it’s stuff your granny could write). The hard part of asynchronous programming that requires skill is getting the tasks to cooperate with one another and scale—topics we will deal with in subsequent chapters.