
![]()
In Chapter 3 we used the Web Audio API to analyze audio by creating a simple visualization and a spectrogram. This chapter extends Chapter 3 by using the API to create music. To do this I introduce music theory and have a few examples before creating a web app that lets users create snippets of music using a basic synthesizer and to be able to move the snippets around the track to create their own music. This project is full of potential, so there are many routes you could take to modify it and make it your own, such as a full-fledged web-based Digital Audio Workstation.
Music Theory
This book is not about music theory, but in order to complete this project and to understand (or at least use) the Web Audio API it is quite important to understand the basics of music theory. Music is sound, and random sound is just noise, but since music is not noise, what makes music special? There are a number of aspects of music that are used to separate music from noise. These aspects include rhythm and tempo, but more importantly (from our point of view at least) it is the pitch and timbre that is at the heart of music, they are the aspects that create the instruments themselves. We do not need to be incredible musicians to create a tool that can be used for incredible music, we just need to focus on the aspects of the instrument itself and in this case our instrument is made using the Web Audio API and pitch is the frequency of the note.
So let’s start right at the beginning, what is a note? Simply put, a note is a sound wave of a specific wavelength (the frequency that causes the pitch). Notes are named alphabetically in order of pitch from A to G (well…sort of), so a D is higher than a C. I said sort of because notes actually loop, in octaves, from C to C so A is higher than C of the same octave but lower than the C of the octave above it. Each frequency can be represented (both linguistically and practically) in hertz (hz). Due to the position on a piano, the C at frequency 261.63hz is called Middle C and is generally used as the note that calculations are relative to. For example, an easy to remember frequency is 440hz “A above Middle C.”
Because every octave has the same notes at different frequencies and we already know a note is just a frequency itself, there must be a link between each octave because otherwise they fundamentally cannot be the same note. This link is ratio; each octave has the ratio of 2:1, so the wavelength of the note is double the octave before it. So to go from the A above Middle C to the A below Middle C we can simply do 440/2 = 220hz. This relationship is the fundamental concept behind harmony. Each note can be labeled with a number representing the octave, for obvious reasons, so for example Middle C is C3.
If you think of a piano, you will remember seeing the black keys spread in a pattern above the white keys; these keys are used to play the semitone (or half-step) between notes, which have a ratio of 2^(1/12). A semitone that is above a note will be its sharp, and the semitone below a note is its flat. So 466.16 is known as A# (A Sharp) or Bb (B Flat). These semitones are the most common example of “enharmonic equivalents” because they are technically two notes that are identical, the only difference being the direction of the music.
We don’t have a piano, or a guitar, or any other instrument, so how do we plan to make music? When I explained what a note is, I called its frequency a wavelength because it is generated by sound waves. As you probably know, all sound waves are generated through vibrations. So all we need is the final piece of the puzzle, an oscillator; this is the basis of all sound synthesis, because it allows us to produce sound waves using just a speaker. Sound envelope is a term often used in sound synthesis ‘that defines the sound of the wave, the term covers four components of sound: attack, decay, sustain, and release. By manipulating the sound envelope, you can begin to control the sound. Think of the differences between a piano and a triangle, they both have quite a high sustain (that is, they resonance for quite a while) but a triangle kind of “dings,” whereas a piano sounds for a lot longer (depending of course on how long you play the note) so there is more attack for a piano than a triangle. In practice, it is hard to perfectly synthesis any instrument due to the amount of physics involved (such as the properties of a wooden piano) but by manipulating each note it gives you a way to attempt to replicate the sound of music through simply oscillating a waveform of your choosing.
Each sound wave has a shape (waveform) that visually represents the amplitude of the note over time, this has a lot of physics that we do not need to be concerned with but basically the amplitude is how the speaker needs to move to produce the sound. There are four basic waveforms, which make the basis of all sounds (see Figure 5-1).
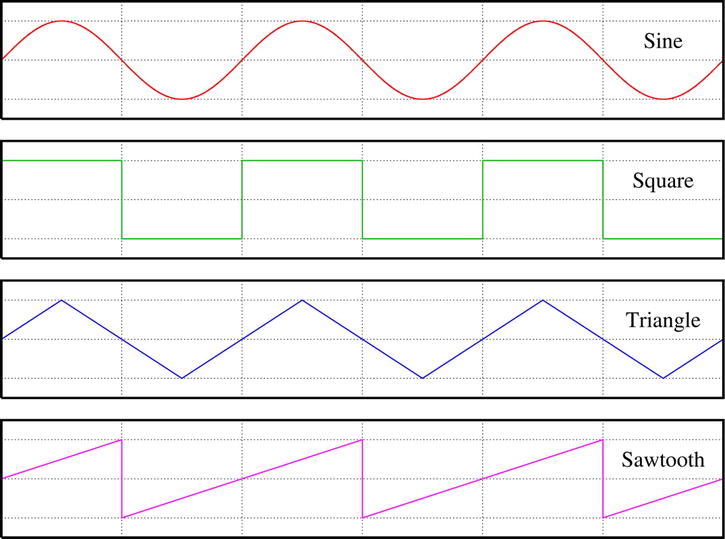
Figure 5-1. Examples of waveforms. https://en.wikipedia.org/wiki/File:Waveforms.svg
The four waveforms are
- Sine wave: This curved line follows the shape of the mathematical function sine.
- Square wave: A square wave is similar to binary, in that it is either at one frequency or the other.
- Triangle wave: The triangle wave is similar to the sine wave but is less smooth. This results in quite a sharp sound.
- Sawtooth wave: These waves are a combination of all the previous waves. This wave has the slow sharp sound of the triangle until it reaches the peak and then resets to the original frequency, much like the square wave.
Creating a Keyboard
Now that we’ve covered some basic theory, let’s knuckle down and create a keyboard. There are many ways we could do this, such as using DOM or canvas but because keys are basic rectangles I have decided the best route is SVG as it is vector. To make it easy to create the SVG and to bind events to the keys (so that they can actually be used), we will be using a library called svg.js (this can be found at www.svgjs.com). A piano has 88 keys (52 white and 36 black), because this is a lot of keys to fit into an on-screen keyboard I have decided to include only the middle 3 octaves, giving us 21 white keys. Now, it does not make sense to allow the keyboard to only be used by a mouse because you cannot (unless on a multi-touch screen) press multiple keys without using the keyboard. Of course, a QWERTY keyboard only has nine letters on the middle row so I have decided to take S to K as playable white keys and use A or L to go down or up an octave. This is not a perfect solution because you may want to play more than one octave at a time, but for this project it is enough.
Let’s start by defining an SVG using var keyboard = SVG('keyboard'); this creates an SVG with an id of keyboard that can be accessed using a variable of the same name. With the SVG created we can now start adding the keys, the white keys are the easiest since we can just create keys with the width (and position) of the SVG divided by the amount of keys needed. Because these are the white keys, we need to set the attributes so that fill is white and stroke is black. Another attribute we need to set is the id so that we can modify the background (for key press) of the key later, this will be set to "key"+i so that we can easily access each key by iterating over the 21 keys.
var keys = [];
for (var i = 0; i < 21; i++)  {
    keys[i] = keyboard.rect(width/21, height);
    keys[i].move(width/21 * i, 0);
    keys[i].attr({ fill: '#fff', stroke: '#000', id: "key"+i });
    // Event handlers go here
}
We need to add rectangles for the black keys also, but instead of being directly next to each other they are split into groups of 2 and 3, also the keys are just over half the height of the keyboard. To split the keys into groups, I have decided to keep it simple and just check to see whether i is one of the last keys of the group. If it is, then we add the width of a white key (width/21) to a variable called prevKey that we use to work out the position of the key.
var bkeys = [];
var prev = 0;
for (var i = 0; i < 15; i++)  {
    bkeys[i] = keyboard.rect(width/42, height / 1.7);
    bkeys[i].attr({ fill: '#000', stroke: '#000', id: "bkey"+i });
    bkeys[i].move(prev + (width/(21*1.3)), 0);
    prev = prev + width/21;
    if (i == 1 || i == 4 || i == 6 || i == 9 || i == 11)  {
        prev += width/21;
    }
   // Event handlers go here.
}
You now have a keyboard drawn to the screen, as seen in Figure 5-2.

Figure 5-2. The layout of the keyboard, consisting of three octaves
Now that we have the keyboard layout created, we need to add the event handlers so that we can play sound as well as highlighting the key that has been pressed. Because we have two types of input (keyboard and mouse), quite a few event handlers are needed. SVG.js allows us to easily bind an event handler to each key, which makes it easy to handle the mouse by binding mousedown and mouseup to the keys. The keypress and keyup events are handled by adding event listeners to the window, which is the normal way of handling events. To bind the keys to the notes, we need to set up arrays for the top row of keys being black and middle row being white. We also need two arrays for each because keypress and keyup have different ids for each key. To get the correct note, because there are not enough keys on a computer keyboard for all the notes, we need to add the note position (using S to K as an octave) to the amount of keys in the octave multiplied by the current octave; this means that for black keys we use i + octave * 5 and for white we use i + octave * 7. For the mouse events we need to use closures to keep the counter because we need to bind the events for each key by binding within the for loops we just made, but if we do this without a closure then it will use i = 21 instead of the correct value. When a key has been pressed it needs to change color and then change back once the key has been released (this is true whether using mouse or keyboard). For the sound we will use functions called playSound(n) and stopSound(n), where n is the count that was originally i before the closure. These changes are shown in Listing 5-1.
var keyboardKeys = [83,68,70,71,72,74,75];
var blackKeys = [69,82,89,85,73];

var keyboardPressKeys = [115,100,102,103,104,106,107];
var blackKeyPress = [101, 114, 121, 117, 105];

var octave = 1; // where octave 1 = middle C

var keys = [];
for (var i = 0; i < 21; i++)  {
    keys[i] = keyboard.rect(width/21, height);
    keys[i].move(width/21 * i, 0);
    keys[i].attr({ fill: '#fff', stroke: '#000', id: "key"+i });
    keys[i].mousedown ((function(n) {
        return function()  {
            var key = SVG.get("key"+n);
            key.fill({ color: '#f06' });
            playSound(n, false);
        }
    })(i));

    keys[i].mouseup((function(n)  {
        return function() {
            keys[n].fill({ color: '#fff' });
            stopSound(n, false);
        }
    })(i));
}

var bkeys = [];
var prev = 0;
for (var i = 0; i < 15; i++)  {
    bkeys[i] = keyboard.rect(width/42, height / 1.7);
    bkeys[i].attr({ fill: '#000', stroke: '#000', id: "bkey"+i });
    bkeys[i].move(prev + (width/(21*1.3)), 0);
    prev = prev + width/21;
    if (i == 1 || i == 4 || i == 6 || i == 9 || i == 11)  {
        prev += width/21;
    }

    bkeys[i].mousedown ((function(n) {
        return function()  {
            var key = SVG.get("bkey"+n);
            key.fill({ color: '#f06' });
            playSound(n, true);
        }
    })(i));

    bkeys[i].mouseup((function(n)  {
        return function() {
            bkeys[n].fill({ color: '#000' });
            stopSound(n, true);
        }
    })(i));
}

window.addEventListener('keypress', function(e) {
    for (var i = 0; i < keyboardPressKeys.length; i++)  {
        if (e.keyCode == keyboardPressKeys[i]) {
            var n = i + octave * 7;
            var key = SVG.get("key"+n);
            key.fill({ color: '#f06' });
            playSound(n, false);
        }
    }
    for (var i = 0; i < blackKeyPress.length; i++)  {
        if (e.keyCode == blackKeyPress[i]) {
            var n = i + (octave * 5);
            var key = SVG.get("bkey"+n);
            key.fill({ color: '#f06' });
            playSound(n, true);
        }
    }
    if (e.keyCode == 97 && octave > 0) --octave;
    if (e.keyCode == 108 && octave < 2) ++octave;
});

window.addEventListener('keyup', function(e) {
    console.log(e.keyCode);
    for (var i = 0; i < keyboardKeys.length; i++)  {
        if (e.keyCode == keyboardKeys[i]) {
            var key = SVG.get("key"+(i+octave*7));
            key.fill({ color: '#fff' });
            stopSound(i+octave*7, false);
        }
    }
    for (var i = 0; i < blackKeys.length; i++)  {
        if (e.keyCode == blackKeys[i]) {
            var n = i + octave * 5;
            var key = SVG.get("bkey"+n);
            key.fill({ color: '#000' });
            stopSound(n, true);
        }
    }
});
To play each note we need to have two arrays of oscillators, one for black and one for white. We connect each oscillator to a single gain node so that we have a node that we can use for recording the music, as well as potential for a volume changer. Obviously each oscillator needs to run at the correct frequency, we could automatically generate the frequencies but because we know exactly which keys will be used (and it is particularly awkward to generate them taking into consideration the gaps in the black keys) we can specify them in arrays like so:
var whiteNotes = [130.82, 146.83, 164.81, 174.61, 196, 220, 246.94, 261.63, 293.66, 329.63,
349.23, 392, 440, 493.88, 523.25, 587.33, 659.26, 698.46, 783.99, 880, 987.77];
var blackNotes = [138.59, 155.56, 185, 207.65, 233.08, 277.18, 311.13, 369.99, 415.3, 466.16, 554.37, 622.25, 739.99, 830.61, 932.33];
As you saw in the code for setting up the keys, the playSound and stopSound functions both take i and black as parameters so that we can know the position and the array that has the frequency for the note that is being played. Within playSound we select the oscillator and set both the frequency as well as the type and of course then turn it on using osc.noteOn(0).
- Sine wave = 0
- Square wave = 1
- Sawtooth wave = 2
- Triangle wave = 3
I have chosen sawtooth due to personal preference, but try them all and see what you think! The modified code is shown here:
function playSound(i, black) {
    stopSound(i, black);
    var freq;
    if (black) freq = blackNotes[i];
    else freq = whiteNotes[i];
    if (black) osc = ob[i];
    else osc = o[i];
    osc.type = 3;
    osc.frequency.value = freq;
    console.log(freq);
    osc.connect(gainNode);
    osc.noteOn(0);
    if (black) ob[i] = osc;
    else o[i] = osc;
}

function stopSound(i, black)  {
    if (black) osc = ob[i];
    else osc = o[i];
    if (typeof(o[i]) != "undefined") {
        osc.noteOff(0);
        osc.disconnect();
        osc = ctx.createOscillator();
    }
    if (black) ob[i] = osc;
    else o[i] = osc;
}
That’s all you need to create a playable keyboard! The Web Audio API handles most of the low-level sound management, so you only need to connect the nodes and play the notes. I’ve used SVG.js but you could use anything else, create it from scratch, or even use a vector program such as Adobe Illustrator to export SVGs.
Recording the Music
Now that we have a working keyboard, we want to be able to record it and playback the output. Later in the chapter we will be adding functionality to move the music clippings around a track, so we need to store the music. So that we can use this as a standalone app, without requiring a server or complicating things for the user by asking them to download and upload the music , we will use local storage as a way to easily store and retrieve the music. Local storage works using key-value pairs, so we are going to need to name the music (which can be done either by user input or generating it based on the size of the local storage) and we also need to store the music as a value—this is the tricky bit.
I am not a fan of reinventing the wheel (and as I said, it is quite tricky), so to record the music to a wav encoded blob I have decided to use Matt Diamond’s Recorder.js (this can be found at http://www.github.com/mattdiamond/Recorderjs). This library works by watching a specified Web Audio API channel, instead of connecting as normal, then enables a number of methods, including the method (exportWAV) that we will be using to get the audio as a blob.
![]() Note To use Recorder.js you must be on a web server because it uses web workers to improve performance. One way to do this on your computer is to run python -m SimpleHTTPServer.
Note To use Recorder.js you must be on a web server because it uses web workers to improve performance. One way to do this on your computer is to run python -m SimpleHTTPServer.
Let’s start setting up the recorder by making it watch the gain node we created earlier. After that is done in the constructor, we then start recording.
var recorder = new Recorder(gainNode, { workerPath: "../recorderWorker.js"});
recorder.record();
As you can see, this makes it very easy to watch any audio that goes from gainNode to the output hardware. Now we need to create a function for recording the sound as well as playing it. When we call the recordSound method we need to store the blob (that is, the audio) as text (because localStorage does not allow objects to be directly stored) so we convert the object using window.URL.createObjectURL. To play the music we dynamically create a new Audio element (no need to append it to the DOM though) that has the src linking to the URL stored in localStorage. To make it scalable, so we can have a lot of music clippings, each function has a parameter called name that then becomes the key to the localStorage (where the object url is the value). Due to the way object URLs are created, to use them in any way you need to add them as the src of an audio element. Due to inefficiencies of doing so for every clip, it is instead best to work out the duration while it is recording and to add it alongside the object URL as an object that is then made into a string using JSON.
function recordSound(name)  {
    recorder.exportWAV(function(blob) {
        var object =  {
            file: window.URL.createObjectURL(blob),
            size: recordEnd - recordStart
        }
        localStorage[name] = JSON.stringify(object);
        drawTimeline();
    });
}

function playAudio(id)  {
    var audio = new Audio(JSON.parse(localStorage[localStorage.key(id)]).file);
    audio.play();
}
Using Recorder.js allows us to painlessly record anything that the Web Audio API can produce, be that generated notes or an input such as guitar. This makes it easy to store the recordings on the client side and play them back.
Timeline
Now that we have the keyboard working and have everything set up for recording the audio, let’s create the interface. To avoid over complicating the project we will keep it simple and just have the keyboard with a timeline on which to put the music clippings, as well as buttons for recording and playing and stopping the timeline. When the page is loaded, the clips in the localStorage need to be represented as rectangles with a width proportional to the duration of the clip.
<!DOCTYPE html>
<html>
    <head>
        <title>Music Theory</title>
        <style>
            * { margin: 0; }
            body { background-color: #747e88; }
            a { color: #d4dfcf; cursor: pointer;}
            a:hover, a:focus  { color: #E4eee3; }

            .controls a { display: inline-block; padding: 10px; }
            .recording { background-color: #d68189; }
            #tracks  { height: 300px; width: 100%; }
            #keyboard  { height: 300px; position: relative; width: 100%; }
        </style>
    </head>
    <body>
        <div class="controls">
            <a id="record">Record</a>
            <a id="play">Play</a>
            <a id="stop">Stop</a>
        </div>

        <div id="tracks"></div>
        <div id="keyboard"></div>
        <script src="../svg.js"></script>
        <script src="../svg.draggable.js"></script>
        <script src="../recorder.js"></script>
        <script src="../recorderWorker.js"></script>
        <script src="script.js"></script>
    </body>
</html>
Starting with the buttons across the top of the page, each button needs an event listener for click events that have callbacks to do their specified task. The play and stop buttons just need to simply toggle a play variable that we will use to check whether the timeline bar for current time should be moving. The record button needs to toggle recording, this includes using the recorder to record the gain node, as well as toggling the recording class on the button and setting up the recordStart and recordEnd variables that are used to work out the duration. To get the name of the music clip we use a prompt. This could be done within the interface, but I used a prompt just for simplicity.
var toggleRecord = false;
var recordStart;
var recordEnd;
var recorder;
document.querySelector("#record").addEventListener('click', function() {
    if (!toggleRecord)  {
        recorder = new Recorder(gainNode, { workerPath: "../recorderWorker.js"});
        recorder.record();
        recordStart = Date.now();
        document.querySelector("#record").className = "recording";
        toggleRecord = !toggleRecord;
    }
    else  {
        recordEnd = Date.now();
        document.querySelector("#record").className = "";
        toggleRecord = !toggleRecord;
        recordSound(prompt("Name of sound clipping:"));
    }
});

document.querySelector("#play").addEventListener('click', function() {
    play = true;
});

document.querySelector("#stop").addEventListener('click', function() {
    play = false;
});
With the buttons ready, let’s start making the actual timeline. As with the keyboard, this uses SVG. An empty timeline simply has lines representing each track, so we need a variable for the amount of tracks (this makes it easy to change the amount needed) and to draw the lines we draw the amount of tracks + 1 so that it has a bottom border. The trackPos variable is used to know the height of each individual track, as well as to position each track in the correct place.
var timelineWidth = document.querySelector("#tracks").clientWidth;
var timelineHeight = document.querySelector("#tracks").clientHeight;
var tracks = SVG('tracks'),

var play = false;

var numOfTracks = 5;
var track = [];
var trackPos = timelineHeight/numOfTracks;

var clippings = [];
drawTimeline();
function drawTimeline()  {
    tracks.clear();

    for (var i = 0; i <= numOfTracks; i++)  {
        track[i] = tracks.line(0, timelineHeight/numOfTracks, timelineWidth, trackPos);
        track[i].move(0, trackPos * i);
        track[i].attr({ stroke: '#DAC8B0', id: "track"+i });
    }
   // Clippings go here
}
The music clippings are rectangles on the same SVG as the timeline, because they are part of it, that represent the music based on the duration of the clip. Each rectangle needs to be draggable so that they can be moved around the tracks. We could use event listeners like we did in Chapter 2, but since we are using SVG.js we can just use the plugin for it that is found at https://github.com/wout/svg.draggable.js. To make the rectangles draggable we just need to include the script, then call .draggable() on the rectangle. Because the rectangle is within the timeline SVG, making it draggable means it can drag within that SVG not over the other components of the app. That said, it can still be dragged outside the SVG but cannot be seen, so we need to stop it from going out of the bounds. We also need to snap the rectangles between the tracks, to do this we need to check that the rectangle is within the boundary of each track and if it isn’t, then to take the ceiling of the position so that it snaps to one of the tracks. Each rectangle also requires some text (that is moved with it) labeling the rectangle to the name of the music. In Figure 5-3 you can see how it looks when a few audio clippings have been recorded and placed in the timeline.
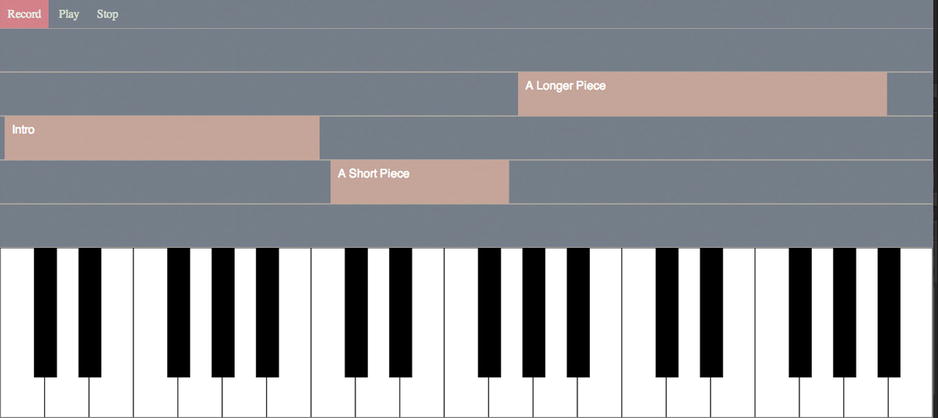
Figure 5-3. The finished project, showing the timeline with some pre-recorded music in separate tracks
In Listing 5-2, you can see the final modifications that are needed to make the rectangles draggable and snap on the timeline.
var clippings = [];
drawTimeline();
function drawTimeline()  {
    tracks.clear();

    for (var i = 0; i <= numOfTracks; i++)  {
        track[i] = tracks.line(0, timelineHeight/numOfTracks, timelineWidth, trackPos);
        track[i].move(0, trackPos * i);
        track[i].attr({ stroke: '#DAC8B0', id: "track"+i });
    }
    for (var i = 0; i < localStorage.length; i++)  {
        var clipping = JSON.parse(localStorage[localStorage.key(i)]);
        clippings[i] = tracks.rect(timelineWidth/120 * clipping.size/120, trackPos);
        clippings[i].attr( { fill: "#C6A49A" } );
        clippings[i].move(150, trackPos * 3);

        var text = tracks.text(localStorage.key(i)).move(clippings[i].x() + 10, clippings[i].y() + 10).front();
        text.attr( { fill: "#fff", id: "text"+i });

        clippings[i].draggable();
        clippings[i].dragend = (function(text)  {
            return function() {
                if (this.y() < 0)
                    this.move(this.x(), 0);
                if (this.y() > timelineHeight - trackPos)
                    this.move(this.x(), height - trackPos);
                else
                    this.move(this.x(), Math.ceil(this.y() / trackPos) * trackPos);
                text.move(this.x() + 10, this.y() + 10);
            }
        })(text);

        clippings[i].dragmove = (function(text)  {
            return function() {
                text.move(this.x() + 10, this.y() + 10);
            }
        })(text);
    }
}
The finalized code for the chapter can be found in the usual place, the downloadable complement to the book on the Apress website at www.apress.com/9781430259442 or on my own website at www.shanehudson.net/javascript-creativity.
Summary
We now have the beginning of a music creation web app. From here there are many paths you can go down, such as changing the tone of the notes or adding the ability to mute tracks. We will be integrating this music creation app into the media player that we will be creating in the next chapter. Hopefully this has given you a good taste of what the Web Audio API can do, as well as some experience with SVG and local storage.