
![]()
So far, we have taken a brief tour through the winding roads of sound and graphics. We started with canvas and explored the world of 2D and animations; from there we crossed into looking at the video and audio html elements and web audio API from which we used canvas for visualizing music by creating tools such as spectrograms. It was then back into graphics to dive head first into 3D worlds where we played with types of lighting and materials to learn how things affect one another. Chapter 5 seemingly dropped the graphics altogether (except from using SVGs of course) and focused purely on music, generating notes through JavaScript without requiring any plugins or audio files, just a browser that implements the web audio API. I would, however, like to focus a little bit more on audio files by extending from Chapter 3 (where we looked at the codecs that are used and introduced the web audio API) and creating that media player I keep mentioning.
This chapter ties up all the loose ends of the previous chapters. We will make a media player that includes the music creation from the previous chapter as well as creating a 3D visualizer (based on Steven Wittens’ js1k demo) that is less of a tool than the spectrogram and more like the art that you may remember seeing on media players such as Winamp.
Media Player
I would like to come at this from a different direction than the previous chapters. Earlier I taught you parts of a subject area, such as sound. Rather than teaching, I would like this chapter to feel more like a project to work on. There are so many ways to build a large app like this, as well as so many different features, that I’m going to define the specification of the app and it is your choice whether to tackle it the same way as I am or to take a different route.
Specification
Our music player must be client-side only, so there should be no reliance on servers except any that host music that is being played via a URL. There must be options from where to play the music, including the local machine and possibly services such as Tomahawk. Of course, as with any media player there must be pause, play, and stop buttons as well as functionality for at least one playlist. As I already mentioned, we will be integrating both the music creation app and a 3D visualizer into the media player. These will be integrated into the app but there is plenty of scope to take the app a lot further, such as developing a plugin system to separate out the functionality.
Where to Start
Now we need to think about the best way to organize the data and interface so that they are not too tightly linked but can affect each other. There are many ways to go about this, but because Backbone is very popular for doing exactly this, I am going to suggest we use Backbone. I am not going to presume any prior knowledge of it, although it isn’t a tutorial about it either, so I will quickly explain each part of it as it is needed.
The main function of a music player is to play the tracks within a playlist. So it makes sense to start with this functionality, where we can have a number of named playlists (the examples used are Latin and Reggae) that have tracks stored within them. The tracks should have a name, artist name, and URL. The URL can be used to play music from both local and remote sources, as well as the Data URIs that we used for storing the music in Chapter 5.
Models
In Backbone, there are both model and collection classes that can be created using Backbone.Model.extend() and Backbone.Collection.extend(), respectively. A model is simply an array that has been enhanced with Backbone features, and a collection is a way to store multiple models (this is a concept that is common in many programming languages but is not native within JavaScript). Each model can have defaults, which are simple objects used so that if part of the data is incomplete, then it will use the default. Collections have a property, called model, which defines the model class that should be used. I have decided to use a localStorage plugin for Backbone called backbone.localstorage.js, which can be added to the collection by adding the property localStorage: new Backbone.LocalStorage("playlists").
To do this we need to separate the entities into models, so that the Playlist model has a name as well as an array of Tracks so that there can be a list of playlists that each have tracks and a name of their own. Each Track model has the name, artist, and URL as explained previously. The reason that we need a model for each playlist rather than just a collection of tracks is that collections cannot be named and of course the purpose of playlists is to separate tracks often into meaningful playlists such as the genre of music.
var Track = Backbone.Model.extend({
  defaults: {
      title: "Unknown",
      artist: "Unknown",
      url: "Unknown"
  }
});

var Playlist = Backbone.Model.extend({
  defaults: {
      title: "Untitled Playlist",
      tracks: []
  }
});

var Playlists = Backbone.Collection.extend({
  model: Playlist,
  localStorage: new Backbone.LocalStorage("playlists")
});

var playlists = new Playlists();
We create views to display the models and collections using Backbone.View.extend(). A view is a way to encapsulate all the methods and event handlers of a model so that each looks after itself rather than worrying about lots of different data. It is also, perhaps more importantly, a way to connect to the data within the models to the templates that produce the HTML for rendering the data to the page. Usually one view would deal with a single model so that you would have to define just one model and one view. Unfortunately, views can handle collections but only as one collective model. We need to create list views that handle the model views, so that each model view can have an event attached to it rather than to the collection overall. So, to have an interface where there is both a list of playlist names as well as the playlist itself we need to have a list view for each as well as a view for each individual model. I have decided to call the list views PlaylistListView and TrackListView so that it is obvious they are list views. Of course I had to choose TrackList instead of Playlist so that the names were not duplicated and it is slightly more obvious what they mean. Each list has a view of the model it represents, PlaylistView and TrackView, of which there can be as many as needed per list view. Figure 6-1 shows a graphical representation of how these views are related.
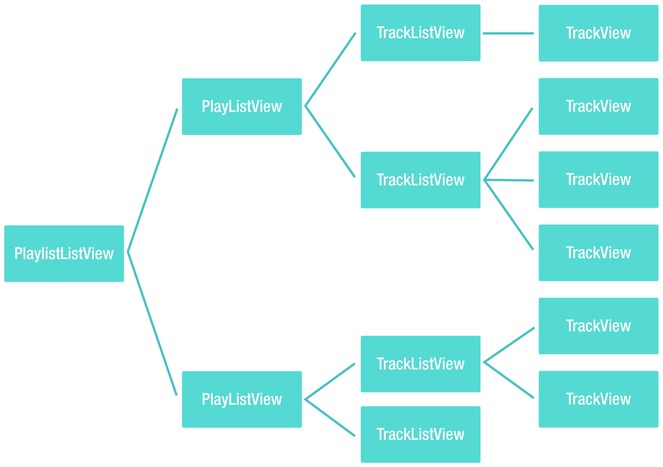
Figure 6-1. A diagram showing the views required for an interface that has two lists with clickable list items
The PlaylistListView is the view that lists each playlist by name, so it can be directly bound to a div with an id of playlists. This view is not responsible for any data that gets rendered to templates so we can go straight ahead and, inside the initialization, bind each model within the playlists collection to a function called renderItem that creates the playlistView for each playlist model in the collection and renders it to the screen. Of course, the view also requires a render function so that calls the renderItem on each model, I have done this by iterating through the models using Underscore’s _.each to get the JSON of each model which it then passes to the renderItem function. The TrackListView works in the same way, rendering a TrackView for each Track model in the playlist’s tracks array.
var PlaylistListView = Backbone.View.extend({

  el: "#playlists",
  model: playlists,

  initialize: function() {
      this.listenTo(this.model, "change", this.render);
      this.bind('render', this.render);
      _.bindAll(this, "renderItem");
  },

  renderItem: function(model){
      var playlistView = new PlaylistView({model: model});
      playlistView.render();
      $(this.el).append(playlistView.el);
  },

  render: function(){
    $("#playlists").html(''),
    var self = this,
        html = '';
      _.each(this.model.toJSON(), function(mod) {
        self.renderItem(mod);
      });
  }

});


var TrackListView = Backbone.View.extend({
  el: $("#tracks"),

  initialize: function(){
      this.bind('changePlaylist', this.changePlaylist);
      _.bindAll(this, "renderItem");
  },

  renderItem: function(model){
      var trackView = new TrackView({model: model});
      trackView.render();
      $(this.el).append(trackView.el);
  },

  render: function(){
    $("#tracks").html(''),
    if (this.model)  {
      var self = this,
          html = '';
        _.each(this.model.toJSON().tracks, function(mod) {
          self.renderItem(mod);
        });
    }
  },

  changePlaylist: function(current)  {
    if (!this.model && current) {
      this.model = current;
    }
    this.render();
  }

});
The individual views work in a similar way but of course they only have to render themselves and not the contents of the collection. These views also use underscore templates to render the data to the page. Each view has double-click events that trigger a function called play for the PlaylistView The play function triggers an event that causes App to play the first track on the playlist, whereas the play function on TrackView is used to play the specific track.
var PlaylistView = Backbone.View.extend({

  tagName: "li",
  template: _.template($('#playlist-template').html()),

  events: {
    "dblclick"  : "play"
  },

  render: function() {
    var html = this.template(this.model);
    $(this.el).html(html);

    return this;
  },

  play: function()  {
    this.trigger('play'),
  }
});

var TrackView = Backbone.View.extend({

  tagName: "li",

  template: _.template($('#track-template').html()),

  events: {
    "dblclick"  : "play"
  },

  render: function() {
    if(this.model)  {
      var html = this.template(this.model);
      $(this.el).html(html);
    }
    return this;
  },

  play: function()  {
    console.log("Playing " + this.model.title);
    player.trigger("play", this.model);
  }

});
You will notice that I call a function on player, this is the object that is in control of managing the sound. By default the object stores el as a way to quickly access $("#player"), which is an audio element, it also stores the current track id as track and defaults to null. The state defaults to "paused" and is used to know whether a track is playing. To change the track we just need a setTrack function that sets track to be the new track id. Of course, the player needs to be able to play music so a play function is required; it needs to take a track id as an optional parameter so that it can be added to the src of the audio element.
var Player = Backbone.View.extend({
    el : "#player",

    track : null,

    state : "paused",

    initialize: function()  {
      this.bind('play', this.play);
      this.bind('pause', this.pause);
    },

    setTrack : function(track)  {
      this.track = track;
    },

    play : function(track)  {
      // If track is set then play new song. Else play current src (used for pausing).
      if (track)  {
        this.setTrack(track);
        $(this.el).attr("src", track.url).appendTo($(this.el).parent());
      }
      $("#togglePlaying").html("Pause");
      this.state = "playing";
      this.el.play();
    },

    pause : function()  {
      $("#togglePlaying").html("Play");
      this.state = "paused";
      this.el.pause();
    }
  });
  var player = new Player();
Main App View
Okay, so we have lots of code to make up the basis of the app, but currently it will not actually do anything because none of the code is linked together. It is this view that is responsible for knowing the current playlist as well as managing all interactions between views (and any elements that are not in views). Due to the way that there is only ever one of each list view on the page, AppView handles the list views as singletons so that there can ever only be one of each in use.
So far all we need is a basic interface, consisting of elements for each view and two links that are used to trigger the prompts for new playlist and add tracks. These elements are just HTML elements that can be used in the same way as you would without Backbone, the only difference is that we also need to include the dependencies (including Backbone) as scripts.
<div id="app">The data is handled using Underscore’s templating engine. The templates are defined within script tags in the main HTML file.
<a id="new-playlist">New Playlist</a>
<a id="new-track">Add Track</a>
<ul id="playlists"></ul>
<ul id="tracks"></ul>
<div id="player-controls">
<a id="togglePlaying">Play</a>
</div>
</div>
<audio id="player">
<script src="../vendor/jquery.min.js"></script>
<script src="../vendor/underscore.min.js"></script>
<script src="../vendor/backbone.min.js"></script>
<script src="../vendor/backbone.localStorage.js"></script>
<script src="js/app.js"></script>
<script type="text/template" id="playlist-template">
    <li><%= title %></li>
  </script>

  <script type="text/template" id="track-template">
    <li>
      <%= title %>
      <%= artist %>
    </li>
  </script>
AppView is responsible for handling interactions with the DOM; the events are handled in Backbone by defining the type of event followed by a selector to find the elements and then a value that is the name of the function that should be triggered. The AppView will be using the models (such as playlists) that we created earlier in the chapter. You can see how the event listeners are set in the code that follows, as well as the structure that we will be using to develop the AppView.
var AppView = Backbone.View.extend({
    el: $("#app"),

    currentPlaylist: -1, // Index of the playlist,
    trackListView : new TrackListView(),
    playlistListView : new PlaylistListView(),

    events: {
      "click #clear-completed": "clearCompleted",
      "click #toggle-all": "toggleAllComplete",
      "click #new-playlist":  "createPlaylist",
      "click #new-track":  "createTrack",
      "click #togglePlaying" : "togglePlay"
    },
    initialize: function() { },
    changePlaylist: function(id)  { },
    createPlaylist: function(e) { };
    createTrack: function(url) { },
    handleDrop: function(e) { },
    play: function()  { },
    preventDefault: function(e) { },
    render: function()  { },
    renderTracks: function() { },
    renderPlaylists: function() { },
    togglePlay: function()  { }
  });
  var App = new AppView;
Within the initialize function we will set up Backbone events (as opposed to DOM events) that trigger functions when events have been triggered on a model. The first function is renderPlaylists, the purpose of it is so that whenever the list of playlists needs changing, it can render on the playlistListView to update the playlists on the page. There is another function for rendering called render, which is used as a catchall to render both playlist and tracks. The render function calls both renderPlaylists and renderTracks. The latter works by making sure the playlist to be rendered (the actual tracks within the playlist, that is) has the current id held within currentPlaylist. However, it should always be correct already because to change playlist in the first place we have a changePlaylist function that both changes the currentPlaylist id as well as changing the playlist model for the trackListView.
changePlaylist: function(id)  {
  this.currentPlaylist = id;
  this.render();
},
render: function()  {
  this.renderTracks();
  this.renderPlaylists();
},
renderTracks: function() {
  if (this.currentPlaylist != -1)  {
    var current = playlists.get(this.currentPlaylist);
    this.trackListView.trigger('changePlaylist', current);
  }
},
renderPlaylists: function() {
  this.playlistListView.trigger('render'),
}
We are now left with two more functions to create—the functions for adding new playlists and tracks. It is very simple to create a new playlist, because we can get the playlist name through a prompt and then just create a new playlist using Backbones’ create function on the playlists collection. For the createTrack function, however, we have quite a lot more work to do. We need to get the trackName, trackArtist, and trackUrl, all of which we can ask for using prompts, except for when a URL is passed to the function (such as for the drag and drop functionality that we will add shortly) in which case that URL is used as trackUrl. We then need to check whether there is a playlist with tracks in it. If a currentPlaylist has not been set, then we just use the first playlist if any exists. Because the tracks are stored within an array inside a model, we have to work around the default Backbone behavior a bit as you can replace the array but not add to it. To do so we retrieve the current array of tracks and then add the new track to that array. With the new track in the array we can overwrite the array in the model with the “new” array that includes the track. With that done, it is now time to render the tracks to the page.
createPlaylist: function(e) {
  var playlistName = prompt("Playlist Name");
  playlists.create({title: playlistName});
},

createPlaylist: function(e) {
  var playlistName = prompt("Playlist Name");
  playlists.create({title: playlistName});
},

createTrack: function(url) {
  var trackName = prompt("Track name");
  var trackArtist = prompt("Track artist");
  var trackUrl = (typeof(url) === "string") ? url : prompt("Track url");
  if (trackName && playlists.models[0]) {
    if (this.currentPlaylist===-1) this.currentPlaylist = playlists.models[0].id;
    var tracks = playlists.get(this.currentPlaylist).get("tracks");
    tracks.push({ title: trackName, artist: trackArtist, url: trackUrl });
    playlists.get(this.currentPlaylist).save({ tracks : tracks});
    this.renderTracks();
  }
},
Drag and Drop
If you stretch your memory back to Chapter 2, you will remember that we used drag and drop functionality for the coloring book app. Dragging files is quite an obvious way to get a file into the app, so it makes sense to use it as a way to add new tracks. This version adds the dropped track to the current playlist but I recommend you modify it to try to add tracks to a playlist by dropping it on the playlist’s name. I have reworked the original code we had in Chapter 2 so that you can see how similar it is to use drag and drop functionality on other types of files. We start by setting up the event listeners to call preventDefaults and handleDrop as needed. The handleDrop function is used to select the first file out of the dropped files and forward it to createTrack, which is the function in the main App view that adds the track to the playlist. This is a good example of leveraging code that has already been written to easily add new functionality! Unfortunately we cannot directly use Backbone events because there is (at the time of writing) no way to stop the event bubbling. To get the track name and artist I have decided that prompts are the easiest way to do it. There are two more opportunities for improving the code here, which I encourage you to try, these are to enable multiple file drops and to improve the interface so that prompts are not required (or you could perhaps try to get the data from the metadata of the file).
In the AppView initialize function, we put the event listeners:
window.addEventListener('dragover', this.preventDefault, false);
window.addEventListener('dragenter', this.preventDefault, false);
window.addEventListener('drop', this.handleDrop, false);
We also need the handleDrop and preventDefault functions in the AppView:
handleDrop: function(e) {
      e.stopPropagation();
      e.preventDefault();
      var file = e.dataTransfer.files[0];

      reader = new FileReader();
      reader.readAsDataURL(file);
      reader.onload = (function(theFile) {
        return function(e) {
          App.createTrack(e.target.result);
        };
      })(file);
    },
    preventDefault: function(e) {
      if (e.preventDefault) {
        e.preventDefault();
      }
      return false;
    },
Integrating the Music Creation
Let’s now integrate the music creation from the previous chapter so that we can create our own tracks to add to the playlists. It sounds like a simple task, and it mostly is, but we made the creator work in such a way that the localStorage with playlists in it will muck it up (because it uses a counter as an id instead of a hash). So we need to fix that first!
Currently the key of each localStorage record of the music creation app is used within a counter to iterate over and to find any particular clipping. This is generally quite a bad approach because if an id is removed, then it could break the loop and also, as I just mentioned, it does not play well when there are other types of key-value pairs in the storage. If you take a look at the localStorage that was produced using the Backbone plugin, you will see that the keys all have a string prepended as a kind of namespace for the key. There is also a single key of the same name as the namespace, the value of which is a list (read: JSON.stringifiy’ed array) containing each clipping name so that we can still iterate over all the keys by taking each name in the array and finding the corresponding key.
Within the recordSound function, we need to change it so that the object is now stored correctly with the namespace before the key. It also needs to add the key to the value of the namespace, as explained, so we need to check whether it exists so that we can either add to it or make a new one. Whenever data needs to be accessed, you can use JSON.parse(localStorage["clippings-" + clippingNames[i]]).
  function recordSound(name)  {
    recorder.exportWAV(function(blob) {
        var object =  {
            file: window.URL.createObjectURL(blob),
            size: recordEnd - recordStart
        }
        if (localStorage["clippings"]) {
            var clippings = JSON.parse(localStorage["clippings"]);
            clippings.push(name);
            localStorage["clippings"] = JSON.stringify(clippings);
        }
        else  {
            localStorage["clippings"] = JSON.stringify([name]);
        }
        localStorage["clippings-"+name] = JSON.stringify(object);
        drawTimeline();
    });
}
The final version of the keyboard with the changes made can be found in the online download available from the Apress website at www.apress.com/9781430259442 or my own website at www.shanehudson.net/javascript-creativity.
Music Visualization
Most of what we have gone through so far has rules, such as design patterns or music theory. This step does not. You can think of music visualization as an art, most of the mathematics we use are loosely based on concepts such as trigonometry from which we can fiddle the numbers to make the visualization look interesting. I have been very inspired by Steven Wittens (http://www.acko.net) who has been active in this space by writing articles, speaking at conferences, and creating demos that all use math to create interesting effects. For this section I have modified Steven’s js1k entry to use with the music player, because he has already written an in-depth article (http://acko.net/blog/js1k-demo-the-making-of) about it which I highly recommend reading!
The visualization, shown in Figure 6-2, is a 2D canvas with curved lines on which squares move along to the tempo of the music. Because it is based on Steven’s article, I will not go into too much detail but I would like to pick out some of the key aspects that can often be used in other projects so first take a look at the full code listing for visualizer.js. I have tried to clean the code up but because it was originally created to be very well optimized, there are still some parts that may not use best practices.

Figure 6-2. Music visualization while playing Bassa Island Game Loop by Kevin MacLeod
// Polyfill for RequestAnimationFrame
(function() {
  var requestAnimationFrame = window.requestAnimationFrame || window.mozRequestAnimationFrame ||
                              window.webkitRequestAnimationFrame || window.msRequestAnimationFrame;
  window.requestAnimationFrame = requestAnimationFrame;
})();

function visualizer() {
    w = $('#visualizer').width();
    h = $('#visualizer').height();
    g = $('#visualizer')[0].getContext("2d");
    ratio = w / h;
    g.globalCompositeOperation = "lighter";
    g.scale(w / 2 / ratio, h / 2);
    g.translate(ratio, 1);
    lw = 45 / h;
    a = r = d = 0;
    Xt = Yt = Zt = Xi = Yi = Zi = x = y = z = X = Y = Z = frames = 0;
    lastPointVisible = false;
    time = u = -8;
    requestAnimationFrame(draw);
}

function draw() {
    freqData = new Uint8Array(analyser.frequencyBinCount);
    analyser.getByteFrequencyData(freqData);
    if (!$("#player")[0].paused)  {
        var average = getAverage(freqData);
        console.log(average);
        //console.log(freqData);
        if (average > 0)  {
            for (frames = 0; frames < 70; frames++) {
              Xt = (average/100) * 18 - 9;
              Yt = (average/100) * 18 - 9;
              Zt = (average/100) * 18 - 9;
            }

            Xi = interpolate(Xi, Xt);
            Yi = interpolate(Yi, Yt);
            Zi = interpolate(Zi, Zt);

            X  = interpolate(X,  Xi);
            Y  = interpolate(Y,  Yi);
            Z  = interpolate(Z,  Zi);

            yaw   = Math.atan2(Z, -X * 2);
            pitch = Math.atan2(Y * 2, Math.sqrt(X * X + Z * Z));

            time += 0.05;
            g.clearRect(-ratio, -1, 2 * ratio, 2);
            for (i = 16; i; --i) {
                v = 0;
                for (pointIndex = 45; pointIndex;) {
                    pointIndex--;
                    offset = time - pointIndex * 0.03 - i * 3;
                    longitude = Math.cos(offset + Math.sin(offset * 0.31)) * 2
                              + Math.sin(offset * 0.83) * 3 + offset * 0.02;
                    latitude = Math.sin(offset * 0.7) - Math.cos(3 + offset * 0.23) * 3;
                    distance = Math.sqrt(pointIndex+.2);
                    z = Math.cos(longitude) * Math.cos(latitude) * distance;
                    y = Math.sin(longitude) * Math.cos(latitude) * distance;
                    z = Math.sin(latitude) * distance;

                    x -= X; y -= Y; z -= Z;

                    x2 = x * Math.cos(yaw) + z * Math.sin(yaw);
                    y2 = y;
                    z2 = z * Math.cos(yaw) - x * Math.sin(yaw);

                    x3 = x2;
                    y3 = y2 * Math.cos(pitch) + z2 * Math.sin(pitch);
                    z3 = z2 * Math.cos(pitch) - y2 * Math.sin(pitch);
                    h = !pointIndex;
                    g.lineWidth = lw * (2 + h) / z3;
                    x = x3 / z3;
                    y = y3 / z3;
                    g.lineTo(x,y);
                    distance = Math.round(45 - pointIndex) * (1 + h + Math.max(0, Math.sin(time * 6 - pointIndex / 8) - .95) * 70);
                    g.strokeStyle = "rgb(" + Math.round(distance * (Math.sin(h + i + time * .15) + 1)) + "," + Math.round(distance * (h + Math.sin(i - 1) + 1)) + "," + Math.round(distance * (h + Math.sin(i - 1.3) + 1)) + ")";
                    if (z3 > 0.1) {
                      if (lastPointVisible) {
                        g.stroke();
                      }
                      else {
                        lastPointVisible = true;
                      }
                    }
                    else {
                      lastPointVisible = false;
                    }
                    g.beginPath();
                    g.moveTo(x,y);
                }
            }
        }
    }
    requestAnimationFrame(draw);
}

function getAverage(freqData)  {
    var average = 0;
    for (var i = 0; i < freqData.length; i++)  {
        average += freqData[i];
    }
    average = average / freqData.length;
    return average;
}


function interpolate(a,b) {
    return a + (b-a) * 0.04;
}
The beginning is just setup code like we usually use for canvas, grabbing the context and the dimensions. After these lines however is a very powerful line of code, g.globalCompositeOperation = "lighter". If you have experience with computer graphics on a technical level or have used blending modes in Photoshop (or another graphics package), then you will have an idea of what this does. Composite operations are a form of compositing (alongside clipping) that are used for manipulating (based on a number of commonplace algorithms) multiple shapes depending on how they overlap. The composite operators themselves are known as Porter-Duff operators (after their inventors) but have slightly different names when used with canvas. There are many composite operations. Here we are using lighter, which just makes any overlapped area of shapes so that the color is a lighter blend of the overlapped shapes. The default is source-over. Table 6-1 is a full list of available operations (from the canvas spec):
Operation Name |
Porter-Duff Operator |
Description |
|---|---|---|
source-atop |
A atop B |
Display the source image wherever both images are opaque. Display the destination image wherever the destination image is opaque but the source image is transparent. Display transparency elsewhere. |
source-in |
A in B |
Display the source image wherever both the source image and destination image are opaque. Display transparency elsewhere. |
source-out |
A out B |
Display the source image wherever the source image is opaque and the destination image is transparent. Display transparency elsewhere. |
source-over |
A over B |
Display the source image wherever the source image is opaque. Display the destination image elsewhere. This is the default operation. |
destination-atop |
B atop A |
Same as source-atop but using the destination image instead of the source image and vice versa. |
destination-in |
B in A |
Same as source-in but using the destination image instead of the source image and vice versa. |
destination-out |
B out A |
Same as source-out but using the destination image instead of the source image and vice versa. |
destination-over |
B over A |
Same as source-over but using the destination image instead of the source image and vice versa. |
lighter |
A plus B |
Display the sum of the source image and destination image, with color values approaching 255 (100%) as a limit. |
copy |
A (B is ignored) |
Display the source image instead of the destination image. |
xor |
A xor B |
Exclusive OR of the source image and destination image. |
The next portion of the code uses a ratio to scale and translate the canvas. Strictly speaking, this isn’t needed. But I have decided to keep it because it is an interesting approach to optimization. Basically instead of plotting the coordinates of the entire canvas, we will be plotting them between −1 and 1, so that the performance is improved, as transforming the canvas is easier and quicker than individually plotting the entire thing. The lastPointVisible boolean is another slight optimization that is used to only render the foreground so that nothing in the background that cannot be seen is rendered anyway. From here we need to use requestAnimationFrame for the same reasons as before, to keep it smooth and to only process (this is of course very intensive code) when needed. The RAF calls a draw function that draws each frame. As an aside, are you seeing the patterns yet? Every project can be reduced to just a few patterns, which is why I use examples that you will probably never need to build—the concepts will be useful regardless!
Within the draw function we grab the frequency data. Now we have a bit of a dilemma… how to use the data? For this example I have decided to just use the average frequency to move the lines in the visualization, but there are many options for playing around with this. One good idea might be to work out the beats per minute or to have separate lines representing ranges of frequencies.
The full code listing is, as always, available on both the Apress website at www.apress.com/9781430259442 and on my own website at www.shanehudson.net/javascript-creativity.
Summary
That was a particularly long project so I made sure to only explain the concepts or code that were not already pretty obvious; hopefully you did not get lost along the way. Of course, a music player has such wide scope that this chapter barely scrapes the edges of what you can do so I chose the features that would teach you the most skills for using in other projects. I strongly encourage you to explore other avenues of the project, such as adding a plugin system or converting the music visualizer into 3D (currently it gives the effect of 3D but is only shown in 2D). I glossed over a lot of the math for the visualization because I am trying to explore creative things we can make with JavaScript rather than teaching math, but I strongly recommend reading Steven Wittens’ article on the making of his js1k demo at http://acko.net/blog/js1k-demo-the-making-of.