
![]()
Motion Detection
An Introduction to Motion Detection
Throughout the book so far we have looked at a number of technologies that have obvious applications that you can implement without too much creativity, things that may not have been possible before but that are not too hard to do now, such as the video-to-video chat in the previous chapter. I would now like to delve into the realms of computer vision, one of my personal interests and one that has a large variety of ways to apply it. Because this book is neither about advanced computer vision nor targeted at academia/research labs, we will stick to relatively naïve algorithms and avoid any artificial intelligence that requires training, such as facial recognition.
In this chapter we focus on motion detection, because it ties in well with the WebRTC and is probably the most useful aspect of basic computer vision. In the next chapter we will be creating a musical instrument that can be played using motion detection and with other people over WebRTC, which should nicely tie the entire book together. For now though, think about the other kinds of applications you could use motion detection for, such as home security or even just visual effects.
Boilerplate for Video Manipulation
As you will have noticed by now, most of these kinds of projects follow a similar pattern. Here I quickly go over the pattern that we will be using for video manipulation for the majority (if not all) the code in this chapter. We start with a shim for window.URL and navigator.getUserMedia, for this chapter I’ve decided to use a variable that uses the method that is compatible with the browser rather than using a full polyfill as we did in the previous chapter (because the full WebRTC stack is less supported than getUserMedia).
window.URL = window.URL || window.webkitURL;
navigator.getUserMedia  =  navigator.getUserMedia ||
                           navigator.webkitGetUserMedia ||
                           navigator.mozGetUserMedia ||
                           navigator.msGetUserMedia;
if (navigator.getUserMedia === undefined) {
    throw new Error("Browser doesn't support getUserMedia");
}
Now we need to set up the page, in this case so that both the video and canvas elements are full size within the browser window. Just set the video element to autoplay, get the context of the canvas, and initialize the video stream. To draw the frame we connect the stream and add an event listener that calls draw() once the video is ready (for example, ‘canplay’). There is now a slight problem, normally this would work fine but some versions of Firefox (all of which at the time of writing are quite commonly used) have a bug that causes drawImage to run before the size of the video frame has been set. The error is NS_ERROR_NOT_AVAILABLE and to prevent it we can use a try catch. Of course, in production code it is recommended to do thorough error handling anyway, so this should not be too much of a problem.
Within the try catch block, we need to draw the image from the video element to the canvas context. To get data that we can manipulate we need to get the frame using ctx.getImageData(0, 0, w, h),which has a data property that can be used to retrieve and modify the frame. Following is the boilerplate code. Note that there is a comment showing where to manipulate the data.
function setup()  {
  videoElement = document.querySelector("video");
  videoElement.width = w = window.innerWidth;
  videoElement.height = h = window.innerHeight;
  videoElement.autoplay = true;

  canvas = document.querySelector('canvas'),
  canvas.width = w;
  canvas.height = h;
  ctx = canvas.getContext('2d'),

  navigator.getUserMedia({video: true}, function (stream) {
      videoElement.src = window.URL.createObjectURL(stream);
      videoElement.addEventListener('canplay', draw);
  }, function() {});
}

function draw() {
  if (videoElement.paused || videoElement.ended) {
      return;
  }
  try  {
      ctx.drawImage(videoElement, 0, 0, w, h);
      manip = ctx.getImageData(0, 0, w, h);
      var data = manip.data;

      // Manipulate the frame by modifying data

      ctx.putImageData(manip, 0, 0);
      requestAnimationFrame(draw);
  }
  catch (e)  {
      if (e.name == "NS_ERROR_NOT_AVAILABLE") {
          setTimeout(draw, 0);
      }
      else  {
          throw e;
      }
  }
}
Basic Video Manipulation
You should remember that back in Chapter 3 we manipulated video by simply iterating over the pixels, but because that was at the beginning of the book I will quickly go over it again. This time, let’s just invert the pixels so that we can easily see how the manipulation works without worrying about the exact algorithm used to create an effect.
The function for inverting the frame is invertFrame and take data as a parameter, the call to invertFrame should be placed where the comment was in the boilerplate code and the data parameter should come from the data variable. Do note that we will be returning the data variable so that it directly effects the manip.data from the boilerplate code (since this is the actual frame). We start with the data in the form of a Uint8ClampedArray. This means that the array contains unsigned ints (that is, positive numbers) and they are clamped to 8 bits (a byte) and because 2^8 is 256, the max number in any index of the array is 255 (due, of course, to counting from 0).
![]() Note The array is comprised of RGBA colors, so you should iterate over every four indexes to get the start of each color.
Note The array is comprised of RGBA colors, so you should iterate over every four indexes to get the start of each color.
So while we iterate over the array, we start from the beginning of each color and therefore need to (usually, unless you just want to find red) check the indexes of the green and blue colors as well (by checking data[i+1] and data[i+2], respectively). To invert the colors, we need to minus the current value of each color from 255 (for example, making white become black).
function invertFrame(data)  {

    // Iterate through each pixel, inverting it
    for (var i = 0; i < data.length; i += 4) {
        var r = data[i],
            g = data[i+1],
            b = data[i+2];
        data[i] = 255 - r;
        data[i+1] = 255 - g;
        data[i+2] = 255 - b;
    }

    return data;
}
See Listing 9-1 for how this fits with the boilerplate code.
window.URL = window.URL || window.webkitURL;
navigator.getUserMedia  =  navigator.getUserMedia ||
                           navigator.webkitGetUserMedia ||
                           navigator.mozGetUserMedia ||
                           navigator.msGetUserMedia;
if (navigator.getUserMedia === undefined) {
    throw new Error("Browser doesn't support getUserMedia");
}

var videoElement, canvas, ctx, manip, w, h;


window.addEventListener('DOMContentLoaded', setup);


function setup()  {
    videoElement = document.querySelector("video");
    videoElement.width = w = window.innerWidth;
    videoElement.height = h = window.innerHeight;
    videoElement.autoplay = true;

    canvas = document.querySelector('canvas'),
    canvas.width = w;
    canvas.height = h;
    ctx = canvas.getContext('2d'),

    navigator.getUserMedia({video: true}, function (stream) {
        videoElement.src = window.URL.createObjectURL(stream);
        videoElement.addEventListener('canplay', draw);
    }, function() {});
}


function draw() {
    if (videoElement.paused || videoElement.ended) {
        return;
    }
    try  {
        ctx.drawImage(videoElement, 0, 0, w, h);
        manip = ctx.getImageData(0, 0, w, h);
        var data = manip.data;

        data = invertFrame(data);

        ctx.putImageData(manip, 0, 0);
        requestAnimationFrame(draw);
    }
    catch (e)  {
        if (e.name == "NS_ERROR_NOT_AVAILABLE") {
            setTimeout(draw, 0);
        }
        else  {
            throw e;
        }
    }
}

function invertFrame(data)  {

    // Iterate through each pixel, inverting it
    for (var i = 0; i < data.length; i += 4) {
        var r = data[i],
            g = data[i+1],
            b = data[i+2];
        data[i] = 255 - r;
        data[i+1] = 255 - g;
        data[i+2] = 255 - b;
    }

    return data;
}
Motion Detection
Now that you have refreshed knowledge of manipulating video, let’s dive into our first demonstration of using detecting motion in the video. This is a computer vision that is useful despite (in this case) being completely naïve, there is no artificial intelligence involved nor particularly complicated algorithms. If you think about it, motion detection is simply showing the difference between frames. We could make it more complicated by optimizing it, detect over a number of frames or to track the motion, but for now let’s just find the difference.
It is quite easy to do this; you take the current data and store it so that on the next frame you have both new data and old data. Once you have both pieces of data, you can compare the two and find the pixels that are different. However, if you do this, you will soon notice that the camera doesn’t see everything the same each frame so it will look like there is a lot of motion in the background. To get around this, you can use a threshold to alter the accuracy. Because we are not using any artificial intelligence, this can be an arbitrary number that works well (15 worked well while I was testing). In Figure 9-1, you can see the motion of my head as a result of the arbitrary threshold that I used. If we were creating an AI, it would attempt to find the most likely pixels to be the kind of motion we are looking for, such as the outline of a hand or more simply a bunch of pixels rather than a single movement (since nothing we will be interested in is the size of a pixel!).
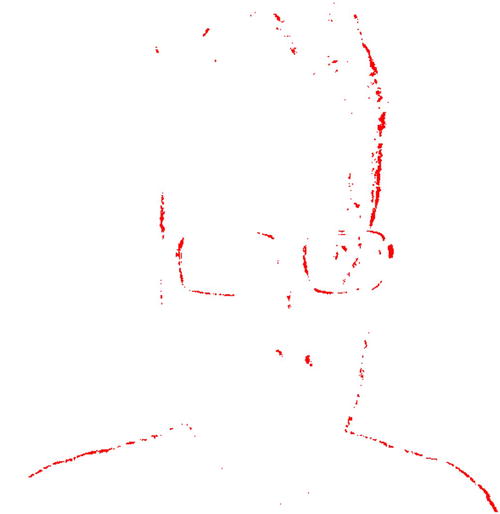
Figure 9-1. A screenshot showing the rough outline of my face being detected as I move
Within the try block, we slightly modify the boilerplate code so that it checks oldData for being null (which should be its initial value), if it isn’t, then it manipulates and if it is null, then it assigns the current data from data.manip.
bctx.drawImage(videoElement, 0, 0, w, h);
manip = bctx.getImageData(0, 0, w, h);
var data = manip.data;
if (oldData != null) {
    data = motionDetection(data, oldData);
    ctx.putImageData(manip, 0, 0);
    oldData = null;
}
else  {
    oldData = manip.data;
}

requestAnimationFrame(draw);
The motionDetection function works as explained previously; it takes both the current frame’s data and the previous (although this could be optimized or more advanced in a variety of ways, so it is not necessarily only the previous frame), then compares them and draws a red pixel to every pixel that has moved and is within the bounds of the threshold.
function motionDetection(data, oldData)  {

    // Iterate through each pixel, changing to 255 if it has not changed
    for( var y = 0 ; y < h; y++ ) {
        for( var x = 0 ; x < w; x++ ) {
            var indexOld = (y * w + x) * 4,
                    oldr = oldData[indexOld],
                    oldg = oldData[indexOld+1],
                    oldb = oldData[indexOld+2],
                    olda = oldData[indexOld+3];
            var indexNew = (y * w + x) * 4,
                    r = data[indexNew],
                    g = data[indexNew+1],
                    b = data[indexNew+2],
                    a = data[indexNew+3];

            if (oldr > r - 15 || oldg > g - 15 || oldb > b - 15)
            {
                data[indexNew] = 255;
                data[indexNew+1] = 255;
                data[indexNew+2] = 255;
                data[indexNew+3] = 255;
                detected = true;
            }
            else
            {
                data[indexNew] = 255;
                data[indexNew+1] = 0;
                data[indexNew+2] = 0;
                data[indexNew+3] = 255;
            }
        }
    }

    return data;
}
Okay, so detecting motion is one thing but, unless you are creating an alarm system or making art, it isn’t very useful alone. You usually want to either make the computer clever enough to recognize what the object is (especially true for robots) or, more often, just know where the same object is—this is called tracking. We produced an image that shows motion but it doesn’t make any attempt to group the motion as an object. There are a large variety of ways to do this, such as calibrating based on color and looking for areas with the correct average color, or you could use artificial intelligence and actually train it to look for an object.
While color calibration is easier than using AI, it can cause a lot of problems and the math soon becomes far too complicated, for just a chapter of a book, if you want it to be reliable. So instead we are going to go half way between the two methods and use library called js-objectDetect (written by Martin Tschirsich and found on github at https://github.com/mtschirs/js-objectdetect), which is based on the OpenCV object detector and can take already trained classifiers. Before we get to the code, let’s look into how the library actually works.
Haar-like Features
Most image processing algorithms require a way to detect features in an image and there are quite a few different ways to do that. The most common (due to their use in the Viola-Jones algorithm) are called Haar-like features. These are based on the original Haar wavelets that were proposed by Alfréd Haar in 1909. A wavelet is a mathematical function that cuts data into different frequencies, then it scales and analyzes the data for patterns. It is an essential tool for signal processing and provides an alternative, with the advantage of being able to scale the data, to the Fourier transform (which we used in Chapter 3). Haar-like features can be considered as a more tangible form of Haar wavelets, as you can visualize them using different sized black and white rectangles (as shown in Figure 9-2).
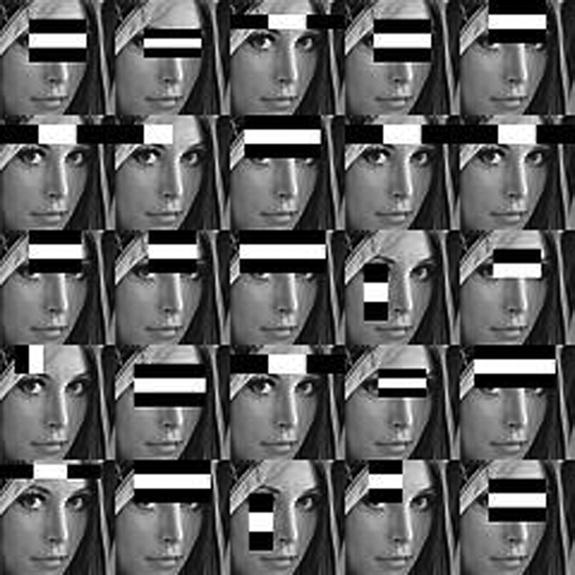
Figure 9-2. An example of Haar-like features, visualized as black and white rectangles
The reason they are black and white rectangles, as opposed to something that resembles the feature they are searching for, is that most objects have a common pattern of shadows (such as between an eye and nose). They work efficiently by using summed area tables, to produce what is known as an integral image, which allows quick lookups of the sum of all the pixels in the rectangle without needing to calculate them every time. On their own, Haar-like features are not particularly useful but when you use them as part of the Viola-Jones algorithm (which uses a moving window to search) then they become essential.
Viola–Jones
As you probably guessed from the previous section, the algorithm that powers both js-objectDetect and the OpenCV object detector is based on a paper written by Paul Viola and Michael Jones in 2001 (later improved on by Rainer Lienhart) and commonly known simply as Viola-Jones. I will not go into details about the algorithm, as it is quite complicated, but if you have a deep interest in computer vision or artificial intelligence, then it may be worth reading. The original paper does include some rather advanced math but it is written in a way that shouldn’t be too difficult to understand. The algorithm basically works by taking two sets of images, positive matches and negative; these are used to train it by going over each image with a small window that attempts to match the contents of the window of the image to Haar-like features. As with all training, the larger the sets, the more accurate it should be.
The paper described the algorithm as being a “visual object detection framework”, so it can be implemented in a variety of different ways. The paper is comprised of three main contributions, which can be considered as the main components of any Viola-Jones−based facial detection algorithm. The first component is integral images, which as I explained earlier, is how Haar-like features are so efficient. The second component is a learning algorithm based on AdaBoost. The last component that they put forward as being important to facial detection is cascade classifiers, which are used to quickly discard the background of the image. It is quite interesting to note that the algorithm used for detection is the same as the one used for training, so there is no extra step required to actually use the classifiers. The classifiers are the outcomes of the training and we will be using predefined cascades so that training is not required (because it needs a large data set and can take a long time). The js-objectDetect library includes some classifiers as samples (including mouth, eye, and hand classifiers, not just faces), so we shall be using those for this chapter. There are two types of cascade classifier, stump and tree. A stump is a single node of a tree and is usually best to use due to the balance between accuracy and efficiency, so the js-objectDetect library only works with stump cascades that are stored as JSON.
The library makes it very easy to use the Viola-Jones algorithm, which is extremely powerful, without even needing to install OpenCV (a large C++ framework for computer vision). It is licensed under GPL so you can freely read the code and modify it. It is also well commented, so if you are interested in the implementation details of the Viola-Jones algorithm, then it is definitely a good place to start. In the next chapter we will be using object detection as input but for this chapter, to demonstrate tracking, we will be drawing a rectangle around a face instead. Facial detection is a common use of computer vision because it is the basis of most more advanced computer vision topics, such as facial recognition or eye tracking.
![]() Note As with motion detection, tracking is still dependent on the 2D image produced by the webcam, so it may not be completely accurate and does require good lighting and only one face to track.
Note As with motion detection, tracking is still dependent on the 2D image produced by the webcam, so it may not be completely accurate and does require good lighting and only one face to track.
It is actually extremely easy to use js-objectDetect for facial detection; it just requires the library to be included and a small bit of JavaScript to run it. It does not use canvas, so the getUserMedia can be set up directly with a video element rather than worrying about canvas contexts. The library is of course included in the download that complements this book. I have included a div with the class cursor; this is the box that surrounds the face that has been detected.
<!DOCTYPE html>
<html>
<head>
    <title>Webcam Stuff</title>
    <style>
        html, body { margin: 0; padding: 0; }
        video { position: absolute; top: 0; left: 0;  }
    </style>
</head>
<body>
    <video></video>
    <div class="cursor"></div>


    <script src="js-objectDetect/compatibility.js"></script>
    <script src="js-objectDetect/smoother.js"></script>

    <script src="js-objectDetect/objectdetect.js"></script>
    <script src="js-objectDetect/objectdetect.frontalface.js"></script>

    <script src="js-objectDetect/jquery.js"></script>
    <script src="js-objectDetect/jquery.objectdetect.js"></script>

    <script src="script.js"></script>
</body>
</html>
The JavaScript required (within script.js) is comprised of a set-up function that handles the dimensions of the video element as well as the getUserMedia that calls the draw function to run the detection on each frame. There is also a jQuery function that is used to actually draw the square around the face. This works by getting dimensions from the library and modifies the css of the div to fit it.
window.URL = window.URL || window.webkitURL;
navigator.getUserMedia  =  navigator.getUserMedia ||
                           navigator.webkitGetUserMedia ||
                           navigator.mozGetUserMedia ||
                           navigator.msGetUserMedia;
if (navigator.getUserMedia === undefined) {
    if (console !== undefined) {
        console.log("Browser doesn't support getUserMedia");
    }
}

window.addEventListener('DOMContentLoaded', setup);

function setup()  {
    videoElement = document.querySelector("video");
    videoElement.width = w = window.innerWidth;
    videoElement.height = h = window.innerHeight;
    videoElement.autoplay = true;

    navigator.getUserMedia({video: true}, function (stream) {
        videoElement.src = window.URL.createObjectURL(stream);
        videoElement.addEventListener('canplay', draw);
    }, function() {});
}

$.fn.highlight = function(rect, color) {
    $('.cursor').css({
        "border":   "2px solid " + color,
        "position": "absolute",
        "left":     ($(this).offset().left + rect[0]) + "px",
        "top":      ($(this).offset().top  + rect[1]) + "px",
        "width":    rect[2] + "px",
        "height":   rect[3] + "px",
        "z-index": 2
    });
}

function draw()  {
    $("video").objectdetect("all", {classifier: objectdetect.frontalface}, function(faces) {
        for (var i = 0; i < faces.length; ++i) {
            $(this).highlight(faces[i], "red");
        }
    });

    requestAnimationFrame(draw);
}
Summary
I hope that from this chapter you have gained a deeper understanding of how to manipulate video in real time and use it to produce useful solutions. Motion detection and object tracking are the two key starting points of computer vision. Although there may not currently be many use-cases for computer vision on the web, we are starting to see more and more of it, such as detecting faces in photos to tag people. Some companies (*ahem* Facebook) are going as far as facial recognition, which has its basis in facial detection. Many people consider computer vision to be incredibly complicated, something that only academia need to be interested in, but that’s just not the case. I highly recommend you to look further into this topic, much of it is beyond the scope of this book but if you take a look at the appendix you will find some extra information and useful resources for further reading. The next chapter builds on some of the concepts in this chapter, although we will be using a fairly naïve algorithm for detecting the movement of a finger so that we can use it to play a note on the keyboard that we built earlier in the book. Hopefully you can see that either by writing naïve algorithms or using libraries other people have already worked on, it is not as difficult to get started with computer vision as most people think it is and it is even more accessible now that it can be achieved, without relying on C++ or other more difficult languages, using HTML5 and JavaScript!