
![]()
Publishing Packages
In Chapter 3, we demonstrated how you can create your own NuGet packages. It would be a shame if those packages weren’t available to others, right?
This chapter will bridge the gap between package creation and package consumption. We’ll show you how you can publish those precious packages to a NuGet feed—whether to nuget.org which is available to everyone, or to your own private package feed. You’ll learn that all this relies on three simple things: your NuGet package, a feed, and an API key.
We’ll also explore how you can publish source code and debug symbols along with your binary NuGet package. This will enable consumers of your NuGet package to debug and step through your source code automatically from inside Visual Studio.
Let’s start this chapter with creating a simple package that we’ll deploy to nuget.org. Feel free to create your own Visual Studio project containing code you wish to ship through the nuget.org Gallery, or use the project we’ll create in this section. This section briefly covers creating a NuGet package. Refer to Chapter 3 for in-depth knowledge about creating NuGet packages.
Open Visual Studio and create a new Class Library project titled ProNuGetStringExtensions, as shown in Figure 4-1.

Figure 4-1. Creating a sample class library project that will be published to nuget.org
By default, this new project will contain a file named Class1.cs. Since it’s more fun to publish a useful NuGet package rather than a simple Hello World–style package, we’ll provide some useful code. Remove this file and add a new class called StringExtensions. The code for this class can be found in Listing 4-1.
Listing 4-1. The StringExtensions Class
namespace System
{
    public static class StringExtensions
    {
        public static string Truncate(this string input, int length)
        {
            return Truncate(input, length, "...");
        }

        public static string Truncate(this string input, int length, string suffix)
        {
            if (input == null)
            {
                return null;
            }
            if (input.Length <= length)
            {
                return input;
            }

            if (suffix == null)
            {
                suffix = "...";
            }

            return input.Substring(0, length - suffix.Length) + suffix;
        }
    }
}
The class that you have just added to this project will provide people with a useful extension method for strings: Truncate. For example, if you have a long string, you can use the Truncate extension method to truncate the string and add an ellipsis at the end. If we run Truncate(9, "...") on the current paragraph, the result would be “The class…”.
![]() Note An extension method is a language feature of C# and Visual Basic.NET that enables you to add behavior to existing types without creating a new derived type, recompiling, or modifying the original type. This makes it possible to extend existing types such as System.String, even if the original source code is out of your control.
Note An extension method is a language feature of C# and Visual Basic.NET that enables you to add behavior to existing types without creating a new derived type, recompiling, or modifying the original type. This makes it possible to extend existing types such as System.String, even if the original source code is out of your control.
Try compiling the project (press Ctrl+Shift+B, or choose Build ![]() Build Solution). If the project compiles correctly, it’s time to create a NuGet package for this project. Open the folder where the ProNuGetStringExtensions.csproj file is located, and create a NuGet package manifest by running the nuget spec command from the command line. A file named ProNuGetStringExtensions.nuspec should be created; modify its contents to something similar to the package manifest shown in Listing 4-2.
Build Solution). If the project compiles correctly, it’s time to create a NuGet package for this project. Open the folder where the ProNuGetStringExtensions.csproj file is located, and create a NuGet package manifest by running the nuget spec command from the command line. A file named ProNuGetStringExtensions.nuspec should be created; modify its contents to something similar to the package manifest shown in Listing 4-2.
Listing 4-2. The Sample Package Manifest That Will Be Used Throughout This Chapter
<?xml version="1.0"?>
<package >
  <metadata>
    <id>$id$</id>
    <version>$version$</version>
    <title>$title$</title>
    <authors>Maarten Balliauw, Xavier Decoster</authors>
    <owners>Maarten Balliauw, Xavier Decoster</owners>
    <requireLicenseAcceptance>false</requireLicenseAcceptance>
    <description>Some useful string extensions for everyday use.</description>
    <copyright>Copyright 2013 Maarten Balliauw and Xavier Decoster</copyright>
    <tags>string extensions extension methods truncate</tags>
  </metadata>
</package>
As you learned in Chapter 3, the various tokens in the package manifest ($id$, $version$ and $title$) will be acquired from the project's AssemblyInfo attributes. Packaging this project is now very straightforward: run the command nuget pack ProNuGetStringExtensions.csproj -Version 1.0.0, and witness the NuGet package file ProNuGetStringExtensions.1.0.0.nupkg being created. We now have created the NuGet package that will be used throughout this chapter.
![]() Note To ensure that the installation process of the package is what you’d expect, feel free to test the ProNuGetStringExtensions.1.0.0.nupkg NuGet package by using the approach described in the “Testing Packages” section of Chapter 3.
Note To ensure that the installation process of the package is what you’d expect, feel free to test the ProNuGetStringExtensions.1.0.0.nupkg NuGet package by using the approach described in the “Testing Packages” section of Chapter 3.
Contributing to nuget.org
Whenever you create a NuGet package, chances are that you will want to publish this package on a NuGet feed. For example, you can publish your company’s NuGet packages to a private NuGet feed, something we’ll continue to describe in the next chapter. Another option is to publish a NuGet package to the public NuGet Gallery found at www.nuget.org.
The NuGet Gallery is an online collection of NuGet packages available out of the box in Visual Studio after you install the NuGet Package Manager extension. As Figure 4-2 shows, the Packages tab allows you to search for packages, inspect package information, consult package ratings, and find out the author of a NuGet package. It contains NuGet packages contributed by a variety of authors, including Microsoft, which is interesting: your NuGet package will be equally visible in these listings as, say, Microsoft’s Entity Framework.
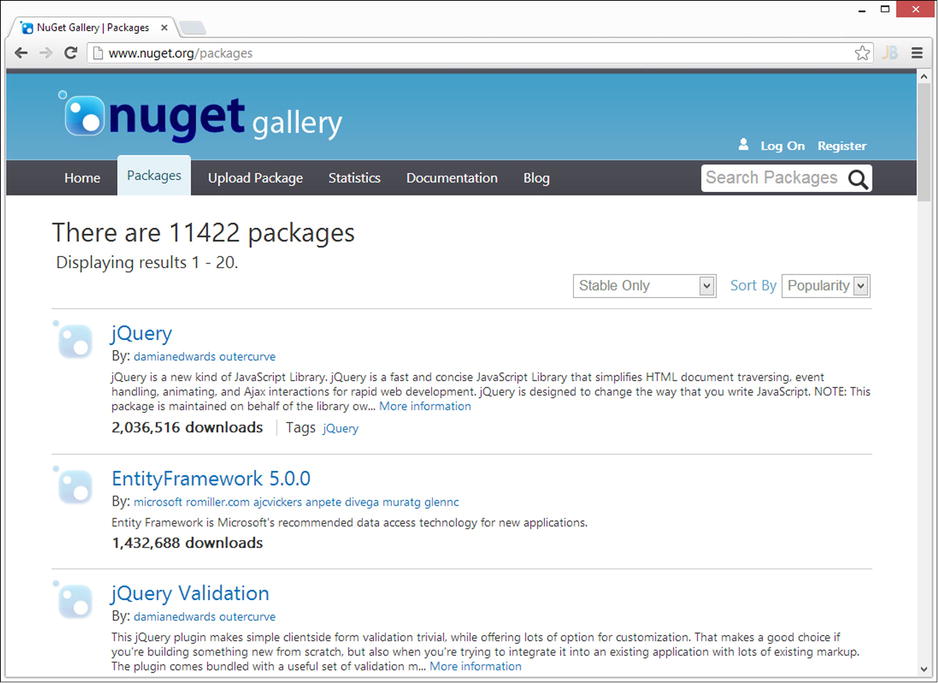
Figure 4-2. The NuGet Gallery found at www.nuget.org
Before being able to publish a NuGet package on www.nuget.org, an account is required. Obtaining an account is a simple and short process in which you select a username and a password and provide your e-mail address. The account registration page for www.nuget.org can be found at www.nuget.org/Account/Register.
After creating an account (and confirming it by using the link sent to the e-mail address you provided), you can log on at www.nuget.org/Users/Account/LogOn and click your username in the top-right corner of the screen. This will bring you to an overview page of your account on www.nuget.org, as can be seen in Figure 4-3.

Figure 4-3. The My Account page on www.nuget.org, displaying a summary of all management options for a NuGet account
The My Account page offers some management options related to your account on www.nuget.org. It allows you to upload packages, manage your packages, edit your profile, change your password, and manage your API key.
The first option allows you to upload a new package. The second option, Manage My Packages, allows you to manage your packages. These first two options are the topic of the next section of this chapter. Edit Profile allows you to edit your public profile as it will be seen by other users of www.myget.org. Change Password speaks for itself: you can use this option to change your password. Finally, we can manage our API key, an option we’ll discuss in the “Obtaining an API Key” section of this chapter.
Publishing a NuGet Package
The only way to let the world know about your package is to publish it to a NuGet feed. Publishing a package to nuget.org can be done by anyone who has an account on www.nuget.org, as you now have since you are following the steps in this chapter. After signing in to www.nuget.org, click the Upload Package link in the top menu. This should navigate you to the page shown in Figure 4-4.

Figure 4-4. The first step of publishing a package to www.nuget.org after clicking the Upload Package menu option
Using the file upload, you can upload the package you created from your local computer. Browse for the ProNuGetStringExtensions.1.0.0.nupkg file located on your computer. Next, click the Upload button, and wait until the NuGet package has been uploaded to www.nuget.org. After uploading the NuGet package, you will be presented with the screen shown in Figure 4-5.

Figure 4-5. Verify the details of your contribution to nuget.org
On this page, you can verify the details of your NuGet package. All data shown comes directly from the package manifest, which was embedded in the NuGet package file. You cannot change these values, but if something looks wrong, you can cancel the upload, correct the values in the NuGet package manifest, and upload a corrected version of the package. The List This Package in Search Results check box at the bottom of the page can be left untouched, as otherwise your package will not be shown in the NuGet Gallery.
![]() Note An unlisted package can be downloaded from the NuGet feed when there are other packages depending on it, but will never show up in search results.
Note An unlisted package can be downloaded from the NuGet feed when there are other packages depending on it, but will never show up in search results.
When the information about the package to be published is correct, click the Submit button at the bottom of this page. This will present you with a package details page, as shown in Figure 4-6. After a short time, usually less than a minute, you should be able to find your freshly submitted NuGet package in the NuGet Gallery.

Figure 4-6. Package details page for a newly uploaded package
![]() Note This section demonstrated the happy path of submitting a NuGet package. It is important to know that from the moment you upload a package on www.nuget.org, it will be available under the Manage My Packages page, under the Unpublished Packages listing. From there, you can either delete a pending package submission or finalize and publish the submission to the NuGet Gallery.
Note This section demonstrated the happy path of submitting a NuGet package. It is important to know that from the moment you upload a package on www.nuget.org, it will be available under the Manage My Packages page, under the Unpublished Packages listing. From there, you can either delete a pending package submission or finalize and publish the submission to the NuGet Gallery.
Managing Published Packages
After a few submissions of a package on nuget.org, chances are you want to manage all of your submitted packages. Also, if you’ve previously started submitting a package to www.nuget.org but weren’t able to complete the publishing process, you may want to either finalize or abandon the unpublished package.
Log in at www.nuget.org using your account and find the Manage My Packages page. It can be found by clicking your username when logged in and navigating directly to www.nuget.org/Account/Packages. This page will show an Unpublished Packages list, if any exist, as well as a list of submissions that have been published to the NuGet Gallery. Figure 4-7 shows you what this page may look like (we admit, we’re addicted to publishing NuGet packages).

Figure 4-7. Overview of your packages on nuget.org
In addition to being able to finalize a package submission from the Unpublished Packages list (at the bottom of this page), you can also list or unlist packages on nuget.org.
![]() Caution Nuget.org does not allow package authors to remove nor overwrite their package on www.nuget.org, and that’s a good thing! People may depend on your NuGet package and may even depend on a specific version you’ve published. This puts you in a powerful position: you have the ability to break people’s development process by suddenly removing one of their dependencies. You are responsible for software builds worldwide! This is why nuget.org forces you to be nice and keep every package version you publish on the NuGet Gallery, even if it is buggy or outdated.
Caution Nuget.org does not allow package authors to remove nor overwrite their package on www.nuget.org, and that’s a good thing! People may depend on your NuGet package and may even depend on a specific version you’ve published. This puts you in a powerful position: you have the ability to break people’s development process by suddenly removing one of their dependencies. You are responsible for software builds worldwide! This is why nuget.org forces you to be nice and keep every package version you publish on the NuGet Gallery, even if it is buggy or outdated.
Since you created an account on www.nuget.org earlier in this chapter, the My Account page (refer to Figure 4-3) showed the existence of something known as an API key. This API key provides you with a token that identifies you to a NuGet feed. An API key is not required to work with the NuGet Gallery through www.nuget.org in a web browser, as you will always have to log in using your account’s username and password combination. However, when you’re publishing a NuGet package by using the NuGet command line or NuGet Package Explorer, the API key will be used to authenticate you.
All NuGet server implementations in the wild, such as nuget.org, myget.org, and the NuGet.Server package have the notion of an API key.
On the My Account page, you can easily find your API key to publish packages to nuget.org. It also features a Generate New Key button, which you can use to generate a new API key and invalidate your current one, something we did after writing this chapter to ensure that you, dear reader, cannot publish NuGet packages under our NuGet.org account—just to be on the safe side.
In the next sections of this chapter, the API key listed under the My Account page will be used. Most examples will use the key shown in Figure 4-3, 4f0ebaea-d608-4e0b-bd4f-eda3a59865e8. Some examples may use a different API key, because the two authors of this book have different API keys. Remember that yours is listed on NuGet.org.
Publishing Packages by Using the NuGet Command Line
While there’s no doubt it is useful to be able to publish a NuGet package to the NuGet Gallery by using your browser, it is not the most convenient way to publish NuGet packages, not to mention the fact that you can’t automate this process. Also, publishing a package through your web browser probably takes more time than doing so using a command-line tool. This section will show you how you can use the NuGet command line to publish packages to any NuGet feed.
![]() Note Since nuget.org does not allow overwriting packages, you’ll see different version numbers of the ProNuGetStringExtensions package being used throughout the examples.
Note Since nuget.org does not allow overwriting packages, you’ll see different version numbers of the ProNuGetStringExtensions package being used throughout the examples.
Publishing a Package to a NuGet Feed
To get you started quickly, issue the following command on a console by using the NuGet command line:
nuget push ProNuGetStringExtensions.1.0.0.nupkg
As you can see in Figure 4-8, this command fails, because no API key was specified to authenticate you to the NuGet Gallery and to identify you as the package owner.

Figure 4-8. Pushing a NuGet package to nuget.org fails because no API key was specified
To overcome this failure, specify the API key retrieved earlier in this chapter in the command. Let’s retry using the following command:
nuget push ProNuGetStringExtensions.1.0.0.nupkg 4f0ebaea-d608-4e0b-bd4f-eda3a59865e8
Figure 4-9 shows you the result of specifying the API key when publishing our NuGet package—a successful publication. After approximately a minute, the ProNuGetStringExtensions package should be visible in the NuGet Gallery at www.nuget.org.

Figure 4-9. The result of a NuGet push command publishing a package to nuget.org
Most NuGet commands, including the nuget push command, support the -Source switch and support pushing packages to feeds other than nuget.org. The following command pushes our package to the pronuget feed on www.myget.org:
nuget push ProNuGetStringExtensions.1.0.0.nupkg 8572d509-9860-4236-9016-d15dfa7e264b
    -Source http://www.myget.org/F/pronuget
![]() Note You may notice that the API key used in this command is different from the API key used earlier in this section. The reason for this is that, since we are pushing to a NuGet feed other nuget.org, the API key for that other repository will be different.
Note You may notice that the API key used in this command is different from the API key used earlier in this section. The reason for this is that, since we are pushing to a NuGet feed other nuget.org, the API key for that other repository will be different.
Managing API Keys
As you’ve seen in the previous section, all NuGet server implementations out there, such as nuget.org, myget.org, and the NuGet.Server package, have a notion of an API key. This API key is used to authenticate you and to identify you as the rightful owner of a package published on a NuGet feed.
The NuGet command line features a setApiKey command, which is used to store API keys in a central location in an encrypted manner. Doing so makes publishing packages easy, because you have to specify the API key only once. Open a console, and use the NuGet command line to store the API key for nuget.org:
nuget setApiKey 4f0ebaea-d608-4e0b-bd4f-eda3a59865e8
The preceding command stores the API key for nuget.org, encrypted using Windows Data Protection (DPAPI), in the nuget.config file, described in Chapter 2. You can have a quick look at it by opening it from %AppData%NuGetNuGet.config.
As with most NuGet commands, the setApiKey command also makes use of the –Source command-line switch to specify the NuGet feed for which you’re specifying the API key. For example, we’ve created a pronuget feed on www.myget.org, on which Maarten is identified through the API key 244e9ea0-737e-48cd-9c51-9426365d0362. Here’s how to store the API key for our pronuget feed using the setApiKey command:
nuget setApiKey 244e9ea0-737e-48cd-9c51-9426365d0362 –Source http://www.myget.org/F/pronuget
![]() Note There is no common best practice in using API keys. Some prefer specifying the API key on every command, as shown earlier in this section. Others prefer storing the API key by using the setApiKey command. We recommend storing the API key on your local development computer, as this makes it easier to work with. To push NuGet packages from a build server or a different machine, it’s probably safer to specify the correct API key, as well as the package source to be used, on every command.
Note There is no common best practice in using API keys. Some prefer specifying the API key on every command, as shown earlier in this section. Others prefer storing the API key by using the setApiKey command. We recommend storing the API key on your local development computer, as this makes it easier to work with. To push NuGet packages from a build server or a different machine, it’s probably safer to specify the correct API key, as well as the package source to be used, on every command.
Publishing Packages by Using NuGet Package Explorer
In the previous chapter of this book, we showed you that you can use both the command line and a GUI-based tool called NuGet Package Explorer (NPE) to create NuGet packages. The same is true for publishing NuGet packages: NPE contains all tools to publish NuGet packages directly from its user interface.
As explained in Chapter 1, NuGet Package Explorer is a ClickOnce application that can be installed from inside your browser. Simply navigate to http://nuget.codeplex.com and find the Downloads page. You can install and run NPE by clicking the ClickOnce Installer download.
Open NuGet Package Explorer on your system, and open the package we created in this chapter, ProNugetStringExtensions.1.0.0.nupkg. Figure 4-10 shows you what this should look like.

Figure 4-10. The ProNuGetStringExtensions package opened using NuGet Package Explorer (NPE)
Using the Edit Metadata button, you can modify the package version number to, for example, 1.1.0. From the File menu, the Publish menu item will do what you would expect: publish the package that is currently open to a NuGet feed. Figure 4-11 shows you the Publish Package dialog box.

Figure 4-11. The Publish Package dialog box in NuGet Package Explorer
The Publish Package dialog box contains no rocket-science options: it asks for the Publish URL, which, by default, points to nuget.org. Next, it requires you to specify the Publish key, the API key provided by the My Account page on www.nuget.org. There’s also a check box that enables you to unlist the package so it doesn't appear in search results.
As with the nuget push command you saw earlier, the Publish button will perform the actual work and make sure your NuGet package is pushed directly to the destination feed from the graphical user interface. The ProNuGetStringExtensions package should be visible in the NuGet Gallery at www.nuget.org after about a minute.
![]() Note We typically use the NuGet package Explorer tool while developing a NuGet package. Since it allows you to open a package directly from a NuGet feed, as shown in Chapter 3, and since it allows you to push a package directly to a feed, as shown in this section, NPE serves as a handy small NuGet package development interface that allows for an easy NuGet package development workflow.
Note We typically use the NuGet package Explorer tool while developing a NuGet package. Since it allows you to open a package directly from a NuGet feed, as shown in Chapter 3, and since it allows you to push a package directly to a feed, as shown in this section, NPE serves as a handy small NuGet package development interface that allows for an easy NuGet package development workflow.
We have all had the experience of debugging an application in Visual Studio that contains external libraries. Usually, you don’t have the debugging symbols or the original source code for those dependencies at hand. It’s often difficult to obtain all of those, let alone to hook them up in your Visual Studio application and step through the external sources.
A symbol server can provide relief there: symbol servers host the .pdb files related to an assembly referenced in your project. Ever since Visual Studio 2005, a symbol server could be referenced in the Visual Studio settings so you could retrieve from it debugging symbols and source code for external assemblies.
Users of Microsoft Team Foundation Server (TFS) can make use of the built-in symbol server and index their sources during builds by configuring the appropriate settings in the default TFS build definition template. When using this feature, assuming Visual Studio is configured correctly, you can still benefit from stepping through the source code directly from TFS Source Control while inheriting all built-in security and permission checks on these sources. However, not everyone is using TFS, and NuGet is meant to be version control system (VCS)–agnostic. That’s where SymbolSource.org comes in. This section will show you how to configure Visual Studio to consume the symbol server for nuget.org hosted on SymbolSource.org and how you can provide debugging symbols and source code to consumers of your NuGet packages.
NuGet has teamed up with SymbolSource.org to provide a symbol server for all NuGet packages hosted on nuget.org. With almost no additional effort, package authors can publish their symbols and sources, and package consumers can debug them from Visual Studio. As a package consumer, using the symbols hosted on SymbolSource.org is a one-time action that consists of adding the correct URL to the symbol server in Visual Studio. This section will take you through the required Visual Studio configuration steps.
First of all, Visual Studio typically will debug only your own source code—the source code of the project or projects that are currently opened in Visual Studio. To disable this behavior and to instruct Visual Studio to also try to debug code other than the projects that are currently opened, open the Options dialog box (under the Tools ![]() Options menu). Find the Debugging node on the left, and click the General node underneath. Turn off the option Enable Just My Code.
Options menu). Find the Debugging node on the left, and click the General node underneath. Turn off the option Enable Just My Code.
In the same dialog box, turn on the option Enable Source Server Support. This usually triggers the warning message shown in Figure 4-12. It is safe to just click Yes and continue with the settings specified.

Figure 4-12. When enabling the use of a source server, a warning is displayed
Keep the Options box dialog open, and find the Symbols node under the Debugging node on the left. In the dialog box shown in Figure 4-13, add the symbol server URL for nuget.org: http://srv.symbolsource.org/pdb/Public. After that, click OK to confirm configuration changes and consume symbols for NuGet packages.

Figure 4-13. The NuGet symbol server added to the list of symbol servers configured in Visual Studio
![]() Tip Did you know that most assemblies of the Microsoft .NET Framework also provide their debugging symbols from a symbol server? For example, you can debug your ASP.NET MVC application and step into Microsoft’s code to see what happens inside those System.* assemblies. To do so, open the Options dialog box, and then open the Debugging node and click Symbols. Add the Microsoft symbol server, located at http://msdl.microsoft.com/download/symbols. Some Visual Studio installations will already have the Microsoft symbol server listed. In those versions, just enabling it through the dialog box mentioned earlier in this note is enough to step into any core .NET assembly.
Tip Did you know that most assemblies of the Microsoft .NET Framework also provide their debugging symbols from a symbol server? For example, you can debug your ASP.NET MVC application and step into Microsoft’s code to see what happens inside those System.* assemblies. To do so, open the Options dialog box, and then open the Debugging node and click Symbols. Add the Microsoft symbol server, located at http://msdl.microsoft.com/download/symbols. Some Visual Studio installations will already have the Microsoft symbol server listed. In those versions, just enabling it through the dialog box mentioned earlier in this note is enough to step into any core .NET assembly.
Consuming Symbols for NuGet Packages
While technically not in the scope of this book, we do want to demonstrate how you can consume symbols for NuGet packages from Visual Studio. Create a new project in Visual Studio, a console application, and install the ProNuGetStringExtensions package into it by using either the NuGet Visual Studio extension or the Package Manager Console (Install-Package ProNuGetStringExtensions will do the trick). In the Program.cs file, add the code from Listing 4-3.
Listing 4-3. A Simple Console Application Consuming the Truncate() Method from the ProNuGetStringExtensions Package
using System;

namespace ConsoleApplication1
{
    class Program
    {
        static void Main(string[] args)
        {
            string longString = "This is a long string that I'll truncate later.";
            string shortString = longString.Truncate(5, "...");

            Console.WriteLine(shortString);
            Console.ReadLine();
        }
    }
}
The code fragment shown creates a long string and then uses the Truncate method from the ProNuGetExtensions package created earlier in this chapter. Add a breakpoint on line 10 (string shortString = longString.Truncate(5, "...");). Run the application by pressing F5 and step through the source code.
As you can see in Figure 4-14, Visual Studio downloads the symbols from the symbol server we’ve added to the Visual Studio configuration. You are now able to step through this code and debug it as if it were your own source code.
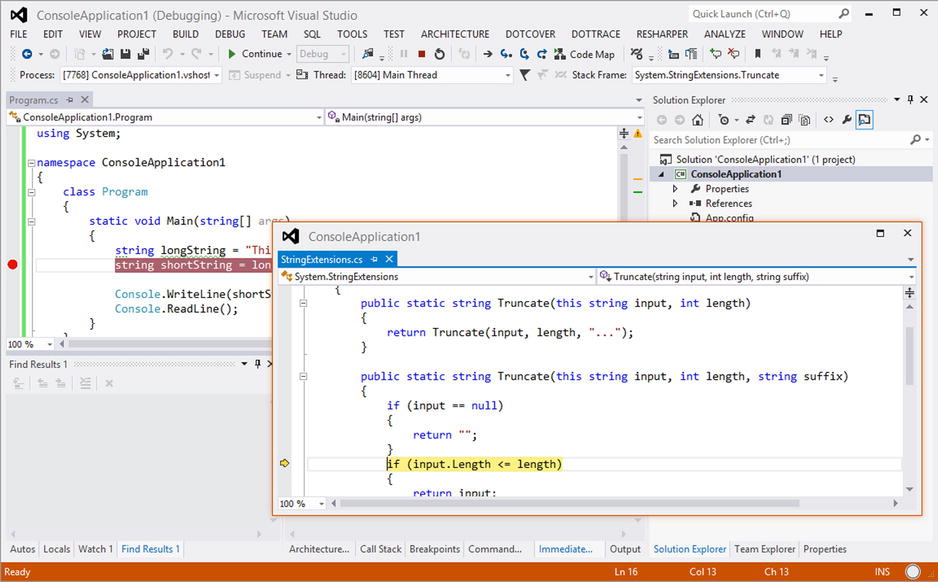
Figure 4-14. Visual Studio has downloaded the debugger symbols for the ProNuGetStringExtensions package
Publishing Symbols for Your Own NuGet Packages
Before you can publish a symbols package for a NuGet package, the symbols package has to be created. As you learned in Chapter 3, creating a symbols package can be done by using the nuget pack command and specifying the –Symbols switch. Run the following command to create a symbols package for ProNuGetStringExtensions:
nuget pack ProNuGetStringExtensions.csproj -Symbols -Version 1.0.0
On your file system, two NuGet packages should now be created:
- ProNuGetStringExtensions.1.0.0.nupkg: The NuGet package that will be published to nuget.org
- ProNuGetStringExtensions.1.0.0.symbols.nupkg: The NuGet package containing debugging symbols (.pdb files), which will be published to the symbol server at SymbolSource.org
Assuming the API key for publishing to nuget.org is 4f0ebaea-d608-4e0b-bd4f-eda3a59865e8, the following command will publish these two packages in one go:
nuget push ProNuGetStringExtensions.1.0.0.nupkg 4f0ebaea-d608-4e0b-bd4f-eda3a59865e8
If you wish to just push the symbols package, the following command can be used to achieve that goal:
nuget push ProNuGetStringExtensions.1.0.0.symbols.nupkg 4f0ebaea-d608-4e0b-bd4f-eda3a59865e8
![]() Note The NuGet command line contains some magic that pushes the regular package to NuGet.org and the symbols package to SymbolSource.org (more precisely, to http://nuget.gw.symbolsource.org/Public/NuGet). When pushing to a NuGet feed other than NuGet.org, you will always have to explicitly push both packages.
Note The NuGet command line contains some magic that pushes the regular package to NuGet.org and the symbols package to SymbolSource.org (more precisely, to http://nuget.gw.symbolsource.org/Public/NuGet). When pushing to a NuGet feed other than NuGet.org, you will always have to explicitly push both packages.
Summary
In this chapter, we’ve shown how you can publish packages created on a NuGet feed. We’ve demonstrated how to use www.nuget.org, how you can use your web browser to publish your NuGet package to nuget.org, and how to list your NuGet packages among other packages offered through that feed.
Next, we’ve shown you how to use the NuGet command line to do the same, by using the nuget push command. We’ve touched on the notion of API keys (or access keys) that are used to authenticate against a NuGet feed and to identify who owns the package being pushed. The nuget setApiKey command proved helpful when working with the NuGet command line to push packages.
NuGet Package Explorer (NPE) again proved itself as a useful tool by providing a graphical user interface to do common tasks like publishing a NuGet package. It can also be used to ease the NuGet package development workflow by opening a package from a NuGet feed directly, modifying the contents, and publishing it back to the NuGet feed.
Finally, we’ve demonstrated how you can consume and publish symbol packages. With almost no additional effort, package authors can publish their symbols and sources, and package consumers can debug them from Visual Studio.
The next chapter will show you how you can set up your own NuGet feed using different approaches, and we will explain why you might want to do so even though there’s a public NuGet Gallery at nuget.org.