
![]()
Consuming and Managing Packages in a Solution
The introduction of this book introduced you to the bigger picture: the general concept of package management and why it is so extremely powerful. We also introduced NuGet as a solution-wide package management tool and explained its key benefits. Chapter 1 showed you how to get your development environment ready to fully leverage NuGet on your machine. This chapter will build on that knowledge and show you how you can consume your first NuGet package in Visual Studio.
In our first simple scenario, a package will be added to an ASP.NET MVC project. Afterward, we’ll explore additional options for installing, updating, and uninstalling NuGet packages in your projects. You will also learn how to adjust NuGet to your needs by configuring custom package sources. There’s a nice graphical user interface to do all that, in addition to PowerShell commands and a command-line tool. We’ll show you how to use all of those, so you can decide for yourself which method best suits you.
Finally, we’ll demonstrate how you can analyze packages installed into a project and how those packages relate to your project and to each other.
Consuming Your First NuGet Package
In this section, we’ll show you how you can consume your first NuGet package. Using the tools that are integrated into Visual Studio by installing the NuGet Visual Studio extension, as explained in Chapter 1, we’ll search for a NuGet package from the public NuGet repository.
![]() Note To most NuGet users, the term NuGet repository describes a NuGet package source, but to others, this is a NuGet feed. In essence, both names are correct. Since we’re talking about a source of NuGet packages, it is a repository. Since those repositories (except the local folder or simple network share) are exposed to the world as an ATOM (XML) feed, the term feed is also appropriate.
Note To most NuGet users, the term NuGet repository describes a NuGet package source, but to others, this is a NuGet feed. In essence, both names are correct. Since we’re talking about a source of NuGet packages, it is a repository. Since those repositories (except the local folder or simple network share) are exposed to the world as an ATOM (XML) feed, the term feed is also appropriate.
NuGet packages can be consumed in any type of Visual Studio project, so go ahead and create a new Visual Studio project—for example, an ASP.NET MVC project or a Windows Presentation Foundation (WPF) project. You can also open an existing project and add a NuGet package there.
For this section, we’re using a new ASP.NET MVC project, since there’s something special about that type of project in relation to NuGet (we’ll come to that in a second). Figure 2-1 shows the settings used to create a new ASP.NET MVC project, to demonstrate this NuGet version of “Hello, World.” After creating a new ASP.NET MVC project in Visual Studio, you’re finished with this section.

Figure 2-1. Settings used in Visual Studio to create a new ASP.NET MVC project
Integrating Visual Studio and NuGet
The NuGet Visual Studio extension adds several menu options to Visual Studio. For example, the Tools menu contains a new entry called Library Package Manager, which features a number of submenus (see Figure 2-2).

Figure 2-2. The NuGet Visual Studio extension adds a new menu item to Visual Studio
At the solution and project level in the project explorer, a new context menu is available. Find the Manage NuGet Package context menu by right-clicking either the solution or one of the projects in a solution.
![]() Note In Figure 2-2, you may notice the Package Visualizer submenu if you have installed Visual Studio 2010 or 2012 Ultimate edition. Although this submenu is not available in all Visual Studio versions, it is a valuable tool when working with NuGet packages, so it will be covered later in this chapter.
Note In Figure 2-2, you may notice the Package Visualizer submenu if you have installed Visual Studio 2010 or 2012 Ultimate edition. Although this submenu is not available in all Visual Studio versions, it is a valuable tool when working with NuGet packages, so it will be covered later in this chapter.
Finding the Package You Need
The NuGet Visual Studio extension adds some search functionalities to find a NuGet package. Right-click your project in Visual Studio and click Manage NuGet Packages. This will open a search form with basic filtering options, as shown in Figure 2-3.

Figure 2-3. The NuGet package management dialog box enables searching for NuGet packages
The window presented consists of three panes: one to switch among installed packages, package updates, and a list of packages that you have recently used; another to search packages; and a third to display details of selected packages. Make sure to open the Online pane. From there, you can work with the search functionalities available in the Search Online field.
Note that the Stable Only drop-down can be changed to Include Prerelease, which allows Alpha, Beta, or Release Candidate versions to be included in the results. We’ll talk more about these Prerelease versions later. For now, keep the drop-down set to Stable Only.
Searching for packages is a difficult job when you don’t know what to search for. The best way to start exploring NuGet is by entering the technology you are working with in the search box in the top-right corner of this window. For example, type mvc as a search query when you are working with ASP.NET MVC. If you are looking for something related to Windows Phone 8, enter wp8.
The list of NuGet packages will be filtered based on your query but may still yield a large number. Refine your search by adding a second keyword. For example, if you want to work with HTML5, change the search query to mvc html5 to get a more relevant list of packages to explore. Of course, this method is not ideal, because it is based on filtering titles, descriptions, and tags added to NuGet packages. If the package author forgot to add tags to the published packages, they will probably not be visible when you search for specific keywords. Nevertheless, this way of filtering is the only method of getting a short list of NuGet packages that may provide the functionality you need.
At the time of this writing, over 15,500 NuGet packages are available on NuGet.orgSome of these packages have multiple versions available, resulting in more than 120,000 unique packages in the public NuGet.org repository! By the time you are reading this book, these numbers have probably gone stale, and even more packages are available. Even after you’ve searched for your technology, how do you find the specific package you need?
Once you filter the list of available NuGet packages based on the technology you are using and an additional keyword that refines that search, the list of packages at your disposal will be easier to process. Note that while you have now searched on technology, a search for things like Twitter or JSON parserwill yield packages that provide a certain functionality.
Since nuget.org contains various packages of a variable quality, it is important to take some other clues into account in choosing packages. It’s very similar to all app stores out there, where not every app you install has the same quality baseline.
Luckily, every NuGet package comes with a number of details to inform your choice. If you look back at Figure 2-3, the right-hand pane shows a variety of details about a package:
- The package creator, which may influence whether you deem the NuGet package to be trustworthy.
- The package ID, which will probably not influence your decision but is great to remember if you really like the package and want to reuse it in future projects.
- The package version and last update date, which may give you an idea of how mature and how well-maintained the NuGet package is.
- The number of downloads is a good indication of a package’s popularity. But don’t judge a package by its number of downloads alone; great-quality packages sometimes have only a handful of downloads.
- The Project Information hyperlink brings you to the NuGet package’s project information page, where you can learn a lot about a package.
- The package description, dependencies, and release notes can also give a strong indication about whether the NuGet package will fit your needs.
- The package license. Sometimes a specific open source license cannot be added to the project you are building or a package cannot be used in production because of conflicting license terms. There are packages with many different licenses, and depending on your environment and project, the license can be very important.
Be wise in your decisions, and always try out new packages in a sample application (not on your actual project) if you are not familiar with them!
![]() Note As we will see in later chapters, NuGet packages can contain PowerShell code that runs under the same privileges as your Visual Studio application. Package authors can do a lot of interesting things, such as adding PowerShell cmdlets to the Package Manager Console within Visual Studio. However, a malicious PowerShell script could do much damage, as there are no restrictions or validations on the PowerShell code being executed. While we don't want to scare you, always be cautious about the packages you install and report anything you find harmful. You can always extract the package archive or use NuGet Package Explorer to inspect the package contents.
Note As we will see in later chapters, NuGet packages can contain PowerShell code that runs under the same privileges as your Visual Studio application. Package authors can do a lot of interesting things, such as adding PowerShell cmdlets to the Package Manager Console within Visual Studio. However, a malicious PowerShell script could do much damage, as there are no restrictions or validations on the PowerShell code being executed. While we don't want to scare you, always be cautious about the packages you install and report anything you find harmful. You can always extract the package archive or use NuGet Package Explorer to inspect the package contents.
If you do find a nefarious package, use the Report Abuse link on the package page. This will inform the NuGet Gallery administrators and prompt them to investigate the package more closely.
If you know the value of one or more fields displayed in the NuGet package management dialog box or the metadata fields within a package, you can narrow search results further. For example, if you want to search for packages containing the word Glimpse in the ID, you can specify a search for id:Glimpse. Similarly, other package metadata fields can be searched as well. Table 2-1 lists some example searches for attributes that can be searched through. Do note that these searches will execute a Contains search, meaning that a search for id:Glimpse will return Glimpse as well as Glimpse.WindowsAzure and so on.
Installing a NuGet Package
Let’s add a package to our still-blank ASP.NET MVC project. Right-click your project in Visual Studio and click Manage NuGet Packages. Find the package named ELMAH, an error-logging framework for ASP.NET. As shown in Figure 2-4, it is pretty obvious what to do next: click the Install button and watch what happens.

Figure 2-4. Finding and installing the ELMAH package in a project
The NuGet Visual Studio extension added a new reference to your project. Also, if you look at the web.config file in the ASP.NET MVC project, some configuration settings have been added as well, as shown in Listing 2-1.
Listing 2-1. The Modified web.config File After Installing the ELMAH NuGet Package
<?xml version="1.0" encoding="utf-8"?>
<configuration>
  <configSections>
    <sectionGroup name="elmah">
      <section name="security" requirePermission="false"
              type="Elmah.SecuritySectionHandler, Elmah" />
      <section name="errorLog" requirePermission="false"
              type="Elmah.ErrorLogSectionHandler, Elmah" />
      <section name="errorMail" requirePermission="false"
              type="Elmah.ErrorMailSectionHandler, Elmah" />
      <section name="errorFilter" requirePermission="false"
               type="Elmah.ErrorFilterSectionHandler, Elmah" />
    </sectionGroup>
  </configSections>
  <!-- ... -->
  <system.web>
    <!-- ... -->
    <httpModules>
      <add name="ErrorLog" type="Elmah.ErrorLogModule, Elmah" />
      <add name="ErrorMail" type="Elmah.ErrorMailModule, Elmah" />
      <add name="ErrorFilter" type="Elmah.ErrorFilterModule, Elmah" />
    </httpModules>
    <httpHandlers>
      <add verb="POST,GET,HEAD" path="elmah.axd" type="Elmah.ErrorLogPageFactory, Elmah" />
    </httpHandlers>
  </system.web>
  <system.webServer>
    <!-- ... -->
    <modules runAllManagedModulesForAllRequests="true">
      <add name="ErrorLog"
           type="Elmah.ErrorLogModule, Elmah" preCondition="managedHandler" />
      <add name="ErrorMail"
           type="Elmah.ErrorMailModule, Elmah" preCondition="managedHandler" />
      <add name="ErrorFilter"
           type="Elmah.ErrorFilterModule, Elmah" preCondition="managedHandler" />
    </modules>
    <handlers>
      <add name="Elmah" path="elmah.axd" verb="POST,GET,HEAD"
           type="Elmah.ErrorLogPageFactory, Elmah" preCondition="integratedMode" />
    </handlers>
  </system.webServer>
  <!-- ... -->
</configuration>
Browse the Solution Explorer tree, and you’ll see that ELMAH has been added to the list of references. If you right-click the ELMAH reference and select Properties, the properties pane in Visual Studio will show you where the package has been downloaded and referenced:
C:....YourSolutionpackageselmah.corelibrary.1.2.2libElmah.dll.
Looking at the evidence gathered, the following happened automatically just by clicking Install in the Package Manager dialog box:
- The latest version of ELMAH was downloaded from the NuGet.org package source.
- The ELMAH package depends on the Elmah.CoreLibrary package, which is also downloaded and referenced.
- The required assemblies and other files have been added to a folder under the solution root.
- The ELMAH assembly has been automatically referenced in the current project.
- The web.config file was automatically modified and updated with all required settings for ELMAH.
Impressive, no? Imagine having to search the Internet for the latest version of ELMAH, find the correct download, extract it to your system, read through the documentation to understand what’s required to install it into your project, change web.config, and so on.
It gets even better. When a package has a dependency on another package, NuGet will download and install the additional required package together with the one you were installing, in one go. This is a first indication of how useful NuGet can be for managing your dependencies: no more time wasted reading through release notes for installation steps and prerequisites. NuGet will figure it out for you!
When you’re refactoring a project, chances are that some dependencies on external libraries may be removed along the way. We’ve already seen that NuGet offers a clean way of installing NuGet packages; the good news is that uninstalling NuGet packages is equally frictionless.
Open the Manage NuGet Packages dialog box and click the Installed Packages tab. This will list all packages installed in your project, including their dependencies. To uninstall a package, simply click the Uninstall button next to the package. This will uninstall the package from the selected project.
Uninstalling a package goes through the inverse process of installing a NuGet package into your project. For example, when uninstalling ELMAH from the project, the following process will be executed:
- 1. The NuGet Visual Studio extension will prompt to uninstall dependencies that are no longer used. In this case, you will be asked whether the Elmah.CoreLibrary should be uninstalled as well.
- 2. The web.config file will be automatically modified, and all required settings for ELMAH will be removed. Note that if you have modified these ELMAH-specific settings, the modified version of these settings will be left sitting in your web.config and may have to be removed manually. No need to worry about modifications to other parts of the web.config file: NuGet is smart enough to detect which modifications happened as part of the ELMAH package installation, and which ones have nothing to do with this event.
- 3. The ELMAH reference will be removed from your project.
- 4. The required assemblies and other files that have been extracted from the original package into the solution root will be removed from the file system if no other projects in your solution are dependent on them.
If you try to uninstall a package that is still required by another NuGet package, the NuGet Visual Studio extension will provide you with an error message like the one shown in Figure 2-5.
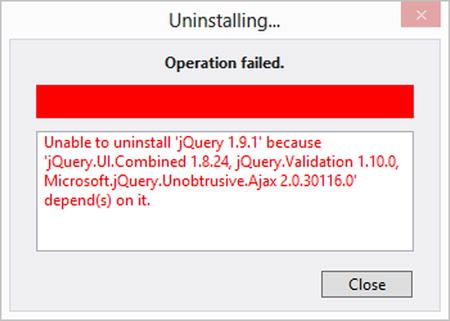
Figure 2-5. Uninstalling a NuGet package that is still required by other Nuget packages generates an error message
Uninstalling a package will almost never leave behind any artifacts from the previously installed package. Exceptions to that are framework references and assembly-binding redirects that have been added by a package. NuGet has no way to know if they were added due to the package and used only because of the package, and hence will leave them in the project.
Updating a Package to the Latest Version
What do you do when a dependency you are using in your project publishes a new version? Do you immediately update to the new version? Do you wait? Do you wait because you want to make sure it’s stable first, or do you wait because upgrading a dependency again means downloading software, reading manuals, updating configuration, and so on?
If you find yourself waiting to save yourself the work of updating, NuGet offers a clean upgrade path for any NuGet package installed to your project that respects semantic versioning (read more on semantic versioning in Chapter 3).
Just as when installing a new NuGet package into your project, right-click your project in Visual Studio and click Manage NuGet Packages. In the dialog box that opens, select the Updates tab. As shown in Figure 2-6, this tab shows the list of all updates available for NuGet packages installed into your project.

Figure 2-6. Updating a package by using the Manage NuGet Packages dialog box
Since we’ve installed the ELMAH package earlier in this section and NuGet typically installs the latest version of a NuGet package into your project, the Updates tab will not be showing ELMAH. Nevertheless, you will see some updates available for this fresh, blank project. ASP.NET MVC projects are created with some NuGet package references automatically added, such as Entity Framework, jQuery, jQuery UI, jQuery Validation, and Modernizr. Updates can easily be installed by selecting the reference and clicking the Install button.
![]() Note For this section of the book, we’ve chosen to work with an ASP.NET MVC project because it uses NuGet as part of the project template. The ASP.NET MVC framework features a predefined set of NuGet package dependencies, enabling you to automatically update external dependencies like jQuery with just a few clicks.
Note For this section of the book, we’ve chosen to work with an ASP.NET MVC project because it uses NuGet as part of the project template. The ASP.NET MVC framework features a predefined set of NuGet package dependencies, enabling you to automatically update external dependencies like jQuery with just a few clicks.
Whenever a package update requires additional configuration settings, additional .NET framework dependencies, or dependencies on other NuGet packages, these will also be installed in one go, just as when you are installing a fresh NuGet package into your project.
Be aware that when you change content files that have been installed through NuGet, by default these changes will never be overwritten. This has been done to protect your work from being replaced by a clean, blank state of the NuGet package. This also means that if an update requires changes in these files, you will have to either overwrite your local changes or make the changes required by an updated package yourself. Since NuGet 2.5, a dialog box will be shown in which you can specify whether you want to overwrite one file or all files, or none at all.
For reference, the following happens during a package update. First, the package is uninstalled by applying the following flow:
- Assembly references for the package are removed.
- Framework references are left behind.
- Content files are removed, unless they were edited.
- MSBuild .props/.targets files are removed.
- Configuration transformation files are merged out.
- Configuration XDT transformations named *.uninstall.xdt are processed.
Next, the updated version is installed:
- Assembly references for the package are added.
- Framework references are added.
- Content files are added (or ignored or overwritten, depending on settings).
- MSBuild .props/.targets files are added.
- Configuration transformation files are merged in.
- Configuration XDT transformations named *.install.xdt are processed.
Using the Package Manager Console
You have now learned the basic operations of working with the graphical user interface provided by the NuGet Visual Studio extension. Although working with a graphical user interface is easy, many developers using NuGet prefer working with the Package Manager Console that is also installed as part of the NuGet Visual Studio extension.
The Package Manager Console is an interactive window you can dock in your Visual Studio IDE that allows you to interact with NuGet through commands or, in a broader sense, to automate Visual Studio. This window is special because it’s PowerShell enabled, and as such, you can run NuGet commands as well as PowerShell commands. In proper PowerShell terms, we speak about cmdlets (pronounced commandlets). The fact that the Package Manager Console enables you to use PowerShell commands inside Visual Studio is probably the main reason that many developers prefer working with the Package Manager Console instead of the NuGet Visual Studio extension: it enables you to work with NuGet and script Visual Studio in a familiar yet powerful manner.
Before we cover a more specific scenario and work with an explicit version of a package, we would like to give you some quick tips on how to make optimal use of the Package Manager Console.
Don’t worry if you are not familiar with PowerShell or its syntax. Most operations you will do while working with NuGet packages can be accomplished with one command. You don’t have to learn the various commands by heart either, as they are easily discoverable using the built-in autocompletion feature.
As you can see in Figure 2-7, pressing the Tab key in the Package Manager Console at any time opens an IntelliSense-like window showing the commands available. Once you are using a command, pressing the Tab key will display a list of options available for that command, as you can see in Figure 2-8.

Figure 2-7. List the available cmdlets in the Package Manager Console, using the Tab key for autocompletion

Figure 2-8. List the available command switches for a given cmdlet, using the Tab key for autocompletion
Once you are more familiar with the Package Manager Console, you’ll see that the naming pattern used for these commands is so intuitive that you’ll be able to perform all these actions spontaneously.
![]() Tip You can always find out more information about the available commands and how to use them by executing the Get-Help cmdlet. To find out more about a specific command, you can type Get-Help followed by the name of the cmdlet—for example, Get-Help Get-Package.
Tip You can always find out more information about the available commands and how to use them by executing the Get-Help cmdlet. To find out more about a specific command, you can type Get-Help followed by the name of the cmdlet—for example, Get-Help Get-Package.
Finding a Specific Version of a Package
There are several ways to find a package without using the Manage Packages dialog box. You can browse www.nuget.org for a package, you can use the command line, or you can use the Package Manager Console. Lazy as we are, we don’t want to leave our Visual Studio IDE, so we won’t use the command line or the NuGet Gallery. We’ll cover those later in this book.
To find a package by using the Package Manager Console, you’ll need to list the packages available matching your query. This is the purpose of the Get-Package cmdlet. By default, this cmdlet will show you the packages installed in your project. To query the package source, which is by default the NuGet Gallery, you’ll have to add the -ListAvailable switch, as illustrated in Figure 2-9. Add a -Filter switch to the command to filter the results.

Figure 2-9. Getting a list of packages available on the NuGet Gallery matching a given filter
By default, only the latest version of a package will be returned. If you want to list all versions of this package available on the package source, you can add the -AllVersions switch, as shown in Figure 2-10. Note that this will not yield prerelease packages.

Figure 2-10. Getting a list of all available versions of a package matching a given filter
Installing a Specific Version of a Package
Once you have found the package you need, you’ll have to install it. To install a package into a project using the Package Manager Console, you need to use the Install-Package cmdlet. To install a specific version of a package, you can simply add the -Version switch to the command. If a prerelease package is to be installed, include the -Prerelease switch to the Install-Package command. Straightforward, isn’t it? The only thing left to do is to pick a project in the Default Project drop-down list to make sure the Package Manager Console targets the correct one.
You’ll notice that the Package Manager Console will output the progress of the installation procedure. As Figure 2-11 illustrates, any required dependencies that need to be installed or updated will be taken care of.

Figure 2-11. Installing a specific version of a package by using the Package Manager Console
In the event you need or want to uninstall a package from a project, you can use the Uninstall-Package cmdlet. This command’s default behavior is to rely on the default project selected in the drop-down list at the top of the Package Manager Console window. To uninstall a package from the default project, simply pass the package ID to the Uninstall-Package command, as shown in Figure 2-12. Notice that we did not specify any target project name.
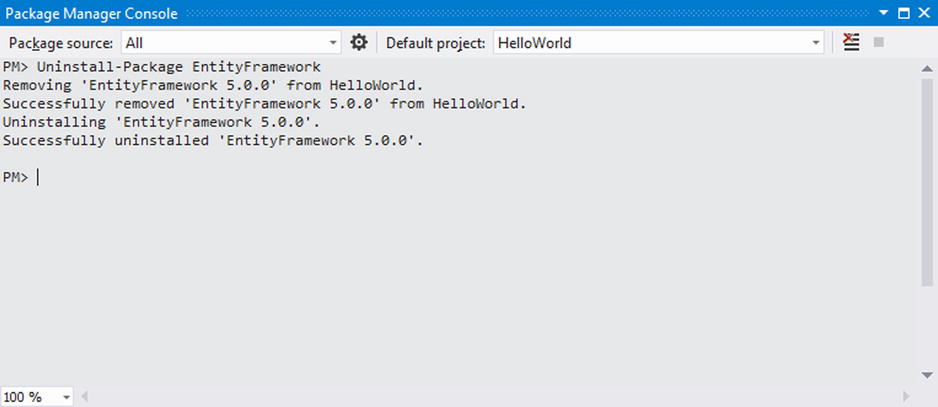
Figure 2-12. Uninstalling a package from the default project by using the Package Manager Console
Uninstalling a package can impact the other packages you reference in your project. NuGet will assist you by detecting these dependencies and inform you about any conflicts that might occur. For instance, if another package depends on the package you want to remove, the command will fail. This is a safety precaution and default behavior for this command. However, you can force the removal of a package by using the -Force switch, which will instruct NuGet to remove the package, even while another package depends on it.
Another useful switch to this command is the -RemoveDependencies option, which will make sure that not only the specified package will be uninstalled but also all unused dependencies of that package. Any dependency depended on by another package will be skipped. Appendix C gives an overview of the available switches.
Updating a Package to a Newer Version
At some point in time, you’ll want to update one of your packages to a newer version. The Manage Packages dialog box will, by default, show you the latest available version of any updates that are available. The same can be accomplished by using the Package Manager Console, as shown in Figure 2-13.

Figure 2-13. Listing the available updates for a project by using the Package Manager Console
If you want to update to one of these package versions, you simply run Update-Package followed by the ID of the package you want to update. If you want to update to a specific version of a package, you can do so by adding the -Version switch to the Update-Package cmdlet in the Package Manager Console, as illustrated in Figure 2-14.

Figure 2-14. Updating a package to a specific version by using the Package Manager Console
By default, all dependencies that have an update available will be updated as well. By adding the -IgnoreDependencies switch, the update can be limited to just the current package. Also notice that we did not provide any target project for this command. This command targets all projects within the solution, unless you explicitly target a project by using the -ProjectName switch. The Default Project drop-down list at the top of the dialog box does not have any impact on the Update-Package cmdlet. Being aware of these defaults and caveats will allow you to make optimal use of the Package Manager Console. All available switches are explained in Appendix C of this book.
![]() Tip Did you know you can update all packages for an entire solution at once, with one simple command? That’s exactly what the Update-Package statement will do by default if you don’t add anything else to it!
Tip Did you know you can update all packages for an entire solution at once, with one simple command? That’s exactly what the Update-Package statement will do by default if you don’t add anything else to it!
Of course, some human intervention may be required to complete the update process of a NuGet package. Think about updating the references to the new jQuery script files in your HTML or a changed API. These are things that the producer of a package cannot anticipate, so no automation will be available for you to perform these custom steps.
Using the Package Manager Console Default Project
The Package Manager Console toolbar shows a drop-down in which a default project can be specified. It might sometimes seem a bit counterintuitive to have a default project selected when running a cmdlet in the Package Manager Console. We have summarized which cmdlets use the default project in Table 2-2.
Table 2-2. Using the Default Project in the Package Manager Console
| Cmdlet | Uses the Default Project? |
|---|---|
| Get-Package | Yes, except when using the -ListAvailable switch |
| Install-Package | Yes |
| Update-Package | No |
| Uninstall-Package | Yes |
Reinstalling Packages
The Package Manager Console also allows you to easily reinstall packages. To do so you should make use of the -Reinstall switch that comes with the Update-Package cmdlet. The following command reinstalls the Newtonsoft.Json package:
Update-Package Newtonsoft.Json -Reinstall
This is a very simple command that makes it super easy to reinstall a certain package. A common use case for this scenario is when you want to retarget your projects to another version of the .NET Framework. Another situation where package reinstallation is useful is during testing of packages as part of a good development workflow, as explained in Chapter 7.
Although this is very straightforward, you have to be very careful and consider the following effects of this command:
- You might be attempting to reinstall a package (or an indirect package dependency) which has no support for the new framework or platform you are targeting.
- Package version constraints only apply on direct package dependencies. This means that when you reinstall a package, one or more of its dependencies can be a newer version than before. To avoid this you can make use of the -IgnoreDependencies switch.
More information about the caveats of reinstalling packages can also be found in the NuGet documentation at http://docs.nuget.org/docs/workflows/reinstalling-packages.
Using the NuGet Command Line
So far, you didn’t need to leave the Visual Studio IDE for any operation you wanted to perform using NuGet. Actually, you’ll rarely have to do that at all! The NuGet Visual Studio extension provides a great integrated experience, one that many developers will quickly be able to adopt. “Then why is there a need for a command line?” you ask. There are a couple of reasons for using it.
Many people use the NuGet command line for grabbing packages directly from a NuGet feed and creating a local copy of them on their system. The package is not installed into a project but “just downloaded” instead. We personally use it for all kinds of tasks, such as creating packages or fetching a list of available packages from a feed.
There are other scenarios where you will fall back on the NuGet command line, however. One of them is continuous integration. Typically, a build environment contains the bare minimum to be able to build your software. NuGet could be one of those tools that will enable your build servers to consume and produce NuGet packages as part of automated builds. To be able to do so, you’ll need a simple tool that allows you to interact with NuGet repositories and packages, preferably a command line. That’s exactly what the NuGet command line is for. We’ll dive deeper into this topic in Chapter 7.
All of the operations supported by the NuGet cmdlets in the Package Manager Console are also available in the NuGet command line, but note that the NuGet command line can never update your project file. Running a package update by using the command line will fetch the latest version from the NuGet feed and store it on disk, but it will not update the package in a project.
To work with the NuGet command line, you should open a command prompt in Windows. You can do this in many different ways:
- Press the Windows key+R, type cmd, and press Enter. Navigate to the folder where you stored nuget.exe, and interact with it. If you manually downloaded nuget.exe from the Internet, do not forget to unblock it by right-clicking the file and selecting Properties
 Security Unblock.
 - On Windows 7 and 8, you can browse to nuget.exe by using Windows Explorer. Shift+right-click the folder containing nuget.exe, and select Open Command Window Here.
The NuGet command-line tool comes with a built-in help function: type nuget help to get a list of available commands, as illustrated in Figure 2-15. If you want help about a specific command (for example, the install command), you simply execute nuget help install. Another way to do so is by executing nuget install -help.

Figure 2-15. Getting help from the NuGet command-line tool
Installing a Package
To install a package by using the NuGet command line, you’ll have to run the install command, which can be used in two different ways. You can specify a package source or multiple package sources to be used, or you can specify no package source, in which case the NuGet command line will fall back on using the nuget.config file in your local application data folder. If the configuration doesn’t specify any package sources, it will fall back to a hard-coded NuGet feed URL.
![]() Note The NuGet command line is unaware of any context contrary to the NuGet Visual Studio extensions. As such, you’ll have to specify a target for the commands used in the NuGet command line. Some commands will use the current directory where the nuget.exe tool is located: in that case, you usually can specify an output directory for the command.
Note The NuGet command line is unaware of any context contrary to the NuGet Visual Studio extensions. As such, you’ll have to specify a target for the commands used in the NuGet command line. Some commands will use the current directory where the nuget.exe tool is located: in that case, you usually can specify an output directory for the command.
By default, the install command will always pick the latest version of a given package. Similar to the Install-Package cmdlet in the Package Manager Console, the install command has some switches that allow you to be more specific in your request.
To install the latest version of a specific package in the current directory, execute the command shown in Listing 2-2.
Listing 2-2. Installing the Latest Version of a Package by Using the NuGet Command Line
nuget install {packageId}
Simply replace {packageId} with the ID of the package you want to install—for instance, nuget install WebActivator. Notice that the command line will download the package and extract it in the current directory, unless another location is specified by the -outputdirectory option. Because the NuGet command line has no context for the solution or projects you might want to target, it will limit the install operation to the extraction of the package in a specific place. Typically, you’ll want to point the -outputdirectory switch to <path to your solution>packages, which is the default configuration for NuGet to store packages relative to a solution. However, you can deviate from it if you want to.
One of those conventions is that each package will be installed in its own subdirectory of the <path to your solution>packages directory. The subdirectory name equals the package ID followed by its version number—for instance, <path to your solution>packagesWebActivator.1.4 would be used for version 1.4 of the WebActivator NuGet package. By doing so, NuGet allows you to use multiple versions of a package within the same solution. The binaries will not be overwritten on installation, as each package’s contents will be contained within its own directory. Again, you can deviate from this default convention and instruct the NuGet command line to use only the package ID for its subdirectory names, without the version number added to it (use the -ExcludeVersion flag to do so). For the given example using WebActivator, this would result in <path to your solution>packagesWebActivator.
When installing NuGet packages in Visual Studio, a file named packages.config is created, which holds the ID and version of every package installed in a project. The NuGet command line can use this file as a source of which packages to install. This can be done by targeting the packages.config file of the solution, as shown in Listing 2-3.
Listing 2-3. Installing the Latest Versions of All Packages in a Solution by Using the NuGet Command Line
nuget install C:srcslnpackages.config
You need to specify the full absolute path to the packages.config file, as shown in Listing 2-3. If the path contains spaces, you’ll have to enclose it in quotes—for example, nuget install “C:srcsln dirpackages.config”. Working with packages.config from the command line is a technique used by Continuous Integration systems to perform NuGet package restore, explained in Chapter 6.
You may want to install a specific version of a package. This can be done by adding the -version switch and the version number in the command, as shown in Listing 2-4. This allows you to install a specific version of a package from the command line.
Listing 2-4. Installing a Specific Version of a Package by Using the NuGet Command Line
nuget install {packageId} -version {packageVersion}
For example, nuget install -version jQuery 2.0.0 will download the jQuery package version 2.0.0 to your system. Of course, all other command options remain valid for this scenario as well. Make sure to include the -prerelease switch when installing prerelease packages.
The NuGet command line allows you to update packages to a newer version. You can do so by using the update command (see Listing 2-5 and Listing 2-6).
Listing 2-5. Updating All Packages in a Project to the Latest Versions by Using the NuGet Command Line
nuget update packages.config
Listing 2-6. Updating All Packages in a Solution to the Latest Versions by Using the NuGet Command Line
nuget update solution.sln
The update command has various options, allowing multiple update scenarios. For example, you can specify a list of package sources to be used by using the -source switch, and you can specify a list of package IDs to update by using the -id switch.
You can also instruct NuGet to consider only safe packages, by using the -safe flag. When you set this flag, NuGet will look for the highest available version of the package within the same major and minor version of the already installed package.
If for some reason you want to deviate from the default Packages folder as the package repository path for your solution, you can specify another one by using the -repositorypath option.
![]() Tip The update command in the NuGet command line has another option that allows you to update the NuGet command line itself. To update the NuGet command line, execute nuget update -self.
Tip The update command in the NuGet command line has another option that allows you to update the NuGet command line itself. To update the NuGet command line, execute nuget update -self.
The NuGet command line does not support uninstalling a package from a solution or project, because it doesn’t touch the Visual Studio solution or projects at all. Because the install command really just downloads and extracts the NuGet package archive, uninstalling a package can be done by just deleting the folder where the package was extracted.
Managing Packages in a Solution
So far, we’ve shown you how you can add, update, and remove packages at the project level. In a lot of software development projects, multiple projects share the same dependencies. For example, multiple projects in a solution can have a dependency on Microsoft’s Entity Framework (which is also on NuGet with package ID EntityFramework).
Both the NuGet Visual Studio extension and the Package Manager Console support managing and updating packages across project boundaries. This enables you to have a consistent set of package dependencies in your solution, all having the same version and assemblies. Imagine having to update references manually in multiple projects!
Using a large Visual Studio solution, this section will show you how to install, update, and uninstall packages in multiple projects at once. As with installing NuGet packages at the project level, you’ll find that right-clicking your solution in Visual Studio followed by clicking Manage NuGet Packages for Solution will allow you to perform some magic.
Installing Packages in Multiple Projects
In this section, we will add log4net, a logging framework, to some projects that require logging, and we’ll use both the NuGet Visual Studio extension and the Package Manager Console to do so.
Once you select a set of projects and the NuGet package to install, NuGet will download the selected package from its repository and install it into the selected projects. The same package installation steps will happen for each selected project:
- The latest version of the selected NuGet package is downloaded from the Internet.
- The required assemblies and other files are added to a folder under the solution root.
- Assemblies in a NuGet package are referenced in all selected projects.
- Optionally, configuration files and source files are added or transformed. This depends on the actual package contents.
Using the NuGet Visual Studio Extension
Right-click your solution in Visual Studio and click Manage NuGet Packages. Notice that the exact same Manage NuGet Packages dialog box is displayed as when you wanted to add a package reference to a single project. Figure 2-16 shows you what this screen looks like.

Figure 2-16. Searching for the log4net NuGet package
By now, you should be familiar enough with the Manage NuGet Packages dialog box to search for the package log4net. If not, Figure 2-16 shows you what to look for. When you find the package, click the Install button next to it. Notice that, before the package is actually downloaded and installed, the NuGet Visual Studio extension opens a dialog box asking which projects to install the package to (see Figure 2-17). Select the projects to install log4net to and then click the OK button.

Figure 2-17. The Select Projects dialog box when installing a NuGet package to multiple projects at once
Using the Package Manager Console
As with the NuGet Visual Studio extension, the Package Manager Console is also able to install NuGet packages into multiple projects at once. Doing this requires you to sharpen your PowerShell scripting skills a little but enables you to do powerful things.
If we take the example of installing log4net into several projects at once, entering the following PowerShell command into the Package Manager Console should do the trick:
Get-Project HelloWorld, HelloWorld.Core | Install-Package log4net
If you prefer to install a package into every project (which is a rare use case, when solid architectural patterns are applied to a project!), issue the following command:
Get-Project -All | Install-Package log4net
As shown in Figure 2-18, the NuGet Package Manager Console runs through all project names specified and invokes the Install-Package command for each project.

Figure 2-18. Installing a NuGet package into multiple projects at once using the Package Manager Console
Of course, you can also apply the commands learned earlier in this chapter to install a specific version of a NuGet package into multiple projects at once. The following example will install a specific version of log4net into multiple projects simultaneously:
Get-Project HelloWorld, HelloWorld.Core | Install-Package log4net -Version 2.0.0
![]() Note The PowerShell command used actually consists of two commands. Get-Project retrieves a reference to one or more Visual Studio projects specified as a parameter. Using the pipe symbol (|) tells PowerShell to loop the selection of projects and invoke the Install-Package command for every project. This very powerful concept enables you to chain multiple commands to do a lot of work, using just a few keystrokes. This power is probably also the reason a lot of developers prefer the Package Manager Console over the NuGet Visual Studio extension.
Note The PowerShell command used actually consists of two commands. Get-Project retrieves a reference to one or more Visual Studio projects specified as a parameter. Using the pipe symbol (|) tells PowerShell to loop the selection of projects and invoke the Install-Package command for every project. This very powerful concept enables you to chain multiple commands to do a lot of work, using just a few keystrokes. This power is probably also the reason a lot of developers prefer the Package Manager Console over the NuGet Visual Studio extension.
Uninstalling Packages from Multiple Projects
In the event a package is obsolete, no longer supported by its author, or simply no longer needed in a project, it’s perfectly possible to uninstall a package from several or all projects in a solution at once. Again, both the NuGet Visual Studio extension and the Package Manager Console support this. As with single-project package uninstalls, solution-wide package uninstalls will also remove any dependencies that are no longer needed and will try to restore your projects to a state where no, or close to no, traces of the package are left behind.
Using the NuGet Visual Studio Extension
Right-click your solution in Visual Studio and click Manage NuGet Packages for Solution. Here too, the exact same Manage NuGet Packages dialog box is displayed as when uninstalling a package from a single project (see Figure 2-19).

Figure 2-19. Uninstalling NuGet Packages on a solution level
Once you select a package, the Manage button becomes visible. After clicking this button, you can deselect the projects from which a NuGet package should be removed, as can be seen in Figure 2-20.

Figure 2-20. Uninstalling a NuGet package from multiple projects in a solution
Using the Package Manager Console
As you’ve seen previously, the Package Manager Console is able to manage NuGet packages in multiple projects at once. Using the following chained command, the log4net NuGet package will be removed from all projects in the open Visual Studio solution; Figure 2-21 shows you the output of this command:
Get-Project -All | Uninstall-Package log4net

Figure 2-21. The result of uninstalling a NuGet package from all projects in a solution through the Package Manager Console
Of course, you can also apply the commands learned earlier in this chapter to remove packages from only a few projects at once instead of removing them from all projects.
Updating Packages in Multiple Projects
Updating packages in a solution to their latest versions can be done using both the NuGet Visual Studio extension and the Package Manager Console. As with single-project updates, solution-wide updates also respect dependencies on other packages and may invoke additional downloads to ensure all package dependencies are met.
Using the NuGet Visual Studio Extension
Right-click your solution in Visual Studio and click Manage NuGet Packages. After clicking the Updates pane, notice the exact same Manage NuGet Packages dialog box that is displayed when you want to update a package reference in a single project. Instead of showing updates for a single project, this dialog box displays a list of all packages used in a solution that have an updated version available. Figure 2-22 shows you what this screen looks like.

Figure 2-22. Updating NuGet Packages on a solution level
An Update All button is available that will update all packages at once. Note that this operation may take a while and potentially can break your solution if a package contains breaking changes and the package author did not version the package correctly.
Once you select a package to update and click its Update button, the Select Projects dialog box is presented (see Figure 2-23). It is important to note that the NuGet Visual Studio extension will preselect all projects that currently have the old version of the selected NuGet package installed. If you wish to selectively update projects, this dialog box allows you to cherry-pick the projects in which the selected NuGet package should be updated.

Figure 2-23. Selecting projects for which a package should be updated
Using the Package Manager Console
The Package Manager Console is also able to update NuGet packages in multiple projects simultaneously. Then too, it can also update all packages in all projects at once.
Using the same chained command used previously when installing a package into multiple projects at once, the following PowerShell command will update AutoMapper in multiple projects at once:
Get-Project HelloWorld, HelloWorld.Core | Update-Package AutoMapper
The NuGet Package Manager Console runs through all project names specified and invokes the Update-Package command for each project specified in the PowerShell command.
If you prefer to update all packages in all projects, you can issue the following command. Some words of warning apply: for larger solutions, this can take quite some time. Updating all packages blindly can also have a big impact: your compilation may fail if packages contain breaking changes. It is advised to handle updates with care.
Get-Project -All | Update-Package
Of course, you can also apply the commands learned earlier in this chapter to update packages to a specific version instead of updating them to their latest available version.
Visualizing Package Dependencies by Using the Package Visualizer
In large projects, keeping track of all external package dependencies used in a solution can be difficult. Using the Package Visualizer that ships with the NuGet Visual Studio extension, a graphical diagram of all projects in a solution and their package dependencies can be generated.
The Package Visualizer will be mainly used by technical project leads or architects to analyze which packages are referenced by which project and how a solution is structured.
![]() Note The Package Visualizer depends on Directed Graph Markup Language (DGML) support in Visual Studio. Anyone with Visual Studio Premium (or higher) can view DGML diagrams. Unfortunately, you'll require someone using Visual Studio Ultimate to create and save this diagram for you.
Note The Package Visualizer depends on Directed Graph Markup Language (DGML) support in Visual Studio. Anyone with Visual Studio Premium (or higher) can view DGML diagrams. Unfortunately, you'll require someone using Visual Studio Ultimate to create and save this diagram for you.
Open a Visual Studio project that contains references to NuGet packages, and select Tools ![]() Library Package Manager
Library Package Manager ![]() Package Visualizer, as shown in Figure 2-24. After you click this menu option, a Packages.dgml file will be added to your solution.
Package Visualizer, as shown in Figure 2-24. After you click this menu option, a Packages.dgml file will be added to your solution.

Figure 2-24. Finding the Package Visualizer menu option in Visual Studio
The Packages.dgml file automatically opens while generating the diagram, and Visual Studio opens a diagram that shows all projects in your solution on the left and maps all package dependencies (and their dependencies). Figure 2-25 shows an example of a project that depends on a large number of NuGet packages.

Figure 2-25. The Package Visualizer in action
The Visual Studio Directed Graph toolbar shows a series of options to display the diagram in a left-to-right, top-down, or clustered format.
Working with Package Sources and the Package Cache
NuGet packages always originate from a package source, that is, a NuGet repository or NuGet feed. Since Microsoft backs the development efforts of NuGet with time and materials, these materials include hosting an official, default, and public NuGet repository, which you can explore at www.nuget.org.
As you will see later in this book, you can also create your own NuGet packages and publish them to this official repository. What if you want to distribute your private, corporate, in-house developed base framework to just your development team, and not the entire world of .NET developers? We will cover how you can host your own, private NuGet repository later in this book as well.
Managing Package Sources
By default, the NuGet repository at http://nuget.org/api/v2 will be registered as the NuGet Official Package Source” in the NuGet Visual Studio extension. Open the Visual Studio Tools ![]() Library Package Manager
Library Package Manager ![]() Package Manager Settings menu, and click the Package Sources item to register additional repositories or to replace the default, public repository with a repository that contains only those packages that you want to use in your projects. Figure 2-26 shows you the dialog box in which you can register additional package sources.
Package Manager Settings menu, and click the Package Sources item to register additional repositories or to replace the default, public repository with a repository that contains only those packages that you want to use in your projects. Figure 2-26 shows you the dialog box in which you can register additional package sources.

Figure 2-26. Register an additional package source
To order the package sources in a specific way, you can select a package source from the list and play with the Move Up and Move Down buttons. When searching for a package, NuGet will respect the order of the package sources as defined here, meaning the first one in the list will be queried first, then the second one, and so on.
![]() Note While package sources can be added manually, some community members have proposed a Package Source Discovery protocol, described at https://github.com/myget/PackageSourceDiscovery. Package Source Discovery, or PSD, provides an easier way for discovering packages related to an individual or organization, by discovering feed information from their web site URL. As an example, you can run the following in the Package Manager Console and install all Xavier's feeds:Install-Package DiscoverPackageSourcesDiscover-PackageSources -Url "http://www.myget.org/gallery".
Note While package sources can be added manually, some community members have proposed a Package Source Discovery protocol, described at https://github.com/myget/PackageSourceDiscovery. Package Source Discovery, or PSD, provides an easier way for discovering packages related to an individual or organization, by discovering feed information from their web site URL. As an example, you can run the following in the Package Manager Console and install all Xavier's feeds:Install-Package DiscoverPackageSourcesDiscover-PackageSources -Url "http://www.myget.org/gallery".
Package sources are defined in the nuget.config file, which can be found in your local application data folder (%AppData%NuGet uget.config). More on the NuGet configuration file(s) can be found in Appendix D. The NuGet Visual Studio extension, the Package Manager Console, and the command line make use of this file to determine where a package can originate from. Some tools, like the NuGet Visual Studio extension, offer a graphical user interface for managing the package sources listed in this file, as we’ve just seen. The NuGet command line also has a command for managing package sources: the sources command. Let’s add a MyGet feed as a package source: nuget sources add -Name GoogleAnalyticsTracker -Source https://www.myget.org/F/googleanalyticstracker. Note that other commands, like install or update, allow you to specify a package source by using the -Source option.
If you emptied the packageSources section of the nuget.config file, the NuGet command line will fall back to the original NuGet feed URL.
How the Cache Impacts Package Installation
There is more to tell about where a NuGet package originates. If you click the General item in this dialog box, you’ll see an entry named Package Cache. The NuGet Visual Studio extension will always create a copy of installed packages on your local hard drive, so packages don’t have to be downloaded every time they are installed. Therefore, NuGet checks its repositories when installing a package in the following sequence:
- Package cache: When a package does not exist in the package cache, the actual package sources will be checked.
- Package sources: Next, NuGet checks the list of defined package sources, in order of appearance. This means a package source higher up the list of package sources will be consulted prior to a repository lower on that list.
![]() Tip The package cache can be a source of frustration when consuming packages from a file share or local folder. For example, the cached version of a specific package will be used if a NuGet package author forgets to update the version number of a package. If you encounter problems or see the wrong version of a package installed in your projects, the source of failure is probably either that a stale version of a package is located in the package cache or that the package is being downloaded from the wrong package source. The package cache can currently not be disabled.
Tip The package cache can be a source of frustration when consuming packages from a file share or local folder. For example, the cached version of a specific package will be used if a NuGet package author forgets to update the version number of a package. If you encounter problems or see the wrong version of a package installed in your projects, the source of failure is probably either that a stale version of a package is located in the package cache or that the package is being downloaded from the wrong package source. The package cache can currently not be disabled.
Authenticating Package Sources
Whichever NuGet client you’re using, whether the NuGet command line or from within Visual Studio, some package sources require you to provide some kind of authentication before you can access them.
The nuget.org feed doesn’t require authentication for any operation that is consuming packages. The feed is by definition public and read-only at this point. Publishing packages will require an API key, but more about that in Chapter 4.
MyGet, which will be discussed in Chapter 9, supports the concept of private feeds, which additionally enforce basic authentication for read operations. Whenever you need to authenticate while running an operation against a feed that has basic authentication enabled, the NuGet command line will prompt you for your username and password.
From within Visual Studio, there is currently no way to store these credentials in the nuget.config file. The NuGet command line, on the other hand, does support storing feed credentials in the nuget.config, albeit using machine-specific encryption. The code snippet in Listing 2-7 illustrates how you can store your username and password for a secured feed, encrypted in your global nuget.config file.
Listing 2-7. Storing Feed and Encrypted Feed Credentials in the Global nuget.config File
nuget sources add -name {name} -source {feedUrl}
nuget sources update -Name {name} -User {username} -pass {password}
Because the encryption is machine-specific, this means you can’t commit this nuget.config file containing your encrypted credentials and expect it to work on another machine. For that, you’ll have to make use of the cleartext password feature, allowing you to store your password in a nonencrypted (and thus readable!) format. You can target a solution-specific nuget.config with the command from Listing 2-8 and add the file to your version control system. Note that by doing so, you are sharing your feed’s password with anyone who has access to the sources!
Listing 2-8. Storing Feed Credentials in Cleartext in a Local nuget.config File
nuget.exe sources add –Name {name} -User {username} -Password {password}
-ConfigFile nuget.config -StorePasswordInClearText
Also, nothing prevents you from creating your own preconfigured PowerShell cmdlets for use in the Package Manager Console, or just from within PowerShell itself.
Choosing Stable vs. Prerelease Versions
In general, when installing NuGet packages, we want the latest stable release of those packages. For some scenarios, we want to be able to grab the latest prerelease version of a package. For example, a specific hotfix or much-needed new feature of a library may be in a prerelease package.
The NuGet ecosystem defines stable packages as packages that are considered stable by the package author. Prerelease packages typically are considered bug-prone and should be handled with caution! All NuGet tools support installing, updating, and uninstalling stable and prerelease packages.
Distinguishing between stable and prerelease packages is done based on the Semantic Versioning specification found at www.semver.org. In short, semantic versioning, or SemVer, is a convention for versioning software in which the version number has a meaning attached to it. In short, version numbers will always look like major.minor.patch-prerelease—for example, 2.1.0-nightly. The major version describes breaking API changes; the minor version describes new features while retaining backward compatibility; and the patch number describes internal changes or bug fixes that do not affect the public API at all. By appending a string to the patch number, prefixed with a dash (-), we can denote a prerelease version. Table 2-3 contains some versioning examples.
Table 2-3. Example Version Numbers in Semantic Versioning
| Version | Stability |
|---|---|
| 1.0.0 | Stable |
| 1.0.1 | Stable, containing bug fixes or internal changes |
| 1.1.0-alpha | Prerelease, alpha version of a new feature |
| 1.1.0-beta | Prerelease, beta version of a new feature |
| 1.1.0 | Stable, containing a new feature |
| 2.0.0 | Stable, breaking public API changes since previous version |
Note that the versions in Table 2=3 are ordered from lowest to highest and that prerelease tags are ordered alphabetically (technically, in lexicographic ASCII sort order). We will cover semantic versioning, and especially prerelease versioning, in more detail in Chapter 3.
Summary
In this chapter, we covered the basics of consuming NuGet packages. We showed you how you can consume NuGet packages in Visual Studio by using different options, like the NuGet Visual Studio extension and the Package Manager Console.
You learned how to perform basic operations by using the NuGet command line and how package sources can be configured. We also explained how you can install a specific version of a package.
We explored additional options for installing, updating, and uninstalling NuGet packages in your projects and how you can manage package references in multiple projects at once.
We have seen where packages originate from. Package sources can be added and multiple NuGet feeds can be consumed by all NuGet clients.
Finally, we demonstrated how you can analyze packages installed into a project and how they relate to your project and to each other, so you can quickly analyze interdependencies in a project.