
![]()
Migrating Databases to Exadata
An Exadata system, freshly installed and configured, has but one database, normally named DBM. As you might expect, it’s a RAC database, so it exists on all available database servers. Exadata can run more than one database (either clustered or non-clustered), which is why you bought the system in the first place. Creating new databases isn’t difficult, if you’ve built RAC databases before, and if you haven’t, we’ll provide instructions and guidance in this chapter, to help you along. However, you won’t always be building truly “new” databases, because your goal is to migrate existing application databases to Exadata. There are a number of ways to accomplish this task. Some, such as the logical methods, require an empty database to work with, while others (the physical methods) will require only an init.ora file and the control files to get the process started. The aim of this chapter is to make migrating databases to Exadata as painless a task as possible.
Getting Physical
In these sections, we will discuss three options for physically migrating databases to Exadata: backups, transportable tablespaces, and standby databases. Each method has its advantages and disadvantages. Which method you choose is dependent on what migration strategy you have to use. Not all platforms are the same. Some are “big-endian,” where the most significant byte of a data “word” is written to the lowest address in memory, and others are “little-endian,” where the least significant byte of a data “word” is written to the lowest memory address.
If these concepts are unfamiliar, consider how data is stored in memory. The smallest unit of storage is the bit, which can have the value of either 0 or 1. Bytes, the next largest storage unit, are composed of 8 bits, and each byte of data can be represented either by the binary values of the bits of which it is composed or by hexadecimal digits that represent the same value. Thus the character “w” can be represented by the hexadecimal digits 6F or the binary value 01101111. In most of today’s general-purpose computers, words are 4 bytes (32 bits) long, although some hardware architectures use words of different lengths (such as 64 bits).
Each memory address can store 1 byte, so each 32-bit word is divided into four single-byte values. The endian-ness of an operating system determines in which order the bytes will be written to memory. There are only two orders to choose from: big-endian or little-endian. To illustrate this behavior, the word word is composed of the following hexadecimal digits, listed in the order in which the letters appear:
6F
77
64
72
In a big-endian system, the bytes would be written as follows:
6F 77 64 72
In a little-endian system, the bytes would be reversed, as follows:
72 64 77 6F
If a source system is big-endian, then copying the data files directly to a little-endian system would result in unreadable data, because the destination operating system would be reading the bytes in the “wrong” order. Exadata runs Linux, a little-endian operating system. Migrating from big-endian operating systems, such as AIX or Solaris, for example, is possible but requires RMAN, either as the primary migration tool or as an additional utility, to convert the data files from big-endian to little-endian format.
Regardless of the endian-ness of the source system, RMAN is an excellent choice as a migration tool, especially because the database backup processes already in place can be used to generate the necessary backup set for migration. There are process changes you will have to make to migrate a database from a big-endian system to Exadata, so that RMAN can convert the data files to a little-endian format. These steps will be provided later in the chapter. Using RMAN to essentially clone the source database onto Exadata is relatively fast and brings over all of the internal database objects, regardless of data type. There will likely be objects that RMAN won’t transfer, such as BFILES and directories, and there is a way to report those objects. Additional steps, which are discussed later in this chapter, can be performed to ensure those objects also get migrated.
Transportable tablespaces are also an option when only specific schemas have to be migrated. Tablespace dependencies are determined; the desired and dependent tablespaces are prepared; the metadata is exported; the tablespace files are transferred; and the tablespace metadata is imported into Exadata. Using this method requires that an empty database be created on Exadata, and the Database Configuration Assistant can perform that task. These general steps will be discussed in detail in another section.
A physical standby database can also be used to migrate a source database to Exadata. Basically using the same process as a standard RMAN database clone, a few additional steps, required for standby configuration and operation, will have to be performed. This method allows you to migrate the database to Exadata and keep it synchronized with the source database until the desired cutover date, when the standby is converted to a primary and all user traffic is redirected to Exadata. This method will also be covered in more detail later in this chapter.
Depending on the number of tablespaces to migrate, using transportable tablespaces might not be the method to use. RMAN, in our opinion, would be the physical method of choice, and data pump would be the method to use for a logical transfer of data. To aid in this migration, Oracle provides a view, V$TRANSPORTABLE_PLATFORM, that lists the operating systems RMAN can convert data files from and to and includes the endian-ness of that operating system. In the next section, we cover this view and how to use it to migrate a database from a system with different endian-ness to Exadata, running Linux, using RMAN.
Using Backups
Possibly the easiest method involves using the existing database backups to relocate a database to Exadata, because the backup strategy is already in place and has been tested to provide reliable results. This is the same procedure used to clone a database with RMAN, so it’s reliable and repeatable.
![]() Note We have found it necessary to have external storage available for the backup pieces. This is especially true if you are migrating a database from a big-endian platform to Exadata, a little-endian platform, and using either transportable tablespaces or RMAN.
Note We have found it necessary to have external storage available for the backup pieces. This is especially true if you are migrating a database from a big-endian platform to Exadata, a little-endian platform, and using either transportable tablespaces or RMAN.
Looking at the steps involved to migrate a database to Exadata using RMAN backups, the procedure is straightforward. If a common storage device can be made available between the source server and the Exadata destination, it’s even easier, as no transfer of backup pieces is necessary. Because we clone databases for testing and development purposes, we have access to an external storage array, which we use for backups of the desired databases. We will proceed with this discussion based on this configuration, and apart from having to copy backup pieces from the source machine to Exadata, the steps are identical.
![]() Note The steps outlined in this section will migrate a database to a single-instance database on Exadata. There are additional steps to execute, should you want the migrated database to be a cluster database. Those steps will be covered at the end of this section and will apply to either of the RMAN methods described.
Note The steps outlined in this section will migrate a database to a single-instance database on Exadata. There are additional steps to execute, should you want the migrated database to be a cluster database. Those steps will be covered at the end of this section and will apply to either of the RMAN methods described.
A recent backup of the source database is required before you begin. This process should also back up the control files and do so after the database backup is complete. This is necessary so that the backup just taken is found in the control files that will be restored. It’s these control files you will use to start the database restore and recovery to Exadata. Additionally, a current copy of the init.ora or sp file from the source database is required, as are any necessary directory components, such as the diagnostic destination as defined for the source database. For a RAC database being migrated, the init.ora or spfile from each node will have to be copied to its respective location on the Exadata system. We recommend that you use tar or cpio to archive the diagnostic destination for the source database and transfer that archive to Exadata, where it can be restored. There may be situations where the full path for the diagnostic destination cannot be replicated on the Exadata system. In such cases, change directories to the directory listed in the init.ora file as the diagnostic_dest and archive from that point. An example for a database named TEST using tar follows:
$ cd /u01/oracle/11.2.0.3
$ tar cvf /obkups/diag_dest.tar ./diag/rdbms/test
The tar archive created would be transferred to the Exadata system. Change directories to the diagnostic_dest listed for the DBM database (because this is the ORACLE_HOME you will likely use for your transferred database) and restore the tar archive, as follows:
$ cd /u01/oracle/11.2.0
$ tar xvf /obkups/diag_dest.tar
This will restore the diag directory structure for the migrated database to the Exadata system. All that remains is to change the diagnostic_dest, background_dump_dest, core_dump_dest, and user_dump_dest values to the newly created location in the copied init.ora or spfile. During this process, the local archivelog destination also has to be created, and any necessary changes to that location string have to be made to the init.ora or spfile. If this is a RAC database being migrated, these steps will have to be performed on all nodes where this database will have running instances. To better explain this, presume this TEST database is a two-node RAC database. On database node 1 and on database node 2, the diag destination will have to be archived. Then the tar archive for node 1 will be copied to Exadata database node 1, and the tar archive for node 2 will be copied to Exadata database node 2. Each node will require the restore step to be run, and each copy of the init.ora or spfile will have to be modified to reflect any location changes.
Restoring the database to Exadata can be accomplished in two ways: by a simple restore-and-recovery session using only the backup pieces from the most recent backup, or by using the duplicate database command, which requires connecting to the source database as the auxiliary. We will presume that if you are able to copy the backup pieces from the source server to Exadata, you also have a valid SQL*Net connection to the source database. We will begin with a basic restore-and-recover scenario.
As mentioned previously, the first step is to ensure the availability of the backup pieces. It is presumed they are available on the Exadata system. With the init.ora or spfile in place, it is necessary to restore the control files from the current backup. Make note of the control file backup piece name, then issue the following command:
RMAN> restore controlfile from '<backup piece name>';
You should see the following output:
Starting restore at 27-JUL-13
 using channel ORA_DISK_1

channel ORA_DISK_1: restoring control file
 channel ORA_DISK_1: restore complete, elapsed time: 00:00:02
 Finished restore at 27-JUL-13
Now you can start and mount the database in preparation for the restore and recovery. If the source database is a RAC database, it will be necessary to set the cluster_database parameter to false before starting the restore and recovery. This is because the database must be mounted exclusive for the restore to be successful. From this point, it is a standard restore-and-recovery scenario, which should complete without error, presuming all of the configuration parameters in the init.ora or spfile are listing the correct locations on the Exadata system. If you set cluster_database to false before beginning the migration, you will have to set it back to true once the recovery is complete.
You may choose to clone the database from the source. The init.ora or spfile will have to be copied from the source database, so that the database can be started nomount on the Exadata system. Again, if this is a RAC database being migrated, the cluster_database parameter has to be set to false before starting the clone.
The clone process uses the duplicate database command to RMAN. Example commands for this process to duplicate the mytest database on a remote server to a database named test on Exadata follow (both databases use ASM):
connect target sys/<password>@mytest
connect auxiliary /
run {
  sql 'alter session set optimizer_mode=rule';
  allocate auxiliary channel c1 type disk ;
  allocate auxiliary channel c2 type disk ;
  allocate auxiliary channel c3 type disk ;
  allocate auxiliary channel c4 type disk ;
  allocate auxiliary channel c5 type disk ;
  allocate auxiliary channel c6 type disk ;
  duplicate target database to 'test'
        db_file_name_convert=('+DATA','+DATA_MYEXA1')
        logfile
           GROUP 11 ( '+DATA_MYEXA1','+RECO_MYEXA1' ) SIZE 512M,
           GROUP 12 ( '+DATA_MYEXA1','+RECO_MYEXA1' ) SIZE 512M,
           GROUP 13 ( '+DATA_MYEXA1','+RECO_MYEXA1' ) SIZE 512M,
           GROUP 14 ( '+DATA_MYEXA1','+RECO_MYEXA1' ) SIZE 512M ;
}
A shell script can also be written for this, making it easier to run and monitor the progress from a single session. The shell script would appear as in the following example:
export NLS_DATE_FORMAT='Mon DD YYYY HH24:MI:SS'
DATESTAMP=`date '+%y%m%d%H%M'`
MSGLOG=/home/oracle/clone/logs/dup_mytest_${DATESTAMP}.log

$ORACLE_HOME/bin/rman msglog $MSGLOG append << EOF
connect target sys/<password>@mytest
connect auxiliary /
run {
  sql 'alter session set optimizer_mode=rule';
  allocate auxiliary channel c1 type disk ;
  allocate auxiliary channel c2 type disk ;
  allocate auxiliary channel c3 type disk ;
  allocate auxiliary channel c4 type disk ;
  allocate auxiliary channel c5 type disk ;
  allocate auxiliary channel c6 type disk ;
  duplicate target database to 'test'
        db_file_name_convert=('+DATA','+DATA_MYEXA1')
        logfile
           GROUP 11 ( '+DATA_MYEXA1','+RECO_MYEXA1' ) SIZE 512M,
           GROUP 12 ( '+DATA_MYEXA1','+RECO_MYEXA1' ) SIZE 512M,
           GROUP 13 ( '+DATA_MYEXA1','+RECO_MYEXA1' ) SIZE 512M,
           GROUP 14 ( '+DATA_MYEXA1','+RECO_MYEXA1' ) SIZE 512M ;
}
EOF
This script would be run after the destination database has been started nomount and would be run in the background in no-hang-up mode. If this script were named clone_test_from_mytest.sh and located in the /home/oracle/clone directory, the command to do this would be as follows:
$ nohup $HOME/clone/clone_test_from_mytest.sh &
The duplicate process will now be running, and control will return to the shell prompt, so you can monitor the progress through the generated log file. This would be done with the following commands:
$ cd $HOME/clone/logs
$ ls -ltr *mytest*
...
dup_mytest_201307271343.log
$ tail -f dup_mytest_201307271343.log
The tail -f command is used to continually read the contents of a file that is actively being written, so you can see the entries as they occur. The script illustrated can also be used to refresh an existing destination database. If Oracle Managed Files are being used (they are on Exadata), it will be necessary to delete the existing files for the destination database before beginning the clone, because the data files won’t be overwritten by the duplication process. All other steps will be executed as described previously in this section.
One good reason for using RMAN to migrate databases to Exadata is the fact that you can change the “endian-ness” of the data files if you need to. Exadata is using Linux, a little-endian operating system, but you may be migrating from AIX, a big-endian system. This will require that the data-file format be changed, and RMAN can do this task for you. You will need external storage available for the converted data files from the source database, because there isn’t sufficient file-system storage available on Exadata. The first step in this process is to see which platforms are supported, and the V$TRANSPORTABLE_PLATFORM view provides this information, as follows:
SQL> select platform_name, endian_format
  2  from v$transportable_platform;

PLATFORM_NAME                                 ENDIAN_FORMAT
--------------------------------------------- --------------
Solaris[tm] OE (32-bit)                       Big
Solaris[tm] OE (64-bit)                       Big
Microsoft Windows IA (32-bit)                 Little
Linux IA (32-bit)                             Little
AIX-Based Systems (64-bit)                    Big
HP-UX (64-bit)                                Big
HP Tru64 UNIX                                 Little
HP-UX IA (64-bit)                             Big
Linux IA (64-bit)                             Little
HP Open VMS                                   Little
Microsoft Windows IA (64-bit)                 Little

PLATFORM_NAME                                 ENDIAN_FORMAT
--------------------------------------------- --------------
IBM zSeries Based Linux                       Big
Linux x86 64-bit                              Little
Apple Mac OS                                  Big
Microsoft Windows x86 64-bit                  Little
Solaris Operating System (x86)                Little
IBM Power Based Linux                         Big
HP IA Open VMS                                Little
Solaris Operating System (x86-64)             Little
Apple Mac OS (x86-64)                         Little

20 rows selected.

SQL>
RMAN can transport data files between any of the listed platforms, and the AIX to Linux migration is possible. The next step is to check for database objects that won’t be transported by RMAN, such as directories, BFILES, and external tables. The following PL/SQL block will display these objects:
SQL> set serveroutput on
SQL> declare
  2    x boolean;
  3  begin
  4    x := sys.dbms_tdb.check_external;
  5  end;
  6  /
The following directories exist in the database:
SYS.ADMIN_BAD_DIR, SYS.ADMIN_LOG_DIR, SYS.ADMIN_DAT_DIR, SYS.XMLDIR, SYS.DATA_PUMP_DIR, SYS.ORACLE_OCM_CONFIG_DIR

PL/SQL procedure successfully completed.

SQL>
Notice that the PL/SQL reports six directories that will have to be re-created once the database is migrated to Exadata. It is very likely that these directories will have new locations after the move to Exadata, so not only will the database locations have to change, but the directories themselves will have to be created on the Exadata system. A simple query can generate the necessary CREATE DIRECTORY statements, as follows:
SQL> column cr_dir format a132
SQL>
SQL> select 'create or replace directory '||directory_name||' as '''||directory_path||''';' cr_dir
  2  from dba_directories;

CR_DIR
--------------------------------------------------------------------------------------------------
create or replace directory ADMIN_LOG_DIR as '/u01/oracle/directories/log';
create or replace directory ADMIN_BAD_DIR as '/u01/oracle/directories/bad';
create or replace directory XMLDIR as '/u01/oracle/directories/rdbms/xml';
create or replace directory ADMIN_DAT_DIR as '/u01/oracle/directories/dat';
create or replace directory DATA_PUMP_DIR as '/u01/oracle/admin/mydb/dpdump/';
create or replace directory ORACLE_OCM_CONFIG_DIR as '/u01/oracle/directories/ccr/state';

6 rows selected.

SQL>
Spool this output to a file and edit the destination text to point to the newly created locations on Exadata. It is then a simple task of running the generated script in the migrated database to re-create these directories.
You will have to create a destination for the converted database files on the available external storage. In this example, we will use /obkups/db_convert as the destination for those files. Take a current backup of the source database, then shut down and start the source database in read-only mode. Connect RMAN to the target database and execute the CONVERT DATABASE command, as follows:
CONVERT DATABASE NEW DATABASE 'mydb'
          TRANSPORT SCRIPT '/obkups/db_convert/migratedb.sql'
          TO PLATFORM 'Linux IA (64-bit)'
          DB_FILE_NAME_CONVERT = ('/home/oracle/dbs','/obkups/db_convert'),
RMAN will convert the database files and place them in the /obkups/db_convert directory, along with a copy of the pfile and the migration script. These files will have to be transferred to the Exadata system, if the external storage is not common to both servers. Once all of the generated files are transferred, you will have to edit the migration script, to enable restricted session. A sample migration script, including the edits, follows:
-- The following commands will create a control file and use it
-- to open the database.
-- Data used by Recovery Manager will be lost.
-- The contents of online logs will be lost and all backups will
-- be invalidated. Use this only if online logs are damaged.

-- After mounting the created controlfile, the following SQL
-- statement will place the database in the appropriate
-- protection mode:
--  ALTER DATABASE SET STANDBY DATABASE TO MAXIMIZE PERFORMANCE

STARTUP NOMOUNT PFILE='init_00bz4glk_1_0.ora'
CREATE CONTROLFILE REUSE SET DATABASE "MYDB" RESETLOGS  NOARCHIVELOG
    MAXLOGFILES 32
    MAXLOGMEMBERS 2
    MAXDATAFILES 32
    MAXINSTANCES 1
    MAXLOGHISTORY 226
LOGFILE
  GROUP 1 '/obkups/db_convert/archlog1'  SIZE 25M,
  GROUP 2 '/obkups/db_convert/archlog2'  SIZE 25M
DATAFILE
  '/obkups/db_convert/system01.dbf',
  '/obkups/db_convert/sysaux01.dbf',
  '/obkups/db_convert/mydatatbs01.dbf',
  '/obkups/db_convert/mydatatbs02.dbf',
  '/obkups/db_convert/mydatatbs03.dbf'
CHARACTER SET AL32UTF8
;

-- ALTER SYSTEM statement added to enable restricted session.

ALTER SYSTEM ENABLE RESTRICTED SESSION;

-- Database can now be opened zeroing the online logs.
ALTER DATABASE OPEN RESETLOGS;

-- No tempfile entries found to add.
--

set echo off
prompt ∼∼∼∼∼∼∼∼∼∼∼∼∼∼∼∼∼∼∼∼∼∼∼∼∼∼∼∼∼∼∼∼∼∼∼∼∼∼∼∼∼∼∼∼∼∼∼∼∼∼∼∼∼∼∼∼∼∼∼∼∼∼∼∼∼∼∼
prompt * Your database has been created successfully!
prompt * There are many things to think about for the new database. Here
prompt * is a checklist to help you stay on track:
prompt * 1. You may want to redefine the location of the directory objects.
prompt * 2. You may want to change the internal database identifier (DBID)
prompt *    or the global database name for this database. Use the
prompt *    NEWDBID Utility (nid).
prompt ∼∼∼∼∼∼∼∼∼∼∼∼∼∼∼∼∼∼∼∼∼∼∼∼∼∼∼∼∼∼∼∼∼∼∼∼∼∼∼∼∼∼∼∼∼∼∼∼∼∼∼∼∼∼∼∼∼∼∼∼∼∼∼∼∼∼∼

SHUTDOWN IMMEDIATE
-- UPGRADE option sets restricted session
STARTUP UPGRADE PFILE='init_00bz4glk_1_0.ora'
@@ ?/rdbms/admin/utlirp.sql
SHUTDOWN IMMEDIATE
-- NOTE: The startup below is generated without the RESTRICT clause.
-- Add the RESTRICT clause.
STARTUP RESTRICT PFILE='init_00bz4glk_1_0.ora'
-- The following step will recompile all PL/SQL modules.
-- It may take serveral hours to complete.
@@ ?/rdbms/admin/utlrp.sql
set feedback 6;
The database should now be created using the filesystem, instead of ASM, so now it’s time to move the data files into the proper ASM disk groups. Make a copy of the pfile generated by the RMAN CONVERT process described earlier. Using RMAN, you will have to make another backup, this time using a script similar to the example that follows:
RUN
{
  ALLOCATE CHANNEL dev1 DEVICE TYPE DISK;
  ALLOCATE CHANNEL dev2 DEVICE TYPE DISK;
  ALLOCATE CHANNEL dev3 DEVICE TYPE DISK;
  ALLOCATE CHANNEL dev4 DEVICE TYPE DISK;
  BACKUP AS COPY
    INCREMENTAL LEVEL 0
    DATABASE
    FORMAT '+DATA_MYEXA1'
    TAG 'ASM_DB_MIG';
}
This puts the filesystem database files into the +DATA_MYEXA1 disk group. Archive the current log through RMAN, as follows:
SQL "ALTER SYSTEM ARCHIVE LOG CURRENT";
You are using a pfile, so it will be necessary to create an spfile in the ASM disk group. Use the following example to create the new spfile:
CREATE SPFILE='+DATA_MYEXA1/spfile<sid>.ora'
FROM PFILE='/obkups/db_convert/'init_00bz4glk_1_0.ora';
You are now ready to shut down the database cleanly. Create a new init<sid>.ora file in the $ORACLE_HOME/dbs directory with the following entry:
SPFILE='+DATA_MYEXA1/spfile<sid>.ora'
You will have to set the spfile parameters listed in the following example to ASM locations, as follows:
STARTUP FORCE NOMOUNT;
ALTER SYSTEM SET DB_CREATE_FILE_DEST='+DATA_MYEXA1' SID='*';
ALTER SYSTEM SET DB_RECOVERY_FILE_DEST_SIZE=100G SID='*';
ALTER SYSTEM SET DB_RECOVERY_FILE_DEST='+RECO_MYEXA1' SID='*';
ALTER SYSTEM SET CONTROL_FILES='+DATA_MYEXA1','+RECO_MYEXA1' SCOPE=SPFILE SID='*';
You can now switch to RMAN to migrate the control file into ASM, as follows, and mount the database.
RMAN> STARTUP FORCE NOMOUNT;
RMAN> RESTORE CONTROLFILE FROM '<original control file name and path>';
RMAN> ALTER DATABASE MOUNT;
Using RMAN, switch to the migrated data files, as shown, and recover the database.
SWITCH DATABASE TO COPY;
RUN
{
  ALLOCATE CHANNEL dev1 DEVICE TYPE DISK;
  ALLOCATE CHANNEL dev2 DEVICE TYPE DISK;
  ALLOCATE CHANNEL dev3 DEVICE TYPE DISK;
  ALLOCATE CHANNEL dev4 DEVICE TYPE DISK;
  RECOVER DATABASE;
}
Once the database is recovered, you can exit RMAN, connect with SQL*Plus, and open the database. You should now have your database migrated to Exadata and ASM. The next step is to drop the old tempfiles and re-create them in ASM, as follows:
SQL> ALTER DATABASE TEMPFILE '<existing tempfile name>' DROP;
SQL> ALTER TABLESPACE temp_tbs_name ADD TEMPFILE;
You will have to drop each tempfile individually. You may script this, if you like, to generate the ALTER DATABASE statements, to drop all of the tempfiles. The new tempfiles will be Oracle Managed Files, which makes the ADD TEMPFILE statement a single command that you will execute as many times as necessary to provide the desired temp space. Lastly, you will have to migrate the redo log groups to ASM and drop the old redo log groups. After that is complete, shut down the database cleanly and restart, to ensure there are no issues with the storage or ASM.
Exadata is designed with RAC in mind. At this point, the database you’ve migrated, either through a direct clone from a backup or from a different platform, is a single-instance database. It can be converted to RAC with the following steps. To start that process, some changes will have to be made to the spfile. The cluster_database, cluster_database_instances, and instance_number parameters will have to be set, as follows:
ALTER SYSTEM SET CLUSTER_DATABASE='TRUE' SID='*' SCOPE=SPFILE;
ALTER SYSTEM SET CLUSTER_DATABASE_INSTANCES=<number of instances> SID='*' SCOPE=SPFILE;
The following statement needs to be edited and run for each instance in the cluster:
ALTER SYSTEM SET INSTANCE_NUMBER=<instance number> SID='<instance_name>' SCOPE=SPFILE;
Shut down the local instance cleanly. On all of the nodes where instances for this database will run, you will have to put a copy of the init.ora file you just created, modifying the name to reflect the local instance SID. The next step is to register the database with cluster services, using the srvctl utility. The db_unique_name, the Oracle home, the instance name, and the spfile are required parameters. The following example illustrates adding the database mydb and instance mydb1 for database node myexa1db01:
srvctl add database -d mydb -i mydb1 -o /u01/oracle/product/11.2.0/dbhome_1 -p
/u01/oracle/product/11.2.0/dbhome_1/dbs/initmydb1.ora
For each node in the cluster that will be running an instance of this database, the step shown will have to be repeated, changing the instance name and pfile name accordingly. Next, it will be necessary to enable the database, as follows:
srvctl enable database -d mydb
You should now be able to start the cluster database using srvctl, as follows:
srvctl start database -d mydb
The database should start on all nodes successfully. You have now migrated a database to Exadata and converted it to RAC. Ensure that the listener and SCAN listener have registered this new database, by using the lsnrctl status command, which can report the status and services available from the conventional TNS listener and for the local SCAN address. The following example shows how to return database services registered with SCAN listener address LISTENER_SCAN2 on a two-node RAC cluster database.
$ lsnrctl status listener_scan2

LSNRCTL for Linux: Version 11.2.0.3.0 - Production on 04-OCT-2013 14:58:55

Copyright (c) 1991, 2011, Oracle.  All rights reserved.

Connecting to (DESCRIPTION=(ADDRESS=(PROTOCOL=IPC)(KEY=LISTENER_SCAN2)))
STATUS of the LISTENER
------------------------
Alias                     LISTENER_SCAN2
Version                   TNSLSNR for Linux: Version 11.2.0.3.0 - Production
Start Date                03-OCT-2013 15:25:02
Uptime                    0 days 23 hr. 33 min. 53 sec
Trace Level               off
Security                  ON: Local OS Authentication
SNMP                      OFF
Listener Parameter File   /u01/11.2.0/grid/network/admin/listener.ora
Listener Log File         /u01/11.2.0/grid/log/diag/tnslsnr/myexa1db01/listener_scan2/alert/log.xml
Listening Endpoints Summary...
  (DESCRIPTION=(ADDRESS=(PROTOCOL=ipc)(KEY=LISTENER_SCAN2)))
  (DESCRIPTION=(ADDRESS=(PROTOCOL=tcp)(HOST=XXX.XXX.XXX.XXX)(PORT=1523)))
Services Summary...
Service "dbm" has 2 instance(s).
  Instance "dbm1", status READY, has 2 handler(s) for this service...
  Instance "dbm2", status READY, has 1 handler(s) for this service...
Service "mydb" has 2 instance(s).
  Instance "mydb1", status READY, has 1 handler(s) for this service...
  Instance "mydb2", status READY, has 1 handler(s) for this service...
The command completed successfully
$
The mydb cluster database has successfully registered with the SCAN listener and can be accessed remotely.
Transporting Tablespaces
Transportable tablespaces are useful for migrating data for specific schemas or subsets of data, even from different operating platforms. However, to migrate across platforms, RMAN will also have to be used, to convert the data files to the correct endian format.
The process for transportable tablespaces is not complicated, but it does involve several checks prior to the move. The first check determines if the objects in the target tablespace or tablespaces are self-contained, meaning there are no dependencies in other tablespaces that aren’t considered as the targets. Oracle offers a packaged procedure, DBMS_TTS.TRANSPORT_SET_CHECK, to report this information. As an example, the RETAIL_1 and RETAIL_2 tablespaces have to be migrated to Exadata. To determine if any other dependencies exist for this tablespace set, you would execute the following statement:
EXECUTE DBMS_TTS.TRANSPORT_SET_CHECK('retail_1,retail_2', TRUE);
Querying the TRANSPORT_SET_VIOLATIONS view will report any issues with this set of tablespaces.
SQL> SELECT * FROM TRANSPORT_SET_VIOLATIONS;

VIOLATIONS
----------------------------------------------------------------------------------
Constraint SALES_FK between table STORES.SALES in tablespace RETAIL_1 and table
STORES.UNIT in tablespace UNITLOC
Partitioned table STORES.MON_SALES is partialy contained in the transportable set
The output reports that the UNITLOC tablespace also has to be included in the tablespace set, and a bit of investigation is required to find all of the tablespaces containing partitions for the STORES.MON_SALES table. A second attempt, including the UNITLOC and the SALESPART_1, SALESPART_2, and SALESPART_3 tablespaces in the transport set, succeeds, as shown in the following example:
EXEC DBMS_TTS.TRANSPORT_SET_CHECK('retail_1,retail_2,unitloc,salespart_1,salespart_2,salespart_3', TRUE);

PL/SQL procedure successfully completed.

SQL> SELECT * FROM TRANSPORT_SET_VIOLATIONS;

no rows selected
You now have a complete transportable tablespace set, ensuring all of the data and constraints will be transferred to the destination database. The next step is to ensure that no transactions can be executed against the source data, by setting the desired tablespaces to read-only, using the following statements:
alter tablespace retail_1 read only;
alter tablespace retail_2 read only;
alter tablespace unitloc read only;
alter tablespace salespart_1 read only;
alter tablespace salespart_2 read only;
alter tablespace salespart_3 read only;
You are now ready to export the tablespace metadata for import into the destination database. Use expdp on the source system to generate this metadata export, using the TRANSPORT_TABLESPACES option, as follows:
expdp system/password DUMPFILE=retail_data.dmp DIRECTORY=tstrans_dir
transport_tablespaces = retail_1,retail_2,unitloc,salespart_1,salespart_2,salespart_3
transport_full_check=y
Using the TRANSPORT_FULL_CHECK=Y option verifies the tablespace check you made previously. If the transportable tablespace check fails for any reason, the export terminates unsuccessfully. Although this shouldn’t occur if you have no output from the DBMS_TTS.TRANSPORT_SET_CHECK procedure, it is a good second check to execute when transporting tablespaces, to ensure there will be no issues once the tablespaces are migrated to Exadata. The TSTRANS_DIR location is, for this example, pointing to /obkups/tablespaces, which will be used as the source directory for the file transfers to Exadata.
If the source and destination systems have the same endian-ness, it’s time to copy the tablespace files and the metadata export to Exadata. If the source tablespaces are using ASM, they will have to be copied out of ASM to the filesystem for transfer. This is the reverse of the step we provided to migrate data into ASM. The following example is provided:
RUN
{
  ALLOCATE CHANNEL dev1 DEVICE TYPE DISK;
  ALLOCATE CHANNEL dev2 DEVICE TYPE DISK;
  ALLOCATE CHANNEL dev3 DEVICE TYPE DISK;
  ALLOCATE CHANNEL dev4 DEVICE TYPE DISK;
  BACKUP AS COPY
    INCREMENTAL LEVEL 0
    DATAFILE file1,file2,...
    FORMAT '/obkups/tablespaces/'
    TAG 'FS_TBLSPC_MIG';
}
You will have to generate a list of the required data files, so you can modify the provided example to copy the desired data files. Execute the modified statement to copy the ASM data files into the desired directory. In this example, that is /obkups/tablespaces, for transport. You should now have all of the files necessary to transport the tablespaces to Exadata. Use scp to copy the contents of /obkups/tablespaces to an external location connected to the Exadata system. Copy the transferred data files into ASM using the same basic command you used to get the data files out of ASM, changing the destination to the desired Exadata ASM disk group. You will need a current list of the data files you just copied into ASM, so the metadata import will complete successfully. When you have that list, modify the following example and import the metadata using impdp:
impdp system/password DUMPFILE=retail_data.dmp DIRECTORY=tstrans_dir
TRANSPORT_DATAFILES=
   +DATA_MYEXA1/file1,
   +DATA_MYEXA1/file2,
...
The expectation is that you have created the necessary user accounts from the source database in the destination database, including all necessary privileges. The impdp utility will not create these accounts, so they must exist prior to executing the import. When the import has successfully completed, you will have to put the tablespaces back into read/write mode, as follows:
alter tablespace retail_1 read write;
alter tablespace retail_2 read write;
alter tablespace unitloc read write;
alter tablespace salespart_1 read write;
alter tablespace salespart_2 read write;
alter tablespace salespart_3 read write;
Please Stand By
A physical standby database is a good choice as a migration strategy, if the database has to be migrated to the new system at an earlier date than the application. Using a standby database keeps the data synchronized between the old production system and the new production system and allows for connectivity testing prior to the final move. The process to create a standby database is basically the same as the process provided earlier in this chapter that uses RMAN. Additional steps to configure a secondary archivelog destination, standby redo logs, and redo transport will be necessary. Those steps will not be discussed here, as they are available in the Oracle online documentation.
Using Oracle 11.2.0.3 it’s possible to test the new database without affecting the standby configuration, by executing a switchover. This temporarily allows the standby to assume the primary role, providing an opportunity to test configurations and make necessary adjustments to the environment before the final move occurs. This also allows you to switch back to the primary without the necessity of a database rebuild.
On the date of cutover, it will be necessary to failover to the standby location, converting the standby to being the primary database. This will be a “one-way” move, as the source database will no longer be used and will not have to be rebuilt.
Post-migration Stuff
Packages, procedures, and views can be invalidated, owing to the migration, so it will be necessary to recompile those objects and correct any issues that may arise. It is a good idea to generate a list of invalid objects in the source database prior to the move. This will make it easier to know when you have succeeded in restoring all of the valid migrated objects from the source database. The following script will produce that list:
select owner, object_name, object_type, status
from dba_objects
where status <> 'VALID';
Spool the output to a file for later reference and transfer that file to Exadata. Run that same query again on the migrated database and execute $ORACLE_HOME/rdbms/admin/utlrp.sql to recompile the database objects, correcting any issues until the final list of INVALID objects matches the list generated from the source database.
If you were using a physical standby to migrate a database to Exadata, you would have to remove the spfile parameters that were necessary to establish the standby and possibly adjust the control file locations to reference multiple copies. (Usually, a standby uses a single standby control file.) Copy the existing control file to these additional locations.
Deprecated init.ora parameters could also be an issue, as the source database may be a release prior to 11.2.0.3 (the current release on Exadata). The alert log is a good place to find such parameters, so that they can be dealt with accordingly.
Although the BFILE columns will be replicated, the source files they point to will not. These files will have to be copied over to the Exadata system, and, once they are accessible to the database, the BFILE locators will have to be reassigned, based on the new locations.
You may find that other management tasks may be necessary, such as resizing extents, partitioning large tables, or compressing tables (such as archived tables or archived partitions). These tasks are also part of the post-migration list. Resizing extents and creating partitions can take a considerable amount of time, especially for large databases. Take such tasks into consideration when planning database migrations to Exadata, so that the end users will be aware that after the actual physical migration, tasks may still exist before the database can be made available for use.
That’s Logical
Logical migration is also an option to Exadata. Such a migration would involve export and import, replication, or database links. Each of these options will be covered in the following sections.
Export and Import
The export and import utilities that are available depend on the release of Oracle you are migrating from. For releases earlier than 10.1, the original export and import utilities exist (exp and imp). These utilities are provided in all current releases of Oracle for backwards compatibility. For 10.1 and later releases, the newer Data Pump utilities (expdp and impdp) should be used.
Using an export-import strategy requires that an empty database be created on the Exadata system. This can be achieved by using the Database Configuration Assistant (DBCA), and this utility can create both single-instance and cluster databases. We recommend creating a new cluster database, because Exadata is built for RAC. We won’t go into detail on how to create a database with DBCA, as the process is straightforward, and the GUI is intuitive.
When migrating older databases using the exp and imp utilities, it will be necessary to create the user account in the new Exadata database before importing any tables and data. If you’re able to use the expdp and impdp utilities, this won’t be necessary, as exporting a user exports the commands to create that user, commands that will be executed during the import process.
The compatibility matrix for the older export-import utilities is shown in Table 12-1.
Table 12-1. Compatibility Matrix for the exp and imp Utilities
Destination Release |
Source Release |
|---|---|
| | 7 | 8i | 9i | 10g | 11g | |
| 7 | |yes | no | no | no | no |
| 8i | |yes |yes | no | no | no |
| 9i | |yes |yes |yes | no | no |
| 10g | |yes |yes |yes | yes | no |
| 11g | |yes |yes |yes | yes | yes |
As expected, the older releases are not forward-compatible, so an export from an 8i database cannot be imported into a database using release 7. You can always use the exp and imp utilities from the oldest release, however, and later releases will be able to read and process the resulting dump file.
Table 12-2 lists the compatibility matrix for the expdp and impdp utilities.
Table 12-2. Compatibility Matrix for the expdp and impdp Utilities
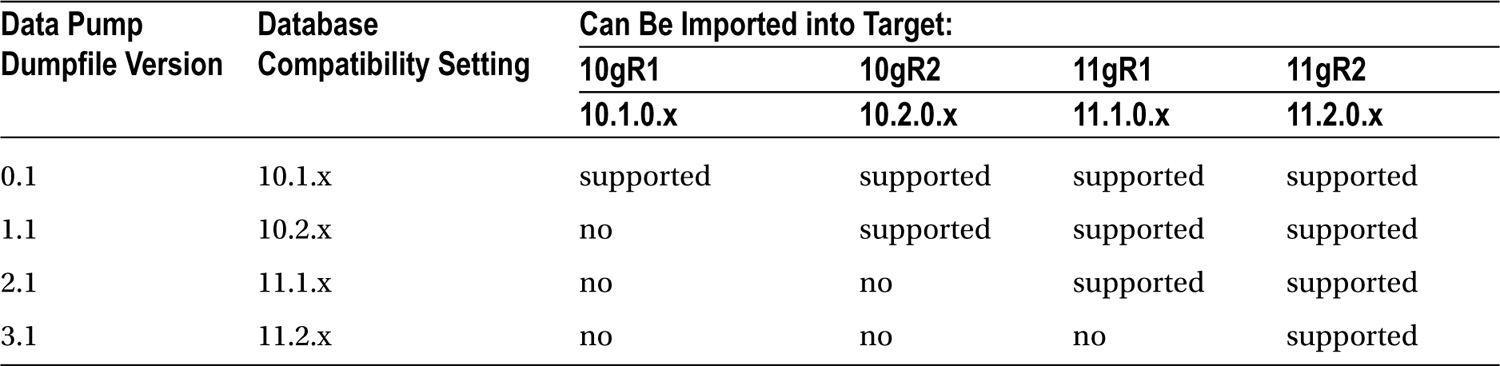
Use these matrices when planning your logical migration, using the export and import utilities, to avoid issues during the export and import process.
If you’re using the export-import strategy, it’s likely that you are transferring only a subset of the database data and tables. It is a good idea to export by schema or user, rather than by table name, because exporting a given user will capture all of the internal objects owned by that account. As we discussed previously in this chapter, it may be necessary to re-create directories and transfer BFILES to the Exadata system, as these objects won’t be created on import. In the case of directories, the DDL to create the directory is captured. It’s the location referenced in that DDL that won’t exist on Exadata, and those locations will have to be created after the import is complete. If you cannot create the same location on Exadata as there was on the source server, you will have to create new locations and then re-create those directories to point to the new directories.
Cross-schema dependencies may exist for a given user account, and if that is the case, then some objects, such as views and integrity constraints, will fail to compile and will be invalid. The DBA_DEPENDENCIES view is useful for finding such dependencies, so you can export the necessary users to keep objects valid in the migrated schemas. A list of the user accounts having objects referenced by a given user can be generated with the following query:
select distinct referenced_owner
from dba_dependencies
where owner = '<user account>'
and referenced_owner <> '<user account>';
If you would rather have a list of the objects to reduce the size of the export, the following query can be used:
select referenced_owner, referenced_name, referenced_type
from dba_dependencies
where owner = '<user account>'
and referenced_owner <> '<user account>';
This will generate a list of the object name, object type, and owner, so only those objects will be in the export file. Remember that if you are only exporting a selected list of objects, you will have to perform an additional export after the original user export created, to transfer application tables and data to Exadata. The following example, for an 11.2.0.3 database, illustrates this concept:
#
# Export application user
#
expdp directory=dbmig_dir schemas=$1 dumpfile="$1"_mig.dmp logfile="$1"_mig.log

#
# Export dependent objects not owned by
# application user
#
expdp directory=dbmig.dir dumpfile="$1"_"$2".dmp logfile="$1"_"$2".log tables="$3"
This example takes three parameters, two user names, and a comma-delimited list of tables and presumes the list of tables is fairly short. If, for example, only a short list of tables is to be excluded, the command can be written as follows:
expdp directory=dbmig.dir schemas=$2 dumpfile="$1"_"$2".dmp logfile="$1"_"$2".log exclude="$3"
Now the table list is one of exclusion, and all tables for the user specified in parameter 2 will be exported, except those in the supplied list. The dumpfiles should be imported in reverse order, that is, for the user of the dependent tables, then for the application user. This will allow the import process to create and validate constraints and views for the application user without error.
Replication
Replication is another way to logically migrate a database to Exadata, and Streams or Golden Gate are the tools we would recommend for such a migration. Because Golden Gate has all of the Streams functionality built in, it is the more robust tool to use. We won’t go into detail on a Golden Gate migration scenario, but we will mention a few areas you should be aware of with this type of migration.
Both Golden Gate and Streams impose limitations on the data types that will replicate to the destination server. The types that won’t replicate follow:
BFILE

ROWID

User-defined types (including object types, REFs, varrays, and nested tables)

XMLType stored object relationally or as binary XML

The following Oracle-supplied types: Any types, URI types, spatial types, and media types
If your data contains such types, it might be better to use a physical method of migration, so that all data types, regardless, will be replicated. As mentioned previously, the files referenced by BFILE locators won’t be copied, and it will be necessary to modify those locators once the source files have been copied.
Directories will also have to be re-created on the Exadata system, and, if the locations the directories reference change, the directory entries will have to be replaced. This was mentioned previously with the physical migration methods, but we feel it’s important enough to repeat here.
Using Database Links
Database links can transfer data between two databases and, if the network bandwidth is sufficient, do so in a fairly efficient manner. You won’t get the speed of a physical migration (a database restore can run relatively quickly), but you won’t require external storage to house the files being transferred.
We suggest using one of the following two methods to transfer data over a database link:
INSERT
COPY
Because DDL is not allowed on remote databases through the CREATE TABLE ... AS SELECT ... statement, the destination tables will have to exist in the Exadata database prior to data migration. Also, LOB data is not accessible through a database link. Tables containing LOB columns are not eligible for migration through the COPY command and are probably best migrated through a physical method.
After migration, it will be necessary to go through the “Post-migration Stuff” section to resolve any issues caused by missing data, such as BFILES and directories.
Things to Know
Physical and logical methods can be employed to migrate databases to Exadata. Which method you use depends on availability of external storage and on the data types that have to be migrated.
Databases that include LOB data or BFILEs are best migrated using a physical methodology, as logical methods such as Golden Gate and Streams have restrictions on the data types they can replicate. Also, physical methods offer the possibility of migrating from a big-endian platform (such as AIX or Solaris) to Linux, a little-endian platform.
Big-endian platforms write the most significant byte first in the string, and little-endian platforms write the least significant byte first in the string. For example, the hexadecimal characters for the word word would be written with the w as the first byte. Little-endian platforms would store the word in reverse order, with the d in the first-byte position.
Three physical methods have been described: RMAN backups, transportable tablespaces, and physical standby databases. Each has its advantages, and the decision to select a particular method should be made based on the migration time line and the volume of data that has to be migrated.
RMAN backups will migrate the entire database to Exadata. RMAN can also be used to facilitate migration from different platforms, by converting the source data files to an endian format compatible with Linux.
Transportable tablespaces can be used to migrate subsets of data from the source database. An empty database will have to exist on the Exadata system. If the tablespaces are coming from a big-endian system, it will also be necessary to use RMAN to convert the data files to a little-endian format.
Physical standby databases make it possible for the database to be migrated well before the application is migrated. Using a standby keeps the destination database synchronized with the source while the application migration is in progress. A failover will have to be executed to convert the standby to a primary database for the final cutover.
Logical methods are also available, using export and import, replication via Streams or Golden Gate, and database links. All of the logical methods have restrictions on data types that will not migrate, and it is recommended that one of the physical methods be employed, if the database being migrated uses data types that won’t replicate.
Export and import rely on the version of the source database. The export utility from the lowest Oracle release must be used to perform a successful logical migration.
Replication using Golden Gate or Streams won’t copy BFILEs, user-defined types, or rowid columns, to name a few. You should be aware of the data types in use in the database being migrated, before choosing a method.
Database links can be used. The COPY command is the utility of choice for such migrations, but LOBs are not transferrable over a database link. Carefully consider the source data before choosing a final migration strategy.
Regardless of the method selected, objects such as BFILEs and directories will have to be addressed after the initial migration has completed. The files referenced by the source BFILE locators will have to be copied to Exadata, and the BFILE locators re-created using the new file locations. Directories will have to be created at the operating-system level, and the directory objects in Oracle will have to be replaced using the new directory locations.
Objects can be invalidated by a migration, so it is good practice to generate a list of invalid objects in the source database as a reference, when checking the destination database for objects invalidated by the migration. The $ORACLE_HOME/rdbms/admin/utlrp.sql script should be run post-migration to compile invalidated objects.