
![]()
3D Printer Maintenance: Inspection and Adjustment Tasks
Owning a 3D printer can be very rewarding—especially once the printer is calibrated correctly and you are achieving high-quality prints. You should take pride in creating things for your household, family, and friends. Whether you are creating new gadgets, fixing things around the house, or just creating things for gifts,1 the enjoyment factor is quite high.
However, keeping your printer running well requires vigilance and the judicial application of proper maintenance. You have to learn to pay attention to the printer mechanicals and understand the tasks needed to keep things running properly. Even the best-calibrated printer will eventually have problems if you never adjust or repair it when things go a little wrong (or worse, break).
Indeed, if you let the maintenance of your printer slip far enough, you could encounter a myriad of minor print problems that will be more difficult to diagnose and repair. That is, several minor things that are off by a bit, become dirty, lack proper lubrication, and so forth, can have a cumulative effect. It is our job as responsible 3D printer owners to keep that from happening. This chapter is an introduction to the tasks you need to keep your printer in top shape.
I like to categorize maintenance tasks into two groups: tasks that you should perform before each print (or at least once each day that you use your printer) or as needed (basic maintenance), and tasks that should be performed at certain milestones (periodic maintenance). The frequency of these depends largely on how much you use your printer, as well as the general reliability of your printer design.
I present basic maintenance tasks in this chapter. I will also discuss some basics about maintenance for those who need a primer or an introduction to performing maintenance.
The next chapter will present more complex, preventive maintenance tasks that you need to do on a periodic basis, as well as some of the more complicated corrective maintenance tasks (or simply how to fix things that go sideways).
Let’s begin by looking at some of the basics of performing maintenance and the basic 3D printer maintenance tasks you will need to master.
![]() Note Some of the practices and tasks discussed in this chapter may seem familiar. That is no accident. I discussed these either in brief or in some detail in previous chapters. I repeat the information here and build on it so that this chapter can be used as a general reference, keeping all of the information in one place.
Note Some of the practices and tasks discussed in this chapter may seem familiar. That is no accident. I discussed these either in brief or in some detail in previous chapters. I repeat the information here and build on it so that this chapter can be used as a general reference, keeping all of the information in one place.
Getting Started with Maintenance
Maintenance of 3D printers involves a lot more than some may think and yet not nearly as much as others fear. That is, there are certain things you should do every time you use your printer or as needed, things you need to do regularly (e.g., every 50 hours), and things you need to do after significant use (e.g., every 250 hours). However, none of the maintenance tasks are very difficult nor do they require any extensive skills or familiarity with complex procedures.
There is no magic behind learning how to perform maintenance on your 3D printer—especially if you built your own printer. While some tasks require a modicum of skill with basic hand tools, nothing is so complicated as to require years of experience. The best tool is your desire to keep your printer working at its best. If you have that in mind, none of the maintenance tasks will be difficult. You may find some tasks tedious perhaps, but not very difficult.
Like most things, there are some maintenance tips that can help you succeed. I’ve already mentioned the desire to maintain your printer. Beyond that, you should also be aware of certain best practices for maintenance in general. The following sections outline some of the common practices for performing maintenance. These apply to almost any type of maintenance, from automobiles to Zamboni machines.
Keep Your Area Clean and Free of Clutter
Have you ever heard the phrase that suggests the degree of clutter on the desk corresponds with the degree of clutter of the mind? I don’t strictly believe in that adage, but there is some merit to it. I’ve known some academics, researchers, and engineers who have completely spotless work areas cleaned to a near surgical level of sanitation. Amazingly, many of these people maintain their office area using a completely different philosophy. Indeed, I’ve witnessed a major book and file folder quake and landslide on several occasions. Perhaps more amazing is the fact that these brilliant minds can locate anything on their desk within seconds of the request.
Sadly, I am not in this league. While I have been accused of being slightly obsessive when it comes to organization, I have also been known to have moments of shameless clutter. Let’s face it: things tend to pile up after a while. This is especially true for hobbies like 3D printers. As you have learned from a previous chapter, there are all manner of tools needed to use and maintain the printer. And it isn’t just the tools that can clutter your work area.
Indeed, it doesn’t take long for printed parts (prototypes or otherwise) and little bits of filament to litter the area around your printer. Be it from discarded rafting, shavings from finishing your pieces, or simply trimmings for cases when things need a little adjustment to fit properly. Whatever the source, you should avoid the temptation to let things pile up to the point where you are spending time looking for things, or pushing things around.
Not only does the clutter make it harder to work around your printer, but it can also interfere with the normal operation of your printer. I once discovered that I had inadvertently left a pair of ESD tweezers on my build platform. I don’t recall having done so, but I was clearly in a hurry at some point and forgot to secure all of my tools. Suffice it to say, it became very obvious when I homed the axes. Fortunately, no harm was done, but I learned a valuable lesson: even if you don’t put your tools away, take inventory to make sure all are accounted for.
Consequently, I’ve formed the habit to make sure the area around my printers is cleaned once per day. That is, I discard unwanted filament and parts, use a vacuum to remove the little bits of filament, and put my tools away. If you do this once per day, you can avoid unexpected surprises and always know where things are stored.
![]() Caution If you have pets, you need to vacuum regularly. I discovered one of our miniature dachshunds has a knack of finding small parts of filament on the floor. He would also seek out discarded wire insulation. I reasoned that these things look like his food (small rods) and were therefore fair game in his doggy brain. Since this discovery, I also make sure I vacuum the floor area around my workspace and keep a watch on my pets.
Caution If you have pets, you need to vacuum regularly. I discovered one of our miniature dachshunds has a knack of finding small parts of filament on the floor. He would also seek out discarded wire insulation. I reasoned that these things look like his food (small rods) and were therefore fair game in his doggy brain. Since this discovery, I also make sure I vacuum the floor area around my workspace and keep a watch on my pets.
Organize Your Tools for Quick Access
If you have friends and family that are mechanically inclined, you may have encountered a variety of garage and tool organizational styles or methods. There are the compulsive types that like to keep everything in its place—with a place for everything, those that group things in similar yet somewhat disjointed containers, the free spirits who let things fall where they may,2 and of course, everyone in between.
No matter which style you subscribe to, you can make maintenance tasks easier by gathering the tools you need ahead of time and placing them nearby. Not only will this save you time, you won’t have to drop everything—sometimes literally—to find the tool you need. Experience and familiarity with your printer will teach you which tools you need for certain tasks.
For example, if you are cleaning the extruder drive gear, you will need whatever tools you need to disassemble the mechanism to expose the drive gear, as well as tools for cleaning the gear and removing loose plastic. For the MakerBot Replicator 1 and 2, you need an Allen wrench to take off the extruder fan, a pointed hobby knife or similar object to remove filament from the grooves in the drive gear, and compressed air or a vacuum to remove the debris.
You don’t have to lay your tools out like a dental hygienist’s tray, but placing them in a shallow basket, or even on the table near the printer, is a good plan. When maintaining or repairing my printers, I like to gather my tools and lay them in front of the printer so that I can reach them easily and quickly.
In fact, as I mentioned in a previous chapter, I keep a complete set of tools to perform all maintenance and repair tasks on my 3D printers in my workshop near my printers. I keep them organized into several groups to make it easier for me to select a subset for whatever I want to do. It takes only a small amount of discipline to return the tools to their proper places when the task is complete.
Most maintenance tasks should be performed while your printer is turned off and unplugged from mains power. This may seem like a very prudent thing to do (and it is) but you would be surprised at how tempting and easy it is to think your off switch can save you from a nasty electrical surprise. In most cases, this simply isn’t true. Even if the switch was designed to interrupt power completely, the fact remains that power is still live on the mains side of the switch.
The best practice is to simply unplug the printer when working on it. For those cases where you need power to manipulate the axes, you should take care to avoid areas of your printer that contain electronics and power connections. If you must come into contact with the electronics, use a grounding strap to avoid ESD damage.
![]() Tip Use an electronics enclosure to help protect against accidental damage to your electronics from foreign objects such as small animals and insects, fingers, arms, and other miscellaneous human tissue. While most of the printer uses 5v and 12v systems, even 5v power should be treated with a degree of caution. Don’t assume low DC voltage is harmless.
Tip Use an electronics enclosure to help protect against accidental damage to your electronics from foreign objects such as small animals and insects, fingers, arms, and other miscellaneous human tissue. While most of the printer uses 5v and 12v systems, even 5v power should be treated with a degree of caution. Don’t assume low DC voltage is harmless.
With the risk of sounding like your elementary school science teacher (or your grandmother), you should not rush yourself when working on your printer. A rushed task will lead to mistakes and, often, rework. Rushing can also result in misplaced tools, added clutter—or worse, mistakes. While very easy to say (write), this is one area many of us struggle to overcome. I can say with few exceptions that every time I’ve rushed through a procedure, I didn’t do quite as good of a job as I preferred.
The best way to avoid rushing is to give yourself plenty of time to complete your work. For example, if you are planning to do some maintenance on your printer before a print job, plan to set aside an hour so that you can be sure to get your printer going in time to complete whatever print you need. If you find yourself rushing because you have other things to do (be it with family, your job, etc.), take a break and take care of the more important tasks first, and then return to your printer when you are done and can take the time you need to do it properly.
An earlier chapter demonstrated how to make observations about your printer when things go wrong. The topic was encouraging you to record observations about the printer to help you diagnose and repair something that has broken or become misaligned. The same philosophy applies to performing maintenance on your printer.
More specifically, you should make observations about your printer each time you use the printer. Visually inspect things to make sure that they have not become unfastened, broken, or loose. Like the diagnostic tasks, I recommend keeping a journal and recording anything you observe about your printer. For example, you may notice some wear on one of the gears, a belt starting to get a little loose, or even some buildup of filament on the nozzle. None of these things are necessarily things that need to be fixed immediately, but entering the observation in your journal will help you stay aware of what your printer is doing. Not only that, it can also help you spot trouble before it becomes imperative.
For example, if you observe that one of the belts is a little loose one day, and looser still the next day, and then tight the third day, you should stop and check the axis mechanism for loose or broken parts. That is, a gradual decrease in tension may be normal, but a sudden shift from loose to tight or tight to loose means something is wrong.
Visual inspection isn’t the only observation technique you can employ. You can observe your printer by listening for odd sounds or being aware of odd smells or any strange movement of the printer. Sometimes a strange sound is fine, but it can also be a precursor to failure or something that will affect your print quality. For example, if you hear a clunk, or a knock, or a similar collision sound, it could mean a portion of one of your axes mechanisms has become loose or out of alignment. Checking for this when you observe the behavior may permit you to fix the anomaly before it becomes an issue.
If your printer starts to move strangely, like returning one or more of the axes to home position or seeming to add extra movement, it isn’t always the case that it is the printer at fault. It could be that the print file contains unusual commands. It can also be caused by intermittent errors in your electronics. The bottom line is: if your printer does something strange, pay close attention to what it is doing, stop your print, and diagnose the problem.
BECOME A 3D PRINTER WHISPERER
The more you use your printer, the more familiar you will become with the often strange and sometimes alarming (but normal) noises it makes, how the axes move, or even how it smells when printing.3 That is, a properly configured printer will make certain noises when the axes are moved; when moving quickly or slowly; and when fans are turned on, off, faster, or slower. In fact, the more you print, the more likely you will become so tuned to the normal sounds and smells that something unusual can manifest as a barely perceptible cue—a sixth sense if you will.
When I was younger and had more “free” money, I raced motorcycles. I knew my motorcycle. I knew how it smelled when hot, how the engine sounded in the rain or dry, noises it made under acceleration, braking, cornering, and so forth. So in tuned was I to the normal behavior that I could tell when something mechanical wasn’t right. Sometimes it was a simple adjustment, and other times it was something more serious. In fact, this technique kept me from a serious crash during practice for the championship race at Road Atlanta, GA.
While at top speed on the (then) long back straight, I grabbed a handful of front brake at my breaking point, but something didn’t feel right. There was a small vibration and a slightly different pitch to the sound of the brake pads on the disc. I knew something was wrong but I didn’t know what. I was traveling well over 140 mph. I had to make a choice. I could keep applying the front brake and check the bike out later, or I could trust my instincts.
I let off the brake and took the turn really wide, using the pit lane to scrub off speed. It was a good thing too because about the time I got the bike into the straight, the front wheel locked up. The brake caliber bracket had broken, throwing the caliber into the spokes and ruining the front wheel, forks, and what was left of the brakes. Had it not been for that minor, almost imperceptible cue, I would have faced a really bad crash.
I learned this technique from my father who, having been a sailor, taught me to learn the nuances of sailing. He told me to learn the normal sounds, vibrations, and even to feel the movement of the water under the hull and the sound of the wind. He learned this during his tour in the Navy. Indeed, I’ve met naval officers who could tell you whether their ship was in fresh water, salt water, deep water, or shallow. They couldn’t explain—it was just a “feeling” that ran from the keel through the deck and was felt through their feet.
You may develop a similar insight with your printer. Not everyone will achieve this but some will. You may even think this is a bunch of malarkey or a Jedi mind trick, but it really is one of familiarity. The more familiar you are with the sights and sounds of something mechanical, the more likely you are to know when things need attention. So while you are enjoying your printer, pay attention to how it sounds, moves, and smells. That data may come in handy.
Basic Maintenance Tasks
Once again, basic maintenance tasks are those that you should do every time you use your printer and things you should do before each printing session (each day that you use your printer). There are two types of basic maintenance tasks. First, you should inspect your printer for potential problems (loose or broken parts, etc.), and second, there are a few minor adjustments you should perform each time you use your printer or as needed. I say “as needed” because some of these tasks apply to new or newly built (or upgraded) printers and may not be required each and every time you print. I describe each of these types in more detail in the following sections.
The first type of basic maintenance task involves observing the printer—its mechanisms, wiring, frame, filament, and so forth. More specifically, you need to check your printer for anything that looks out of place, and then take action to correct the problem before you start a print. For example, if you observe that one of the belts is loose, you can adjust it so that print quality is not affected. Inspection tasks include the following.
- Frame: Checking for loose bolts and alignment
- Axes: Checking for loose or misaligned mechanisms
- Filament: Measuring the filament to ensure your slicer options are set correctly
- Extruder: Checking for broken, worn, or loose parts
- Belts: Checking tension
- Electronics: Checking for loose connections or broken wires
- Print surface: Checking the print surface for damage or wear
For new printers, I recommend performing these tasks each time you print. If you have a new printer or one that you built yourself, it is important to perform these inspections before each print. Doing so will help you make minor adjustments to get the printer broken in. Even if your vendor built your printer, inspecting it before each print will give you a sense of the reliability of your printer.
As you become more familiar with your printer, you may be able to perform these tasks less frequently. However, even if you have printed many objects and your printer is reliable such that adjustments or repairs are infrequent (more than every 50 hours of use), inspecting the printer can help detect when adjustments or repairs may be needed. Thus, for reliable printers, I recommend performing these tasks the first time you use your printer for a given day. For example, if you are going to print a series of objects, inspect the printer before printing the first object.
![]() Tip If you keep a journal of your observations, it can help you determine which of these tasks you need to do more frequently than others. For example, if you have never had to tighten your frame bolts, you can delay this task until you perform a preventive maintenance task like lubricating the axes.
Tip If you keep a journal of your observations, it can help you determine which of these tasks you need to do more frequently than others. For example, if you have never had to tighten your frame bolts, you can delay this task until you perform a preventive maintenance task like lubricating the axes.
Table 9-1 will help you determine when you should perform each of the inspection tasks in the following sections. Notice that I have columns that apply to new printers, including printers that are built from a kit (new); printers that are prebuilt or have not been used much (low usage); and printers that have shown to be reliable without issues over many hours of printing (reliable).
Table 9-1. Frequency of Inspection Tasks

Frame
Recall from the discussion about building a 3D printer that the frame is the foundation upon which all other mechanisms are attached. If the frame (some use the term chassis) is loose or misaligned, these anomalies will translate to the other mechanisms. For example, if the frame becomes misaligned, it can cause the axes mechanisms to bind, which can translate to poor print quality or, at worse, axis travel failures and ruined prints.
Given that there are so many different 3D printer designs and frame configurations, a complete step-by-step instruction for checking the bolts for tightness and even alignment would be difficult to assemble. However, you don’t really need a detailed checklist. You just need to know how your printer is constructed.
That is, you need to locate the parts of the frame that are bolted together. Some of the professional-grade printers have frames that are welded together, and therefore have no parts that could come loose. But the vast majority of printers are constructed from several pieces. RepRap printers, on the other hand, are built from many parts that are bolted together.
Whether you built your printer or purchased one already assembled, you should familiarize yourself with how the frame is assembled. Some manufacturers provide tips on keeping the frame tight and aligned. Some even include illustrations on what parts of the frame should be checked. Even so, take some time to examine your frame and locate all of the fasteners. Make an inventory of the size of wrenches or hex bits you need to tighten the fasteners, and enter that data in your journal.
Check each bolt to make sure that it is tight. Some suggest using your fingers to try to loosen a nut or bolt. The idea is that if you can loosen it with your fingers, it isn’t tight enough. I think this is a fine strategy, but it only works for those bolts and nuts that you can get to and can grasp.
I prefer to use tools to check tightness. I simply use the appropriate tool, and rather than try to loosen (which is all too easy), I give each nut and bolt a slight turn to ensure that it is tight. The idea here is that if you can move the bolt or nut with very little effort, it is too loose. When I encounter a bolt or nut like this, I give the tool a one-eighth but no more than a quarter turn to ensure that it is tight. Be sure to not overtighten.
OVERTIGHTENED BOLTS IN PLASTIC FRAME PARTS
If you accidentally overtighten a bolt that secures a plastic part, you will be rewarded with the sound of compressing or breaking plastic. Don’t do that. Bolts that secure plastic parts require very little torque. In fact, you need only tighten them to the point where the frame component is rigid and cannot come loose from normal operation of the printer.
However, overtightening bolts, even marginally, can result in a bolt that comes loose frequently. There are several things that contribute to the problem. Most often it is a case where the plastic is compressed just enough to break the internal supports of that part (especially if they are printed with a low fill percentage). When this happens, the part can appear to be solid but has enough flex that can allow the fastener to come loose.
If you find a bolt or nut that has to be tightened frequently, and the part is not overly stressed or is in an area where there should be no flex, you should consider replacing the plastic part and carefully tighten the bolts. If the problem continues to appear, you should consider using a brace or additional frame components to reduce the flex.
Repeat the process until all of the bolts and nuts are checked. It is not unusual for a new printer to have several bolts or nuts that need tightening. But you should not have to retighten them more than once or twice.
If you find a bolt or nut that needs to be tightened frequently, or find bolts or nuts that have fallen out, you either have a stress point that requires a change of fastener or you’ve overtightened the bolt one too many times. If it is not an overtightening problem, you may need to consider changing or augmenting the fastener.
For instance, you could use Loctite on the threads to help keep bolts in high-stress areas tight, or add a lock washer to keep a nut tight, or change the nut to a self-locking nut (a nut with a nylon ring that grips the threads—sometimes called nylock or nyloc4), which is far less prone to loosening. If the bolt or nut comes loose after that, you should consider reinforcing the area with a brace—or better, isolate the forces that are causing the part to come loose.
Figure 9-1 shows a modification I made to one of my Prusa Mendel i2 printers to keep the frame tight. Interestingly, this printer took longer to get all of the nuts tight. I suspect it is because the plastic parts were printed with slightly larger holes for the threaded rods. That is, the threaded rods have some play—enough that the normal vibrations of regular use can loosen the nuts. I solved the problem with lock nuts. If you choose to use lock nuts, be sure to not overtighten the nuts. It can take a lot of torque to compress the lock nuts completely. So much that it is possible to crush the plastic parts.5

Figure 9-1. Checking frame bolts: Prusa Mendel i2
Aside from tightening the bolts, you should check the alignment of your frame. Normally, the frame should not lose alignment and you would not normally have to do this task. However, if your printer was moved, accidentally bumped, or several parts of the frame have come loose, there is a chance the frame could have become misaligned or twisted.
To check alignment, use a square to check that all right angles are still right angles and a straight edge to ensure that parts that form a plane are not twisted. You should also use a ruler to ensure that all parts are at their correct locations. This is especially true for older Prusa variants that use threaded rods for frame components.
You should also make sure that all axes move smoothly without binding or collisions with the frame. RepRap printers are susceptible to minor changes or flexing of the frame. For example, if you move your Prusa Mendel i2 and set it on a surface that is not level (one corner is higher or lower than the others), the weight of the printer can cause the frame to flex and introduce binding in one or more of the axes—most notably the Y axis; this is thought to be the source of bearing holder and clamp failures.
Finally, examine all of the plastic parts to ensure that they are not cracked or show any signs of stress. The effects of stress can manifest in a number of ways. Most often, the part shows small cracks between the layers, but in the extreme case, you could see discolored sections—or worse, breaks in the plastic. Replace all parts that show any sign of damage.
Once you have performed this inspection to the point where there are no loose bolts and the frame components have not become unaligned, and no parts are broken or loose, you can consider changing the frequency of the inspection. That is, if you haven’t tightened a bolt in three or four prints, try making the inspection once a week. If nothing comes loose or misaligned after several weeks, you can consider making the inspection only when the printer is physically moved.
The axes of your printer are often subjected to small, rapid movement, which can put a lot of stress on the components. New and recently modified printers should be checked frequently to ensure that the axes remain properly aligned. Not only should you check each axis for loose parts, you should also check them for cracked or broken parts as well.
Like the frame, check each bolt to make sure that it is tight, and that pulleys and other moving parts are not loose. Inspect each of the plastic parts carefully to ensure that they are not damaged in any way. That is, if there has been any flexing of the frame, there is also the possibility of plastic parts failure in the axes mechanisms.
Be sure to check the plastic components to make sure that they are not cracked or show any wear. For example, Prusa Mendel i2 X-ends are fragile and can break if the axis is flexed. This can happen if your Z axis crashes into your build plate. In this case, the motors of the Z axis continue to drive the X-ends down once the nozzle strikes the build plate. If the extruder is not in the center of the build plate, one side of the X-end can lower farther than the other flexing the plastic to point of breakage.
You should also check the endstops for damage or loose mounts. An endstop that has moved or can move will make homing your printer difficult and could allow hard parts to collide. Some endstop holders made from PLA may be more brittle than those made with ABS. Endstop holder breakage most often occurs as a result of a malfunction in axis movement that causes the axis to crash into the endstop.
If your printer has been moved or there has been some other event, such as modification of the axes components, you should check the axes for alignment. You can check this quickly for axes that use multiple bearings running on parallel rods (in other words, most printers). The axis should move freely without binding. If there is any friction anywhere along the movement, check the alignment of the axis rods and adjust them until the axis moves freely.
![]() Tip Whenever you change an axis, be that for loose parts or realignment, always level your print bed to compensate for the changes.
Tip Whenever you change an axis, be that for loose parts or realignment, always level your print bed to compensate for the changes.
You should check your axis semifrequently (and always after moving the printer from one place to another). Once per each day that you print should be sufficient. On the other hand, if you find you have to adjust the frame, or even realign the axis, you should perform this inspection more frequently.
The filament is one of the areas that are often overlooked as a source for inspection or even adjustment. More specifically, the diameter of the filament can vary—often changing several times during the spool. Unless your filament vendor has very high standards, you could see variations that can cause some issues with printing.
Recall that we measure the diameter of filament with a caliper. If the measurement is more than a few hundredths of a millimeter larger or smaller than what you specified in your slicer, you may need to change your filament diameter setting, which normally requires reslicing. If you are printing an object you have already sliced, you should consider slicing your object again. We need to do this to ensure that the correct amount of filament is extruded when laying down runs. Too much filament (the actual diameter is larger than your slicer settings) and you risk bulges, stringing, and excess filament in smaller and narrower protrusions. Too little filament (the actual diameter is smaller than your slicer settings) and you risk poor layer adhesion and weak parts.
I recommend changing your slicer settings if you encountered a change in the diameter greater than 0.05 millimeters. Any more than that and you risk the problems stated previously. For example, if you measured your filament at the start of a spool at 1.77mm and find that it varies between 1.74mm and 1.80mm, a setting of 1.75 in your slicer filament settings should be fine.
While you should always check the diameter of the filament before slicing an object for printing, most people forget that the diameter of the filament is a variable in the sliced file. Thus, it is important to make sure that you check the filament diameter regularly and compare it to what is in the sliced file.
If you are using a slicer that produces a .gcode file and it saves the filament diameter (check your slicer to see if this is an option), you can open the file to see the filament size (as follows). If you are using a slicer that produces a binary file (e.g., MakerWare), you may need to remember what the filament size is or make sure that you use high-quality filament.
; filament_diameter = 1.75
If you are working with spools of filament from a reliable vendor, you may only need to check it once every few prints, or even once each time you start a new spool. However, until you are comfortable with the variance of the filament from your vendor (it may require sampling a number of spools), you should check the diameter every time you print.
Extruder
The extruder is the workhorse of the printer. There are several parts to the extruder, all of which need to be checked for wear or damage. The parts of the extruder include the stepper motor, extruder body, idler bearing or pulley (if equipped), drive and driven gears (if equipped), filament drive gear or hobbed bolt, and wiring for the stepper motor and hot end (if mounted together).
The stepper motor in the extruder is almost always turning, and therefore gets more use than any other stepper motor. In addition, the extruder body endures a lot more heat than the axes movements (unless it is a Bowden setup).
The filament drive gear is one of the top areas that can cause you some trouble. This is because it can become clogged with pieces of filament and start to slip. Furthermore, if the extruder uses a set of gears, the gears will wear over time and should be checked for excessive wear, broken or missing teeth, or loose gears.
There really isn’t any way to visibly observe problems with a stepper motor to tell if it needs replacement or has excessive wear (other than complete shutdown in one or both directions). I have seen stepper motors wear out; but the only symptoms were a loss of holding torque where the stepper could not hold its position, or a lack of torque when stepping, such that it missed steps. When this happens, the stepper motor is easier to turn by hand. However, unless the filament is unloaded, you cannot turn the stepper motor. Fortunately, you don’t normally have to worry about this until your stepper motor has been used for hundreds of hours of printing.
Rather, the most common wear to the stepper motor is the wiring. If not properly restrained, it is possible for the stepper motor wires to break after many hours of printing. Thus, I recommend that you often check the wiring running to the stepper motor.
The extruder body should be checked for breaks and wear. Some printer owners have reported that the extruder body can wear over time. This is normally associated with multipart extruder bodies. For example, the Greg’s Wade extruder uses a hinged door for the idler gear. The pivot point on the door can wear over time. The tension on the bolts that press the idler against the hobbed bolt can put stress on the pivot point, eventually making the hole larger. I have seen this myself a couple of times. The telltale sign is a loose idler door. You can see this visibly whenever you change filament, but you can also see the door flex as the extruder moves. If you see any play in the idler door, you should consider replacing it. Figure 9-2 shows an idler door for a Greg’s Wade hinged extruder that has failed.
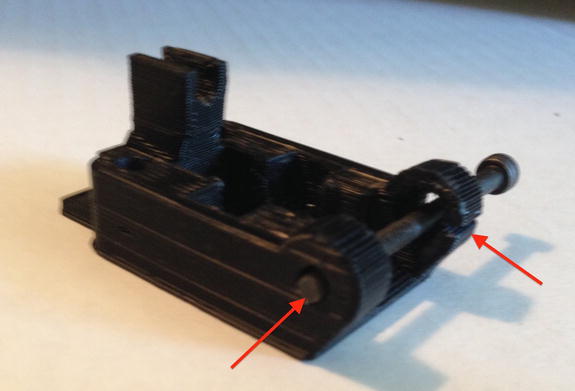
Figure 9-2. Failed idler door: Greg’s Wade hinged extruder
Notice that in the foreground we see that the hole for the bolt is rounded out. This made setting the tension of the idler bearing imprecise. Also, notice in the background that there is a crack in the part. This was due to the wear of the hole for the pivot, which weakened that area of the part.
Even if the extruder body does not have multiple parts, it is a good idea to check it. Look for changes to the way it mounts to the axis, including the carrier to which it is bolted. I have seen a case where the extruder body came loose, which caused some really strange and erratic layer shifts. Thus, always check the extruder body and its mount for loose bolts.
If your extruder uses a set of gears to drive the filament pulley, and if they are 3D-printed parts, you should check the gears for wear and damage. That is, if the gears wear long enough, it is possible that the teeth can become worn down to the point where there is play in the gears. In rare cases, the teeth could break off of the smaller of the two gears. The telltale sign of worn gears is a light dusting of plastic debris in the valleys of the teeth. Figure 9-3 shows a set of gears that have some wear. In this case, the gears have about 125 hours of use.6

Figure 9-3. Inspecting extruder gears: Prusa Mendel i2
![]() Tip You can use a small amount of lithium, silicone, or PTFE grease on the gears to reduce wear, but this can make it harder to detect worn gears.
Tip You can use a small amount of lithium, silicone, or PTFE grease on the gears to reduce wear, but this can make it harder to detect worn gears.
Notice how the teeth appear a lighter color than the extruder body. The gears in this photo are black. The teeth have a light-gray dusting on them. This is largely normal and should not be a source of alarm. I like to use a soft brush and a vacuum to remove the dust so that I can inspect the teeth more closely. If you see dust spilling over out of the valleys of the gears or packing into the valleys, you need to clean it out, and you should consider checking the gears for excessive play.
Worn teeth can cause excessive play to the point where they no longer mesh properly. To check the gears for play, hold one of the gears stationary and try to turn the other back and forth. You should have no play in the gears. Even a small amount is enough to warrant replacing the gears. The play may not affect your prints, but it is something that will only get worse over time.
Be sure to check the lateral play of the gears as well; more specifically, that the gears are mounted securely. As we saw in an earlier chapter, the larger gear that mounts to a hobbed bolt for a Greg’s Wade extruder is susceptible to the nut trap rounding out, causing the gear to wobble and slip back and forth as the gears are rotated in either direction.
If your extruder uses an idler bearing (sometimes called the idler pulley), you should also check it for play. If the idler bearing uses a modern sealed bearing, you aren’t likely to see it fail, but if the mounting point is a 3D-printed part or is mounted to the same, you should check the bolts for tightness and any play. Play in the idler bearing can cause filament extrusion problems if the play is enough to change the tension on the filament. I have seen a case where the play was no more than about 0.04mm, but that was enough to ease tension and cause an extrusion failure. I originally increased the tension to compensate (which does work temporarily), but that only made the problem worse, and eventually resulted in a cracked idler door.
![]() Tip Any play or loose bolts on the extruder should be corrected immediately.
Tip Any play or loose bolts on the extruder should be corrected immediately.
The filament drive gear, or hobbed bolt, is the one spot on all 3D printers that will eventually require service. If your extruder is constructed so that you can see the filament drive gear or hobbed bolt, check it for filament debris in the teeth. If you see any buildup, you should remove the debris from the teeth or grooves. I discuss this in more detail in the adjustments section.
As I mentioned, the wiring to the extruder is a source of failure caused by being flexed as the extruder moves on the axis. This is known as wire fatigue. If you use a strain relief to combat the problem, check the strain relief mounting to make sure that it has not come loose. An improperly mounted strain relief can exasperate the problem by creating yet another stress point. For example, if your strain relief is in the form of a plastic wire wrap and the wrap comes loose on the extruder side where the wires are not restrained, the stiffness of the plastic wire wrap will make the wires flex even more than if there were no wrap at all.
In summary, check the extruder fixed parts for wear, gears for play, filament drive pulley for buildup, and the wiring for any breaks.
Since the extruder gets so much work, I recommend checking it before every print. At the very minimum, you should do a quick look at the extruder body, the stepper motor, the drive and driven gear (if equipped), and the filament drive pulley to ensure that nothing is wrong. Remember, if something goes wrong in the extruder, your print will likely be ruined.
Belts
The belts on your 3D printer can loosen over time. This is normally very little and only after many hours of printing. What is more likely to cause loosening belts is slippage of the securing blocks. This is especially true for printer designs that use clamps on each end of the belt.
Newer RepRap designs and many of the consumer- and professional-grade printers have adapted a more secure mount that prevents slipping. For example, many of the X- and Y-carriage designs for the Prusa i3 have teeth spaced evenly to match the spacing of teeth for the belt, which creates a mounting point that does not slip.
Loose belts are those that have more than about 20mm or more of play (up and down movement perpendicular to the belt travel). Any more than this and the belt can slip on the drive gear. Not only that, but the extra length of the belt can cause minor layer shifts on that axis. For example, a very loose Y-axis belt can manifest as layer shifts on the Y-axis plane (front to back). The amount of play or slack in the belt will depend on how long the belt is, as well as its type. Check your vendor’s documentation for the correct threshold for your printer.
To adjust loose belts that are secured at each end (the belt does not form a continuous loop) and that do not include a belt tensioner, you should loosen the clamps that hold the belt, pull the belt tight, and secure the clamp. If your printer has a belt tensioner, you can simply tighten the tensioner to remove the play.
USE AN AUTOMATIC BELT TENSIONER
If your printer does not have a belt tensioner built into it, you should consider adding one. There are a number of belt tensioner designs available on Thingiverse for most common printer designs. I discuss one in particular in Chapter 11 that you can add to a printer to keep a constant tension on the belt. It has a wide range of movement in the spring-loaded arm so that you won’t have to make any changes to the belt over many hours of printing.
For closed-loop belts, you should still check the tension. If the belt gets a little loose, you can tighten the belt by loosening the mount of either the idler or driven side of the belt. For example, the MakerBot Replicator 1 and 2 have slotted mounting holes on the driven side (e.g., at the stepper motor mount) that permit you to loosen the four stepper motor mounting bolts and pull out the stepper motor, thereby increasing tension on the belt. You then retighten the bolts to complete the process.
Checking the belts for tension is a very quick test: just press up and down on the belt. I recommend checking belt tension before each print for new printers and for printers that use clamps to secure the belts. If you don’t notice any looseness in the belts, you can delay the check to once every day of printing, and if no looseness is detected then, delay the check to once a month.
The wiring on your 3D printer is another often overlooked source of problems. Printers built by vendors typically use electronics with connectors that are securely fastened and rarely come loose. However, kit-based printers are more susceptible because most wire connections are press-fit and not secured with tabs, screw terminals, or other forms of keeping the wire in place.
For printers that are assembled from kits, you should make it a priority to check all of the wiring for loose connections. A visible inspection is enough to see a connector that is not seated properly. Check slip and press-fit connections to make sure that they have not become unplugged; screw terminals to ensure that wires are still tight; and look for worn insulation or bare or broken wires at any area where the wiring crosses a metal object. Wiring can loosen due to the normal vibrations of a printer, or it can loosen due to accidental stress on the wiring when performing maintenance.
I once replaced the Z-axis mechanism on one of my Prusa Mendel i2 printers in an effort to test an experimental threaded rod mount. I didn’t realize that I had inadvertently pulled on some of the wiring, knocking loose one of the endstops and one of the stepper motors. Unfortunately, it was the Y stepper motor and the Y-axis endstop together. I really scratched my head when I homed the axes, only to discover the Y axis would only move in one direction and wouldn’t stop! Since then, I always check the wiring after any maintenance task or upgrade.
![]() Tip When moving the axes, especially homing the first time after a major upgrade or electronics change, always keep your hand near the power switch just in case the axis does not stop. It is best to kill the power than risk breaking something. Recall from Chapter 3 that you should also consider testing the endstops by triggering them manually. If the axis movement does not stop, turn off the printer and check your wiring.
Tip When moving the axes, especially homing the first time after a major upgrade or electronics change, always keep your hand near the power switch just in case the axis does not stop. It is best to kill the power than risk breaking something. Recall from Chapter 3 that you should also consider testing the endstops by triggering them manually. If the axis movement does not stop, turn off the printer and check your wiring.
But it isn’t just the wiring connections that should be checked. I have already mentioned the need to inspect the wiring on the extruder for flexing and signs of breakage, but that is just one of the stress points. Another is the heated print bed. If your printer has a heated print bed that is attached to one of the axes that moves, the wiring on the print bed should be checked for stress in the same manner as the extruder.
![]() Note While you would rarely be concerned about soldered connections, if you soldered your own connections and have not had a lot of practice soldering, you may want to check these for the first few prints to make sure the connections are strong.
Note While you would rarely be concerned about soldered connections, if you soldered your own connections and have not had a lot of practice soldering, you may want to check these for the first few prints to make sure the connections are strong.
At least once each day that you start a series of prints, I recommend checking all wiring connections to make sure that they are securely fastened. Otherwise, check the wiring on newly built printers once every print until you are certain that no connections are loose.
The print surface is another wear site. For cases where you are using blue painter’s tape or Kapton tape without ABS juice, you only need to replace the print surface when either there are adhesion problems (sudden lifting after many prints without lifting) or when you have torn or gouged the print surface treatment by removing parts. Figure 9-4 shows a print surface that is in need of replacement.

Figure 9-4. Worn print surface (blue painter’s tape)
Notice here that there are small tears and some discoloring in the print surface. Normally, discoloring won’t affect adhesion, but any tears will affect adhesion. If your print surface starts looking like this, I recommend changing it. On the other hand, you could just move the start of the print to another portion of the print bed. In Figure 9-4, the surface on either side of the wear is still good.
Recall from a previous chapter that if you use narrower strips of tape, you can replace only those strips that are affected. In Figure 9-4, I needed to replace only the centermost strips.
PATCHING PRINT SURFACES
Some printer owners have suggested patching print surfaces as a means to make supplies last longer. I’ve tried this, and it can be done, but there is some risk involved when removing the old treatment. For example, if you applied the treatment in strips that run the length of the print surface, you would have to cut out the parts that have to be replaced. Using a hobby knife or other sharp instrument may risk scaring the surface—that is, you could scratch the glass. Doing this with blue painter’s tape is a bit easier because your may be able to tear the tape in the middle of the damaged area and pull it away from the print surface before cutting. Regardless, I think it takes a bit of practice to get the new pieces cut just right and then plugged in where they need to go. I’d rather just replace the entire strip—it’s easier and far less complicated.
Even if you do not need to replace the print surface, it is a good idea to wipe it with a lint-free cloth to remove any oils from touching it with your hands, as well as any dust that may have accumulated. For Kapton tape, a cloth with a small spot of acetone will remove any filament residue, as well as oils and dust.
Checking the print surface is another easy thing you can do; and, in fact, you should do this before every print. Only a brief glance at the print surface is required to tell if it needs replacing.
The next type of basic maintenance task includes those things that require minor adjustments on a semiregular basis. I recommend checking to see if you need to do these tasks as your first step when using your printer on any given day. Adjustment tasks don’t have to be done before every print (although they can), and printers that have proven to be reliable can have these tasks done on an as-needed basis.
For example, one of my MakerBot printers rarely needs to have the print bed leveled (trammed). As a result, I make this adjustment only when I change print surfaces or build plates (I have three types: the original plastic, a lightweight glass, and a lightweight aluminum build plate).
More importantly, adjustment tasks are those that are most frequently needed to keep your printer running well. Thus, these are tasks you should perform more often, and include the following. I will discuss each in more detail shortly.
- Level the print bed: Keep the print bed adjusted properly to ensure high adhesion
- Set the Z-height: Adjust the height of the first layer with respect to the print surface
- Clean the filament drive pulley (gear): Remove debris from drive gear
- Clean the nozzle: Remove melted filament and contaminants from exterior of nozzle
In the following sections, I provide example procedures for performing these tasks. I have tried to keep them generic enough to be applicable to most printers. That being said, you may find that slightly different steps are needed for your particular printer. For example, your printer may have a different set of screens for its assisted print bed leveling feature or even no such feature. You should still be able to adapt the example to your printer by mimicking the steps by manually jogging the axes.
Table 9-2 will help you determine when you should perform each of the inspection tasks in the following sections. Notice that I provide columns that apply to new printers, including printers that are built from a kit (new); printers that are prebuilt or have not be used much (low usage); and printers that have shown to be reliable without issues over many hours of printing (reliable).
Table 9-2. Frequency of Adjustment Tasks

Level the Print Bed
Recall from Chapter 5 that we need to level (tram) the print bed to ensure that the X axis is always parallel to the print bed (Y-axis) or that the nozzle is the same height above the print bed at all locations of the printable surface area of the print bed.
Some printers incorporate a Z-height adjuster that allows you to control the height of the first layer, or more precisely, how much the first layer is pressed or squished (which can help first-layer adhesion). For these printers, leveling the print bed is a separate procedure. In these cases, you must level your build plate before setting the Z-height. Otherwise, the Z-height could be the correct setting for only one area of the build surface. Printers that do not have a Z-height adjuster incorporate the Z-height setting as part of the print bed leveling procedure.
I presented a procedure for leveling the print bed for a RepRap printer in Chapter 5, but I’d now like to show you a different procedure that is common to printers that incorporate an assisted print bed–leveling feature. The feature is designed to position the axis automatically and guide you along the way as to how to set the nozzle height over the print bed. Demonstrating the procedure will help you adapt it to your own printer, should it vary from the examples in this and previous chapters.
In this example I will use a MakerBot Replicator 1 Dual. This printer has a four-point build plate mount that includes adjusters that tighten or loosen each of the four bolts that suspend the heated print bed on springs. This four-point system is analogous to the construction of most RepRap printer designs.
![]() Note Adjusters on the four corners can work against each other by applying too much or too little tension on one corner, which can affect the others. Newer MakerBot and other printers have adapted a three-point mount that makes leveling the print bed easier. Adopting a three-point system allows you to control left/right tilt and front/back tilt without binding or putting stress on the build plate.7 The assisted print bed–leveling feature is the same on the newer MakerBot Replicator 2, but instead of four adjusters, you use only the three—two in the front and one in the rear.
Note Adjusters on the four corners can work against each other by applying too much or too little tension on one corner, which can affect the others. Newer MakerBot and other printers have adapted a three-point mount that makes leveling the print bed easier. Adopting a three-point system allows you to control left/right tilt and front/back tilt without binding or putting stress on the build plate.7 The assisted print bed–leveling feature is the same on the newer MakerBot Replicator 2, but instead of four adjusters, you use only the three—two in the front and one in the rear.
To get started leveling the build plate of a MakerBot Replicator 1 (or similar), you first power on the printer and get a sheet of paper ready. I like to use a piece of paper about 3” × 4”—something you can hold onto easily. When you are ready, choose the Utilities menu and then select Level Build Plate.
![]() Tip You can also use a Post-it note. The sticky portion makes holding the paper a bit easier.
Tip You can also use a Post-it note. The sticky portion makes holding the paper a bit easier.
The printer will have you wait until it jogs the axes into position, and then displays the following screens to explain the procedure. You can simply click the M button to skip to the next screen (once you’ve read it!). Example 9-1 shows the screen text for this step in the procedure.
Example 9-1. Startup Screens for Leveling the Print Bed
+----------------------+
| Find the 4 knobs on  |
| the bottom of the    |
| platform and tighten |
| four or five turns   |
+----------------------+
+----------------------+
| I'm going to move    |
| the extruder to      |
| various positions    |
| for adjustment.      |
+----------------------+
+----------------------+
| In each position,    |
| we will need to      |
| adjust 2 knobs at    |
| the same time.       |
+----------------------+
+----------------------+
| Nozzles are at the   |
| right height when    |
| you can just slide a |
| sheet of paper
+----------------------+
+----------------------+
| between the nozzle   |
| and the plate.       |
| Grab a sheet of      |
| paper to assist us.  |
+----------------------+
Once you press the M button at this point, the printer will display the screen as shown in Example 9-2. Pressing the M button here will move the extruder to the front center position of the build plate. Figure 9-5 shows the location and an example of how you use the sheet of paper to slide under the nozzles. The adjustment knobs are not shown but are located to the left and right of the print bed. Adjust the knobs together until the paper slides snuggly under both nozzles.
Example 9-2. Move to First Point
+----------------------+
| Adjust the front two |
| knobs until paper    |
| just slides between  |
| nozzle and plate     |
+----------------------+

Figure 9-5. Leveling the print bed: MakerBot Replicator 1 Dual
![]() Note It is important that the paper have the same tension with each nozzle. This will ensure that the print surface is the same height for each nozzle.
Note It is important that the paper have the same tension with each nozzle. This will ensure that the print surface is the same height for each nozzle.
Once you have the front two knobs set, press the M button again. You will see the screen message shown in Example 9-3, and the printer will move to the rearmost center (left-to-right) position over the build. Use the two rear adjusters to set the height.
Example 9-3. Move to Second Point
+----------------------+
| Adjust the back two  |
| knobs until paper    |
| just slides between  |
| nozzle and plate     |
+----------------------+
Once you have the rear two knobs set, press the M button again. You will see the screen message shown in Example 9-4, and the printer will move to the rightmost center position (front-to-back) over the build. Use the two rightmost adjusters to set the height.
Example 9-4. Move to Third Point
+----------------------+
| Adjust the right two |
| knobs until paper    |
| just slides between  |
| nozzle and plate     |
+----------------------+
It is important to note here that the build plate should not need more than a very minor adjustment of the two rightmost knobs. If you need more than that, you may have a warped print bed or the nozzles may not be at the same height. If this is the case, you must remove the extruder from the printer and adjust the nozzle height. See the MakerBot support page for procedures on how to do this.8
Once you have the two rightmost knobs set, press the M button again. You will see the screen message shown in Example 9-5, and the printer will move to the leftmost center position (front-to-back) over the build. Use the two leftmost adjusters to set the height.
Example 9-5. Move to Fourth Point
+----------------------+
| Adjust the left two  |
| knobs until paper    |
| just slides between  |
| nozzle and plate     |
+----------------------+
Similarly, it is important to note here that the build plate should not need more than a very minor adjustment of the two leftmost knobs. If you need more than that, you may have a warped print bed or the nozzles may not be at the same height. If this is the case, you must remove the extruder from the printer and adjust the nozzle height.
Once you have the two leftmost knobs set, press the M button again. You will see the screen message shown in Example 9-6, and the printer will move to the center of the build plate.
Example 9-6. Move to Fifth Point
+----------------------+
| Check that paper     |
| just slides between  |
| nozzle and plate     |
+----------------------+
If the paper slides easily under the nozzles at this point, you are done and your printer is ready to print! If not, you should carefully consider whether the problem is due to a built plate that is not flat. Unless you have a defective plate, it should be flat enough that the nozzles will not press into the build plate. If they do, you may have to compensate by turning each of the four adjusters one-eighth of a turn. Do this and check the nozzle height again; repeat as needed. I would also recommend running the build plate routine again to make sure that you know the effects of this minor adjustment. That is, if the other four points are considerably higher (the paper slides easily with play) or lower (the nozzles hit the build plate), you may have to replace the build plate.
I recommend leveling the print bed for new or unproven printers once each day that you use the printer. Once you have established that the printer is not affected by environment factors—that is, it doesn’t need much adjustment from one week to the next, you can adopt a policy of leveling the print bed that is less frequent than once a week. For printers that have been proven reliable and rarely need the print bed leveled, I recommend doing the procedure each time you change the print surface treatment or change the print build plates.
As I mentioned in the previous section, some printers incorporate a Z-height adjuster. I have added this feature to all of my RepRap printers and one of my consumer-grade printers. Once again, a Z-height adjuster allows me to set the Z-height based on conditions such as needing higher first-layer adhesion, using thicker print surface material (like adding ABS juice), and so forth. The basic procedure is as follows. Figure 9-6 shows an example of using the Z-height adjuster on a Prusa Mendel i2.

Figure 9-6. Setting the Z-height: Prusa i2 with separate Z-height adjuster
- Make sure that your print bed is level and that you home all axes.
- Use either your printer’s LCD menu or printer controller to raise the Z axis by 5mm.
- Use the same method to position your X and Y axes in the center of the location where you plan to print your object (for instance, in the center of the build platform).
- Place the sheet of paper under the nozzle and use the printer controller software to home the Z axis.
- Check the paper for tension and adjust the Z-height adjuster accordingly, and then rehome the Z axis.
- Repeat step 5 until the height is set.
Notice that the printer also has adjusters to set the print bed height. These are used to level the print bed, which is done prior to this procedure. You may think that the Z-height adjuster is superfluous, given that you can accomplish the same thing with the four adjusters on the print bed. However, the four adjusters would have to be moved exactly the same, else you risk altering the print bed height in one or more corners. The Z-height adjuster is a better alternative because it moves the Z endstop up and down, thereby giving you only one point to adjust—versus four.
![]() Note I will cover how to add a Z-height adjuster to your RepRap printer in Chapter 11.
Note I will cover how to add a Z-height adjuster to your RepRap printer in Chapter 11.
I recommend setting the Z-height once each day that you use the printer, or as needed as dictated by the first layer adhesion. If you are having first-layer adhesion problems not attributable to the print surface, you can set the Z-height a bit lower to help. For printers that have been proven reliable and rarely need the Z-height set,9 I recommend doing the procedure each time you change the print surface treatment or change print build plates.
Clean the Filament Drive Pulley
Cleaning the filament drive pulley is the first line of offense in correcting the problem of extrusion failure, because most extrusion failures are related to either slipping filament caused by a dirty drive pulley or a blockage. Any time you have an extrusion failure, you should clean the filament drive pulley.
The process for cleaning the filament drive pulley will vary from one printer (extruder) design to another. We saw how to do this for a Greg’s Wade extruder in Chapter 7. What follows is a similar procedure for a direct drive extruder. In this case, I am using a MakerBot Replicator 2 with an upgraded extruder mechanism. In the following, I list the procedure and then I present figures that represent each major step.
- Unload the filament.
- Disconnect the stepper motor.
- Remove the extruder fan and heat sink.
- Remove the stepper motor. Inspect and clean the drive gear.
- Remove debris from the X-carriage and hot end.
- Reassemble the extruder and load filament.
![]() Note This procedure also applies to the MakerBot Replicator 1, Replicator 1 Dual, and Replicator 2X. In the case of dual extruders, the parts are mirrored, but otherwise are removed and installed in the same manner.
Note This procedure also applies to the MakerBot Replicator 1, Replicator 1 Dual, and Replicator 2X. In the case of dual extruders, the parts are mirrored, but otherwise are removed and installed in the same manner.
The first step is to unload the filament. You can do this by powering on your printer and selecting the Utilities menu, and then the Change Filament menu and the Unload option. Remove the filament guide tube by pulling it straight up, and then pull up the filament very slightly as the filament is ejected. Figure 9-7 shows what this looks like.

Figure 9-7. Unloading filament: MakerBot Replicator 2
![]() Tip If you are using PLA, check the flexibility of the filament near the end that you removed. You may find that the filament is a bit more flexible than normal. I like to move up the filament (toward the spool) until I find a more brittle place, and then I snap off the filament there, removing the previously heated portion. I’ve found that filament loads a bit easier if it has not been heated and cooled before.
Tip If you are using PLA, check the flexibility of the filament near the end that you removed. You may find that the filament is a bit more flexible than normal. I like to move up the filament (toward the spool) until I find a more brittle place, and then I snap off the filament there, removing the previously heated portion. I’ve found that filament loads a bit easier if it has not been heated and cooled before.
![]() Note If your printer does not have an LCD panel, you can use your printer controller software to reverse the extruder once the hot end has reached temperature.
Note If your printer does not have an LCD panel, you can use your printer controller software to reverse the extruder once the hot end has reached temperature.
The next step requires you to power off your printer because you will be disconnecting the stepper motor. Failure to turn off your printer first can damage your stepper driver. Just pull up gently on the connector located at the rear of the stepper motor. Figure 9-8 shows the location.

Figure 9-8. Disconnect stepper motor: MakerBot Replicator 2
Next, we remove the stepper motor by unbolting the fan guard, fan, spacers, and heat sink. Be sure to cover your print bed with a towel so that falling parts (or tools) do not damage the print surface. Figure 9-9 shows the location of the two bolts. Be careful to not jostle the stepper motor as you remove the last bolt because it can fall onto your print bed. If you remove the bolts slowly, this will not happen. If you want to feel a bit safer, use a piece of blue painter’s tape to hold the stepper motor in place.

Figure 9-9. Removing the extruder fan: MakerBot Replicator 2
At this point, the small plastic spacers are likely to fall down into your printer. If this happens, be sure to locate them and place them outside of the printer next to the other parts so that you won’t lose them. Also, the extruder fan does not need to be disconnected and is fine to dangle from its wiring, provided you don’t pull on it in any way.
Next, we remove the stepper motor and examine the filament drive pulley. Remove any loose debris with a vacuum. If there are any bits of plastic stuck in the drive pulley, use a toothpick or sharp hobby knife to remove them and vacuum again. Figure 9-10 shows a filament drive gear in need of cleaning.

Figure 9-10. Cleaning the extruder drive pulley: MakerBot Replicator 2
The piece of filament shown in the photo is of a color that I printed before the current filament—that is, it was left over from a previous print run. I was in a bit of a hurry and did not take the time to clean the filament drive gear. In some ways, I was lucky since this extra bit of filament didn’t pose any problems and indeed it is quite small. However, if there were several stray bits in there, it could have caused filament to drop down onto my part—or worse, the drive gear to clog and eventually skip. The lesson here is to always check your filament drive gear when you change filament.
![]() Note The idler shown in Figure 9-10 is an aluminum upgrade, which I will discuss in Chapter 11. It is one of the best upgrades I’ve found. So much so that I’ve installed it on my MakerBot Replicator 1 Dual and Replicator 2/2X.
Note The idler shown in Figure 9-10 is an aluminum upgrade, which I will discuss in Chapter 11. It is one of the best upgrades I’ve found. So much so that I’ve installed it on my MakerBot Replicator 1 Dual and Replicator 2/2X.
The next step is to examine the X-carriage mount and the top of the hot end for debris. Not surprisingly, I found some stray bits of filament in mine. Figure 9-11 shows an example. Use a vacuum to remove any loose debris. If you see filament stuck to the hot end bar (the light-colored bar that runs parallel to the X axis), use tweezers or a hobby knife to remove it.

Figure 9-11. Cleaning extruder drive pulley: MakerBot Replicator 2
Once all of the debris is removed and the gear is clean, reassemble the extruder in the opposite order. It can be a bit of a challenge to keep the spacers in their place. I leave the stepper motor off to give me room to thread the bolts through the fan guard, fan, spacers, and heat sink. Start with the leftmost side. Once you have these parts on the bolt, insert the bolt through the corresponding hole, and then do the same for the right side. Finally, put the stepper motor on and tighten the bolts.
I recommend checking the filament drive pulley once each day that you use the printer. If you do not notice any buildup, you can check it every time you change filament, and clean it when needed. In fact, I always clean the filament drive pulley every time I encounter an extrusion problem.
Clean the Nozzle
The hot end nozzle is one area that many people neglect. Although there isn’t anything that needs to be adjusted, it is possible for the nozzle to become dirty over many prints—that is, bits of filament can stick to the outside of the nozzle. This can happen whenever there is stringing from the end of a print, oozing from the nozzle due to higher temperatures, or collisions with objects on the print bed. Figure 9-12 shows a J-head hot end with a brass nozzle. While this specimen is reasonably free of debris, there are some small pieces on the underside.

Figure 9-12. J-head nozzle: Prusa Mendel i2
![]() Caution We will be working with a hot end that has been brought up to temperature. When moving around inside the printer, be careful to avoid touching the hot end or nozzle. It will burn you. Also, make sure that the printer is off before using any tools near the nozzle.
Caution We will be working with a hot end that has been brought up to temperature. When moving around inside the printer, be careful to avoid touching the hot end or nozzle. It will burn you. Also, make sure that the printer is off before using any tools near the nozzle.
Over time, these bits of filament can harden and turn dark—encrusting the nozzle. While some users may say that this isn’t a big deal (and I suppose I must admit that it could be OK), I don’t like my tools or equipment to get so dirty. And it turns out that if you switch filament often, especially from PLA to ABS and back, some of the extra bits of filament can melt off and fall onto your prints.
I’ve seen this happen on occasion, and with one particularly gnarly nozzle, it would leave dark spots occasionally on the prints. This is most noticeable when printing with light-colored filament. I observed a very good print from this same printer that was printed in white. There were a total of only four or five tiny black spots that despite their small size, made the part look bad.
You can avoid this ultimate problem by simply cleaning the outside of your nozzle whenever it gets dirty (filament buildup). Best of all, it does not require you to remove the nozzle. Although it may be easy with some printers, with others it is a very involved process. The process to clean the nozzle in place is as follows. As you will see, it is very straightforward and not difficult. I describe the more involved steps in more detail.
- Use your printer’s LCD menu or printer controller software to position the X and Y axes in the center, and raise the Z axis about 50 to 80mm to give you room to work.
- Heat the hot end to the temperature for the filament used.
- Turn off the printer and unplug it.
- While the hot end is still hot, use tweezers (ESD-safe) to remove the larger pieces of filament.
- If your nozzle is oozing, wait for it to cool until it no longer oozes.
- Use a soft wire brush to remove loose filament while the nozzle is still warm.
- Vacuum away the loose debris.
- Soak a small portion of a paper towel with acetone and then wipe the nozzle.
I use ESD-safe tweezers to remove hot filament. This will remove the majority of the loose filament from the nozzle. Figure 9-13 illustrates this process.

Figure 9-13. Remove loose filament from the nozzle with tweezers
While the hot end is still warm, remove any remaining filament residue with a soft wire brush. Figure 9-14 shows this step in progress.

Figure 9-14. Cleaning the outside of the nozzle with a brush
Be sure to use a metal brush with bristles of the same or softer metal than the nozzle. A wooden or metal handle10 is a must. In the photos, for example, I used a brash brush to clean a brass nozzle. You can also use a metal scouring pad, but be sure to use the kind without soap! I do not recommend the use of steel wool because it can deposit several small bits of steel into your printer.
You can scrub the burned-on parts harder, but be sure to not put too much pressure on your hot end. Don’t worry about any filament sticking to the brush. You can remove it easily once it is completely cooled.
BURNED FILAMENT: HOW DOES THAT HAPPEN?
If your nozzle has a lot of buildup of melted filament, you may be using temperatures that are too high, and so you should consider lowering the temperature. The buildup can also occur when switching from filament that requires lower heat ranges to those that require higher heat ranges. Thus, always clean your nozzle before switching filament types.
The nozzle also should not be heated to temperature without extruding for extended periods. This is because filament in the nozzle will ooze out and be replaced with an air pocket. This can cause plastic to oxidize inside the nozzle, which can blacken and, in some cases, even clog the nozzle.
To complete the cleaning process, use a towel soaked with a small spot of acetone to clean the nozzle. Fold the towel a couple of times to help absorb the acetone, as well as help protect your fingers if the hot end is still warm. By now, the nozzle should be cool enough to touch. If it is not, wait until it cools some more, and then use the acetone cloth. I use a paper towel to help reduce the temptation to scrub the nozzle. Putting too much force on the nozzle could damage the hot end, its mount, any accessory lighting—or worse, the wiring for the heater core and thermistor. Figure 9-15 shows the use of the towel to clean the nozzle. Notice how close the wiring is to the cloth. Be careful not to damage the wiring.

Figure 9-15. Cleaning the outside of the nozzle with acetone
Once you are done, be sure to vacuum any bits of debris—filament, unidentifiable black flakes (burnt filament), bristles, and so forth, before using the printer.
I recommend cleaning the outside of the nozzle once each day that you use the printer, or as needed. If you are using the proper temperature for your filament and you haven’t had any extrusion failures or build failures, you may not need to do this procedure very often. Regardless, buildup is very easy to spot, and except for waiting for the heating and cooling cycles, it is very easy to correct.
Summary
Keeping your printer running well requires some patience and discipline to perform some simple routine tasks. While some tasks are things that make sense and are quite clearly needed, like setting the Z-height or keeping the print bed level (trammed), other tasks—like tightening the frame—may seem mundane, or tasks like keeping the print bed clean and free from debris may not seem like a lot of benefit.
However, failure to do all of these tasks can have a cumulative effect on your printer and you will eventually see some degradation of print quality. That is, if it doesn’t break first! You save yourself a lot of time by keeping up with the needs of the printer through inspection and adjustment.
In this chapter, we saw the more common inspection tasks that you can use to help you determine when things need adjustment or repair. We also saw tasks that you need to perform before each print, or once before the first print of the day, in order to keep the printer adjusted properly so that you can continue to enjoy quality prints.
Now that you’ve seen the common things you need to do to inspect and adjust your printer, the next chapter jumps into the deeper end of 3D printer maintenance. The next chapter will discuss maintenance tasks that you must perform regularly (sometimes called preventive maintenance) and describes solutions for some of the more common failures (sometimes called corrective maintenance), such as clearing a clogged nozzle and replacing failed parts.
_____________________
1This Easter, I printed an impressive horde of rabbits and a small flock of bird figurines in all colors and sizes. Some were even given names by their new owners. The figurines brightened a few faces; mine included.
2Hey, it’s still in the garage, right? Plus, you can always tell what they worked on last—just find the pile of tools.
3Aside from the heated filament odors but those are important too. ABS has a very distinctive odor when overheated. So do electronics when there is too much dust and they overheat.
4Nyloc is a registered trademark of Forest Fasteners (http://en.wikipedia.org/wiki/Nyloc_nut).
5Can you guess how I know this to be true? Yep. Wrench, wrench, crack!
6The gears were printed with PLA, which has shown to be more resistant to wear than ABS.
7Thus we have the proverbial three-legged stool that never needs shims to keep it from rocking.
8You should never have to do this.
9Only one of my RepRap printers exhibits this characteristic, so I think it is the exception.
10A plastic handle can melt if you make contact with the nozzle or hot end. This can undo all of your hard work. The best brushes are those with wooden handles.