
![]()
Solving Hardware Issues
I hope no one would be so bold as to tell you that 3D printing is a carefree experience. While it is true you should expect your printer to perform as designed, a lot of your success will be whether you perform the necessary maintenance and know how to fix the printer when things go wrong. And things will occasionally go wrong. That’s part of the charm of owning a leading-edge innovation. In other words, your success should be measured by your ability to maintain, repair, and tune your printer, as well as your learned skills in producing quality prints.
That is not to say all 3D printers will have problems, nor do I insinuate they will self-destruct when you least expect it.1 Some printers will be better than others. I have read where people have had problems with every grade of printer. Most times the problem can be solved with a simple adjustment, replacing a worn or broken part, or altering your software settings (e.g., slicer). Again, knowing what to focus on when trying to solve a problem is key, but knowing how to properly diagnose the problem will lead you to success quickly.
Keep in mind that we are seeking the best print quality possible. Anything that affects our print quality (or expectations of quality) is a problem that must be fixed. In some cases, the problem causes the print to fail (the part is unusable). In other cases, the part is still usable but may not be of sufficient quality. Also consider that most problems can have more than one cause. For example, layer shifting can be caused by loose axis mechanisms, as well as failing electronics and software.
In this chapter and the next, I present some of the tools that you will need to solve problems as they arise. I focus on the hardware in this chapter and software in the next. I present general ideas and techniques rather than step-by-step directions. I’ve found knowing why you do something is more important than what you do. Reading these chapters will help give you a broader idea of what to look for when troubleshooting.
It also helps to know which area to focus on. For example, if the hardware isn’t working properly, no printing technique or amount of slicing will overcome the problem if it is severe enough.
In this book’s appendix, I also present a set of tables that you can use to narrow down the possible remedies for many of the most common problems. After reading this chapter and the next, the appendix will become your guide to applying the knowledge presented.
Before I jump into the types of hardware problems you may encounter, let’s discuss some basic techniques for troubleshooting. I present only one form of troubleshooting technique—a technique that has worked well for me. You may find other techniques, or variations of the same, that can work equally as well. However, if you haven’t had a lot of experience in troubleshooting, what follows should help you avoid a lot of missteps and headaches.
There is something I learned early on when troubleshooting problems with my 3D printers. It seems there is no end to differing ideas for how to solve some problems. For example, it doesn’t take too many web searches to find dozens of solutions for lifting. Some will offer some very good advice—a few may actually work well for most. However, there are others that resemble voodoo or magic. While it is possible some of these will work for you, I present only those techniques that others and I have found to work well. That does not mean there are no other techniques; only that the ones listed here are the most tried and true.
Troubleshooting Techniques
Troubleshooting is not a new method, process, art, or science. Essentially, troubleshooting is determining the source of the problem and solving it. How you go about that can contribute greatly to the success of your solution. You may be able to fix your problem by randomly changing things until the problem gets better. Or you may instinctively know what to do.
![]() Note The information presented here assumes the problem is repeatable. Random failures can be very difficult to repair due to the inability to re-create the problem. Without the ability to re-create the problem, you won’t know whether you have fixed the problem or introduced a new one.
Note The information presented here assumes the problem is repeatable. Random failures can be very difficult to repair due to the inability to re-create the problem. Without the ability to re-create the problem, you won’t know whether you have fixed the problem or introduced a new one.
Some have learned good troubleshooting techniques the hard way by suffering many failures and frustrations before adapting strategies that minimize failure and maximize success. That is, they learn the hard way to approaching problems with methodical, proven techniques. Others have learned good troubleshooting techniques from wise tutors. Others still, like myself, have learned from a combination of life experience and academic training. I hope that this section fills in some niche or void in your own experience. If nothing else, you should be able to use these techniques to greater success when facing problems.
THE WHITE X
I once encountered someone with a television that had two pieces of white tape in the form of an X on one side of the chassis. When I asked about it, the owner told me it was the spot that worked the best. When I asked the owner to elaborate,2 the owner told me it was the spot that worked best to strike the TV with your palm to get it to turn on. While I admired the owner’s ability to reason out the best solution, the implementation of the solution was flawed. Don’t do this with your 3D printer—or any mechanical or electrical device. Ever.
The following sections describe several tasks you should do prior to trying to solve a problem. If you follow these tasks when approaching a problem, especially a problem with a 3D printer, you will find a solution more quickly and with less frustration and fewer headaches.
A baseline will establish many things for you. First and foremost, it will allow you to set a standard or set of observations that define the normal operation of your printer. A baseline is a set of observations made under normal (or initial) operation. Any observation that changes beyond normal parameters can be an indication that something is wrong. As an example, let us consider a garden pond. Depending on weather conditions, some evaporation is common and expected. Similarly, the water level can increase due to precipitation. However, how do you know whether it is a problem when the water level changes? If you kept records of your observations concerning water level—when it decreased or increased, and the weather conditions at the time, you would be able to form patterns from the data. Furthermore, you can form a range of how much the water level can vary under normal conditions. If you encounter a situation where the water level drops inconsistently within this range, you will know there is something wrong. The same is true for your 3D printer. If you ever detect a deviance from the normal operation, you will know not only that there is something wrong, but also where to start looking.
Most people skip this step and it is truly a pity because they often fail to notice when something is starting to wear or requires maintenance. For example, how would you know that the belts on your belt-driven axes need adjustment? You could wait until your printer starts skipping steps and ruining prints, but that seems silly. Wouldn’t it be better if you measured the slack in the belts while the printer is operating correctly? If you have data like this, you would be able to tell when the belts needed adjustment. That is, you know you need to tighten the belts when the slack becomes considerably more than your baseline measurement.
A baseline for a 3D printer is a list of observations about a fully configured and properly functioning 3D printer. You should create this baseline as soon as you are comfortable with the print quality of your printer. You can record the observations before that—say when your printer is assembled—but if you make major changes to components during calibration, the values may become invalid.
You can capture all kinds of observations from measuring the length of travel for each axis, belt tension, frame size, and so forth. However, some of these may not be of much use because they measure things that should never change (but there is nothing wrong with recording them).
To give you a starting point, I recommend making the following observations for your printer and recording them in your engineering notebook (or suitable recording device). You may want to include these and any other observations you can think of. Consider all aspects of your particular printer, especially those components that have any form of adjustment. For example, some MakerBot owners are unaware that their X and Y axes can be adjusted.3
- Belt tension: Establishes minimal tension values
- Height of each end of the X axis: Establishes that they are the same values at a known Z position)
- With bed leveled (trammed), measure height of each corner of the bed adjustors: Establishes starting point for bed leveling
- Actual vs. reported temperatures for the hot end and heated print bed: Lets you check to see if heaters or sensors fail
- Tightness of axes mechanisms: Establishes whether they become loose and affect printing
- Thickness (diameter) of new filament rolls: Lets you know if there is a quality problem with your filament
Once you have these values and any others you can think of recorded, you can refer to them when something goes wrong. The next sections discuss a process to follow when problems occur. Whether you record a baseline or not, the following process will help you to methodically find the best solution (or at least one that works). I discuss each in more detail later.
- Observe and record relevant data.
- Consider all possibilities.
- Choose and implement a strategy.
- Observe changes and compare data.
- If problem solved, stop and record new baseline data.
- If problem not solved, return setting to original value and return to step 3.
I present each of these using a concrete example of a layer shift during printing an object.
Observe and Record
The key to successful troubleshooting is making observations and recording them at the time the problem occurs. Recording your observations will help you understand what is wrong. Having a written record of the problems you encounter will also allow you to diagnose and repair the problem more quickly should the problem reoccur.
Let’s look at an example. Suppose you notice your object layers are shifted a little. Figure 7-1 shows an example of this problem. There are many observations that you could make about this situation. More generally, I recommend starting with observing the state of the printer at the time of the error. When this problem happened to me, I stopped the printer and noted the obvious things.

Figure 7-1. Layer shift
Specifically, I noted which axis the shift occurred on and that it occurred more than once. In this case, it was the Y axis. I also noted the state of the axis mechanisms. Initially, all seemed well and nothing seemed out of place. Next, I homed all the axes, one at a time, to their home positions and noted how they moved and whether there were any noises (beyond the usual), and if everything moved smoothly. I then checked the stepper motors for excessive heat. I performed a general check, without touching anything, to ensure I didn’t change anything by accident. Listing 7-1 shows the observations made when the layer shift occurred.4 Notice that I record a problem description, the date the problem occurred, and a list of my observations.
Listing 7-1. Layer Shift Problem: Observations
Problem:  Layer shifted several times.
Date: 3 June 2012

Observations:
- Occurred on Y-axis
- Stepper motors are warm but not more than expected
- No heat, odor, noise, or smoke from electronics
- Axis movement is normal, no binding
- Problem occurs only on taller objects
So how do you know what to observe? While you may be able to discern which observations are more likely to point to the problem—and only experience will give you this knowledge—you should record as many as you can. This may sound more like an art form than scientific analysis, and there is some truth to this. The best diagnosticians I’ve met sometimes use their creativity when problem solving. This includes thinking of all possible things that can go wrong, as well as observations of the state of the machine when the problem occurs.
Once you have noted your observations, it is time to consider a list of causes. You should always try to think of as many causes as you can, because while sometimes the cause is obvious (e.g., user error), this isn’t always the case. You should consider all of the components involved. In the layer shift example, this includes all of the components of the axis movement—from loose or broken parts—to failed electronics.
While you may not know what to list, you should try to list anything that comes to mind. Experience or a good diagnostic chart like those found in the appendix will help you. I like to make a list of the possible causes and write them underneath the observations. Listing 7-2 shows the updated problem entry in my engineering notebook.
Listing 7-2. Layer Shift Problem: Causes Added
Problem:  Layer shifted several times.
Date: 3 June 2012

Observations:
- Occurred on Y-axis
- Stepper motors are warm but not more than expected
- No heat, odor, noise, or smoke from electronics
- Axis movement is normal, no binding
- Problem occurs only on taller objects

Potential Causes:
- Loose belt on Y axis
- Belt clamps broken
- Stepper motor failure
- Stepper driver failure
- Loose drive gear
- Obstruction in axis mechanism
The next step is to consider each cause in turn and decide which to explore first. I like to start with the most likely cause. From experience, it usually has something to do with the mechanics of the axis movement.
Choose a Cause and Implement a Strategy to Correct
When considering potential causes to explore, one strategy is to first focus on those that are the most likely. If the problem is a new one (one you have not experienced before), you may not know which to choose, but you can start with any of them.
Another strategy you could adopt is to check those causes that are least likely to be the problem. In the layer shift example, this includes the broken clamp, loose gear, and obstructions in the axis mechanism. All of these are easy to check. As you test each possible cause, make a tick or check mark next to it on your observations list so that you know you’ve tested and eliminated it as a cause.
Regardless of which strategy you implement, you should follow the simple technique of adjust, observe, and readjust. More specifically, you make a change, test to see if the change fixed the problem, and if not, return the adjustment back to the previous setting. This is another very handy use of a baseline—how do you know what the initial setting was if you didn’t record it? It also applies to anything you do, from adjusting belts and other mechanical items to changes in software (as we will see in the next chapter).
This technique of adjust, observe, and readjust works well to successfully diagnose and repair. It reduces the chances of introducing other problems. If you did not use this technique, you may still fix the problem by changing several things at one time, but you may not learn which repair fixed the problem. In this case, if the problem occurred again, you would not have learned how to fix it—merely how to throw a box of wrenches at a problem.5
Choosing what to change is dependent on the cause you’ve decided to correct, and it is usually intuitive. Some causes may not require any changes; rather, you may just need to check something. For example, if you suspect the cause is a broken clamp, you can simply observe the clamp. If it isn’t broken, loose, or so forth, then you can cross off that potential cause and move on to the next.
![]() Caution Change one—and only one—setting at a time. Changing more than one thing before observing the effects can lead to making unnecessary changes—or worse, introducing other problems.
Caution Change one—and only one—setting at a time. Changing more than one thing before observing the effects can lead to making unnecessary changes—or worse, introducing other problems.
Once you choose a cause to try to fix, work on that cause and that cause alone. The best approach is to check and fix the cause, changing only one thing at a time. For example, if you chose to explore the possibility that the belt is loose, you first check the tension on the belt and, if slack, adjust it accordingly. But you don’t go any further! You test the condition again before looking at another cause.
When the problem is fixed, you should make a notation in your engineering notebook that describes how you fixed the problem. I like to describe what I did and how it affected the problem. It is sometimes the case that making a change reduces the problem but may not completely fix it. In this case, you would try the repair again until the problem is fixed. For example, if you need to increase the temperature of the hot end, and changing it by 5 degrees helps, increase it another 5 degrees and repeat until the problem is fixed.
Listing 7-3 shows the completed entry for the layer shift example. Notice that I tried several causes before I found the source.
Listing 7-3. Layer Shift Problem: Solution Added
Problem:  Layer shifted several times.
Date: 3 June 2012

Observations:
- Occurred on Y-axis
- Stepper motors are warm but not more than expected
- No heat, odor, noise, or smoke from electronics
- Axis movement is normal, no binding
- Problem occurs only on taller objects

Potential Causes:
- Loose belt on Y axis
- Belt clamps broken
- Stepper motor failure
- Stepper driver failure
- Loose drive gear
- Obstruction in axis mechanism

Solution:
This problem was caused by a failed stepper motor.

Notes:
I was able to repeat the problem but it only occurs on tall objects when the printer has run for more than an hour. I checked the belt tension and while it was a little loose, it wasn’t loose enough to cause such a large step failure. All clamps, bolts, and other mechanical items are working correctly.
Notice that in this example the problem was a failing stepper motor. That is very unusual; the stepper motors generally don’t fail very often. In fact, I had never seen a stepper motor fail in this manner (actually, ever). Normally, a loose belt or other mechanical failure in the axis mechanism causes this problem. But since I listed all of the problems I could think of, including all of the components involved, I was able to include this test. Had I not considered the stepper motor, I may have spent a lot more time finding the source of the problem.
Now that we have a good understanding of good practices for diagnosing and repairing problems, let us look at some specific hardware problems that you could encounter with your 3D printer.
There are a number of hardware-related problems that can occur. In this section, I present discussions of the most common hardware failures that can induce a number of problems in 3D printing. These include those related to the filament and its feeding to/through the extruder; adhesion of the heated filament to the print surface, axis and chassis; and electrical failures.
In the following sections, I present discussions of each of these areas. I also include environmental influences in these categories because environmental influences affect how some of the hardware performs. Consider the fact that the hot end must heat to a specific temperature and that the filament extruded must cool in a controlled manner. If there are environmental factors that affect that balance, such as air currents, they can cause the filament to cool too quickly, or in extreme cases, they can cause the hot end temperature to fluctuate.
Filament
You may think filament-related issues are software related. That is, how the slicer builds the objects from settings concerning the filament. However, there are a number of things that can go wrong with filament that is hardware related. Filament is also very sensitive to environmental factors. The following sections describe some of the problems you could encounter, along with recommended remedies.
The most common issue concerns the quality of the filament. Poor-quality filament can vary in diameter. Some variation is normal, but in this case we are talking about variances of more than a few tenths of a millimeter. This can cause the extruder to extrude too much or too little filament during printing. This manifests in a number of ways, including globs of filament deposited in corners or small curved parts of the object, as well as poor layer adhesion. In extreme cases it can also cause extrusion failures.
Another issue with poor-quality filament is the possibility of weak areas or portions of the filament that are hollow—or worse, portions that have contaminants embedded in the filament. Contaminants, in particular, can block the nozzle, resulting in extrusion failure.
Clearly, the best way to avoid these problems is to use a higher quality of filament. I have found the filament sold by major online retailers such as Maker Shed (makershed.com), MakerBot (makerbot.com), and IC3D (ic3dprinters.com) sell filament of very high quality. I have switched to using their filaments exclusively. I have had only one small issue with a roll of colored filament that was not tinted correctly near the end of the spool. The filament was still usable, only it did not have any tint for the last 20 feet or so.
When we buy filament, it is usually delivered on a spool. Most printers have accommodations for filament spools to ensure the extruder can pull the filament with as little tension as possible. If your printer does not have a spool holder, you should consider getting (or printing) one. Choose a design that incorporates bearings or rollers that allow the spool to unroll filament easily.
When the spool has too much tension, the extruder can strip the filament. When this happens, you will likely not catch it right away (unless you stare into your printer while it prints). The result is called an “air print,” where the printer happily continues to move the axes as if the filament were extruding. There really isn’t any way to detect this problem other than observing it.
CHOOSING A SPOOL HOLDER
If your printer did not come with a spool holder and you decide to print one yourself, you will find there are hundreds of different spool holder designs available. In fact, a recent search on Thingiverse revealed over 1400 hits for “spool holder”. Most use bearings or rollers that permit the spool to roll freely. Where a design differs most is in the size of the spool it supports, and how it mounts to your printer or if it is free-standing.
You can choose whichever spool holder design you want. Just make sure it is designed to attach to your printer (in a way that you like) and accommodates the spool sizes you own. This is another reason to choose a filament vendor with quality filament—their spool sizes rarely vary. However, some designs permit a variety of spool sizes. The ones I like best have two cones that ride on bearings. They allow me to use a horizontal rod to mount the spool. The outer diameter, thickness, and size of the hole are all easily adaptable using the cones. The following image shows an example of such a spool holder incorporated into a Prusa design.

Filament sold in bundles or coils are susceptible to tangles—where one or more loops are intertwined so that the filament cannot be uncoiled. When this occurs, it will have the same effect as having a spool holder that has too much tension. Extreme cases can result in having to untangle the filament by unraveling the entire coil.
![]() Tip Don’t toss those used spools! If you ever encounter a coil or partial spool of filament, you can always roll it up on an empty spool and use your spool holder.
Tip Don’t toss those used spools! If you ever encounter a coil or partial spool of filament, you can always roll it up on an empty spool and use your spool holder.
If you buy coiled filament, I recommend rolling onto a used spool and using a spool holder. This will reduce the possibility of the filament tangling. But be careful and do not allow the filament to come into contact with dirty surfaces, such as your shop floor. This will introduce contaminants that can cause extrusion failures.
Contaminants
You should store your filament in a clean, dry storage bag or plastic container. Make sure your filament is not in a position to have dust or other debris fall onto it. Dust and other debris can stick to the filament and be fed into the hot end. If the particles are large enough, they can cause extrusion failures.
When this occurs, it usually isn’t obvious that there is any contamination. That is, you normally clean the extruder and test extrusion. Typically, filament will seem to feed normally, but when you start your print again, you may have another extrusion failure a short time later. If you get several extrusion failures and cannot find any reason for it, you probably have dust and debris on your filament.
The best way to eliminate external contaminants is to use a foam filament filter (sometimes called a filament cleaner) that mounts on the filament. The foam or sponge wipes off external contaminants off as the filament slides through the filter. Like spool holders, filament filter/cleaner designs are plentiful. Figure 7-2 shows a filament filter (circled) that I’ve found works best for me. It mounts on the filament above the extruder. I use a dense sponge in my filters.
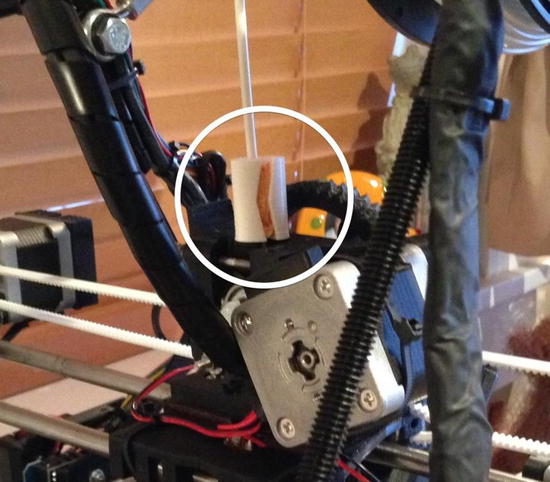
Figure 7-2. Filament filter
Another thing that can cause filament problems is moisture. Filament can absorb a certain amount of moisture if exposed to high humidity. The result can be popping or hissing sounds, steam, and even moments where the filament spurts from the nozzle (rather than flowing evenly).
Should these problems occur, you must stop your printer and remove the filament. Continued use of filament with a high level of moisture is likely to produce poor-quality objects. It also isn’t good for your hot end.
If you are thinking you will have to throw the filament away, you can relax because that isn’t necessary. You need only place the filament in a plastic bag with a drying agent for a day or so. Once it dries, you can resume printing with it.
![]() Tip Always store filament spools that are not in use in a clean, dry plastic bag with a small amount of drying agent (desiccant). I always save those little white packets you get in many products these days and drop a few in the bag with each spool of filament. Since I started storing my filament this way, I haven’t encountered a problem with humidity. Also, do not store the desiccant in the open air because this can reduce its effectiveness. You should keep it in a sealed bag when not in use.
Tip Always store filament spools that are not in use in a clean, dry plastic bag with a small amount of drying agent (desiccant). I always save those little white packets you get in many products these days and drop a few in the bag with each spool of filament. Since I started storing my filament this way, I haven’t encountered a problem with humidity. Also, do not store the desiccant in the open air because this can reduce its effectiveness. You should keep it in a sealed bag when not in use.
I have referred to clogged nozzles and extrusion failures, but I have not explained them or how to fix them. The next sections will do exactly that—describe the types of problems you could encounter with your extruder and hot end.
Extruder and Hot End
The extruder and hot end can be a source of problems and frustration for new enthusiasts. I have already described a number of them in the previous section. In this section, I will list the most common problems and include some suggestions on how to fix or avoid them.
Recall that the extruder is responsible for feeding filament to the hot end. The extruder is driven by a stepper motor and a drive pulley or hobbed bolt. The drive pulley or hobbed bolt may be driven by a set of gears. These components can sometimes fail, and when they do, there are a number of ways it can affect your print quality.
If you encounter a situation where you observe the extruder gears turning but there is a delay with filament beginning to extrude, you could have a loose or worn gear. Depending on how worn or loose the gears are, this may not affect print quality for some time; and when it does start affecting quality, you may notice small gaps in the start of print layers. Again, this can be very subtle. Where it can matter more is if you use a retraction setting. In this case, the retraction will be cancelled out by the delay induced in the worn or loose gears.
WHAT IS RETRACTION?
Retraction is a setting some slicers provide to allow you to turn the extruder backward for a short period. This “retracts” the heated filament and can be used to treat cases where the filament oozes from the nozzle or there are thin strings between moves. The oozing can be caused by residual pressure in the nozzle after the motor stops. This is more common in nozzles with small openings and large bores. Retraction can relieve the pressure and avoid oozing and stringing.
Fixing this problem for geared extruders begins with observing the gears with the printer powered off. Try turning the extruder manually or checking the gears for wobble. If one or both gears are loose, you should try tightening them. In one case, I found the large gear on a Greg’s Wade extruder had its nut trap rounded out. No amount of tightening can fix the problem, but I did find a temporary fix that allowed me to print a new gear.
![]() Note If your extruder is direct drive where the filament drive pulley is connected directly to the stepper motor, you may not be able to see the gear turning. Similarly, if the extruder uses an enclosed gear box, you may not be able to observe the gears. Thus, you may need to partially disassemble the extruder to check all pulleys and gears to make sure they aren’t loose.
Note If your extruder is direct drive where the filament drive pulley is connected directly to the stepper motor, you may not be able to see the gear turning. Similarly, if the extruder uses an enclosed gear box, you may not be able to observe the gears. Thus, you may need to partially disassemble the extruder to check all pulleys and gears to make sure they aren’t loose.
When a nut trap rounds out, you can fix the problem temporarily by heating the head of a bolt, rod, or similar blunt metal tool. Heat it with a butane torch or similar heat source. Place the nut in the nut trap and then use the heated tool to press the plastic around the nut trap against the nut. This effectively “squishes” plastic back into the nut trap and should be good for a short-term fix until you can print a new gear.
Worn gears, on the other hand, are easier to spot. You will typically see the teeth of the gear rounded or ground down. You may also see tips or even teeth broken off. For gears that wear evenly, you can check wear by powering off the printer, and holding each gear to try turning them in opposite directions. If there is any play (there shouldn’t be any), you should replace both gears as soon as you can. In extreme cases, the gears can become stripped, thereby stopping filament extrusion and leading to air prints.
If you use an extruder with a door, lever, clamp, or arm that you have to tighten to apply tension to the drive pulley, you could encounter problems if the door is tightened too much or too little—either of which can result in extrusion failures. Too much tension can result in the filament pressing into the drive pulley and eventually clogging it. Too little tension can cause the drive pulley to strip the filament, also clogging it. If your drive pulley gets clogged often and there are no spool holder issues (no tension, tangles, etc.) and the hot end is operating correctly, you may want to check the tension on the extruder door, lever, clamp, or arm.
There are several problems that can occur with the nozzle. Obstructions are normally the cause for filament extrusion failure in cases where the hot end is heating properly. We’ve seen this in the section that discussed filament contamination. However, there is a possibility you could encounter other forms of obstruction.
For example, if the nozzle drags on the print surface, it can damage the small opening or the nozzle can pick up some debris. In these cases, you may see the filament curl when exiting the nozzle. When this occurs, you should remove the filament and let the hot end cool. Once cool, remove the nozzle and use a wire brush (brass or aluminum bristles) to clean off the nozzle, and a micro drill bit to reshape the opening. You can also use a piece of emery cloth to lightly sand the nozzle tip, but be careful not to get any shavings in the nozzle itself. Use compressed air to blow out any such contaminants.
![]() Caution Some hot ends are easier to disassemble than others. For instance, a J-head hot end is easy to disassemble, but a Buko-style hot end is not. Disassembly of complex hot end designs should be a last resort to clearing nozzle jams. Be sure to check with your vendor for recommendations on how best to service your hot end.
Caution Some hot ends are easier to disassemble than others. For instance, a J-head hot end is easy to disassemble, but a Buko-style hot end is not. Disassembly of complex hot end designs should be a last resort to clearing nozzle jams. Be sure to check with your vendor for recommendations on how best to service your hot end.
An alternative to removing the nozzle would be to use a cold pull method where you heat the hot end to a temperature slightly below glassing and pull the filament out by hand. This will remove the majority of the filament stuck in the hot end and often the obstruction as well. Temperatures for this technique are 160–180ºC for ABS and 140ºC for PLA (see http://bukobot.com/nozzle-cleaning for a complete analysis of this technique).
When your drive gear gets clogged with filament, it can no longer grip the filament and pull it from the spool and feed it to the hot end. The following presents a process you can use to clean out the extruder.
- Open the extruder door.
- Bring the hot end to temperature.
- Remove the filament manually (watch out—it’s hot!).
- Turn off the printer.
- Use a pointed object to scrape out the filament from the drive pulley, turning the pulley to get to all areas.
- Use a vacuum to remove all of the filament shards.
- Reload the filament and resume printing.
Figure 7-3 shows an extruder that has stripped filament clogging the drive pulley (hobbed bolt in this case). Notice how there is excessive buildup of filament on the hobbed bolt. This prevents the grooves from gripping the filament, and thus no filament is extruded.

Figure 7-3. Clogged extruder
Also shown is the use of a hobby knife to clean out the grooves. Depending on how accessible your drive gear is, you may be able to use a brush to clean out the filament.
Now that we have seen what can go wrong with the extruder and hot end, the next section presents hardware related problems that can cause adhesion problems.
Adhesion is the number-one bane of 3D printer enthusiasts. This is especially true for those printing with ABS. Adhesion problems are manifested as portions of the object that have started to curl and pull away from the print surface (hence, it appears to have “lifted” off the print bed). Figure 7-4 shows a large gear that has suffered significant lifting. In this case, the resulting part was unusable.

Figure 7-4. Lifting example
![]() Tip Lifting may be worse for larger objects or objects with a small surface area that contacts the print surface. Increase the surface area by using a brim (set in the slicer) to print several loops of filament to extend the outer layer of the object. You can peel or cut away the brim once the object is removed from the print surface.
Tip Lifting may be worse for larger objects or objects with a small surface area that contacts the print surface. Increase the surface area by using a brim (set in the slicer) to print several loops of filament to extend the outer layer of the object. You can peel or cut away the brim once the object is removed from the print surface.
Conquering this problem involves tackling the three most common causes for lifting: leveling the print bed, ensuring that the print surface is prepared correctly, and eliminating environmental factors. I describe each of these in the following sections.
If your parts are lifting in such a way that the lifting occurs more toward one edge, it is possible your bed is not trammed (level). You may not notice this if you are printing small parts on a common area (like the center of the print bed). However, the larger parts you print, or the more parts that you have positioned toward the side that is lower, the more lifting can occur. Lifting occurs because the Z-height is too high and the first layer of filament is not being pressed onto the print surface. Conversely, having the nozzle too close to the print surface and compressing the filament can also cause warping.
If you set your Z-height at one spot (say the center), a print bed that is not trammed (level) could be lower at the front, rear, left, or right side. Conversely, it is likely the opposite edge of the print bed could be higher (a lower Z-height), which can cause the first layer to be pressed out, and the object may appear squished. If the Z-height is so low that the nozzle makes contact with the print surface, it can block the nozzle and cause extrusion failures.
The cure for this form of adhesion problem is to level the print bed. Once you have tested your printer and ensured any mechanical issues are resolved, I recommend leveling the print bed on new printers (especially ones that were built from a kit) before you print for the first time each day.
Print Surface
Another common problem that can cause lifting is a print surface that is worn or dirty. If you have touched your print surface with your fingers or other body parts,6 you could have transferred oils from your skin to the print surface, which will reduce adhesion. Similarly, a printer that has not been used for some time may have a layer of dust built up on the print surface. Finally, the print surface could have been used enough to need replacing.
You can improve adhesion when printing ABS on Kapton film by cleaning the film with acetone. This will remove oils and other contaminants, and renew the surface for better adhesion. If cleaning the surface does not improve adhesion, you should replace the Kapton film. I find Kapton tape has a very long life when compared with other print surface treatments. Indeed, I only replace the Kapton tape when I’ve accidentally damaged it from removing parts.
![]() Tip You can also use ABS slurry to increase adhesion on Kapton tape. In fact, if the bed is level (trammed) and the Z-height is set properly, ABS slurry can nearly completely cure lifting for ABS prints.
Tip You can also use ABS slurry to increase adhesion on Kapton tape. In fact, if the bed is level (trammed) and the Z-height is set properly, ABS slurry can nearly completely cure lifting for ABS prints.
Blue painter’s tape with PLA can lose its adhesive properties much sooner than Kapton film. Fortunately, blue painter’s tape is easier and cheaper to replace. I recommend replacing blue painter’s tape after 5 to 10 prints, or when parts show any signs of lifting.
Another strategy that works very well for PLA is to use a raft, which improves first-layer adhesion. A raft is a series of layers printed on the print bed and the object is printed on top. Some CAM software includes settings to generate a raft. For example, MakerWare has a setting to print a raft, which is printed in such a way that it peels off the object once it has cooled. Slic3r also allows you to print a raft, but it is not as sophisticated as the MakerWare option and can be harder to remove. Figure 7-5 shows the raft setting in Slic3r.

Figure 7-5. Raft settings in Slic3r
![]() Tip The slicer software generates the raft. Some slicers are better at printing rafts. You should experiment with rafts to be sure your slicer will generate rafts that are easy to remove.
Tip The slicer software generates the raft. Some slicers are better at printing rafts. You should experiment with rafts to be sure your slicer will generate rafts that are easy to remove.
The effects of environmental factors that can cause lifting include unstable room temperature and air currents or simple drafts. If the room temperature is too low, it can cause parts to cool unevenly and can cause parts to lift off the print surface. Likewise, air moving across the print bed can cause the filament on some layers to cool faster than others. This causes the part to curl and the curling can cause the part to pull away from the print surface. Furthermore, it is possible for upper layers on larger objects to lose layer adhesion, which causes cracks, because some areas cool faster than others.
![]() Note Lifting, cracking, and layer adhesion problems are more prevalent with ABS than PLA.
Note Lifting, cracking, and layer adhesion problems are more prevalent with ABS than PLA.
You should always ensure your room temperature is stable. The exact temperature isn’t that important (as long as it’s comfortable for human occupation), but it should remain the same for the duration of your prints. For example, do not use your printer near air conditioners or space heaters. If your room needs to be cooled or heated, allow time for the temperature to stabilize before printing.
You may think “drafts” mean any air driven by a fan or a breeze from an open window, but it doesn’t take that much air movement to cause lifting. In fact, you may not even notice the draft. Fans and open windows should be turned off and closed. However, detecting or eliminating all drafts may not be possible. Thus, we need to try and reduce their effects.
The best way to reduce the effects of drafts is to eliminate the sources. You can move the printer away from open windows (or close them), close HVAC vents, and turn off any other source of drafts. However, if you cannot eliminate the source, there are several ways to reduce the effect. These include the following. I describe each in more detail in the following sections.
- Print skirts or walls around the object
- Place removable walls around the object
- Place the printer in an enclosure
Some slicer applications allow you to add a wall of filament around your object, called a skirt. The skirt is printed as a single row to a specific layer height, forming a wall around the object. The effect of the skirt is to reduce effects of drafts from cooling the object. In fact, it helps keep more heat in the object. I find a skirt to work best for ABS prints, but I have used it for PLA prints with similar effect. Figure 7-6 shows the Slic3r application skirt settings. It also shows the brim settings, which can be used to increase the surface area making contact with the print surface. Using a skirt and brim together can help reduce the effects of drafts.

Figure 7-6. Skirt settings in Slic3r
If your slicer does not have a skirt feature or you do not want to expend that much filament, you can use removable walls made from blue painter’s tape.7 This may sound low-tech, but you’ll be surprised how well it works. In fact, I find it a better treatment than printing a skirt.
To build a removable tape wall, cut a length of blue painter’s tape and fold one-third of it over lengthwise and press it down. Next, cut the adhesive side every inch or so. This will allow you to form the tape around the object. Figures 7-7 and 7-8 show the steps for preparing the tape.
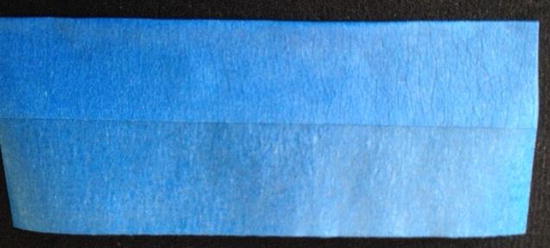
Figure 7-7. Folding the tape

Figure 7-8. Cut adhesive side every inch
The best way to apply the tape is to allow the print to print the first couple of layers, and then pause the printer. This ensures you can place the tape so that it will not interfere with the movement of the printer. When the print is done, you can remove the walls and then remove the object. Figures 7-9 and 7-10 show the steps in applying the removable blue painter’s tape wall.

Figure 7-9. Pause and apply the tape around the object

Figure 7-10. Continue printing with wall around the object
The best way to combat lifting caused by drafts that cannot be eliminated is to place the printer in an enclosure. I will show several examples of how to add panels to a MakerBot printer to transform the printer into an enclosed printer in a later chapter. If your printer does not have any external frame or ways to accommodate panels, you will have to improvise. For example, there are a number of designs for printer enclosures on Thingiverse. Here are just a few that I found promising.8
- Big acrylic box (thingiverse.com/thing:55065): Acrylic panels joined with printed parts.
- Thermal enclosure (www.thingiverse.com/thing:269586): Panels made from insulation board that can be used to retain heat in rooms with unstable temperatures.
- Wooden box (thingiverse.com/thing:40080): An enclosure made with wood frames and acrylic panels; great for wood working enthusiasts.
I have also seen a very inexpensive enclosure made from a simple, large plastic container where the lid was used as the base with the printer placed on the base in the center and the box placed on top. It won’t win any craftsmanship awards, but it will get the job done.
![]() Tip Another use of a full enclosure is fume extraction. You can use a low-power fan connected via a duct to a charcoal filter to remove a lot of the fumes from heating some filament. For example, if you are sensitive to the odor of printing ABS, an enclosure with a fume extractor can greatly reduce the irritants. Search Thingiverse for examples of fume extractors.
Tip Another use of a full enclosure is fume extraction. You can use a low-power fan connected via a duct to a charcoal filter to remove a lot of the fumes from heating some filament. For example, if you are sensitive to the odor of printing ABS, an enclosure with a fume extractor can greatly reduce the irritants. Search Thingiverse for examples of fume extractors.
Now let’s turn to the axes and chassis for the source of print failures or quality issues.
When diagnosing print quality problems, we often don’t consider the possibilities that the mechanical components of your printer can fail or come out of adjustment. Sometimes this is because of normal wear or part failure, other times it is from accidental events or changes, and still other times from neglect. I discuss each of these in the following sections.
The most obvious hardware problems are those things that cause the axes to fail to operate properly or move from its minimum to maximum positions.
Sometimes the obstruction is accidental,9 but other times it can happen that a part of your printer comes loose or an object is knocked off the print bed, only to obstruct one or more axes. When an obstruction falls into the axis mechanism, you are likely to hear chattering, bumps, and other undesirable sounds. Should this occur, you should stop your printer as soon as you can. Use the reset button or simply turn it off. The print will be incomplete and therefore useless, but it is better than your printer breaking a component, belt, or bending some vital part of the printer.
To correct the problem, clear the obstruction and make sure your printer is not damaged. Ensure all axes can be moved freely for their full range. In some cases, the obstruction can bend or dislodge endstops or cause minor changes in the axis adjustments. Be sure to check all components in the area. Power on the printer and home all axes then resume your print.
![]() Caution Never attempt to adjust your printer while it is printing. Likewise, never attempt to access your objects on the print bed while the printer is printing.
Caution Never attempt to adjust your printer while it is printing. Likewise, never attempt to access your objects on the print bed while the printer is printing.
Every printer differs, but most have several components that can be adjusted to accommodate changes or wear. These often include tension adjustments for belt-driven axes—either at the stepper motor or the idler pulley. There also cases where the printer mechanisms are required to be aligned properly. For example, the print bed must be level in order to ensure that the nozzle moves across the print bed at the same height.
Certain events—such as obstructions, mechanical or electrical failure, or major overhaul or upgrades—can cause changes that foil your adjustments. For instance, if you have a printer that uses two stepper motors for the same axis, such as the Prusa variants, the mechanism is susceptible to misalignment of the threaded rods. If you do something to move one of the threaded rods and not the other, the X axis becomes misaligned.
We have already seen the effects of print bed that isn’t level (trammed). This will cause adhesion problems, which can lead to lifting. However, if the print bed gets too far out of adjustment, it can cause the nozzle to come into contact with the print surface. Recall that this can cause extrusion failure as the print surface obstructs the nozzle.
Likewise, loose belts can cause layer shifts if they skip a cog on the drive pulley. If the belt is moderately loose, some backlash may be noticeable. As the belt becomes looser, it begins to introduce a delay—much like a stripped or worn gear. You can tell a belt needs tension by simply testing it by moving the belt up and down. If you can move it up and down so much that the axis moves, it is too loose. On the other hand, once the belt becomes very loose, it can cause the belt to slip over a notch (or more). This will introduce an immediate and extreme layer shift.
Z AXIS WOBBLE
Variations of the Prusa-style RepRap printers (Prusa i2 and prior) that have fixed mounts for the Z-axis threaded rods suffer from Z wobble. The threaded rods for the Z axis may be bent, have inconsistent threading, or simply be out of round. All of these can contribute to minute shifts of the X axis. This is because the X axis is part of the Z-axis lift mechanism. As the threaded rods wobble and shift, so does the X axis. Later versions of the Prusa style have greatly improved this problem by fixing only one size of the threaded rod with a flexible coupling, which allows the rod to wobble around a bit and not transfer to the X axis.
When parts of your printer fail, you often notice the problem immediately and it is usually clear what failed. For example, if a belt or other vital component of the axis movement breaks, that axis will also fail to operate properly and the print will fail.
Sometimes a part will crack from stress or wear. Most times the failure isn’t severe enough to cause print quality issues. For example, it is common for the X-axis ends on Prusa i2 printers (and perhaps others) to crack after several to many hours of printing. This normally doesn’t affect how the printer operates. Regardless, when you detect a part failure, you should fix or replace the part as soon as possible. Figure 7-11 shows a close-up of an X-end failure. More precisely, it shows how the part was fixed. I used a piece of ABS filament soaked in acetone for 20 seconds. The ABS becomes very soft and can be pressed into the crack. Once the acetone evaporates, the part is mended.

Figure 7-11. Repaired part
Whenever I encounter a print quality issue or print failure, I check the parts of the affected axes to ensure there are no broken parts. I also check all of the parts when I perform maintenance on the printer. As you will learn about your printer, there are some parts that fail occasionally. For example, endstop holders for RepRap printers are susceptible to breakage.
Another common part failure, which I have mentioned previously, concerns stripped or broken gears on the extruder. As mentioned, this can cause inconsistent layers in the vertical direction, or even a lack of extrusion altogether.
Far less common are minor part failures that affect only a small portion of the part. For example, the nut trap in the large gear for a Wade-style extruder can sometimes round out, permitting the nut to turn slightly. This can lead to the nut becoming loose. A rounded out nut trap will eventually cause the part to delay action. For example, if the nut trap for a gear rounds out, it may cause the mechanism to appear to pause or hesitate. This can cause delayed extrusion for extruder gears and layer shift for gear-driven axis mechanisms.
Keep in mind that each printer design varies and some may not have any recurring part failures. Likewise, wear can also vary. Some printers are more susceptible to wear than others. While some may have longer periods before wear is an issue, wear is normal for most mechanisms—especially those that must slide or make contact with other parts (e.g., bearings and gears). But how do parts break? Wear can be a cause of breakage, but other factors include maintenance (preventive vs. corrective). I discuss lack of proper maintenance in the next section.
Keeping your printer running well can be achieved through proper and regular maintenance. I discuss routine and periodic maintenance tasks in upcoming chapters. However, sometimes your printer needs maintenance (or even repair) more often. This need can manifest as noises from your printer axes movement such as squeaks, clunks, or metallic sounds; all of these are early warning alarms.10
The most common cause of these issues is lack of lubrication. For example, when bearings become dry or the smooth rods or roller channels become dirty, it is possible for friction to increase. Too much friction may cause stepping errors from too much stress on the stepper motors. If your object seems to have inconsistent layer alignment, you should ensure all axes move freely and that your stepper motors are not overheating. Lubricating the axes, or more specifically, performing maintenance on the axes should return the printer to proper operation.
You can also experience problems if you do not maintain your printer properly. More specifically, if parts wear down or become loose, your printer may start to lose some quality. I have already mentioned loose belts. If you do not adjust your belt-driven mechanisms regularly, they could become loose enough to cause axis shifts. Similarly, if you never adjust your Z-height and print bed, you will eventually experience lifting and similar adhesion problems.
Another example is loose frame components. These can cause the entire frame to shift, causing slight shifts in the layers as viewed vertically. This is the same effect as the Z-wobble problem for Prusa-style printers. If you notice slight variations in how layers are aligned, and the vertical walls are not even, check your frame components for tightness. However, if you add checking the frame for loose components to your maintenance routine, you are not likely to encounter this problem.
In fact, if you follow good maintenance practices, you can normally eliminate maintenance as a cause for the problem. For example, if you adjust your print bed and Z-height, and tighten your belts before printing the first print (that day or session), you do not have to consider lack of maintenance as a cause for print quality problems. Proper maintenance also permits you to detect and correct potential problems. For example, if you discover a part has cracked or is worn, you can replace it, even if it has yet to cause any print quality issues. Clearly, the importance of proper maintenance has significant benefits, which is why I devote two chapters to the subject.
Now that we have explored problems related to filament, extrusion, adhesion, and the mechanics of the printer, let us look at the electrical components for sources of printing problems.
Should an electrical component fail, it is the same as when a physical part breaks. That is, the mechanism fails to perform properly. For example, if a stepper motor stops turning, the axis (or extruder) will not move. However, electronic components fail intermittently, which can be much harder to diagnose. An electronics failure, even an intermittent one, does not always manifest as print quality issues. For example, when an LCD fails, your printer may continue to print.
Before testing any electrical component, you must ensure you are properly grounded and follow all safe practices for working with electricity. Most importantly, know where the mains and high power connections are and take care to avoid touching anything when powered on.
IS THIS THING ON?
One thing novices usually forget (and even some of us “mature” enthusiasts) is to check that the power supply is plugged in, the unit is powered on, and the USB cable is attached to both the printer and the computer (if that is how you print). I learned this lesson very early on and always check the cables when diagnosing a problem. If your printer is in a lab or other open area where others can interact with it, someone could have simply turned the thing off and, gasp!, unplugged it.11 A properly seated plug and a firm click of the switch can fix a host of “dead printer” problems.
I explore a few of the more common problems related to the electronics in the following sections. As you will see, there are several categories of problems: stepper motors, wiring, the main electronics board, and other components, such as switches. I also give suggestions for how to diagnose intermittent problems.
Stepper motors do most of the work of the printer. When one fails or begins to operate erratically, it will have an immediate effect on the print. It can manifest as layer shifts, missed steps, and even complete failure.
There are two things to consider when focusing on the stepper motors as a source of print problems: the stepper motor itself and the stepper motor driver. If the stepper motor driver fails, it normally fails completely and the stepper motor will not turn. In some cases, this may fail so that insufficient voltage is sent to the stepper motor. This can be detected by excessive noise when the motor is turning, or even stuttering of the motor. If you correct the problem by adjusting the voltage but it occurs again, you should replace the stepper motor driver.
Another symptom of an incorrectly set current is excessive heat. If the motors are getting really warm and the current is set correctly, you could have a stepper motor problem. If the stepper motor is too small, meaning it doesn’t have sufficient power to move the mechanism, installing a larger motor can solve the problem. However, if the printer was working correctly, with no or little heat buildup in the motors, it is possible you will need to replace the motor.
As I mentioned previously, I encountered a layer shift problem with a failed stepper motor. It was such a unique experience (I thought they would run forever, pending no abuse like too much voltage) that I was able to observe something interesting. The failing stepper motor had very little torque. In fact, I could hold the shaft and turn it even when power was applied.12 From experience, if your stepper motor is very easy to turn and you are seeing skipped steps or layer shift, replace the stepper motor.
In rare cases, you could also notice problems with filament extrusion, where the filament seems to feed at different rates. That is, the filament extrudes sluggishly for short periods, freezes, or even stutters. In this case, you could have a stepper motor failing from overheating or a simple electrical failure. If the stepper motor is overheating, you should check your stepper driver’s current settings to make sure it matches the stepper motor.
We do not think of wiring as being a part that can fail. However, consider the way the axes on your printer moves. Any axis that has electronic components that move with the axis has one thing in common—a potential stress point for the wiring powering those components. This could be an endstop, stepper motor, hot end, and so forth.
Wiring can break in two ways. It can simply break away from its solder or clamp, and it can break internally from stress.
A broken wire that has come loose is easy to find and fix. Simply reattach the wiring by removing any bits of broken wiring, and then resolder. If it is a clamped connection, try adding a bit of solder to the end of the wiring to give the clamp something to grip.
When building a printer, you should consider the wiring stress points. Failure to ensure that the wire can move freely and not bind or bend in only one area can result in broken wires. More specifically, as the axis moves, the wire is bent back and forth in a small area (the stress point). Over time, this will cause the copper filaments13 to break. If the flex continues and enough (as in all) filaments break, the component will stop working.
If you encounter a situation where a stepper motor turns in one direction but not the other, the axis does not stop when the endstop is engaged, or a hot endstops heating, it is possible your wiring is damaged or your driver is malfunctioning.
Unfortunately, the break in the wire isn’t so easy to see, and in some cases you won’t be able to see it. When looking for broken wiring from stress, look at the stress points. You can locate the break by flexing the wire slightly. The place that flexes more easily than others is the location of the break.
When you find the break, do two things. First, replace the wire, and second, use a stress relief to prevent future breaks. I like to use flexible plastic wire wrap to wrap all wiring that must flex. The wrap gives the wire more strength and is designed to distribute the flex over a larger segment of wire. I also secure both ends of the wrap to ensure that it can flex along the length and not at the attachment points. Figure 7-12 shows an example of a wiring run with flexible plastic wrap.

Figure 7-12. Using plastic wrap as a wiring stress relief
When your electronics board fails, it is normally an all-or-nothing affair. That is, your printer will go dark and you won’t be able to communicate with it via USB (or over the network). In some cases, the host board (the Arduino) may still be functioning properly, but the rest of the devices—the hot end, stepper motors, and so forth—do not. In this case, I like to always check the power supply first before considering an electronics board as the source of failure, because sometimes it is a question of power.14
For those printers that use a RAMPS or similar setup, you have two boards to test—the Arduino and the RAMPS. If the Arduino board fails, you are likely to encounter a dead printer. However, if the RAMPS fails, you may still be able to communicate with the printer via USB. I had the RAMPS board fail once, and in that case, even the LCD panel, lights, fans, and so forth, all worked; just no motors and no heaters. I originally thought this was a power problem, but as it turns out, my RAMPS board failed (a blown polyfuse).
I have also seen where the electronics board can fail intermittently. This has many possible manifestations—all of them not good. If it is truly random, it may be very inconvenient and fail at the most inopportune times. If you suspect an intermittent problem with your electronics board, try replacing it with a new or known-good component.
Other Components
This category concerns the rest of the electronics components in your printer, including switches (endstops), SD card readers, LCD panels, and so forth. When these components fail, it is usually clear what is wrong (like no display on the LCD), but in other cases it may not be so clear.
Endstop failures are rare, but when one fails, it can be a dramatic event. That is, the axis will slam into the home (or max depending on the configuration) side of the axis mechanism, which can cause damage to your printer. Fortunately, we discover such failures when homing the printer before printing, so it generally won’t affect your print. Naturally, the fix is to replace the endstop and rehome your printer.
Endstop holders can break, causing axis problems. If the holder breaks or comes loose, it may allow your axis to travel beyond its limits. Always inspect the endstop holder if you suspect a problem with axis homing.
SD cards are not as robust as other media and can fail. They are also susceptible to corruption from electrostatic discharge (ESD). When an SD card fails, your printer will likely present an error message stating it cannot read the card. Reformatting the card usually fixes the problem, but requires you to reload the card with all of the files you want to print.
In rare cases, the print file itself can become corrupt. This normally manifests as a print that fails in the middle in some bizarre manner, such as suddenly printing out in limbo land (away from the part), dropping the temperature unexpectedly, or just halting. If this occurs, and you’ve checked all other potential causes, try using a new SD card to see if it is the card or the file on the card.
Sometimes the SD card reader itself can fail with the same result—unable to read the card. In this case, reformatting the SD card or using a second (or third) known-good card will result in failures. The only recourse is to replace the SD card reader. Most printers include the SD card reader with the LCD panel, and thus you may need to replace the whole unit. However, even if the SD reader itself fails, you can still print from a computer until your replacement part arrives.
When an LCD panel fails completely, you will likely not see any text (or graphics) displayed. You may also see a display with all the block characters or several lines illuminated. The printer may even continue to function and print normally. You can even use the printer via a computer. Replacing the LCD is the only option when this occurs. Consult your documentation and contact your vendor to order a new LCD.
However, it is more common—especially on RepRap printers—to see corrupt displays on the panel. This is caused by an electrostatic discharge. If your printer is not properly grounded, your LCD can become corrupted if there is an ESD. If you have ever touched your printer and gotten a mild spark or shock, this is an ESD, which can be deadly to sensitive electronics. Fortunately, the printer will continue to print normally—you just won’t be able to read the screen.
Corrupt LCD displays can also be caused by electromagnetic interference (EMI). This can manifest in a number of ways, but higher power electrical wiring placed too close to the LCD ribbon cable normally causes it. I treat this problem two-fold. First, I wrap the LCD panel cables in shielding, and second, I route the mains power away from the LCD panel. Doing both greatly reduces the possibility of EMI corrupting your LCD panel.
In rare cases it is possible for your heating element to fail. In this case, your printer may never reach its target heat and therefore never start printing. Or in the case of the hot end, the print could fail in the middle. If you suspect your printer is not heating properly, use an infrared temperature sensor or a contact sensor to measure the temperature of your heater. If it is not heating properly, replace the heater. If that does not correct the problem, you may need to consider either a software issue or an electronics board failure.
Another possible reason for not reaching the correct temperature is that you are using a power supply set to 220VAC when plugged into a 110VAC outlet. This can cause the output of the power supply to be too low (around 10V), and therefore not enough to heat the hot end.
![]() Caution Never attempt to use your fingers, palms, or any appendage to test heaters. Some heaters can heat up very quickly to temperatures that can cause severe burns. Always use a sensor to measure heaters.
Caution Never attempt to use your fingers, palms, or any appendage to test heaters. Some heaters can heat up very quickly to temperatures that can cause severe burns. Always use a sensor to measure heaters.
BROTHER, CAN YOU SPARE A PART?
I will talk more about having a set of spares on hand in Chapter 10. However, it is worth mentioning you may want to consider building a spares kit to include printing some of the parts for your printer,15 which is a great way to start using your printer.
The contents of your kit may depend on how much you want to spend, or more importantly, how long you can wait for a replacement part. For electronics, I like to have at least one stepper motor that matches the other motors in the printer, as well as an electronics board, at least one stepper driver, and plenty of wiring. If the printer is going to be used in a business, I like to also keep on hand a spare hot end and a heated build platform. On the other hand, if you have more than one printer, you can harvest parts from one printer should another fail and require parts.
Summary
Hardware problems can cause a host of print quality issues. As we have seen, finding the cause of the problem requires you to consider several possibilities, because most problems can be caused by several different sources.
In this chapter, I presented some basic best practices for troubleshooting problems, and I presented a host of hardware problems you could encounter. While it is my hope that you never encounter any of these problems, knowing what could fail is a key to being able to detect and repair the problem.
In the next chapter, I present potential problems related to software settings. As you will see, fixing these problems involve changing one or more settings in your slicer, printer settings, or firmware.
___________________
1I once had a car in college that would do that. Failures were random, always dramatic, and when you least expected or needed to rely on it for transport.
2Fearing the inevitable answer.
3Indeed, on first glance it appears all belts are nonadjustable, but this isn’t the case for the Replicator 1, 2, and 2X.
4I would normally write this in my engineer’s notebook, but I list it here electronically. Otherwise, you would need a decoder ring to read my handwriting.
5This is akin to throwing money at a problem. For example, don’t throw that clogged nozzle away without first knowing why it clogged and how to unclog it!
6Properly cooled, of course.
7Use that roll of tape with the logo imprinted, or that less expensive roll you were sure would work just as well as the one twice the price. At least, that’s what I do.
8I have not created any of these myself, but I recommend trying these if skirts or removable walls do not work for you.
9You should treat your printer the same as any other piece of equipment. Specifically, keep your hands, other robots, drones, and loose clothing away from the printer while it is operating.
10Normally early warning. Ignore them long enough and they become “told you so” sounds.
11Unpluggers unite! It’s one of my OCD quirks. I unplug things. There, I’ve said it.
12This is one of those “do as I say, not as I do” moments. Never handle electronics that are powered on unless you know precisely what you are doing.
13As in stranded wire. You would not choose solid-core wiring for components that require flexible wire.
14You checked to see it if is plugged in and the power switch is in the “ON” position, didn’t you?
15This was one of the original goals of the RepRap project—to be able to reproduce itself by printing a new set of plastic parts.