
![]()
Taking It to the Next Level
Mastering your 3D printing hobby can be a very rewarding achievement, and once you do, it is time to take things to the next level. The 3D printing community has evolved around several principles. Most notably it is one of sharing your work with others. That is, you should desire to share what you have learned and what you make with others.
Indeed, the RepRap movement in particular was founded and fueled by members of the community who shared a desire to make the 3D printing world as open as possible. Thus, I hope you feel an obligation and a desire to share your designs with others.
Furthermore, you will likely reach a plateau where you begin to look for ways to put your 3D printer to work to solve real-world problems. That is, you will desire to print more than the occasional whistle, stretchy bracelet, and figurine (although all of those are really cool things to print).
This chapter completes our journey through the 3D printing world by presenting suggestions and guidelines for contributing your own 3D models, as well as presenting ideas for solving real-world problems. I also discuss a rather interesting application from the RepRap world: spawning a new printer.
Contributing 3D Models
As more and more free thinkers drive hobbies like 3D printing, the more prevalent the concept of sharing becomes. This is no accident. Many of the founders of the 3D printing movement are open source advocates. This applies not only to hardware and software, but it also applies to other intellectual products, such as 3D printing models (“things” in the Thingiverse vernacular).
Many feel designs for objects (models) should be free for anyone to use and modify with reciprocal expectations. For example, if you modify someone else’s design, you should share not only the improved design but also credit the originator. In some cases, this is as simple as listing the original author, but other times it may mean giving the original author your modifications. So long as you follow the guidelines of the license, all is fair and well in sharing.
![]() Note I use the terms model, object, and things to mean the same: a set of files for 3D printing. There may be some specifics that delineate, but that is not a concern for this discussion.
Note I use the terms model, object, and things to mean the same: a set of files for 3D printing. There may be some specifics that delineate, but that is not a concern for this discussion.
However, depending on how the model was created, there may be some limitation to what can be shared. For example, it may not be possible to share a model made by a proprietary CAD application. While you may be the creator of the object, you do not own the file format and the application that created it. You most likely can share the file with others, but modification of the file format may be restricted to the CAD application.
Sharing your models also means placing them someplace where others can find them. You may want to make them freely available to anyone or you may want to sell your objects. Fortunately, there are web sites that can handle either quite well.
It is a really good feeling to see one of your things being liked, used, and made by others. Thingiverse1 has a feature that allows you to show the world something you’ve made that others have designed and shared by adding a photo of your print. While little used, this feature has a huge feedback aspect because it shows the original author that her thing was put to use by someone else. If you download and make someone’s thing—and you like the outcome—post a picture of the printed thing by visiting Thingiverse and clicking “I Made One”.
The next section focuses on how to go about sharing your objects—either for free or fee.
How We Share
You may be wondering why anyone would want to give away something they have worked on for hours. While it is true that the expectation is you should share your cool things with others, it isn’t a hard and fast rule. In fact, there are some who have made their things available for a fee. But the vast majority of enthusiasts share their things for free. I discuss each of these options in this section.
It is possible to sell your things for profit. There is nothing wrong with that and there are people doing it now. There are even web sites you can use to sell your own designs.
For example, MakerBot Industries now has an online thing store called the Digital Store (https://digitalstore.makerbot.com), where you can purchase things (models) for downloading and printing. Prices are relatively low and the models are of the highest quality. Currently, there are many things available (mostly toys) and many more being added every week.
If you are thinking you’d like to do the same, there are web sites you can use. The RedPah web site (redpah.com) is a site for people to upload designs (much like Thingiverse) and set a fee for people to purchase the right to use the design for printing. Like the Digital Store, most things are inexpensive and there are even some things that are free. The idea is that you can check out someone’s free things before deciding to buy their other things. This allows you to evaluate the quality and appropriateness of the design, which will tell you if it is worth purchasing other things from the same designer. All you need to do to post your thing on RedPah is to set up an account and agree to the usage license agreement. If you want to sell items, you may also be required to set up a payment vehicle. RedPah will get a percentage of your sale (that is how they make their money).
![]() Tip Selling your things will require you to pay someone to host them for you. You can build your own web site, but you won’t have the market exposure that the professionals can provide.
Tip Selling your things will require you to pay someone to host them for you. You can build your own web site, but you won’t have the market exposure that the professionals can provide.
There is also a site called Shapeways (shapeways.com) that allows you to upload your designs for sale. However, unlike RedPah, Shapeways provides a 3D printing service. Yes, that’s right. They have a huge assortment of industrial 3D printers that can print anything from plastic to advanced metal-based powder fusion. In fact, you can upload your thing for sale and people can have it made from steel, nickel, and even some precious metals. How cool is that?
Best of all, you can browse the site’s catalog of things and print many exciting objects—from rings to larger objects of art, function, and form. I’ve found some designs that I’d like to have printed myself. However, the price is considerably higher than a site where you download the thing and print it yourself. As you can imagine, the fee for hosting your object is also higher than sites like RedPah. However, if you design some object that you’ve prototyped in plastic but want it made from platinum, Shapeways is the place for you.
Giving to Others
As I mentioned, making your things free for others to use is the more popular method of sharing 3D things. I have used Thingiverse (thingiverse.com) as an example of a repository for free things. However, there are others. The following lists a few alternatives to Thingiverse. Most are repositories, but some provide some rather unique features. I give a brief overview of each. If you are looking for something other than Thingiverse, you may want to check out some of these.
- Bld3r (bld3r.com): A community-driven site for 3D printing tinkerers. Provides a forum for members to vote for the best designs and rate each design based on quality. Largely member-driven.
- Yeggi (yeggi.com): A search engine for finding 3D models. If there is a model to match your description, Yeggi will find it for you.
- Repables (repables.com): A 3D print file repository.
- YouMagine (youmagine.com): An online 3D printing community featuring a repository, a blog, and forums for discussion. Community-driven and provided by Ultimaker.
- Cuboyo (cuboyo.com): A 3D print file repository.
There are many more alternatives and more being added. Only time will tell which ones will endure or become as popular as Thingiverse (or as well advocated and advertised). Those that were not created and directly funded by the community are likely to have been started by a 3D printing company. Two popular examples are Treasure Island (http://treasure.is/#/products) and 123D’s Gallery (123dapp.com/Gallery/content/all). Most sites sponsored by companies tend to cater to their own brands. So if you use these sites, be aware that they may have a specific slant or viewpoint.2
However, no matter which site you choose (and the choice is yours), there are some things you must understand about sharing objects. I discuss the etiquette or code of conduct in the following section.
Sharing Etiquette
Believe it or not there is a set of rules—some written, some not—that you are expected to follow should you decide to embrace the community of 3D printing or any similar community. The following lists some guidelines (rules) you would do well to heed when sharing your ideas, things, and commentary with the community.
Nobody likes a copycat. You didn’t like it when you were five and you won’t appreciate it when you see something you designed and shared for free being presented as the “design of the month” credited to someone else.
Thus, you must do your homework to make sure your design is unique. You don’t have to purposefully alter your design so that it doesn’t resemble someone else’s thing, but you should do due diligence and at least search for similar objects.
In the rare case that it so happens that your design is nearly identical to another design, so long as your work is your own, there shouldn’t be a problem. In fact, this happened to me once. My response and that of the other designer were something like, “Cool thing. Like-minds, eh?” Once again, there is nothing wrong with that, provided you both acknowledge the resemblance and there are no licensing issues.
If the other thing like yours is truly the same design but was licensed differently, you may have to negotiate with the other designer. This can happen when things are licensed for ownership (e.g., commercial property), but it is rare given that most 3D printing repositories are sites where people share their designs for free.
Let’s look at another example. What is the likelihood that a dozen different cases for a Raspberry Pi will be similar in size, have the same openings for ports, and perhaps even assemble the same way (snap together)? Very likely, yes? Does this mean that there is one original and eleven copies? No, certainly not. This is not what I am talking about.
What I mean by unique is that of those twelve cases, you should be able to identify some differences among them. Be that how they print (e.g., orientation on the build platform), whether they are made from several parts, whether they have designs on the top or ventilation, and so forth. Even if all twelve designers started at the same time, there will be some minor differences. More importantly, each is its own work. That is, no one used the design of another to pass off as his own.
However, using another’s work to create a new version with an alteration creates a new thing. This is permissible and encouraged. Consider a thirteenth sample of the Raspberry Pi case. Let’s say you like one of the twelve, but you wanted to add feet to it so that it could be raised off the work surface. Rather than start your design from scratch, you decide to download and use the one you like.
When it comes time to share your design, you must annotate your thing, giving credit to the original designer. That is, you state unequivocally that your thing is a derivation of the original (a “remix” in Thingiverse vernacular). You should list a link to the original design, along with your modifications. That is, this assumes the license permits it (most things on Thingiverse do with the share-and-share-alike license).
I mentioned licensing of things in a previous chapter under the aspect of downloading and printing things. Recall that most repositories will require you to specify a license for your thing. This permits the repository to host your thing and communicate to everyone what your intentions are regarding ownership, permissions to use, andso forth.
As I stated previously, you need to check the license before using any design. If you plan to modify it, you need to pay close attention to the license. The vast majority of licenses will allow you to use the design and most will allow you to modify it.
However, some licenses differ where it concerns the ownership of the modifications. Some open source licenses, like GPL, permit modifications but require you to surrender those modifications to the original owner (the person or organization that created and licensed it) if you plan to distribute those changes. That is, you can modify it at will for personal use, but once you distribute those changes, you have to give them to the owner of the license.
I have only run into this a couple of times, but in those cases, the designer was prototyping designs for a commercial product. The license and indeed the text of the thing made it clear she was looking for help with the design, but that the design would not be made public. Watch out for this and tread lightly. Any work you do could be for the benefit of the owner and not yours to keep or profit from.
![]() Tip When in doubt about a license, contact the originator and ask him or her directly.
Tip When in doubt about a license, contact the originator and ask him or her directly.
Since most things are licensed for sharing and free modification, you normally don’t have to worry too much. However, I recommend you check the license before using anyone else’s object in your own design.
The most vivid imaginations among us have come up with ways to use 3D printing to print things that some may consider inappropriate or even obscene. No matter what your own views are, you should strive to tolerate the views of others.3 That doesn’t mean you must compromise your own views, just be aware yours may offend, and strive to minimize the offense.
More specifically, don’t upload inappropriate things to sites that are viewable by everyone. It’s fine to upload some design for a thing that promotes a theme, ideal, and so forth (provided there are no copyright violations), just don’t upload things that are clearly offensive or intended to cause harm.
For example, if you consider the fact that 3D printing is being used in schools to teach children the technology and techniques of 3D design and printing, you shouldn’t upload things that parents may deem as inappropriate. The most obvious, of course, are offensive language, adult themes, and slanderous images.
You should check the usage and user agreement for the site that hosts your chosen repository as part of the post/no-post decision. Make sure you read the section about what is and what is not appropriate, and adhere to that. On Thingiverse, for example, it is not permitted to upload designs for firearms.
There is another angle to consider. You should avoid uploading designs that are or could potentially be illegal or unlawful. This may be difficult to discern considering the 3D printing community includes the entire globe. However, most sites will have language to suggest what is and what is not permitted. And some have language in the agreement that gives them (the site) the right to remove things they deem inappropriate.
For example, I once saw a design for something that had a very adult theme. It wasn’t something one could get in serious trouble for downloading, or even using, but it was just a bit too adult for most young children (in my opinion). I decided to test the site to see what would happen. I did nothing but wait. I checked the site the following day and found the thing had been removed. There was no trace of it and its link was broken (content missing).
So before you upload a design, make sure you understand and agree to the terms of the user agreement as to what is and what is not appropriate. Most times, a misunderstanding is not something that will get you into trouble, but if you do it more than once, chances are that someone at the site will want to speak with you or restrict your access. Which brings me back to the opening of this section: be sure to respect the views of others and especially the intended audience of the site. If you disagree, find another site.
One of the ways I can tell if a thing is good or of high quality is how it is annotated. That is, how well the designer described the thing on its site. If I encounter a thing that looks appealing, only to discover the designer didn’t bother to describe the thing with more than seven words (or less), didn’t provide any instructions, or worse—didn’t present any photos of the actual resulting print, I won’t use the thing.
Thus, you should strive to provide as full a description as possible. You don’t have to write a novel, novella, or a dissertation on the thing, but you should provide enough information to describe the intended use, what problem it solves, as well as a set of instructions for how to print or modify it (if you made it parametric).
The only exception is a case where you are still working on a thing or you plan to make changes before finalizing it. In this case, you should mark (annotate) the thing with some verbiage about it being a work in progress, being experimental, and so forth. If your repository has a feature to mark the thing as such, use that. This way, others will know your thing isn’t quite ready. One reason for doing this may be to get feedback from others. I’ve done this myself with mixed results. Mostly, people like the thing but don’t comment, or if they do, however encouraging, don’t suggest any changes.
I would also suggest you provide some level of contact information so that others who have questions can contact you. Most sites make it easy for viewers to contact you through the site, but you may want to provide other forms of contact (e.g., e-mail). You may not want to provide your home address and phone number (don’t do that), but an e-mail address is a nice way to make yourself open to the community. For example, I have seen things where people have posted their IRC handles, e-mail addresses, and even in one case a business phone number. While I may not go quite that far, I like to provide an e-mail address so that I can communicate with people who like my designs. Sometimes they needed some help using it, other times they have made practical—and in at least one case, profound—suggestions for improving the design. Plus it’s nice to connect one-on-one with someone to discuss 3D printing!
Be a Good Citizen
Suppose you run across a design for a thing that not only isn’t high quality but is also (in your opinion) engineered incorrectly. Should you immediately comment on the thing and crush the designer’s ego with a flippant remark about how dumb the thing is? No, certainly not!
What I would do (most likely) is ignore the thing altogether. I mean, why make things worse by pointing out the defects? I have found the community at large (there are some exceptions) will likely do the same and ignore the thing and not comment. Recall that one of the keys to determining whether a thing is well designed (good) is the number of people who use it. Typically, there is a counter on the site that allows you to check for this. If no one has liked it, or even downloaded it, you can be sure it won’t make it to the top of any search lists or as “thing of the month.”
On the other hand, if you feel compelled to comment, be sure to either contact the designer privately or be as constructive as you possibly can. The goal should be to help the designer improve his designs, not challenge his intellect (or pride).
When I do comment on things I find strange and perhaps flawed (and it is rare), I generally phrase my comments in the form of a question. A question normally doesn’t put someone on the defensive, and if worded properly, it should also not offend.
For example, I may ask, “How have you found the thing may break when using it in a moving vehicle?” This is a nice way of asking if the designer has tested his thing under conditions that you expect it to fail. This is good, constructive criticism in a most intellectual form. I am certain that if you think about what you are about to say, you can find other and perhaps more elegant ways of helping people improve their designs.
Example: Uploading a Thing to Thingiverse
Let’s look at an example of how to make things available for others on Thingiverse. In this case, I want to share a mount for a dial gauge for a Prusa i3. It allows you to use a dial gauge to level your print bed. It is designed to clip to the X-axis rods and hold the dial gauge firmly. Figure 13-1 shows my finished design. The following sections guide you through the process of uploading the design.

Figure 13-1. Prusa i3 dial gauge
Prepare the Design
I decided to use OpenSCAD to create the model (object). I also decided, based on my experience with dial gauges, to allow users to change the size of the hole for the dial gauge because not all dial gauges have the same diameter shaft. Furthermore, the dial gauge needs to be mounted firmly so that the tension of the depth rod doesn’t dislodge it from the mount. Thus, I decided to make the object as a module and provide a parameter for the tool diameter.
![]() Note This thing can be found on the Thingiverse site (thingiverse.com/thing:232979).
Note This thing can be found on the Thingiverse site (thingiverse.com/thing:232979).
I also wanted to provide comments in the file to include why the object was created and how to use it. As it turns out, I also decided to provide additional information about how to use the dial gauge for leveling the print bed. Listing 13-1 shows an abbreviated set of the comments I added to the top of the file.
Listing 13-1. Comments for Prusa i3 Dial Gauge
// Dial Gauge Mount for Prusa i3
//
// This thing is designed to allow you to use a typical dial guage
// for tramming (leveling) the print bed.
//
// Notes
//
// The only parameter you should have to change is the diameter of
// the tool itself. The hole for the tool should be snug so that
// the tool does not get dislodged when raising or lowering the
// Z-axis. If it is too snug, you can use a rolled up piece of
// sand paper to make the hole a bit larger. You can also change
// the parameter to the method and recompile the object if the
// tolerance is too large.
//
// Instructions for Use
//
// To use the thing, move the extruder to the center of the X-axis
// (not by hand!), insert your gauge into the mount, and clip the
// mount onto the X-axis to the left of your extruder. Press the
// top on first then swing the bottom until it lightly clicks onto
// the lower bar.
//
// Move the Z-axis (not by hand!) so that the dial tip makes contact
// with the print bed. Move it closer a few millemeters to ensure
// the dial gauge will have a good range of motion.
//
// To tram your print bed, move the gauge to the left-most edge of
// the print bed and move your Y-axis to the home position (not by
// hand!). This should be the [0,0,0] corner (home) of your print
// bed. Note the value (I like to turn the dial so the gauge reads
// 0. Make sure your bed adjuster is not too far out of the middle
// range.
//
// Next, move the Y-axis (not by hand!) to the MAX point and adjust
// the bed until the dial reads '0' or as close to it as your
// patience will permit. ;) Now you see why I move the dial to '0'!
//
// Next, move the gauge to the other side of the X-axis carefully
// so as to not change the position of the tool in the mount or the
// position of the dial. Measure and adjust the MAX/MAX point for X/Y.
//
// Finally, move the Y-axis to 0 (not by hand!) and measure and
// adjust the last corner.
//
...
// Created by: Charles Bell
//
// Enjoy!
As you can see, the comments are quite long. However, you will notice that I listed the purpose, usage notes, and even instructions on how to use the thing. You don’t have to be quite as verbose as this, but you should be sure to include all of the information someone needs to use your thing. The more complete you make the comments, the more likely someone will like it and make one.
The next step is to generate the .stl file. Recall that we do this by compiling the code in OpenSCAD. This step is required before exporting it to graphic file format. We then export the file as an .stl by clicking the File![]() Export
Export![]() Export as STL. . . menu item. Figure 13-2 shows the rendered object.
Export as STL. . . menu item. Figure 13-2 shows the rendered object.

Figure 13-2. Compiled object
At this point, you should have a set of files to upload. In this example, I have the OpenSCAD file (dial_gauge_mount.scad) and the .stl file (dial_gauge_mount.stl).
Choose a License
Once the object has been prepared, you need to consider which license you want to use. I chose the Creative Commons—Attribution—Share Alike license. Figure 13-3 shows the license options Thingiverse allows you to choose.

Figure 13-3. License options
Be sure to choose the one that best matches your intentions. In this case, I want to make the thing available to anyone to use and remix.
![]() Tip If you are not sure about the use of a particular license, you should search for it and read it before you use it. For example, the Creative Commons licenses (the most common choice) can be found at http://creativecommons.org.
Tip If you are not sure about the use of a particular license, you should search for it and read it before you use it. For example, the Creative Commons licenses (the most common choice) can be found at http://creativecommons.org.
Create the Site
If you don’t already have a Thingiverse account, you will need one to upload objects. Once you have registered, you can log in to Thingiverse and click the Create![]() Upload a Thing! menu item. This will open a page that has several areas for you to fill out. There are three steps: 1) upload files, 2) provide the details, and 3) publish the thing.
Upload a Thing! menu item. This will open a page that has several areas for you to fill out. There are three steps: 1) upload files, 2) provide the details, and 3) publish the thing.
The first screen you see prompts you for the source files. These are the OpenSCAD and .stl files you created when you completed your design. You can drag these onto the page. The upload will start immediately. Figure 13-4 shows a snapshot of the screen.

Figure 13-4. Upload source files
Note the discussion at the bottom left of the form that provides guidelines for uploading things. You should read this list and adhere to its restrictions. Indeed, by creating the thing, you are agreeing to the terms of service—see the link at the bottom of the list. Listed to the right are the supported file types.
Once the files are uploaded, you will see the form expand to allow you to upload a photo of your thing (highly recommended), as well as sections to add a name and description, choose a category and license, and optionally provide instructions. I highly recommend you add the instructions. There is also a check box to tick for marking the thing as a work in progress. Lastly, you should add any tags you deem appropriate. For this thing, I chose dial_gauge, mount, and Prusa_i3. You can use whatever you want and is appropriate.
At the bottom of the form is a place for you to identify any design that you used to create your thing. That could be a thing you downloaded and included, or perhaps it is a design that you re-created and augmented. Whatever the case, always list the sources for your design here. If you created it yourself without any inspirational examples, you can leave it blank, but that is only for those ideas that are truly unique.
For example, if you created a new X-end for a RepRap printer, even if you dreamed up the design yourself, the fact of the matter is that the original X-end already exists. In fact, there are many variants. You should choose the one that best matches your idea and list it here. You should also note this in the description. It is fine to say, “Inspired by” in the description to indicate it isn’t a direct variant (remix), but it is good taste to give credit to your inspiration.
You should also choose a name that correctly identifies your thing. Resist the temptation to glorify it with something like, “Chuck’s amazing, wonderful, absolutely beautiful thing.” That isn’t very descriptive and some may take offense at the egotistical spin (however well intended as humor). Rather, you should use a name that is short and completely describes your thing by using keywords. I chose “Prusa i3 Dial Gauge”. It is short and precise.
To give you an idea of what I would consider the bare minimum for a description and instruction, the following is what I included when I created the site for this thing.
Description
This is a dial gauge to fit the Prusa i3 X-axis. See the .scad file for more details on customizing
it to fit your dial gauge.

UPDATE: Added lower version for printers with taller hot ends.

Instructions

Print the gauge holder and insert the dial gauge. When you want to use it, simply attach it to the
each group fits easily on aX-axis smooth rods. Snap it onto the top rod and then swivel it down to snap onto the lower rod.

See the .scad file for a complete description of how to use the dial gauge to tram the print bed.
![]() Note The tool size is 9.75mm. If you need it larger, use the .scad file and enlarge the mounting hole per the instructions.
Note The tool size is 9.75mm. If you need it larger, use the .scad file and enlarge the mounting hole per the instructions.
As you can see, it is very terse but it serves to communicate everything one needs to know. Notice that I refer to the OpenSCAD file for anyone who would like to learn how to use the dial gauge. I reasoned that those searching for a dial gauge would likely know how to use it, and thus I spared them from having to ponder all that text.
Once you have all of the information entered and the options selected, you can click Save Draft to save it so that you can edit it later (for example, you want add more pictures), or click Publish to publish the thing. Figure 13-5 shows an excerpt of the thing site.

Figure 13-5. Site for dial gauge
Notice that visitors to this site can view your description, instructions, and files, and even leave you comments. What this page doesn’t show is the number of visits and downloads. At this time, there were 96 views and 30 downloads. Not the most successful thing on Thingiverse, but clearly a couple dozen people liked it enough to download it!
Once your thing is published, you have one more task to do to be a responsible community member. You should check back periodically for any comments, and respond where appropriate. When you are logged in, you will see a tab labeled Dashboard at the top. If anyone has liked your thing, left a comment, made an example, a remix, and so forth, you will see a red box with a number that indicates the number of events for your things.
Be sure to check back every couple of days or at least weekly to see if there are comments, and respond to them. As for me, I check Thingiverse daily, so if you comment on one of my things, I am likely to respond within 24 hours. There is no unspoken rule about that; just make sure that you do respond—especially if someone has asked you a question.
Ideas for Using Your 3D Printer
Unlike other 3D printing books, I have saved the discussion of “What can you do with your 3D printer?” to last. I don’t like reading 3D printing books that place it at the front. It makes me feel like I’m reading the ending before the rest of the story. In this section, I give you some ideas of the many things you can make with your 3D printer. More specifically, I would like to encourage you to consider using your 3D printer to solve real-world problems. I hope to convey this by showing you some of the ways I have done so in my home. I begin by presenting one of the original uses for RepRap printers—creating another printer.4
Spawning a New Printer
One of the most satisfying tasks that I’ve used my 3D printers for was to print the parts to make another printer. Originally one of the tenets of RepRap printers, printing a new printer (sometimes called spawning) can be a lot of fun. This is especially true once the set of parts are ready, and made sweeter when the build is complete. Even if you don’t want to make a hobbyist career of building 3D printers, you should give it a go with at least one build. You will learn a lot.
In this section, I present a different design for a 3D printer. It’s called a Smartrap and is sponsored by Smartfriendz (smartfriendz.com). Figure 13-6 shows a completed Smartrap printer.

Figure 13-6. Smartrap printer (courtesy of smartfriendz.com)
I chose this design as an example because the plastic components are small and can be printed with PLA in about 8 to 12 hours, depending on the feed rate of your printer. It is also easier to assemble than some of the popular Prusa designs, requiring only a couple of screwdrivers and an Allen wrench.
What Is a Smartrap?
The Smartrap is a RepRap variant that is designed around a minimalistic view. There are no large frame components, complex axis mechanisms, or even an enclosure. In fact, rather than an external frame, the plastic parts bolt to a wooden plank to provide a solid foundation. The frame therefore is formed from the plastic parts that mount the various components together, namely the stepper motors—three of which are mounted on the bottom. It resembles a Printrbot Simple in form factor.
What I like most about the Smartrap is its mad scientist look—with the bare electronics mounted under a glass build plate and wires running here and there. Overall, it’s a really cool-looking printer.
But the best part is that it is fully supported by a vendor, Smartfriendz. Not only that, but the files for printing the plastic parts are both available online and open source. As a result, you will find that there is a growing community of people creating features and upgrades. Indeed, many are on Thingiverse.
Smartfriendz has a storefront where you can purchase fully assembled printers, complete kits, and partial kits. Thus, Smartfriendz is a hobbyist-grade provider. However, their web site is complete with documentation, a forum for getting help, build files and videos, an FAQ, and more. So in many ways, Smartfriendz is closer to a consumer-grade provider. They are an excellent example of what RepRap vendors should strive to become.
The plastic parts for the Smartrap can be found on Thingiverse (thingiverse.com/thing:177256). You will find four files on this site. There is a bill of materials file and three .stl files that make up the set of plastic parts.
The three .stl files are subsets of the plastic parts laid out to fit on a typical RepRap printer build platform. More specifically, they can fit on the Smartrap platform. All you need to do is take the .stl files, slice them, and print them. Figure 13-7 shows the set of plastic parts needed.

Figure 13-7. Plastic parts for a Smartrap (courtesy of smartfriendz.com)
Notice that there are 27 parts that you need to print. None of them are very large, so printing them in three groups should not be a problem for most printers. For example, each group fits easily on a MakerBot Replicator 2 platform and takes about 2 to 3 hours to print.
However, if you want to print each part separately, you can. All you need to do is load the .stl file in a slicer, split (ungroup) it, and save the individual parts. You can do this easily with Slic3r. I leave this as an exercise for anyone who wants to break up the sets.
I would recommend printing the parts with a lower resolution of about 0.3mm layer height and 20% infill. This will enable you to print each .stl file in a few hours. In fact, you can print all of the parts over a weekend, easily, and still have time to watch the big game.5
If you plan to print the plastic parts over some time, say during your ever-shrinking free time, I would recommend waiting to acquire the hardware and electronics until your set of plastic parts is complete.
Don’t forget that you may need to clean up some of the parts by removing any supports and reaming out the holes for proper fitting.
Acquiring the Hardware and Electronics
As I mentioned, you can purchase the entire hardware and electronics kits from Smartfriendz. But you don’t have to. If you have leftover parts (spares even) from building other RepRap printers, you can use those for your Smartrap. In fact, the Smartrap uses many of the same parts as the Prusa variants.
For example, you will need four NEMA 17 stepper motors (you need five for a Prusa i3), some smooth and threaded rods, linear bearings, belts, and various metric bolts. See the bill of materials for a complete list. As for the electronics, most people use a RAMPS setup with one of several popular hot ends.
So if you want to acquire the components yourself, you need to get the bill of materials and make a list of the vendors near you that have the components in stock. Of course, you could just order what you need from smartfriendz.com.
Building
Rather than present a complete build guide for the Smartrap, I encourage you to visit the Smartfriendz site and download the build guide (http://reprap.org/wiki/Smartrap_Build_Manual), which is maintained by the RepRap community. You will find that it is very well written and easy to follow. You should also refer to Chapter 3 for additional tips on building 3D printers.
Overall, the build should go well and fairly quickly. None of the assembly is overly difficult, and with needing so few tools, you should not encounter any problems. If you do, be sure to visit the Smartfriendz web site for help.
Now that you’ve seen a brief overview of an example printer, you can create one yourself by generating a set of plastic parts, you should be ready to go forth and spawn your own 3D printer.
Have you ever found something broken in your home? Maybe a hook, handle, or pull has become loose, stripped, or cracked. Wouldn’t it be nice to replace it with a part you made yourself? With enough creativity and a bit of work with a CAD application and your 3D printer, you should be able to make almost anything.
Perhaps you have had ideas for things you could make out of plastic, but you didn’t have the tools or information needed to make it happen. Now that you have a deeper understanding of your printer and its capabilities, as well as some new skills at making your own objects, you can make these things a reality.
WHAT DOES 3D PRINTING COST?
You may be wondering how much it costs to print something vs. buying a manufactured one in the store. The answer depends on a number of factors. If you exclude your own time and effort, and focus on only the cost of the plastic, you may be surprised to learn printing your own parts won’t necessarily save you a lot of money.
For example, consider a typical small household hardware item that costs $4.6 Now consider that you print the same part and it weighs a mere 3 ounces (which is a lot of plastic). Further, consider that the cost of a spool of filament is $45 (an average cost) and it weighs approximately 2 pounds (32 ounces). Simple division gives you 45/32 = $1.40 per ounce. Now, at 3 ounces, we have a printed part that costs about $4.20. It’s close, right? Well, not really. If you factor in the additional time to make the part vs. the time it would have taken to get it from a store, the printed part isn’t such a good bargain.
However, if you consider the wow factor and joy you get from seeing a creation realized, that printed part becomes priceless—especially so if you are creating a part that just isn’t available (see the upcoming gate hinge). Imagine when someone asks about it. You can say, “I made that.”
Rather than take you down a path of listing all manner of suggestions without substantial information, I will present three solutions from the many things I’ve made for my own home. By reading through these, I hope to inspire your own creativity rather than present something for you to go forth and print (although you are welcome to do so).
I will begin with some tips on how to go about building parts that work. This is because it isn’t always as simple as measuring something, printing a part to match, and installing it. Many times, the part needs fine-tuning to get it correct. Indeed, I’ve found that I need to print samples of key portions of the part in order to get things to work correctly. That is, I find printing a hinged portion of the part helps solve problems like one side being a bit too large, or a hole that is too small. How do I do this? I use my 3D printer for printing prototypes of the part.7 The following are recommendations for prototyping your solutions.
When you make things intended to be installed or used in some manner other than a knickknack or curiosity, especially those things that bolt or mount to other things, you would do well to measure, re-measure, and then measure again.8 Imagine designing and printing a complex shape, only to discover the spacing of the holes or size is slightly off—either due to measuring mistakes or a mistake when coding the OpenSCAD file. I can say with some certainty that printing an object for three hours, only to discover a minor error in the CAD process, is very disappointing and even frustrating. Wouldn’t it be better if you could print only a part of the object to test the fit?
This is a form of prototyping—making test pieces (prints) to check fit so that you can adjust the object and avoid printing the completed product. Not only does this mean the pieces are faster to print, it also means that when you do print the entire object, it will be fit correctly and be ready to use.
I’ve done this before with things I’ve printed by aborting the print after a few layers. However, this only works for testing fit for features on the bottom. What do you do if you want to test a portion of an object on a different plane?
Enter the ever-versatile OpenSCAD. Even if all you have is an .stl file, you can use OpenSCAD to mask out part of the object and print the remaining parts. You can even use this technique to mask the object in stages, creating several parts.
The vehicle at work here is the difference() statement. Recall that it allows us to subtract (erase) portions of an object that are overlapped by one or more other shapes. Let’s see an example.
Let’s suppose we want to test the fit of a piece that has some holes and a channel for mounting on a piece of wood. Rather than print the entire object, we can use the difference() statement to erase or mask the parts we don’t want to print. Figure 13-8 shows the code for this (comments omitted for brevity). We will see this object later in the chapter.

Figure 13-8. Masking for prototyping
Notice that I used two cubes to cut away most of the object. What is left is a much smaller test piece that I can print quickly to test the location of the holes, as well as the depth and width of the groove to ensure that it fits. If adjustments are needed, I can make the adjustments to the code, compile, export, and reprint the prototype.
![]() Note You may be able to use intersect() to achieve the same goal. Check the OpenSCAD documentation for how to use this method.
Note You may be able to use intersect() to achieve the same goal. Check the OpenSCAD documentation for how to use this method.
Another helpful technique for prototyping is changing the slicing parameters to generate lower fill and thinner walls. This saves you a bit of plastic, because the strength of the prototyped part is normally not an issue—it will never be installed! Thus, there is no need to print with higher quality, additional shells (thicker vertical and horizontal walls), or even a high fill factor. I recommend using 0.3mm layer height, no more than two shells, 10% infill, and the fastest print speed allowed. Again, the look of the part isn’t important. We’re mainly testing fit and alignment.
As you may surmise, the color of the filament is also not important, so you can use whatever filament you have the most of and save your chosen filament for the final product.
![]() Note Some printers may exhibit dramatically poorer print quality at higher speeds and higher layer heights. Be sure to consider this because these effects can cause part warping and the distortion of smaller areas that affect fit. In this case, some trimming and cleanup may be needed if the anomalies are not too severe.
Note Some printers may exhibit dramatically poorer print quality at higher speeds and higher layer heights. Be sure to consider this because these effects can cause part warping and the distortion of smaller areas that affect fit. In this case, some trimming and cleanup may be needed if the anomalies are not too severe.
I have found this technique to be extremely handy when creating unique parts, replacement parts, or new parts that need to fit or be assembled with other parts. As I mentioned, you can also use the technique of breaking a part into several pieces.
Making closet accessories, and to some extent, accessories for the bathroom, such as shelves, hooks, and hangers, is very popular. Indeed, there are a lot of these types of things on Thingiverse. If you are looking for smaller, less complex things to design and print, I recommend looking for solutions to your storage challenges.
For example, my wife wanted to hang her purses on a clothes rod so that she can get them off the floor and shelves9 and free up that space for other things. The clothes rod was easy (I made the rod holders, too), but what we really needed was a bunch of S-shaped hooks. I found about a dozen different ones on Thingiverse, but none that were the right size and thickness (leather purses are heavy). So I made my own. Listing 13-2 shows my solution.
Listing 13-2. S-Hook Code
//
// S-hook
//
// This thing makes an S-shaped hook for hanging things. You can use
// it to hang planters, belts, bags, purses, etc.
//
// Instructions
// Simply compile, export, and print! If you want to make the hooks
// a different size, use the following parameters to alter the size.
//
// - The diameter parameter sets the outer diameter of the loops.
// - The thickness is the height and width of the cross section of
//   the loops.
//
// Created by: Charles Bell
//
// Enjoy!
//
module s_hook(diameter=40,thickness=5) {
  radius=diameter/2;
  difference() {
    cylinder(thickness,radius,radius,$fn=64);
    cylinder(thickness,radius-thickness,radius-thickness,$fn=64);
    translate([0,-radius,0]) cube([radius,radius,thickness]);
  }
  translate([0,thickness-diameter,0]) difference() {
    cylinder(thickness,radius,radius,$fn=64);
    cylinder(thickness,radius-thickness,radius-thickness,$fn=64);
    translate([-radius,0,0]) cube([radius,radius,thickness]);
  }
}

s_hook();
Prototyping this object was easy. I simply halted the print after a couple of layers. This allowed me to check the fit of the S-hook to see if it fit over the clothes rod. Figure 13-9 shows the finished product installed.

Figure 13-9. Closet S-hooks
Notice the hook in the center. This was a metal hook from a hardware store that came in a pack of two for about $2.00. I printed almost a dozen S-hooks for about $0.20 each. If you are wondering about the elasticity of plastic, don’t. These hooks were printed with ABS in early 2013 and have held the purses without sagging.
If you are looking for something to design and print, look in your closet and bathroom for ways you can improve organization by making hooks, small containers, and similar devices.
Another area where your 3D printer can solve real-world problems is by making mechanical hardware. This could be something that you want or need to attach something to a wall, floor, or ceiling, or perhaps a new knob, clip, or similar miscellaneous bit.
For example, sometimes you may find you can print a replacement part for something that breaks. I once made a replacement handle for a shower door. The original was over 30 years old and not available for purchase. Rather than try to find something at the hardware store that I could trim, drill, or otherwise modify to fit, I just created one and printed it! Best of all, I chose to print it in translucent clear PLA, which most closely matched the faded opaque original.
While fixing things is a lot of fun, creating new solutions is even more fun.10 However, it can also be a lot of work if you need to create a part to fit into or be mounted on something. Let’s look at an example.
![]() Note This is the same part shown in the example in the prototyping section.
Note This is the same part shown in the example in the prototyping section.
Suppose you have children or small pets, and your home has a steep stairwell that you don’t want them to explore. What do you use? A baby gate of course. What if the area where you want to install the baby gate has two locations that you want to block, but only one at a time. The mounting hardware for the gate works well for securing the gate, but has no ability to pivot. Rather than install two sets of hardware, you decide what you need is a hinge. More specifically, one side of the gate is mounted so that it can be swung from one locking position to another. Figure 13-8 shows the code to create the hinge (you need two of them). Figure 13-10 shows the hinge installed.

Figure 13-10. Gate hinge
Notice that there is an eyehook in the center of the hinge, which the hinge pivots on. I used a simple pin to secure the hinge to the eyehook, and screws to mount the hinge to the gate. Of course, this required removing the original hardware that was mounted at the same location. Therefore, the hinge was made large enough to cover the holes from the original hardware and to fit onto the wooden gate without modifying the gate itself (other than removing the hardware).
To design the part, I prototyped the slot and hole location for the mounting point on the gate, and printed a prototype of the left side to ensure that it fit the eyehook and could swing like I expected. Once I had those prototypes sorted out, I printed the complete hinge and tested it. It worked! Figure 13-11 shows the gate in operation in each of its positions.

Figure 13-11. Completed swinging gate
Objects in this category tend to be more complex, but once you’ve created a few less-complex solutions, you will be ready to take on projects like this one.
You can also print solutions for building and accessorizing furniture. My wife received as a gift a replica of a Chesapeake skiff made by one of her uncles. He had been a waterman for some time and built his own boats. The replica is true to his original designs (only much smaller) and it turned out great—so much so that we decided to use the boat as a coffee table by mounting a piece of glass over the boat.
However, being boat-shaped, it was not so easy to get glass to fit. Fortunately, we found a glass shop that agreed to cut the odd shape if I made a template of the surface. Rather than mount a piece of glass that floated on top of the boat, we decided to make a piece to fit within the gunwales. But this presented another problem. There were no cross members to mount the glass. We need a solution that mounted to the gunwales in such a way that it looked like it fit and was also as unobtrusive as possible. Figure 13-12 shows the final design of the solution.

Figure 13-12. Riser design for glass shelf
I used four of these mounts with a bolt and nut to complete the riser. It is a fairly minimal solution, but more importantly, it looks like it has always been part of the boat. Figure 13-13 shows the completed solution. The risers are noted with circles. Hard to see, aren’t they? Success!
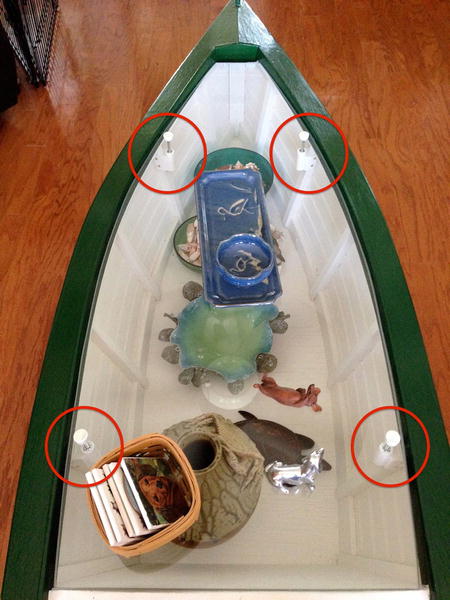
Figure 13-13. Chesapeake skiff coffee table with glass top
As you can see, the mount is designed to use a bolt and nut to form the adjustable riser. The mount was designed to attach to one of the ribs with counter-sink wood screws. The ribs are slanted to form the sides of the boat, so I had to make an angled slot. I made the ears of the slot longer so that it would fit the differing angles of the fore and aft ribs.11
Overall, the project was fun and it shows off how 3D printing can be used to solve problems where there are no commercial solutions. I am certain I could have eventually cobbled together some strange bits from the hardware store, but at least I didn’t have to wander for hours up and down the aisle deflecting “May I help you?” a dozen times. Plus, it looks great and was entirely homemade—except for the glass.
MAKERBOT DESKTOP SOFTWARE
There is one other tool that you can put in your 3D printing arsenal to take your 3D printing to the next level. Recently, MakerBot released a new software application called the MakerBot Desktop. This application is a one-stop application for browsing Thingiverse, purchasing things on the Digital Store, and organizing your own library of things. It combines the ability to find and organize things with the ability to prepare things for printing, print them, and control the printer.
If you have downloaded or created as many things as I have, the organization feature is a very valuable addition. The organizational feature alone makes it worth checking out this app. You can manage your own things that you’ve uploaded to Thingiverse, search for things on Thingiverse, browse things you have downloaded, and buy things from the Digital Store.
Furthermore, if you have the MakerBot Digitizer, you can connect to it to scan your image, upload it, and even print it. The following is a snapshot of the software.

The software is currently available in beta and for the Mac, Windows, and Linux platforms. Furthermore, only the most recent MakerBot printers are supported, going back to the MakerBot Replicator 2 and 2X. Older printers are not supported.
The MakerBot Desktop software is an excellent example of how 3D printing companies are bundling features that were previously separate applications into a 3D printing environment; an IDE for 3D printing. I cannot wait to watch this software (and others like it) evolve. I can envision having a single application that covers the entire 3D printing tool chain. We’re almost there!
There is one more bit of coolness at MakerBot. Check out their MakerBot Printshop for iPad. This is a 3D printing suite for your iPad that allows you to browse and print things. It also provides the ability to customize certain objects. It’s still very new, but it looks very promising.
If you have a recent MakerBot printer, you should consider downloading and installing the MakerBot Desktop, and if you have an iPad, try out the new MakerBot Printshop.
Summary
Owning a 3D printer is a lot of fun. You can increase that enjoyment by extending your printing endeavors from printing knickknacks, small boxes, and miscellaneous curiosities to printing solutions that solve real-world problems. With your newfound knowledge and experience, you can also become a contributing member of the 3D printing community.
This chapter presented discussions in these areas. You saw how to become a productive member of the community by learning how to participate and share your designs. The chapter also presented some ideas and suggestions for things you can print around the house by way of demonstration of actual solutions. This means you weren’t shown an image of a 3D printed bunny, only to be told, “Now go print your own steam engine.” This book has given you all of the tools you need to design and print your own objects. All you need is imagination and creativity!
Now that you’ve discovered these things, you have all of the knowledge you need to get the most out of your 3D printer. So ends our journey through the 3D printing world. May all of your 3D printing endeavors be successful.
___________________
1The originators were thinking the “Universe of Things” when they named this site and its very core is about sharing things.
2Which is partly why some people don’t like sites like Thingiverse and Autodesk 123D.
3Be careful here. The ultimate path of tolerance is anarchy and chaos, so clearly there must be limits. Where those limits are, I have no clue.
4Every home needs another 3D printer, right?
5That is, if you don’t have any print failures and someone doesn’t kick the power strip out of the wall.
6While that may sound like a random number, I’ve come to realize when buying small hardware items at a home improvement store, if I add up the number of items in my cart and multiply by 4, I get a number that is pretty close to the total cost of all of the items. Weird.
7This is one of the primary uses of 3D printers in industry!
8In carpentry terms: measure twice, cut once.
9No, she doesn’t have that many, but you’d be surprised by how much space only a few can consume.
10In a geeky, mad-scientist way.
11“Front and back” to landlubbers.